DISCLOSURE: This site contains some affiliate links to products. I may receive a commission for purchases made through these links (at no cost to you). As an Amazon Associate I earn from qualifying purchases. Thank you!
Hello Folks! Scott here with a bit of a diversion for you (and me!!) Due to the pandemic and lockdown restrictions, Hero Arts and Love From Lizi are falling behind with their ability to ship their kits out to us. Hero Arts is coming back to work (in limited numbers) this week, so kits should start moving from there, and Lizi is having supply problems, but she hopes to have her release and begin shipping by the first of June.
So, with no new kits on my desk, I thought I would play around with some new product I bought from Altenew and see what I could come up with!
Last year, Altenew came out with six Gradient Cardstock Sets – eights 3″x 6″ sheets of each color grouped in gradient sets. Now, I’m not a big collector of cardstock, and don’t have bunches of colors in my stash, but these sets really caught my eye when they were released. Naturally, they sold out almost instantly, so, I dutifully asked to be notified when this set was back in stock, and lustily bought the whole set as soon as it was available!
Altenew has aways been known for their beautiful layered floral stamps, and I believe these packs were created to compliment Altenew’s growing collection of “3D Die sets“. I didn’t have any of those in my stash, , so when I bought the cardstock, I sprung for the Open Bloom 3D Die Set.
Looking closely at the layering instructions included in the packaging, I realized that there are actually seven dies that make this bloom. The bottom, smaller three assemble to make the front petal, and are thus cut from the same colors. The first and last die here (largest and (almost) smallest) are the same color, so I thought I might be able to die cut the single petal piece from the middle of the large background piece, and have the resulting hole covered by the second layer of card stock. Sure enough, that worked beautifully, and that little trick will help me conserve on cardstock!
The top four pieces were very easy to glue together – matching their edges makes for perfectly aligned die-cuts. The three petal pieces were a little different.
The smallest piece will fit most anywhere on the bottom curve of the petal, but the illustration did show the right side of that piece tucked up under the top-most (lightest piece). So that’s where I glued the middle piece – with the two left ‘prongs’ just below the edge of the petal, and the right side tucked underneath.
Here’s my completed bloom all glued together. The position of the front petal is also a little ambiguous, but I just had to refer to the illustration for proper placement. I think these blooms are kind of amazing! If your are not in the mood to color, then these Altenew 3D dies can certainly provide some beautifully colored blooms without ever picking up a paintbrush, a marker, an ink pad, or any other medium you might have in your stash!
I also die-cut a bunch of the leaf dies in this set. The leaves only have two layers, and are ultimately very simple to line-up. I did some with the medium and darkest Green Meadows card stock and some with the medium and lightest colors as well. For the top right leaves I used some plain green card stock from my stash instead of the medium green from the Green Meadows set. You can see a slight difference, but that works very well and is extremely close color-wise! That should be enough leaves!
Now that I have these cardstock sets in my stash, I’ve already started worrying about not using them up too quickly! I’m such a hoarder!! So I did go looking through my stash of card stock for other options that might work with this die – I need matching gradient colors in groups of four. I did come across this pack of Recollections card stock from Michael’s – Purple Passion. That would work terrifically – in fact, it actually gave me an extra color I didn’t need! I went ahead and made two more blooms using this card stock.
These are very close to the Shades of Purple blooms on my first card. The Altenew cardstock is a little bit darker and a little bit lighter, but I think the Purple Passion blooms look just as nice! Let’s put this card together!
Now, these are fairly big blooms – a little over 3″ wide and more than 1.5″ tall. Most of the card examples for this die at Altenew feature only a single bloom. I was determined to make a little bouquet on my cards, but I had a hard time figuring out an arrangement for all three blooms on a card front without them seeming to ‘float’. Hmmmmmmmmm… STEMS! That’s what any good bouquet needs! I cut some thin strips of the dark green card stock to use as the flower stems for this card. That should provide an “anchor” for my blooms and keep them from feeling unmoored! These strips are a little less than 1/8″ wide, and they certainly don’t have to be all exactly the same. I glued the stems to my card front and (since they are so thin) was able to get a nice curve to the stems as I attached them. Liquid glue adds some moisture to the card stock and enhances their flexibility! Now I can assemble the rest of this card!
I used my liquid glue and strategically placed foam squares to attach the blooms, and glued all the leaves flat to the card front. I stamped and die-cut the the sentiment on the lightest Cherry Blossom card stock and inked the edges of that die-cut with some Worn Lipstick Distress Oxide ink. Some Studio Katia Cupid’s Kiss crystals adds a little touch of sparkle to this card. I think this bouquet of blooms is downright gorgeous!
When digging around in my card stock stash, I found some grey colors that I thought might work to give me a white bloom, so I made another card with only a single bloom.
This card front is dry-embossed with Altenew’s Fine Frames Cover Die. That die cuts out 13 thin frames but I love using it to emboss with. The sentiment is from the My Monthly Hero January 2020 kit and is stamped using Hero Arts Soft Granite ink. I thought the ‘white’ bloom came out very nicely, and I attached that to the card front using foam squares. I even attached the front petal with foam squares to add a little more dimension. Very simple, very pretty sympathy card! I think I’m going to like these dies!
That’s my three cards made with Altenew’s Open Bloom Dies and Gradient Cardstocks. I think I like the yellow and purple bouquet better than the pink and purple one! Must be my pink allergy! I promise I will not hoard these Gradient Cardstock Sets and will look for more ways to use them on my cards!
I hope this was a nice diversion and a helpful How-To for you beyond my regular 10C1K posts! Thank you so much for sharing your time with me here today! Your support means the world to me! Please stay safe and healthy! As restrictions are lifted, I hope you continue to wear a face mask in public, wash your hands regularly, and please send some prayers to all of us in New York City. Remember to Like me, List me, Pin me, Post me, Share me with all your friends, Don’t touch your face…! And as always, I wish you Happy Crafting!
DISCLOSURE: This site contains some affiliate links to products. I may receive a commission for purchases made through these links (at no cost to you). As an Amazon Associate I earn from qualifying purchases. Thank you!
Hello Folks! Scott here with my 10 cards from the My Monthly Hero April 2020 Kit! Due to current shutdowns I don’t think Hero Arts started shipping this kit until April 20th… I didn’t receive mine until April 25th… Looks like we’re off to Australia this month!
Our 6″ x 8″ stamp set features silhouettes of Australian animals, plants, birds, fish, and even Ayers Rock. Some ‘Aussie’ sentiments (with some good puns!) round out the image stamps, and of course we get 31 coordinating frame cuts to die cut all the stamps. For extras this month, we get this great 5.25″ x 6.5″ background stencil, and full size pad of Intensive Black ink. Finally, we get two 5.5″ x 8.5″ Cherry Wood sheets and 3 adhesive -backed Birch Wood sheets. Quite a collection! I really enjoyed the trip to Venice last April and am looking forward to spending a little time in the Land Down Under!
I do try to use all the stamps in a stamp set on these 10 card posts, and, I have to admit, I was intimidated with this collection of 37 different stamps… I think including the names of the animals on the stamp packaging is what gave me this idea!
I tried to make this look like a page from an old zoological folio..! Though I doubt all these animals would be classified together (beyond the fact that they are Australian!) I do think the idea comes across pretty good! On a piece of parchment paper from my stash, I arranged and stamped all these guys using Hickory Smoke and Frayed Burlap Distress Oxide ink, trying to add a touch of dimension with the darker ink on the edges of the stamps. I stamped some wisps of tiny text around the edges and all about using the text stamp from the MMH Jan. 2020 Kit. I wrote in all the names using a Brown Micron PN pen – I wish I had something finer and more delicate to write in the names, but this does nicely!
I distressed the edges and the whole page using the same Oxide inks along with some Vintage Photo Distress Ink. I stamped the sentiment on a scrap of ivory card stock with Hickory Smoke Oxide ink and embossed it with some clear embossing powder, and distressed it the same. I ripped and curled some of the edges of the paper before glueing it down to a Kraft card base, and mounted the sentiment in the center with some foam tape. This came together as envisioned, and I actually like this card quite a lot! It certainly gets you in the Australian mood, and HEY! it used 16 stamps from our set!
I was eager to play with that nice background stencil, so I used some Zig 2 Way Glue on the back of the stencil to add a little “sticky”, and grabbed my Hero Hues inks…
On a piece of Neenah Solar White 80# card stock, I stuck the stencil down and used my ink brushes with Splash and Blue Hawaii inks on the bottom, and Lemon Drop and Creamsicle in the sky. SOOOO Ok… I was looking to use the “Auss-ome Day” sentiment on this card, but I didn’t think this sunny background was saying Australia to me. I looked up Ayers Rock, but it turns out that landmark is deep in the interior of Australia… and most of the fish stamps in our set aren’t indigenous to Australia… hmmm… I kept thinking Sydney Opera House was an unmistakable landmark, so I went digging through the internet and found a simple silhouette of the Sydney skyline. OKAY! I imported that image into my Silhouette Software and created a cut file for my Silhouette Portrait. I was a little crazy trying to cut this skyline quite this small, but I got one cut (from plain 65# black card stock) that worked! I glued that cut-out between the sea and sky, and die-cut the whole piece with a Lawn Fawn Stitched Rectangle die.
I did stamp the sentiment on the stenciled “sun” using the HA Intense Black ink, but I got it a little crooked, and couldn’t stand it, so I fussy-cut the sun out (leaving some white edges on the clouds). I cut a mat for the front panel from a piece of yellow card stock from my stash, traced the “sun” opening on the mat, and stamped the sentiment again. I did emboss this sentiment with clear embossing powder – the Intense Black ink will stay wet long enough to emboss with! I blended a little Creamsicle ink around the edges of the sun and glued the front panel to the mat with the sentiment perfectly placed (and straight!) behind the opening.
I decided somebody needed to witness this scene, so I masked some of the waves off and stamped the dolphin peeking out with HA Soft Granite ink. I added some touches of shading to the dolphin with my Prismacolor colored pencils, and matted the whole panel to more Kraft card stock and then down to a 110# Neenah Solar White card base. There ya go! No mistaking this for anyplace other than Australia! Good pun too!
As I often do with MMH solid stamps, I contemplated coloring these – adding detail and character to otherwise flat silhouettes… but some of these critters are SO, so small… however, the shark is actually one of the largest stamps in this set…
I stamped the shark on some black card stock using HA Unicorn White ink, and colored up the shark using my colored pencils. I die-cut this formidable fellow with the matching die and turned my attention to the background. I played around with some Alcohol inks on DCWV Glitzy Glitter card stock, and I did get some nice movement from the inks on this glitter card stock. I picked a section that I liked, and using the bottom of the stencil, ink blended Unicorn White ink through the stencil to add some defined waves. I die-cut that section with a 4″ x 2.75″ LFSRD, and glued that to a thin black mat (top and bottom only) and then to another thin white mat.
I took a piece of plain blue card stock from my stash and stamped the Echo Park Make Waves A2 Background on that using the Unicorn White ink, and die-cut that panel with another LFSRD. I trimmed off an inch from the top and bottom of that stamping and glued those strips behind my matted glitter piece with about 5/8″ showing.
I turned to my Silhouette software and my ‘Piggy-Back Printing’ method to add this fun sentiment to the front of my Neenah 110# card base. This is printed in dark blue using the American Typewriter font. Finally, I glued the background panels to the card front, and attached the shark using foam tape. This shark came out very well, and I love all the glitter in the water – the Unicorn White ink blocks some of the glitter, so this has quite a variety of glitter. This is also a fun, perfectly apropos sentiment!
I thought the little Koalas should be easy to color… it’s all about their big noses, right?
I stamped the Koalas on some Kraft card stock using Unicorn White ink, colored them with my colored pencils, and die-cut them with their matching dies. On a Neenah 110# card base, I ink blended the bottom half of our stencil vertically on the left of the card front using Hero Hues Key Lime Fizz and Green Apple inks.
I found some “bamboo” in my image stash and used my Silhouette Portrait to cut a bunch of stalks from one of the Cherry Wood sheets. They seemed a little big to go along with these small Koalas, so I simply trimmed a bunch of thin (1/16″) strips of the Cherry wood that were sized better for our bears. When the wood sheets are cut this thin, they curved very easily as I glued them down to the card front.
I die cut the leaves from Hero Hues Meadow (MMH 4/19) and Neon (MMH 10/19) card stocks using an old LFL Medallion die that has some perfectly-sized leaf-shaped openings. I glued the leaves down and added the Koalas with their arms clutching the branches and some foam tape behind their backs for a little dimension. I stamped the sentiment using the HA Intense Black ink, and finally added two of my bamboo cut-outs to the left – trimming the first at the boundaries of the greenery, and letting the second one run from top to bottom. Those add an interesting suggestion of depth – making it feel like the bears are deep in the grove enjoying their lunch. Who can resist a couple of adorable little Koalas?? I think this is so cute, and works well with this sentiment stamp!
I can’t stop playing around with this stencil! Let’s try something a little more arid..!
On a Neenah 80# card stock panel, I ink blended the bottom of the stencil using Distress Oxide inks in Antique Linen and Frayed Burlap. I ink blended the sky using HA Lemon Drop ink, and stamped the Ayers Rock stamp on the horizon line using Frayed Burlap ink and topped the edge of that rock with some Fired Brick Oxide ink. I spattered some tiny dots of the Frayed Burlap ink all over the background with a small paint brush, and die-cut the background with a LFSRD.
I stamped the kangaroo on white card stock using Antique Linen ink and the Kiwis using Vintage Photo ink, and colored them with my colored pencils and added highlights with Sakura White gel pens. For these small images, I did create a die-cut template to help me die-cut the colored stamps. I cut the die in a contrasting card stock, and centered that over my stamped and colored image, then taped it down with the die in place, and ran it through my die-cutting machine to get a nicely accurate die-cut. Nothing worse than spending a lot of time coloring a stamp and then die-cut it slightly off…!
I stamped and embossed the sentiment with Frayed Burlap ink and added a few birds in the sky using the stamp from the MMH July ’19 Kit, I die cut the background with a LFSRD, matted that on some Kraft card stock, and glued it down to another Neenah 110# Solar White card base. Of course kangaroos are very Australian and I love those little kiwi birds! This card highlights the fact that much of Australia is covered by desert landscapes… with a recognizable landmark looming in the distance…!
That was a good pun that actually came in our stamp set! I had an idea for another…
Sometimes I just can’t help myself! Using my Hero Arts MISTI (in black and white!) I stamped a pattern of the crocodiles on some Kraft card stock using Hickory Smoke Distress Oxide ink. I die cut that with a LFSRD, glued that to a black mat and down to a White card base. I stamped the croc on a scrap of white card stock using HA Soft Granite ink, colored him with my colored pencils, die-cut him with the matching die and mounted him to the card front with foam tape.
I printed this sentiment on a scrap of Kraft card stock using my Silhouette software and the Brady Bunch Remastered font, trimmed that sentiment out, added a black and white mat behind the sentiment and mounted it to the card front with foam tape. Fairly simple and a good pun! I don’t think crocodiles are particularly cheerful, but this pun is fun!!
I have more fish in the stamp set, so I need some water, and I wanted to try that stencil for a nighttime scene with a moon instead of a sun…!
The background is stenciled in all the same inks mentioned earlier with a swipe of Hero Hues Fruit Punch and a touch of Black Soot Oxide ink around the top. I added the fish using Soft Granite ink, and cut out another (much larger) Sydney silhouette to glue on the horizon. I tried creating my own moon in the space provided and failed miserably, HA! So I once again cut out the ‘moon’ shape (NOT leaving white space round the clouds) and went into my image files for the moon. I did look up to see how the moon looked in Australia, and, sure enough, it is upside down from how we see it…! I thought that was very interesting and made sure to attach my printed moon in the correct orientation!
I die-cut the card front with a LFSRD and glued that to a thin black mat, then to a larger blue alcohol ink mat, and then down to a white card base. I printed the sentiment using my Silhouette software and the Lato font, trimmed it down to a short banner, and attached it to the card front with foam tape. One of the sentiment stamps in our set works perfectly with this card, so I stamped “Beaut” on the inside of the card using the Intense Black ink. For a final touch I added some sparkle to the moon and waves with a Wink of Stella Clear sparkle pen, and a few of the birds from the MMH July ’19 kit. I could have probably gone darker with my sky but am pretty happy with the final outcome… that is one big moon!!! Perfect congratulations card!
The Cassowary stamp in our set intrigued me, and actually, this is a fairly colorful bird!
This card tickles me a lot! I really like the Cassowary stamp, but couldn’t figure out an appropriate sentiment… I found this sentiment when I was doing some research for this kit and it seemed the perfect accompaniment for these birds. Looks like this is the entrance gate to the Australia Zoo! “Have a ripper day!” becomes a bit of a pun paired with these extremely large and dangerous birds – cassowaries have three claws and their center claw is like a dagger around 5″ long – sounds like a ‘ripper’ to me!
I ink blended the background using HA Lemon Drop ink on the bottom and HA Splash ink on the top, then used the bottom of the stencil and HA Key Lime Fizz ink and Frayed Burlap Distress ink to texture the ground. Cassowaries are “forest birds” so I used the two tree stamps in our set to create some forest on this card. I stamped a variety of the trees using HA Soft Granite ink, Key Lime Fizz and Green Apple inks. I added some of the Kangaroo Paw plants on the bottom using Green Apple ink and added some dark red highlights to the flowers. I stamped (and reverse stamped) the two cassowaries on white card stock using HA Soft Granite ink and colored them using my colored pencils and the Hero Arts Red and Aqua Glimmer Metallic ink. Those inks add a touch of shine to the head and necks of our birds. I die-cut them both using the matching die and a template.
I die -cut our background with a LFSRD, added that to a thin white mat and glued both to a Kraft card base. I printed this sentiment using my Silhouette software and the Brady Bunch font on a scrap of Hero Hues Arctic card stock (MMH April ’19 Kit) and die-cut the banner using a Lawn Fawn Everyday Sentiments die. I added the birds and banner to the card front using foam tape, and added some dotty texture to the ground with myDisposable Micro applicators and the same inks. I did feel a little explanation was required for those who aren’t aware of the cassowaries proclivities, and added this little directive on the bottom of the writing surface inside the card. That is printed using my Silhouette software and the Typewriter Hand font. A true Australian saying paired up with a large dangerous bird should make any Aussie giggle!
I need a break from all those full card backgrounds, and I still have three kangaroo stamps to use in our stamp set, so I went for another pun on this next card!
A Wallaby is basically a smaller version of the Kangaroo, so I thought I could get away with calling this kangaroo a wallaby – just in the interest of a good pun! I stamped the ‘wallaby’ on the front of a Neenah Solar White 110# card base using Antique Linen Distress Oxide ink and colored this pair with my colored pencils and a white gel pen, adding a bit of a shadow to ground them. I printed the sentiment on the front of the card using the Brady Bunch font and my ‘piggy-back’ printing method. This is a fun friendship pun and could work as a Mother’s Day, or New Baby card with a different sentiment! It’s so nice to have a simple one-layer card with a lot of white space in this collection!
But what about the best pun-y sentiment in our stamp set? This last card will wrap up the final three stamps in this kit…!
One more background!! On Bristol Smooth card stock, I used my Marabu Art Crayons and wet wipes to create this background. This is one of the quickest backgrounds I created for this kit! I scribbled some Flesh Marabu crayon on a wet wipe and spread it on the bottom half, wiped Sky-Blue crayon on the top half (using a wet wipe), then used the stencil with a Kiwi crayon and Cocoa crayon (and more wet wipes) for the ground. I added a slight suggestion of a cloud in the sky with Unicorn White ink and a simple mini ink blender. I really like this background and need to remember this quick technique using those Marabu markers!
I stamped both kangaroos using Simon Says Stamp Barely Beige ink on Neenah 80# card stock, colored them with my colored pencils, made die templates for both and die-cut them out. The trees are stamped and die-cut and trimmed down to provide the greenery on this card front – I really like the pandanus palm as the bushes down front! LOOK! There’s a pull tab on the side… what does this card do??
Hoppy Birthday to Roo indeed! LOL! I cut the bottom of the background away from the sky portion, to hide the mechsnics behind, stamped and embossed the sentiment on the top, stamped another pair of birds in the sky, and glued everything in place to make this fun interactive card! I do have a complete how-to on assembling this card on my 10C1K video at: , so I encourage you to check that out for the particulars. I thought of this card before I even got the kit in my hands this month, and am very pleased with my first attempt at this rocking teeter-totter mechanism. A great pun, and a fun interactive card that highlights the pun! I will look for more chances to use this rocker on other cards!
That makes up my 10 cards for this kit! This was a nice challenge for me, and certainly provided some much-needed distraction as we continue our lock-down here in NYC.
I did try to stick to the Australian theme for all these cards. The shark and crocodile are not that specific, but we have a nice assortment of useful cards with a fun Aussie theme. I did manage to use every single stamp in this stamp set – thanks to that first zoological card, and I even got chance to use some of the included wood sheets! This kit did sell out almost instantly, the MMH May Kit has been released and HA is hoping to start shipping that kit around the 15th. If you want to get in on the action, I highly recommend subscribing to the My Monthly Hero kits. A six-month subscription allows you the freedom to skip a month if that kit is not to your liking. If you do go shopping at Hero Arts, please use my links – it is supremely appreciated! Hero Arts: https://shrsl.com/1f7qx My Monthly Hero May Kit: https://shrsl.com/29ud7 My Monthly Hero 6 month Subscription: https://shrsl.com/24ss0. THANK YOU!
I did have fun creating these cards – I hope you enjoy them too! Thank you so much for sharing your time with me… Let me know which cards are your favorites and remember to Like me, List me, Pin me, Post me, Share me with all of your friends, don’t run with cassowaries, and I send you and yours healthy and happy thoughts… Please take care of yourselves and each other. We WILL get through this together! Happy Crafting!
DISCLOSURE: This site contains some affiliate links to products. I may receive a commission for purchases made through these links (at no cost to you). As an Amazon Associate I earn from qualifying purchases. Thank you!
Hello Folks! Scott here with my 10 Cards 1 Kit posting using the Love From Lizi May 2020 Card Kit. This kit sold out very quickly – Lizi didn’t assemble quite the same number of kits as usual due to the lockdowns in effect over much of the world, but I hope I can provide a little inspiration and some unique ideas on using this kit.
Lizi is calling this kit Happy Bluebirds (or Lucky Bluebirds at Lizi’s online store) and this kit features tons of supplies, pattern papers, embellishments, stamps, ephemera, and even a couple of mini-decoupage sheets in a bright palette of springtime colors perfect for lifting our spirits this month! Plenty of pink in this kit as well!
As I usually do, I took the five sheets of card stock in the kit, cut them all in half and scored them to make my ten A2 card bases. I do really love Lizi’s decoupage sheets, and thought making one of those would be a good start for my first card with this kit.
There’s some pink for you right off the bat! I wanted this mini-decoupage bouquet to be the focal point on this card, but worried that it might feel too small and get lost on a card front, so I traced the shape of the hexagon from layer 1 (bottom piece) of the decoupage sheet and made a pattern for the large mat behind the bouquet, and cut that from a piece of the Tim Holtz Metallic Confections paper pad in the Pewter metallic color. I glued a thin black mat behind that and assembled the six layers of decoupage using some Small Square 3D Pop Dots – perfectly sized for these mini decoupage assemblies!
I stenciled the Raspberry Pink card base using Hero Arts Unicorn White ink, a TCW Mini Sheet Music Stencil and my Tim Holtz Distress Blending Brushes. I was thinking Birthday here, so that inspired the music note background. The single decoupage hexagon still seemed a bit wan, so I grabbed two of the nesting hexagon dies from the LFL March 2018 kit, and die cut the smallest hexagon twice and the medium hexagon four times from more of the Pewter Metallic card stock. I added thin black mats behind those six additional hexagons and glued everything down to the card front.
For a final touch, I added a Happy Birthday banner from the die-cut sentiment sheet on the inside writing surface. I really love this decoupage bouquet – I think it has great dimension (there are six layers here) and the die-cutting on this sheet was terrifically accurate. That makes for an easy-to-assemble layered bouquet that is really quite amazing! This would work as an Anniversary card, a Mother’s Day card, or any “Special Day” occasion!
We got so much pattern paper in this kit, but there was one cut-apart that caught my eye.
I really like this 3″x3″ rose panel from our pattern papers. I die-cut the background pattern paper with a Lawn Fawn Stitched Rectangle die and mounted that on a thin pink mat and glued those down to one of my Navy card bases. I matted the rose panel and the “Thank You” banner on some of the blue striped pattern paper (from the middle of one of our ‘flower frame’ pattern papers) and mounted those to the card front with foam tape. I originally tried stamping the sentiment directly on the rose panel, but I messed it up horribly (OOPS!) and ended up embossing the sentiment on a matching piece of pattern paper using VersaMark ink and the LFL Warm Navy embossing powder. I trimmed that into a flag and attached it with more foam tape. I think those two roses were my favorite piece of all the pattern papers… another very pink card, but tempered with all the blue!
I cut up the center of that ‘flower frame’ pattern paper, so I better use the flower parts!
Mother’s Day is just around the corner! I love this card! I fussy-cut the flowers away from the leftover center, and trimmed all four sides down so they would fit an A2 card. If you look close, you can see where the flowers overlap on all four sides. I glued the frame together and matted that on a thin white mat (with the center cut out!) and glued the edges to the Navy card base and used foam tape to lift up the flowers around the center.
The sentiment is from an old Paper Pumpkin kit (April 2016) and I think this is my favorite Mother’s Day stamp in my stash! I embossed that with White embossing powder right in the center, and die cut the two butterflies using the included die and scraps from the flower frame. I drew on their black bodies using a Pigma Micron 05 pen, folded them in the center and glued them down to the card front. Lastly, I drew in the antenna using an 05 Sakura White Gelly Roll pen. If you know me at all, you know I am not a big fan of butterflies, but the die in this kit is so small, I can’t help but love the tiny accents these butterflies bring to this card.
In searching for the Mother’s Day sentiment stamp, I found another stamp I wanted to use on the inside writing surface. “you are amazing” is from the Altenew Penned Rose stamp set and I stamped that using a Hero Arts Ombre Meadow stamp pad. I think my mother is pretty amazing, and I do believe this is the card she is going to receive this year!
We also had a few pieces of ephemera in our kit and for some reason, the circular butterfly piece inspired me – it helps when the butterflies are extravagantly colored!
Using my craft knife, I fussy-cut the butterfly wings (but not the body!) from their polka-dot circle, and using mycircle dies, I cut a black frame to fit that circle. I cut the matching polka-dot pattern paper to 3″ x 5.25″, and mounted that to a thin black mat – only showing the sides of the mat. I did a little stamp surgery to the “Thinking of you” stamp from the kit, arranged that in a bit of a curve on my MISTI, and embossed that on the background using LFL Golden Crown embossing powder. I glued the ephemera piece below the sentiment, and wrapped a piece of the butterfly ribbon around the bottom of the panel and tied a little bow for the center.
I glued that panel to one of the Mint card bases, cut out two 1/2″ x 5.25″ strips of the blue butterfly pattern paper, and glued those along the sides. It’s hard to see in this picture, but I did add the thinnest Mint Moondust peel offs along the edge of the black mat for a little sparkle. I tucked some foam tape under the butterfly wings, and die cut the 3 tiny butterflies from the pattern paper – our die almost perfectly matches some of those butterflies on this pattern paper! ALL of the butterflies on this card match! I folded and glued the die-cuts to the top, and added some antenna with my Pigma Micron pen. Tons of butterflies, and plenty of pink, but I really do like this card!
Last month, our Sunray Crossette Nuvo Shimmer Powder was really fun to play with, and I wanted to check out the Green Parade Shimmer Powder included in this kit. I spritzed a sheet of watercolor paper with water, then sprinkled the powder onto the wet paper. Lots of dark tones in this green – I swear this almost looks like the surface of some distant moon…! I wasn’t quite sure what to do with this panel, so I let it dry and turned my attention to the Specialty Paper in this kit. We got two sheets of handmade paper with actual flower petals embedded in the paper fibers. I was at a loss on how to use this paper in a card until I realized that handmade paper should be able to take some painting… it’s just thin watercolor paper, right?
I was a bit afraid that my printer would eat this delicate paper, so I printed the “hugs” portion on some plain paper using my Silhouette Software and the Gothic 821 Condensed BT font, then placed the handmade paper over the top of the print, and, using a light board, painted the “hugs” using the Nuvo Shimmer Powder. I did do a bit of an ombre’ effect with the color darker at the bottom and lightest at the top. That came out really nice, and caused no buckling on the paper at all! I used my Pigma Micron Pen for a thin outline on the letters. I die-cut the paper using a LFSRD, and matted that on a thin black mat before adhering it to the White card base.
I die-cut the “Special” die (included in the kit) from my painted shimmer powder piece, and cut three more from white card stock. I glued all those layers together for a nice chunky sentiment, and glued that on the card front. I stamped the “For you” sentiment from the stamp set using Stamping’ Up Mint Macaron ink, and finished up this card by gluing a couple of loose petals to the front. I’m not a big fan of “For you” sentiments (stating the obvious) so I was especially pleased to be able to use that stamp from our stamp set to fill out this sentiment. I really like this card – no pink here!
There were a couple of large bouquets on our pattern papers, and I really liked the darker tones on one of them.
I split that bouquet pattern paper right down the middle and fussy-cut the bouquet away from the greenery. I did some ink blending on the edges of the Mint card base using Cracked Pistachio Distress Oxide ink, and I die-cut four of the cornice dies from my painted shimmer piece. I glued those to the four corners of the card front, and cut a strip of the shimmer painting to just over 3/4″. I attached the two halves of the bouquet to the Green Parade strip – there’s about a half an inch gap between the bouquet halves hidden by that strip. I die cut the “MOM” using an alpha die set from the LFL Special Edition Oh Baby Kit from back in March of 2018. I cut those from the pink Tim Holtz Metallic Confections card stock and added two layers of black die-cuts to chunk it up a little bit. I glued the letters to the Green shimmer strip and added two pink brads from my stash to either side. I glued the whole assembly to the card front and added the Mint Moondust Straight peel offs above and below the shimmer strip. This card feels very Victorian to me – rather formal with the bouquet and flourishes in the corners, and the simple MOM in the center says it all!
There are three image stamps in our stamp set, and I haven’t used any of them yet, so let’s do some coloring. The stamp with the two birds has a circular opening in the center that happens to be the exact perfect size to use with the LF Magic Iris dies. I’ll try again!
AHA! This is my third month making a Magic Iris card with the LFL kit, and I really like the addition of the stamping to the center moving pieces on this card! I don’t need to match the background, and I love how the berries form a cluster right in the center!
This slideshow requires JavaScript.
I do have a Magic Iris Die how-to on my YouTube channel, so I won’t go into the assembly here. The background is cut from the pink ‘flower frame’ pattern paper, and the sentiment is stamped (VersaFine Onyx Black ink) and clear embossed in the center of the cut out circle – there’s some pattern matching there for you! I stamped the bird wreath on Bristol Smooth card stock using VersaFine Onyx Black ink and used my Zig Real Brush Markers to color it. Since there was so much black on the bird stamps, I decided to color them as Orioles instead of bluebirds – I think the orange pops nicely amidst all the green. And, luckily, the circle in the center of the wreath is the exact same size as the circular opening in the Iris! I did color the center ring with some Hero Arts Gold Glimmer ink, so it has a bit of a metallic shine. I fussy-cut the wreath leaving a little border around the outside, and cut right against the stamp lines in the center opening.
The three moving pieces (the ‘sausages’) were die-cut from more Bristol smooth card stock, stamped and colored identically. This is all on a light pink card base from my stash. I actually assembled this whole card (without the stamped sausages) on the Cream card base using some interesting “fiber” card stock from my stash (very similar to the hand made specialty paper in our kit) but the “fiber” card stock started to fail after a few rounds of operation – I managed to salvage the stamped and colored wreath but nothing else from that first failed attempt.
Some sequins from the embellishment bag adds some sparkle to the front of this card, and I am very pleased with stamping on the moving pieces – it certainly works well for this card!
I have now used all the sentiment stamps in our stamp set, but have two more birds!
Since these bird stamps have so much detail, I tried some no-line watercoloring with this stamp! Now that’s a bluebird! I used the Earth Palette Reactive ink pad from the My Monthly Hero December 2019 kit to stamp the image, and my Daniel Smith Dot Card to watercolor this image. I die cut the watercolor paper with a LFSRD, and matted that on some black card stock. I used a larger LFSRD to die cut the pattern paper, added a thin black mat, and wrapped some of the pink glitter ribbon across the center before gluing down to the Raspberry Pink card base. I stamped the sentiment on the center panel using Onyx black ink and the very small “Just a little Thanks!” stamp from the Paper Pumpkin January 2017 kit. Love that tiny sentiment, and think my no-line watercoloring came out quite nicely! A few sequins (yes, even some pink ones!) add a last bit of sparkle!
One more bird to go… let’s try some more no-line watercoloring on this one too!
This one came out REALLY nice! Almost looks like some kind of Audubon illustration! I do think if you want to color these as bluebirds, you need to stamp them in blue – I stamped this one using the same HA Earth Palette Reactive ink pad – trying to keep the blues on the bird and the greens on the leaves. I painted this one using my DS dot card again, and die-cut the finished painting with a smaller LFSRD, and matted that on a thin dark green mat. The background pattern paper is die-cut with a LFSRD, and printed with this fun sentiment using the Silhouette Dream State font. This is a lyric from Cole Porter’s ANYTHING GOES and I do credit him on the inside writing surface. The background is mounted to a thicker dark green mat and glued to the Cream card base. I added a strip of my shimmer painting and two straight peel offs to go behind the artwork, and attached the front panel using foam tape. A few Blue Babe Nuvo Crystal Drops (LFL Feb. 2020 Kit) adds a dash more blue to this sweet encouragement card. I’m loving this card a lot… I’m getting a little more adept at that no-line watercoloring and maybe I’m pleased simply because there’s no pink!
I stamped this on my last White card base from the kit, and colored all with my Spectrum Noir alcohol markers. I did cut a mask for our center doctor, but didn’t have to get too detailed as the overlaps were slight. I sketched in a little hospital background for these heroes and stamped the sentiment on a scrap of card stock, trimmed that down to a nice banner, and mounted that with some foam tape. I really like these health care workers stamps and LOVE the fact that we get some guys to go along with the girls! This kit may be sold out, but this stamp set is still available! Lizi is donating all profits from the sale of this stamp set to her local hospital. This card is heading directly to MY local hospital! Love it! Get your own here: https://shrsl.com/28k63
That wraps up my 10 cards using the Love From Lizi May 2020 Card Kit. Lizi’s kits usually sell out – often very quickly – so if you’d like to get in on the fun, I would suggest subscribing! Subscribers have the opportunity to add additional products to their kits for no extra shipping! Please use my links when you do go shopping with LFL! It is always hugely appreciated! Love From Lizi Monthly Subscriber plan / Love From Lizi / LFL May 2020 Bumper pack (LOTS of ephemera in this pack!)
Naturally, I have bunches of supplies left over… I did manage to use most every stamp in our stamp set (didn’t use that single leaf) I used 10 different pattern papers, one of the ephemera pieces, one of the mini-decoupage sheets, a couple of the die-cut sentiments, and lots of the embellishments – I didn’t get to the resin roses or bluebirds, or the ribbon roses either, but I did use some of the ribbons, sequins and most of the dies! I had a great time putting these cards together, and they certainly cheered me up as we enter into our sixth week of lockdown here in New York City. Thank you for sharing your time with me here, and please take care! I send Healthy and Happy wishes to you and yours! Please remember to Like me, List me, Pin me, Post me, Don’t touch your face…! And, as always, I wish you Happy Crafting!
DISCLOSURE: This site contains some affiliate links to products. I may receive a commission for purchases made through these links (at no cost to you).
Hello Folks! Scott here, unboxing the new Love From Lizi May 2020 Card Kit. This month is all about bluebirds… Happy Bluebirds or Lucky Bluebirds whatever the case may be!
This kit has the requisite pinks and florals often associated with Lizi, but the color palette this month is quite vibrant. Almost a jewel-tone feel to this whole kit. I like that!
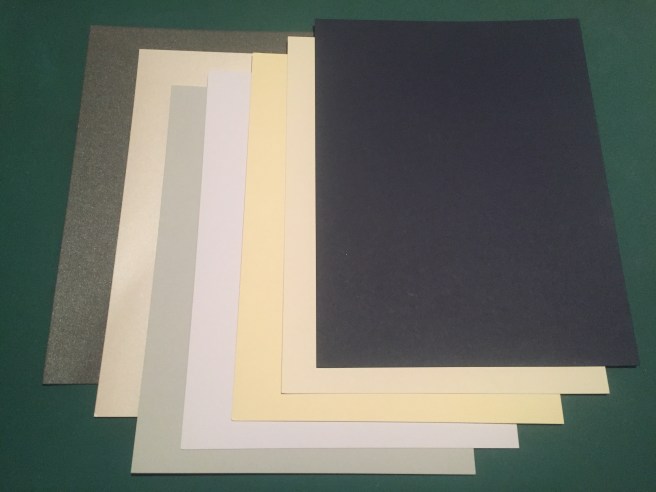
Lizi always gives us 5 sheets of 8.5″ x 11″ card stock in our kits and this month we have a Raspberry Pink, Mint Green, Cream, Alcohol Marker-friendly White, and Navy. We get two sheets of A4 Special paper this month. This beautiful handmade paper with real flower petals embedded. You can actually feel the velvety texture of those petals!
We are treated to 18 sheets of 6″x6″ single-sided pattern papers this month. Here’s where a lot of those jewel-tone colors shine! Lots of flowers and bluebirds, small background patterns and larger bouquets, some geometric patterns and even a couple of cut-apart sheets as well! Of course there’s plenty of pink, too!
We also get a sheet of die-cut sentiments. Everything from Thank You to Happy Birthday to Hello, With Love, Just a Note, and Thinking of You. We also get these two mini-decopauge sheets. I LOVE Lizi’s decoupage sheets and these look like fun! The blue one makes a double-sided dimensional tag, and the pink one makes a six-layer “On your special day” bouquet! SWEET!
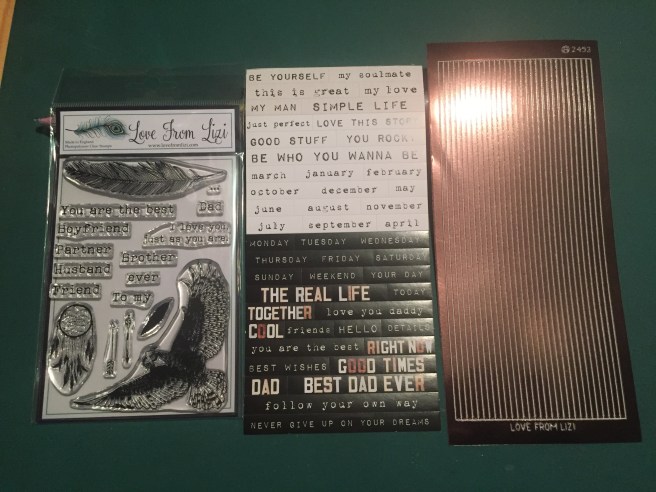
That brings us to our stamp set and peel offs. This is a 4″ x 8″ stamp set featuring our Happy Bluebirds amongst a wreath of greenery and other leaf clusters. There are four sentiments and even a single leaf for you pattern stampers out there! I’m looking forward to brushing up on my Bluebird coloring this month! And we get a sheet of new Mint Moonstone Straight peel offs. We’ve seen the Mint Moonstone in the pin-stripe peel offs and this is another wider strip to compliment those!
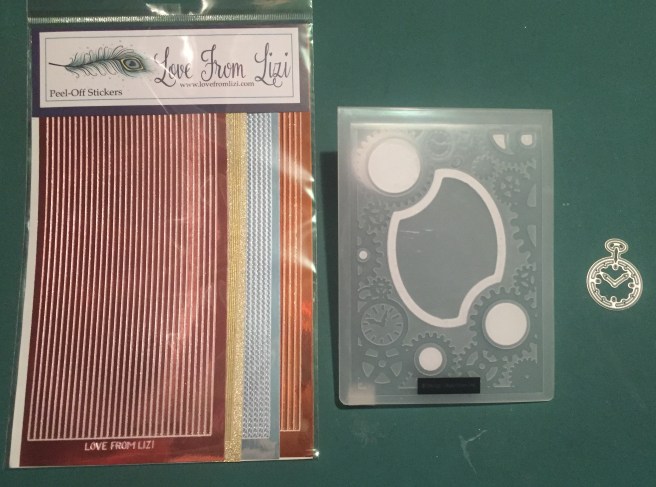
That brings us to the embellishment pack! From let to right, top to bottom we get, a spool of five ribbons in lovely colors and some delightful patterns – pink glitter, mint green branches, blue butterflies, and more! All one meter lengths of 3/8″ ribbons. We get a new Nuvo Shimmer Powder in Green Parade. That looks like fun! There’s our Happy Bluebird sequin mix with teal, navy, soft pink, and graphite gray sequins in all different sizes. We get some resin embellishments this month – three bluebirds, and three pink roses along with five soft pink ribbon roses. Our dies this month include two sentiment dies “Someone” and “Special”, a tiny butterfly die (I actually like that!) and a lovely cornice flourish. We also get five nice, thick card stock ephemera pieces with a couple of sentiments, another bluebird, a yellow rose and some butterflies!
That’s everything in the monthly kit, but I did manage to snag a couple of add-ons too!
This is the SPECIAL add-on stamp set for May – Angels Without Wings – featuring Lizi’s popular eyelash girls AND A COUPLE OF BOYS TOO!!! (their eyelashes aren’t as long!) This stamp set is certainly a sign of the times! I can’t wait to color up a bunch of these health care workers! The Peel Off Pack for this month has another new Straight peel off sheet in Apricot, a sheet of Apple Green Sway peel offs, a Lemon Glitter Clear Pin-stripe peel off sheet and and Soft Peach Pin-stripe to finish the pack.
This May 2020 kit and add-ons are available now at Love From Lizi! Lizi’s kits usually sell out quickly, so if you like this collection at all, I’d recommend grabbing one for yourself right away! If you do go shopping with Lizi, please use my links! It is always greatly appreciated! Love From Lizi: https://shrsl.com/1yyuw LFL May 2020 Card Kit: https://shrsl.com/28k5y Lucky Bluebird Peel Off pack: https://shrsl.com/28k5z Angels Without Wings stamp set: https://shrsl.com/28k63
Thanks for spending your time with me here, please share this post with all your crafty friends and grab one of those “Angels Without Wings” stamp sets for yourself! Please remember to Like me, List me, Pin me, Post me, Stay safe, Stay home, (we’re supposed to wear masks when out in public now..!) I send you and yours health, and happiness, don’t touch your face…! And as always, I wish you Happy Crafting!
DISCLOSURE: This site contains some affiliate links to products. I may receive a commission for purchases made through these links (at no cost to you). As an Amazon Associate I earn from qualifying purchases. Thank you!
Hello Folks! Scott here with my 10 cards created using the Love From Lizi April 2020 Card Kit! As usual, this month’s kit is chock-a-block with pattern papers, cut-aparts, stickers, ephemera, stamps, dies, and all sorts of embellishments!
As is my habit, I do cut and fold the 5 sheets of card stock included in the kit to make my 10 card bases. I also spread out all my ephemera pieces on my desk so I could see all the options they afforded me. We have six large sentiment stamps in this kit, and you know I like trying to use all the stamps on my 10 cards, so I figured I should start by stamping!
There is plenty of pink (and a few butterflies as well) in this kit, so I figured I should confront my demons and tackle the pink with my first card. This one’s for YOU, Judy B.!
Due to the unique arrangement of this sentiment, I thought it would make for some nice pattern stamping. Hero Arts recently paired up with My Sweet Petunia, and came out with a line of black and white MISTI’s. I have had my Mini MISTI (in the original PINK) for a few years, and am thrilled to now have the full-size MISTI from Hero Arts. I LOVE the Black and White, and the larger size just makes me want to do more pattern stamping!
Using my new MISTI, I stamped the sentiment on the pink dotted pattern paper using Hero Arts Taffy Reactive ink, and embossed the center sentiment using Lizi’s Neon Grapefruit Embossing powder (using VersaMark ink). I think all those different pinks go together beautifully! And that embossing powder really pops!!
I die cut that panel with a Lawn Fawn Stitched Rectangle die, and drew in a little black drop shadow on the large embossed words with a 01 Pigma Micron pen. I glued that panel to a thin white mat and down to one of the Black card bases. I added the butterfly and flowers from the ephemera pack using glue and foam tape. A few sequins from the sequin mix around the sentiment, and we have a lovely card for all you pink enthusiasts out there. Pink. Pink. Pink Pink Pink. AND a butterfly! I do think this sentiment makes for a really nice stamped pattern.
Now that I’ve got that out of my system, I decided I should use the butterfly die included in our embellishment pack and put those pesky insects behind me as well!
I die-cut three of the butterflies from some Black Tie glitter paper, and glued some of my glassine paper (kite paper) to their backs. When dry, I trimmed away the excess paper and that gave me a nice stained glass effect. I trimmed two strips of the floral pattern paper to 1.5″ x 5.5″ and .5″ x 5.5″ and glued the thin strip to the right side of a White card base. I cut the pink and blue-green ephemera flowers apart, and added the mustard ephemera flower between them with foam tape.
I traced their outline on the wider strip of pattern paper and trimmed down the center of the strip to highlight the cut edges of the flowers. The strip is glued to the card base, both strips are edged with the Jade Glitter peel-offs, and the flowers are mounted with more foam tape. I was thinking about this sentiment to use on this card, and stamped that on the inside using VersaFine Onyx Black ink. I do think butterflies are pretty incredible! I folded the wings of the butterflies up and glued their bodies to the card front with a few white sequins from our sequin mix. The butterflies match the flowers! A very spring-y encouragement card! For all you butterfly lovers!
Then there’s that “You’re nothing short of FABULOUS” sentiment stamp… hmmmmm.. what in this kit qualifies as FABULOUS? I think that cheetah print is the way to go..!
I think this fits the bill quite nicely! Using two LFSRDs, I die cut a frame of the Cheetah print pattern paper and glued that to the second black card base. I die cut a panel of white card stock with the next smaller LFSRD, and stamped the sentiment on the top of that using Onyx Black ink. I added a thin mat of the cheetah print behind the stamped panel and glued those to the card base. I added some Glossy Accents to the lenses on the ephemera sunglasses, and when they were dry, added them along with the shoes and purse ephemera to the card front using foam tape. A few gold sequins adds the finishing touch to a truly “Fabulous” card!
I think I’m getting a pretty good feel for this kit now… Let’s try that Nuvo Shimmer powder! Sunray Crossette is an interesting name – let’s see what it looks like!
I grabbed some watercolor paper and spritzed it all over with a light spray of water, and started sprinkling on the Nuvo Shimmer Powder. Now this powder definitely sports a variety of pigment colors and has an incredible amount of shine! I kept lightly spritzing water and adding more powder till I was satisfied with the results. Again, I didn’t move the powder around at all, I just let the water and the powder do whatever they wanted. I’m kind of in awe of the final result. There are light touches of texture all over the panel where the powder sat in a small pile and just absorbed the water. I Really Love This!
I couldn’t bear to cover up any of that great shimmering background! I die cut the shimmer panel with a LFSRD and set it aside. I stamped the sentiment on some Bazzill 40# vellum using Onyx Black ink, and I embossed that with some clear embossing powder. I trimmed the vellum sentiment close to the small signifier text, and fussy cut around the parts of the sentiment that went beyond that line. I folded the vellum strip around the edges of the shimmer panel, glued those to the back and added spots of glue behind the sentiment for more adhesion. I added some Muave Moondust Straight peel off stickers along the top and bottom edges of the velum and glued that all down to a thin black mat and then down to the Mauve card base.
I did experiment with adding a “you are” to this sentiment. The LFL 4/18 kit has a “You” and an “are” stamps… fairly large, and the LFL 12/17 kit has a “you are” that is smaller. I decided to go to the inside and added “Yes, you are!” on the inside writing surface – printing that using my Silhouette software and the Freehand 521 BT font. A few gem flowers from the embellishment pack adds a perfectly appropriate sparkle to this “Beautiful” card that looks like some kind of rare red-veined gold. Very cool shimmer powder!
There are a huge bunch of terrific cut-apart panels in this kit. One caught my eye right away – must be because we’re all spending some much of our time at home these days!
I cut away this 3″ x 4″ panel from the cut-apart sheet, and did some ink blending on the edges using Vintage Photo Distress Oxide ink, then glued it to a thin white mat, then to a thin black mat, and then to a bit wider pattern paper mat. I did more Vintage Photo ink blending on the Golden Yellow card base, and added the matted pieces to the card front with some foam tape. This pink house is from the sticker sheet and matched the printed house almost perfectly. I used my anti-static powder bag to neutralize the sticky and mounted that to the card front with foam tape. I used the smallest heart die from the Hero Arts Nested Hearts Infinity dies to die cut some pink hearts, covered them with Glossy Accents, and when dry, added them to the card front with foam tape. This card is really so very cozy and welcoming… This would make a great housewarming card! I hope we all are appreciating our homes a little more these days! I know I am!
There were so many great 3″ x 4″ cut apart panels in this kit that I took a little detour here, and decided to create a little card set that might make a lovely gift!
This slideshow requires JavaScript.
I picked these five panels not only because I liked them, but I could also add a bit of dimension on top of each with a sticker or an ephemera piece. I cut each panel to size and added a thin white mat to all of them. I added a 1/4″ mat of pattern paper to four of them, but added two thin mats of black and cheetah print and a 1/8″ mat of black to finish the Sending My Love card. Those are all glued down to white card bases and the ephemera swan, and scooter, along with the sticker flowers and heart are mounted to the fronts with foam tape.
I chose two of the small sentiment strips from the sticker sheet and added a thin white mat to both and attached them to the two text-only cards with more foam tape. A few sequins on each add the requisite touch of bling and this turned out to be a very encouraging set of cards perfect for gift-giving. I thought about creating a belly-band to hold this set together but decided to make an actual box using the 12″ x 12″ cut-apart sheet with the 4″ x 4″ panels. Most box-making patterns are basically an envelope with added depth. I wanted this box to feature the “dream big” sentiment on the front so I placed the 12″ x 12″ sheet right side up on my score board and scored at 2″, 3″, 9″, and 10″. Then, rotating the paper 90 degrees to the right, I scored at 2.75″, 3.75″, 8.25″, and 9.25″. Then it’s a fairly simple matter of cutting away the bits you don’t need, folding and gluing your box together. I added five ivory envelopes and the strip of banner stickers to finish out this set and tied the box shut with some of the yellow and teal ribbon included in the kit. I really love this little package with cards and envelopes and stickers! I think this will make a great gift anytime!
We also have the 12″x 12″ sheet filled with 2″x 2″ tiles with lots of affirmative sentiments.
I chose the “CRUSH YOUR GOALS” notebook cover from the ephemera pack and, using a bunch of 2″x 2″ tiles turned it into a book! I trimmed the chosen tiles to match the size of the ephemera cover, and bound them together to make this little book. You open the cover and you have: “you are”, “living with purpose”, “so sweet”. “one-of-a-kind”, “fab & fierce”,”dreaming big”, and finally “killing’ it”. To bind the pages together I used 1/8″ score tape and tissue paper – attaching each ‘page’ to the one next to it. The last “killin’ it” page was left long on the left side to create the “spine” (wrap around the other pages) and glue it to the ‘cover’. Not bad for the first “book binding” I’ve attempted, but not perfect either… I learned a lot with this effort!
I die cut the pattern paper and black frame with a LDRS Fancy Rectangles & Layers die, and glued those to the blue card base with the edges distressed with Broken China Distress Oxide ink. I glued the little ephemera postcard and the assembled notebook flat to the card front and added the ephemera pen with some foam tape. The gold foil on the pen goes with the foiling on the notebook. EXTREMELY encouraging card!
I was looking forward to playing with the set of bicycle dies in this kit – I had an idea…
“And you’ll look sweet upon the seat of a bicycle built for two!” Since this bicycle die came in pieces, I thought it could be used to make a tandem bike! VOILA! You can see where the bicycle frames are joined, and I partially die-cut the long chain-guard/pedal assembly to make it longer and hide the end under the second set of pedals. I used the Nuvo powder to paint the bicycle frame, and colored pencils to color everything else. GREAT bike!! And that shimmer powder really looks like a metallic enamel paint job!
I cut a strip of the striped patten paper to 1″x 5.5″ and placed the bike where I wanted it and traced the tire onto the pattern paper. I cut the pattern paper along the tire line to the bottom stripe, and then straight along that stripe to the end. I ink blended the clouds using the MFT Cloud Edges stencil and Broken China Distress Oxide ink, and printed the sentiment on the front using the Noteworthy font, Silhouette software and my piggy-back printing method. I glued the strip to the card front, added a Jade peel off along the bottom, and attached the bike with tiny bits of foam tape (I think it’s worth it)! A few teal sequins from our sequin mix gives the glitter peel off a little company, and I love that you can use these dies to make a passable Tandem Bike! Love this sentiment too!
I still have two sentiment stamps to get to – “Inspiring” and “Adorable” – hmmmmm…
I thought a little clothespin art might be inspiring!! We did get five clothespins in our kit, and I have BUNCHES of clothespins in my stash… (see 10C/1K MMH 5/19) I’m thrilled I was able to use 12 on this card! I took the clothespins apart and started this fractal pattern by making the square in the center. Find four pieces whose ends fit in the spring notch on the back of the others to make as perfect a square as possible and glue them together. Let that first piece dry well and then keep adding pegs on the backs of your original square. When everything is glued and dried, it’s actually quite sturdy!
I die-cut a piece of the light mauve pattern paper with a 2.5″ square die, and added a thin black mat to the back. I glued the pin-art to the top and added one of the pearls embellishments to the center. The left side of the card front has a 1/4″ strip of black card stock topped with a 1/8″ piece of the mauve pattern paper. The sentiment is stamped using Onyx Black ink, and, I declare, the tone of that mauve pattern paper goes so nicely with the wood clothespins…! I think I’m kind of in love with this card!
I think the swans are about the only thing in this kit even remotely “Adorable” so let’s try upping the adorable factor by using the Lawn Fawn Magic Iris die (and add-on) again!
I love the coy look on that swan sticker in the opening! There are oodles of how-to videos on how to assemble the Magic Iris dies, so I won’t bother you with my foibles..! (I actually filmed me putting this together (AFTER everything was die-cut) and it still took me almost 50 minutes! I don’t have the brain-power to even think of editing that!)
I die-cut the iris dies from the swan pattern paper for the viewable portions, and black card stock for the inner workings. I tried to die-cut the moving iris pieces (they call them the sausages) so the swans would go in the same direction as the pattern paper, but I didn’t take into account where the pull tab was, so, though the swans on the iris are all in the same orientation, that doesn’t match the orientation on the full panel. I’ll have to keep experimenting with that!!
The swan sticker is attached to the blue card base in the right location, and the iris assembly is attached on top with some foam tape. I stamped the sentiment on a piece of blue card stock from my stash (good match!) using Blueprint Sketch Distress Oxide ink, trimmed that to just over an inch tall and used the iris add-on die to cut it to size and add the stitch detail on the sides. The cattail ephemera is glued to the left of the opening, and the flower ephemera and sentiment are mounted with foam tape. I find the iris die set totally captivating, and I vow one day to be able to match patterns on those moving pieces! And I do think this is pretty adorable!
I have to credit the New York Times for the inspiration for my last card this month. On April 1st they published a pattern and instructions for “How to Sew a Face Mask”.
I’m just trying to roll with the punches here..!! To create our little face mask, I cut a piece of pattern paper to 2” tall by 2.75″ wide. I scored two score lines 1/8″ apart right in the center and two more 1/4″ above and below the center to make three pleats. I used scor-tape to hold the pleats shut on the back (sides only) and added dots of glue underneath the ends of the pleats on the front and weighed it down to let the glue dry completely.
I removed the scor-tape liner paper on the back and attached the white ribbon to the top and bottom and topped those with a 1.25″x .5″ strip of white card stock over the ribbon with a little bit sicking out the sides. When that was dry, I added thin strips of white card stock to the top and bottom edges for the last touch of trim. Then press out the pleats in the center to shape the mask.
The mustard pattern paper is die-cut with a LFSRD, the sentiment printed on that using the Rockwell font, glued to a thin white mat and a thin black mat, and down to the Golden Yellow card base that has been inked with Fossilized Amber Distress Oxide ink. I glued the ends of the mask to the card front and did have to add a wad of paper behind the mask to help it keep its shape. I think this is terrific! Now, it doesn’t really have much to do with this card kit, but with the CDC recommending that we all wear masks now, it certainly is topical! This gives me a big smile, and those are hard to come by these days!
Thats my 10 cards and MORE from the Love From Lizi April 2020 Card Kit. I really had a great time putting these cards together – there’s so much stuff in this kit – and we have a great assortment of encouragement cards here… a nice gift set… some of these are usable as valentines, or friendship cards, some are certainly topical, but, unfortunately, no puns this month… DAMN! Let me know which cards are your favorite!
I used some of almost everything in this kit – all 12 pattern papers, a great deal of the cut apart sheets, some of the peel offs, and I even managed to use all of the stamps in the stamp set. I used a lot of the embellishments this month but I didn’t get to the mini white envelopes or the wooden buttons. As of posting, this kit is still available for purchase at lovefromliziz.com. If I’ve inspired you at all and you’d like to grab a kit for yourself, please use my links when you go shopping!
We are still under lockdown here in NYC… my theatre is closed through the end of the month (at least), but I am thankfully able to work from home. Broadway just announced they are staying closed through May..! We are staying safe and healthy and are trying to combat cabin fever and the occasional urge to kill each other. I pray that you and yours are safe and healthy and encourage you to stay that way! Please remember to wash your hands often, wear a mask when you go out, stay home if you can, and remember to Like me, List me, Pin me, Post me, Don’t touch your face… and as always I send you Health, Happiness and Happy Crafting!
DISCLOSURE: This site contains some affiliate links to products. I may receive a commission for purchases made through these links (at no cost to you). As an Amazon Associate I earn from qualifying purchases. Thank you!
Hello Folks! Scott here with my 10 cards inspired by the My Monthly Hero March 2020 kit. Between production delays at Hero Arts and the lock-down of NYC I didn’t get my kit till late and… I have to admit… I am having a hard time feeling very creative… so I must apologize for the tardiness of this post. I am safe and healthy, and I hope you and yours are as well!
This kit is a (sorely needed) bright splash of a cherry-blossom spring with Japan as the inspiration for this new HeroScapes 6″ x 8″ stamp set. Three layering stamps – grass, a tree and a zen sand garden are the highlights of this stamp set with four smaller layering stamps including a couple of stone lanterns and a pair of rocks. Four sentiments and some floating blossoms finish out our stamp set which is then complimented with five frame cut dies, and five Hero Arts ink cubes in Green Hills, Field Greens, Dusty Blue, Cotton Candy, and Rose Madder. I always LOVE getting inks with out MMH kits! We also get six sheets of 8.5″ x 5.5″ Hero Hues card stock – two each in Peony, Kiwi, and Mist, and a half-ounce oz. pot of Pink Puff embossing powder. Looks like we’re channeling the Far East with our kit this month!
The only ink on this card not from the kit is the Hero Arts Sandstone and Cocoa inks (from the July 2019 kit) used on the tree trunk, and HA Soft Granite for the stone lanterns. A light blending of the Dusty Blue ink for the sky… The two green inks for the grass… The two pink inks for the tree and blossoms in the wind. Everything is die-cut using the included dies and I also trimmed the whole scene down with a Lawn Fawn Stitched Rectangle die and matted that on a piece of the Peony card stock before gluing it down to a 110# Neenah Solar White card base. The grass is glued flat to the background and the tree and lanterns are attached using foam tape. The sentiment is stamped with the Dusty Blue ink and embossed with clear embossing powder.
I did use a touch of Spectrum Noir alcohol markers for the stones on the ground, but still felt the whole scene was a little flat. That made me break out my White Gel pen and go a tiny bit crazy on this whole card adding white highlights (almost!) everywhere. If you don’t focus directly on them, they do add a little bit of life to this pretty picture. I also used a tiny hole punch on some of the Peony card stock and scattered some ‘fallen petals’ at the base of the tree. This appears to be pretty much what HA had in mind with this kit. Pretty even in pink!
But this doesn’t quite feel like cherry blossoms to me… I think of cherry blossoms as more white with just a touch of pink… Let’s try something else…
I found this pattern paper in my image stash from who knows when and trimmed that down with a LFSRD, mounted that on thin white and kraft mats and glued it down to a white card base. I stamped the tree trunk (on kraft card stock) and sentiment using Walnut Stain Distress Oxide ink and die-cut the tree trunk. I die-cut the tree foliage from a scrap of white card stock and did a little ink blending on that with Tattered Rose Distress Oxide ink. Then I stamped the foliage detail stamp on the cut out with VersaMark ink and embossed it using the Pink Puff embossing powder.
I glued the trunk to the back of the foliage and used foam tape to attach both to my card front. This feels a little more like a cherry tree in blossom, but it also felt like it needed a tiny pop of color. I grabbed a red gel pen and added little spots of red to the center of the background flowers. That adds a touch more interest to this card! And this pattern paper is kind of spot-on perfect to use with this kit!
I’ve said I don’t do this often, but, for the second month in a row, the stamp and die packaging in this kit featured a beautiful image I simply could not resist!
I think this image gave me the idea to add the little red dots to the pattern paper in the previous card! I die-cut this using a LFSRD and glued it to thin white and kraft mats before gluing all down to a white card base. I stamped the sentiment using Acorn Archival Ink and embossed it with clear embossing powder so it wouldn’t smear. Now here’s some “full bloom” for you! I think this is quite lovely!
That takes care of three of the four sentiments in this kit… All that’s left is “thank you”.
I started this card by making my own pattern paper on some on some plain “parchment” type paper. Hero Arts recently partnered with My Sweet Petunia to create a line of MISTI stamping tools in the Hero Arts palette of Black and White. I did have a Mini-MISTI in my stash (original pink!) but I am thrilled to now have the fill-size Hero Arts MISTI in Black and White now! I did share this pattern stamping on social media, and I was very pleased with the results.
I stamped the tree trunks and foliage using Stampin’ Up Tip Top Taupe ink and stamped the detailed stone lantern stamps using Simon Says Stamp Barely Beige ink. Then I blended Frayed Burlap and Vintage photo Distress Oxide ink over the whole background. I trimmed the background to 4″ x 5.25″, matted that on a thin Ivory mat and glued both to a Kraft card base. I really like this, and considered just stamping the “thank you” in the middle, but I thought this card needed more than that.
So I went searching on the internet for the Japanese symbols for Thank You and found this nice vertical rendition. I imported that into my Silhouette Software, colored it red, and gave it a black off-set shadow and a beige background. I trimmed that printed piece to 4 7/8″ tall and 1 1/8″ wide and matted that on more Ivory card stock and glued it directly to the background.
I am super pleased with the sentiment! After practicing a few times with my new MISTI, I stamped the “thank you” sentiment using VersaFine Onyx Black ink on some of the extra beige printed paper. When that was nice and dry, I shifted the stamp a TINY bit, stamped it again with VersaMark ink, and embossed it with Love From Lizi Cherry Red embossing Powder. That gave me a really good black shadow on the red embossing – LOVE THAT! I die-cut the sentiment with a Spellbinders Deckled Rectangle die, and used the same inks to distress the whole piece.
I felt this card needed one more accent, so I found the Japanese symbol for “love”, colored it red, gave it a black shadow, fussy cut it out, distress inked it the same and mounted it on the bottom right with some foam tape. I mounted the sentiment piece with foam tape as well, and now I have a “Thank You” card that fits in perfectly with the theme of this kit. LOVE THIS CARD! Of course Red is a classic Japanese color…!
Now that I have used all the sentiments in the kit, I decided to search out some real “zen” sayings to use on the rest of my cards. This one caught my eye first.
I thought this sentiment gave me the perfect excuse to break out some of the pieces from the MMH July ’19 kit. I die cut the Mountain and Hillside dies from the July kit using a couple of shades of purple card stock from my stash, stamped the detail mountain stamp with HA Soft Granite Ink, and added some “mist” ink blending at the bottom of both using HA Unicorn White Ink.
I took a panel of white card stock and die-cut the grass piece from that. I stamped the tree trunk (HA Sandstone and Cocoa) and clear embossed it that so it would resist ink added on top. I ink blended the grass portion with Twisted Citron and Peeled Paint Distress Oxide ink then stamped the detail grass stamp using HA Fresh Lawn ink. I also added both layers of the stones from the kit amongst the grass using HA Soft Granite ink.
I took the other half of the die-cut grass panel and ink blended the sky using HA Reactive ink in Creamsicle and Grape Slush, and finished that off with a light sprinkling of stars using my Permanent White gouache paint. Once all four panels were colored, I spaced them out and die cut all with a LFSRD. Before attaching the panels together, I turned to my Silhouette Software and my ‘piggy-back’ printing method to print the sentiment in brown using the SignPainter font.
I wanted a bit of dimension between these layers so I die-cut a ‘template’ of plain paper with the same LFSRD, and glued the sky portion to the paper. then I added the mountains with squares of foam tape along the top edge and then the hillside with more squares of foam tape on the top edges, and then added the grass panel flat – making sure to stay within the limits of the template. Then I cut a thin white mat and and thin dark purple mat and glued them all together and down to a white card base.
The tree-top is die-cut from a piece of green card stock and stamped with the detail layer in the Green Hills ink and then shifted a tad and stamped again in the Field Greens ink. I added some branches amongst the foliage usining my Spectrum Noir alcohol markers, attached that to the card front with foam tape, and dabbed in some light suggestions of shadows for the rocks and tree with a grey colored pencil. Combining elements from both MMH kits was a lot of fun, and gave us a really lovely card!
I’ve been itching to try a one-layer-wonder card with this kit, and wanted to try filling a landscape orientation with these stamps. I’ll have to cut some masks, but I’m ready!
I stamped the tree trunk in HA Sandstone and Cocoa, and the pond in Dusty Blue. I placed the tree so the trunk would mask the end of the detail grass stamp so it would be easy to do a repeat stamp on the right side of the tree. Thereby our 4.25″ wide grass stamp fills up the 5.5″ of the card. I cut a mask for the pond and the tree trunk and that was all I needed. I stamped the detail grass using HA Lime Green ink and shifted the stamp over to stamp the grass on the right side of the tree. The tree top is stamped in HA Lemon Drop reactive ink and the leaves in Lime Green Fizz reactive ink.
I clear embossed some of the water ripples (from the 7/19 kit) on the surface of the pond for a little watery reflection, and stenciled in the line of clouds using the MFT mini Cloud Edges stencil and some Broken China Distress Oxide ink – I did use a die cut of the tree-top for masking. Because I didn’t stamp the grass background, I still had a lot of white space on the ground. I grabbed my Prismacolor pencils and filled in all the white with multiple green colors – keeping my pencils sharp and using short strokes to imitate grass. That worked so well, I continued on the stamped grass, some in the pond, and even added extra colors to the tree top.
Very pretty, but it needed a pop of color. I took he two ‘floating petals’ stamps from the kit and embossed them in the LFL Cherry Red embossing powder to provide some flowers for our scene – just the right touch! I did print this “zen” sentiment last, using Silhouette Software and the Black Jack font. I like the slight gag that a pond will ‘reflect’! Okay maybe I’m reaching here, but I’m very pleased with this one-layer-wonder card!
I thought there had to be another way to color this tree… someway to maybe get more than 2 or 3 colors going on there at the same time. I reached for my alcohol markers.
I grabbed my Light Green Spectrum Noir markers 1 through 5 and used a negative mask of the tree top to mask off the shape, and filled the tree top opening with dots and dabs of all five markers. As it started to fill up, I did try to give it a little shape with the dots, and when I was happy with the coloring, I stamped the detail tree stamp on top using the Field Greens ink from the kit. THAT’s what I’ve been looking for!! LOVE IT! I stamped the tree trunk with HA Sandstone and Cocoa inks, and added a touch of grass at the bottom.
I die-cut the tree and dark green mat with the HA Oval Nested Frame dies, did some light ink blending on the tree oval with Broken China Distress Oxide ink, and then glued them both together. I printed this background from my image stash, and die cut it with a LFSRD (3.74″ tall) and trimmed it to 4.25″ wide. I printed the sentiment (very topical!) in brown using the Black Jack font directly on the white card base. I glued the background to the card front, edged that piece with some Love From Lizi Green Mirror Sway peel offs, and mounted the tree oval using foam tape. I think this is my favorite tree from all my cards this month… and I think this sentiment is absolutely perfect here!
Six of my last 7 cards had that tree stamp… let’s see what I can do with other stamps!
Here’s a zen garden fo you…! I stamped the two rock stamps in a variety of directions to make this rock stack using HA Soft Granite ink. This from Wikipedia: Rock balancing has also been described as a type of problem solving, and some artists consider it as a skill in awareness. Sounds pretty ZEN to me!! I masked off the bottom three rocks and stamped both layers of the zen garden using SSS Barely Beige ink for the background, and HA Soft Granite for the rake marks. I added some tiny touches of foliage around the perimeter of the ‘sand’ with alcohol markers and used my colored pencils again to add some detail to the rocks and a bit of a shadow on the ground.
I printed this sentiment (love this one too!) in grey using the Black Jack font again, and trimmed the front panel with a smaller LFSRD. I matted that on a red and then a grey mat and glued all to a white card base. I really like the “rock balancing” I was able to achieve with just two rock stamps! Though mostly flat, this card has great dimension!
I had to search high and low and truly rack my brain for a pun this month…
And I think this fits the bill very nicely!! The little stone pagoda stamps are generally used as lanterns in a zen garden, so I decided to light one up! I used my homemade sunburst stencil to do this background, inking blending with HA Lemon Drop, Creamsicle, and Fruit Punch Reactive inks.
I stamped the larger pagoda using Soft Granite ink, and fussy cut it out along with the two ‘windows’ on the sides. I die-cut a scrap of yellow card stock with the pagoda die and glued the two pagoda pieces together. I printed the pun on the front panel using my Silhouette Software and the Marker Felt font, and die cut the main sentiment from Black Tie glitter card stock using and old Marker Micro Alpha die. Since the “JUST BE” had some glitter, I added some flicks of my Spectrum Noir Sparkle pen all over the front panel for a light touch of sparkle all over!
I die-cut the front panel with a LFSRD, matted that to a thin orange mat and glued both to a white card base. I glued the sentiment flat to the card front, and added the pagoda with a little foam tape. I think we’re all learning how to JUST BE these days! Makes me giggle!
I had the idea for this card almost from the beginning, and I had to fuss around with a number of different approaches before this card finally came to me.
“I think I’m turning Japanese, I think I’m turning Japanese, I really think so!” I really wanted to do a card featuring the tree in all four seasons, and played around with the stamps for a long time before I realized that I could emulate my Thank You card and do the four trees as screens… very Japanese! This is on a 9″ x 4″ card base (fits in a business envelope) and the panels are each 1.75′ x 3.25″ cut from some ivory card stock. The tree trunks are again stamped with Sandstone and Cocoa inks, the foliage is stamped in SSS Barely Beige, Stampin’Up Tip Top Taupe and Early Espresso inks. The birds are from the July kit, and the petal stamps are simply falling on the last tree.
I ink blended all over the four panels again using Frayed Burlap and Vintage Photo Distress Oxide inks, matted them all to thin black mats and then down to the red card panel cut to 3.75″ x 8.5″. I added two strips of black card stock (1 7/8″ tall) to the center of the card base on each side, and glued the completed panel on top of those. Of course this card has a sentiment which I printed on the inside of the card using the Black Jack font and adding the Japanese for ‘love’ on the two sides. This is a great valentine card – or maybe an Anniversary card or any kind of an occasion when you’d like to express your own long-term feelings for someone special! I really like this, and am thrilled to finish up this batch of cards with a real Japanese inspired card.
Thats my 10 cards using the My Monthly Hero March 2020 kit. I’m very pleased with the wide assortment of cards I achieved, and the very Zen nature of most of them. As I mentioned, this kit sold out very quickly. If you don’t want to miss out on future kits, I would highly recommend subscribing. If you subscribe to the six-month plan you can skip out on a kit if it’s not to your liking. Personally, I find that I make some of my best cards with kits I thought held no interest for me! Sometimes you just have to do it!
It has been an absolutely crazy month here in NYC, (you can imagine) and I have been surprisingly UNMOTIVATED to create. I am working from home (fortunately) and thought I’d be crafting up a storm, but I can’t shake this depressive ennui and brain-deadening despair as this pandemic continues to spread. We’ve got field hospitals erected in Central Park for God’s sake! PLEASE stay safe, be healthy, wash your hands often, and stay home if you can!
As a special treat with this post, if you send me a note at cardcutups@gmail.com, I’ll send you a pdf with all my sentiments, patterns and Japanese characters used on my cards this month! Thank you so much for sharing your time with me here, I hope I was able to distract you for a little while and give you some fresh ideas for using this kit. Please remember to Like me, List me, Pin me, Post me, Share me with all of your friends… Don’t touch your face, and as always, I wish you happy crafting!
DISCLOSURE: This site contains some affiliate links to products. I may receive a commission for purchases made through these links (at no cost to you). Thank you!
Hello Folks! Scott here unboxing the new Love From Lizi April 2020 Card Kit. Lizi is calling this kit “You Are” and it is full of lots of spring-time encouragement for us all!
Fortunately for us, Love From Lizi is a small company still able to continue creating these lovely card kits for all of us who are stuck at home during the shut-downs occurring across the country. Broadway theaters (and my theatre) shut down on March 12 and will probably be closed for many more weeks. Thankfully, I am able to work from home and still collect a paycheck, but when I think about the number of people who are out of work with no promise of re-employment, I get quite anxious. I wonder how many Broadway shows will be able to weather a month (or two) of closing down and not have to close for good…! A tenuous grasp we all have on reality at the moment – I am safe and healthy here, and pray that your friends and family are staying the same. Looks like we are all in this together, and together we shall prevail!
As is the norm, we get five sheets of 8.5″ x 11″ card stock in this month’s kit. We have a Mauve (purple), Super smooth, copic-friendly White, Black, Golden Yellow, and a Sky Blue. Lizi called that last one Mint but I don’t really see any green in it at all..!
This kit does arrive in a 12″ x 12″ box so that usually means some cut-apart sheets! Three 12″ x 12″ cut-aparts and one 12″ x 12″ sheet of stickers!
Our first sheet is 3″ x 4″ panels with lots of sentiments and a couple journaling cards. The cut-aparts are double-sided – the back of this sheet sports this colorful ‘pebble’ pattern.
The second sheet has 4″ x 4″ square cut apart panels with more encouraging words.
And the pattern on the back is this deep pink geometric.
Our third cut apart sheet has 2″ x 2″ panels with more sentiments and lots of images!
The back of this third sheet has a mustard color background with random white dots.
And finally, we get this 12″ x 12″ sheet of stickers – nice thick card stock stickers with gobs of images, sentiment strips, word banners and a fun cheetah spot scalloped border.
We are treated to the larger 6′ x 8″ pattern papers this month. 12 sheets of double-sided pattern papers – most with large images and icons on one side and smaller patterns on the reverse.
The reverse side of these six are –
Mostly subtle, geographic patterns and there’s that cheetah spot pattern again!
The next six sheets have some smaller, vibrant patterns and two 3″ x 4″ cut apart sheets. Perfect size for the front of an A2 card!
The back of those six sheets has some more colorful patterns, that great text sheet, black and green gingham and smaller patterns that match the big cut apart sheets. I love the larger pattern paper format… it gives us a few more options…!
Our peel offs this month are a new color – Jade Glitter Pin peel offs – REALLY sparkly and a great color! And our 6″ x 4″ stamp set is all about really big sentiments! These are the largest sentiment stamps I’ve ever received in a LFL kit, and I can’t wait to put them to use! That will bring us to our Embellishment bag…!! WOO-HOO!
We get more 1/4″ satin ribbons this month! A meter length each of Teal, Pink, Yellow, Black and White. We get two mini white envelopes, and our sequin mix includes Teal, Pink, Gold, Oyster, and Peach sequins in a variety of sizes. We get five wooden buttons and five mini-clothespins, a bottle of Nuvo Shimmer Powder in Sunray Crossette (I have no idea what that means!) a sheet of self-stick pearls and flower gems that are strung together but can be cut apart, and two dies – a fairly simple butterfly and a multi-part bicycle die – the frame, the pedal and chain, the wheels, and a basket. AND…
EPHEMERA! A great big batch of ephemera! Lots of images and sentiments, flowers and plants, notebooks and banners, and some of the pieces feature gold foiling. I know LOTS of folks love these ephemera packs and this batch is sure to please you!
I did get a couple of add-ons this month, including the four-sheet peel off pack.
The peel off pack includes a NEW color: Pink Holographic Pin peel offs, and the Teal Mirror Sway, the Gold Moondust Pin, and the new White Iridescent Clear Glitter Straight peel offs – Love those new colors and that Pink Holographic hardly seems pink at all! I also received the Foam Sentiment Sticker add-ons that are all gold foiled, self-stick and nicely thick sentiments – some of these would make a card all by themselves!!
That’s the new Love From Lizi April 2020 Card Kit! These kits are still currently available at lovefromlizi.com – if you want to join in on the springtime encouragement and have some new product to play with while you are sitting at home waiting for this crisis to pass, please use my links when you go shopping with Lizi!
DISCLOSURE: This site contains some affiliate links to products. I may receive a commission for purchases made through these links (at no cost to you). As an Amazon Associate I earn from qualifying purchases. Thank you!
Hello Folks! Scott here with my ten cards created using the Love From Lizi March 2020 Card Kit. Lizi is calling this kit “A Moment in Time” and it features a bunch of terrific pattern papers, cut apart sheets and an amazing pocket-watch die set.
I was so taken with the large cut apart sheets and the pattern papers, that I decided to let them inspire me through these cards instead of being a slave to the stamp set! As always, I did make my ten card bases from the five sheets of card stock included in the kit.
But, of course, I did start with the large owl stamp from the stamp set! I stamped that on some HA Pitch Black card stock using VersaMark ink and embossed it with the LFL Golden Crown embossing powder. I sprinkled some Spectrum Noir Sparkle pen on the background by flicking the pen tip on the edge of an acrylic block – that gives me a nice even layer of glitter without worrying about brush strokes! I die-cut that panel with a Lawn Fawn Stitched Rectangle Die, added a thin white mat, and glued that down to a Navy card base. I embossed the W I N D wood-veneer die cuts with matching embossing powder – the backs of these letters are not colored white as reported in my un-boxing, but it’s liner paper that removes to expose adhesive!
To complete that sentiment I turned to my Silhouette software and printed “you are the” and “beneath my wings” in the Abadi MT Condensed Light font. I trimmed down both lines using a Lawn Fawn Everyday Sentiment Banner die and embossed both of them with some clear embossing powder. I used the adhesive on the back of the letters to stick them to the card front, and mounted the two banners using foam tape. For a last little touch I added some Ebony Black Nuvo Crystal Drops (LFL 8.18 kit) for a little added dimension and shine. I really like that the owl stamp is quite large and commands most of the attention on this card. Did you ever know that you’re my hero…!
I rarely make square cards, but it seemed particularly appropriate for this next design.
I love these boxing guys! They were printed with a white outline on one of the cut-apart sheets (with the “fight for yourself” sentiment) so I fussy cut them out to use on this card. I then added some soft color to them with my colored pencils. I cut one of the Off-White card bases down to a 4.25″ x 4.25″ top-folding card. The background is the 4″ x 4″ antique ceiling tile, cut from the same page as the boxers, and glued to the card front. I outlined that with the peel offs from the kit, and attached the boxers with foam tape.
I cut this sentiment stamp from the stamp set into two separate sentences, and stamped the two lines on a scrap of the Off-White card stock with VersaFine Onyx Black ink and embossed them with clear embossing powder. I die cut both with the LF sentiment banner die and mounted them to the card front with more foam tape. Though it’s not a pun, this makes me laugh a lot! Certainly appropriate for a lot of couples I know! And do you get the reason it’s a square card…? A boxing ring is a square…! I think this is funny!
Other than the boxers, I think this is the only other image I colored for this kit.
I stamped the large feather stamp on some Neenah Solar White 80# card stock using Archival Acorn ink and colored it using my Spectrum Noir alcohol markers, and fussy-cut it out (wasn’t as hard as it looks!). I took a tiny bit of the Nuvo Storm Cloud Shimmer Powder from the embellishment bag, and mixed it with a touch of water to spatter the front of the Grey card base. Not much shimmer there when using such a small amount..! I cut the feather pattern paper to 2″ x 5″, glued that to a thin mat of the Grey Pearlescent card stock and glued both to the card front.
The “be yourself” sentiment is from the sentiment sticker sheet, and I mounted that and the feather to the card front with foam tape. There is more to this sentiment on the inside. I decided to add “everyone else is already taken” on the inside of this card using my Silhouette Software and my piggy-back printing method and the Typewriter Hand font. This is actually an old quote from Oscar Wilde, and I thought it was a fun, lighthearted completion for the sentiment on the front. A few black sequins from our sequin mix adds a little sparkle and I really like that purple and green feather — certainly unique!
Sometimes, it’s the simplest images that catch my eye and make my imagination soar!
I’m loving this card! I took a piece of my Bee Paper 140# cold press Watercolor paper and sprinkled the Nuvo Shimmer Powder lightly all over it and then slowly started spritzing some water on it using a mini mister. I sprayed sparingly to keep everything from running together and let the powder and the water work their own magic. I let it air dry and die cut it with a large Lawn Fawn Stitched Rectangle die, and glued it to a White card base.
I cut out the image following the frame, and printed the sentiment on it just the same as the previous card. I took a scrap of white card stock and laid down a bunch of strips of the washi tape to make a larger frame to go behind the cut apart piece (that frame measures 3 3/8″ x 4 3/8″). I glued those together and added a thin mat of the Oyster pearlescent card stock, then mounted all three of those pieces to the card front using foam tape. Finally I added three of the chocolate sequins from the sequin mix for a bit of sparkle on the front. The sentiment is paraphrased from an old Confucius saying, and I LOVE the subtle shading on the cut apart image, and the striped washi tape frame and that great background that looks like storm clouds a-brewin’. This makes my heart happy.
Time to play with the set of pocket-watch dies in our embellishment bag…!!
I wanted to do a gold watch, so I grabbed a piece of the Gold Matte mirror card stock from the LFL January 2020 kit and die cut the main watch from that. I die cut the Oyster pearl card stock with a MMH Nesting Circle die (the circle die in the clock set is a bit small to cover the whole back of the clock face), then die-cut the date box and sweep second hand right through that oyster clock face. I trimmed off the hour hand from the tiny clock and colored that and the date frame with a little more of the Nuvo Shimmer Powder. I die-cut another background circle, the clock hands and the “18” from some plain white card stock and colored the hands and date with the shimmer powder.
I glued everything together on top of the white circle background and took a black gel pen to go over the thin rim pieces around the clock face. For the final touch on this pocket-watch, I die-cut the chain from shiny Gold mirror card stock in my stash, trimmed off the attachment ring and glued it on top of the Matte Gold die cut. PHEW! These pieces are pretty tiny! But you have got to love the results! I only wish I had a nice curved glass ‘crystal’ to cover over the top!
I cut a piece of the ‘linen’ pattern paper to 3″ x 5.5″ and printed the sentiment just like the last two cards, still using the Typewriter Hand font. I glued that panel to a Soft Cream card base and edged that with the kit peel offs. A small amount of ink blending on all the edges with a mini ink blending tool and Black Soot Oxide ink, and I attached the watch using foam tape and glued the end of the chain directly to the card front. Some of the oyster sequins from our sequin mix add more sparkle and I’m calling this one DONE! I was originally intending this as a Birthday card (my sister has a birthday April 18th) but upon completion, I realized this would make a perfect retirement card!! Isn’t a gold watch the classic retirement gift? And this sentiment is perfect for a retiree!! Anybody know someone retiring on the 18th? Very cool set of dies here – and many of the smaller dies (like the numbers!) should prove very useful for many different applications!
Being an old Monty Python fan, I have to say my favorite sentiment on all the pattern papers and cut apart sheets had to be “Always look on the bright side of life”.
I fussy cut the binoculars from the ‘ephemera’ sheet thinking they were the same size as the binoculars on the brick cut apart panel, but no… they were a little smaller. Okay! I can work with that! I cut the background from the 4×6 cut apart panels and trimmed that down to 3.75″ x 5.5″. I cut a couple of 3/8″ strips from the dark blue pattern paper and glued those to the sides of a white card base and added the pattern paper on top. I cut out the sentiment strips from the original binocular panel, and mounted them to the card front with foam tape. I did emboss the binoculars with clear embossing powder and used foam tape to attach that to the card front. A few Dirty Bronze Nuvo drops (from the LFL 12/19 kit) finishes out this optimistic card. “If life seems jolly rotten, There’s something you’ve forgotten, And that’s to laugh and smile and dance and sing. When you’re feeling in the dumps, Don’t be silly chumps, Just purse your lips and whistle, that’s the thing.. and… Always look on the bright side of life! Thank you, Eric Idle!
I still have a number of image stamps from our kit waiting to be used… all together now…
I stamped the leaf silhouette and the arrow stamps in a nice pattern on the sides of the Cream card base and embossed them with LFL Ivory Pearl embossing powder. I stamped the dream catcher using VersaMark ink on a piece of the Oyster pearlescent card stock, embossed that with the LFL Copper Rose embossing powder, and die cut it with a MMH Nesting Oval Infinity die. Then I used the next larger oval die to cut a mat of Black Tie Glitter card stock to go behind the dream catcher. I attached that double oval piece to the card front with foam tape.
I fussy-cut the feathers from the ‘ephemera’ sheet and split the sentiment from the sticker sheet and attached those to the card front with glue and some foam tape. Some thin strips of the Gold Moondust peel offs (in this month’s peel off pack), and a few more of the chocolate sequins from our sequin mix add even more shine to this great encouragement card. I thought it might be difficult to make that dream catcher the focal element on a card since it is pretty small, but, with the addition of the feathers and silhouette stamps, I think it commands just the right amount of attention!
I was fortunate to get the “Cogs” cut and emboss folder and wanted to see it in action…
I cut and embossed that folder using some of the Grey pearlescent card stock, and used a very thin wash of the Storm Cloud Shimmer powder to add a little more contrast to the embossing. I mounted that to a piece of the Oyster pearlescent card stock using foam tape. I die-cut the two small clocks and the add-on “fob clock” from more of the grey Pearl card stock, and used the MMH Circle infinity dies to cut backgrounds for those clocks from the Oyster Pearl card stock. I glued the backs to the fronts and mounted the clocks on top with more foam tape.
I split the “You are the best” sentiment stamp (stamp surgery!) and stamped that (along with the “ever” stamp) inside the center opening using Hickory Smoke Distress Oxide ink and embossed them with clear embossing powder. I embossed the “DAD” wood-veneer die-cut letters with LFL Silver Dollar embossing powder and glued those down with their own adhesive. This was still missing something until I remembered that “gear” die from the LFL July 2017 kit. I die cut two of those gears from more Grey pearl card stock and glued those flat on the inside of the opening… that’s what we needed… MORE GEARS! Everything is glued to a Grey card base, and we have a great Birthday card or even better, a Father’s Day card! VERY Steampunk! LOVE that cut and emboss folder!
One of my other favorite images in this kit has to be that anatomically correct heart…
I fussy cut the red heart from the cut apart sheet and embossed that with clear embossing powder (wet and slimy!). I die-cut the background frame from the 4×6 cut apart sheet (using a LFSRD and partial die-cutting to make the panel 5.5″ tall) and glued that to a Navy card base. I blended a touch of white pastel in the center to give us a little highlight behind the heart, and I ran some white peel offs down the two sides.
I attached the shiny heart using a mini action wobbler! YUP! This heart is still beating! You know it’s rare for me to NOT have a sentiment on the front of card, but I thought this image held it’s own (the wobbling heart helps!) and added “I can’t live without you” on the inside writing surface. I do believe that’s quite an understatement, but I think this is a terrifically fun Valentine or anniversary card for any one with a dramatic flair or a slightly morbid sense of humor!
You know how much I love my Lawn Fawn Stitched Rectangle dies, and I have always admired the Lawn Fawn interactive card dies, but have never bought any of them because I could easily make my own “reveal wheel” or “pull tab” mechanisms. BUT! they recently came out with the Magic Iris die (and add ons) that totally caught my eye and my imagination! I couldn’t resist using that magic iris on one of my cards this month!
This slideshow requires JavaScript.
I used both pieces of the map pattern paper for this card – One for the top panel (Magic Iris Add-On) and one for the ‘sausages’ that make the moving part of the iris (Magic Iris Die). I used black card stock to cut all the other parts of this assembly. There are a ton of how-to videos on YouTube that show how to assemble the Magic Iris – here’s a link to the original: https://www.youtube.com/watch?v=MUP8cPbwwYU&t=0s This die set displays some amazing engineering… I decided it would take me much too long to figure out the mechanics of this moving iris, so I just went ahead and splurged on the dies themselves!
The compass from our ‘ephemera’ cut apart page was the perfect size to fit in this iris opening… I cut it out and added a little color to the white end of the needle and glued it in place on my last Off-White card base. I die-cut a larger circle of acetate and glued that over the top of the compass. I printed this sentiment (same font as the others) on the last scraps of the Off-White card stock, die-cut those with my banner dies and attached them to the card front with foam tape. I was able to squeeze the last arrow die (on the pull-tab) from the off-white card stock as well. I mounted the whole iris assembly on the card base with foam tape and I punched a partial circle through the front edge of the card base to make it easier to grab the pull-tab. I LOVE THIS SO MUCH! My mind is just racing with thoughts of how to incorporate this iris die into more cards..!!
So that wraps up my 10 cards using the Love From Lizi March 2020 Card Kit. I used most of the items in this kit – all of the card stock, most of the specialty card stock, 5 sheets of the pattern paper, pieces from all three of the 12×12 cut apart sheets, I used all of the image stamps in our stamp set and the two main sentiments, some of the peel offs, and a couple of the sentiment stickers, and most of the embellishements. The only items I didn’t get to use were the wood-veneer die cut birdcages and the kraft tags. Pretty good I think!
I am extremely pleased with this batch of masculine cards! A few encouragement cards, a retirement/birthday card, a Father’s Day/birthday card, and a number of off-beat valentine/love you cards! No real puns this month but some nicely humorous cards! Quite a variety! I was really taken by the high quality of all the pattern papers and cut-aparts in this kit as well as the great masculine themes! No pink in this batch of cards!! Okay… the purple is close, but it’s still purple!
Of course this kit has sold out already – as most of Lizi’s kits do…! If I’ve managed to pique your interest or spark your imagination, I would suggest subscribing to the LFL Card Kits so you’ll never miss out on these over-stuffed bundles of crafting joy. I do think Lizi’s kits are some of the most unique kits on the market these days, and it’s always a surprise seeing what she has in store for us each month!
On a side note… I GOT TO MEET LIZI face to face this last Friday, February 28th! Lizi was visiting NYC for a little R&R (and shopping therapy!) and we met up for coffee and cake at a little coffee shop right by the theater where I work. It was almost surreal getting to meet and chat with her – I could have bent her ear all day…! I look forward to the next time!
Another side note… Announcing the WINNERS of my 5000 Subscriber Giveaway! • CAROL-LYNNE CARNES won the £50 store credit at Love From Lizi • KRISTIE EAGLES won the My Monthly Hero August 2019 Kit • JEANNE TRUMBULL won 12 assorted sheets of Love From Lizi Peel Offs • JEANNE THOMPSON and ANGELA GRIFFIN each won a collection of 5 original cards from CardCutups. BIG THANKS to everyone who entered!
And a big Thank You to YOU for sharing your time with me here. You are MY inspiration! Let me know what card(s) you like best this month, and remember to Like Me, List Me, Pin Me, Post Me, share me will all of your friends, don’t run with scissors, and, as always, Happy Crafting!
DISCLOSURE: This site contains some affiliate links to products. I may receive a commission for purchases made through these links (at no cost to you). As an Amazon Associate I earn from qualifying purchases. Thank you!
Hello Folks! Scott here with my ten cards featuring the My Monthly Hero February 2020 Kit. Looks like it’s all about birthdays, balloons, cakes and candles this month!
Our 6″ x 8″ stamp set features a large background party stamp (with an open center) that will fill an entire A2 card front, a smaller frame stamp perfect for gift cards and a wrapped gift and a small cake. 8 birthday and party sentiments finish out this stamp set. The die set includes 9 frame cuts for the gift and the cake and for assorted elements in both frame stamps – the single and triple balloon images and a number of the flowers too. VERY interesting! We also get a large Cake Fancy Die on a cake stand with candles and decorations! The extra goodies in this kit include 3 Lacquer Pens (Yellow Icing, Pink Icing, Teal Icing) and a big bag of Rainbow Spirals & Balloon Sequins. I think most folks go through a lot birthday cards, so it’s really nice to have a dedicated kit with lots of groovy birthday card options.
For my first card, I went with a gold and white celebratory palette! I stamped the large party stamp on a Neenah Solar White 110# card base with Hero Arts Clear Embossing & Watermark ink, and embossed that with Hero Arts Gold embossing powder. I did the same with the two sentiment stamps in the center opening, and then painted in select portions of the images with Hero Arts Gold Glimmer Metallic ink (from the MMH August 2019 Kit). For a final flourish, I tied a simple gold metallic ribbon bow from my stash and glued that down in the center. That metallic ribbon is pretty stiff, so, instead of fighting with it to make it go in the direction I wanted, I let the bow do its own thing and it fit that open space perfectly! Lovely! I think gold embossing on white is very sharp, and all the parts came together beautifully for this classy birthday card!
Naturally, I’m eager to play with the large Cake Fancy Die, so let see what that’s all about!
For some reason, I decided that paper piecing was the way to go with this first cake card! First, I die-cut the whole cake from a spare David Tutera glitter card base, the cake stand from some silver card stock in my stash, and then die-cut the cake three times from the Silver, Sea Glass and Twilight glitter card stock from our MMH October 2018 Kit. I fussy-cut all the icing decorations (and the candles) from the glitter card stock and glued those on top of the white glitter cake – those were fairly simple to cut out, aside from the little swirls on the bottom (am I CRAZY?). I did take a light gray alcohol marker to add a little definition to the tops of the cake layers, and cut a thin sliver of the Sea Glass glitter card stock to define the bottom of the top layer.
I fussy-cut the candles from the Silver card stock, glued them in place, and added some of the Yellow Icing lacquer pen to the flames. I die-cut the background from some light yellow Lawn Fawn Gotta Have Gingham pattern paper with a Lawn Fawn Stitched Rectangle Die and glued that to a thin mat cut from the Twilight glitter card stock. I stamped the sentiment with HA Clear Embossing & Watermark ink and embossed that with HA Silver embossing powder. I glued the background to a matching David Tutera glitter card base, and mounted the cake with foam tape. This card was admittedly a little fussy, but I love all the glitter and shine – and I really like that sentiment as well!
You know me… I have to take a stab at coloring that large background frame stamp!
This is stamped on Neenah Solar White 80# card stock with Gina K. Jet Black Amalgam ink and colored with my Spectrum Noir alcohol markers. I did add a little yellow gel pen to the balloons for some shine – I thought they needed a little more pop (pun intended)! Now, I was going to stamp the small cake in the bottom of the center opening, but decided to make it a little shaker window instead. I die-cut the cake in the proper position on the colored panel and stamped the cake stamp on a piece of heat-resistant acetate with StazOn Jet Black ink and embossed that with some clear embossing powder. I stamped the sentiment using Vermillion Archival ink and clear embossed that for more shine and a little dimension.
I glued the acetate behind the window, and covered the back of that panel with foam tape – only doubling it up around the cake itself to allow the shaker bits some freedom of movement. I separated the rainbow spirals from our sequin pack and loaded them behind the cake before attaching the front panel to a white card base. I like the softer colors on this card – makes the cake pop a little more, and am reminded that a small shaker element can have just as much of an impact as a large one! Celebrate!
I don’t do this often, but I simply couldn’t resist this great image from the kit packaging.
I die cut the balloons with a LFSRD, glued that to a purple mat from my stash, and glued those down to a pale yellow card base. I stamped the sentiment using Deep Purple Archival ink and clear embossed that to avoid any smearing! I couldn’t leave this card without a little bit of a pun, so I turned to my Silhouette software (remember that software is FREE!) and printed the “party till you Pop!” sentiment on the inside writing surface. This is printed in purple using the Ballpark Weiner font. This is a fun and very appropriate pun, and this card could be used for a number of occasions – not just for birthdays. Makes me smile!
Now let’s play with that smaller frame stamp – the kit description said this stamp was perfect for a gift card, so I took them at their word!
I cut a piece of dark blue dotted card stock from my stash to 4″ x 6.5″ and scored that at 2.75″ and 5.5″ so I could fold and glue it into a little gift-card holder. I stamped the frame stamp on the front using HA embossing ink and embossed that with the HA gold embossing powder. I took a white colored pencil and added a little color to some of the images – surprisingly, that highlighted the dots as well… Cool! I stamped and embossed the sentiment in white and added the “Celebrate” sentiment on the inside bottom flap using gold again. I punched out a 1″ circle of the same blue card stock, scored it in the middle, stamped and embossed the “open” on the top half and glued that to the back of the holder.
I matted that on a piece of gold card stock from my stash with a couple pieces of this sparkly burlap ribbon peeking out from the sides. Everything is glued down to a David Tutera shimmer card base. I did think the addition of the “It’s your day ” sentiment finished up this card nicely, and again we have a card that works for assorted celebrations – graduations for instance – and not just as a birthday card! You’ll never go wrong with blue and gold!
About a month ago I did a how-to video showing how I make my galaxy backgrounds using Brusho Pigment powder… that galaxy has been sitting on my desk since then…
I thought this was the perfect opportunity to use that galaxy background! I stamped the balloons (wiping off the string ties) and the cake using VersaFine Onyx Black ink on some Neenah 80# card stock and colored them with my colored pencils before using the included dies to cut them out. I did do a partial die-cut on the balloons (and cut one from the back side) so I could extend their strings a little longer. I also did a little fussy-cutting with my craft knife between the strings – fussy, but I think it adds to the dimension! I die-cut the galaxy with a LFSRD and attached that to a thin white mat before gluing those down to a HA Pitch Black card base. Of course this card doesn’t mean much without a sentiment, so I turned to my Silhouette software again to print this sentiment on the inside writing surface using the Noteworthy font. A great birthday sentiment for any space nerd or sci-fi fan on your list! Of course it was pointed out to me that in space, the balloons would deflate and the candles wouldn’t be lit, but c’mon! It’s just a birthday card! I do love the colors and the awesome sense of movement on this card!
Let’s try that big cake die again but let’s try coloring it this time…!
I dry embossed this die on some Bee 140# cold press watercolor paper and painted it using the colors from my Zig markers. After it was totally dry, I completed the die-cut and added the sequin pieces and a little Spectrum Noir sparkle pen to the flames for a lot more bling. I die-cut a piece of Neenah 80# card stock with a LFSRD and blended some HA Lemon Drop reactive ink over the entire surface. When that was dry, I sprinkled some water droplets across the surface and blotted them away with a paper towel. I stamped and clear embossed the sentiment with the Deep Purple Archival ink and glued the background down to a purple card base from my stash. The cake is attached to the card front with some foam tape, and few more balloon sequins and some Yellow Icing lacquer dots finish off this card nicely! Those sequin pieces are HUGELY reflective and are a fun decorative compliment for this watercolored cake.
I still haven’t used the gift stamp from our stamp set, and I had an idea on how I could use it to illustrate one of the sentiments from the stamp set…
I repeatedly stamped this gift box on some Neenah 80# Solar White card stock using Gina K Amalgam ink and my Tim Holz stamp platform.
I thought I was being clever, but was faced with a bit of a puzzle after stamping. I didn’t realize that the space between the boxes would be the same width as the ribbons on the boxes. It was a little hard to tell where the boxes began and where they ended! Undeterred, I grabbed my alcohol markers and began coloring all these gifts. Here’s a shot of the markers I used on this card. I die-cut the panel with a LFSRD, and glued that to a thin mat cut from my Black Tie Glitter card stock. I love the multi-color glitter on this card stock and thought it went especially well with this colorful card! I stamped and clear embossed the sentiment (perfect!) with Onyx Black ink and glued the finished panel to a red card base. I did go ahead and delineate this card as a birthday card by stamping the “happy birthday” sentiment on the inside writing surface. LOVE this card. The coloring of the gifts helps define the packages, but it doesn’t completely camouflage the ‘puzzle’ aspect of this repeating pattern. Tons of fun indeed!
I have now used every stamp in this stamp set! (woo-hoo!) Now, this is an extremely unique stamp set – despite some of the frame cut dies that cut images out of the background frames, we basically only have four stamp images in this set. Is there more?
I’m a big advocate of performing stamp surgery to your photopolymer stamps to stretch their usefulness. I cut away the balloons and confetti portions of the small frame stamp and spread them out to stamp the front of this card. That really expands the options you have with that stamp – I really like this larger frame arrangement – it’s similar to the big frame stamp but a little simpler and not quite so busy. It really draws your focus right in to that cake. This is all stamped with VersaFine Onyx Black ink on Bristol smooth card stock and colored with my Zig markers.
Using my Silhouette software, the Marker Felt font, and my piggy-back printing method, I printed this pun-y sentiment directly on the card front. This one makes me laugh out loud! I glued the front panel to a thin red glitter mat and then down to my white card base. A few dots from our lacquer pens and some confetti added with my Sakura Stardust glitter pen add some more embellishment and I did go ahead and stamp the “happy birthday” sentiment on the inside of this card. I love this pun! This one is definitely MY KIND OF CARD!
I wanted to take one more stab at that fancy cake die to wrap up these 10 cards…
I die-cut the cake one more time from some Neenah 80# card stock, trimmed off the pedestal, and colored the cake with my colored pencils. Since I was coloring very lightly and adding layer after layer of color, It soon became apparent that the die cut impressions would stay white unless I dug in really hard to try and color them. I really liked the automatic “highlights” that gave me, so I tried to preserve them as much as possible. I die cut the candles from a piece of pattern paper and glued those on the top. I wanted this cake to have some ‘fondant’ shine, so I embossed the whole piece with clear embossing powder… mmmmmmmm… milk-chocolatey!
I die-cut a piece of Neenah 80# card stock with a LFSRD and used my blending brushes, a Stampendous Flourishes metal stencil and HA reactive inks in Lemon Drop, Creamsicle, and Fruit Punch to blend the stencil on the background. I’m glad I found this old stencil in my stash – I don’t believe it’s available anymore – it makes a perfect ‘party’ background. For a final touch I spritzed the background with some Sheer Shimmer Spray to add a light touch of glitter.
It must have been that “cake my day” pun that made me think of this other ‘tough-guy’ quote that I printed on a scrap of white card stock (Marker Felt font again) then matted to a scrap of kraft card stock. I glued the background to a kraft card base and added the cake and sentiment with foam tape. I did add another birthday sentiment on the inside using a Love From Lizi die from more kraft card stock. This sentiment tickles me a lot, and I just might like this cake treatment the best – or maybe it’s chocolate that I like the best!
That completes my 10 Cards 1 Kit collection featuring the My Monthly Hero February 2020 Kit. More options are possible with this kit than I originally thought!
A wide assortment of cards this month – eight birthday cards and a couple usable for other occasions as well! I did use every stamp in this set but I didn’t use every die… I may have been a little die-cut-flowered out after last month’s kit! This is certainly a perfect kit for making birthday cards and I’m sure it will get a lot of use over the years!
Like January’s kit, this one sold out extremely quickly as well! If you don’t want to miss out on any of these wildly popular kits, I’d suggest doing a 6-month subscription which allows you to skip a month if you don’t like the offering. Nonetheless, when you do go shopping at Hero Arts, please use my links! I always appreciate the support!
Thank you so much for sharing your time with me here! Please share this post with any interested parties you may know, Like me, List me, Pin me, Post me, and remember, Don’t count the years… just make the years count! Happy Crafting!
DISCLOSURE: This site contains some affiliate links to products. I may receive a commission for purchases made through these links (at no cost to you). Thank you!
Hello Folks! Scott here un-boxing the new Love From Lizi March 2020 Card Kit. This is the “A Moment in Time” kit featuring a palette of masculine colors and unique images.
There are a few flowers images in this kit, but this feels very masculine to me! Hardly any pink whatsoever! This kit has lots of wood images and textures, maps, clocks and the whole kit feels rather vintage.
To starts with, we get five sheets of 8.5″ x 11″ card stocks in a soft Gray, Alcohol marker-friendly White, soft Cream, Off-White and Navy. Those are complimented with two specialty sheets of pearlescent card stock in Gray and Oyster (the two left sheets). I most always create my 10 card bases using the plain card stock, and save the pearlescent sheets for decoration and die-cutting.
This month our kit comes in a large 12″x 12″ box which usually means we get some over-sized cut-apart sheets perfect for scrap-book lovers. We get three big sheets this month!
Our first 12×12 sheet is full of images featuring Owls, compasses, a globe, binoculars, some flowers and assorted frames. This is basically a sheet of uncut ephemera – filled mostly with fairly simple shapes that shouldn’t bee too hard to cut out!
Of course our 12×12 sheets are double sided. This is the back of the image sheet with a nice wood plank pattern and some subtle greenery images on top.
Our second sheet features six 4″ x 6″ cut-apart panels – easily trimmed down to fit a card front and/or provide a stylish framing element.
This is the back of that second sheet featuring a soft sort-of distressed linen texture.
The third 12×12 sheet features more cut-apart panels – eight 3″ x 4″ and three 4″ x 4″ panels – perfect for those who like to make square cards! I think that heart panel on the lower left is as close to pink as we get in this kit!
The back of that sheet is a large parquet pattern – almost quilt-like – done up in all sorts of wood patterns colors and tones… really perfect for a scrapbook page!
That brings us to our pattern paper this month! We get 12 sheets of 6″ x 6″ pattern papers that are double-sided – we get six different sheets twice – so you don’t have to make a choice between which side to use! The top row shows one side, and the bottom row is the reverse. The last two sheets on the right are smaller versions of our cut-apart sheets.
The “Moment in Time” 4″ x 6″ stamp set features a large flying owl and detailed feather, along with a smaller “dream-catcher” stamp, a couple of arrows and a feather silhouette. The sentiments are a mix and match set with “Your are the best” and assorted nouns to complete that – “Boyfriend”, “Partner”, “Husband”, “Friend”, “Dad”, and “Brother”. Additional fragments include “To my”, “ever”, “…” and a complete sentiment that says, “I love you just as you are”. This stamp set is is obviously VERY masculine! #boysclub!
We also get a sheet of sentiment sticker strips. These have become quite popular over the last couple of years, and we get both black and white sentiments with some small pops of color done in a very ‘distressed typewriter’ font along with some big bold caps. This sheet also features the months of the year and days of the week, and those would work perfectly in a planner.
The Brown Mirror Straight is our featured peel off sheet this month – another new design to add to your ever growing stash of peel offs!
And that brings us to our ever-popular, ever-exciting Embellishment Bag!
Left to right: Two Kraft tags with white twine in a small and large size, a sample pack of the “Moment in Time” sequin mix, four wood-veneer die-cut birdcages, a roll of diagonal-stripe washi tape, a bottle of Nuvo Shimmer Powder in Storm Cloud (very similar to the Brusho Pigment powders but with a little shimmer added!). Finally, we have a big pack of wood-veneer die-cut Alphas (I’ll spread those out to see just what we get), AND a totally groovy die set featuring 24 (count ’em, 24!) pocket watch dies.
We get the quite large pocket watch, additional face and background dies, four different sets of clock hands, a little square ‘window’ die with a set of small numerals (1-0) that could be used for the “date” window on your clock face, and 2 mini-clock faces that could be used for a “sweep-second clock” or a “world-time clock” on the your clock face as well. This is an extremely cool set of dies, and I can’t wait to start playing with these!
Here’s that pack of wooden Alphas spread out – looks like we get three whole alphabets and three ampersands! These are plain wood on one side and white on the other – so you can choose which side to use on the reversible letters. That won’t work on the letters that are NOT reversible, but the white layer seems to peel off fairly easily if you so desire.
Lots of Add-Ons and new releases this month as well! I got a few add-ons this month!
The “Moment in Time” peel off pack includes a sheet of Rose Gold Straight, Gold Moondust Pin, Ice Blue Sway, and Copper Mirror Straight peel offs. Specially selected to go along with this kit. Here’s a new one – a Cut and Emboss folder (“Cogs”) featuring clocks and gears and an assortment of cut-out (white) sections. The center die-cut can be removed and replaced depending on whether you want to cut that portion out or leave it in… I find that VERY interesting and quite unique! (so did lots of other folks – this folder has sold out already!) For a final treat, I got the Mini Fob Watch die – so cute!
I did want to mention that Lizi has released the “Happy Days” A4 stamp set featured in last month’s kit, so if you missed out on the kit, you can get that gigantic stamp set all on its own.
That completes my un-boxing of the Love From Lizi March 2020 Card Kit. After so many flowers and so much pink over the last few months, I am really looking forward to playing with this kit! Lizi says her stock of this kit is extremely limited, so if you want to join in on the fun, I would recommend grabbing one of these asap! If you do go shopping at Love From Lizi please use my links:
Thank you so much for joining me here today! Be sure to grab your kit before they sell out! Please share this post with anyone who might be interested, and remember, don’t run with scissors, and, as always, Happy Crafting!

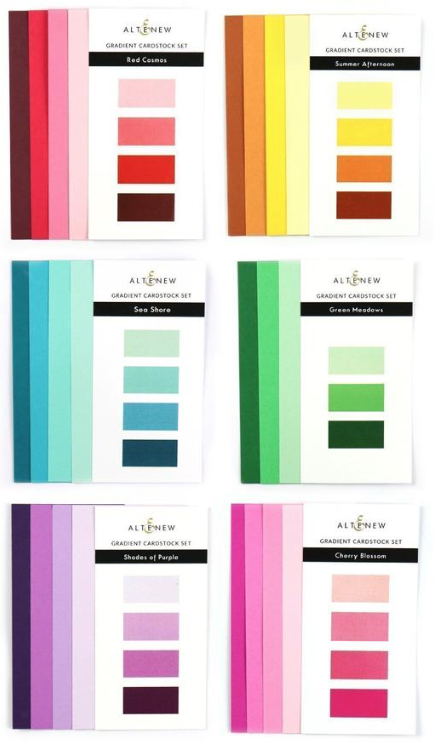 Altenew came out with six Gradient Cardstock Sets – eights 3″x 6″ sheets of each color grouped in gradient sets. Now, I’m not a big collector of cardstock, and don’t have bunches of colors in my stash, but these sets really caught my eye when they were released. Naturally, they sold out almost instantly, so, I dutifully asked to be notified when this set was back in stock, and lustily bought the whole set as soon as it was available!
 The sentiment is from the Altenew Penned Rose Stamp Set stamped on a piece of the lightest Summer Afternoon cardstock using Versafine Onyx Black ink, die cut with a Lawn Fawn Everyday Sentiment Banners die, and lightly inked on the edges with Fossilized Amber Distress Oxide ink. Let’s do one more card like this and I can show you some details and tips!
 and have the resulting hole covered by the second layer of card stock.
  Sure enough, that worked beautifully, and that little trick will help me conserve on cardstock!

 Here’s my completed bloom all glued together. The position of the front petal is also a little ambiguous, but I just had to refer to the illustration for proper placement. I think these blooms are kind of amazing! If your are not in the mood to color, then these Altenew 3D dies can certainly provide some beautifully colored blooms without ever picking up a paintbrush, a marker, an ink pad, or any other medium you might have in your stash!
 I did some with the medium and darkest Green Meadows card stock and some with the medium and lightest colors as well. For the top right leaves I used some plain green card stock from my stash instead of the medium green from the Green Meadows set. You can see a slight difference, but that works very well and is extremely close color-wise! That should be enough leaves!
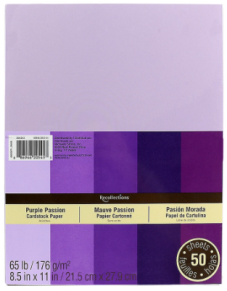 I did come across this pack of Recollections card stock from Michael’s – Purple Passion. That would work terrifically – in fact, it actually gave me an extra color I didn’t need! I went ahead and made two more blooms using this card stock.
 That should provide an “anchor” for my blooms and keep them from feeling unmoored! These strips are a little less than 1/8″ wide, and they certainly don’t have to be all exactly the same. I glued the stems to my card front and (since they are so thin) was able to get a nice curve to the stems as I attached them. Liquid glue adds some moisture to the card stock and enhances their flexibility! Now I can assemble the rest of this card!
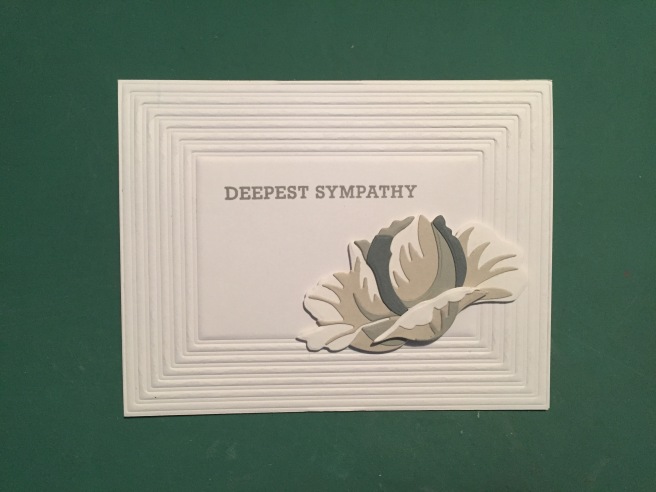
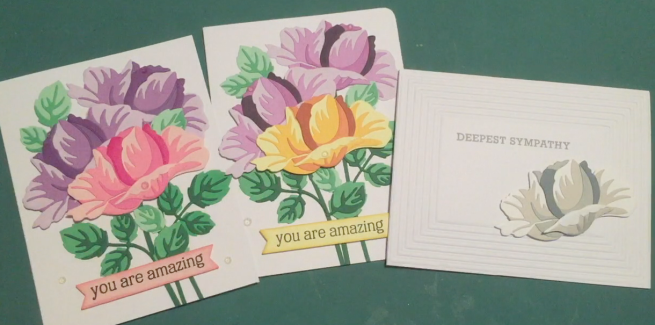
 Our 6″ x 8″ stamp set features silhouettes of Australian animals, plants, birds, fish, and even Ayers Rock. Some ‘Aussie’ sentiments (with some good puns!) round out the image stamps, and of course we get 31 coordinating frame cuts to die cut all the stamps. For extras this month, we get this great 5.25″ x 6.5″ background stencil, and full size pad of Intensive Black ink. Finally, we get two 5.5″ x 8.5″ Cherry Wood sheets and 3 adhesive -backed Birch Wood sheets. Quite a collection! I really enjoyed the trip to Venice last April and am looking forward to spending a little time in the Land Down Under!

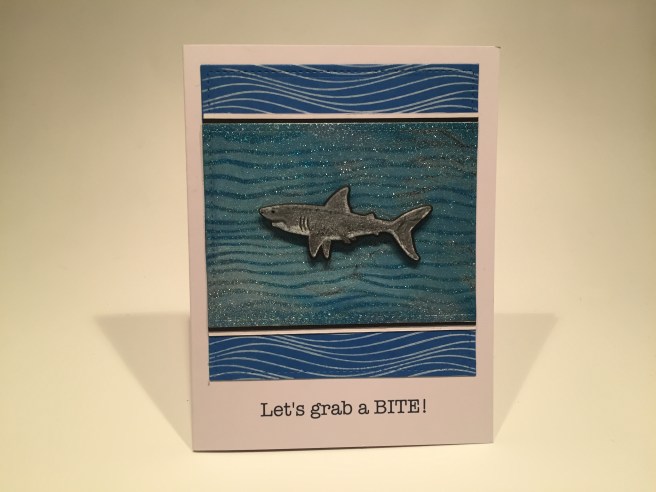


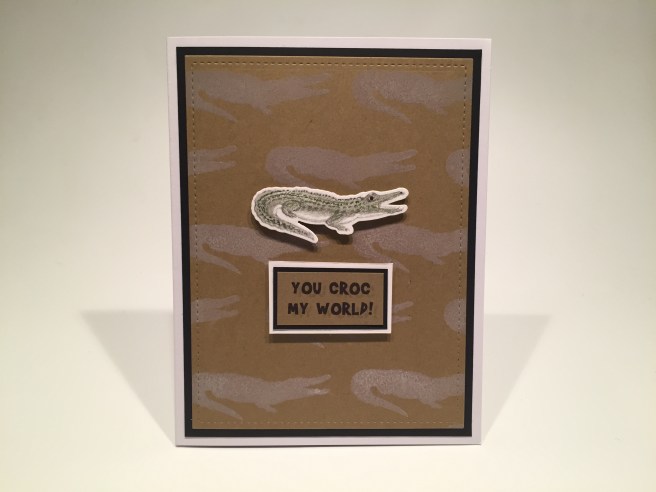

 my Silhouette software and the
 Looks like this is the entrance gate to the Australia Zoo! “Have a ripper day!” becomes a bit of a pun paired with these extremely large and dangerous birds – cassowaries have three claws and their center claw is like a dagger around 5″ long – sounds like a ‘ripper’ to me!

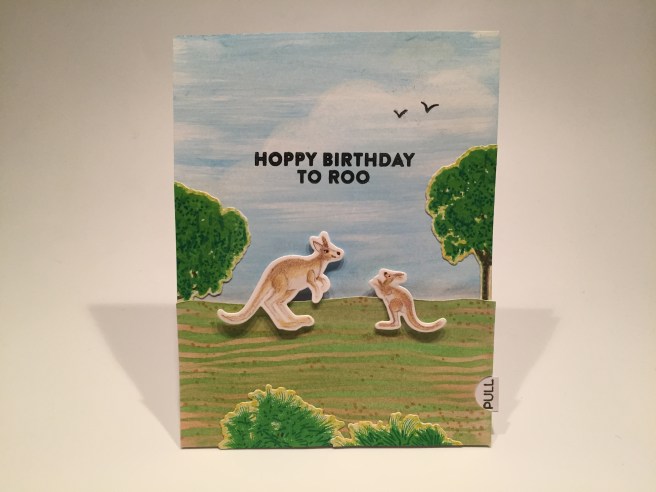

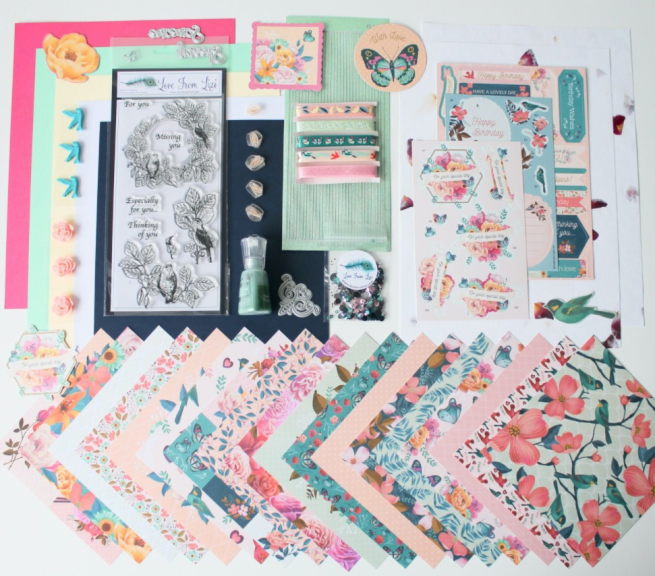
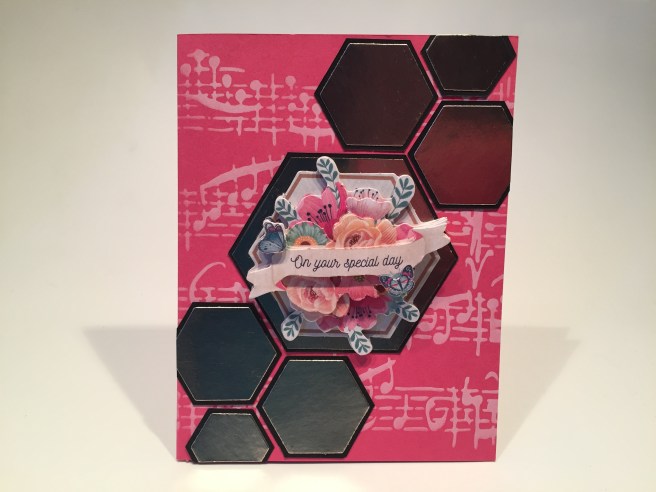

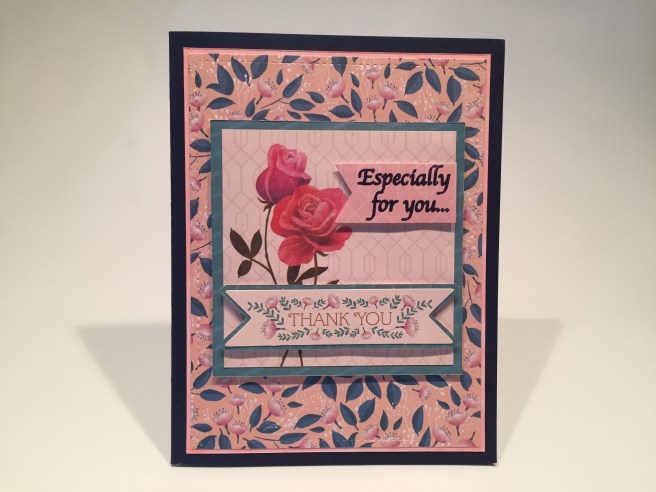
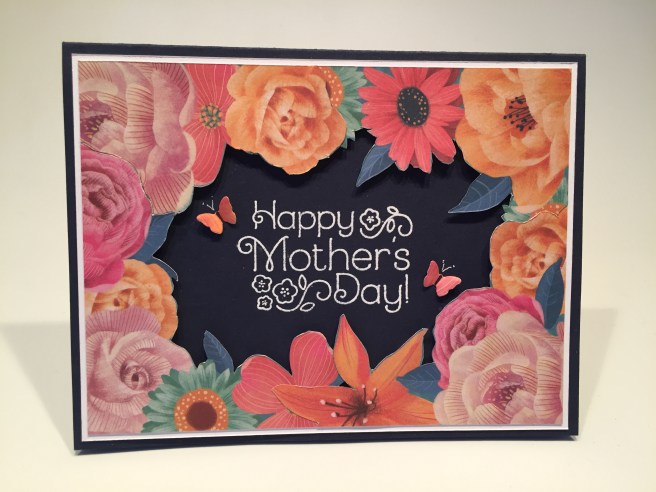


 Last month, our Sunray Crossette Nuvo Shimmer Powder was really fun to play with, and I wanted to check out the Green Parade Shimmer Powder included in this kit. I spritzed a sheet of watercolor paper with water, then sprinkled the powder onto the wet paper. Lots of dark tones in this green – I swear this almost looks like the surface of some distant moon…! I wasn’t quite sure what to do with this panel, so I let it dry and turned my attention to the Specialty Paper in this kit. We got two sheets of handmade paper with actual flower petals embedded in the paper fibers. I was at a loss on how to use this paper in a card until I realized that handmade paper should be able to take some painting… it’s just thin watercolor paper, right?
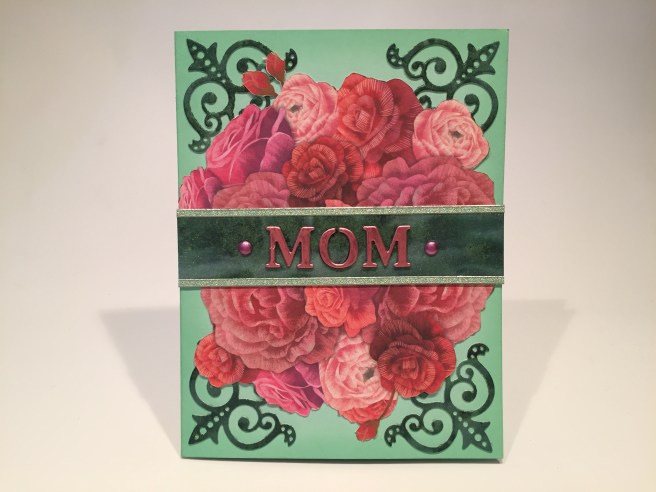
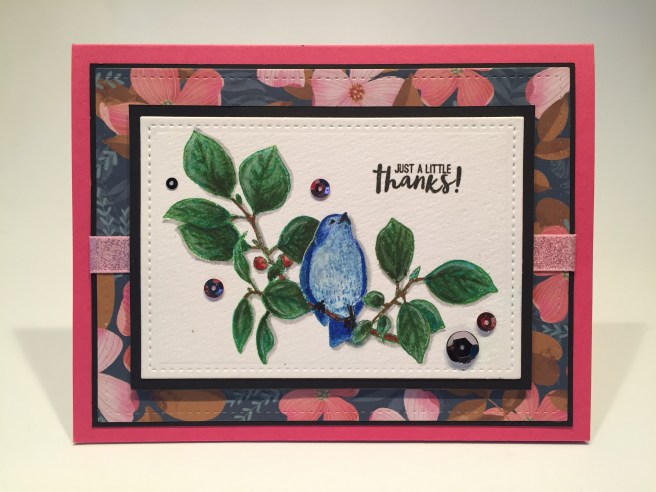
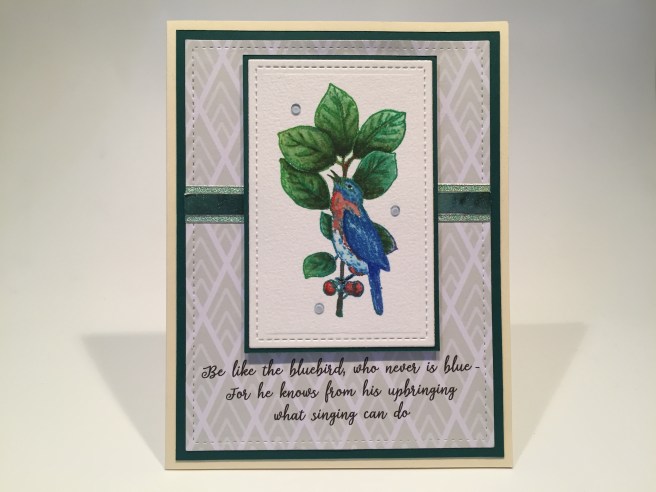
 and I do credit him on the inside writing surface. The background is mounted to a thicker dark green mat and glued to the Cream card base. I added a strip of my shimmer painting and two straight peel offs to go behind the artwork, and attached the front panel using foam tape. A few Blue Babe Nuvo Crystal Drops (LFL Feb. 2020 Kit) adds a dash more blue to this sweet encouragement card. I’m loving this card a lot… I’m getting a little more adept at that no-line watercoloring and maybe I’m pleased simply because there’s no pink!
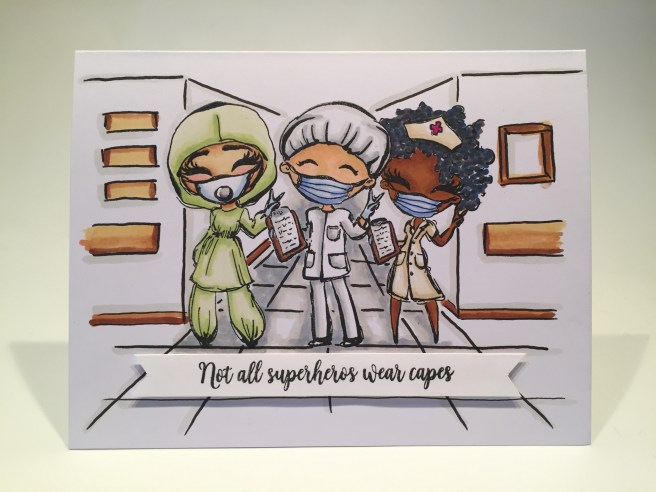
 I stamped this on my last White card base from the kit, and colored all with my


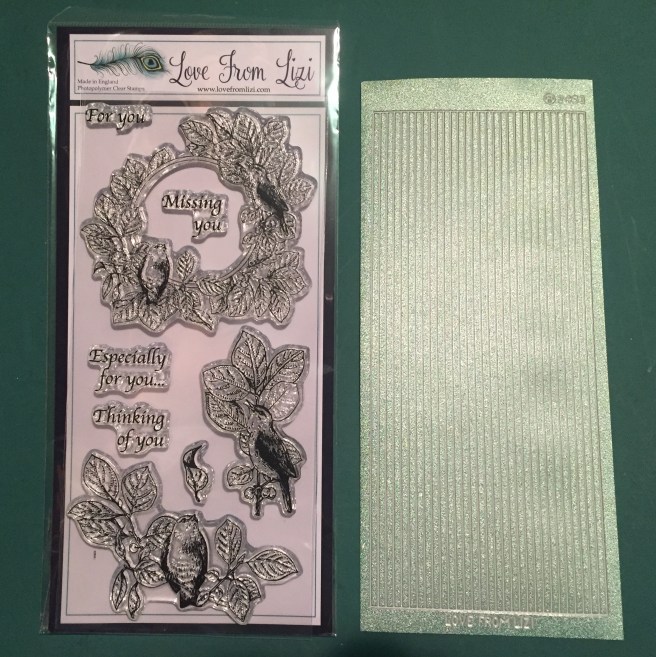
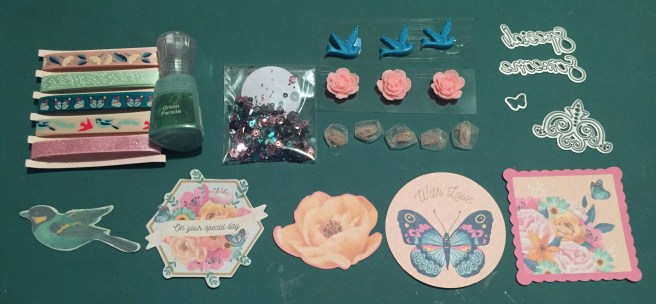
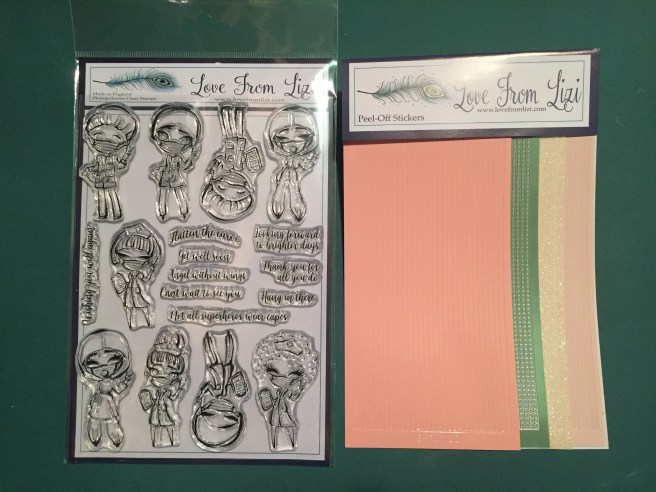
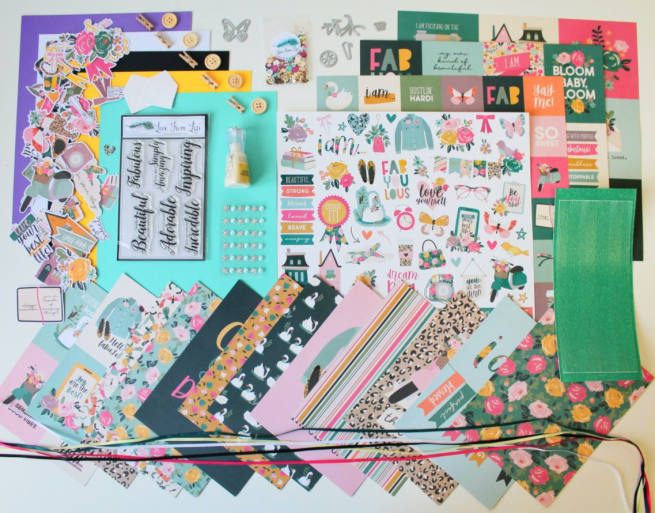

 and came out with a line of black and white MISTI’s. I have had my Mini MISTI (in the original PINK) for a few years, and am thrilled to now have the
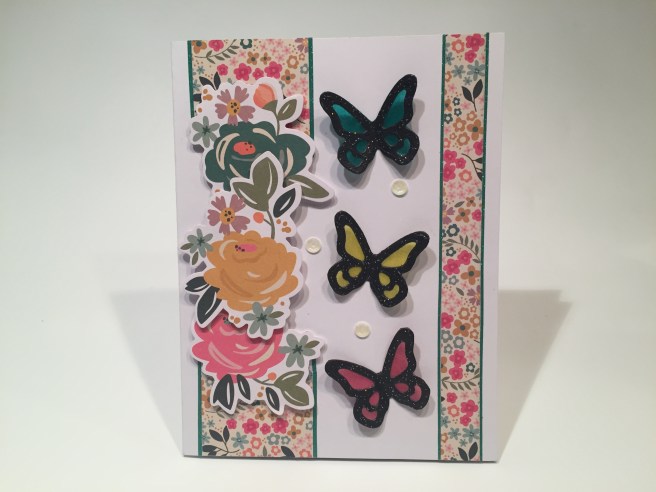
 I was thinking about this sentiment to use on this card, and stamped that on the inside using
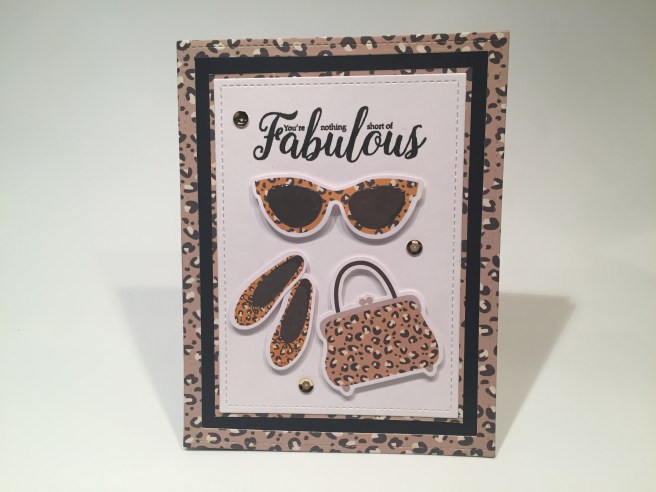
 I grabbed some
 I did experiment with adding a “you are” to this sentiment. The LFL 4/18 kit has a “You” and an “are” stamps… fairly large, and the LFL 12/17 kit has a “you are” that is smaller. I decided to go to the inside and added “Yes, you are!” on the inside writing surface – printing that using my
 I thought about creating a belly-band to hold this set together but decided to make an actual box using the 12″ x 12″ cut-apart sheet with the 4″ x 4″ panels. Most box-making patterns are basically an envelope with added depth. I wanted this box to feature the “dream big” sentiment on the front so I placed the 12″ x 12″ sheet right side up on my score board and scored at 2″, 3″, 9″, and 10″. Then, rotating the paper 90 degrees to the right, I scored at 2.75″, 3.75″, 8.25″, and 9.25″.
  Then it’s a fairly simple matter of cutting away the bits you don’t need, folding and gluing your box together. I added five ivory envelopes and the strip of banner stickers to finish out this set and tied the box shut with some of the yellow and teal ribbon included in the kit. I really love this little package with cards and envelopes and stickers! I think this will make a great gift anytime!
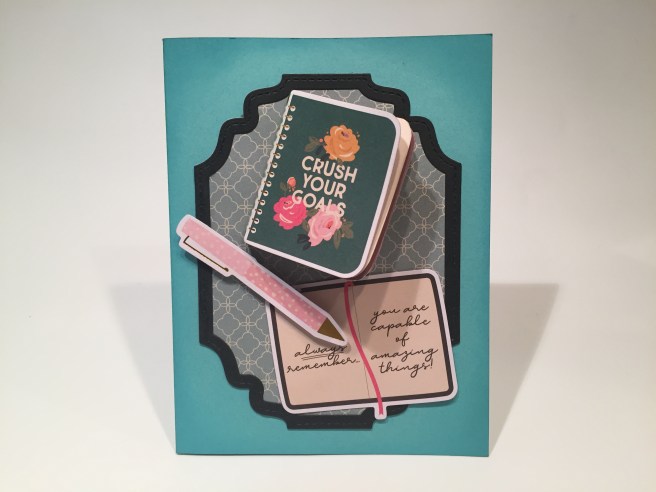

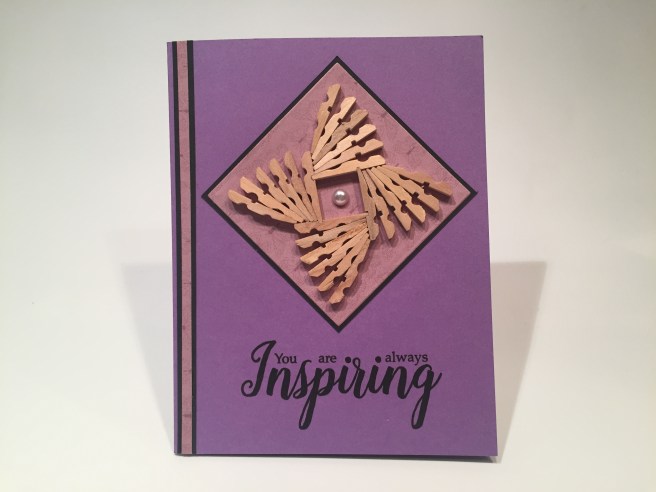
 I die-cut the iris dies from the swan pattern paper for the viewable portions, and black card stock for the inner workings. I tried to die-cut the moving iris pieces (they call them the sausages) so the swans would go in the same direction as the pattern paper, but I didn’t take into account where the pull tab was, so, though the swans on the iris are all in the same orientation, that doesn’t match the orientation on the full panel. I’ll have to keep experimenting with that!!
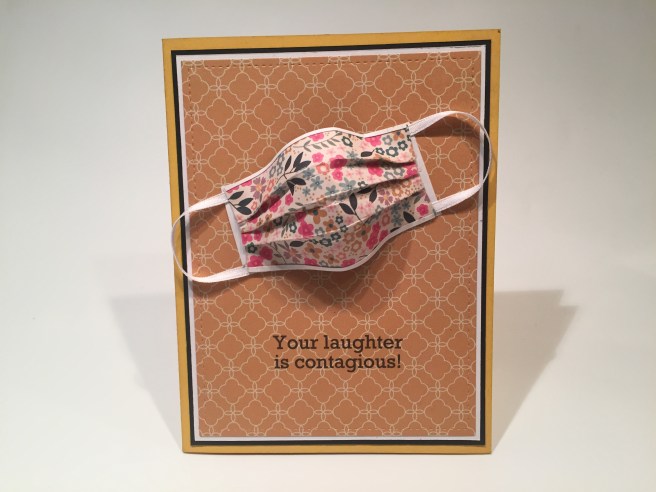
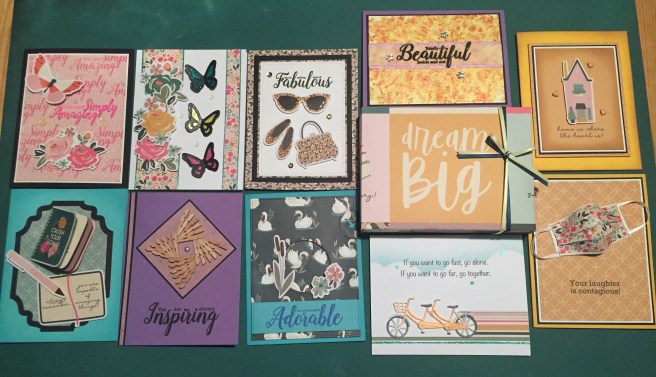
 This kit is a (sorely needed) bright splash of a cherry-blossom spring with Japan as the inspiration for this new HeroScapes 6″ x 8″ stamp set. Three layering stamps – grass, a tree and a zen sand garden are the highlights of this stamp set with four smaller layering stamps including a couple of stone lanterns and a pair of rocks. Four sentiments and some floating blossoms finish out our stamp set which is then complimented with five frame cut dies, and five Hero Arts ink cubes in Green Hills, Field Greens, Dusty Blue, Cotton Candy, and Rose Madder. I always LOVE getting inks with out MMH kits! We also get six sheets of 8.5″ x 5.5″ Hero Hues card stock – two each in Peony, Kiwi, and Mist, and a half-ounce oz. pot of Pink Puff embossing powder. Looks like we’re channeling the Far East with our kit this month!
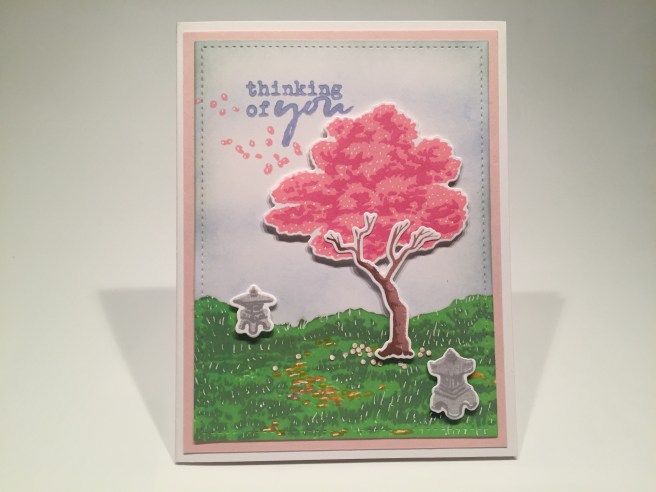
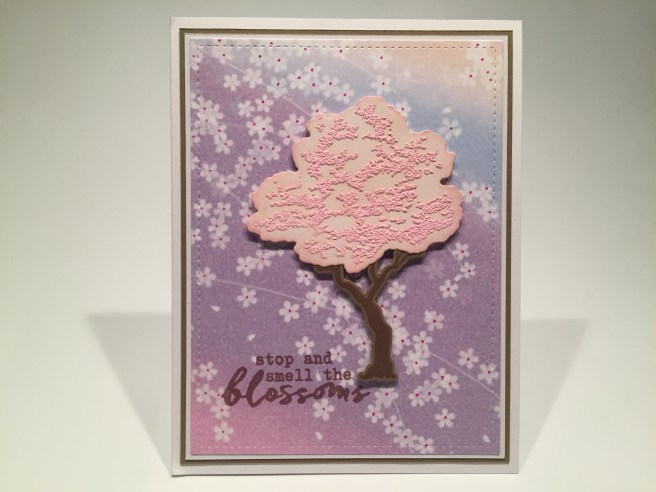
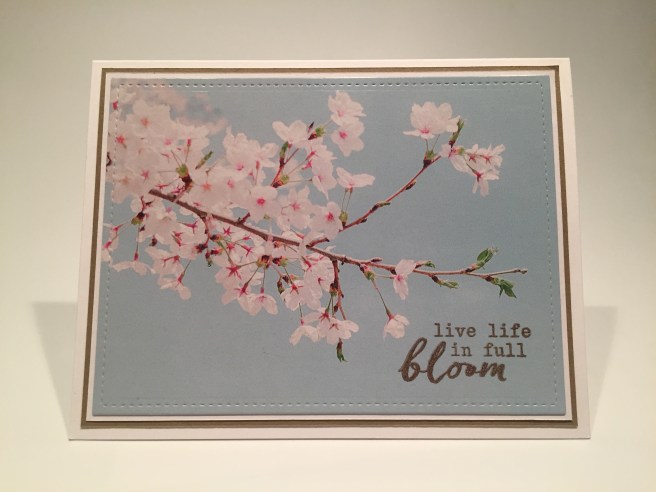

 I did have a Mini-MISTI in my stash (original pink!) but I am thrilled to now have the
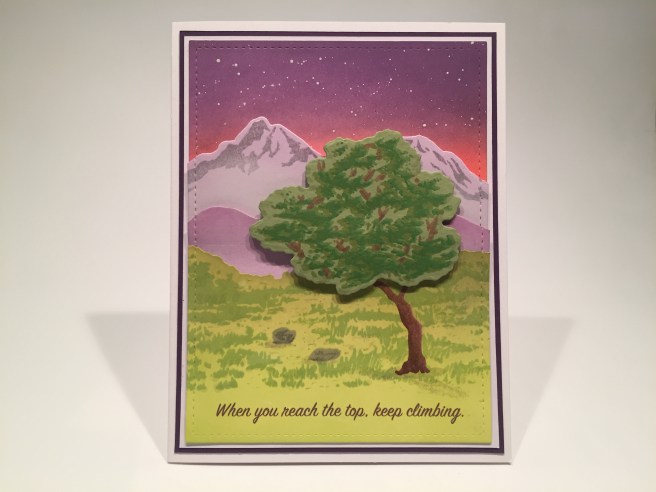
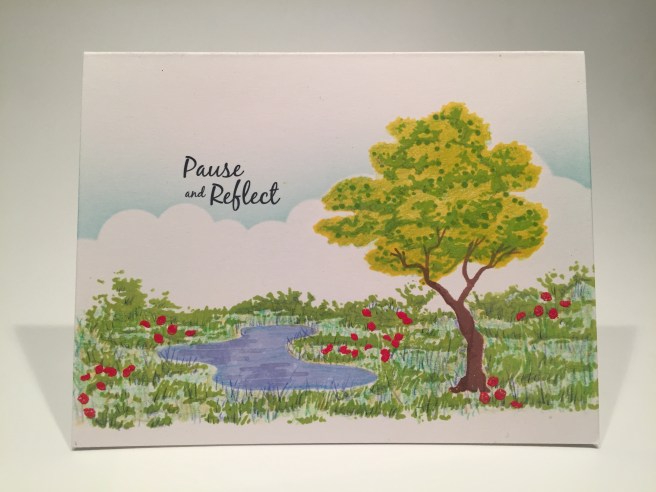
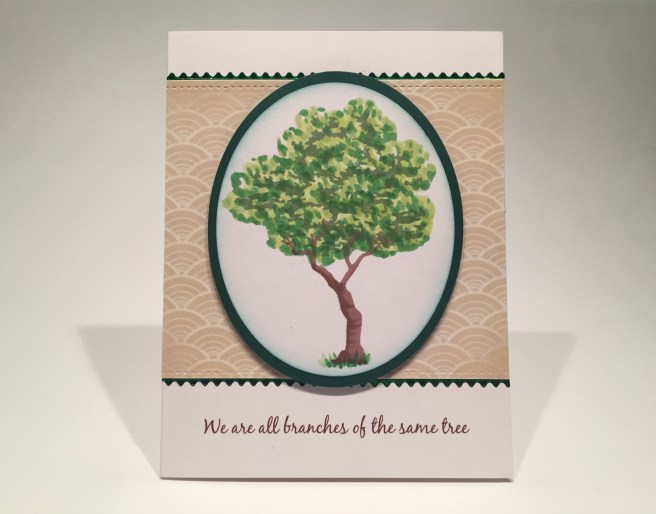
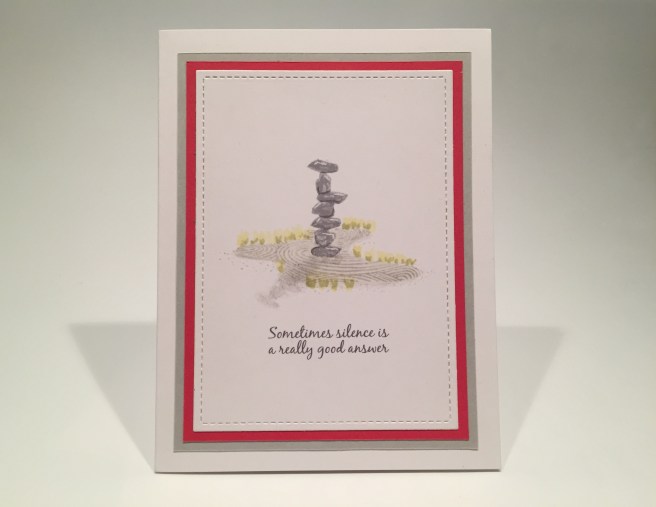
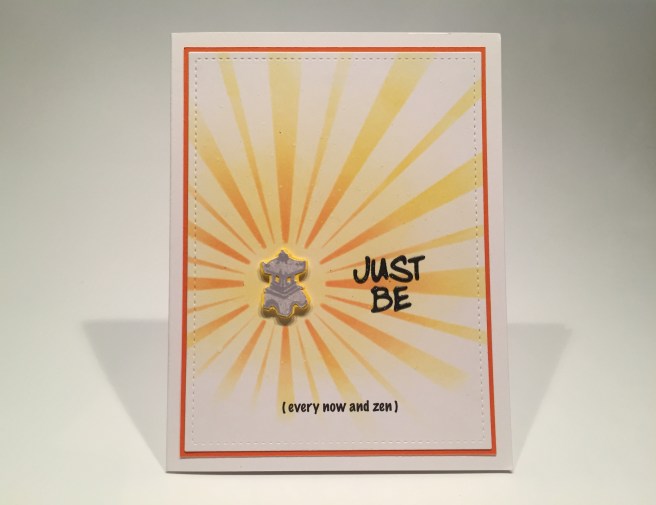
 I used my homemade sunburst stencil to do this background, inking blending with HA Lemon Drop, Creamsicle, and
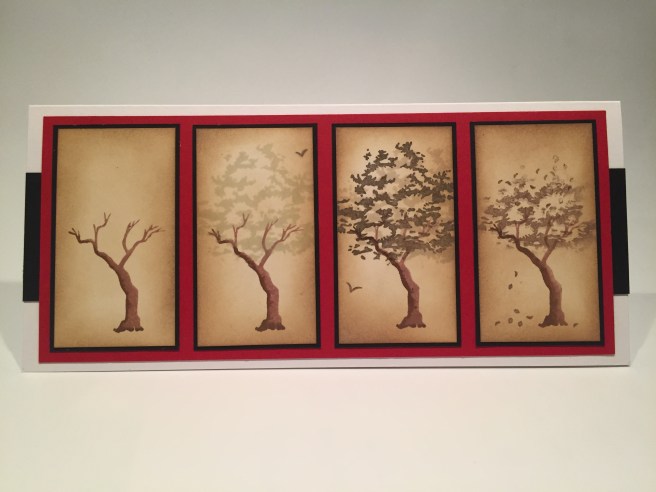
 Of course this card has a sentiment which I printed on the inside of the card using the Black Jack font and adding the Japanese for ‘love’ on the two sides. This is a great valentine card – or maybe an Anniversary card or any kind of an occasion when you’d like to express your own long-term feelings for someone special! I really like this, and am thrilled to finish up this batch of cards with a real Japanese inspired card.
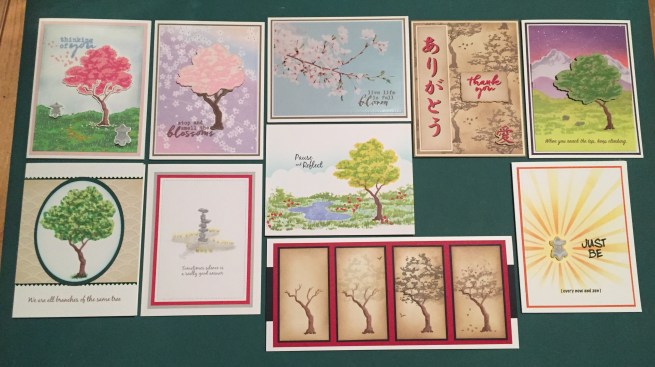


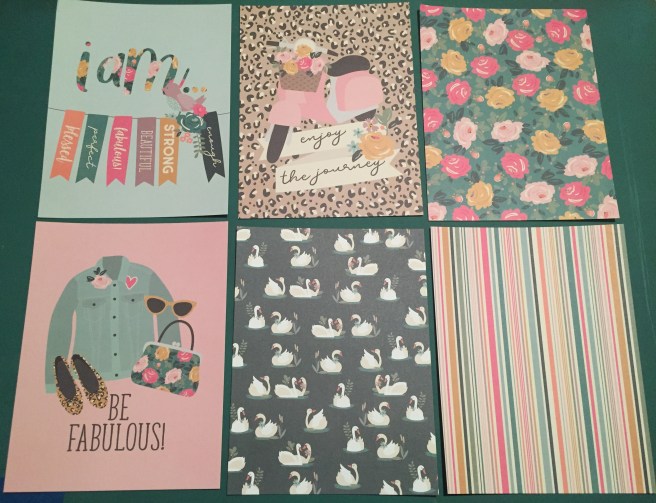


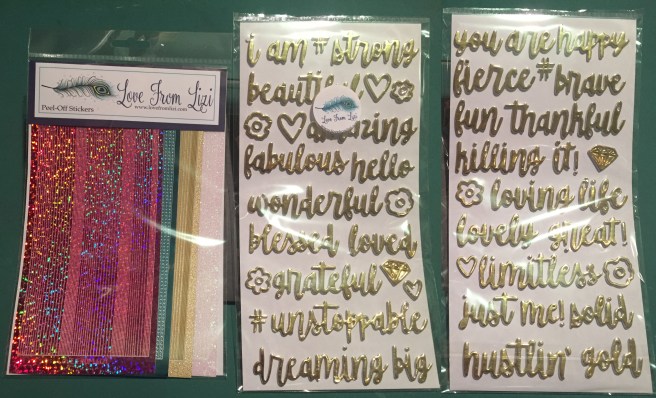


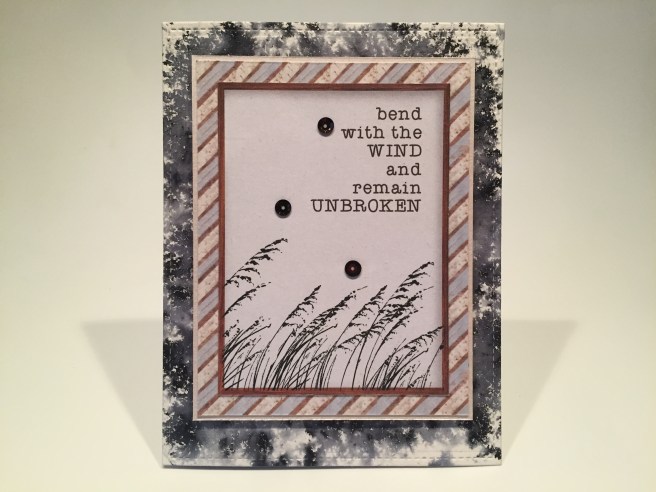
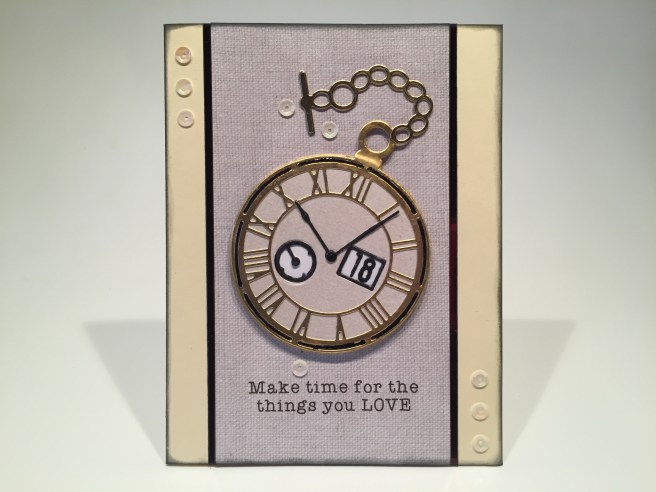
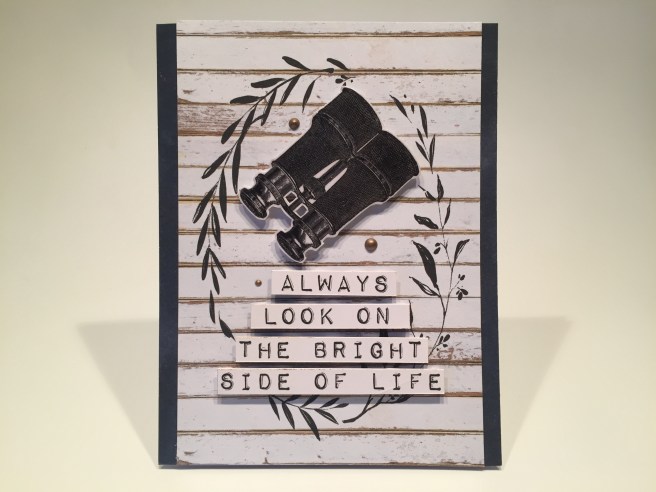
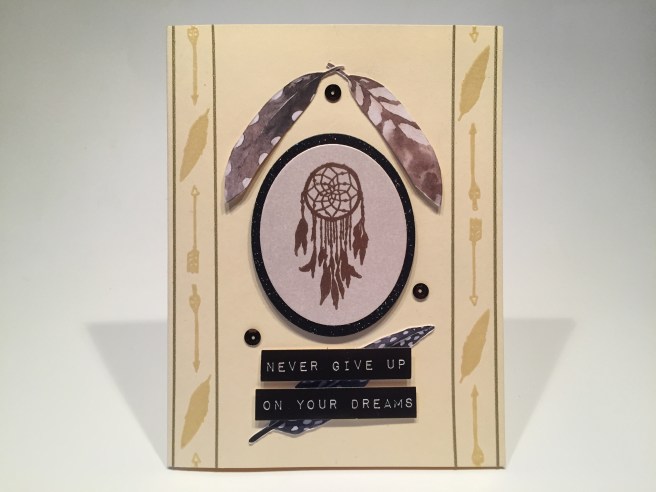
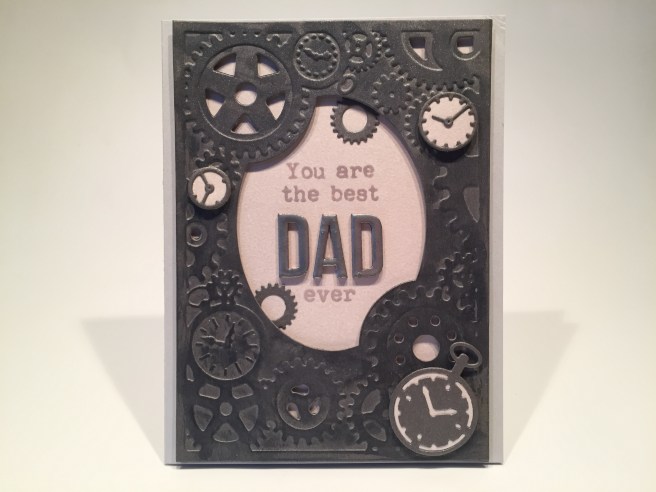

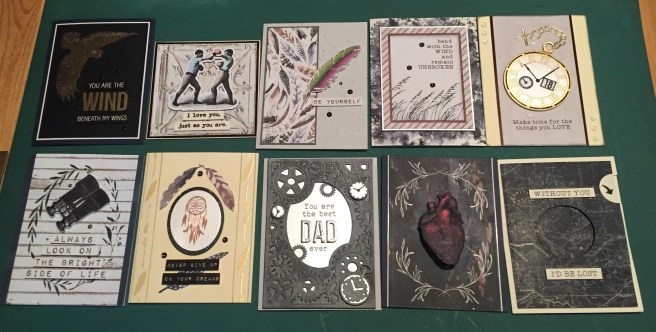
 Lizi was visiting NYC for a little R&R (and shopping therapy!) and we met up for coffee and cake at a little coffee shop right by the theater where I work. It was almost surreal getting to meet and chat with her – I could have bent her ear all day…! I look forward to the next time!
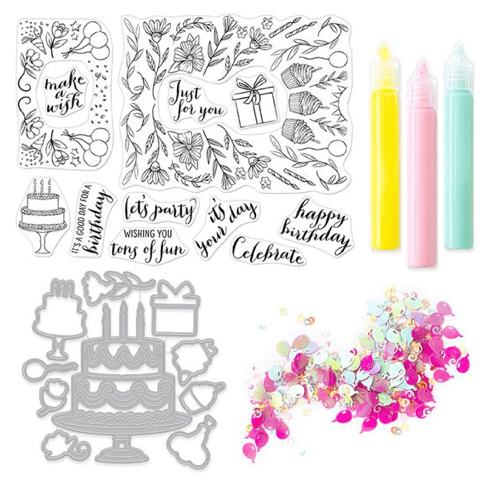
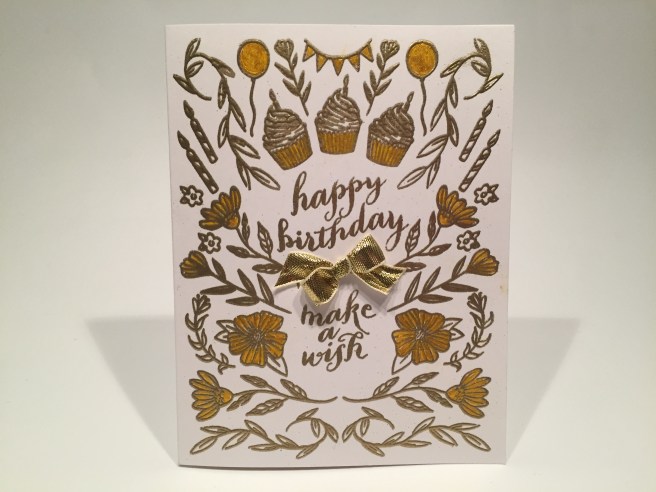


 I couldn’t leave this card without a little bit of a pun, so I turned to my
 I stamped the frame stamp on the front using HA embossing ink and embossed that with the HA gold embossing powder. I took a white colored pencil and added a little color to some of the images – surprisingly, that highlighted the dots as well… Cool! I stamped and embossed the sentiment in white and added the “Celebrate” sentiment on the inside bottom flap using gold again. I punched out a 1″ circle of the same blue card stock, scored it in the middle, stamped and embossed the “open” on the top half and glued that to the back of the holder.
 I did think the addition of the “It’s your day ” sentiment finished up this card nicely, and again we have a card that works for assorted celebrations – graduations for instance – and not just as a birthday card! You’ll never go wrong with blue and gold!
 Of course this card doesn’t mean much without a sentiment, so I turned to my Silhouette software again to print this sentiment on the inside writing surface using the


 I die-cut the panel with a LFSRD, and glued that to a thin mat cut from my
  as a birthday card by stamping the “happy birthday” sentiment on the inside writing surface. LOVE this card. The coloring of the gifts helps define the packages, but it doesn’t completely camouflage the ‘puzzle’ aspect of this repeating pattern. Tons of fun indeed!
 A few dots from our lacquer pens and some confetti added with my
 to a scrap of kraft card stock. I glued the background to a kraft card base and added the cake and sentiment with foam tape. I did add another birthday sentiment on the inside using a Love From Lizi die from more kraft card stock. This sentiment tickles me a lot, and I just might like this cake treatment the best – or maybe it’s chocolate that I like the best!