
DISCLOSURE: This site contains some affiliate links to products. I may receive a commission for purchases made through these links (at no cost to you). As an Amazon Associate I earn from qualifying purchases. Thank you!
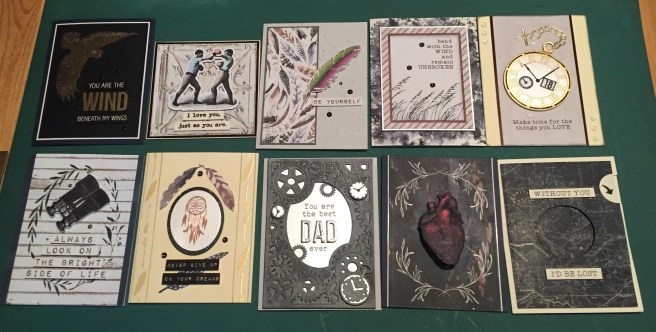
Hello Folks! Scott here with my ten cards created using the Love From Lizi March 2020 Card Kit. Lizi is calling this kit “A Moment in Time” and it features a bunch of terrific pattern papers, cut apart sheets and an amazing pocket-watch die set.

I was so taken with the large cut apart sheets and the pattern papers, that I decided to let them inspire me through these cards instead of being a slave to the stamp set! As always, I did make my ten card bases from the five sheets of card stock included in the kit.
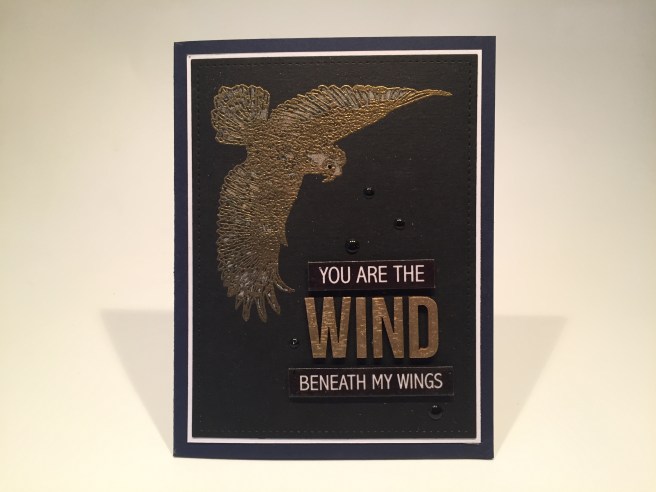
But, of course, I did start with the large owl stamp from the stamp set! I stamped that on some HA Pitch Black card stock using VersaMark ink and embossed it with the LFL Golden Crown embossing powder. I sprinkled some Spectrum Noir Sparkle pen on the background by flicking the pen tip on the edge of an acrylic block – that gives me a nice even layer of glitter without worrying about brush strokes! I die-cut that panel with a Lawn Fawn Stitched Rectangle Die, added a thin white mat, and glued that down to a Navy card base. I embossed the W I N D wood-veneer die cuts with matching embossing powder – the backs of these letters are not colored white as reported in my un-boxing, but it’s liner paper that removes to expose adhesive!
To complete that sentiment I turned to my Silhouette software and printed “you are the” and “beneath my wings” in the Abadi MT Condensed Light font. I trimmed down both lines using a Lawn Fawn Everyday Sentiment Banner die and embossed both of them with some clear embossing powder. I used the adhesive on the back of the letters to stick them to the card front, and mounted the two banners using foam tape. For a last little touch I added some Ebony Black Nuvo Crystal Drops (LFL 8.18 kit) for a little added dimension and shine. I really like that the owl stamp is quite large and commands most of the attention on this card. Did you ever know that you’re my hero…!
I rarely make square cards, but it seemed particularly appropriate for this next design.
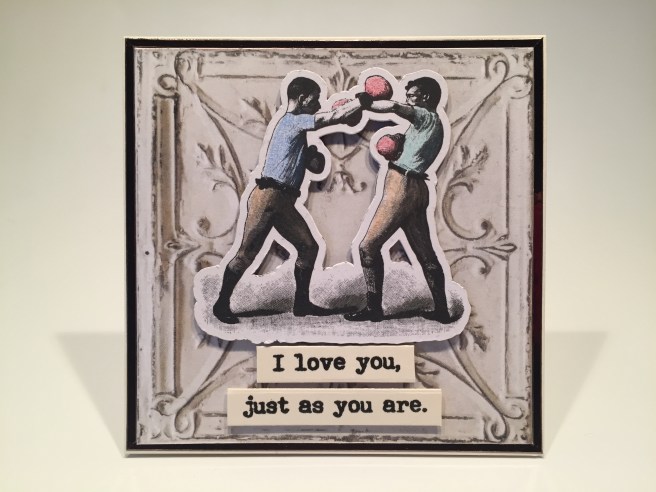
I love these boxing guys! They were printed with a white outline on one of the cut-apart sheets (with the “fight for yourself” sentiment) so I fussy cut them out to use on this card. I then added some soft color to them with my colored pencils. I cut one of the Off-White card bases down to a 4.25″ x 4.25″ top-folding card. The background is the 4″ x 4″ antique ceiling tile, cut from the same page as the boxers, and glued to the card front. I outlined that with the peel offs from the kit, and attached the boxers with foam tape.
I cut this sentiment stamp from the stamp set into two separate sentences, and stamped the two lines on a scrap of the Off-White card stock with VersaFine Onyx Black ink and embossed them with clear embossing powder. I die cut both with the LF sentiment banner die and mounted them to the card front with more foam tape. Though it’s not a pun, this makes me laugh a lot! Certainly appropriate for a lot of couples I know! And do you get the reason it’s a square card…? A boxing ring is a square…! I think this is funny!
Other than the boxers, I think this is the only other image I colored for this kit.
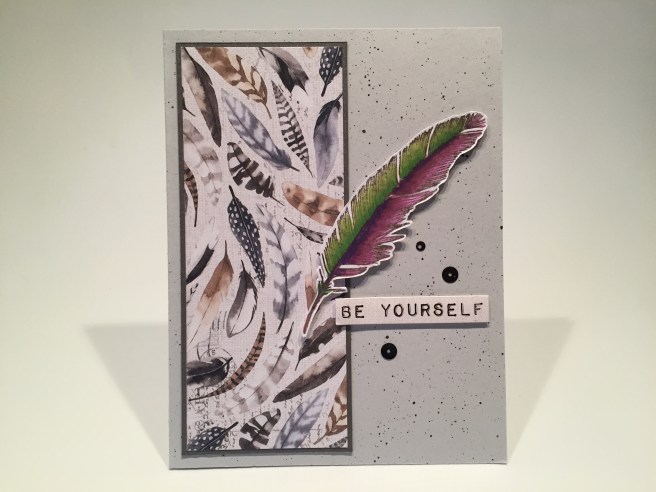
I stamped the large feather stamp on some Neenah Solar White 80# card stock using Archival Acorn ink and colored it using my Spectrum Noir alcohol markers, and fussy-cut it out (wasn’t as hard as it looks!). I took a tiny bit of the Nuvo Storm Cloud Shimmer Powder from the embellishment bag, and mixed it with a touch of water to spatter the front of the Grey card base. Not much shimmer there when using such a small amount..! I cut the feather pattern paper to 2″ x 5″, glued that to a thin mat of the Grey Pearlescent card stock and glued both to the card front.
The “be yourself” sentiment is from the sentiment sticker sheet, and I mounted that and the feather to the card front with foam tape. There is more to this sentiment on the inside. I decided to add “everyone else is already taken” on the inside of this card using my Silhouette Software and my piggy-back printing method and the Typewriter Hand font. This is actually an old quote from Oscar Wilde, and I thought it was a fun, lighthearted completion for the sentiment on the front. A few black sequins from our sequin mix adds a little sparkle and I really like that purple and green feather — certainly unique!
Sometimes, it’s the simplest images that catch my eye and make my imagination soar!
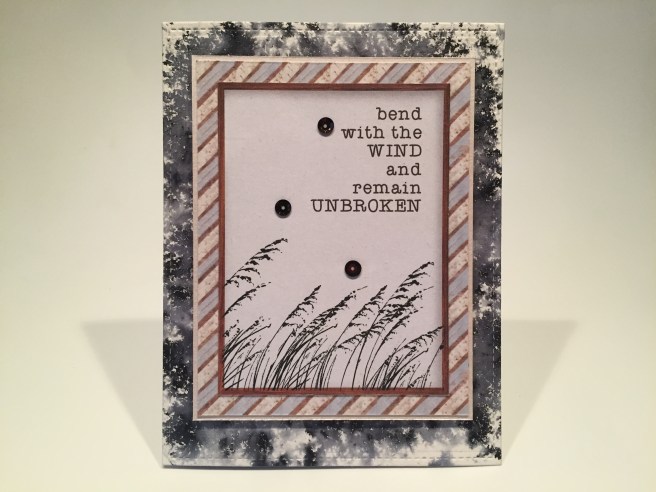
I’m loving this card! I took a piece of my Bee Paper 140# cold press Watercolor paper and sprinkled the Nuvo Shimmer Powder lightly all over it and then slowly started spritzing some water on it using a mini mister. I sprayed sparingly to keep everything from running together and let the powder and the water work their own magic. I let it air dry and die cut it with a large Lawn Fawn Stitched Rectangle die, and glued it to a White card base.
I cut out the image following the frame, and printed the sentiment on it just the same as the previous card. I took a scrap of white card stock and laid down a bunch of strips of the washi tape to make a larger frame to go behind the cut apart piece (that frame measures 3 3/8″ x 4 3/8″). I glued those together and added a thin mat of the Oyster pearlescent card stock, then mounted all three of those pieces to the card front using foam tape. Finally I added three of the chocolate sequins from the sequin mix for a bit of sparkle on the front. The sentiment is paraphrased from an old Confucius saying, and I LOVE the subtle shading on the cut apart image, and the striped washi tape frame and that great background that looks like storm clouds a-brewin’. This makes my heart happy.
Time to play with the set of pocket-watch dies in our embellishment bag…!!
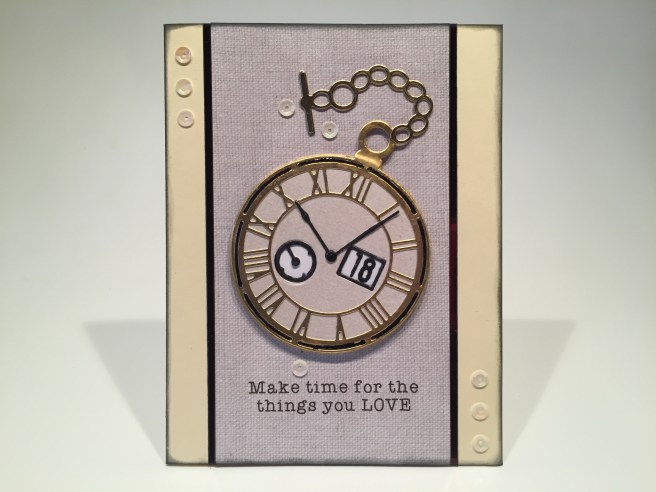
I wanted to do a gold watch, so I grabbed a piece of the Gold Matte mirror card stock from the LFL January 2020 kit and die cut the main watch from that. I die cut the Oyster pearl card stock with a MMH Nesting Circle die (the circle die in the clock set is a bit small to cover the whole back of the clock face), then die-cut the date box and sweep second hand right through that oyster clock face. I trimmed off the hour hand from the tiny clock and colored that and the date frame with a little more of the Nuvo Shimmer Powder. I die-cut another background circle, the clock hands and the “18” from some plain white card stock and colored the hands and date with the shimmer powder.
I glued everything together on top of the white circle background and took a black gel pen to go over the thin rim pieces around the clock face. For the final touch on this pocket-watch, I die-cut the chain from shiny Gold mirror card stock in my stash, trimmed off the attachment ring and glued it on top of the Matte Gold die cut. PHEW! These pieces are pretty tiny! But you have got to love the results! I only wish I had a nice curved glass ‘crystal’ to cover over the top!
I cut a piece of the ‘linen’ pattern paper to 3″ x 5.5″ and printed the sentiment just like the last two cards, still using the Typewriter Hand font. I glued that panel to a Soft Cream card base and edged that with the kit peel offs. A small amount of ink blending on all the edges with a mini ink blending tool and Black Soot Oxide ink, and I attached the watch using foam tape and glued the end of the chain directly to the card front. Some of the oyster sequins from our sequin mix add more sparkle and I’m calling this one DONE! I was originally intending this as a Birthday card (my sister has a birthday April 18th) but upon completion, I realized this would make a perfect retirement card!! Isn’t a gold watch the classic retirement gift? And this sentiment is perfect for a retiree!! Anybody know someone retiring on the 18th? Very cool set of dies here – and many of the smaller dies (like the numbers!) should prove very useful for many different applications!
Being an old Monty Python fan, I have to say my favorite sentiment on all the pattern papers and cut apart sheets had to be “Always look on the bright side of life”.
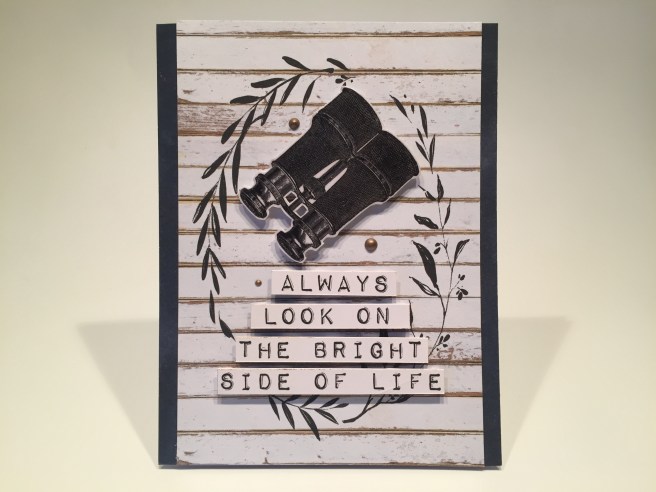
I fussy cut the binoculars from the ‘ephemera’ sheet thinking they were the same size as the binoculars on the brick cut apart panel, but no… they were a little smaller. Okay! I can work with that! I cut the background from the 4×6 cut apart panels and trimmed that down to 3.75″ x 5.5″. I cut a couple of 3/8″ strips from the dark blue pattern paper and glued those to the sides of a white card base and added the pattern paper on top. I cut out the sentiment strips from the original binocular panel, and mounted them to the card front with foam tape. I did emboss the binoculars with clear embossing powder and used foam tape to attach that to the card front. A few Dirty Bronze Nuvo drops (from the LFL 12/19 kit) finishes out this optimistic card. “If life seems jolly rotten, There’s something you’ve forgotten, And that’s to laugh and smile and dance and sing. When you’re feeling in the dumps, Don’t be silly chumps, Just purse your lips and whistle, that’s the thing.. and… Always look on the bright side of life! Thank you, Eric Idle!
I still have a number of image stamps from our kit waiting to be used… all together now…
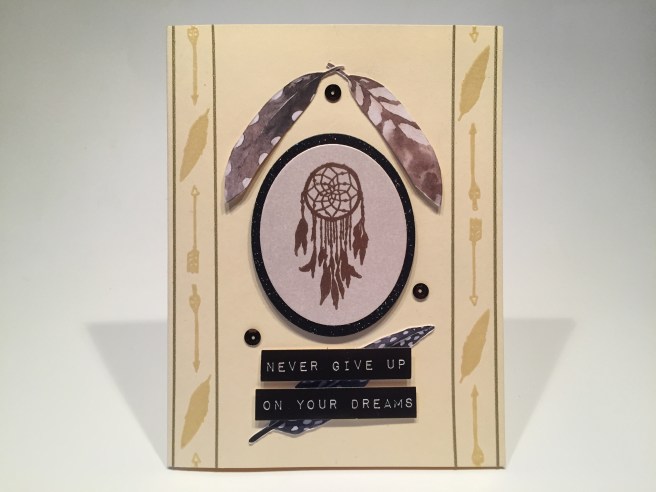
I stamped the leaf silhouette and the arrow stamps in a nice pattern on the sides of the Cream card base and embossed them with LFL Ivory Pearl embossing powder. I stamped the dream catcher using VersaMark ink on a piece of the Oyster pearlescent card stock, embossed that with the LFL Copper Rose embossing powder, and die cut it with a MMH Nesting Oval Infinity die. Then I used the next larger oval die to cut a mat of Black Tie Glitter card stock to go behind the dream catcher. I attached that double oval piece to the card front with foam tape.
I fussy-cut the feathers from the ‘ephemera’ sheet and split the sentiment from the sticker sheet and attached those to the card front with glue and some foam tape. Some thin strips of the Gold Moondust peel offs (in this month’s peel off pack), and a few more of the chocolate sequins from our sequin mix add even more shine to this great encouragement card. I thought it might be difficult to make that dream catcher the focal element on a card since it is pretty small, but, with the addition of the feathers and silhouette stamps, I think it commands just the right amount of attention!
I was fortunate to get the “Cogs” cut and emboss folder and wanted to see it in action…
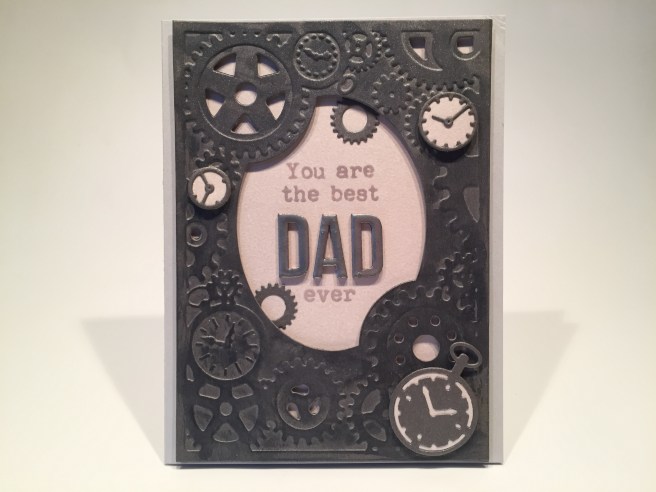
I cut and embossed that folder using some of the Grey pearlescent card stock, and used a very thin wash of the Storm Cloud Shimmer powder to add a little more contrast to the embossing. I mounted that to a piece of the Oyster pearlescent card stock using foam tape. I die-cut the two small clocks and the add-on “fob clock” from more of the grey Pearl card stock, and used the MMH Circle infinity dies to cut backgrounds for those clocks from the Oyster Pearl card stock. I glued the backs to the fronts and mounted the clocks on top with more foam tape.
I split the “You are the best” sentiment stamp (stamp surgery!) and stamped that (along with the “ever” stamp) inside the center opening using Hickory Smoke Distress Oxide ink and embossed them with clear embossing powder. I embossed the “DAD” wood-veneer die-cut letters with LFL Silver Dollar embossing powder and glued those down with their own adhesive. This was still missing something until I remembered that “gear” die from the LFL July 2017 kit. I die cut two of those gears from more Grey pearl card stock and glued those flat on the inside of the opening… that’s what we needed… MORE GEARS! Everything is glued to a Grey card base, and we have a great Birthday card or even better, a Father’s Day card! VERY Steampunk! LOVE that cut and emboss folder!
One of my other favorite images in this kit has to be that anatomically correct heart…

I fussy cut the red heart from the cut apart sheet and embossed that with clear embossing powder (wet and slimy!). I die-cut the background frame from the 4×6 cut apart sheet (using a LFSRD and partial die-cutting to make the panel 5.5″ tall) and glued that to a Navy card base. I blended a touch of white pastel in the center to give us a little highlight behind the heart, and I ran some white peel offs down the two sides.
I attached the shiny heart using a mini action wobbler! YUP! This heart is still beating! You know it’s rare for me to NOT have a sentiment on the front of card, but I thought this image held it’s own (the wobbling heart helps!) and added “I can’t live without you” on the inside writing surface. I do believe that’s quite an understatement, but I think this is a terrifically fun Valentine or anniversary card for any one with a dramatic flair or a slightly morbid sense of humor!
You know how much I love my Lawn Fawn Stitched Rectangle dies, and I have always admired the Lawn Fawn interactive card dies, but have never bought any of them because I could easily make my own “reveal wheel” or “pull tab” mechanisms. BUT! they recently came out with the Magic Iris die (and add ons) that totally caught my eye and my imagination! I couldn’t resist using that magic iris on one of my cards this month!
I used both pieces of the map pattern paper for this card – One for the top panel (Magic Iris Add-On) and one for the ‘sausages’ that make the moving part of the iris (Magic Iris Die). I used black card stock to cut all the other parts of this assembly. There are a ton of how-to videos on YouTube that show how to assemble the Magic Iris – here’s a link to the original: https://www.youtube.com/watch?v=MUP8cPbwwYU&t=0s This die set displays some amazing engineering… I decided it would take me much too long to figure out the mechanics of this moving iris, so I just went ahead and splurged on the dies themselves!
The compass from our ‘ephemera’ cut apart page was the perfect size to fit in this iris opening… I cut it out and added a little color to the white end of the needle and glued it in place on my last Off-White card base. I die-cut a larger circle of acetate and glued that over the top of the compass. I printed this sentiment (same font as the others) on the last scraps of the Off-White card stock, die-cut those with my banner dies and attached them to the card front with foam tape. I was able to squeeze the last arrow die (on the pull-tab) from the off-white card stock as well. I mounted the whole iris assembly on the card base with foam tape and I punched a partial circle through the front edge of the card base to make it easier to grab the pull-tab. I LOVE THIS SO MUCH! My mind is just racing with thoughts of how to incorporate this iris die into more cards..!!
So that wraps up my 10 cards using the Love From Lizi March 2020 Card Kit. I used most of the items in this kit – all of the card stock, most of the specialty card stock, 5 sheets of the pattern paper, pieces from all three of the 12×12 cut apart sheets, I used all of the image stamps in our stamp set and the two main sentiments, some of the peel offs, and a couple of the sentiment stickers, and most of the embellishements. The only items I didn’t get to use were the wood-veneer die cut birdcages and the kraft tags. Pretty good I think!
I am extremely pleased with this batch of masculine cards! A few encouragement cards, a retirement/birthday card, a Father’s Day/birthday card, and a number of off-beat valentine/love you cards! No real puns this month but some nicely humorous cards! Quite a variety! I was really taken by the high quality of all the pattern papers and cut-aparts in this kit as well as the great masculine themes! No pink in this batch of cards!! Okay… the purple is close, but it’s still purple!
Of course this kit has sold out already – as most of Lizi’s kits do…! If I’ve managed to pique your interest or spark your imagination, I would suggest subscribing to the LFL Card Kits so you’ll never miss out on these over-stuffed bundles of crafting joy. I do think Lizi’s kits are some of the most unique kits on the market these days, and it’s always a surprise seeing what she has in store for us each month!
On a side note… I GOT TO MEET LIZI face to face this last Friday, February 28th!  Lizi was visiting NYC for a little R&R (and shopping therapy!) and we met up for coffee and cake at a little coffee shop right by the theater where I work. It was almost surreal getting to meet and chat with her – I could have bent her ear all day…! I look forward to the next time!
Another side note… Announcing the WINNERS of my 5000 Subscriber Giveaway! • CAROL-LYNNE CARNES won the £50 store credit at Love From Lizi • KRISTIE EAGLES won the My Monthly Hero August 2019 Kit • JEANNE TRUMBULL won 12 assorted sheets of Love From Lizi Peel Offs • JEANNE THOMPSON and ANGELA GRIFFIN each won a collection of 5 original cards from CardCutups. BIG THANKS to everyone who entered!
And a big Thank You to YOU for sharing your time with me here. You are MY inspiration! Let me know what card(s) you like best this month, and remember to Like Me, List Me, Pin Me, Post Me, share me will all of your friends, don’t run with scissors, and, as always, Happy Crafting!

Great cards and wonderful photo of you and Liz as always thank you for sharing your creativity
LikeLike