
DISCLOSURE: This site contains some affiliate links to products. I may receive a commission for purchases made through these links (at no cost to you). As an Amazon Associate I earn from qualifying purchases. Thank you!
Hello Folks! Scott here with my 10 cards created using the Love From Lizi April 2020 Card Kit! As usual, this month’s kit is chock-a-block with pattern papers, cut-aparts, stickers, ephemera, stamps, dies, and all sorts of embellishments!
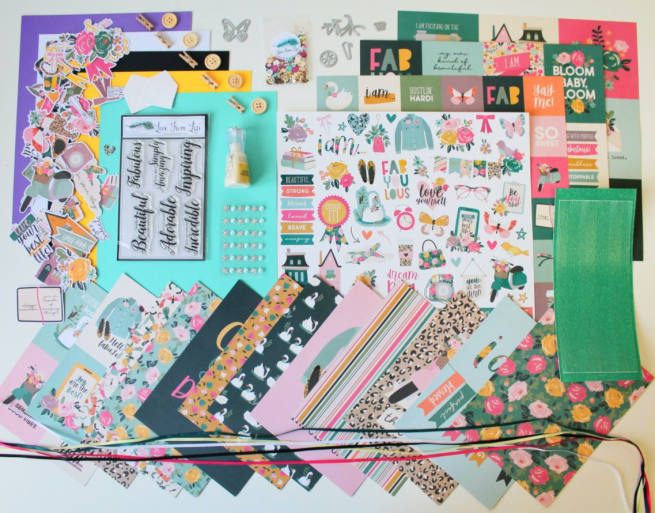
As is my habit, I do cut and fold the 5 sheets of card stock included in the kit to make my 10 card bases. I also spread out all my ephemera pieces on my desk so I could see all the options they afforded me. We have six large sentiment stamps in this kit, and you know I like trying to use all the stamps on my 10 cards, so I figured I should start by stamping!
There is plenty of pink (and a few butterflies as well) in this kit, so I figured I should confront my demons and tackle the pink with my first card. This one’s for YOU, Judy B.!

Due to the unique arrangement of this sentiment, I thought it would make for some nice pattern stamping. Hero Arts recently paired up with My Sweet Petunia, and came out with a line of black and white MISTI’s. I have had my Mini MISTI (in the original PINK) for a few years, and am thrilled to now have the full-size MISTI from Hero Arts. I LOVE the Black and White, and the larger size just makes me want to do more pattern stamping!
Using my new MISTI, I stamped the sentiment on the pink dotted pattern paper using Hero Arts Taffy Reactive ink, and embossed the center sentiment using Lizi’s Neon Grapefruit Embossing powder (using VersaMark ink). I think all those different pinks go together beautifully! And that embossing powder really pops!!
I die cut that panel with a Lawn Fawn Stitched Rectangle die, and drew in a little black drop shadow on the large embossed words with a 01 Pigma Micron pen. I glued that panel to a thin white mat and down to one of the Black card bases. I added the butterfly and flowers from the ephemera pack using glue and foam tape. A few sequins from the sequin mix around the sentiment, and we have a lovely card for all you pink enthusiasts out there. Pink. Pink. Pink Pink Pink. AND a butterfly! I do think this sentiment makes for a really nice stamped pattern.
Now that I’ve got that out of my system, I decided I should use the butterfly die included in our embellishment pack and put those pesky insects behind me as well!
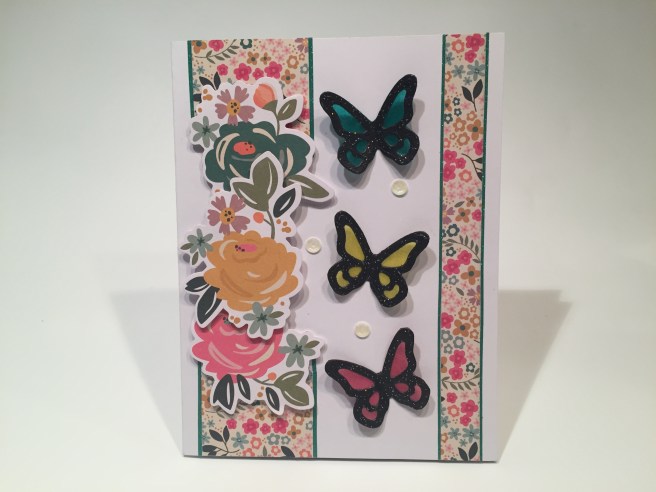
I die-cut three of the butterflies from some Black Tie glitter paper, and glued some of my glassine paper (kite paper) to their backs. When dry, I trimmed away the excess paper and that gave me a nice stained glass effect. I trimmed two strips of the floral pattern paper to 1.5″ x 5.5″ and .5″ x 5.5″ and glued the thin strip to the right side of a White card base. I cut the pink and blue-green ephemera flowers apart, and added the mustard ephemera flower between them with foam tape.
I traced their outline on the wider strip of pattern paper and trimmed down the center of the strip to highlight the cut edges of the flowers. The strip is glued to the card base, both strips are edged with the Jade Glitter peel-offs, and the flowers are mounted with more foam tape. I was thinking about this sentiment to use on this card, and stamped that on the inside using VersaFine Onyx Black ink. I do think butterflies are pretty incredible! I folded the wings of the butterflies up and glued their bodies to the card front with a few white sequins from our sequin mix. The butterflies match the flowers! A very spring-y encouragement card! For all you butterfly lovers!
Then there’s that “You’re nothing short of FABULOUS” sentiment stamp… hmmmmm.. what in this kit qualifies as FABULOUS? I think that cheetah print is the way to go..!
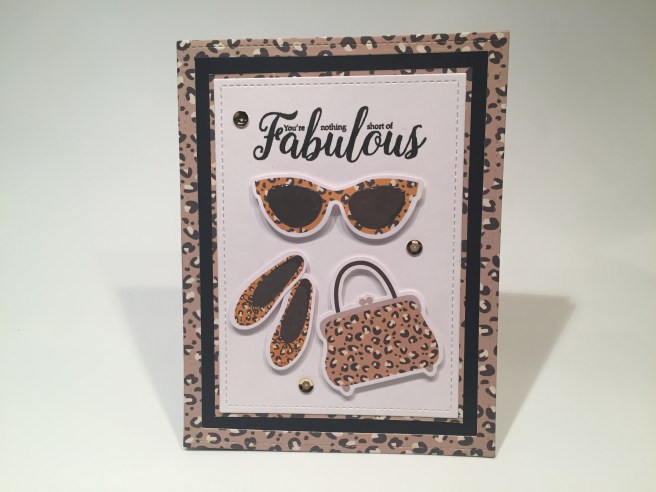
I think this fits the bill quite nicely! Using two LFSRDs, I die cut a frame of the Cheetah print pattern paper and glued that to the second black card base. I die cut a panel of white card stock with the next smaller LFSRD, and stamped the sentiment on the top of that using Onyx Black ink. I added a thin mat of the cheetah print behind the stamped panel and glued those to the card base. I added some Glossy Accents to the lenses on the ephemera sunglasses, and when they were dry, added them along with the shoes and purse ephemera to the card front using foam tape. A few gold sequins adds the finishing touch to a truly “Fabulous” card!
I think I’m getting a pretty good feel for this kit now… Let’s try that Nuvo Shimmer powder! Sunray Crossette is an interesting name – let’s see what it looks like!
 I grabbed some watercolor paper and spritzed it all over with a light spray of water, and started sprinkling on the Nuvo Shimmer Powder. Now this powder definitely sports a variety of pigment colors and has an incredible amount of shine! I kept lightly spritzing water and adding more powder till I was satisfied with the results. Again, I didn’t move the powder around at all, I just let the water and the powder do whatever they wanted. I’m kind of in awe of the final result. There are light touches of texture all over the panel where the powder sat in a small pile and just absorbed the water. I Really Love This!

I couldn’t bear to cover up any of that great shimmering background! I die cut the shimmer panel with a LFSRD and set it aside. I stamped the sentiment on some Bazzill 40# vellum using Onyx Black ink, and I embossed that with some clear embossing powder. I trimmed the vellum sentiment close to the small signifier text, and fussy cut around the parts of the sentiment that went beyond that line. I folded the vellum strip around the edges of the shimmer panel, glued those to the back and added spots of glue behind the sentiment for more adhesion. I added some Muave Moondust Straight peel off stickers along the top and bottom edges of the velum and glued that all down to a thin black mat and then down to the Mauve card base.
 I did experiment with adding a “you are” to this sentiment. The LFL 4/18 kit has a “You” and an “are” stamps… fairly large, and the LFL 12/17 kit has a “you are” that is smaller. I decided to go to the inside and added “Yes, you are!” on the inside writing surface – printing that using my Silhouette software and the Freehand 521 BT font. A few gem flowers from the embellishment pack adds a perfectly appropriate sparkle to this “Beautiful” card that looks like some kind of rare red-veined gold. Very cool shimmer powder!
There are a huge bunch of terrific cut-apart panels in this kit. One caught my eye right away – must be because we’re all spending some much of our time at home these days!

I cut away this 3″ x 4″ panel from the cut-apart sheet, and did some ink blending on the edges using Vintage Photo Distress Oxide ink, then glued it to a thin white mat, then to a thin black mat, and then to a bit wider pattern paper mat. I did more Vintage Photo ink blending on the Golden Yellow card base, and added the matted pieces to the card front with some foam tape. This pink house is from the sticker sheet and matched the printed house almost perfectly. I used my anti-static powder bag to neutralize the sticky and mounted that to the card front with foam tape. I used the smallest heart die from the Hero Arts Nested Hearts Infinity dies to die cut some pink hearts, covered them with Glossy Accents, and when dry, added them to the card front with foam tape. This card is really so very cozy and welcoming… This would make a great housewarming card! I hope we all are appreciating our homes a little more these days! I know I am!
There were so many great 3″ x 4″ cut apart panels in this kit that I took a little detour here, and decided to create a little card set that might make a lovely gift!
I picked these five panels not only because I liked them, but I could also add a bit of dimension on top of each with a sticker or an ephemera piece. I cut each panel to size and added a thin white mat to all of them. I added a 1/4″ mat of pattern paper to four of them, but added two thin mats of black and cheetah print and a 1/8″ mat of black to finish the Sending My Love card. Those are all glued down to white card bases and the ephemera swan, and scooter, along with the sticker flowers and heart are mounted to the fronts with foam tape.
I chose two of the small sentiment strips from the sticker sheet and added a thin white mat to both and attached them to the two text-only cards with more foam tape. A few sequins on each add the requisite touch of bling and this turned out to be a very encouraging set of cards perfect for gift-giving.  I thought about creating a belly-band to hold this set together but decided to make an actual box using the 12″ x 12″ cut-apart sheet with the 4″ x 4″ panels. Most box-making patterns are basically an envelope with added depth. I wanted this box to feature the “dream big” sentiment on the front so I placed the 12″ x 12″ sheet right side up on my score board and scored at 2″, 3″, 9″, and 10″. Then, rotating the paper 90 degrees to the right, I scored at 2.75″, 3.75″, 8.25″, and 9.25″.
  Then it’s a fairly simple matter of cutting away the bits you don’t need, folding and gluing your box together. I added five ivory envelopes and the strip of banner stickers to finish out this set and tied the box shut with some of the yellow and teal ribbon included in the kit. I really love this little package with cards and envelopes and stickers! I think this will make a great gift anytime!
We also have the 12″x 12″ sheet filled with 2″x 2″ tiles with lots of affirmative sentiments.
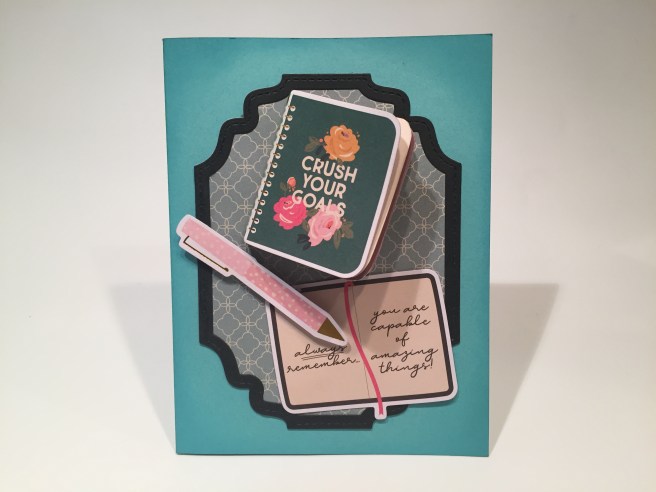
I chose the “CRUSH YOUR GOALS” notebook cover from the ephemera pack and, using a bunch of 2″x 2″ tiles turned it into a book! I trimmed the chosen tiles to match the size of the ephemera cover, and bound them together to make this little book. You open the cover and you have: “you are”, “living with purpose”, “so sweet”. “one-of-a-kind”, “fab & fierce”,”dreaming big”, and finally “killing’ it”. To bind the pages together I used 1/8″ score tape and tissue paper – attaching each ‘page’ to the one next to it. The last “killin’ it” page was left long on the left side to create the “spine” (wrap around the other pages) and glue it to the ‘cover’. Not bad for the first “book binding” I’ve attempted, but not perfect either… I learned a lot with this effort!
I die cut the pattern paper and black frame with a LDRS Fancy Rectangles & Layers die, and glued those to the blue card base with the edges distressed with Broken China Distress Oxide ink. I glued the little ephemera postcard and the assembled notebook flat to the card front and added the ephemera pen with some foam tape. The gold foil on the pen goes with the foiling on the notebook. EXTREMELY encouraging card!
I was looking forward to playing with the set of bicycle dies in this kit – I had an idea…

“And you’ll look sweet upon the seat of a bicycle built for two!” Since this bicycle die came in pieces, I thought it could be used to make a tandem bike! VOILA! You can see where the bicycle frames are joined, and I partially die-cut the long chain-guard/pedal assembly to make it longer and hide the end under the second set of pedals. I used the Nuvo powder to paint the bicycle frame, and colored pencils to color everything else. GREAT bike!! And that shimmer powder really looks like a metallic enamel paint job!
I cut a strip of the striped patten paper to 1″x 5.5″ and placed the bike where I wanted it and traced the tire onto the pattern paper. I cut the pattern paper along the tire line to the bottom stripe, and then straight along that stripe to the end. I ink blended the clouds using the MFT Cloud Edges stencil and Broken China Distress Oxide ink, and printed the sentiment on the front using the Noteworthy font, Silhouette software and my piggy-back printing method. I glued the strip to the card front, added a Jade peel off along the bottom, and attached the bike with tiny bits of foam tape (I think it’s worth it)! A few teal sequins from our sequin mix gives the glitter peel off a little company, and I love that you can use these dies to make a passable Tandem Bike! Love this sentiment too!
I still have two sentiment stamps to get to – “Inspiring” and “Adorable” – hmmmmm…
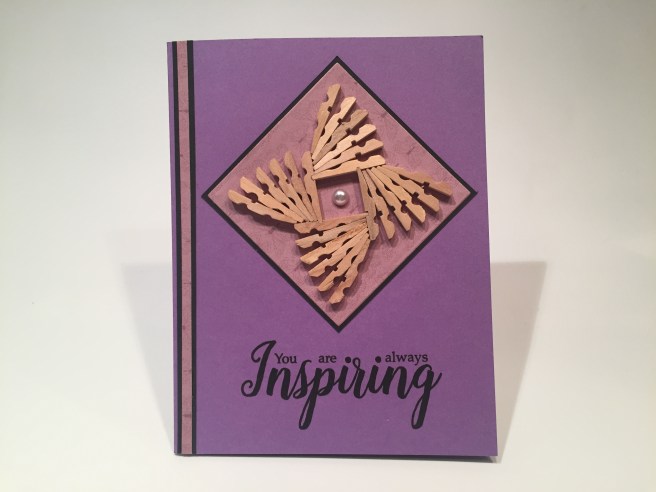
I thought a little clothespin art might be inspiring!! We did get five clothespins in our kit, and I have BUNCHES of clothespins in my stash… (see 10C/1K MMH 5/19) I’m thrilled I was able to use 12 on this card! I took the clothespins apart and started this fractal pattern by making the square in the center. Find four pieces whose ends fit in the spring notch on the back of the others to make as perfect a square as possible and glue them together. Let that first piece dry well and then keep adding pegs on the backs of your original square. When everything is glued and dried, it’s actually quite sturdy!
I die-cut a piece of the light mauve pattern paper with a 2.5″ square die, and added a thin black mat to the back. I glued the pin-art to the top and added one of the pearls embellishments to the center. The left side of the card front has a 1/4″ strip of black card stock topped with a 1/8″ piece of the mauve pattern paper. The sentiment is stamped using Onyx Black ink, and, I declare, the tone of that mauve pattern paper goes so nicely with the wood clothespins…! I think I’m kind of in love with this card!
I think the swans are about the only thing in this kit even remotely “Adorable” so let’s try upping the adorable factor by using the Lawn Fawn Magic Iris die (and add-on) again!
I love the coy look on that swan sticker in the opening! There are oodles of how-to videos on how to assemble the Magic Iris dies, so I won’t bother you with my foibles..! (I actually filmed me putting this together (AFTER everything was die-cut) and it still took me almost 50 minutes! I don’t have the brain-power to even think of editing that!)
 I die-cut the iris dies from the swan pattern paper for the viewable portions, and black card stock for the inner workings. I tried to die-cut the moving iris pieces (they call them the sausages) so the swans would go in the same direction as the pattern paper, but I didn’t take into account where the pull tab was, so, though the swans on the iris are all in the same orientation, that doesn’t match the orientation on the full panel. I’ll have to keep experimenting with that!!
The swan sticker is attached to the blue card base in the right location, and the iris assembly is attached on top with some foam tape. I stamped the sentiment on a piece of blue card stock from my stash (good match!) using Blueprint Sketch Distress Oxide ink, trimmed that to just over an inch tall and used the iris add-on die to cut it to size and add the stitch detail on the sides. The cattail ephemera is glued to the left of the opening, and the flower ephemera and sentiment are mounted with foam tape. I find the iris die set totally captivating, and I vow one day to be able to match patterns on those moving pieces! And I do think this is pretty adorable!
I have to credit the New York Times for the inspiration for my last card this month. On April 1st they published a pattern and instructions for “How to Sew a Face Mask”.
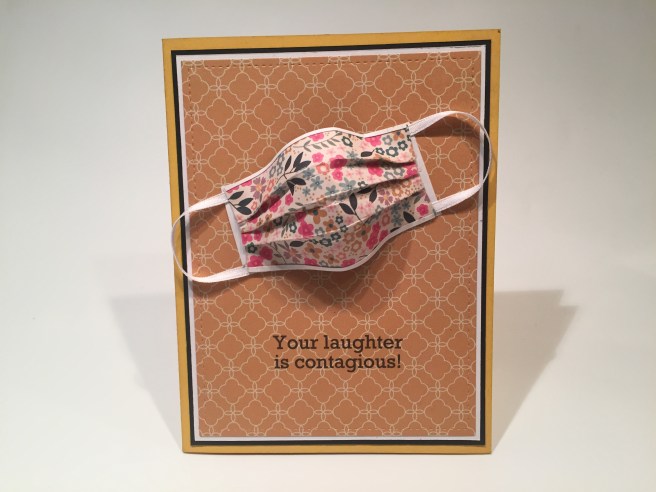
I’m just trying to roll with the punches here..!! To create our little face mask, I cut a piece of pattern paper to 2” tall by 2.75″ wide. I scored two score lines 1/8″ apart right in the center and two more 1/4″ above and below the center to make three pleats. I used scor-tape to hold the pleats shut on the back (sides only) and added dots of glue underneath the ends of the pleats on the front and weighed it down to let the glue dry completely.
I removed the scor-tape liner paper on the back and attached the white ribbon to the top and bottom and topped those with a 1.25″x .5″ strip of white card stock over the ribbon with a little bit sicking out the sides. When that was dry, I added thin strips of white card stock to the top and bottom edges for the last touch of trim. Then press out the pleats in the center to shape the mask.
The mustard pattern paper is die-cut with a LFSRD, the sentiment printed on that using the Rockwell font, glued to a thin white mat and a thin black mat, and down to the Golden Yellow card base that has been inked with Fossilized Amber Distress Oxide ink. I glued the ends of the mask to the card front and did have to add a wad of paper behind the mask to help it keep its shape. I think this is terrific! Now, it doesn’t really have much to do with this card kit, but with the CDC recommending that we all wear masks now, it certainly is topical! This gives me a big smile, and those are hard to come by these days!
Thats my 10 cards and MORE from the Love From Lizi April 2020 Card Kit. I really had a great time putting these cards together – there’s so much stuff in this kit – and we have a great assortment of encouragement cards here… a nice gift set… some of these are usable as valentines, or friendship cards, some are certainly topical, but, unfortunately, no puns this month… DAMN! Let me know which cards are your favorite!
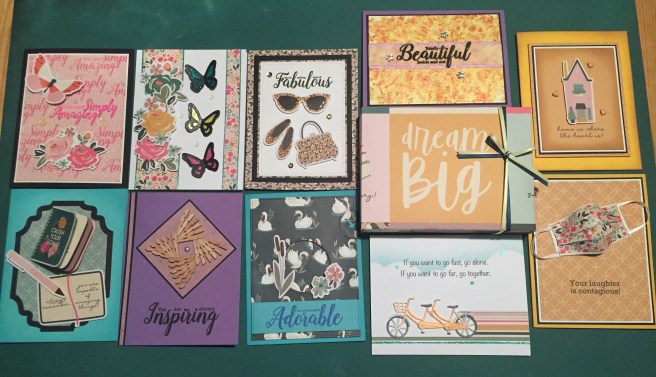
I used some of almost everything in this kit – all 12 pattern papers, a great deal of the cut apart sheets, some of the peel offs, and I even managed to use all of the stamps in the stamp set. I used a lot of the embellishments this month but I didn’t get to the mini white envelopes or the wooden buttons. As of posting, this kit is still available for purchase at lovefromliziz.com. If I’ve inspired you at all and you’d like to grab a kit for yourself, please use my links when you go shopping!
We are still under lockdown here in NYC… my theatre is closed through the end of the month (at least), but I am thankfully able to work from home. Broadway just announced they are staying closed through May..! We are staying safe and healthy and are trying to combat cabin fever and the occasional urge to kill each other. I pray that you and yours are safe and healthy and encourage you to stay that way! Please remember to wash your hands often, wear a mask when you go out, stay home if you can, and remember to Like me, List me, Pin me, Post me, Don’t touch your face… and as always I send you Health, Happiness and Happy Crafting!

I enjoy your art and creativity so very much , thanks for sharing . Please stay safe
LikeLike