
DISCLOSURE: This site contains some affiliate links to products. I may receive a commission for purchases made through these links (at no cost to you). As an Amazon Associate I earn from qualifying purchases. Thank you!
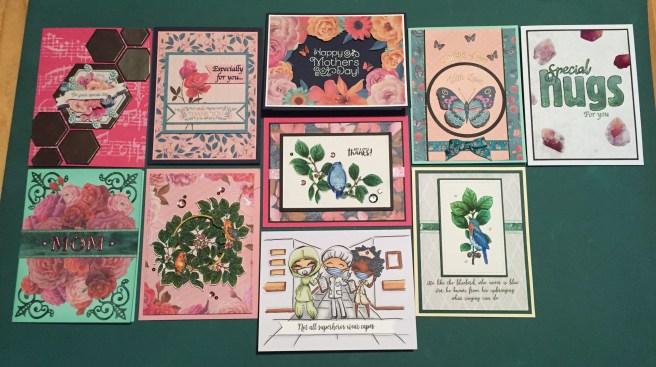
Hello Folks! Scott here with my 10 Cards 1 Kit posting using the Love From Lizi May 2020 Card Kit. This kit sold out very quickly – Lizi didn’t assemble quite the same number of kits as usual due to the lockdowns in effect over much of the world, but I hope I can provide a little inspiration and some unique ideas on using this kit.
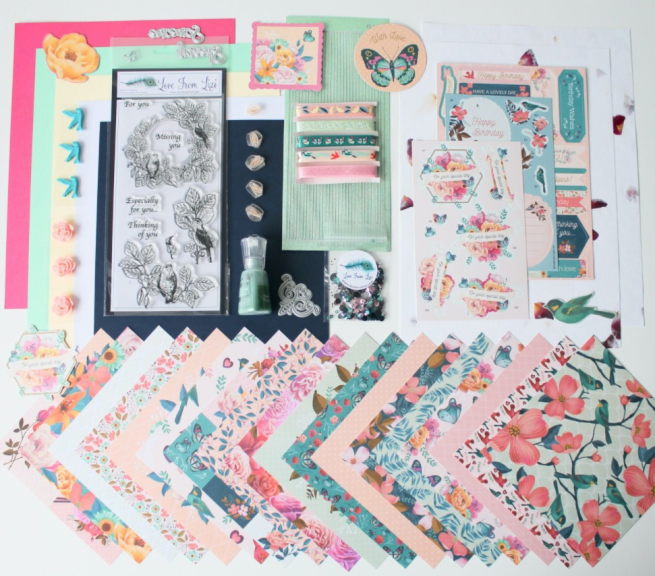
Lizi is calling this kit Happy Bluebirds (or Lucky Bluebirds at Lizi’s online store) and this kit features tons of supplies, pattern papers, embellishments, stamps, ephemera, and even a couple of mini-decoupage sheets in a bright palette of springtime colors perfect for lifting our spirits this month! Plenty of pink in this kit as well!
As I usually do, I took the five sheets of card stock in the kit, cut them all in half and scored them to make my ten A2 card bases. I do really love Lizi’s decoupage sheets, and thought making one of those would be a good start for my first card with this kit.
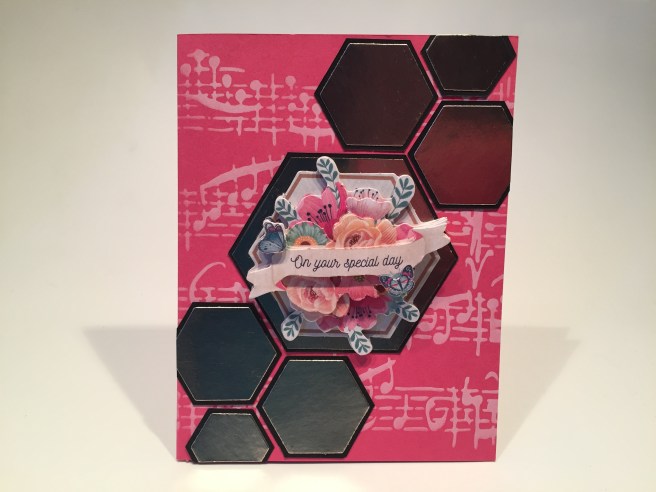
There’s some pink for you right off the bat! I wanted this mini-decoupage bouquet to be the focal point on this card, but worried that it might feel too small and get lost on a card front, so I traced the shape of the hexagon from layer 1 (bottom piece) of the decoupage sheet and made a pattern for the large mat behind the bouquet, and cut that from a piece of the Tim Holtz Metallic Confections paper pad in the Pewter metallic color. I glued a thin black mat behind that and assembled the six layers of decoupage using some Small Square 3D Pop Dots – perfectly sized for these mini decoupage assemblies!
I stenciled the Raspberry Pink card base using Hero Arts Unicorn White ink, a TCW Mini Sheet Music Stencil and my Tim Holtz Distress Blending Brushes. I was thinking Birthday here, so that inspired the music note background. The single decoupage hexagon still seemed a bit wan, so I grabbed two of the nesting hexagon dies from the LFL March 2018 kit, and die cut the smallest hexagon twice and the medium hexagon four times from more of the Pewter Metallic card stock. I added thin black mats behind those six additional hexagons and glued everything down to the card front. 
For a final touch, I added a Happy Birthday banner from the die-cut sentiment sheet on the inside writing surface. I really love this decoupage bouquet – I think it has great dimension (there are six layers here) and the die-cutting on this sheet was terrifically accurate. That makes for an easy-to-assemble layered bouquet that is really quite amazing! This would work as an Anniversary card, a Mother’s Day card, or any “Special Day” occasion!
We got so much pattern paper in this kit, but there was one cut-apart that caught my eye.
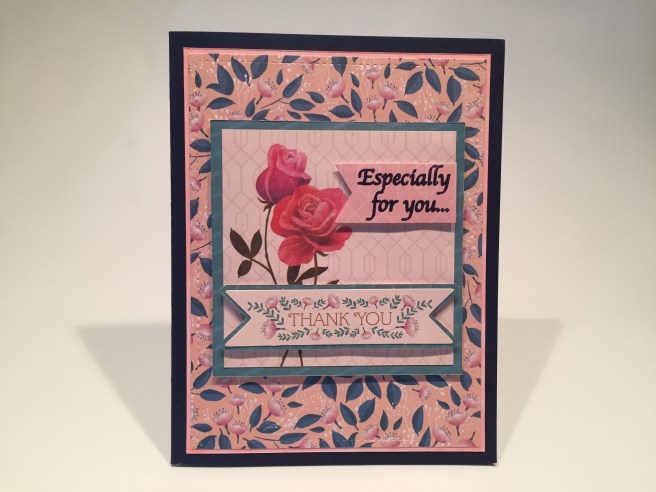
I really like this 3″x3″ rose panel from our pattern papers. I die-cut the background pattern paper with a Lawn Fawn Stitched Rectangle die and mounted that on a thin pink mat and glued those down to one of my Navy card bases. I matted the rose panel and the “Thank You” banner on some of the blue striped pattern paper (from the middle of one of our ‘flower frame’ pattern papers) and mounted those to the card front with foam tape. I originally tried stamping the sentiment directly on the rose panel, but I messed it up horribly (OOPS!) and ended up embossing the sentiment on a matching piece of pattern paper using VersaMark ink and the LFL Warm Navy embossing powder. I trimmed that into a flag and attached it with more foam tape. I think those two roses were my favorite piece of all the pattern papers… another very pink card, but tempered with all the blue!
I cut up the center of that ‘flower frame’ pattern paper, so I better use the flower parts!
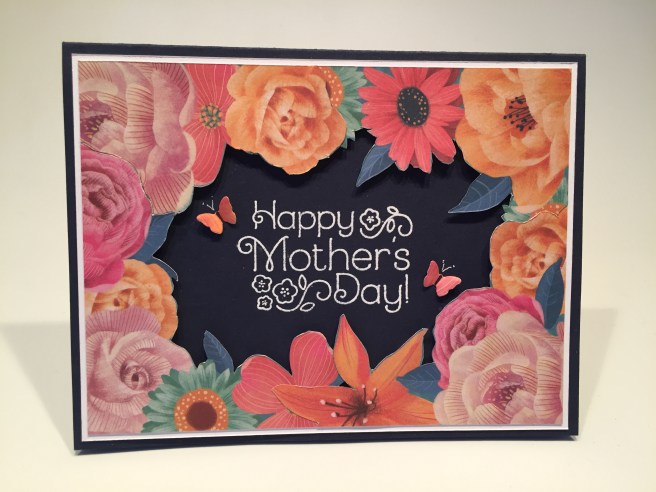
Mother’s Day is just around the corner! I love this card! I fussy-cut the flowers away from the leftover center, and trimmed all four sides down so they would fit an A2 card. If you look close, you can see where the flowers overlap on all four sides. I glued the frame together and matted that on a thin white mat (with the center cut out!) and glued the edges to the Navy card base and used foam tape to lift up the flowers around the center.
The sentiment is from an old Paper Pumpkin kit (April 2016) and I think this is my favorite Mother’s Day stamp in my stash! I embossed that with White embossing powder right in the center, and die cut the two butterflies using the included die and scraps from the flower frame. I drew on their black bodies using a Pigma Micron 05 pen, folded them in the center and glued them down to the card front. Lastly, I drew in the antenna using an 05 Sakura White Gelly Roll pen. If you know me at all, you know I am not a big fan of butterflies, but the die in this kit is so small, I can’t help but love the tiny accents these butterflies bring to this card.
In searching for the Mother’s Day sentiment stamp, I found another stamp I wanted to use on the inside writing surface. “you are amazing” is from the Altenew Penned Rose stamp set and I stamped that using a Hero Arts Ombre Meadow stamp pad. I think my mother is pretty amazing, and I do believe this is the card she is going to receive this year!
We also had a few pieces of ephemera in our kit and for some reason, the circular butterfly piece inspired me – it helps when the butterflies are extravagantly colored!

Using my craft knife, I fussy-cut the butterfly wings (but not the body!) from their polka-dot circle, and using my circle dies, I cut a black frame to fit that circle. I cut the matching polka-dot pattern paper to 3″ x 5.25″, and mounted that to a thin black mat – only showing the sides of the mat. I did a little stamp surgery to the “Thinking of you” stamp from the kit, arranged that in a bit of a curve on my MISTI, and embossed that on the background using LFL Golden Crown embossing powder. I glued the ephemera piece below the sentiment, and wrapped a piece of the butterfly ribbon around the bottom of the panel and tied a little bow for the center.
I glued that panel to one of the Mint card bases, cut out two 1/2″ x 5.25″ strips of the blue butterfly pattern paper, and glued those along the sides. It’s hard to see in this picture, but I did add the thinnest Mint Moondust peel offs along the edge of the black mat for a little sparkle. I tucked some foam tape under the butterfly wings, and die cut the 3 tiny butterflies from the pattern paper – our die almost perfectly matches some of those butterflies on this pattern paper! ALL of the butterflies on this card match! I folded and glued the die-cuts to the top, and added some antenna with my Pigma Micron pen. Tons of butterflies, and plenty of pink, but I really do like this card!
 Last month, our Sunray Crossette Nuvo Shimmer Powder was really fun to play with, and I wanted to check out the Green Parade Shimmer Powder included in this kit. I spritzed a sheet of watercolor paper with water, then sprinkled the powder onto the wet paper. Lots of dark tones in this green – I swear this almost looks like the surface of some distant moon…! I wasn’t quite sure what to do with this panel, so I let it dry and turned my attention to the Specialty Paper in this kit. We got two sheets of handmade paper with actual flower petals embedded in the paper fibers. I was at a loss on how to use this paper in a card until I realized that handmade paper should be able to take some painting… it’s just thin watercolor paper, right?

I was a bit afraid that my printer would eat this delicate paper, so I printed the “hugs” portion on some plain paper using my Silhouette Software and the Gothic 821 Condensed BT font, then placed the handmade paper over the top of the print, and, using a light board, painted the “hugs” using the Nuvo Shimmer Powder. I did do a bit of an ombre’ effect with the color darker at the bottom and lightest at the top. That came out really nice, and caused no buckling on the paper at all! I used my Pigma Micron Pen for a thin outline on the letters. I die-cut the paper using a LFSRD, and matted that on a thin black mat before adhering it to the White card base.
I die-cut the “Special” die (included in the kit) from my painted shimmer powder piece, and cut three more from white card stock. I glued all those layers together for a nice chunky sentiment, and glued that on the card front. I stamped the “For you” sentiment from the stamp set using Stamping’ Up Mint Macaron ink, and finished up this card by gluing a couple of loose petals to the front. I’m not a big fan of “For you” sentiments (stating the obvious) so I was especially pleased to be able to use that stamp from our stamp set to fill out this sentiment. I really like this card – no pink here!
There were a couple of large bouquets on our pattern papers, and I really liked the darker tones on one of them.
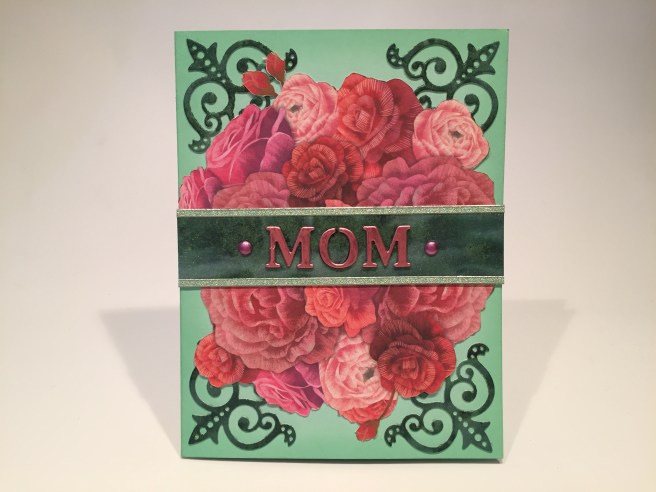
I split that bouquet pattern paper right down the middle and fussy-cut the bouquet away from the greenery. I did some ink blending on the edges of the Mint card base using Cracked Pistachio Distress Oxide ink, and I die-cut four of the cornice dies from my painted shimmer piece. I glued those to the four corners of the card front, and cut a strip of the shimmer painting to just over 3/4″. I attached the two halves of the bouquet to the Green Parade strip – there’s about a half an inch gap between the bouquet halves hidden by that strip. I die cut the “MOM” using an alpha die set from the LFL Special Edition Oh Baby Kit from back in March of 2018. I cut those from the pink Tim Holtz Metallic Confections card stock and added two layers of black die-cuts to chunk it up a little bit. I glued the letters to the Green shimmer strip and added two pink brads from my stash to either side. I glued the whole assembly to the card front and added the Mint Moondust Straight peel offs above and below the shimmer strip. This card feels very Victorian to me – rather formal with the bouquet and flourishes in the corners, and the simple MOM in the center says it all!
There are three image stamps in our stamp set, and I haven’t used any of them yet, so let’s do some coloring. The stamp with the two birds has a circular opening in the center that happens to be the exact perfect size to use with the LF Magic Iris dies. I’ll try again!
AHA! This is my third month making a Magic Iris card with the LFL kit, and I really like the addition of the stamping to the center moving pieces on this card! I don’t need to match the background, and I love how the berries form a cluster right in the center!
I do have a Magic Iris Die how-to on my YouTube channel, so I won’t go into the assembly here. The background is cut from the pink ‘flower frame’ pattern paper, and the sentiment is stamped (VersaFine Onyx Black ink) and clear embossed in the center of the cut out circle – there’s some pattern matching there for you! I stamped the bird wreath on Bristol Smooth card stock using VersaFine Onyx Black ink and used my Zig Real Brush Markers to color it. Since there was so much black on the bird stamps, I decided to color them as Orioles instead of bluebirds – I think the orange pops nicely amidst all the green. And, luckily, the circle in the center of the wreath is the exact same size as the circular opening in the Iris! I did color the center ring with some Hero Arts Gold Glimmer ink, so it has a bit of a metallic shine. I fussy-cut the wreath leaving a little border around the outside, and cut right against the stamp lines in the center opening.
The three moving pieces (the ‘sausages’) were die-cut from more Bristol smooth card stock, stamped and colored identically. This is all on a light pink card base from my stash. I actually assembled this whole card (without the stamped sausages) on the Cream card base using some interesting “fiber” card stock from my stash (very similar to the hand made specialty paper in our kit) but the “fiber” card stock started to fail after a few rounds of operation – I managed to salvage the stamped and colored wreath but nothing else from that first failed attempt.
Some sequins from the embellishment bag adds some sparkle to the front of this card, and I am very pleased with stamping on the moving pieces – it certainly works well for this card!
I have now used all the sentiment stamps in our stamp set, but have two more birds!
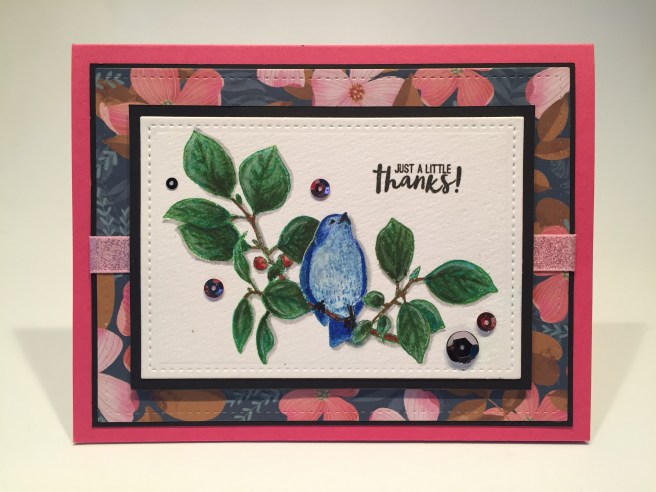
Since these bird stamps have so much detail, I tried some no-line watercoloring with this stamp! Now that’s a bluebird! I used the Earth Palette Reactive ink pad from the My Monthly Hero December 2019 kit to stamp the image, and my Daniel Smith Dot Card to watercolor this image. I die cut the watercolor paper with a LFSRD, and matted that on some black card stock. I used a larger LFSRD to die cut the pattern paper, added a thin black mat, and wrapped some of the pink glitter ribbon across the center before gluing down to the Raspberry Pink card base. I stamped the sentiment on the center panel using Onyx black ink and the very small “Just a little Thanks!” stamp from the Paper Pumpkin January 2017 kit. Love that tiny sentiment, and think my no-line watercoloring came out quite nicely! A few sequins (yes, even some pink ones!) add a last bit of sparkle!
One more bird to go… let’s try some more no-line watercoloring on this one too!
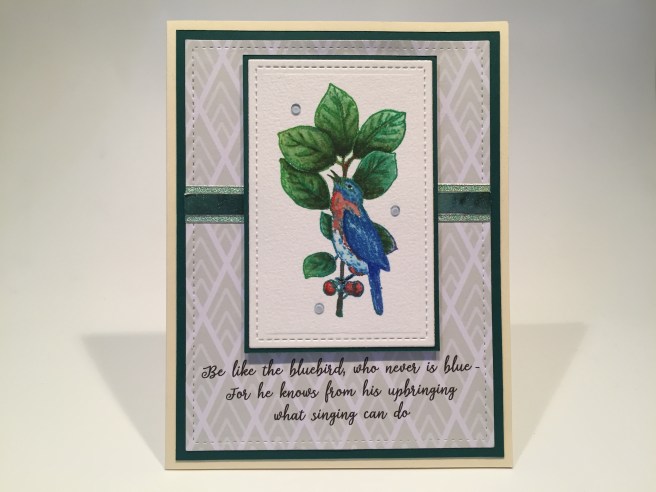
This one came out REALLY nice! Almost looks like some kind of Audubon illustration! I do think if you want to color these as bluebirds, you need to stamp them in blue – I stamped this one using the same HA Earth Palette Reactive ink pad – trying to keep the blues on the bird and the greens on the leaves. I painted this one using my DS dot card again, and die-cut the finished painting with a smaller LFSRD, and matted that on a thin dark green mat. The background pattern paper is die-cut with a LFSRD, and printed with this fun sentiment using the Silhouette Dream State font. This is a lyric from Cole Porter’s ANYTHING GOES  and I do credit him on the inside writing surface. The background is mounted to a thicker dark green mat and glued to the Cream card base. I added a strip of my shimmer painting and two straight peel offs to go behind the artwork, and attached the front panel using foam tape. A few Blue Babe Nuvo Crystal Drops (LFL Feb. 2020 Kit) adds a dash more blue to this sweet encouragement card. I’m loving this card a lot… I’m getting a little more adept at that no-line watercoloring and maybe I’m pleased simply because there’s no pink!
I was thrilled to get the add-on “Angels without wings” stamp set this month…
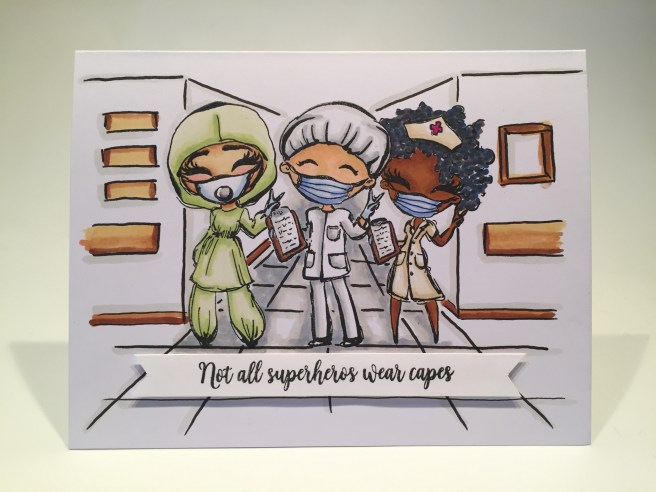
 I stamped this on my last White card base from the kit, and colored all with my Spectrum Noir alcohol markers. I did cut a mask for our center doctor, but didn’t have to get too detailed as the overlaps were slight. I sketched in a little hospital background for these heroes and stamped the sentiment on a scrap of card stock, trimmed that down to a nice banner, and mounted that with some foam tape. I really like these health care workers stamps and LOVE the fact that we get some guys to go along with the girls! This kit may be sold out, but this stamp set is still available! Lizi is donating all profits from the sale of this stamp set to her local hospital. This card is heading directly to MY local hospital! Love it! Get your own here: https://shrsl.com/28k63
That wraps up my 10 cards using the Love From Lizi May 2020 Card Kit. Lizi’s kits usually sell out – often very quickly – so if you’d like to get in on the fun, I would suggest subscribing! Subscribers have the opportunity to add additional products to their kits for no extra shipping! Please use my links when you do go shopping with LFL! It is always hugely appreciated! Love From Lizi Monthly Subscriber plan / Love From Lizi / LFL May 2020 Bumper pack (LOTS of ephemera in this pack!)
Naturally, I have bunches of supplies left over… I did manage to use most every stamp in our stamp set (didn’t use that single leaf) I used 10 different pattern papers, one of the ephemera pieces, one of the mini-decoupage sheets, a couple of the die-cut sentiments, and lots of the embellishments – I didn’t get to the resin roses or bluebirds, or the ribbon roses either, but I did use some of the ribbons, sequins and most of the dies! I had a great time putting these cards together, and they certainly cheered me up as we enter into our sixth week of lockdown here in New York City. Thank you for sharing your time with me here, and please take care! I send Healthy and Happy wishes to you and yours! Please remember to Like me, List me, Pin me, Post me, Don’t touch your face…! And, as always, I wish you Happy Crafting!

the richness and variety of our handicrafts that has been a novel feature of world’s culture and heritage. Generations of artisans and craftsmen from completely different regions have increased the charm, adding color and sonorousness to the product.
LikeLike