
DISCLOSURE: This site contains some affiliate links to products. I may receive a commission for purchases made through these links (at no cost to you). As an Amazon Associate I earn from qualifying purchases. Thank you!
Hello Folks! Scott here with my 10 cards from the My Monthly Hero April 2020 Kit! Due to current shutdowns I don’t think Hero Arts started shipping this kit until April 20th… I didn’t receive mine until April 25th… Looks like we’re off to Australia this month!
 Our 6″ x 8″ stamp set features silhouettes of Australian animals, plants, birds, fish, and even Ayers Rock. Some ‘Aussie’ sentiments (with some good puns!) round out the image stamps, and of course we get 31 coordinating frame cuts to die cut all the stamps. For extras this month, we get this great 5.25″ x 6.5″ background stencil, and full size pad of Intensive Black ink. Finally, we get two 5.5″ x 8.5″ Cherry Wood sheets and 3 adhesive -backed Birch Wood sheets. Quite a collection! I really enjoyed the trip to Venice last April and am looking forward to spending a little time in the Land Down Under!
I do try to use all the stamps in a stamp set on these 10 card posts, and, I have to admit, I was intimidated with this collection of 37 different stamps… I think including the names of the animals on the stamp packaging is what gave me this idea!

I tried to make this look like a page from an old zoological folio..! Though I doubt all these animals would be classified together (beyond the fact that they are Australian!) I do think the idea comes across pretty good! On a piece of parchment paper from my stash, I arranged and stamped all these guys using Hickory Smoke and Frayed Burlap Distress Oxide ink, trying to add a touch of dimension with the darker ink on the edges of the stamps. I stamped some wisps of tiny text around the edges and all about using the text stamp from the MMH Jan. 2020 Kit. I wrote in all the names using a Brown Micron PN pen – I wish I had something finer and more delicate to write in the names, but this does nicely!
I distressed the edges and the whole page using the same Oxide inks along with some Vintage Photo Distress Ink. I stamped the sentiment on a scrap of ivory card stock with Hickory Smoke Oxide ink and embossed it with some clear embossing powder, and distressed it the same. I ripped and curled some of the edges of the paper before glueing it down to a Kraft card base, and mounted the sentiment in the center with some foam tape. This came together as envisioned, and I actually like this card quite a lot! It certainly gets you in the Australian mood, and HEY! it used 16 stamps from our set!
I was eager to play with that nice background stencil, so I used some Zig 2 Way Glue on the back of the stencil to add a little “sticky”, and grabbed my Hero Hues inks…

On a piece of Neenah Solar White 80# card stock, I stuck the stencil down and used my ink brushes with Splash and Blue Hawaii inks on the bottom, and Lemon Drop and Creamsicle in the sky. SOOOO Ok… I was looking to use the “Auss-ome Day” sentiment on this card, but I didn’t think this sunny background was saying Australia to me. I looked up Ayers Rock, but it turns out that landmark is deep in the interior of Australia… and most of the fish stamps in our set aren’t indigenous to Australia… hmmm… I kept thinking Sydney Opera House was an unmistakable landmark, so I went digging through the internet and found a simple silhouette of the Sydney skyline. OKAY! I imported that image into my Silhouette Software and created a cut file for my Silhouette Portrait. I was a little crazy trying to cut this skyline quite this small, but I got one cut (from plain 65# black card stock) that worked! I glued that cut-out between the sea and sky, and die-cut the whole piece with a Lawn Fawn Stitched Rectangle die.
I did stamp the sentiment on the stenciled “sun” using the HA Intense Black ink, but I got it a little crooked, and couldn’t stand it, so I fussy-cut the sun out (leaving some white edges on the clouds). I cut a mat for the front panel from a piece of yellow card stock from my stash, traced the “sun” opening on the mat, and stamped the sentiment again. I did emboss this sentiment with clear embossing powder – the Intense Black ink will stay wet long enough to emboss with! I blended a little Creamsicle ink around the edges of the sun and glued the front panel to the mat with the sentiment perfectly placed (and straight!) behind the opening.
I decided somebody needed to witness this scene, so I masked some of the waves off and stamped the dolphin peeking out with HA Soft Granite ink. I added some touches of shading to the dolphin with my Prismacolor colored pencils, and matted the whole panel to more Kraft card stock and then down to a 110# Neenah Solar White card base. There ya go! No mistaking this for anyplace other than Australia! Good pun too!
As I often do with MMH solid stamps, I contemplated coloring these – adding detail and character to otherwise flat silhouettes… but some of these critters are SO, so small… however, the shark is actually one of the largest stamps in this set…
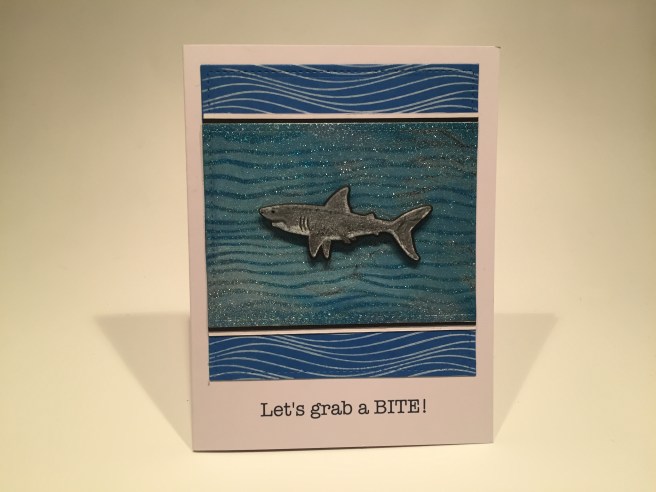
I stamped the shark on some black card stock using HA Unicorn White ink, and colored up the shark using my colored pencils. I die-cut this formidable fellow with the matching die and turned my attention to the background. I played around with some Alcohol inks on DCWV Glitzy Glitter card stock, and I did get some nice movement from the inks on this glitter card stock. I picked a section that I liked, and using the bottom of the stencil, ink blended Unicorn White ink through the stencil to add some defined waves. I die-cut that section with a 4″ x 2.75″ LFSRD, and glued that to a thin black mat (top and bottom only) and then to another thin white mat.
I took a piece of plain blue card stock from my stash and stamped the Echo Park Make Waves A2 Background on that using the Unicorn White ink, and die-cut that panel with another LFSRD. I trimmed off an inch from the top and bottom of that stamping and glued those strips behind my matted glitter piece with about 5/8″ showing.
I turned to my Silhouette software and my ‘Piggy-Back Printing’ method to add this fun sentiment to the front of my Neenah 110# card base. This is printed in dark blue using the American Typewriter font. Finally, I glued the background panels to the card front, and attached the shark using foam tape. This shark came out very well, and I love all the glitter in the water – the Unicorn White ink blocks some of the glitter, so this has quite a variety of glitter. This is also a fun, perfectly apropos sentiment!
I thought the little Koalas should be easy to color… it’s all about their big noses, right?

I stamped the Koalas on some Kraft card stock using Unicorn White ink, colored them with my colored pencils, and die-cut them with their matching dies. On a Neenah 110# card base, I ink blended the bottom half of our stencil vertically on the left of the card front using Hero Hues Key Lime Fizz and Green Apple inks.
I found some “bamboo” in my image stash and used my Silhouette Portrait to cut a bunch of stalks from one of the Cherry Wood sheets. They seemed a little big to go along with these small Koalas, so I simply trimmed a bunch of thin (1/16″) strips of the Cherry wood that were sized better for our bears. When the wood sheets are cut this thin, they curved very easily as I glued them down to the card front.
I die cut the leaves from Hero Hues Meadow (MMH 4/19) and Neon (MMH 10/19) card stocks using an old LFL Medallion die that has some perfectly-sized leaf-shaped openings. I glued the leaves down and added the Koalas with their arms clutching the branches and some foam tape behind their backs for a little dimension. I stamped the sentiment using the HA Intense Black ink, and finally added two of my bamboo cut-outs to the left – trimming the first at the boundaries of the greenery, and letting the second one run from top to bottom. Those add an interesting suggestion of depth – making it feel like the bears are deep in the grove enjoying their lunch. Who can resist a couple of adorable little Koalas?? I think this is so cute, and works well with this sentiment stamp!
I can’t stop playing around with this stencil! Let’s try something a little more arid..!

On a Neenah 80# card stock panel, I ink blended the bottom of the stencil using Distress Oxide inks in Antique Linen and Frayed Burlap. I ink blended the sky using HA Lemon Drop ink, and stamped the Ayers Rock stamp on the horizon line using Frayed Burlap ink and topped the edge of that rock with some Fired Brick Oxide ink. I spattered some tiny dots of the Frayed Burlap ink all over the background with a small paint brush, and die-cut the background with a LFSRD.
I stamped the kangaroo on white card stock using Antique Linen ink and the Kiwis using Vintage Photo ink, and colored them with my colored pencils and added highlights with Sakura White gel pens. For these small images, I did create a die-cut template to help me die-cut the colored stamps. I cut the die in a contrasting card stock, and centered that over my stamped and colored image, then taped it down with the die in place, and ran it through my die-cutting machine to get a nicely accurate die-cut. Nothing worse than spending a lot of time coloring a stamp and then die-cut it slightly off…!
I stamped and embossed the sentiment with Frayed Burlap ink and added a few birds in the sky using the stamp from the MMH July ’19 Kit, I die cut the background with a LFSRD, matted that on some Kraft card stock, and glued it down to another Neenah 110# Solar White card base. Of course kangaroos are very Australian and I love those little kiwi birds! This card highlights the fact that much of Australia is covered by desert landscapes… with a recognizable landmark looming in the distance…!
That was a good pun that actually came in our stamp set! I had an idea for another…
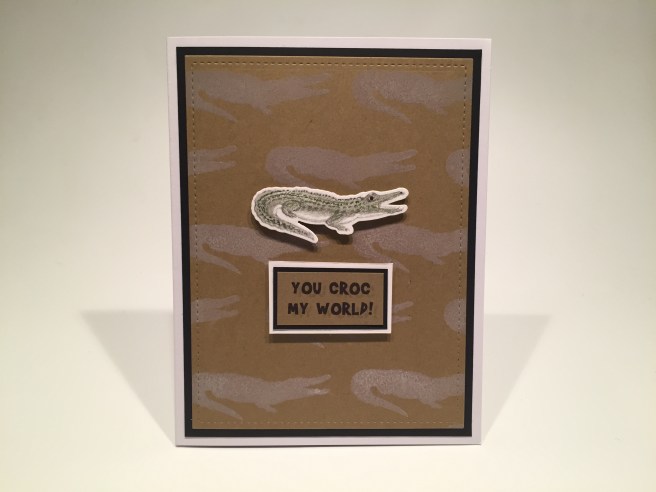
Sometimes I just can’t help myself! Using my Hero Arts MISTI (in black and white!) I stamped a pattern of the crocodiles on some Kraft card stock using Hickory Smoke Distress Oxide ink. I die cut that with a LFSRD, glued that to a black mat and down to a White card base. I stamped the croc on a scrap of white card stock using HA Soft Granite ink, colored him with my colored pencils, die-cut him with the matching die and mounted him to the card front with foam tape.
I printed this sentiment on a scrap of Kraft card stock using my Silhouette software and the Brady Bunch Remastered font, trimmed that sentiment out, added a black and white mat behind the sentiment and mounted it to the card front with foam tape. Fairly simple and a good pun! I don’t think crocodiles are particularly cheerful, but this pun is fun!!
I have more fish in the stamp set, so I need some water, and I wanted to try that stencil for a nighttime scene with a moon instead of a sun…!

The background is stenciled in all the same inks mentioned earlier with a swipe of Hero Hues Fruit Punch and a touch of Black Soot Oxide ink around the top. I added the fish using Soft Granite ink, and cut out another (much larger) Sydney silhouette to glue on the horizon. I tried creating my own moon in the space provided and failed miserably, HA! So I once again cut out the ‘moon’ shape (NOT leaving white space round the clouds) and went into my image files for the moon. I did look up to see how the moon looked in Australia, and, sure enough, it is upside down from how we see it…! I thought that was very interesting and made sure to attach my printed moon in the correct orientation!
I die-cut the card front with a LFSRD and glued that to a thin black mat, then to a larger blue alcohol ink mat, and then down to a white card base. I printed the sentiment using my Silhouette software and the Lato font, trimmed it down to a short banner, and attached it to the card front with foam tape. One of the sentiment stamps in our set works perfectly with this card, so I stamped “Beaut” on the inside of the card using the Intense Black ink. For a final touch I added some sparkle to the moon and waves with a Wink of Stella Clear sparkle pen, and a few of the birds from the MMH July ’19 kit. I could have probably gone darker with my sky but am pretty happy with the final outcome… that is one big moon!!! Perfect congratulations card!
The Cassowary stamp in our set intrigued me, and actually, this is a fairly colorful bird!

This card tickles me a lot! I really like the Cassowary stamp, but couldn’t figure out an appropriate sentiment… I found this sentiment when I was doing some research for this kit and it seemed the perfect accompaniment for these birds. Looks like this is the entrance gate to the Australia Zoo! “Have a ripper day!” becomes a bit of a pun paired with these extremely large and dangerous birds – cassowaries have three claws and their center claw is like a dagger around 5″ long – sounds like a ‘ripper’ to me!
I ink blended the background using HA Lemon Drop ink on the bottom and HA Splash ink on the top, then used the bottom of the stencil and HA Key Lime Fizz ink and Frayed Burlap Distress ink to texture the ground. Cassowaries are “forest birds” so I used the two tree stamps in our set to create some forest on this card. I stamped a variety of the trees using HA Soft Granite ink, Key Lime Fizz and Green Apple inks. I added some of the Kangaroo Paw plants on the bottom using Green Apple ink and added some dark red highlights to the flowers. I stamped (and reverse stamped) the two cassowaries on white card stock using HA Soft Granite ink and colored them using my colored pencils and the Hero Arts Red and Aqua Glimmer Metallic ink. Those inks add a touch of shine to the head and necks of our birds. I die-cut them both using the matching die and a template.
I die -cut our background with a LFSRD, added that to a thin white mat and glued both to a Kraft card base. I printed this sentiment using my Silhouette software and the Brady Bunch font on a scrap of Hero Hues Arctic card stock (MMH April ’19 Kit) and die-cut the banner using a Lawn Fawn Everyday Sentiments die. I added the birds and banner to the card front using foam tape, and added some dotty texture to the ground with my Disposable Micro applicators and the same inks. I did feel a little explanation was required for those who aren’t aware of the cassowaries proclivities, and added this little directive on the bottom of the writing surface inside the card. That is printed using my Silhouette software and the Typewriter Hand font. A true Australian saying paired up with a large dangerous bird should make any Aussie giggle!
I need a break from all those full card backgrounds, and I still have three kangaroo stamps to use in our stamp set, so I went for another pun on this next card!

A Wallaby is basically a smaller version of the Kangaroo, so I thought I could get away with calling this kangaroo a wallaby – just in the interest of a good pun! I stamped the ‘wallaby’ on the front of a Neenah Solar White 110# card base using Antique Linen Distress Oxide ink and colored this pair with my colored pencils and a white gel pen, adding a bit of a shadow to ground them. I printed the sentiment on the front of the card using the Brady Bunch font and my ‘piggy-back’ printing method. This is a fun friendship pun and could work as a Mother’s Day, or New Baby card with a different sentiment! It’s so nice to have a simple one-layer card with a lot of white space in this collection!
But what about the best pun-y sentiment in our stamp set? This last card will wrap up the final three stamps in this kit…!
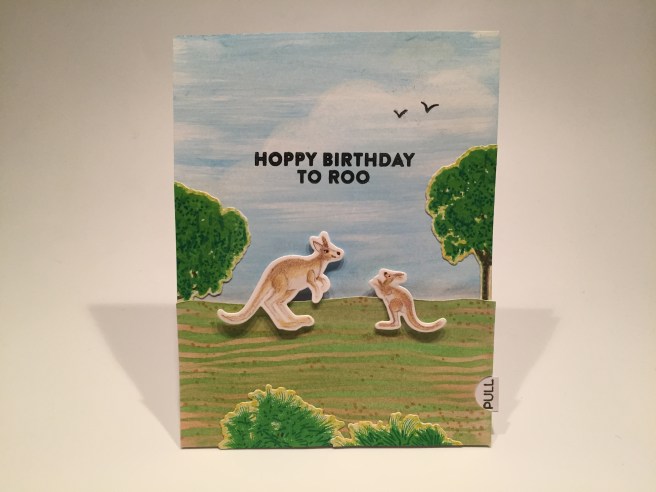
One more background!! On Bristol Smooth card stock, I used my Marabu Art Crayons and wet wipes to create this background. This is one of the quickest backgrounds I created for this kit! I scribbled some Flesh Marabu crayon on a wet wipe and spread it on the bottom half, wiped Sky-Blue crayon on the top half (using a wet wipe), then used the stencil with a Kiwi crayon and Cocoa crayon (and more wet wipes) for the ground. I added a slight suggestion of a cloud in the sky with Unicorn White ink and a simple mini ink blender. I really like this background and need to remember this quick technique using those Marabu markers!
I stamped both kangaroos using Simon Says Stamp Barely Beige ink on Neenah 80# card stock, colored them with my colored pencils, made die templates for both and die-cut them out. The trees are stamped and die-cut and trimmed down to provide the greenery on this card front – I really like the pandanus palm as the bushes down front! LOOK! There’s a pull tab on the side… what does this card do??
Hoppy Birthday to Roo indeed! LOL! I cut the bottom of the background away from the sky portion, to hide the mechsnics behind, stamped and embossed the sentiment on the top, stamped another pair of birds in the sky, and glued everything in place to make this fun interactive card! I do have a complete how-to on assembling this card on my 10C1K video at: , so I encourage you to check that out for the particulars. I thought of this card before I even got the kit in my hands this month, and am very pleased with my first attempt at this rocking teeter-totter mechanism. A great pun, and a fun interactive card that highlights the pun! I will look for more chances to use this rocker on other cards!
That makes up my 10 cards for this kit! This was a nice challenge for me, and certainly provided some much-needed distraction as we continue our lock-down here in NYC.

I did try to stick to the Australian theme for all these cards. The shark and crocodile are not that specific, but we have a nice assortment of useful cards with a fun Aussie theme. I did manage to use every single stamp in this stamp set – thanks to that first zoological card, and I even got chance to use some of the included wood sheets! This kit did sell out almost instantly, the MMH May Kit has been released and HA is hoping to start shipping that kit around the 15th. If you want to get in on the action, I highly recommend subscribing to the My Monthly Hero kits. A six-month subscription allows you the freedom to skip a month if that kit is not to your liking. If you do go shopping at Hero Arts, please use my links – it is supremely appreciated! Hero Arts: https://shrsl.com/1f7qx My Monthly Hero May Kit: https://shrsl.com/29ud7 My Monthly Hero 6 month Subscription: https://shrsl.com/24ss0. THANK YOU!
I did have fun creating these cards – I hope you enjoy them too! Thank you so much for sharing your time with me… Let me know which cards are your favorites and remember to Like me, List me, Pin me, Post me, Share me with all of your friends, don’t run with cassowaries, and I send you and yours healthy and happy thoughts… Please take care of yourselves and each other. We WILL get through this together! Happy Crafting!

I love your videos…they are so informative and they make me laugh too. I usually watch the Hero Arts videos because I get the kits. I would love to have the files for the April 2020 kit you used. I really love the Australian skyline one and I too have a Silhouette. Can you point me to the video where you show us how to get the writing on the exact place on your card? I have tried a few methods but they don’t seem to work very well. Thank you for all your inspiration!
LikeLike
Annette – thank you!! Did you find what you were looking for? drop me a line at cardcutups@gmail.com if you need anything! Love and Light!
LikeLike
Every card is a work of art. You put a smile on my face. I hope you are staying safe. Thank you for sharing.
LikeLike
Thank you so much Laura! Just trying to keep the cheerful going!! (not easy these days!) We are safe and well here in the big city and looking forward to getting back to some semblance of normal! All my best to you and yours!!
LikeLike
What an amazing job you did coloring all those animals!
LikeLiked by 1 person