
DISCLOSURE: This site contains some affiliate links to products. We may receive a commission for purchases made through these links. Thank you!!
Hello Folks! Scott here with my 10 cards inspired by the My Monthly Hero June Kit. “It’s a Jungle Out There” is the theme this month, and one of the most amazing things is that Hero Arts is donating 10% of the profits from this kit to jungle habitat preservation through the World Wildlife Fund. I LOVE THAT! Kudos to Hero Arts for giving back to such a worthy and necessary cause! If you’d like to follow along with the video, click here: https://youtu.be/IXaDvnDMjPQ
 Flowers and leafy images along with realistic animal images make up our 6″ x 8″ clear stamp set paired with seven different sentiments. Ous dies include twenty coordinating frame cuts along with two Jungle Vine Fancy Dies! We are treated this month to a Daniel Smith Watercolor Dot card “Jungle Palette” created especially for this kit. I guess we’re going to be watercoloring this month! This kit is rounded out with a 6″ x 6″ leaf pattern stencil and a brand new black dye ink cube that is darker than Hero Arts Intense Black ink – they are calling this INTENSE-ified Black Ink. I always love getting ink cubes in our MMH kits – this looks like a great kit to color and play with!
Of course, I stamped all the images (using the INTENSE-ified ink cube) on some of my Strathmore 400 Series Cold Press 140# watercolor paper and started watercoloring.

I did mask off the headdress on the elephant. A post-it flag was the perfect size to mask this, and I just used a Pigma Micron 08 pen to draw back in the top of his head. I think that makes the elephant less domesticated! I am only using the DS paints on the dot card. I do tend to watercolor with fairly thin paint, and add more layers of color for shading.
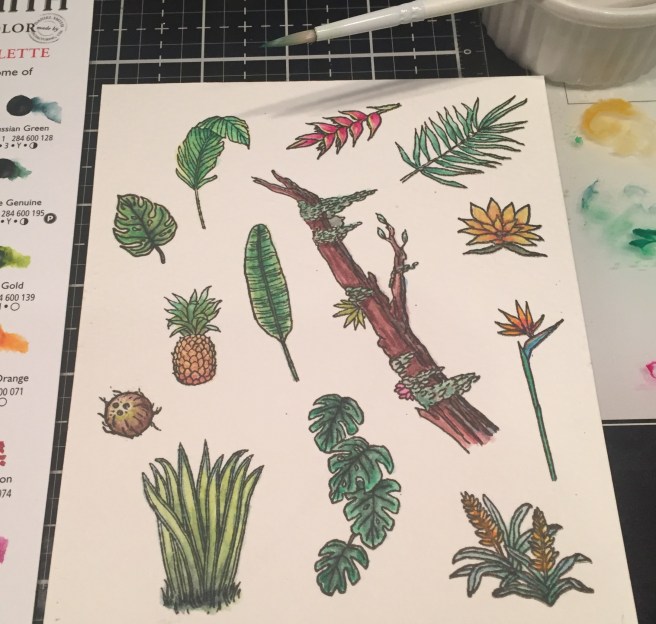
I use a pretty small brush (top of this pic) to do my painting, and it helps get into the tiny spaces some of these botanical stamps require. I love the Lobster Claw plant (top center) and, of course, the Bird of Paradise flower. I don’t really see the opportunity to combine all these plants into a coherent background, so I’ll just go ahead and die-cut everything!

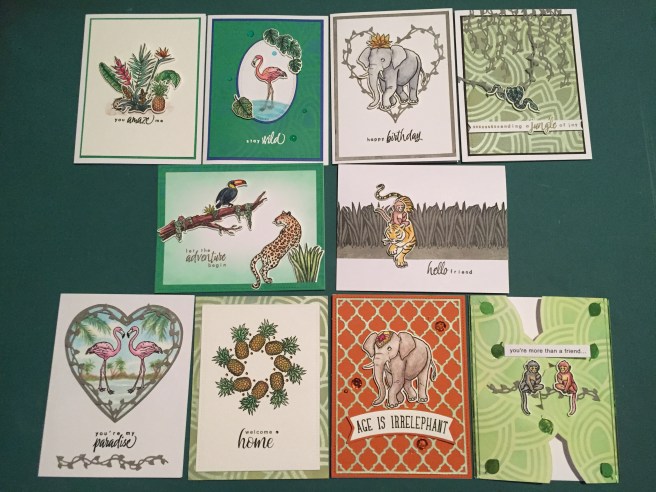
I’ve always admired those pics of a stamp set with all the images colored and die-cut and then displayed on top of the stamp set. I couldn’t resist taking this shot. Let’s Make Cards!
I presented myself with a challenge – Can I possibly use all these images along with the 7 sentiments to create cards without having to stamp any more images?? Let’s try!

As I said, I didn’t see a coherent background using these botanical images, so I fiddled around for a while and came up with this ‘arrangement’ that really highlights all of these images. The flowers and pineapple add a nice pop of color to the leafy greens. I cut a piece of watercolor paper to 5″ x 3.75″ and added a light brownish shadow to that to go underneath the die-cut pieces. I stamped the sentiment with VersaFine Onyx Black ink, and added a thing green mat behind the watercolor paper. I glued the panels to a white card base and added all the plants with some Multi Medium Matte glue and little pieces of foam tape. I did find some of the sentiments in the stamp set presented a bit of a challenge in conjunction with the images in this kit, but I think this floral arrangement deserves an ‘amazing’ sentiment! Not to mention that this card uses 8 of our 20 images!
The “stay wild” sentiment seems a little more in tune with the theme of this kit! And I was definitely looking forward to experimenting with the leaf pattern stencil.
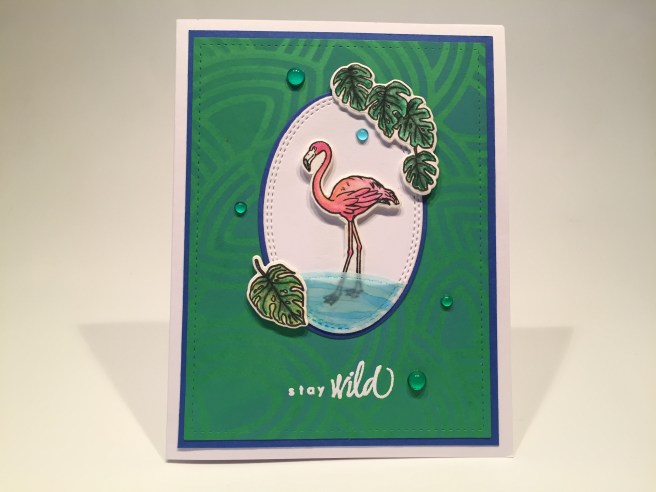
I used Lucky Clover Distress Oxide ink to stencil the leaf pattern on a panel of my plain green card stock and die cut that with a Lawn Fawn Stitched Rectangle Die. I really loved that the green card stock brought out the blue tones in that ink. Perfect for this flamingo card! I stamped and embossed the sentiment with Versa Mark ink and Ranger White embossing powder, and matted that panel on a blue card stock mat before gluing down to a white card base. I die-cut a plain white oval and a blue oval mat with my Gina K./therm-o-web oval dies, and glued those together to the center of the card front.
I added the flamingo to the oval with some foam tape, and die-cut a scrap of vellum and colored the back of that with my Spectrum Noir alcohol markers to provide the ‘shallows’ where our flamingo is hanging out. A touch of glue around the bottom edge of the vellum holds it down nicely without showing any glue spots. The two monstera deliciosa leaf images adds some extra dimension and foliage around our oval, and I used some of our blue and green droplet embellishments from the MMH March ’19 kit for a final touch of bling. I really like the vellum “water” that you can see through and this flamingo stamp is just a little bit of perfect. The first real flamingo stamp in my stash!
I’m really eager to use that elephant – I think that’s my favorite stamp in this whole set!

I found it terrifically funny that after I took the time to mask off the headdress on this stamp that I ended up adding a “party hat” on this elephant after all! BUT… I think that water lily “hat” is kind of hilarious! And, hey… it is a party!! LOL!! I just trimmed the bottom leaf portions away from the lily, and glued it to the top of his head – perfect fit!
One of our Jungle Vine Fancy Dies was a large curve that reminded me of half of a heart. I grabbed a piece of Tim Holtz pattern paper in a distressed olive green and die-cut two of the curved vines – they needed to go in two directions so I die-cut one vine from the front of the pattern paper and one from the back. I glued the bottom points together and then added more of a curve on the top to make the ends meet in the center to form a heart. These vine dies are thin enough to withstand a little extra bending and make a really nice heart shape!
I stamped the sentiment on a plain piece of white card stock cut to 5″ x 3.75″ and matted that on more of the Tim Holtz pattern paper and glued those to a white card base. I glued the vine heart directly to the card front and added our elephant with foam tape.  Of course I justified this sentiment by adding a second sentiment on the inside. Using my Silhouette software and the Arial font, I printed “I remembered!” on the inside. Now that provides a good reason to use an elephant to deliver a Happy Birthday! After all… an elephant never forgets! This elephant in a “party hat” continues to make me giggle!
You know I do like to try and ‘tell a story’ with all of my card designs. The ‘story’ is so often my inspiration when working with a new stamp set, and I couldn’t resist this one!

How about a little cat and bird drama this month!? Let the adventure begin, indeed! This feels like a snapshot of a nature program just before things go bad! LOL! I used my cheap-o life changing brushes to blend some Lucky Clover Distress Oxide ink around the edges of a card base, then added the left-over green frame from the flamingo stenciling. I stamped the sentiment using Walnut Stain Distress Oxide ink and mounted the images with glue and foam tape. Instead of creating a rock or a log or something for the leopard to stand on, I simply hid his front legs behind the stand of tall grasses. I let the tree branch, the grasses and the leopard’s tail break the frame around this scene for a touch of whimsy, and I think we have a great little scene that brings this sentiment to life! (or death as the case may be..!) I’m fairly certain that toucan escapes..! LOL!
I had seen lots of cards from this kit that had the tiger coming out of a swath of the tall grasses. Inspired by one of the sentiments, I decided to take that idea one step further.
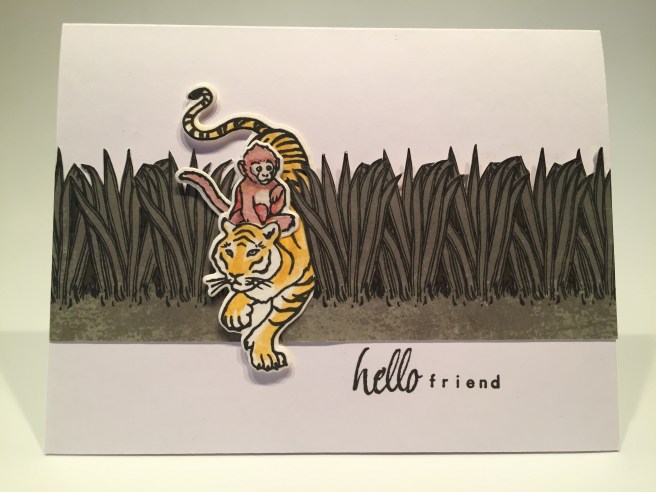
I fussy cut around the tiger’s head and slipped the little monkey behind so it looks like he’s catching a ride! Tiger Taxi, anyone!! I cut off the monkeys tail and changed its position so we could still see it. I masked and stamped the tall grasses in a row across some more of that Tim Holtz pattern paper, added a few shadows with an alcohol marker, and fussy cut the top edge. I stamped the sentiment on a white card base, glued the bottom edge of the grasses to the card and added some foam tape towards the top of the grasses on the right side of the card. Our ‘tiger taxi’ is tucked in among the grasses and mounted with some foam tape. I did consider adding some ink blending to this card, but I really liked the white space, and how it pulls your focus right to the animals! These guys must be friends, or else I think someone might be eating the other..!!
I didn’t’t quite understand the “sending a jungle of joy” sentiment included with this kit. It seems to reference “a bundle of joy” but that’s a sentiment for a new baby and we don’t have any “baby” animals in this kit. You know how literal I can be! Then I had an idea…
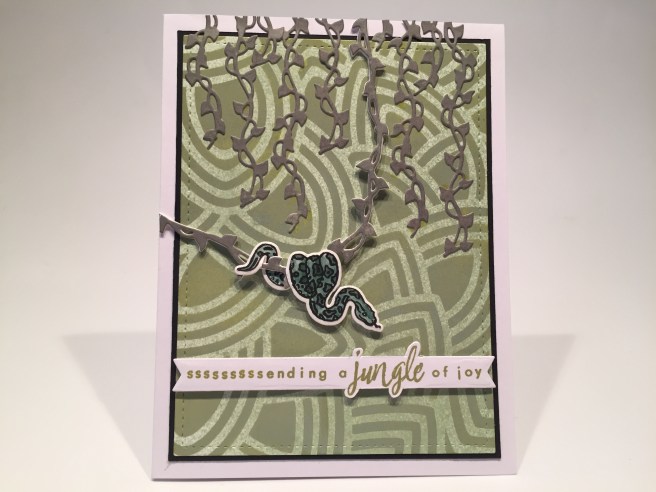
A perfect opportunity to use the sssssssnake image! LOL! I used my Sea Foam shimmer spray (from the MMH June ’18 kit) to cover a white card panel, let that dry, and then stenciled the leafs on top with Peeled Paint Distress Oxide ink. The shimmer from the spray reads right through the ink and I think this is my favorite background using this stencil! I die-cut a bunch of the straight vines and one curved vine from the Tim Holtz pattern paper, then die-cut a couple extra curved vines from white card stock and glued those curved vines together. That not only adds a little rigidity to the vine, but it helps coordinate the vine with the white border on the die-cut snake.
I die-cut the stenciled panel with a LFSRD, added a thin black mat and glued those down to a white card base. I cut the tail end of the snake off and wrapped that around the back of the curved vine, and added the front of the snake on top of the vine with foam tape. I glued (and trimmed) the edges of that vine to the card front and added some tiny bits of foam tape to the vine around the snake. I glued the rest of the vine die cuts to the top of the card front and stamped the sentiment on a scrap of white card stock using the Peeled Paint Distress Oxide ink. I did cut the ‘s’ off of the stamp and added 8 more to the beginning of this sentiment. I wasn’t too concerned with getting them perfectly straight as a little wobble just highlights the ssssnake-y sentiment! I used one of my Lawn Fawn Everyday Sentiment Banners die to do some partial die-cutting on this sentiment and fussy cut around the “jungle” word to complete this sentiment. I think that’s a fun way to use this sentiment, and I love the monochromatic palette on this card!
I’ve used all seven animals from our stamp set but still have one sentiment to go…
I had been seeing a lot of videos about the new Waffle Flower Water Media Mat and was pleased to discovered that silicon mats are good to use for reverse stamping! The Waffle Flower Mat was a little out of my budget, so I started looking for a cheaper alternative. I found this Fiskars 15″ x 18″ Silicone Craft Mat on Amazon for a third of the price! It works beautifully! I am thrilled to be able to have a GOOD reverse stamping option!
Looks like I may be reverse stamping all over the place now! I LOVE THIS!

I swear you cannot tell which flamingo is reverse-stamped on this card! WOO-HOO!! Now, I didn’t quite have the courage to attempt a full card-sized watercolor background, so I alleviated my terror by creating a smaller heart shaped background for this card. I stamped the flamingos on my watercolor paper and die-cut the heart with a Darice Nesting Hearts die. I watercolored the flamingos and the background using the watercolors from the Daniel Smith dot card. I matted the heart on another piece of the Tim Holtz pattern paper and glued both to a white card base.
I made another Vine Heart exactly the same as the one for the elephant birthday card, and mounted that to the heart with tiny dots of foam tape for a little extra dimension. I stamped the sentiment with Onyx Black ink and embossed it with some clear embossing powder for a touch of shine. One more of the straight Jungle Vine die cuts on the bottom of the card front and here’s a terrific valentine card for anyone – especially those predisposed to the tropics! I’m very proud of my watercolor background on this card!
Now I have used every single stamp and die in this kit! Three more cards to go! I did mention in one of my sneak peeks that a wreath card just might appear this month!
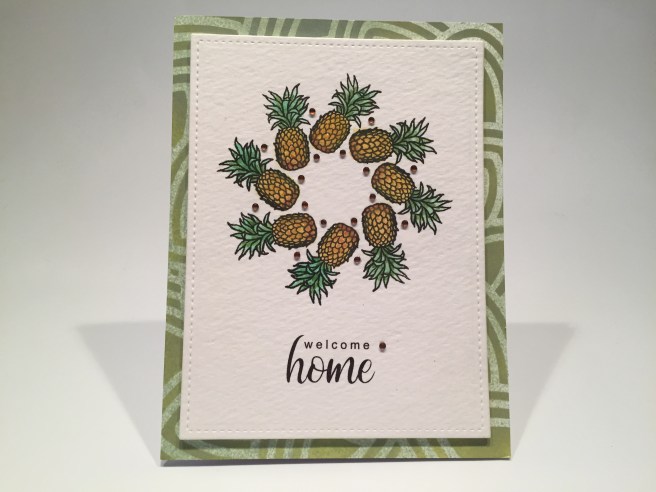
The pineapple is recognized as a traditional expression of “welcome” throughout the South and in areas along the Eastern Seaboard. Appearing on all sorts of décor – from door knockers to quilts – the fruit symbolizes those intangible assets we appreciate in a home: warmth, welcome, friendship and hospitality. I fiddled around with this pineapple stamp for quite a while trying to figure out a nice wreath pattern, but I was stuck on the notion that the pineapple had to be straight up and down. Nothing looked good to me until I actually tilted that pineapple a little and came up with this pattern! I LOVE IT!! I did use my homemade wreath builder template and stamped these pineapples on some more watercolor paper, and painted them with the DS dot card.
I die-cut the watercolor panel with a LFSRD, and grabbed the left over stencil frame from the snake card. I used my Silhouette software to create this sentiment using the Arial font and the Arabella font. I tried to match this sentiment to the other sentiments in this kit, and I think this is a pretty good approximation! I glued the frame to a white card base and mounted the watercolor panel with foam tape. That stenciled frame is a perfect compliment to the pineapples! Some tiny copper gems from the Love From Lizi March ’18 Card Kit add a little bling, and I used my Spectrum Noir sparkle pen to add some shine to the pineapple fruits. I must remember that a little tilt can add a lot to a wreath!
I did feel like I perhaps shortchanged the elephant stamp in this kit by masking off his headdress, so I remedied that with another elephant birthday card! With a Pun!!

I die-cut a piece of the Hero Hues Pumpkin card stock (from the MMH April ’19 kit) with a LFSRD and glued that to a white card base. I used the Sea Foam shimmer spray on another card panel and die-cut that with a Darice Morrocan Geometric background die and glued that to the card front. Since this elephant is a little more domesticated, I figured this ‘architectural’ die would work very well on this card. I like that die! Don’t believe I’ve ever used it before now!
I stamped and watercolored the elephant on more watercolor paper, die-cut him out, and mounted him to the card front with foam tape. I turned to my Silhouette software and Silhouette Portrait to create this great birthday pun! This is the Silhouette Paprika font which is “sketched” on a scrap of watercolor paper using a Pigma Micron pen.  I fashioned that sentiment to fit my Darice Banners die, and matted that on a scrap of the pumpkin card stock before I mounted that to the card front with foam tape. Naturally I had to add the “Happy Birthday!” sentiment on the inside, again using my Silhouette Portrait and a Pigma Micron pen to “sketch” that sentiment. Some orange sequins from my stash adds a nice birthday sparkle for our finishing touch on this card. I think that elephant headdress works well with this Moroccan die because it takes him out of the ‘wild’ and puts him in a more civilized environment. Another great birthday card!!
I wanted to do another round of reverse stamping, and I have one more pun I’d like to use, and I had an interesting idea for using the stencil in a little bit of a different way.
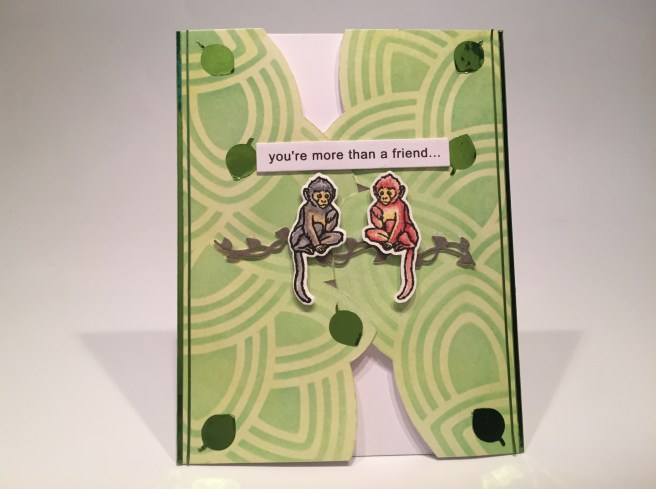
A shaped gate-fold card! There is one side of that Leaf Pattern Stencil that offered a fairly continuous line from the top to the bottom that seemed about 2.5″ wide – perfect to do a gate-fold! I stenciled that one side twice using Cracked Pistachio and Twisted Citron Distress Oxide inks and leaving and extra inch on the sides to use as a flap. I fussy cut the edges of both, flipped one upside-down and scored the sides so the gate-fold would overlap a little in the center. This took a little trial and error, but I think the results are worth it!
I stamped (and reverse-stamped) the monkeys on my watercolor card – again, using a silicon mat to do the reverse stamping. That works so well, you really can’t tell which monkey is stamped backwards! I was even able to do a reverse die-cut on that monkey by putting the colored stamp on a light table and lining up the die from the back. The red monkey is reverse stamped – I actually got a better die cut on the reverse stamp than I did on the normal monkey on the left. I find that reverse stamping option so exciting! Let’s get to the pun already! The two sides of the gate-fold open to reveal…

This pun is so perfect! LOL! I printed “you’re my prime mate!” using the Arial font on a 4.25″ x 5.5″ card panel. I also printed “you’re more than a friend…” on a scrap of white card and trimmed it down to size for the card front. I glued the side flaps of the stenciled pieces to the back of this printed panel and then covered the back of the flaps with another card panel glued to the back.
One more vine die cut, glued to a die-cut blank for a little stiffness, is glued to the gate fold across the center and cut at the seam. I added another layer behind the sentiment strip for rigidity and glued it to the left gate fold. The monkeys are mounted with foam tape leaving a little room on the right side of the left monkey so the right side of the gate-fold can tuck behind his knee. A couple green mirror peel off stickers for edging the sides of the card front add some shine, and I found an old leaf punch from my stash that was very close to the leaf shapes in the stencil, so I punched the mirror leaves from the edges of the peel off sheet for a final shiny surprise. This card tickles me to no end!
Than’s my 10 cards from the My Monthly Hero June 2019 Kit! I did manage to use every sentiment, every stamp and every die on these cards. WOO-HOO! And a couple of good puns! YEA!! I had a fun time with this kit! I like the images in this stamp set – especially the animals – definitely something new in my stash. I think these make a handsome batch of well-themed cards! I find watercoloring small images is much less intimidating than trying to paint larger images or scenes. I am NOT a watercolor artist by any means, but I always appreciate being prodded into practicing! And I always enjoy playing with Daniel Smith watercolors. Even if all I get is a few dots!
This kit is still available at Hero Arts! If I have sparked your imagination or given you some unique inspiration, I’d hop over to HA and grab a kit for yourself. When you do go shopping at Hero Arts, please use my link! http://bit.ly/2sBmuMCHeroArts Thank You!
I would like to extend my heart-felt thanks to all of you for sharing your time with me here! Let me know if you have any questions, or comments and which card is your favorite! Please share this post with all who might (even remotely!) be interested, and remember to Like me, List me, Pin me, Post me, Share me with all of your friends, don’t run with leopards (you’ll never keep up!) and HAPPY CRAFTING!!

I absolutely love your Hero Arts MMH videos and this one is absolutely great! Did you just hand paint the scene behind the two flamingoes?
LikeLike
Robin –
Yes! I just used the Daniel Smith watercolors to paint in the scene behind the flamingos.
Palm Trees are pretty simple! Thanks for the encouragement and support!
Spread the Cheer!
Scott
LikeLike
Oh, Scott, I can’t wait to see what you do with the MMH Kit for July!!!
LikeLike
A very nice set of cards! This is one of my favorite sets.
LikeLike
I just found this set (stamps and dies only) in the resale section of my local stamp store. I knew I would get some wonderful inspiration here. I LOVE what you’ve done with this set. The reverse stamping idea is great and the water color scene behind the flamingos is beautiful. Love your puns. Thanks for the amazing ideas.
LikeLike
Thanks Judy! Always Appreciated !!! Scott
LikeLike