
Hello Folks! Scott here with my post featuring the My Monthly Hero August 2019 Kit! This kit is a medieval set featuring Kings and Queens, Maidens and Knights and a fun assortment of fantasy / fairy tale images and dies.
 Our 6″ x 8″ stamp set includes all these great images and a big assortment of sentiments that you can combine in many different ways. We get 17 matching frame cuts for all the stamp images and a Fancy Castle die too! We also get three Glimmer Ink Pots (Gold, Purple, Red), and a pack of Dragon Scale Sequins along with 2 half-sheets of parchment paper, and 2 half-sheets of that totally groovy Mirri Matte Lava Purple Paper. Almost too pretty to cut! So many treats in our kit this month! Let’s go to the Renaissance Fair!
I did use my Zig Clean Color Real Brush Markers and VersaFine Onyx Black ink on Bristol Smooth Card Stock for all the stamping and coloring (unless otherwise noted). These are fairly small yet very detailed stamps and I find the tiny brush tips on the Zig markers invaluable for coloring – and they move and blend so easily on Bristol Smooth card stock.
I didn’t stamp and color everything immediately for some reason this month… I wasn’t convinced that I would be die-cutting everything – I thought I’d be doing more direct stamping on card fronts (as in this first card). As usual, I do challenge myself to use all of the stamps in these 10 cards and as many kit supplies as possible, so my mind is racing!
First I noticed the empty banner stamps and that there were only a few sentiments that would fit in the banners – none of the larger font sentiments would fit in those stamps. Then I noticed the vertical banner and realized that there were no vertical sentiments created for that stamp. Ah-hah!

There ya go!! One of the big sentiments on five banners! Looks like a medieval billboard! After figuring out the distance between the two poles of the banner (1 3/8″), I used my Tim Holtz Stamp Platform to stamp the right banner (masking off the left side), moved my card stock over 1 3/8″ and stamped the left banner (masking off the right side). I used my Pigma Micron 01 pen and a ruler to connect the cross pole on the top, then stamped the single banner on a piece of scrap card stock and fussy cut it to use as a stencil to trace the points on the bottom of the banner. Finally, I free-handed the banner ‘attachments’ on the pole across the top. I did use the Gold Glimmer metallic ink to color the banner and finials, and stamped the sentiment and embossed it with some Ranger ultra fine Clear embossing powder. A few dragon sequins at the points for a finishing touch!
I stamped and colored the Knight and his trusty steed – using the gold ink for the tassels and trims. Now I had two nicely colored images on a plain white card front… hmmmm. I scribbled some of my Zig markers on my palette, thinned them down with a lot of water, and lightly painted in some clouds in the sky and some grass to ground our scene. This is the first time I’ve done this and I think it worked quite well. I did add some detail and texture to the ground here and there with a more direct application of the markers.
I die-cut the card front with a Lawn Fawn Stitched Rectangle die, added a mat of dark blue card stock, and glued those to a white card base. Of course, I thought Hero Arts had given us a very nice joke with the addition of the “Welcome to the middle ages” sentiment, so I took that to heart and stamped the sentiment on the inside of the card. I think both of these sentiments are my favorite in this kit, and they actually make a very nice birthday card for anyone entering those nebulous middle ages…!
I was eager to tackle the dragon stamp in the kit and the Knight with the sword certainly seemed ready for battle. I was also eager to play with the Fancy Castle die…!

First I used some Holbein Gouache in Permanent White to spatter some stars on a dark blue card panel, I punched a 1″ circle from some light grey card stock for the moon, die cut the Fancy Castle out of some medium grey card stock and sponged the edges with Hero Hues Sea Salt ink. I free-hand cut the darkest grey card for the “rock” border in front, and added detail with the Sea Salt ink and a post-it note mask. I did add a little more “rocks” behind the knight just using the back of the right side of the cut out rocks as a stencil on the castle card stock. I used VersaMark ink and Ranger white embossing powder for the sentiment under the dragon. The castle and moon are glued directly to the blue card panel, and the “rocks” are mounted with foam squares.
I did want to color a red dragon, but was a little unsatisfied with his smooth appearance… Hmmmmm… I drew in the dragon scales and the texture on his belly with my Pigma 01 pen and that made him feel much more dragon-like to me! Much more menacing! The knight and the dragon are mounted with foam squares and the whole panel is glued to a white card base.
Once again this kit provided us with a perfect sentiment for the inside: “thou be-eth on fire” is an obvious compliment to the “you Slay” sentiment. I stamped the fire sentiment on a piece of the parchment paper included in the kit, stamped and colored the “flame” stamp below the sentiment, and die cut the paper with my LFSRD before mounting it to the inside.
I like that dragon stamp a lot and will remember that it’s very easy to add scales to that stamp. I really like the mostly grey tone to this card with the pop of the red dragon to draw your eye. I think that castle die is a great background die and should prove very useful in oh so many ways. These sentiments are my second favorite pair in our stamp set this month. A cool congrats card!
After I posted my 10C1K video of the MMH July ’19 kit, Libbie Hickson at Hero Arts contacted  me and asked if I would like to try the new Hero Hues reactive ink pads. Well, of course…! You don’t have to ask me twice! These pads are formulated with both dye and pigment properties and are water reactive and should lend themselves to easy blending. Hero Arts offers some great colors with these new inks: Taffy, Fruit Punch, Creamsicle, Lemon Drop, Key Lime Fizz, Green Apple, Pool Party, Blue Raspberry, Splash, Blue Hawaii, Berry Smoothie, Thistle, Grape Slush, Fog and Sea Salt. I wanted to try doing some background blending with these new inks on this next card.

I blended this background using Pool Party and Blue Hawaii for the sky and Green Apple for the grass. I did use Bristol Smooth card stock and a Mini ink blending tool for the background and was very pleased with the smooth and very colorful results – goes quite well with the Zig markers! As you can see, I did die cut this Bristol smooth card stock background with a LFSRD. I just can’t help myself!
I stamped the maidens in a row fairly easily by just masking her left side. I stamped the cabana three times, trimmed off half the curtains on two and all the curtains on the third and glued their tops together to make a great big tent capable of holding all these maidens. The sentiments are stamped on the double banner, and I cut off the flag on the right (and center) tent poles so I could fly the banner from there. A thin strip of wood-grained pattern paper provides a bit of a platform for the tents, and the purple lava card stock is the background inside of the tent. Everything is glued to the inked background, and the knight is mounted with foam squares.
I cut a piece of the purple lava card stock to 4″ x 5.25″ to use as a mat, but I couldn’t bear to waste everything behind the card front, so I die cut the center of that mat away using the same LFSRD that I used to cut the card front. The card front and the mat inlay perfectly and are glued down to a white card base. I’m not quite sure if these maidens are putting on a show, displaying the latest fashions, or simply being offered up to this Knight, but whichever it is, I can’t think of anything much warmer..!
I’ve used six out of the 15 sentiments in this stamp set so far… I’m aching for a pun!
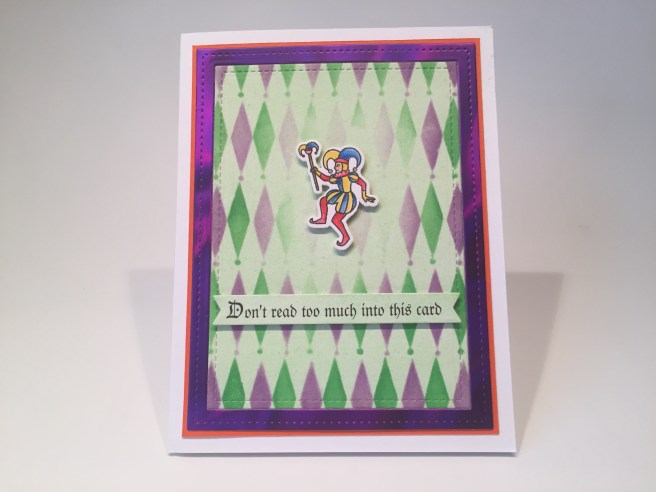
When I saw our little jester stamp I knew just what I wanted to do with him! I die cut a panel of Bristol card stock with the next smaller LFSRD, and colored that using a Marabu Kiwi Watercolor Crayon and a baby wipe. Then I used my Tim Holtz Shifter Diamonds layering stencil with Hero Hues inks in Green Apple and Grape Slush. Love the two-color pattern you can get with that layering stencil! Perfect for a jester card!
Continuing along with my ultra-anal preservation of that purple lava card stock, I took the piece remaining from the last card and die-cut the center away using the same die I used to cut the pattern panel – perfect inlay again! I glued the frame and panel to a thin orange mat from my stash – I chose orange to finish out the rainbow on this card!
I printed this sentiment using my Silhouette software and the Fraktur BT font on a scrap of Bristol card (colored with the Kiwi) and die-cut with a Lawn Fawn Everyday Sentiment die. Of course the pun is on the inside! “It’s just a nice Jester” makes me laugh and is a pretty darn good pun perfect for this kit! The inside sentiment is printed directly on the card base using the same font and software. Finally, I die-cut the colored jester and mounted him and the sentiment banner to the card front using foam squares. Very colorful and fun card! I think that jester is a fun focal image on the card front. Nice pose!
I colored the king and queen stamps and thought that I would be using them together… but we do have individual sentiments for both seats of power, so…
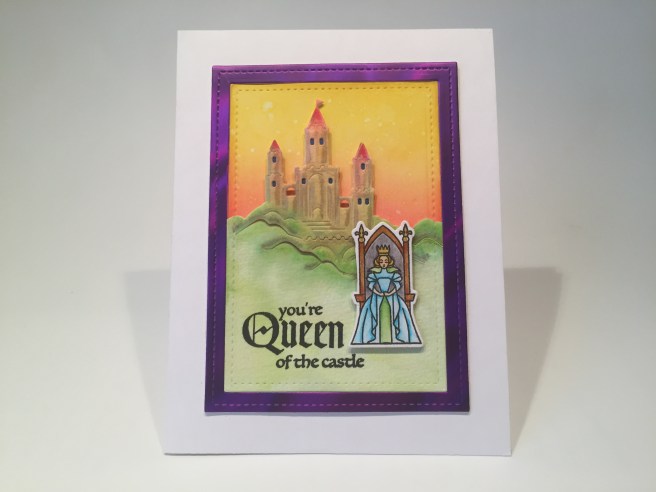
I die cut another piece of Bristol card stock with the next smaller LFSRD and used the Hero Hues Fruit Punch, Creamsicle and Lemon Drop inks to blend this background. I did sprinkle a little water on the background and blotted it up to display the water-reactive properties of this new ink. Very nice!
I dry embossed the castle die on a piece of watercolor paper and sketchily colored it with my Zig markers and then sprayed it down with water. I moved the wet ink around a little bit with a brush and let it all dry before completing the die-cutting. I used the same LFSRD to cut the bottom of the watercolor castle panel. I trimmed the “my” from the “you’re my” sentiment and stamped these (3) sentiments on the bottom of the watercolor panel using Onyx Black ink.
I moved to the next smaller LFSRD to cut the center from the remaining Purple lava card stock, and cut a second frame from some scrap white card stock to make this frame a little thicker – the ink blended background and the castle panel make a double thickness. The double frame and the background are glued to a white card base, and the castle panel is glued at the bottom and foam taped around the castle for a little dimension. Lastly, the seated monarch is attached to the card front using foam squares.
I die-cut more of the parchment paper for my inside writing surface and stamped “You Rule” at the top. I couldn’t resist a little bit more and printed the “my heart” underneath using the Lucida Blackletter font. “You Rule my heart” seems much more user friendly to me and turns this card into a prefect little Renaissance Valentine!
I love the soft watercolor feel on the castle, and the colorful background using the Hero Hues inks. A non-traditional Valentine for any Queen in your life!
A number of years ago, had the pleasure of directing the opera “Un Giorno di Regno” by Giuseppe Verdi which basically translates into King for a Day – thus this next card:

Major masculine here!! On a black card base, I took that last piece of purple lava card stock left over from the Queen card (that piece started with the 4″ x 5.25″ piece cut for my first card!) and matted that on a thin white mat and glued it to the card base. I die cut the castle from more black card stock and die-cut the bottom with the same LFSRD and glued that to the purple background. I embossed the sentiment(s) using VersaMark ink and white embossing powder and attached the die-cut King with foam squares.
I did die cut another piece of the parchment paper for the inside writing surface and stamped the “happy day of thy birth” sentiment on that. This would make an equally good Father’s Day card, and I could always add another writing panel on the inside with a different sentiment if needed. Love that purple lava card stock standing in for the sky… and totally love this uber-masculine card!
I like the stylized unicorn stamp and the pose he’s in – one of my favorites in this set! After I colored this stamp I knew I wanted to continue the rainbow theme on this card.
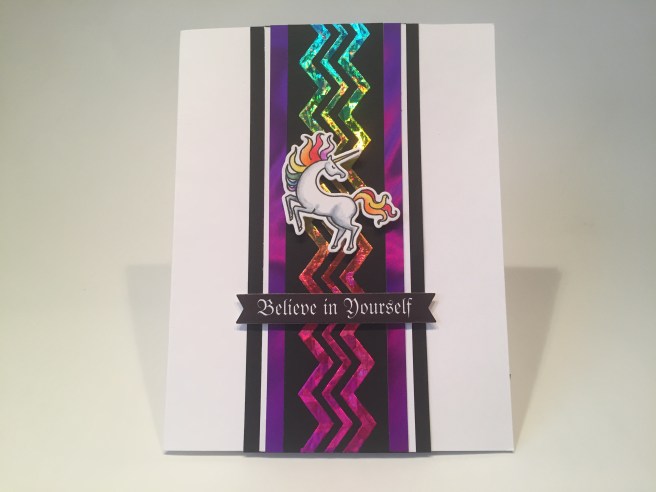
I dug out this old zig-zag stencil (no idea where it came from) and used some Deco Foil Transfer Gel and Rainbow Shattered Glass Deco Foil on some black card stock to make the center panel for this card. I glued that foiled piece and two 1/4″ strips of the lava card stock to a thin white mat, then to thicker black mat, and then down to a white card front.
I printed the “Believe in Yourself” sentiment using the Fraktur Bt font and my Silhouette software (remember that software is FREE!!) and die cut it with the LF sentiment die. The colored and die-cut unicorn and the sentiment banner are attached to the card front with foam squares. I LOVE this card! The zig zags almost feel like lightning and that foil goes so well with the lava card stock and the rainbow unicorn. A terrifically bright and shiny encouragement card!
I also like the archer maiden stamp – another stamp that actually displays some action! I did experiment with making this a single-layer card but the archer on top of the banner got a little too busy, so I went with die cuts for the girl, the arrows and the target.
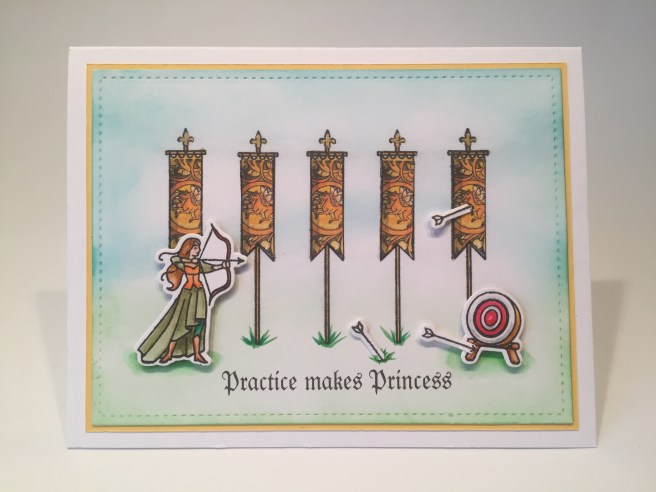
I die-cut another panel of Bristol smooth card stock with a LFSRD and used Hero Hues Pool Party and Green Apple inks along with my Cheap-o Blender brushes to blend this light ethereal background.  I stamped the row of five banners using my stamp platform, and paper pieced them with a little cartoon rendering of one of the unicorn tapestries I found on line. I actually live a few block away from the Cloisters which is a part of the Metropolitan Museum of Art and houses the Unicorn tapestries. I just printed this five times on plain paper, stamped and fussy cut the banner, and glued them on top of the stamped images. I did give them all a little shadow on their left sides with my lightest gray Zig marker. That adds a little dimension!
I printed this sentiment on the card front using my Silhouette software and the Fraktur BT font. I thought this was a fun play on the “practice makes perfect” saying, and totally in tune with this kit. I matted the banner panel to a thin yellow mat and glued those to a white card base. Some of the gold glimmer metallic ink for the finials, a little Zig marker grass and shadow detail, and the die cuts all mounted with foam tape finish out this card. Looks like this maiden needs a little more practice..!! The arrow in the banner makes me giggle ’cause it actually hit the heart of the unicorn! Paper piecing is also a terrific way to use this banner stamp. So many patterns would work quite well as decorative banners! I did want to finish this card on a positive note, so I printed the “You got this!” sentiment on the inside of the card base. Yet another fun encouragement card!
I thought the “royal greetings” sentiment in our stamp set felt a little stuck-up and the “I thank thee” sentiment sounded like a prayer or a hymn, so I decided to pair the two up and hopefully lessen the awkwardness… I think they work pretty well together!
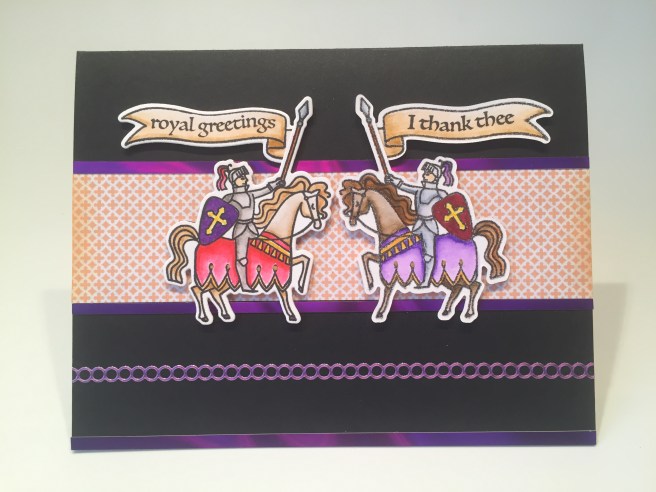
Back to the horse-riding knight for this card, with one of them reverse-stamped so they could face each other (that will help with the pun inside..!!) I printed this pattern from my image stash in orange and glued it just above the center of the card base. I did sponge a little Creamsicle ink on the short edges for a little distressing. I added 1/8″ strips of the lava card stock on either side of that pattern, and another to the bottom edge of the card base. I demonstrate my reverse stamping technique in the MMH June 2019 post if you’re interested, and I die cut the reverse pieces using a light table to position the die.
The shields are actually painted with the red and purple glimmer metallic inks – not as much glimmer as the gold but pretty nonetheless!  For a finishing touch, I added a Love From Lizi Lilac Mirror Bubble peel-off between the lava strips on the bottom. I also used my last piece of parchment paper to create this pun on the inside writing surface. I printed “joust wanted to say…” on the die-cut parchment paper using the Lucida Blackletter font. This pun makes me wish we had a Knight on a charging horse with a jousting pole… but I guess we need him as a standard bearer. Still, a nice thank you card with a pun!
I only have the Wizard stamp and the “have a Magical day” sentiment stamp left to use.

I stamped the wizard directly to a die-cut panel of Bristol smooth card stock, and colored him with my Zig markers. I embossed the sentiment using VersaMark ink and SSS Steel Navy embossing powder. I punched a tiny hole at the end of the wizard’s wand and cut a thin black mat for that panel. I marked the wand hole on the black mat and punched a 1/4″ hole through the mat right behind the wand hole, and glued the two pieces together.
I found this perfect ShutterStock image in my stash, printed it on white card stock, die-cut it with a LFSRD and mounted it to a thin black mat and then down to a white card base. I did the Chibitronic wiring on the pattern paper with the battery in the lower left corner and one of the blue LEDs behind the wand hole. I stamped the “push” stamp from the MFT Interactive Labels stamp using the Blue Reactive ink from the MMH July 2018 kit, and stamped the “… day of thy birth” sentiment on the inside using the same ink. I attached the card front to the background using my EK tools thick foam squares and added some Spectrum Noir Sparkle pen around the wizard, and a clear gem over the hole at the end of the wand.
When I saw this wizard stamp I knew I’d be doing another light-up card with this kit – “luminos!” to quote the Harry Potter gang..! The pattern paper and embossing powder match beautifully, and, though still pretty tiny, I do like this wizard stamp. Whether this is Merlin, or Albus Dumbledore, or Gandalf (the blue?) or some random magician, I think everyone can use a good wizard stamp in their stash! I know I’m glad to have one now! And this sentiment is the perfect compliment!
So that completes my 10 cards using the MMH August 2019 Kit! I ended up die-cutting more images than I thought, and I did manage to use every stamp in this stamp set (if you forgive me not using the “my” from the “you’re my” sentiment stamp)! I used a few sequins and a little bit of all the inks, I used all of the parchment paper and I still have one and a quarter sheets of that Purple Lava card stock left over! Pretty good considering there’s six cards here with some of that shiny card stock. All in all, pretty successful!

We have a lovely assortment of cards with a few birthday cards, a few encouragement cards, a congrats card, a valentine, a thank you card and even a couple of puns! A very colorful batch of cards that are perhaps more Renaissance Faire than Fairy Tale! I’m sure a lot of these stamps and dies will get a good workout in the years to come!
As of posting, this kit is still available at Hero Arts. If I’ve managed to spark your imagination, and you do go shopping at Hero Arts, please use my link: http://bit.ly/2sBmuMCHeroArts And for the MMH August ’19 kit: http://shrsl.com/1rv01. Thank you so much! It is always greatly appreciated!
Please let me know if you have any questions or comments, what cards are your favorites, and remember to click on the FOLLOW button at the top of this page. You can check me out on YouTube: https://www.youtube.com/channel/UCC1IqryClU-61lE1exUP0pA?view_as=subscriber and follow me on Instagram @cardcutups. Please remember to Like me, List me, Pin me, Post me, beware of unsolicited chain mail, and as always, Happy crafting!!
DISCLOSURE: This site contains some affiliate links to products. We may receive a commission for purchases made through these links. Thank you!!

As always, your creativity shines. These are fun and whimsical and maybe a few “puns” here and there perhaps unnoticed . I always look forward to your cards Scott! Thank you so much!
LikeLike
Thank YOU, Katherine! Thou art very welcome!! I appreciate your support and encouragement so very much! Always pleased to be able to share some ideas and a couple smiles with you! Spread the Cheer!
LikeLike
Your puns delight me and your creativity inspires me , thanks for sharing
LikeLike
Thanks so much Alice! Thrills me to be able to share some ideas and a few smiles with you! Spread the Cheer!
LikeLike
I love your card ideas and the way you present them. Hero Arts kits are my favorite and I look forward to your video presentation of how to use these kits every month. Thank you so much for sharing your amazing talents!
LikeLike
Thank YOU, Karen! That means a lot to me! Spread the Cheer!!
LikeLike