
DISCLOSURE: This site contains some affiliate links to products. We may receive a commission for purchases made through these links. Thank you!!
Hello Folks! Scott here with my 10 (plus!) cards featuring the Love From Lizi June 2019 Card Kit. This kit sports a soft teal, mint and peach color scheme and is chock full of a huge variety of papers, stamps, dies and embellishments. Just what we expect from Lizi!

This kit sold out VERY quickly this month. I’m not sure if it was the colors, the stamps, the embellishments or possibly the rare opportunity this kit provides to make some lovely sympathy cards that connected with folks, but, this kit went like hot cakes! If you’d like to follow along with my 10C1K video, click here: https://youtu.be/zzJ06VjNB7s
Usually, I’ll take the 5 sheets of card stock included in Lizi’s kits and make 10 card bases out of them.  This month, I decided to cut the card stock in half and use half of each sheet for card bases and trim the other half down to Acard-sized panels. I augmented the card bases from the kit with five white card bases from my stash, and I kind of like the option of having extra colored card panels to play with!
To begin with, my eye was drawn to the two pattern paper sheets that had 3″ x 4″ cut-apart  panels on one side. Along with the two 12″ x 12″ cut-apart sheets also included in this kit, we have an embarrassment of cut-apart riches this month! I think it must have been that teal ombre, the wreath, and the dandelion panel that made me want to play with these. I went right ahead, and, disregarding the patterns on the back of these, cut both sheets down to eight panels. I wasn’t quite in the mood for a sympathy card right off the bat, so I decided to turn one of these panels into a masculine valentine.

This is the ombre panel that said “sending love and sympathy”, but I just trimmed the sympathy part away from the love part leaving a little bit of the teal as a border along the bottom of the scripty ‘love’. On the black card base, I added a teal card panel die-cut with a Lawn Fawn Stitched Rectangle Die, and a black panel die- cut with another LFSRD, and added the trimmed panel with some foam tape. I did use my Spectrum Noir Sparkle pen to add a layer of glitter on the ombre background before I added the ‘forever in my heart’ banner and the black heart from the sticker sheet. The banner is glued directly to the ‘love’ panel and the heart is mounted with some foam tape. Three little black sequins from our sequin mix add the finishing touch to our uber-masculine valentine!
I mentioned in my un-boxing that I thought this kit would give me the opportunity to create some unique sympathy cards to add to my stash since I’m never in the mood to make one when I need one. I grabbed some old David Tutera shimmer white card bases for these next four cards.

I think the shimmer provides a very ‘dressy’ feeling with just the right gravitas for a sympathy card. I die-cut the printed panel with a LFSRD, and matted that on a teal panel with a thinner black mat. I cut the flowered pattern paper with another LFSRD and matted that on a thin black mat and glued that directly to the card base. The flowers were a little too prevalent, so I toned them down with a piece of vellum die-cut to the same size and glued on top. The printed assembly is foam taped to the card front and three of our gold crystals highlight the flower centers for a simple touch of sparkle. I really like this sentiment and the matching flowers. Lovely sympathy card!

This 3″ x 4″ panel is matted on a thin black mat and paired up with a 1″ wide strip of the ‘confetti’ pattern paper that is attached to a thin black mat and glued to the left side of the card base. I used the Gold Moondust peel-offs (from the add-on peel off bundle) to both sides of the confetti strip and on the top and bottom of the three ‘sentiment strips’ on the panel. That helped this sentiment pop quite nicely! I foam taped the panel to the card base and added three gold sequins from our mix for a final touch. I though this was a perfect sentiment for a sympathy card, and once again, quite respectful yet very pretty!

Again, I die-cut this printed panel with a LFSRD, and glued that to a thin black mat. I did the same with the striped pattern paper for the background and glued that to the card base. The ‘notebook paper’ panel wasn’t quite cutting it on its own, so I grabbed some flower stickers from our sticker sheet and arranged them on the top and bottom edges. The sentiment panel is foam taped to the background, and the flower stickers are foam taped on top of that. The gold heart (from the add-on ephemera pack) is foam taped over the printed heart and provides a tiny bit of shine on this card.  I did go ahead and add a sentiment on the inside of this card. One of the small sentiment strips from the sticker sheet went perfectly with this sentiment and is a great prelude to a personal note. More pretty!
While we’re at it, there’s the wreath with the “So Very Sorry” banner just waiting for me!
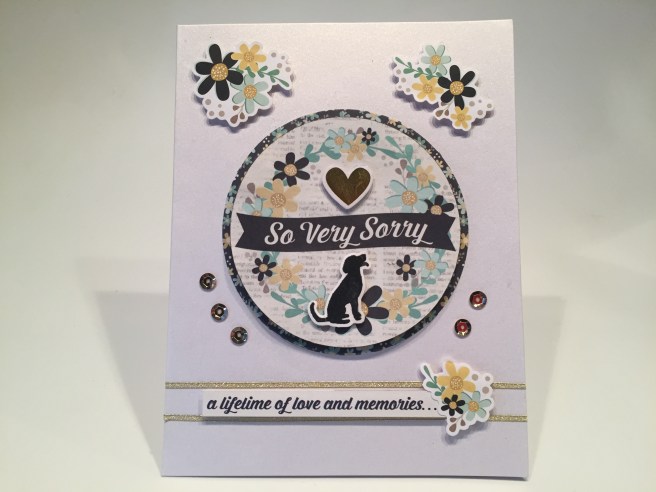
Pet sympathy card to the rescue! I wanted to die-cut this wreath but didn’t have an appropriately sized die so I reached for my EK Success Circle Cutter to cut out the wreath. I did have a Darice circle die that worked for the black flowered mat, and glued that directly to the shimmer card base. The sentiment strip on the bottom is from the sticker sheet and the 3 flower bunches are from the add-on sticker pack. I mounted all of those with foam tape and outlined the sentiment with more Gold Moondust peel offs. I mounted the wreath with foam tape and cut the gold heart away from a sentiment piece from the add-on ephemera and foam taped that above the banner. The dog stamp and die is from the My Monthly Hero May ’18 Kit – that is the only dog stamp I own..! I stamped that with VersaFine Onyx Black ink and embossed him with some clear embossing powder and mounted him under the banner with foam tape. A few gold sequins circle the bottom of our wreath for a little balance and shine, and I think the casual nature of “So Very Sorry” works great for a bereaved pet.
I think that’s enough somber thoughts for the time being… let’s play with that dandelion!
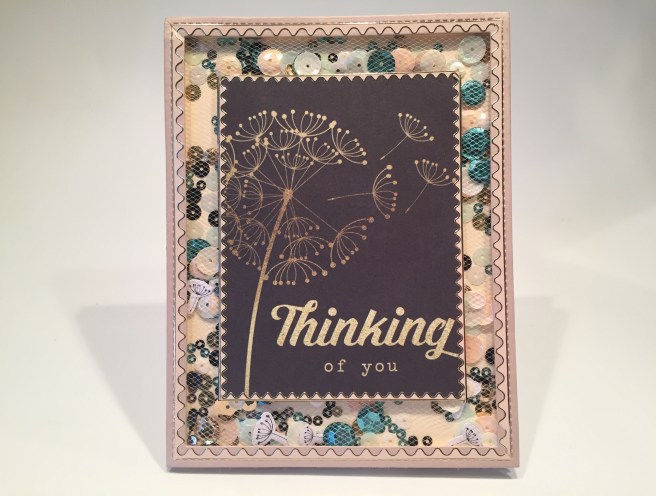
It’s Shaker Card Time!! Using two LFSRDies, I die-cut this frame from the Blush specialty card stock, and glued a piece of the tulle netting to the back of the frame. I centered the dandelion panel on the netting, and added a double layer of foam tape around the frame and behind the panel. I added a bunch of sequins from the sequin mix around the channel, and added all the little dandelion seed pieces from the ephemera pack. I peeled off the liner paper from the foam tape and added the Ivory card panel to the back. I then used the peach/gold sway peel offs from our kit around the frame (large) and the center panel (medium) – those peel offs match the blush specialty card perfectly, and add some nice texture and shine! The whole shaker assembly is then glued to a white card base. I think a shaker card is perfect for this dandelion image – everything floating away and moving around, and I like using the tulle netting instead of acetate – no excess static to deal with! And, if you want to clear out all those (infuriating) extra tiny dots punched out of the sequins, just use the netting as a strainer! LOL!
I was eager to use the swan dies from this kit and thought a black swan would be a unique and interesting way to use this crowned swan die.

I die-cut the swan from the black and white shimmer specialty card stocks and layered the white outline on top of the black die cut swan taking care to hold all the black pieces together with a little tape. Very striking! I die-cut the cattail die from the same card stocks and glued them together with a little offset. I used my Darice Nesting Circles dies to cut three different sized circles from the pattern paper, and turned to my Circle Cutter to cut the black mats for them. I stamped the sentiment on one circle with Onyx Black ink and glued the cattails to another. I die cut the Teal panel with a LFSRD and matted that with a piece of the black flowered pattern paper from the 2″ x 2″ cut apart sheet and glued those directly to a white card base. The sentiment and cattail circles are foam taped to the background, while the large circle is glued to the card base and the swan is foam taped on top of that. I foam taped a black heart from the ephemera pack onto the circle with the swan, and added three gold sequins to the top right corner. I really like this black swan – did you know that black swans are native to Australia?
I kept coming back to the Dr. Seuss sentiment featured on one of our pattern papers. I really love that quote but thought it was too similar to the cut apart I used on card #3.

So I fussy cut the four sentiment strips away from the pattern paper and matted them on strips of brushed gold mirror card stock from my stash. I trimmed two rows of the grey hearts from the pattern paper, and I trimmed the black heart pattern paper to 2.25″ so it would leave me room for the black card panel to show between the pattern papers. All three pieces of the pattern papers are glued directly to a black card front. The large partial heart is fussy cut from one of the cut apart panels, and foam taped to the left side of the card front. The sentiment strips are mounted with foam tape as well. I debated whether this should be a sympathy card or a “miss you” card and finally settled on a sympathy card.  I actually did a little stamp surgery on the “Forever in our Hearts” stamp from the “Heaven Held” add-on stamp set, and trimmed the ‘in loving memory’ away completely. Lizi mentioned possibly being able to mask off this portion of the stamp but I took that a step further and cut it off completely. Another sympathy card (I can’t help myself!) but I adore this quote and just had to use it!
I was also fascinated with the itty-bitty tiny circular sentiment on the “Heaven Held” add on stamp set referencing butterflies and angels, and wanted to see if that small of a stamp would even read, much less carry a whole card. I think it holds its own admirably!
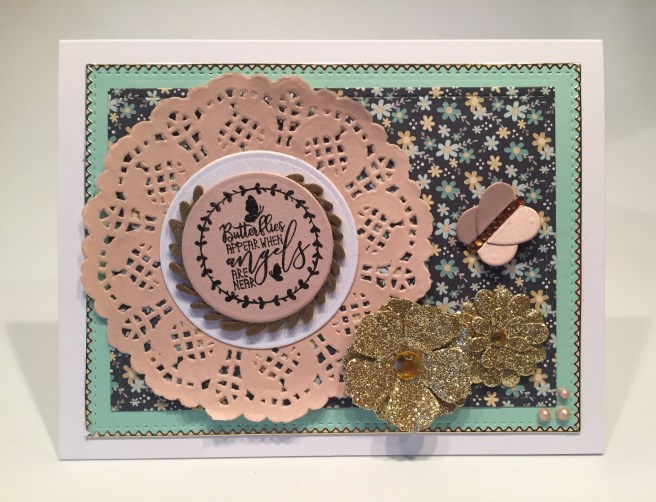
I stamped that on the Blush specialty card stock using StazOn Jet Black ink (I didn’t want to risk smearing ink on that shimmer card stock) and die cut that with a circle die. I embossed the laurel wreath wood veneer die cut with VersaMark ink and LFL Golden Crown embossing powder, and glued the die cut sentiment on top of the wreath. I glued those to a die cut circle of the white pearlescent specialty card stock and went to work on the rest of the card. I die cut a mint card front with a LFSRD and outlined that with the small sway peel offs. I die cut the black flower piece from one of the pattern papers and glued that to the mint piece and glued both to a white card base.
I glued two of the doilies together (since they were so thin you could almost see through them) and glued them directly to the card base, and glued the sentiment stack on top of the doilies. I stacked up two of the large glitter flowers and three of the small glitter flowers, and replaced the beads in the center of each with some gold gems and glued them to the card front. I do not have a butterfly die in my stash (surprise!) so I grabbed one of the heart dies from the LFL May kit and fashioned one of my own with a body made from the mini copper gems from the LFL March ’18 kit. I glued the gems to a strip of the peach ribbon, cut the hearts in half and glued them to the sides of the sequins – this might look more like a moth than a butterfly, but not a bad substitute for the real thing! LOL! I glued the butterfly to the card base and added some Nuvo Drops to the bottom right corner for the final touch. LOTS of embellishments on this card!!
I like the ‘harlequin’ diamonds on the sticker sheet and pattern paper and wanted to see if I could get them to work together to create a unique pattern. The sticker diamonds are about 4 times larger than the pattern paper diamonds so that gave me this idea.

I fussy cut a bunch of the small pattern paper diamonds and glued them together in sets of four to match the size of the sticker diamonds. I cut a piece of scrap white card stock four times larger than the sticker diamonds and stamped the sentiment on that using Broken China Distress Oxide Ink. Then it was a simple matter of foam taping all these diamonds to a black card panel, and adding some “X”s and “O”s die cut from the black and white specialty card stock with an old Die-namics “Little Lizzie” alphabet die. I added some of the small peel offs to the edges of the cut diamonds top and bottom and some more gold gems on the four corners of the center diamond. I like this pattern and the juxtaposition of the small, medium and large diamonds. FUN!
I’m really itching to color something now… I thought the swan wreath might satisfy me.

Ahhhhhhhhh…! That feels so much better! LOL! I dry embossed the swan wreath die on a piece of Bristol Smooth card stock die-cut with a LFSRD, and used my craft knife to cut away the inside of the wreath. I reached for my Stabilo markers and a paint brush to color the swan and wreath. It felt so good just to color something! I added a little detail with a black Pigma Micron pen and stamped the sentiment with Cracked Pistachio Distress Oxide ink and clear embossed that for some nice shine and dimension. Then it was a simple matter to mount the colored panel to the Mint card base with some foam tape, add a few sequins from our mix and we get a nice bright colorful Hello card! It was terrific card therapy for me to be able to color this… this card made me a happy crafter!
I was determined to come up with a great way to use that gold chain embellishment from this kit, and after fiddling around for a bit, I arrived at this.

On the Ivory card base, I glued a 3″ strip of the ‘stars’ pattern paper down the middle, edged that with two 1/8″ strips cut from the striped scallop border on our sticker sheet, and finished that off with 2 strips of the new Lemon Glitter peel offs from the add-on peel off bundle. I think this is my favorite sentiment from the “Heaven Held” add-on stamp set – maybe my favorite in this whole kit! I stamped and embossed this on one of the ivory card fronts and die cut it with the middle-sized die from the Gina K/therm-o-web Small Oval die set. I really like that double stitched edge! Then, using the die as a guide, I determined the appropriate length of the chain needed, and connected the ends together with some plain needle-nose pliers. This chain is inexpensive, and very easy to open and close the links. I centered the die on the card front and used my Multi Medium Matte to glue the chain around the edge of the die. That glue holds brilliantly! Once that had properly dried, I mounted the sentiment oval with some foam tape and added three gold crystals for highlights. I LOVE THIS! Yes… one more sympathy card (that makes 7!) but I love combining “treasure” and the gold chain! And I like this sentiment stamp so much I just might have to use it to make ALL of my future sympathy cards! LOVELY!
The “Sending Love” stamp set had one sentiment stamp that I absolutely HAD to use.
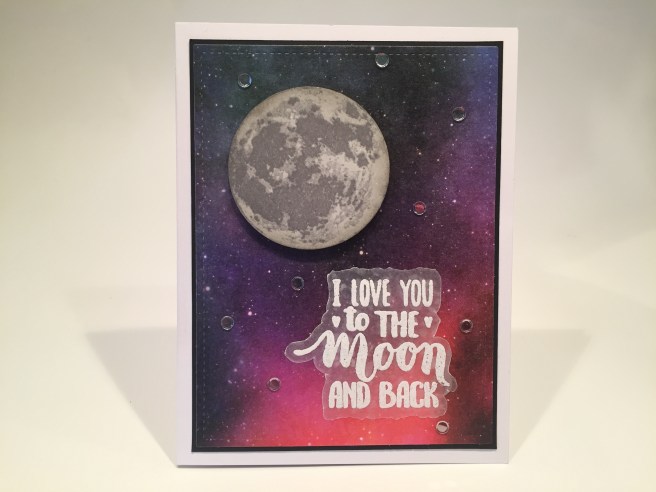
I recently bought the “To The Moon” layering stamp set from Altenew, (on sale!) and I was eager to try it out, and this sentiment gave me the perfect opportunity! It took me a number of tries to figure out the perfect alignment of these stamps, (stamped with Hero Arts Soft Granite ink) but once I figured it out it gave me a really nice moon!! A 2″ circle die cuts the moon out perfectly, and I added a little sparkle to the moon with Sheer Shimmer Spritz. I covered a white card panel with the Altenew Watercolor Nebula washi tape and die-cut that with a LFSRD. I added a thin black mat, and glued those to a white card base. I stamped the sentiment with VersaMark ink on a scrap of vellum, and embossed it with the LFL Very Vanilla embossing powder. I tried a few dies to see if they would fit this sentiment, but ultimately just fussy cut the vellum before running it through my Xyron Sticker Maker and attaching it to the card front. A few SSS Moonshine Confetti sequins adds additional sparkle to the nebula and we have another bright colorful playful card! I just love that wide washi tape… and I shouldn’t have to print a moon image ever again! I LOVE IT!
Thats a baker’s dozen for you right there. 13 cards with seven sympathy cards. But, I haven’t used the Swan with heart die yet! OK! I have one more treat for you this month!

Did you know that swans mate for life? They do! That simple fact actually makes this sentiment stamp perfect for a pair of swans!  On a Teal card base I grabbed my home-made ‘water ripples’ stencil and stenciled the bottom half of the card base using Salty Ocean Distress Oxide ink. I stamped the sentiment with the same ink and clear embossed that as well. I die-cut the two swans and three water lilies from our White specialty card stock and cut the hearts from a scrap of white glitter card stock. I took some green alcohol markers to the leaves of the lilies and glued everything flat to the card front except for the second swan who is mounted with some foam tape. I added two Teal mirror Sway peel offs (add-on peel off bundle) to the top and bottom edges of this card for a final pop of shape and shine.
  Of course, I cannot leave you without any puns this month, so on the inside of this card we get “You’re the swan that I want” (you are the swan I want – ooh, ooh, ohh, honey!) This is printed on a die-cut white writing surface using the Raustila font. A perfect little pun to wrap up my 14 cards this month! That’s 6 sympathy cards, 1 pet sympathy card, and 7 love cards! I just couldn’t stop myself this month! So much inspiration here! I could go on and on! I did manage to use a little bit of most everything in this kit (and my add-ons) except I didn’t get to those gold bows or any of the ribbon, and I didn’t get to use the three small flower dies, and, alas, I didn’t use every stamp in the stamp set(s). I’m Only Human!!

So there’s a little extra for everyone this month! Hopefully that makes up for the fact that his kit sold out so quickly! Most of the add-ons are gone too! I do know that the “Heaven Held” add-on stamp set is still available, and if you need some sympathy sentiments, this is a really nice set to have in your arsenal. If you missed the chance to get this card kit, I heartily encourage you to become subscriber so you won’t miss out on Lizi’s next “knock it out of the park” card kit! If you do go shopping at Love From Lizi, please use my link: http://bit.ly/LFLlink Thank You!
I’m truly pleased to be able to share some ideas with you, along with a smile or two, and I truly appreciate the time you spend with me here. I am always eager to hear from you – let me know what your favorite cards are, if you have any questions, need more information, or just want to chat, you can always email me at cardcutups@gmail.com.
Please share this post with interested parties, remember to Like me, List me, Pin me, Post me, don’t provoke the swans, and, as always, I wish you Happy Crafting!

I’m going to have to CASE every one of these! Just absolutely gorgeous!! Thanks for the great ideas! 🤓
LikeLike
Thanks Jeanne! My Pleasure! Always good to hear from you on the blog! It was actually nice to do a batch of pretty straight-forward cards this month! I’m sure I’ll see your results in the LFL group! HAVE FUN!!!
Scott
LikeLike