
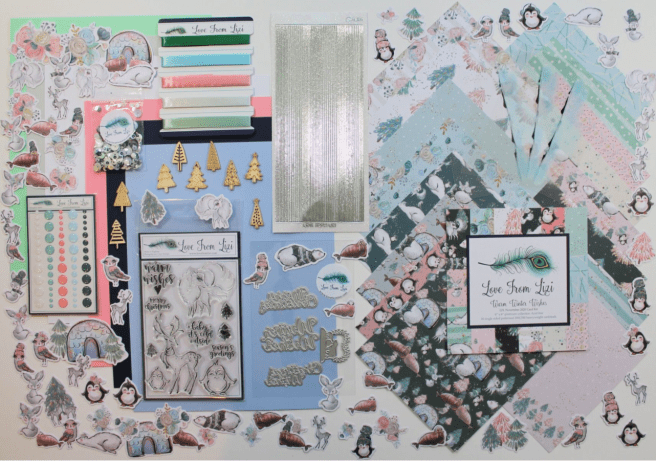
Hello Folks! Scott here with my 10 cards post featuring the Love From Lizi November 2020 Card Kit! Winter holidays is the theme this month with a unique stamp set and pattern papers, lots of embellishments, and gobs of ephemera. I am in the holiday spirit!
As usual, I cut the five sheets of colored card stock in half to make my ten card bases. My eye was drawn to the reindeer stamp, so that’s where I started.

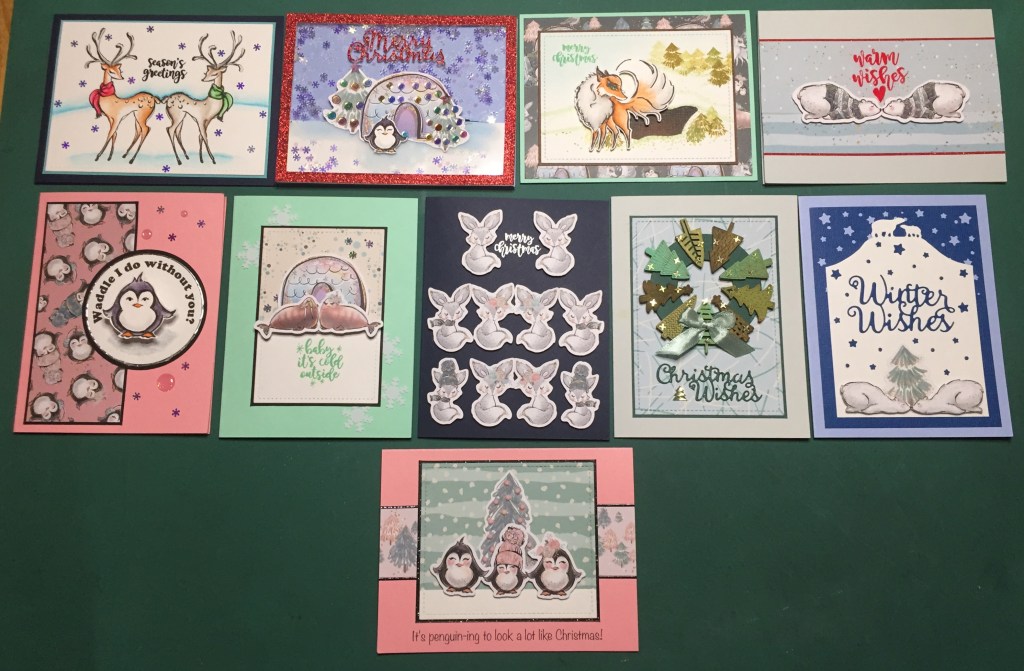
On a piece of Bristol Smooth card stock and using VersaFine Onyx Black ink, I reverse-stamped the deer on the right and matched that up with the regular stamping of the reindeer on the left. I have a short video of how I reverse-stamp on my MMH June 2019 blog – if you’d like a refresher! I colored these ladies with my Zig Clean Color Real Brush markers – a simple horizon line and a bit of a shadow was all this needed.
I stamped the sentiment using VersaFine ink and embossed it with some clear embossing powder, and I added a flurry of small snowflake sequins for some glimmer and shine. I die-cut the panel with a Lawn Fawn Stitched rectangle die, added a thin light blue mat from my stash and glued those down to a Navy card base. If you take some care with this reverse-stamping technique, it certainly produces great results! LOVE IT!
How about those short little penguins on our stamp set? And a pun!

This one makes me laugh! I don’t think anything waddles quite as much as a penguin! And this guy is on a mini Action Wobbler too, so he, literally, waddles..!!! He is stamped on Bristol card stock with Versafine ink and colored with my Zig markers. I did fussy cut him with a thin white border. I cut a piece of the penguin pattern paper to 2″ x 5″, added a thin black mat and (because the pattern paper is pink) glued that to a Pink card base.
I created this sentiment using my Silhouette software and the Cooper Black font, and printed it on a scrap of card stock before die-cutting it with a HA Circle infinity die. I die-cut a black mat with the next size larger die and glued them both together. I glued those to the card front and outlined the inner circle with the thinnest iridescent Peel off from the kit. Some pink glitter enamel dots and more snowflake sequins add a touch of winter and a little sparkle. I like that this isn’t necessarily a winter or Christmas card!
I stamped, colored and cut the smaller penguin along with the big guy here for this one.

I thought this little fellow fit this ephemera igloo perfectly, and that gave me a reason to use the snowy acetate sheet in the kit and make a shaker card! To begin with, I stamped the Marine Blue card base with the snowy infinity stamp from Lizi’s Nov. 2018 kit using HA Unicorn White ink and embossed that with some clear embossing powder. I think I might have over heated that embossing in spots. I should have used VersaMark ink and white embossing powder..! Anyway…
I did cut a piece of white card stock to go behind the printed part of this acetate sheet – it’s glued to the acetate along the edges but not across the top so sequins can get down there too! I die cut the frame and sentiment from some core-dinations glitter card stock, and glued those on top of the acetate. I added foam strips around the perimeter and along the printed snow, added a bunch of those snowflake sequins and glued that down to the card base. I glued the igloo ephemera on top of the acetate and “decorated” it with some old Simon Says Stamp Colorful Confetti sequins. I added one more ‘ornament’ to the little penguin’s hand and mounted him up on some foam tape. Cheerful and SHINY!!
We have a stamp of that “arctic fox” featured in the pattern papers and ephemera…

She doesn’t HAVE to be an arctic fox, does she?? I stamped her on Bristol card stock with Versafine ink and colored her with my Zig markers and cut her out. I used my Spectrum Noir alcohol markers to create this simple background along with some ink blended Broken China Distress Oxide ink, and the three tree stamps from our stamp set. The trees are stamped in Peeled Paint and Forest Moss Distress Oxide inks.
I colored her “den” almost straight black originally and didn’t care for that, so I cut out that section, and did some alcohol marker coloring on the dark brown mat below to give us some dimension into ‘home’. I die cut that panel with a LFSRD, and glued that to the dark brown mat (with the shading in the opening), and embossed the sentiment using Cracked Pistachio Distress Oxide ink and clear embossing powder. I cut this piece of pattern paper to 4″ x 5.25″ and glued it to a Mint Green card base, and added the card front on top. That’s a pretty stamp but I might shorten some of those tail hairs next time I stamp it.
That covers all the image stamps in our set… let’s play with some of that great ephemera!

On the Soft Grey card base, I added two strips of pattern paper – the stripes (<1″) are from the paper that has the kissing polar bears, and the snow (2″) is from the border pattern paper. I thought they went perfectly together – so much so, that I didn’t even try to disguise the seam. I stamped the sentiment with VersaMark ink and embossed it with Lizi’s Cherry Red embossing Powder. I mounted the ephemera polar bears with foam tape and finished this card with some Red Glitter Peel offs. Love how the heart on the stamp nestles in perfectly between their noses! Nothing holiday here either!
And we got all those walrus ephemera pieces – I must have gotten at least a dozen!
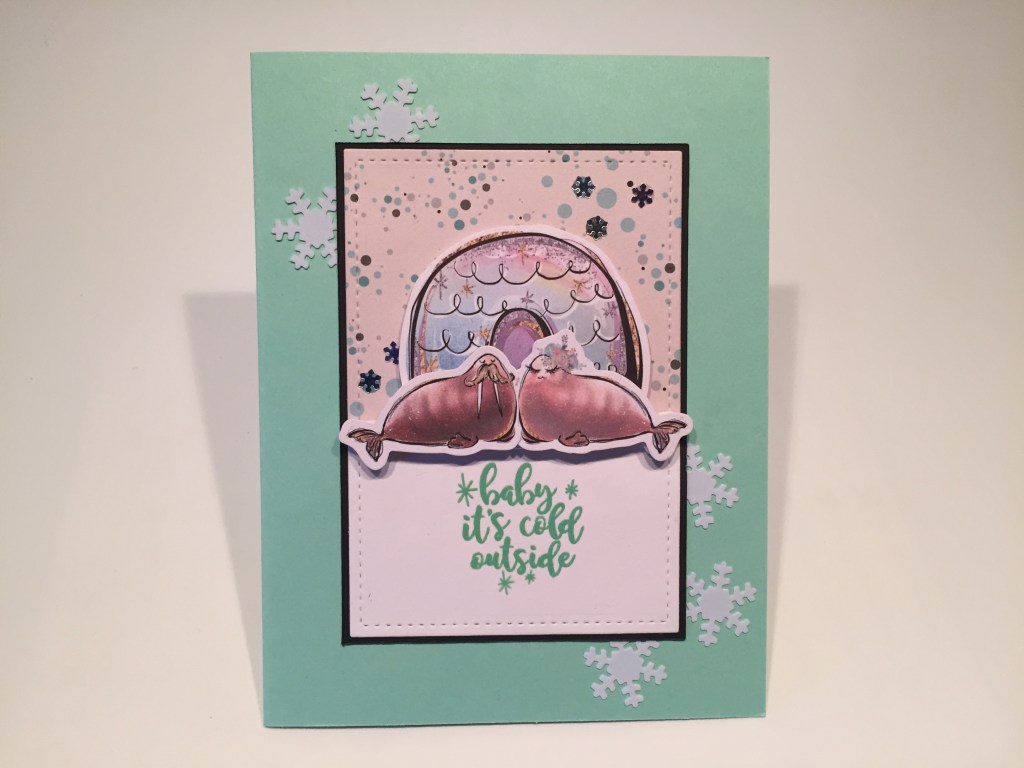
This card tickles me too! I cut pattern paper and white card stock with a 2.75″ x 4″ LFSRD and pieced them together for my background – 2.25″ on top and 1.75″ for the bottom. I glued that to a thin black mat and embossed the sentiment using Cracked Pistachio Distress Oxide ink and clear embossing powder. Using three ephemera pieces, I did a small amount of “decoupage” here – the igloo with the two walrus is attached to the background with foam tape and then two more walrus are mounted on top with more foam tape – that’s three layers!
I did trim some of the white border away from our Wilford Brimley walrus along his chest – the individual walrus ephemera are a tad bigger than the igloo walrus so I had to squeeze them together a little bit! Some large white snowflake sequins from my stash nestle behind the card front on the Mint Green card base and a few small snowflake sequins around the igloo wraps this up nicely. Kind of the perfect illustration of this sentiment I think! LOL!
We got a large variety of penguin ephemera in this kit as well… another pun?
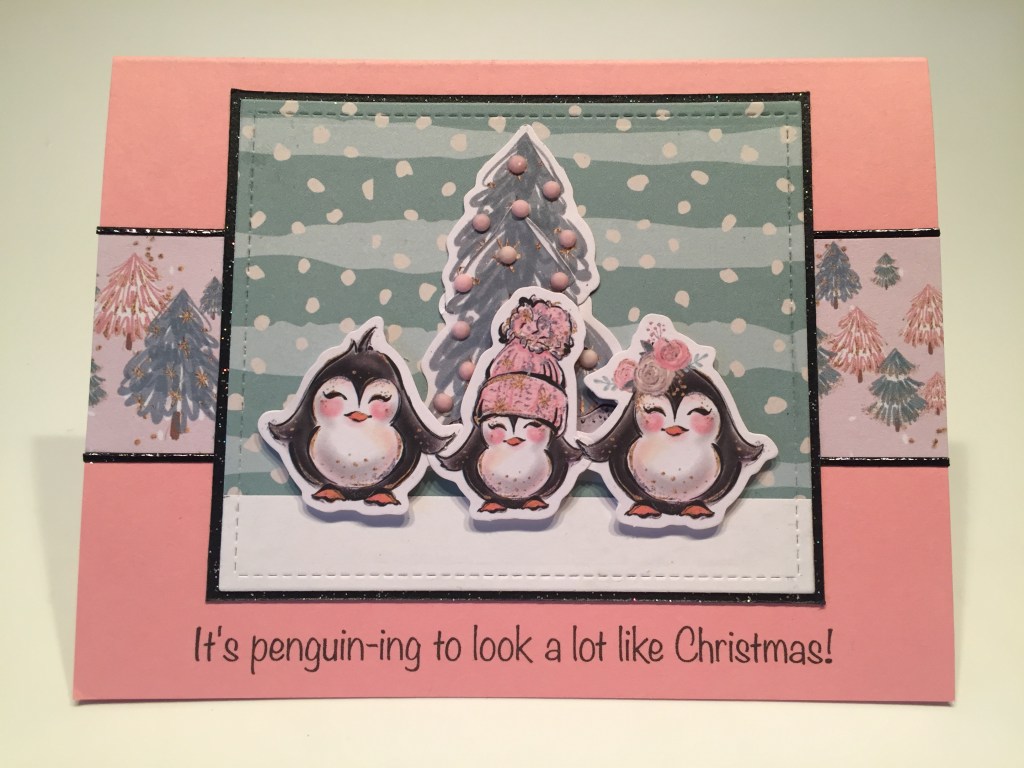
Might be a bit of a groaner here, but it makes me laugh and sing! Again, pattern paper and white card stock die cut with a LFSRD – partial die cutting to get a piece that’s 3.75″ x 3.25″. There’s only 5/8″ of snow on the bottom of that. The background is glued to a thin mat of Black Tie glitter paper. The tree is two of the matching ephemera trees – one had the tiny deer at the bottom – I trimmed the white border on the top tree to blend in with the bottom tree and glued them together and down to the background. I trimmed the white border on our penguins’ hands to blend the three of them together as well.
I printed this pun-y sentiment on the Soft Pink card stock using the Noteworthy font. I trimmed the pink tree border pattern paper down to a couple of 1.5″ strips and glued those in place on the card base, I outlined both of them with some LFL Black Glitter Peel offs and glued my background piece down in the center. To drive home the Christmas sentiment, I added some pink jewels from the Studio Katia Cupid’s Kiss crystal pack to the tree, and mounted the penguins with foam tape. Cute, quite pink, but cute! Fun Pun!
There was also a good deal of those bunny ephemera pieces too… hmmm lots of bunnies…
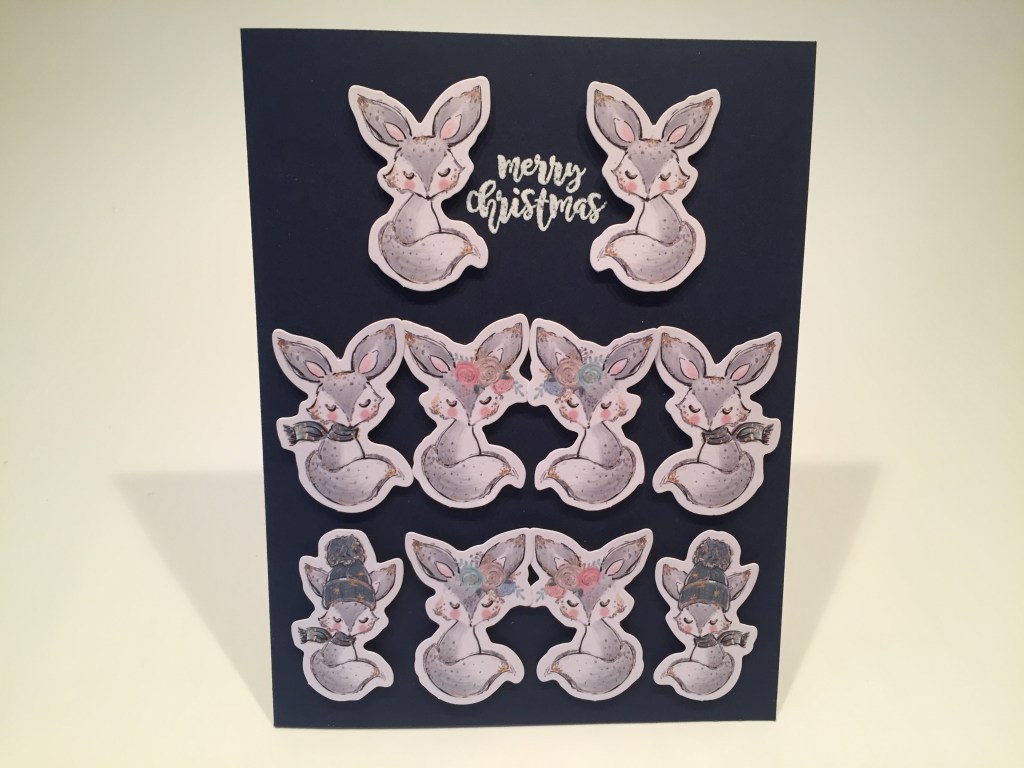
Once I sorted these bunnies out I realized that they made quite a family. So that’s exactly the task I set them to here! On a Navy card base, I embossed the sentiment at the top with VersaMark ink and embossed that with white embossing powder.

I sorted the bunnies into a vague hierarchy and attached them all with foam tape. I printed the sentiment on the inside writing surface using the Raustila font. Perfect Christmas card for anyone with a large family – or a bunny fetish!!
I was playing around with the wood-veneer die-cut trees in our embellishment bag, when it occurred to me that we make wreaths with the branches of trees… what if …

We make a wreath of trees! Almost like your standing in a forest looking straight up at the treetops! I colored all the wood-veneer die-cut trees with Cracked Pistachio, Peeled Paint and Forest Moss Distress Oxide inks. I die-cut a 2.5″ wreath shape from some dark green card stock with a couple infinity circle dies and glued the trees to that – spacing them out evenly. I die-cut a piece of pattern paper with a LFSRD, and matted that on the same dark green card stock – but not before I die cut the sentiment from the center of that mat. The matted background is then glued to the Soft Grey card base. I added little star sequins to the trees, and mounted the wreath with some foam tape. I used my Spectrum Noir Sparkle pen to add a touch of glitter to the sentiment and glued that to the card front. I added a simple bow from our ribbon pack and a small crystal tree by the sentiment. Those trees make for a unique yet highly logical wreath! Really nice and sparkly!
I was determined to figure out a way to use the little polar bears die… I like this idea!

I partially die cut the polar bears at the top of a white card stock panel, trimmed away the heart wreath part, and just continued their snowbank to the ends of the panel. I trimmed that panel down to 3.25″ x 4.5″ (to the top of the bears). I cut a piece of dark blue card stock from my stash to 3.75″ x 5″ – that will frame our die-cut piece perfectly! I did die-cut the sentiment from the center of that panel and then die-cut the stars from the top using the Lawn Fawn Starry Skies die.
I glued the white panel to the dark blue panel and down to the Marine Blue card base. I glued the sentiment and the ephemera tree to the card front, fussy cut the kissing polar bears from their pattern paper and mounted them with foam tape. I also took the die-cut stars from the background panel and scattered them around on the white panel. I really like this card a lot and think this was a fun way to use that polar bears die! And now I have managed to use all the dies in our kit too!
That wraps up my 10 Cards I Kit post featuring the Love From Lizi November 2020 Card Kit. I was pleased to find this kit offered me more options that I originally thought.
I did manage to use every stamp in our stamp set, I used 8 of the 16 pattern papers, so I have 8 more untouched, I used some of the peel offs, the glitter enamel dots, the wooden trees, a ribbon, one of the acetate sheets, a bunch of the ephemera, and all four dies. I used all of the colored card stock but, since I wasn’t doing any alcohol marker coloring, I didn’t use any of the White alcohol marker friendly card stock and I don’t believe I used any of the sequins this month. I guess my little snowflake sequins distracted me! That’s a pretty good use of all the elements in this kit! You can betcha any extras from this kit will find a loving home in my stash!
As of posting, this kit is still available at Love From Lizi – if I’ve managed to capture your imagination or given you some new ideas and you go shopping with Lizi, please use my links! That helps support this site and helps keep my head above water! Thank You!
Love From Lizi November 2020 Card Kit: https://shrsl.com/2lzer
Warm Winter Wishes Variety Peel off Pack: https://shrsl.com/2lzet
Warm Winter Wishes Pin-Stripe Peel off Pack: https://shrsl.com/2lzew
Frozen Mega Pack: https://shrsl.com/2lzf0
Frozen Heavyweight Specialty Papers: https://shrsl.com/2lzf2
Happy Holly Day Mega Pack: https://shrsl.com/2lzf9
Happy Holly Day Heavyweight Specialty Papers: https://shrsl.com/2lzfb
Rosey Christmas Limited Edition Kit: https://shrsl.com/2lzff
Warm Wishes Add-on Stamp Set: https://shrsl.com/2lzfo
Love From Lizi: https://shrsl.com/1yyuw
Due to the late release of this kit, along with supplier slow-downs and increasing Covid-19 restrictions, Love From Lizi is going to skip her December 2020 Card Kit this year. Lizi has added a couple Mega-Packs and Special Edition Kits this month for those of us who can’t make it to the new year! Look for the new Love From Lizi January 2020 Card Kit to be released December 19th… if the fates allow!
Thank you so much for sharing your time with me here! I am grateful for every moment you spend with me! Please remember to Like me, List me, Pin me, Post me, and Share this post with all your crafty friends. I send you and yours Healthy and Happy Holiday Blessings. Please keep yourself and your loved ones safe – don’t run with scissors, and as always, I wish you Happy Crafting!
DISCLOSURE: This site contains some affiliate links to products. I may receive a commission for purchases made through these links (at no cost to you). As an Amazon Associate I earn from qualifying purchases. Thank you!

Oh my, they don’t have masks on lol. Another cute set!!!
LikeLike