
Hello Folks! Scott here with my ten cards featuring the NEW My Monthly Hero and My Monthly Super Hero kits for May of 2026. “Yay Day” is the theme for this month (get it? May Day?) and Birthdays seem to be the “YAY” on tap in these kits. I certainly use more birthday cards than anything else, so I have no qualms in adding to my Birthday card stash!
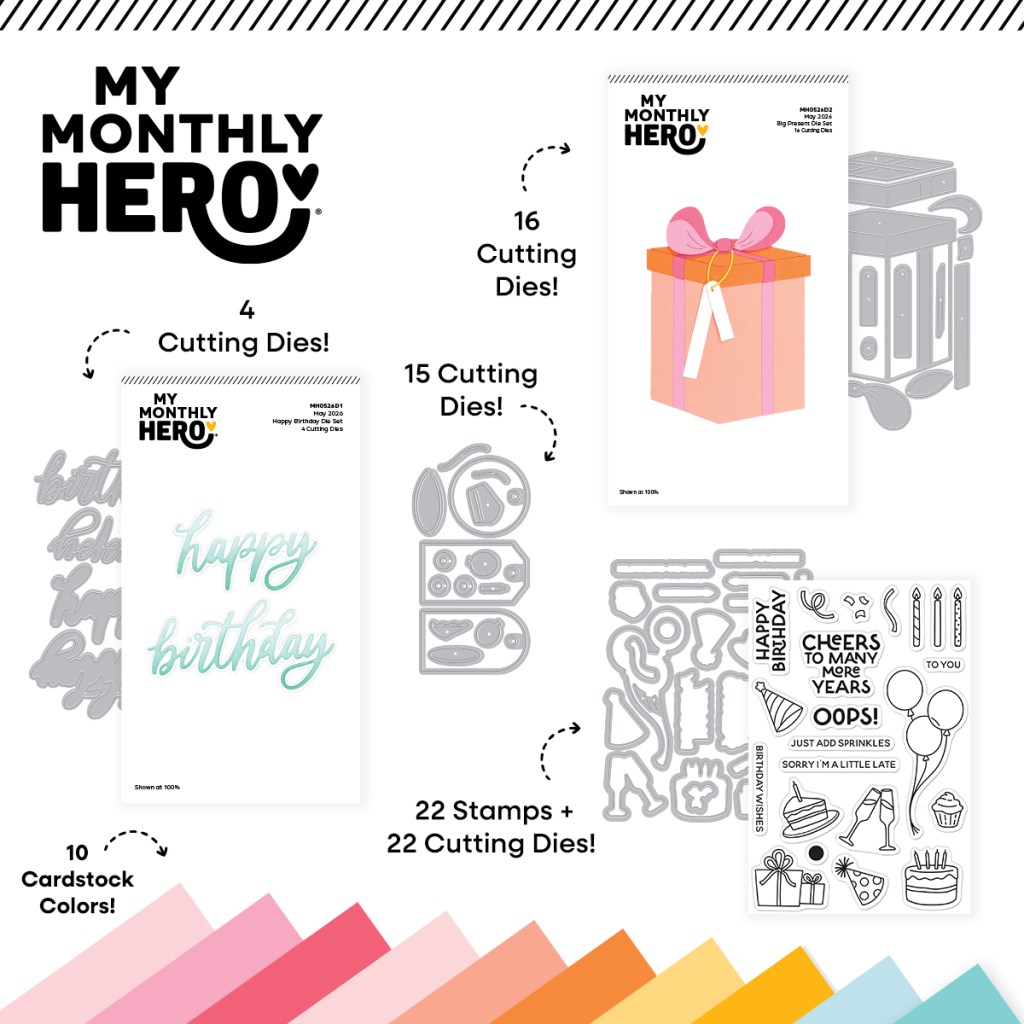
| My Monthly Hero Includes: • Happy Birthday Die Set • Big Present Die Set • Birthday Icons Stamp & Cut • Tiny Tags Die Set • 10 Sheets of Cardstock One 5.5”x8.5” sheet of each color (Blush, Tutu, Dahlia, Chiffon, Coral, Carrot, Beeswax, Saffron, Seaside, Waterfall) |
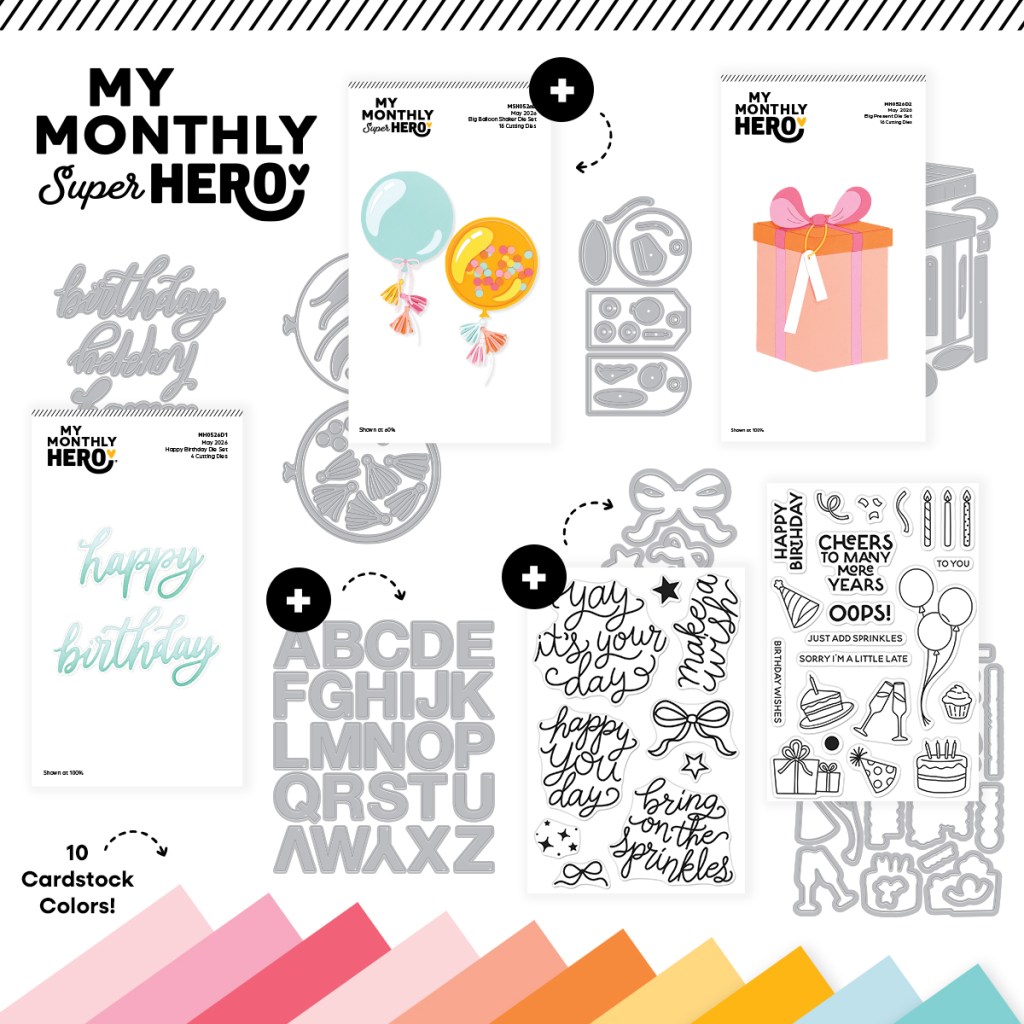
| My Monthly SUPER Hero Includes everything in the regular MMH above, PLUS: • Big Balloon Shaker Die Set • A Train Alpha Die Set • Make a Wish Stamp & Cut |
That’s a lot of Happy Birthdays!! There are minimal stamps this month, but I have become used to this new year of Hero Arts Kits and their propensity to be a little die heavy. As usual, I will do my first cards just using the My Monthly Hero Kit and then add in the Super Hero Kit items for the later half of my cards. First on the list is the Happy Birthday Die Set.
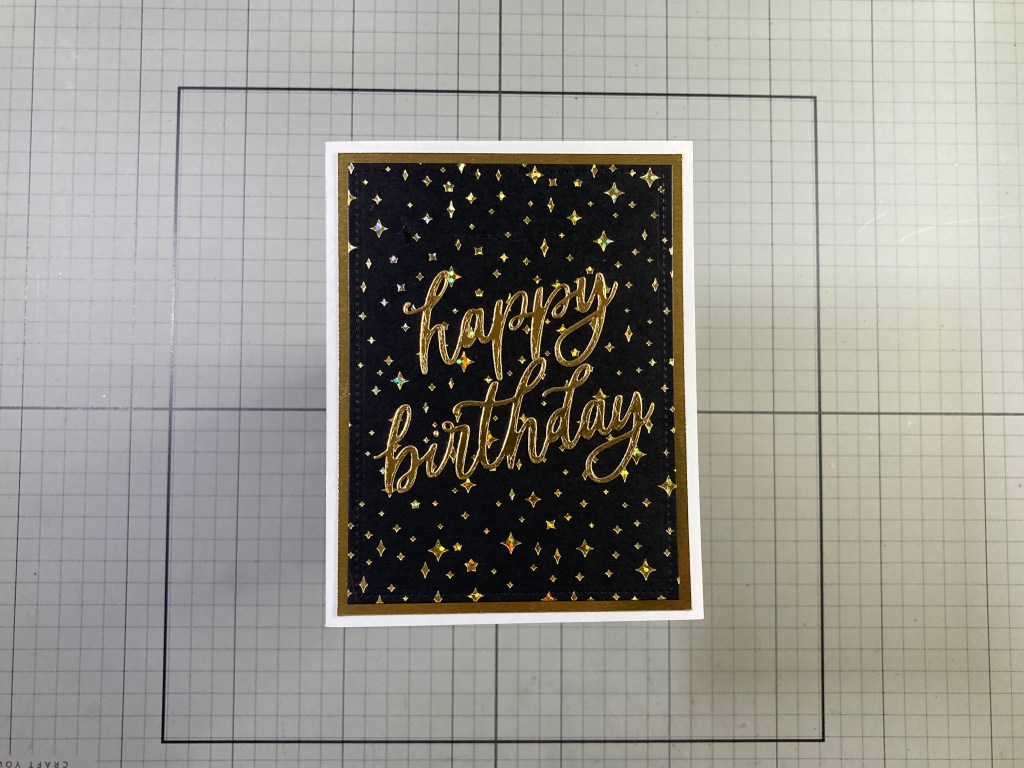
This die-cut sentiment is big enough to command attention all on its own! Most of my Birthday greetings these days are for older folks (like me!) so I thought I would try to class up some of these Birthday cards! I broke out my Spellbinders Glimmer Hot Foil press and used an old Hero Arts Twinkling Stars foil press plate with some Speckled Aura foil on Hero Hues Pitch Black card stock. Love the reflective colors on that Gold Speckled Aura foil! I trimmed the background to 3.75″ x 5″ with a Lawn Fawn Stitched Rectangle die and glued that to a 4″ x 5.25″ Gold mat cut from Tim Holtz Metallic Collection Kraft-core card stock, and then I glued both to an A2 White card base. I die-cut the sentiment from the same metallic gold card stock and glued it in place. Perfectly sparkly and appropriate for a grown-up greeting!
The Big Present Die Set is next on the list… A nice big present with ribbons, bows and tags for accessories!

I die-cut the main parts of the Big Present from the Seaside card stock in the kit and ink-blended the shading with HA Splash Reactive ink and some Post-it Notes for masking. I glued the present pieces together. I die-cut the ribbon and bow pieces from Tim Holtz Metallic Confections Kraft-core card stock in Blue, and added color to the shaded parts of the bow with a dark Grey Alcohol marker before gluing them all in place. I die-cut the loop of string from the Blue Metallic card stock and the two skinny tags from Seaside card stock.
I stamped the sentiment (from the Birthday Icons Stamp and Cut set) using HA Splash reactive ink on White card stock and I embossed the sentiment with Clear Embossing powder. I also stamped the smaller sentiments on the skinny tags with the same ink. I die-cut the sentiment with its matching die and die-cut two more blanks to stack together. I slipped the tags onto the string loop and tucked the loop up under the bow so the tags hang freely, and then I glued the stacked sentiment on the front of the present.
On an A2 White card base I stenciled the “sunburst” on the card front using the Sun Stencil from the My Monthly Hero February 2024 Premium Kit, and Hero Hues Lemon Drop ink. I added the present to the front with foam tape for a little dimension. Nice BIG present (at least on an A2 card!) and the shading helps it feel more dimensional. This is not my favorite die-cut bow of all time, but it is whimsical and works well for a lighthearted Birthday greeting.
And now, the Birthday Icons Stamp and Cut set. There is one sentiment that goes perfectly with one of the icon stamps.
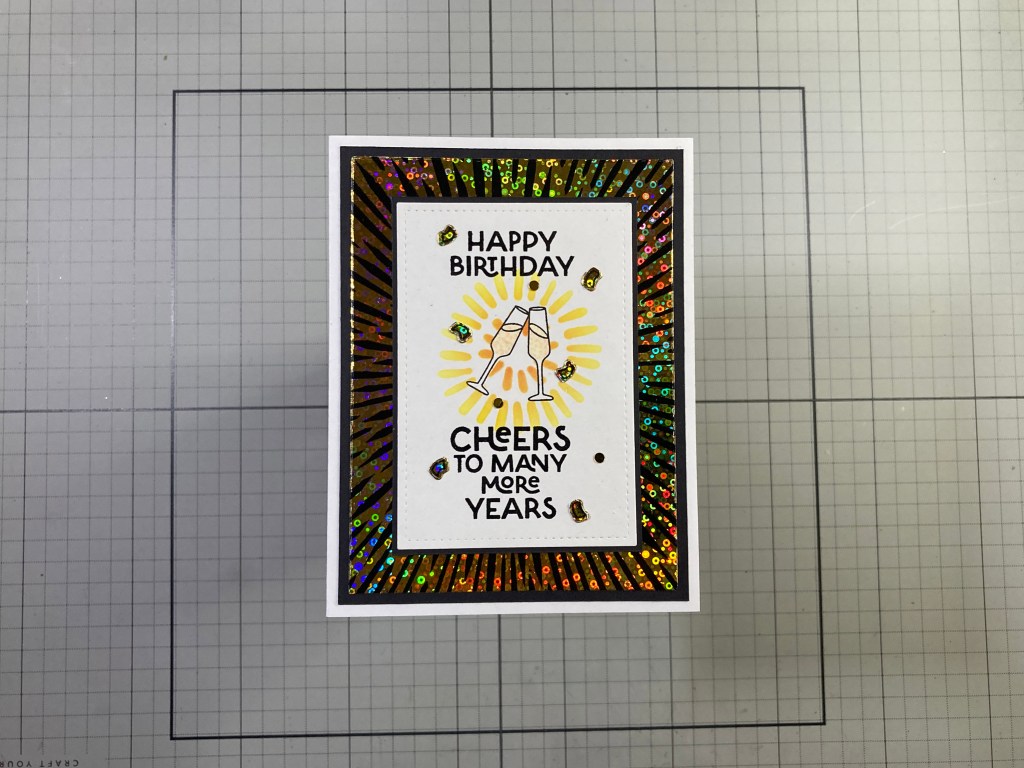
The champagne glasses obviously go with this sentiment! I stamped the glasses on a panel of White card stock using VersaFine Onyx Black ink. One of my favorite ways to mask off small images like these glasses is to take a piece of low-tack tape and tape over the stamped glasses – the ink will leave an image of the glass on the tape. Then I stick the tape down to my craft mat and cut out the glasses using a craft knife – then you can place the tape mask back over the champagne glasses. I stenciled the small burst behind the (masked off) glasses using the Doodles Stencil from the My Monthly Hero Premium Kit of April 2023 with Lemon Drop and Creamsicle Reactive inks. I stamped the sentiments with VersaFine Onyx Black ink and embossed them with Clear embossing powder. I colored the champagne with my Ohuhu Alcohol markers and added some sparkle to the spirits with a Spectrum Noir Sparkle Pen.
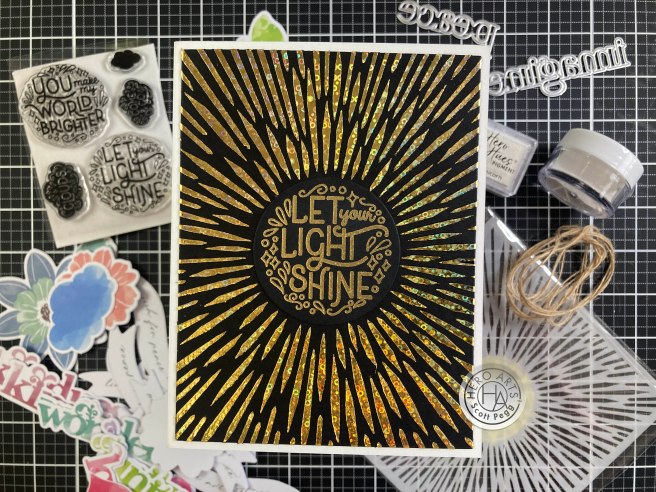
The background is a panel I had left over from the 2/24 MMH kit. I took the leftover foil (Gina K’s Gold Sequins Fancy Foil) from this card and foiled it to a piece of Black Toner paper. I had stored this extra panel with the Sun Stencil, and I thought it would add another classy touch to a Birthday greeting. I cut the foiled panel to 3.75″ x 5″ and glued it to a 4″ x 5.25″ Black mat. (I did cut out the center of the foiled panel before gluing it to the mat). Both are glued to an A2 White card base.
I die-cut the stamped panel to 2.75″ x 4″ with a LFSRdie and added a thin Black mat before gluing those down to the card front. I stamped the “confetti” stamp on the excised center of the foiled background using StazOn Jet Black solvent ink and die-cut them with their matching die – then I fussy-cut the individual confetti pieces and glued them along with some Flat Gold Sequins on the card front for a little added bling. Time to break out the Champagne!!
When we get a stamp set filled with smaller images – or “icons” as such, I do tend to take one stamp at a time, and go with simple vignettes.

This makes me smile! I stamped the Ballon stamp on a piece of Bristol Smooth card stock and colored them with my Zig Clean Color Real Brush markers. I used a cloud edges stencil and the Splash Reactive ink to blend in the clouds – strategically avoiding the balloons! I trimmed the inked panel to 3.25″ x 4.5″ and added a thin Glossy Black mat behind. The sentiment is an old Love From Lizi die cut from more Glossy Black card stock and glued to the inked panel right at the end of the balloon strings.
The background is an old Sizzix Happy Birthday 3-D Embossing folder on White card stock with Splash ink lightly rubbed on the raised embossings. (You can see Cheers and Happy and Wish etc.!) I trimmed that to 4″ x 5.25″ and glued it to a thin Black mat and then down to a White card base. I glued the inked panel on top of the background and added some Rainbow Spirals sequins (from the MMH Feb. 2020 kit) for more shine. Can’t beat balloons in the clouds!
Another way to use a stamp set full of small icon images is to use them to make backgrounds. I have created a few “turnabout” stamps in the past and thought this group of icons would make a great “turnabout” stamping!
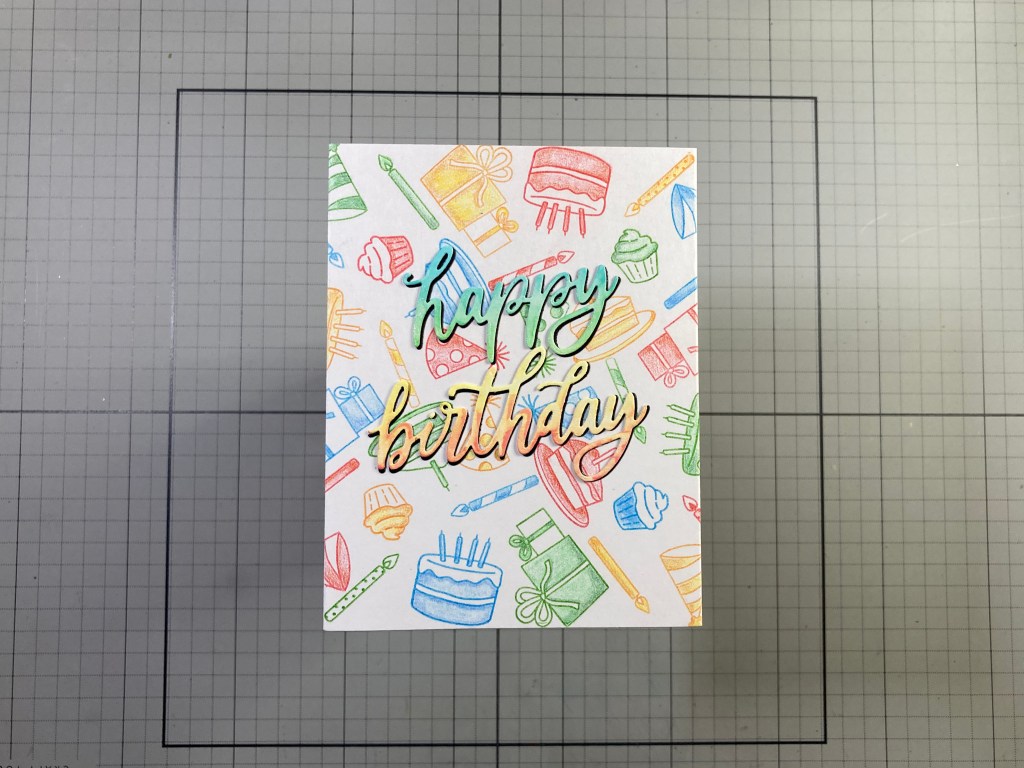
I stamped my “turnabout” stamp using Hero Hues Fruit Punch, Splash, Green Apple and Creamsicle Reactive inks, and colored all the icons with my Prismacolor Colored pencils. Since this is a background, I selectively colored the stamps, leaving some areas white and doing simple blends where there was color. This is nice and colorful, but not too loud about it! I trimmed that to 4.25″ x 5.5″ and glued it to a White card base.
I ink blended a swatch of Splash and Green Apple Reactive inks on a scrap of White card stock and another swatch of Fruit Punch and Creamsicle Reactive inks, and die-cut the sentiment from that. I cut another sentiment in Black and glued that a touch offset behind the colored sentiment. I glued the sentiment flat to the card front and added a l little sparkle to the lettering with a Zig Wink of Stella Sparkle pen. I really do like this “turnabout” arrangement!
Here’s a copy of the stamp arrangement I created that uses the “turnabout” method to stamp these icons in four colors. I have a 6″ square sheet of acetate with diagonal lines on it, and I arranged the 9 stamps in one triangular quadrant and through a little trial and error, got the stamps evenly spaced out to fill the 6″x6″ square. Once you are happy with the spacing of the 4 quadrants, and you have stamped it 4 times, you can use the stamping to spread out the stamps into all four quadrants.
You can download a PDF of this pattern right here:
I’ve used most of the stamps in the Birthday Icons Stamp set but I haven’t even touched the Tiny Tags Dies Set…
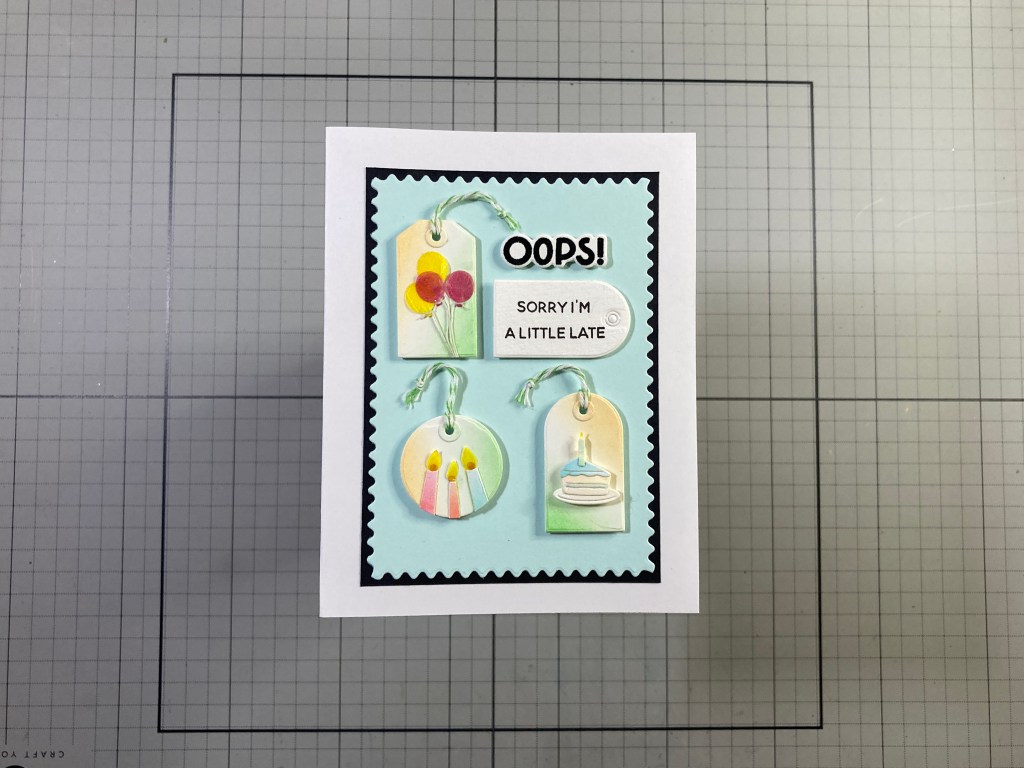
I die cut the three tags from the same ink blended card stock I used for the sentiment on the last card – using the white spaces between the Creamsicle and Green Apple inks. I also die-cut the reinforcement rings from the same colors and glued them on top of the holes. I used a candle die from the Stamp and Cut set to die-cut the candles from the Splash, Creamsicle, and Fruit Punch sections of my blended card stock. I trimmed off the flames and die-cut replacements from some Yellow Glassine (or Kite paper) and added small dots of Red Glassine behind the yellow. I glued the three candles to the round tag.
I die-cut the balloons from the die set in the same Yellow and Red Glassine and tied thin white string to their knots and glued them to the rectangular tag. I die-cut the cake pieces from the same pre-blended card stock and assembled them on the arched tag. I tied Green and White bakers twine through the holes in all three tags. I die-cut the arched tag again from some Muli-media card stock and stamped the sentiment with Onyx Black ink. I stamped, embossed and die-cut the “OOPS!” from the same card stock. I die-cut a piece of the Seaside card stock with a SSS Modern Postage Stamp Rectangle die, glued that to a thin Black mask and then down to a White card base. I arranged all of the die cuts on the front and attached everything with foam tape. I did stamp the “Happy Birthday” sentiment on the inside. Though these Tiny Tags would work perfectly well on the Big Present, I think they also work quite well as a group!
Well, we had so many items in the My Monthly Hero kit this month that it took me six cards to cover everything! Moving right along to the My Monthly Super Hero supplies!
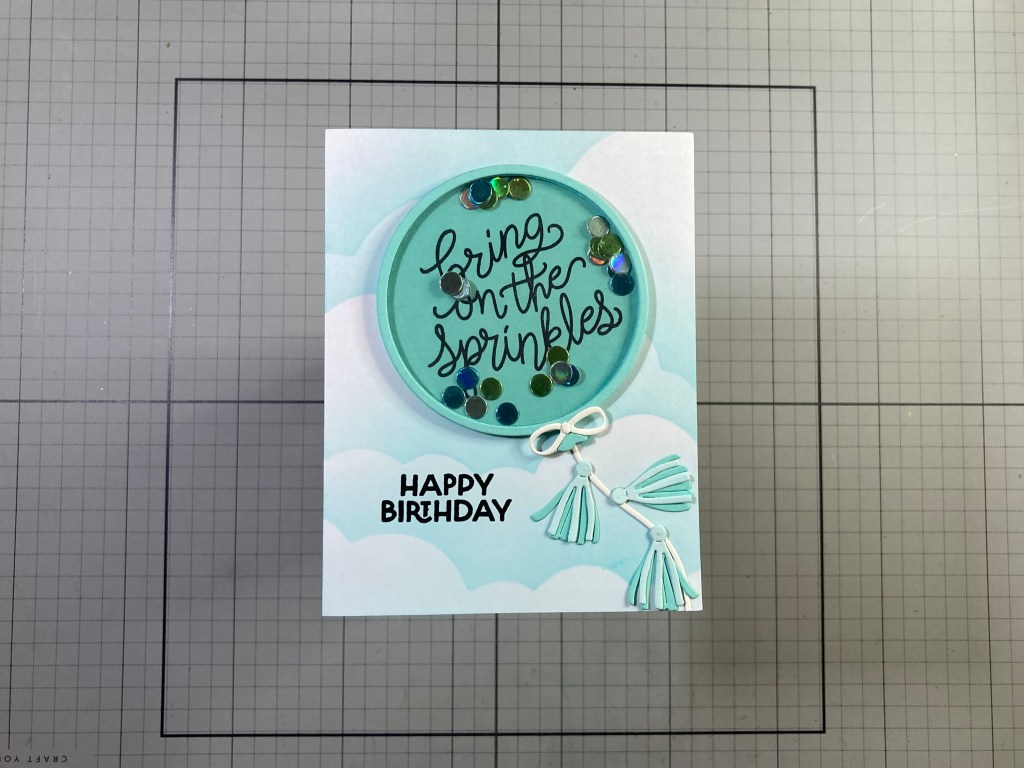
More balloons in the clouds!! The Big Balloon Shaker Die Set is exactly that… a BIG balloon! I die-cut the frame die and the background die from the Waterfall card stock in the kit. I die cut the background balloon die from a piece of acetate as well and glued that to the back of the frame die cut. Since the window frame around the balloon is so thin, I thought just stacking up multiple frame cuts to give it some thickness would be easier than trimming foam tape to 1/8″ wide!. I cut four frames from 110# White card stock and glued them together before coloring the edges to match the card stock. I stamped the sprinkles sentiment from the Make a Wish Stamp set on the balloon back with Onyx Black ink and glued the colored and stacked frame dies behind the acetate.
I die-cut the confetti from an assortment of colored metallic card stocks and sandwiched them between the balloon background and the balloon frame. I did try to cut back on the static electricity with a Swiffer floor cloth and a light touch of powder to the confetti – that does what it can! I die cut the Bow and String from HA Antique Ivory card stock and the three tassels from Seaside and Waterfall card stocks. I assembled the tassels and glued the Bow on the top of the knot and the string in place on the back of the balloon.
On the front of an A2 White card base I stenciled more clouds with Splash ink and the Cloud edges stencil, and stamped the sentiment with Onyx Black ink and embossed that with Clear Embossing powder. I glued the Balloon shaker and string into place and trimmed off the string at the bottom right. Then I arranged and glued down the tassels. I thought the tassels were a bit frivolous at first, but I came to appreciate how much movement they convey!
Of course, you don’t have to make a shaker card from those balloon dies… pardon me… those BIG balloon dies!
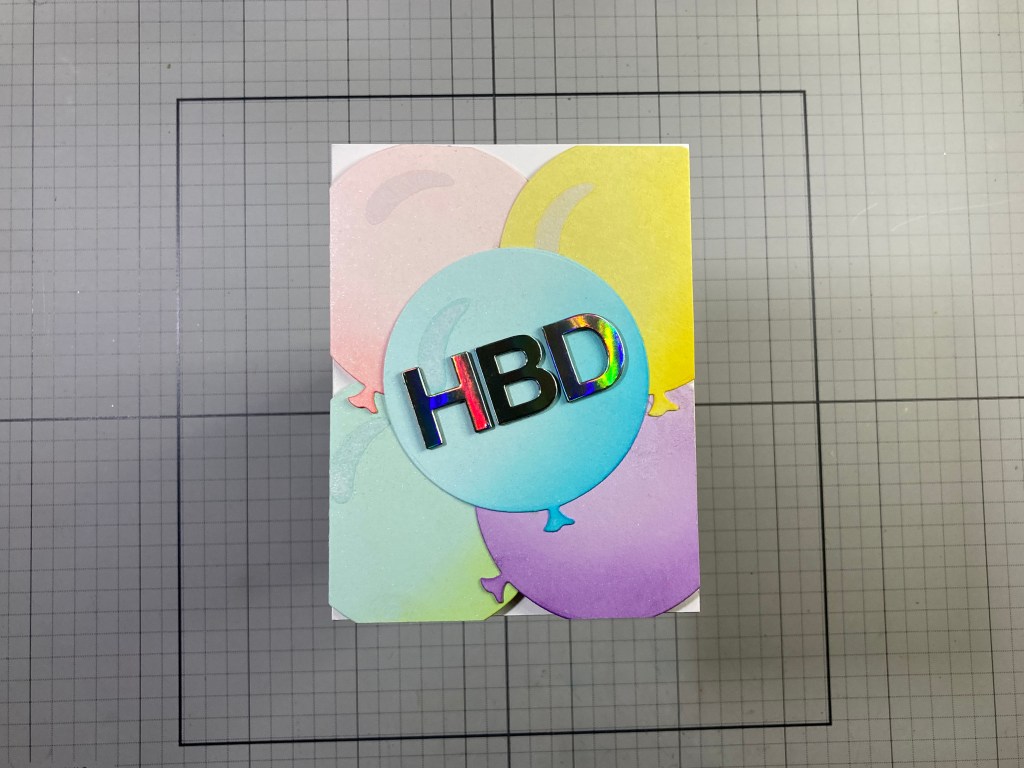
I die-cut the solid balloon die from Spellbinders Mint and Seaside and Chiffon and Hero Hues Lavender and Canary card stocks. I added shading to all the balloons with Reactive inks in Key Lime Fizz, Splash, Taffy, Thistle and Lemon Drop. I die-cut the larger balloon highlight through some masking paper and used the mask to ink blend some Unicorn White ink on the balloons and them embossed that with clear embossing powder for some shine.
I glued the balloons together so they were slightly larger than an A2 card and trimmed the top, right, and bottom sides before scoring the left side at 4.25″. I folded the scored balloons over and glued the flap to the back of a 4.25″ x 5.5″ card panel. Once dried, I added another matching panel to the back effectively covering up the “balloon” hinge. I die-cut the HBD using the A Train Alpha Die set from some holographic metallic card stock and die cut two more from Black card stock. I stacked and glued them together. For a little more sparkle I sprayed the Balloons with some Sheer Shimmer Mist and then glued the HBD down to the center balloon. These balloon dies are large enough to make a whole card front with just four balloons, but odd numbers are more pleasing to the eye! HBD!
I was determined to find a way to make the BIG Present dies and the Big Balloon dies work together on one card. They are both so BIG that I had to make a BIG card (5″ x 7″) to accommodate them both!
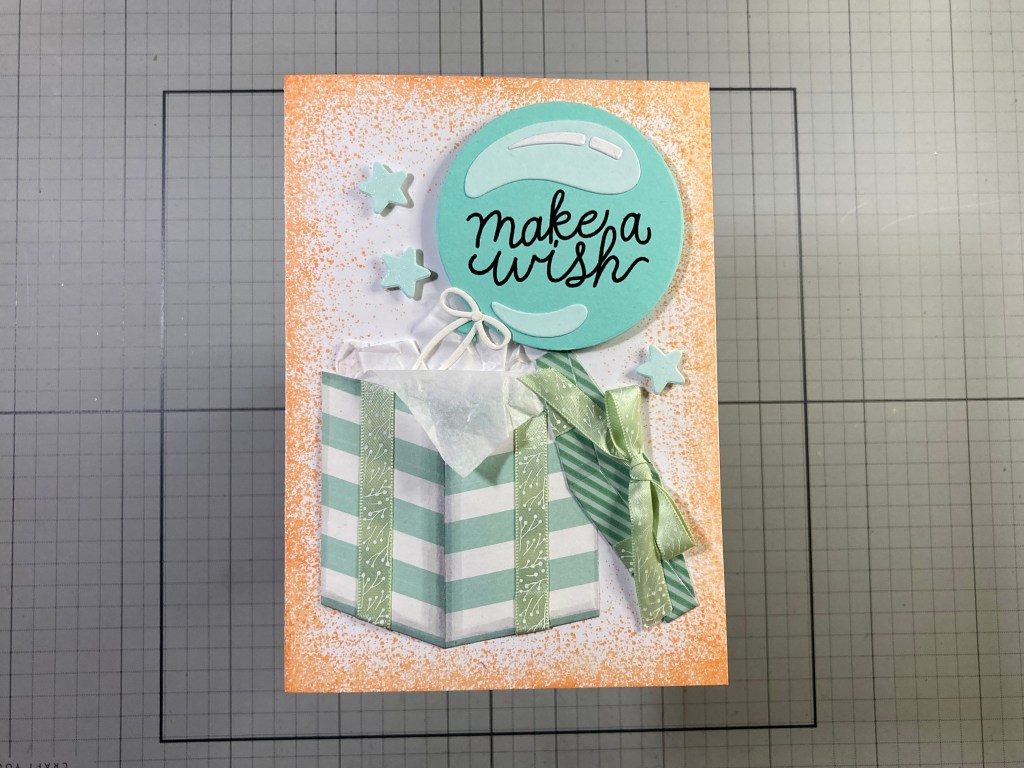
This card started as an experiment to see if I could make real ribbon work on the Big Present. I die-cut the Present twice from some old striped Pattern paper matching the stripe to the right side of the die for one, and matching the stripe on the left side of the die for the other. When trimmed and glued together, they gave me this fun “wrapped” package. I die-cut the Lid from some Glitter Pattern paper, glued it in place and added all the ribbon. Instead of worrying over the thin ribbons on the Lid of the Present, I just camouflaged those with the bow!
I die-cut the balloon from Waterfall card stock and stamped the sentiment with Onyx Black ink and embossed it with Clear Embossing powder. I die-cut the big highlights from Seaside card stock and the small highlights, bow and ties from HA Antique Ivory card stock and glued everything together. I thought it would be fun to have the balloon coming out of the present so I cut the lid off and added some white tissue paper on the inside of the present.
On a 5″ x 7″ card base I stamped the Concord & 9th Splatter Texture Stamp around all four sides with Creamsicle reactive ink. That’s my first time using this stamp set and I LOVE the splatter texture all around! I glued the present and lid flat to the card front and added the Balloon using thick foam tape. I die-cut three stars from Seaside card stock, added some Wink of Stella Sparkle pen to all three and attached them to the card front with thin foam tape. I know some of you folks like these larger cards, and it certainly works well if you want to highlight both of these BIG dies together!
Since I cut the top of the Present off for this last card, I became obsessed with having a present inside the gift box!
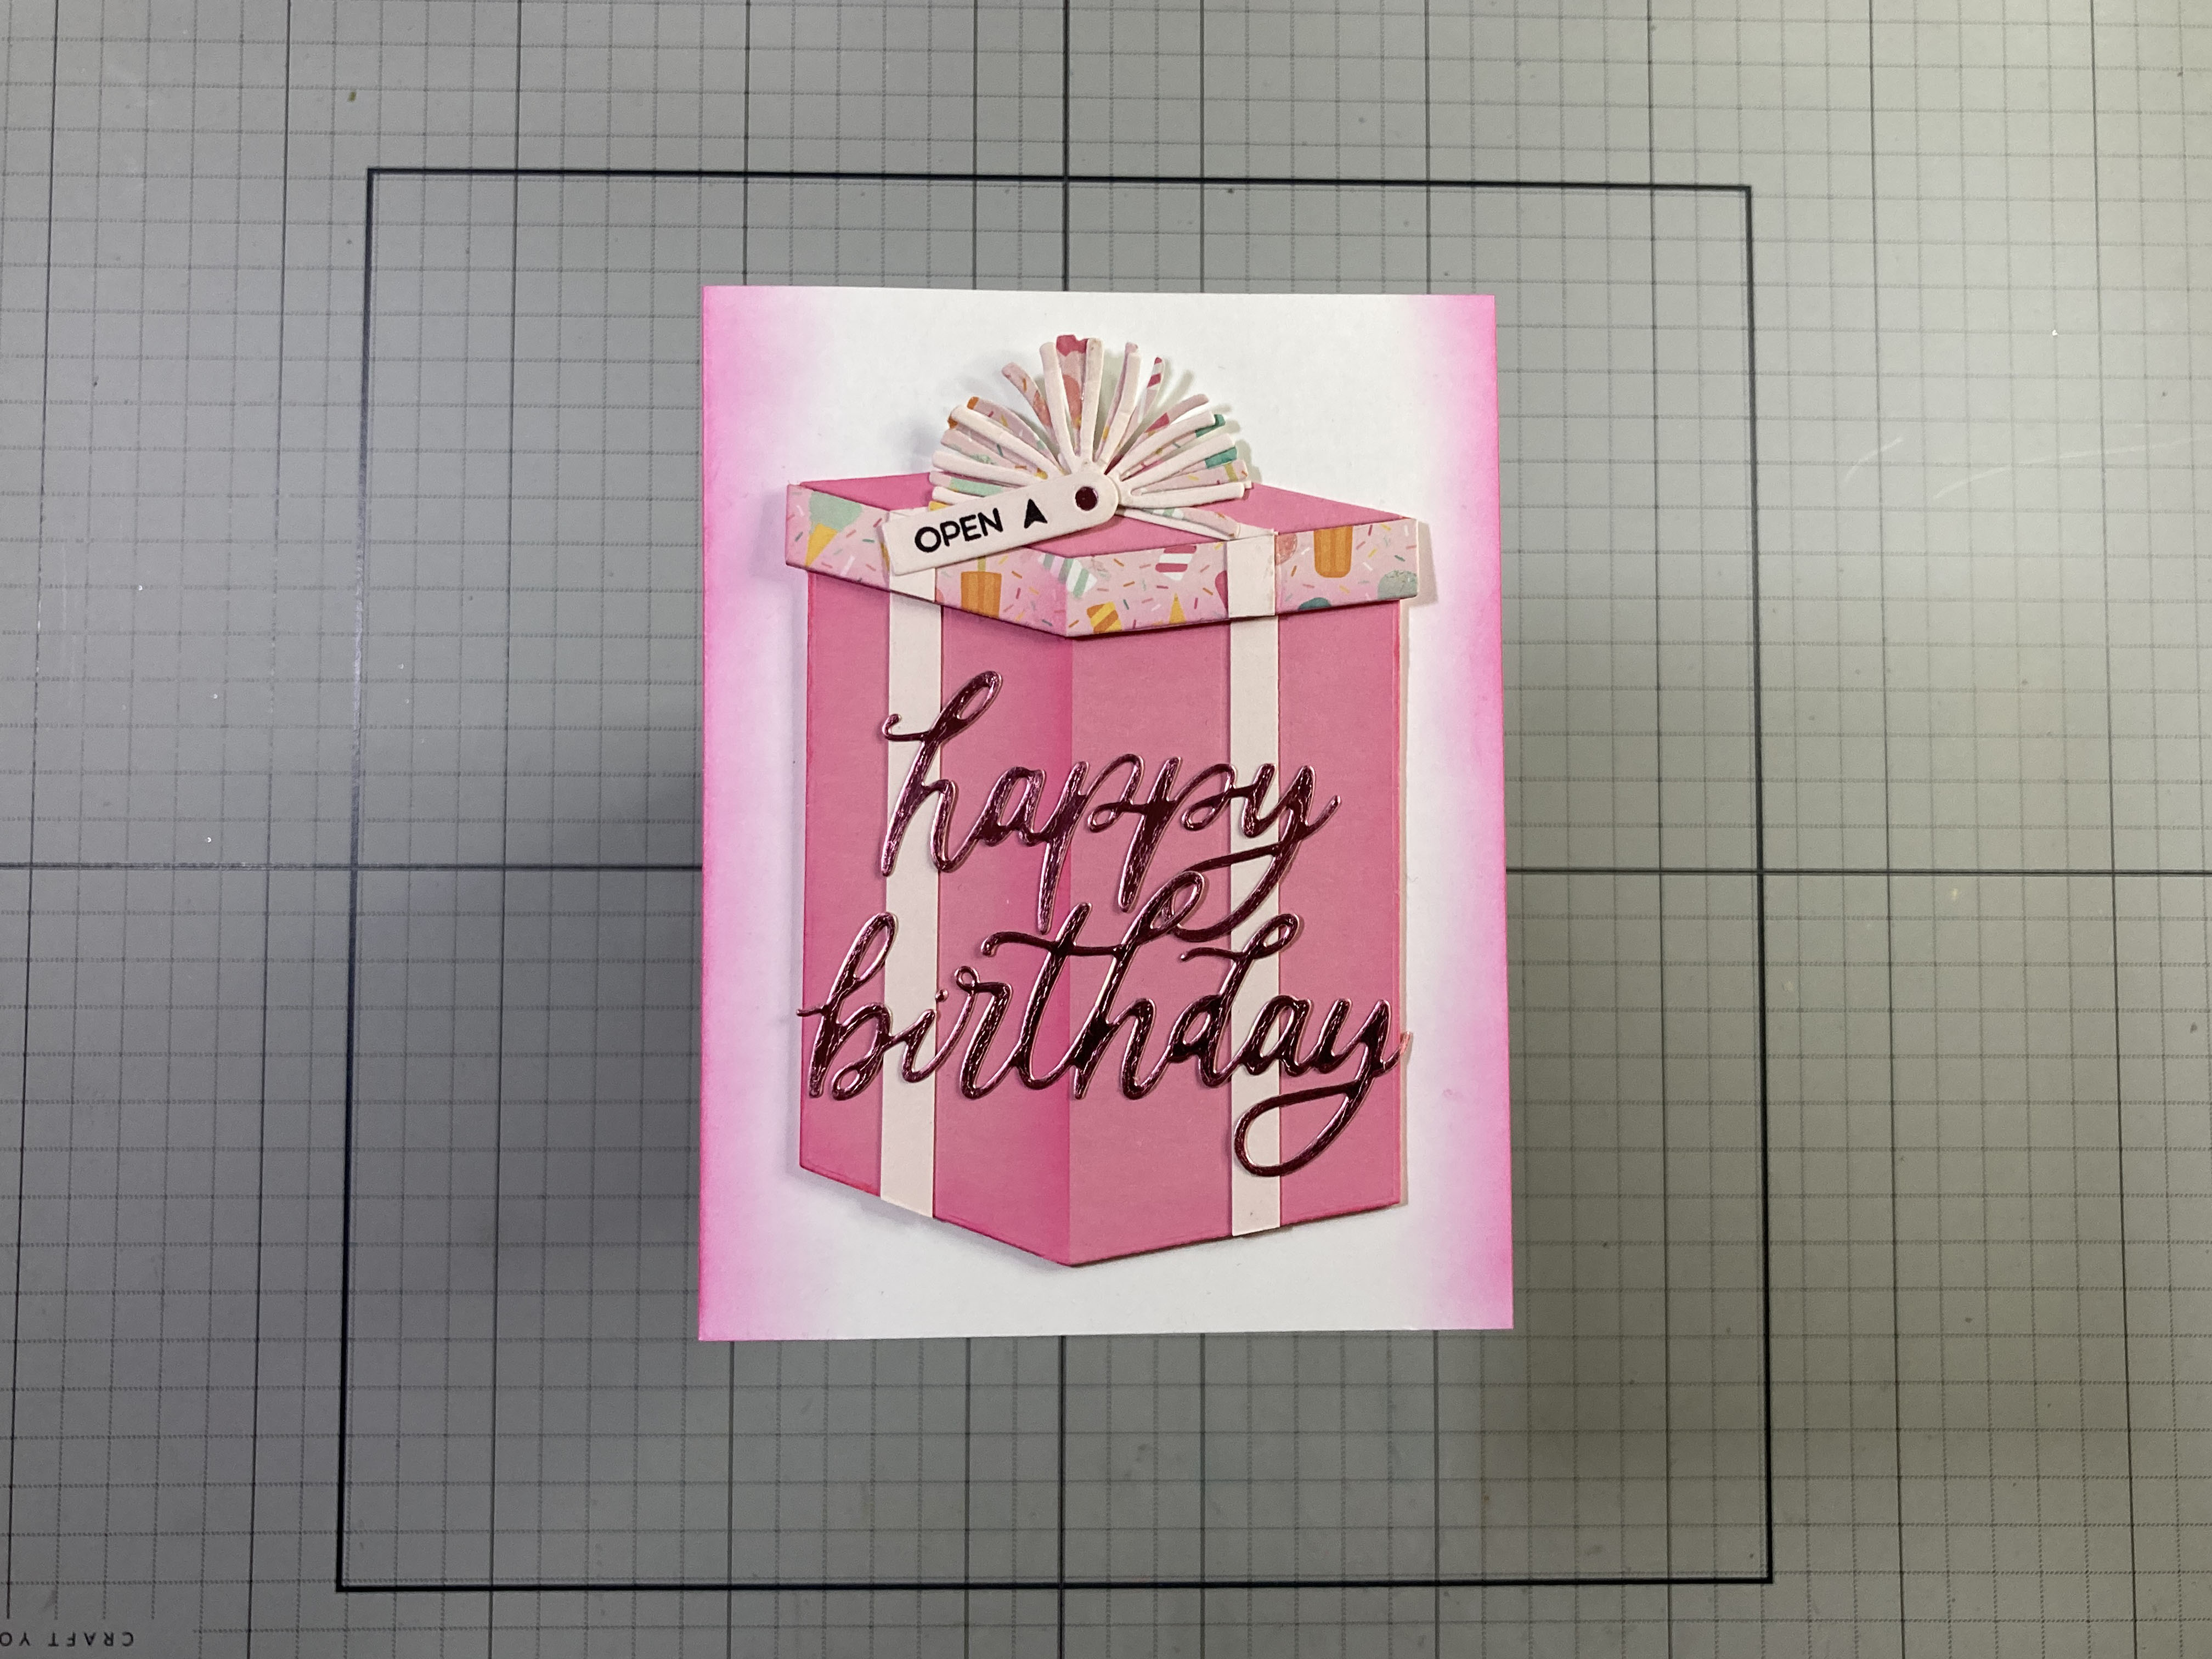
The Big Present die as it is, is not big enough to hide a gift card inside so I just did some partial die-cutting to make the present bigger. This box is right at 4.25″ tall compared to the normal die cut present which is right at 3.75″ – so I added a good half an inch to the overall present height. I die-cut the (taller) present (and the box top) with the Tutu card stock in the kit and die-cut the edge of the lid with some old pattern paper. I did more shading on the box using HA Taffy Reactive ink and Post-it Notes for masking. I glued everything together and cut off the lid. I added the ribbon using 1/4″ strips of Chiffon card stock on the sides and 1/8″ strips of the same to the top of the lid. I die-cut the three big tassels from the same pattern paper and the three smaller tassels from Chiffon card stock and glued them all together to make this fun pom-pom for the top of the box. That’s another good use for those tassel dies!
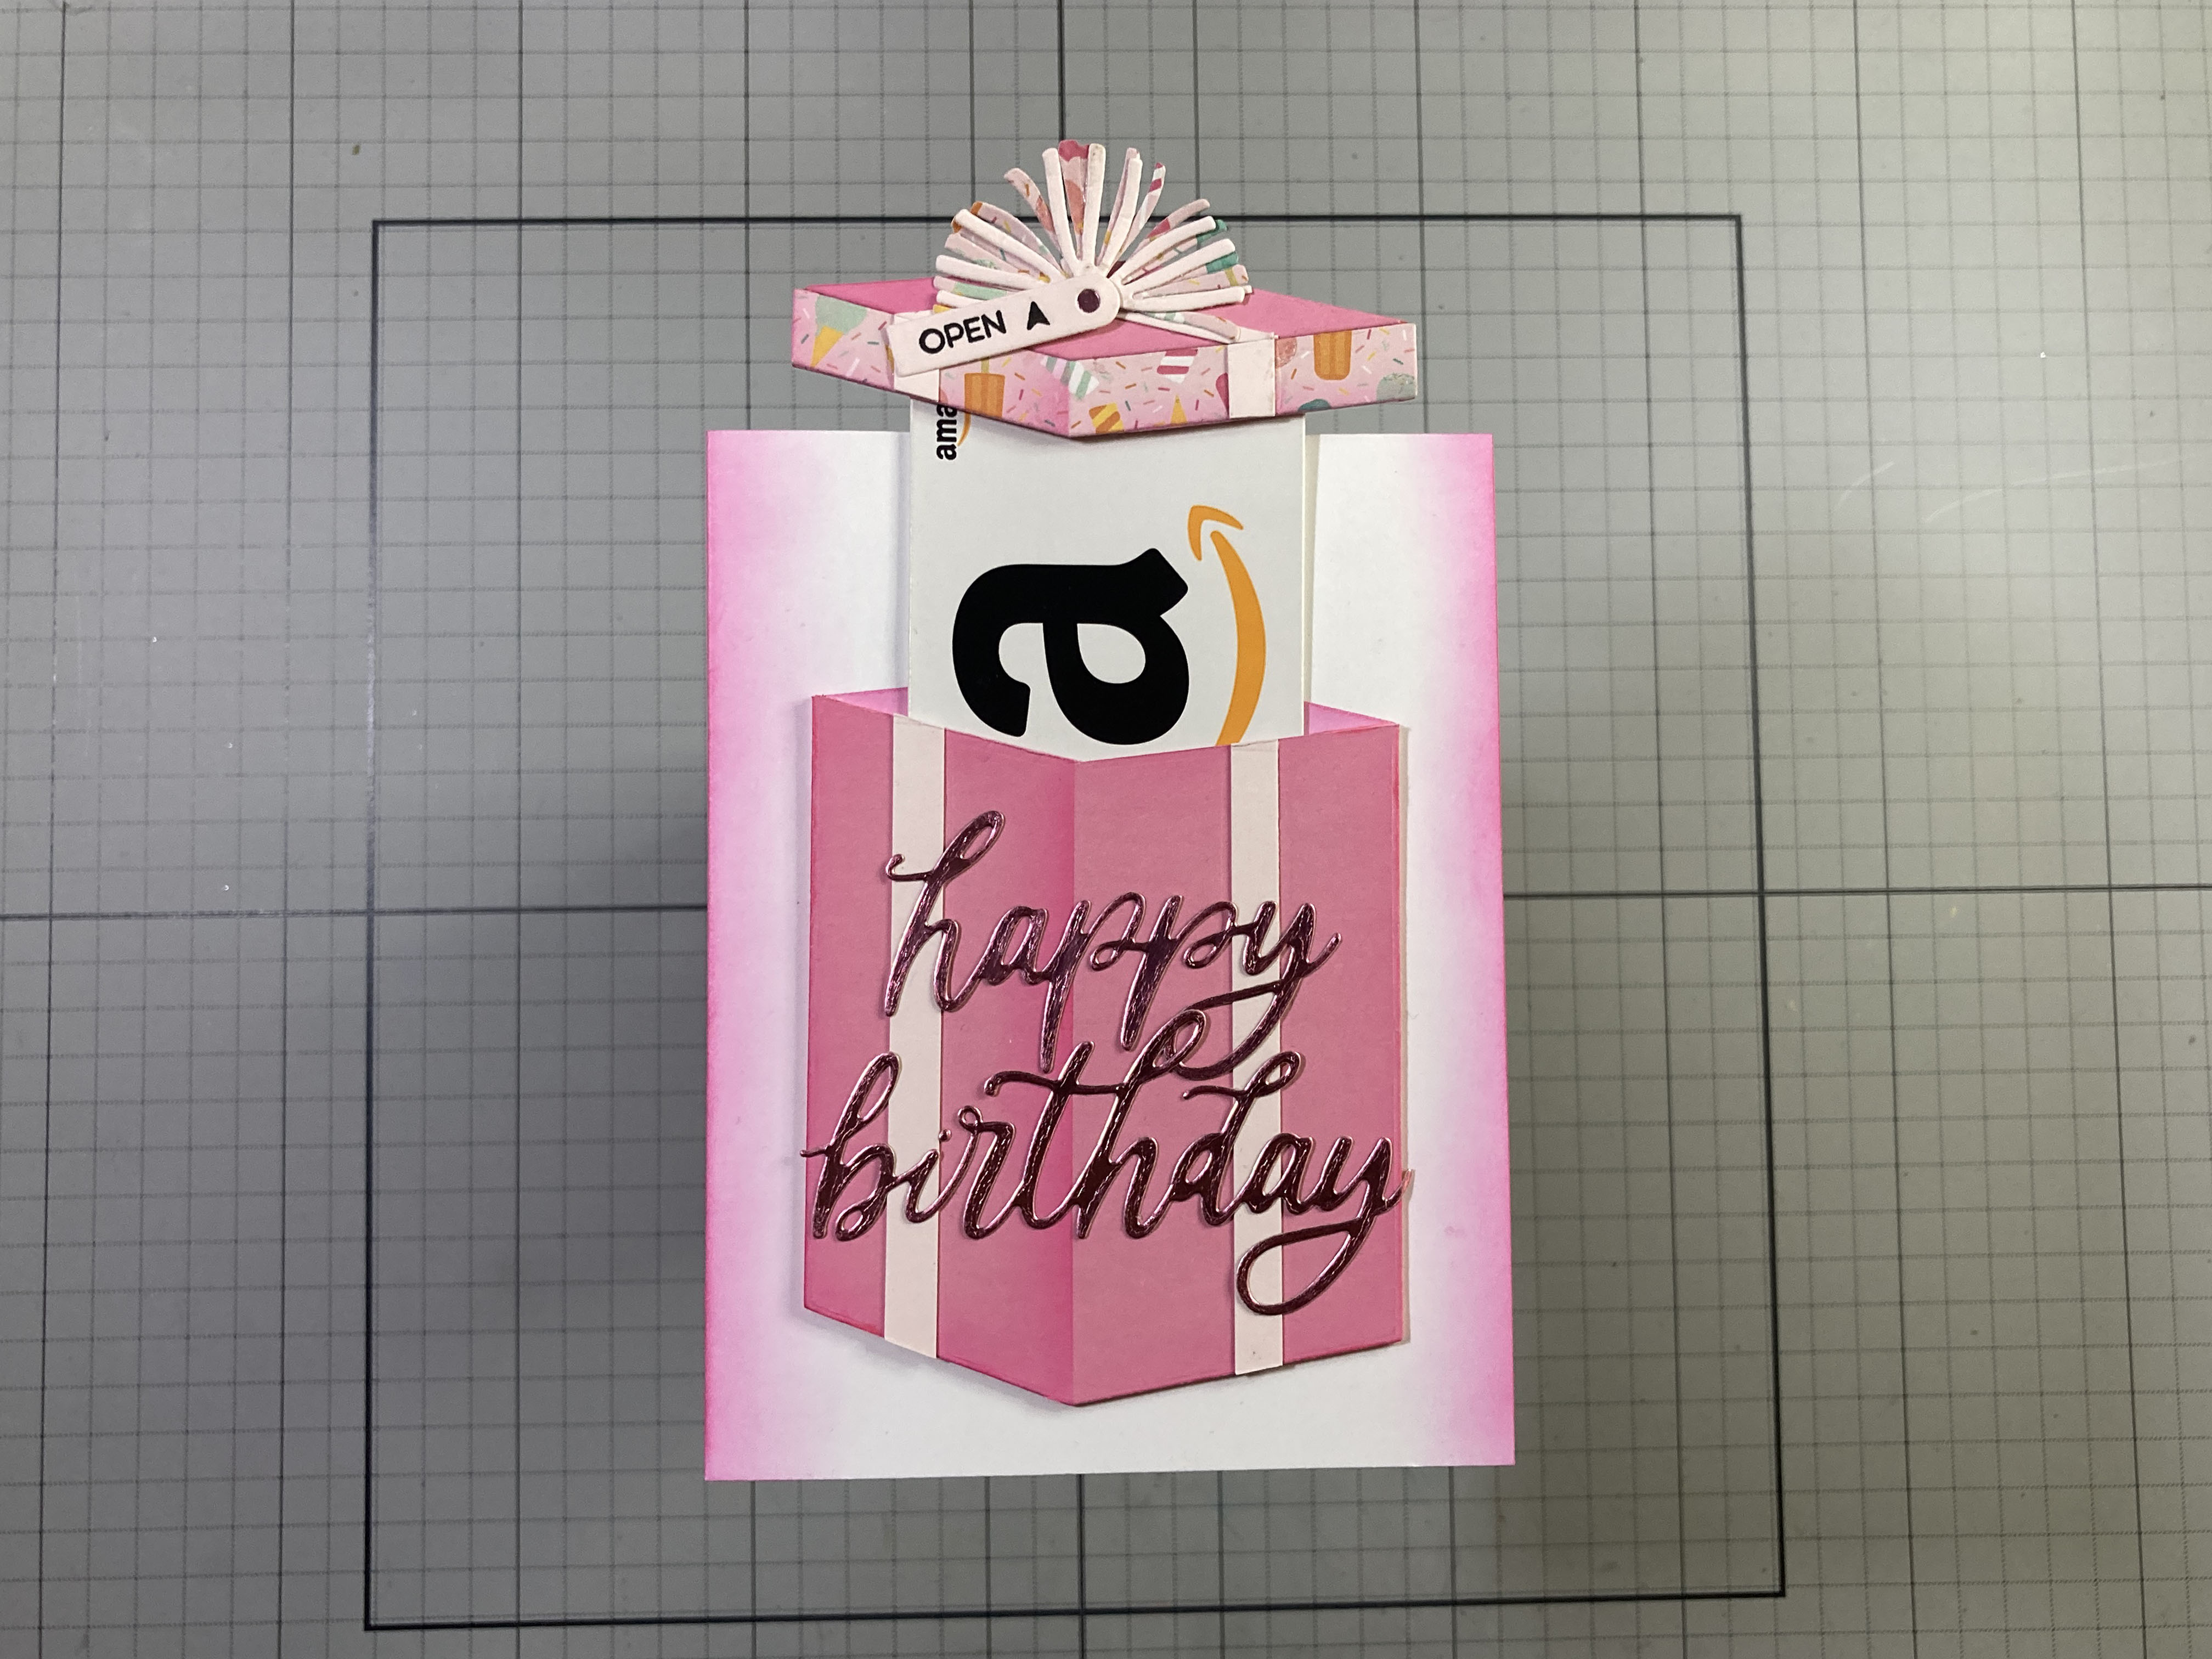
I die-cut the sentiment from some Pink Metallic card stock and glued that to the front of the present. I ink blended Taffy Reactive ink along the sides of an A2 card base. I stacked two layers (just under 1/2″ wide) of 110# card stock together to make channels for the gift card behind the present. I glued those to the back of the sides and bottom of the box and trimmed them off to match. I also die-cut another lid from White card stock, ink blended Taffy ink on it and slipped it behind the present to make the inside back of the box – I had to trim the edges to size, but that made a perfect box back.
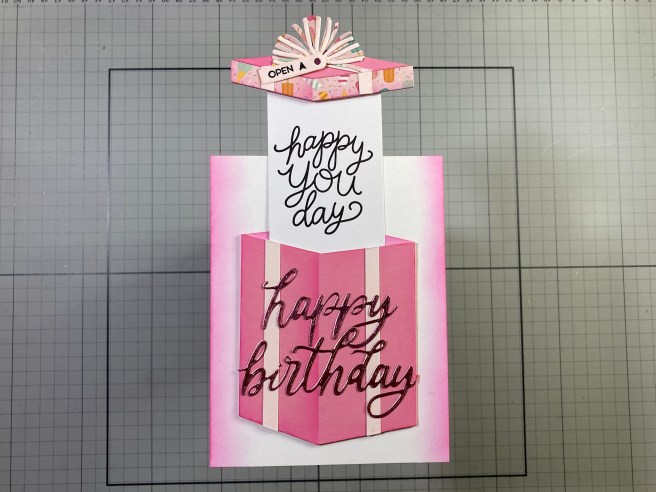
To assist in carrying the gift card, I took a piece of White card stock cut to 2+1/8″ wide (the size of a gift card) and 4″ tall and slid that into the channel behind the present (and in front of the back). I placed the lid on top with just a bit of an overhang on the box and cut the top edge to match the box top. Then I glued that sheet to the top edge of the lid. For a final touch (once the gift card is removed) I stamped the “happy you day” on the card carrier. The gift card actually holds on with simple friction where the carrier is glued to the lid.
I die cut one of the small tags from the Big Present die set from Chiffon card stock and stamped the “open” and the arrow on that using an MFT Interactive Labels stamp set and Onyx Black ink. I glued that to the pom-pom and added a little metallic pink dot in the hole. All that’s left is to glue the box to the card front (being careful not to add any glue in the card channel). The gift card slides inbetween the carrier and the lid, and the whole thing slips right into the box easy as pie! I like this Big Present Die set much more now that I’ve figured out how to use it as gift-card delivery system!
How’s that for ten Birthday cards! Not a lot of stamping and coloring this month but lots of fun Birthday greetings and even a couple surprises. I do love the gift card coming out of the Big Present – made even BIGGER by ME!

Some very classy, colorful and fairly grown-up birthday cards here! I do like the big “happy birthday’ sentiment die, and I really like my “turnabout” stamp for some lively birthday backgrounds, and, of course, everybody loves receiving a shaker card! If you have a big list of Birthdays to cover this year, and you’d like to grab one of these kits for yourself, please use my links below. I do get a small commission (at no cost to you!) from anything you by at Hero Arts if you use these links – it is always superbly appreciated and helps keep the gears turning and the ideas coming!
My Monthly Hero: https://www.dpbolvw.net/click-101337132-16962401?url=https%3A%2F%2Fheroarts.com%2Fproducts%2Fmy-monthly-hero
My Monthly Super Hero: https://www.jdoqocy.com/click-101337132-16962401?url=https%3A%2F%2Fheroarts.com%2Fproducts%2Fmy-monthly-super-hero
Hero Arts: https://www.jdoqocy.com/click-101337132-16957493
Thanks so much for sharing your time with me here today! I hope I was able to provide you a little Birthday inspiration and maybe a smile or two! Let me know which cards are your favorites! If you enjoyed this post please click the “Like” star at the bottom of this page, and if you wish to be notified of new posts click the Follow Me button at the top of this page. Please, take a few moments to Like Me, List Me, Pin me, Post Me, basically, just share this post with everyone and everywhere you can, and remember… Don’t run with scissors!! As always, I send you and yours Love and Light, and Happy Crafting!
DISCLOSURE: This site contains some affiliate links to products. I may receive a commission for purchases made through these links (at no cost to you). As an Amazon Associate I earn from qualifying purchases. Thank you!
