
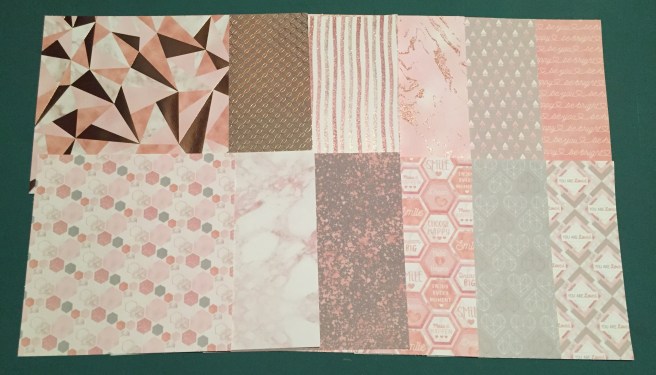
Hello Folks! Scott here with my 10 Cards 1 Kit post featuring the Love From Lizi September 2019 Super Card Kit. September 2nd is Love From Lizi’s third birthday, and Lizi treats us to a kit overloaded with extras every September. Lizi always packs her monthly kits with an abundance of materials and her September Birthday Kits are just filled with more! Whoever said less is more never saw just how much more is more with Love From Lizi! This is the “Warm Thanks” Card Kit, and if there’s one type of card I can use more than any other, it’s Thank You cards!
I was fascinated with the ephemera frames featuring flowers and geometrics. Let’s play!
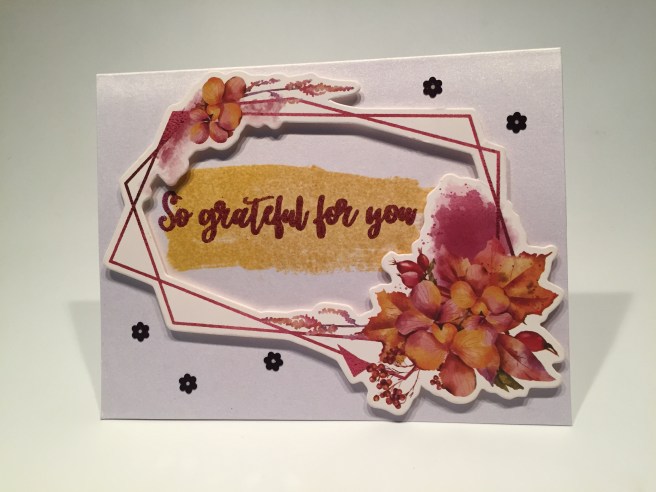
I fiddled around with this concept for a while and tried a few different ink combinations for the brush stroke and sentiment and finally settled on this pairing – The brush stroke is stamped with Mustard Seed Distress ink and the sentiment is embossed using VersaMark ink with the Perfect Plum embossing powder from the kit. I did grab an old David Tutera white shimmer card base for this card, and took care to completely dry the Mustard Seed ink before embossing the sentiment. Of course, I placed the stamps in an appropriate position for this ephemera frame which is mounted to the card front using foam squares. A few of the purple flower sequins add a touch of bling, complimenting the shiny embossing sentiment and shimmer card base. I’ve never seen anything quite like these large ephemera frames – makes for a very sharp fairly simple card.
We do have 11 of those frames in our kit… so I figured this would be a good opportunity to make a couple sets of cards perfect for gifting – especially with the holidays coming..!
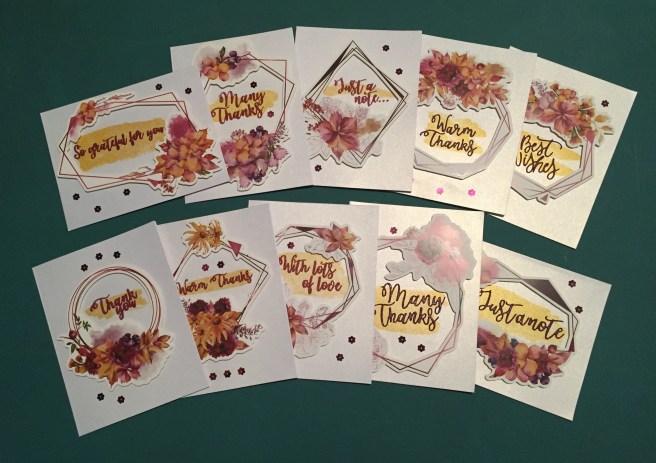
Just by chance, there happened to be 10 different sentiments in my kit – between the included stamps and dies, and the Smudges and Sentiments add-on, and the new Background Builder dies, so I paired all the sentiment up with the brush stroke stamps and the ephemera frames and got 10 different cards. For the die-cut sentiments, I colored white card stock with a dark red Spectrum Noir Marker for a pretty good color match, and shined them up with a Spectrum Noir sparkle pen before die-cutting them out. I actually had a great time figuring out which sentiment and brushstroke went with which frame! That makes two nice card sets for gifts this year! Those flowers are beautiful and the frames unique and the sentiments very useful!
So that’s my 10 cards using the LFL September 2019 Super Card Kit! Pretty normal and straight forward and if you believe me, you really should know better! This was simply a detour I took wanting to use those ephemera frames! But there is so much more to play with in this kit! We did get the regular five sheets of card stock, which I (as usual) turned into card bases for this next batch of 10 cards.
You give me watercolor paper and a watercolor dot palette, and I want to color!
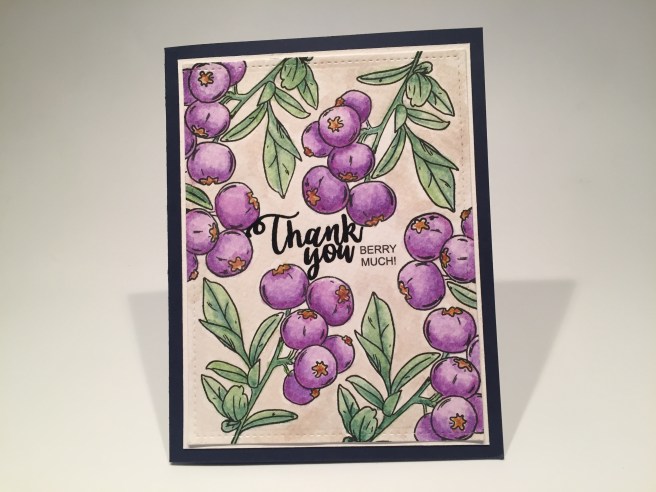
I stamped the berry stamp from the kit six times on the included watercolor paper using VersaFine Onyx Black ink, and I used the Windsor & Newton dot palette to color everything – I ONLY used the palette – no extra colors for this painting! Fortunately, The “Thank you” sentiment fit in the center space perfectly, and I printed the “BERRY MUCH” on the panel using my Silhouette software and the Arial font. This is fairly thin watercolor paper, and I didn’t have any problems getting it to go through my Canon Pixma MX922.
I die cut the panel with a Lawn Fawn Stitched Rectangle die and matted it on a thin white mat and glued those to the Navy card base.  I was a little concerned that this might be my only pun with this kit, so I went all out and added “YOU BLUE ME AWAY” on the inside writing surface. Sometimes I just can’t help myself! And I think the inside sentiment is a perfect addition to this fun blueberry thank you card! I do have my painting of this panel shown on my 10C1K video on YouTube for this kit… sped up of course… it took a little less than an hour for me to paint this. I think it’s worth every minute!
But wait… most of the pattern paper in this kit is blended watercolor backgrounds… maybe I can “paint” these stamps using the pattern paper in the kit!
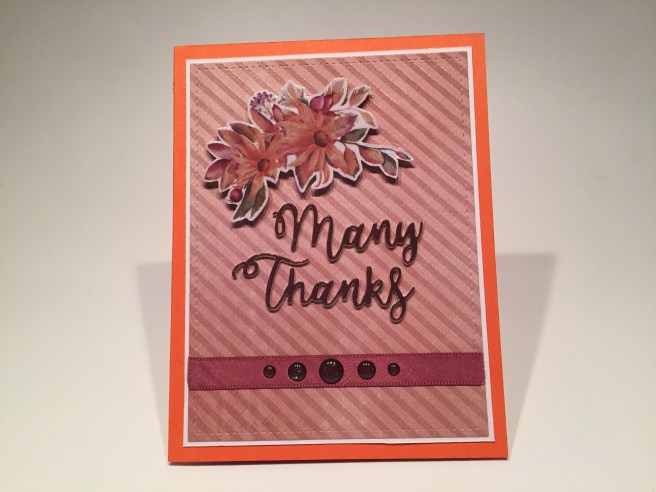
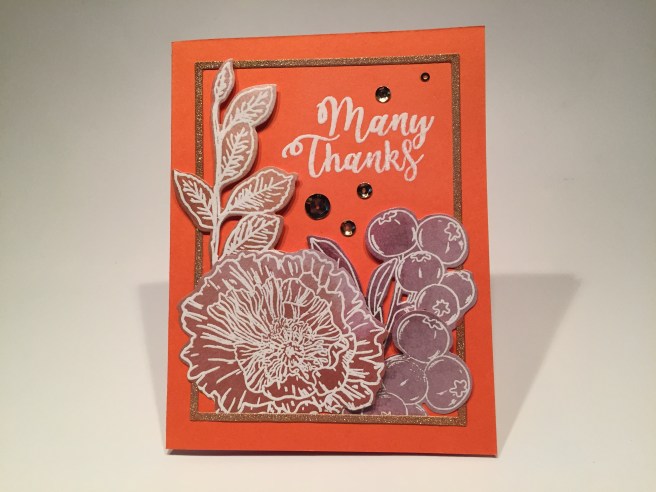 Which brings us to my second card on the Orange card base. I stamped and embossed the flower and leaf sprig on one of the orange-y pattern papers using Ranger White embossing powder and used one of the purple-y pattern papers to do the same with the berry stamp (twice). I die cut them all with the included dies, and trimmed a little extra off from the second berry stamp.
I was rummaging around in my scrap stash for some kind of frame that might fit this grouping, when I came across a bunch of thin frames die-cut in silver glitter card stock using an Altenew Fine Frames Cover die. I had cut these frames when working on the MMH October 2018 kit (that’s where the silver card stock came from too!) I grabbed my OR3 Spectrum Noir Marker and turned that silver glitter frame into an orange glitter frame. I stamped and white embossed the sentiment directly on the card base, glued the frame and all the die cuts to the front using a combination of liquid glue and foam squares. A few sequins from the Warm Thanks Sequin Mix finishes this card nicely! Not quite as detailed as a painting, but the pattern papers work well for ‘coloring’ the stamps!
I started fiddling with the big batch of ephemera in our kit and made and interesting discovery – there are 30 different ephemera pieces in this package, but, upon closer inspection, there are 15 designs in two sizes – a larger and smaller piece. Aha!!

If you look closely, you can see that these two ephemera pieces are the same flower arrangements in two sizes. That should make them easy to pair up! I die cut a scrap of watercolor paper with a LFSRD and embossed the sentiment and one of the geometric frames from Lizi’s “Frames” stamp set using the Plum embossing powder. This is also two more of those silver ‘fine frames’ colored with the Dark Red alcohol marker. The frames and the embossed panel are glued to the Burgundy card base and the ephemera pieces are attached with foam squares. Three of the enamel dots from the kit add a little sparkle and this is definitely a very cozy, very “warm” thank you card!
I really liked the vellum sheet with gold foil we got in our kit this month, and was very intrigued by the fact that is was so dark that you could barely see through it.
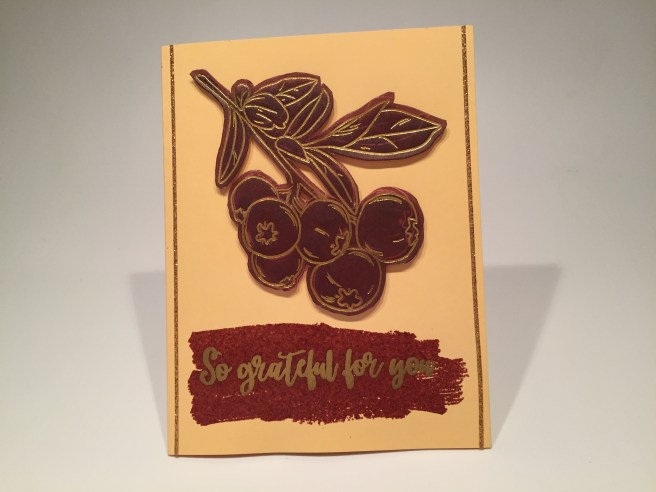
My sheet had two of the berry images that were complete, so I fussy cut one of the clusters to use as the focal image on this card. On the creamy Yellow card base, I embossed the large brushstroke stamp with the Perfect Plum embossing powder and embossed the sentiment on top of that using Ranger Gold embossing powder. I thought that echoed the foiled vellum piece very nicely. A couple of Gold Glitter peel-off stickers (from the Warm Thanks peel-off bundle) on the two sides and I got another fairly masculine ‘grateful’ card!
I needed a break from the muted, autumnal color palette in this kit so I grabbed one of the brushstroke stamps and satisfied my color compulsions with this card!
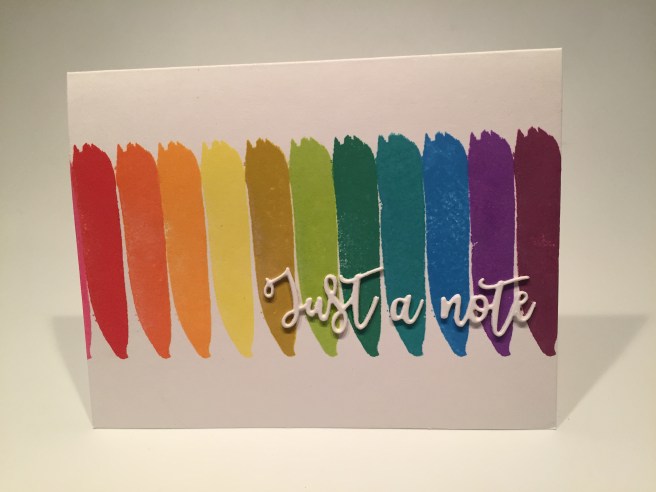
On the White card base, I stamped the brushstroke 12 times using my Tim Holtz Stamp Platform and Distress Oxide inks in (left to right) Picked Raspberry, Candied Apple, Spiced Marmalade, Wild Honey, Squeezed Lemonade, Fossilized Amber, Twisted Citron, Lucky Clover, Peacock Feathers, Salty Ocean, Wilted Violet, and Seedless Preserves. I die cut the sentiment from thick white card stock three times and glued all the layers together and added that to the card front. I think brush stroke stamps lend themselves to repeated stamping in a variety of colors, and this combo reminds me that YES… it IS still Summer! WOO-HOO!
We received more than 15 feet of satin ribbon (in various colors) in our kit this month, and though I’m not really much of a “ribbons and bows” card maker, I did want to come up with a creative way of using some of that bonanza of ribbons…
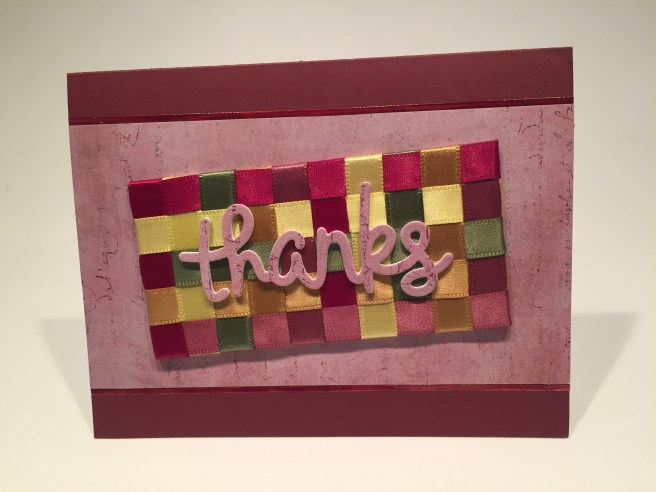
I cut a piece of stiff cardboard to 2″ x 4″ and, using 1/4″ Scor-tape on the back side, attached the five ribbons to the short side and 10 ribbons to the long side. I wove all the ribbons together and (stretching them tight) attached their loose ends to the back. I really like the quilt-y feel that gives us! I’m going to have to go back and look at some of the old ribbons in my stash now! I glued a 3″ piece of the pattern paper to the Burgundy card base, trimmed the edges with White peel-offs colored with my Dark Red Spectrum Noir Marker, and glued the weaving on top with more Scor-tape.
I created this sentiment with the Lawn Fawn Scripty Thanks die cut out of white card stock 3 times, layered together and topped off with one final die-cut from the pattern paper. I worried that a small delicate sentiment would get lost on the weaving so I went for this bold “thanks” instead. I added some sparkle to that sentiment with a Spectrum Noir Sparkle pen and glued it to the top of this card front. I really, really like this!!
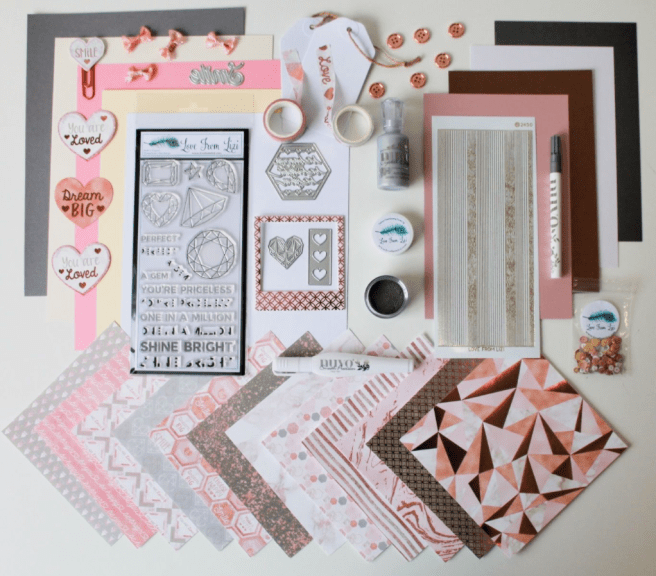
Let’s play with the Alpha Stickers in our kit! I have some dear friends celebrating their 30th anniversary this month so I thought an anniversary card would be appropriate!
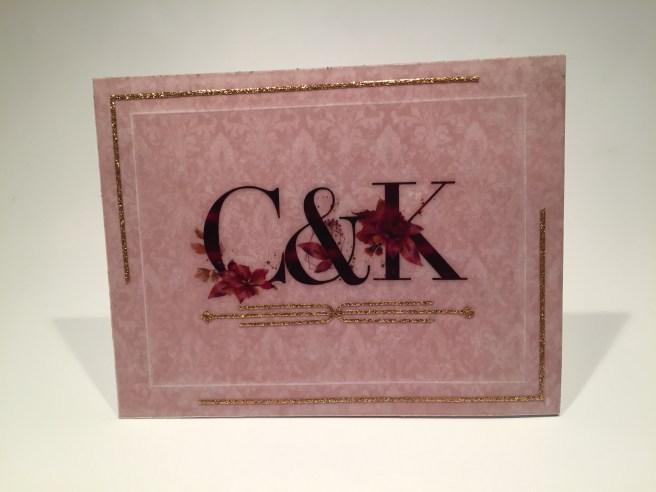
Very sharp and quite classy! First I covered a white card base with the damask pattern paper. I took a 4.25″ x 5.5″ sheet of 40# vellum and, using a small stylus, hand embossed the square on the back of the vellum using the inside of a LFSRD as a stencil. I ran the vellum through my 5″ Xyron Create-a-Sticker and glued that over the pattern paper. I did line up the “C&K” Alpha stickers on the edge of a clear ruler before sticking them down to the card front – those Alpha Stickers are VERY sticky!! I added a partial frame to the top left and bottom right corners using the Gold Glitter peel offs and reached for my LFL Atta Girl die (February 2019) and die-cut the ‘flourish’ from the top border of my peel-off sheet (so it’d be a perfect match!) and attached that in the center under the initials. Really very nice! I can’t wait to send this card! And I have LOTS more of those initials!
I wanted to play with the “Frames” stamp set and ephemera pieces a little more…
On the Navy card base we have two layers of pattern papers with thin white mats. Please note these were hand-cut – that’s right – I DIDN’T use my LFSRDies to cut these!! LOL!! I embossed the frame stamp on some white card stock with the Plum embossing powder and ended up fussy cutting that piece – I LIKE that! I paired that up with a matching set of ephemera pieces (with the flowers BEHIND the frame). I white embossed the sentiment on the card front and mounted the ephemera/frame grouping using foam squares. The white sentiment and white mats on the pattern papers compliment the white borders on the ephemera pieces and the fussy cut stamp. Very similar to my ephemera frames card sets, but with quite a bit more color! I love this combo, and it’s good to know I can create more “ephemera frames” using that stamp set and the huge assortment ephemera pieces!
Now I have used the flowers stamp, but I haven’t water colored it yet…

I die-cut the last of the watercolor paper from our kit with a LFSRD, and stamped the flower and leaves using VersaFine Onyx Black ink. I did make a mask for the flower using my Inkadinkado Stamping Mask Paper so I could stamp the leaves “behind” the flower. I water colored the flower and leaves using only the W&N dot palette from our kit. I did color the flower with the Yellow Ochre to match the soft Yellow card base! I stamped the sentiment using Wilted Violet Distress oxide ink and I embossed that with some clear embossing powder. I glued the watercolor panel to the Yellow card base, and used the medium Lilac peel-off stickers for the frame around the panel and the thinnest peel-offs for the partial frame on the watercolor panel. Some of the green glitter enamel dots adds a little more sparkle to wrap up this card. I really like how this card turned out! Remember purple and yellow are complimentary colors! Though, you know, I still haven’t quite figured out what kind of flower this is…!
I really didn’t want to finish my 10 cards with out using the New Candystripe rubber background stamp – Lizi’s very first rubber background stamp!
I fiddled around with that stamp for a while before I realized I could use it to enhance the pattern papers in this kit by embossing the papers with clear embossing powder! That shiny background stripe dictated this whole card. I die cut the pattern paper with a LFSRD and matted that on a thin white mat (I knew I wanted to use another ephemera piece) before gluing those to the last Orange card base. I die-cut the sentiment from two pieces of thick white card stock, glued them together and topped them off with another die-cut from the dark berry and leaf pattern paper. Then I clear embossed the sentiment as well – matching the shine of the stripes! I liked that so much, I fussy cut a lot of the white border away from this ephemera piece and clear embossed that too! MORE shine!
I attached a piece of the mauve ribbon across the bottom of the panel using my 1.5″ Xyron Sticker maker and, instead of adding a bow, added some of the dark enamel dots to the center of that ribbon instead. The sentiment is glued to the card front and the ephemera flowers are mounted with foam squares. I think this shows off that new rubber background stamp nicely without it becoming too much about the stamp! Great shine on this card – and I like that ephemera piece with a smaller white border… I’ll have to remember that one!
That’s my 20 (twenty, count ’em, twenty!) cards created from the Love from Lizi September 2019 Warm Thanks Super Card Kit.
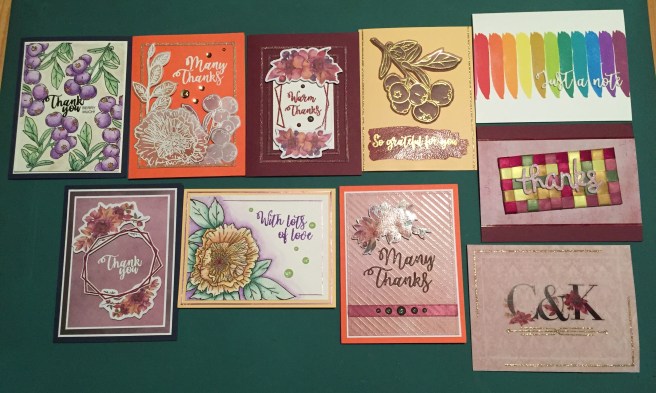
A really nice variety of cards from this kit – and a nice variety of styles on display here! I think I found a lot of options on how to use this plethora of supplies from this card kit. As usual, I do have a good amount of left-overs to add to my stash this month. I only used 8 sheets of pattern paper, so I have 12 sheets untouched, I only have one ephemera frame left, but lots of ephemera pieces. I did use every sentiment in this set (stamps and dies) and a lot (though not all) of the brushstroke stamps. I did manage to use at least a little bit of everything included in this kit. That feels like quite an accomplishment in itself!
This kit has sold out (naturally) but a lot of the add-ons and new products are still available. If you do go shopping at Love From Lizi please use the specific links in this post or my general LFL link: http://bit.ly/LFLlink Your support is greatly treasured and always appreciated.
This marks the beginning of my third year as a LFL Design Team member, and I have to admit that the past couple of years have been a pretty wild ride with one of the most unique card kits on the market. I owe a great big THANK YOU to Lizi, my fellow DT Members and especially to all of YOU – YOU are the reason I do this! Your generous support and encouragement over the last couple of years has kept me inspired and continually searching to come up with unique ways to use these fun kits and hopefully embolden you to think a little bit outside of the box on your own card-making journeys! Please click the FOLLOW link at the top of this post, and remember to follow CardCutups on Instagram, Facebook, and YouTube. Please Like me, List me, Pin me, Post me and share me with all your friends (and your enemies too!) Remember, don’t run with scissors, and as always, I wish you Happy Crafting!
DISCLOSURE: This site contains some affiliate links to products. We may receive a commission for purchases made through these links. Thank you!!
 Our 6″ x 8″ stamp set includes all these great images and a big assortment of sentiments that you can combine in many different ways. We get 17 matching frame cuts for all the stamp images and a Fancy Castle die too! We also get three Glimmer Ink Pots (Gold, Purple, Red), and a pack of Dragon Scale Sequins along with 2 half-sheets of parchment paper, and 2 half-sheets of that totally groovy Mirri Matte Lava Purple Paper. Almost too pretty to cut! So many treats in our kit this month! Let’s go to the Renaissance Fair!
 Of course, I thought Hero Arts had given us a very nice joke with the addition of the “Welcome to the middle ages” sentiment, so I took that to heart and stamped the sentiment on the inside of the card. I think both of these sentiments are my favorite in this kit, and they actually make a very nice birthday card for anyone entering those nebulous middle ages…!
 I stamped the fire sentiment on a piece of the parchment paper included in the kit, stamped and colored the “flame” stamp below the sentiment, and die cut the paper with my LFSRD before mounting it to the inside.
 me and asked if I would like to try the new Hero Hues reactive ink pads. Well, of course…! You don’t have to ask me twice! These pads are formulated with both dye and pigment properties and are water reactive and should lend themselves to easy blending. Hero Arts offers some great colors with these new inks:
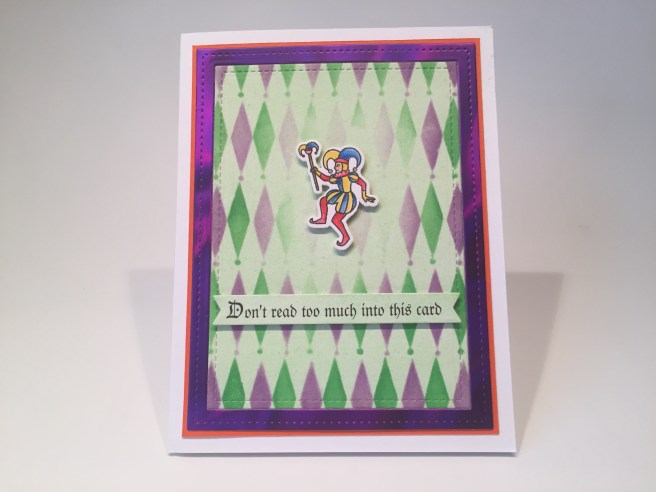
 Of course the pun is on the inside! “It’s just a nice Jester” makes me laugh and is a pretty darn good pun perfect for this kit! The inside sentiment is printed directly on the card base using the same font and software. Finally, I die-cut the colored jester and mounted him and the sentiment banner to the card front using foam squares. Very colorful and fun card! I think that jester is a fun focal image on the card front. Nice pose!
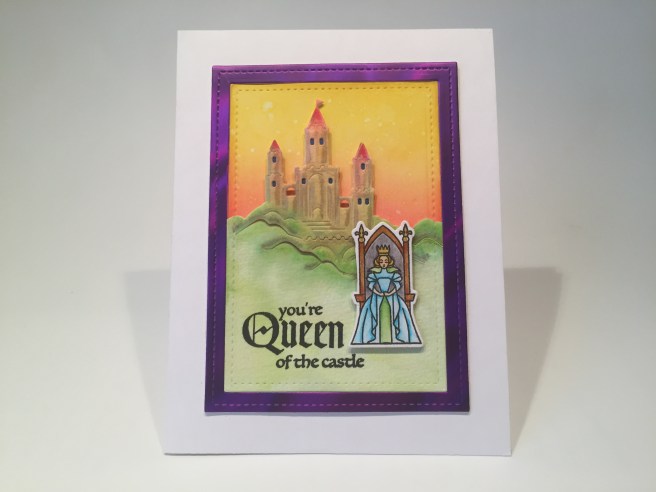
 Lastly, the seated monarch is attached to the card front using foam squares.

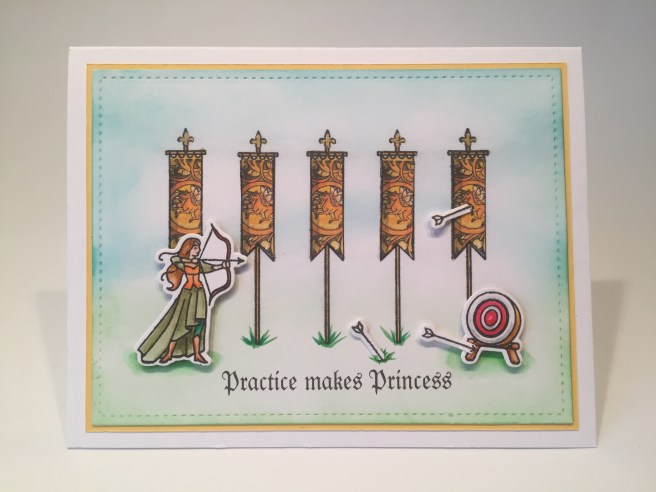
 I stamped the row of five banners using my stamp platform, and paper pieced them with a little cartoon rendering of one of the unicorn tapestries I found on line. I actually live a few block away from the Cloisters which is a part of the Metropolitan Museum of Art and houses the Unicorn tapestries. I just printed this five times on plain paper, stamped and fussy cut the banner, and glued them on top of the stamped images. I did give them all a little shadow on their left sides with my lightest gray Zig marker. That adds a little dimension!
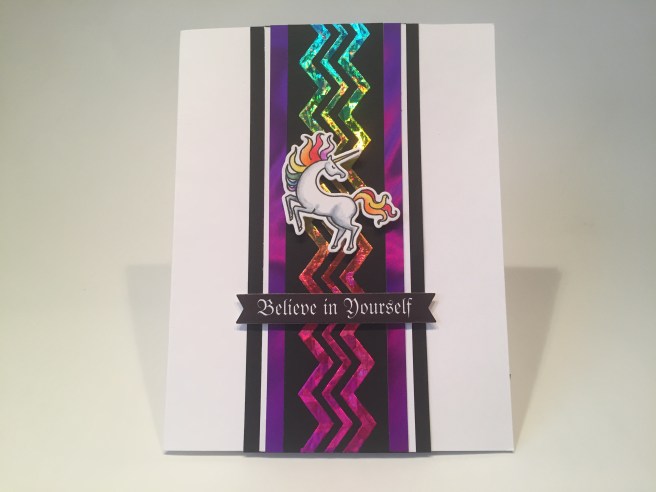
 Looks like this maiden needs a little more practice..!! The arrow in the banner makes me giggle ’cause it actually hit the heart of the unicorn! Paper piecing is also a terrific way to use this banner stamp. So many patterns would work quite well as decorative banners! I did want to finish this card on a positive note, so I printed the “You got this!” sentiment on the inside of the card base. Yet another fun encouragement card!


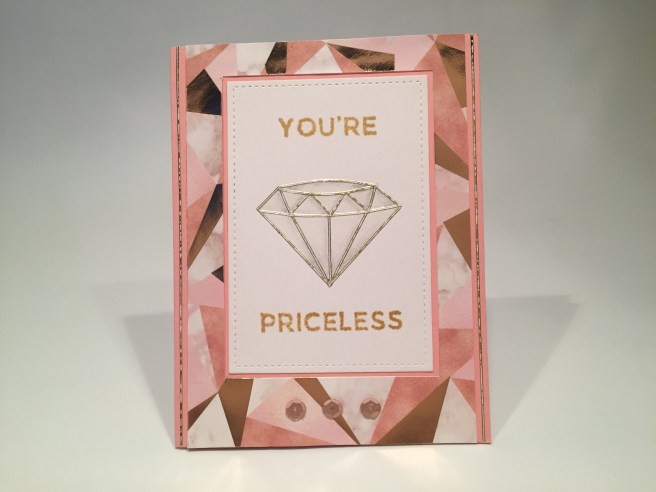
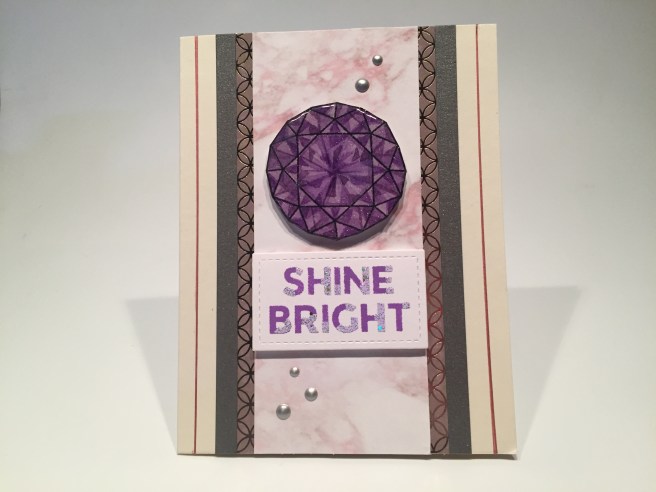
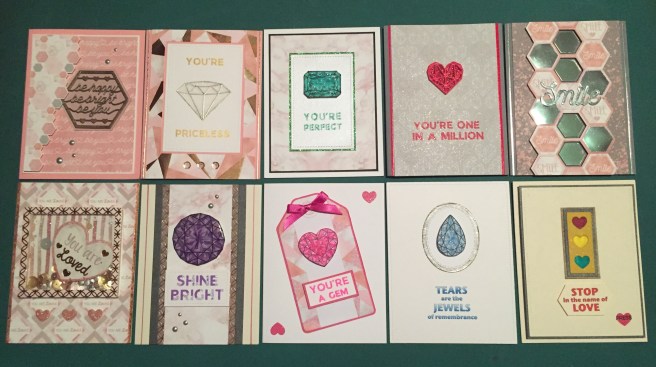
 BUT, she didn’t just give me a DOT card, she sent me a BLOB card!! Oh my heavens, big blobs of colors to play with! And about 60 different colors! I was in a little bit of watercolor heaven when I received this! SO… I thought I would break into this DS BLOB card and watercolor me some gems with this kit. Of course I had to go do a little research and found this great picture of birthstones featuring all different colors
 of gems. It’s not just the top cut that makes a gem sparkle, it’s the facets cut into the back of gems that give them their real sparkle and shine. Maybe I can achieve that effect with watercolors! And look at that Pink Tourmaline!
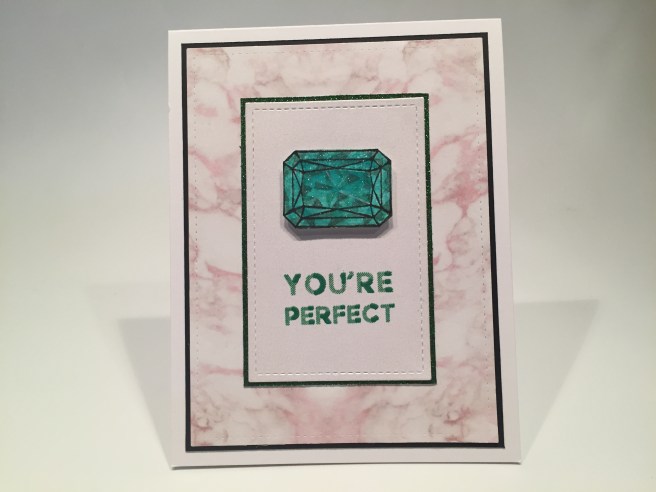 together! I simply laid down a layer of very thin water color (
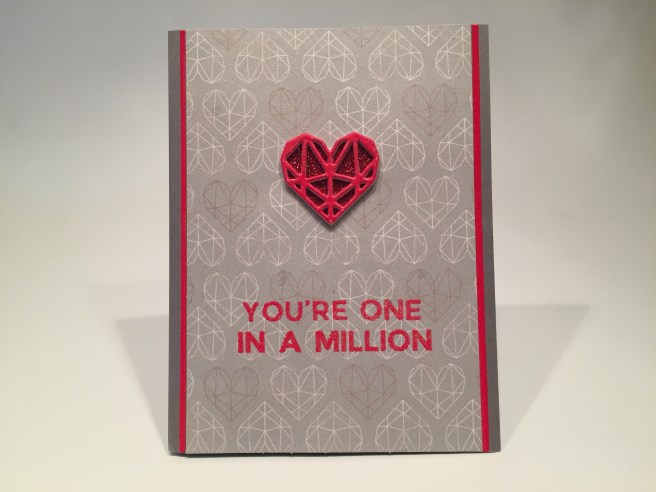
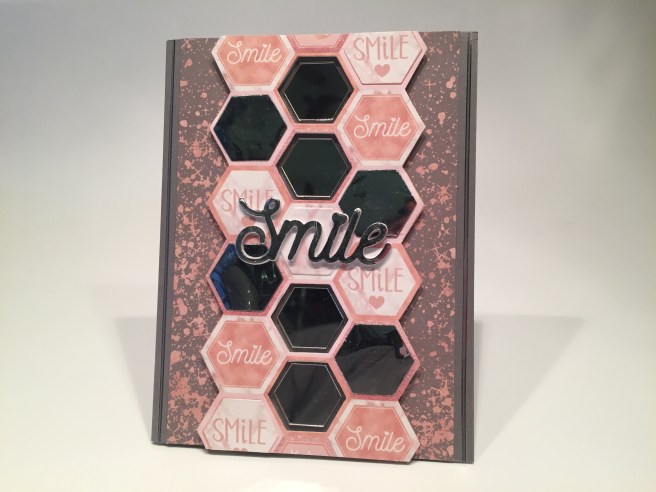
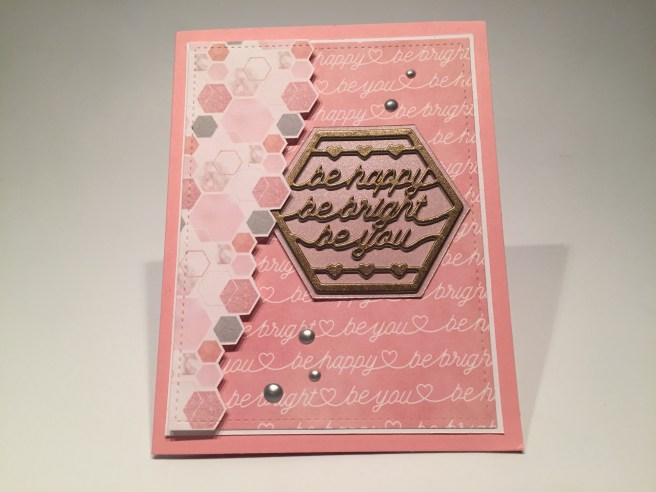
 I’m not a huge fan of simple declarative sentiments, so I decided to add to this card with an additional sentiment on the inside writing surface. I think “It makes people wonder what you’re up to!” is a fun addition to the simple “Smile” sentiment and provides a light-hearted chuckle for the recipient! This sentiment is created using my


 A perfect birthday card for the fisherman in your life! I did add a pun on the inside of this card – I thought it went quite well with the Birthday sentiment and fishing theme! I printed that sentiment using my
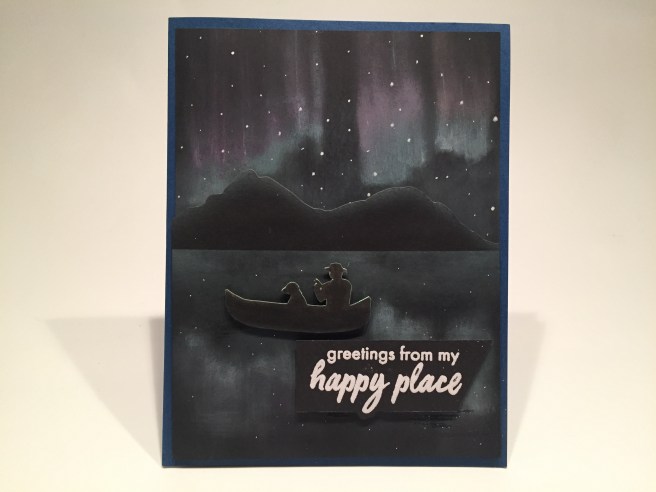
 I thought the extra “wish you were here” sentiment would be a perfect addition to this card, so I stamped that on the inside writing surface with Onyx Black ink. I think this is a pretty good representation of the Aurora Borealis, but I will definitely try some different techniques to try and get some true brightness emanating from these northern lights… isn’t there a “northern lights” stamp out there??

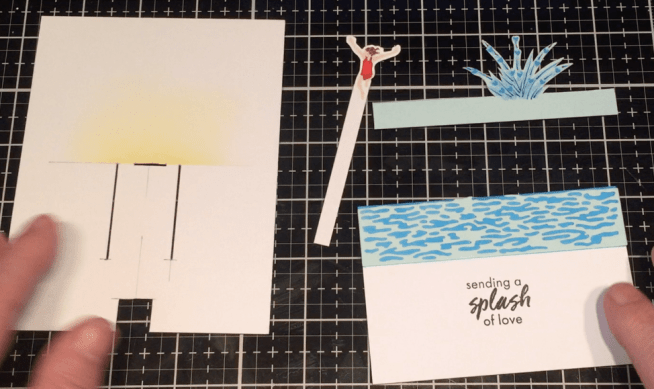
 I had an interesting idea on how to complete this stamped sentiment, so before I did anything to the front of this card, I printed “you can’t make a splash without getting wet” on the inside of the card using the Arial and
 Before I assembled everything together, I printed “avoid pier pressure” using the Arial and BlackJack font. Kind of a perfect pun for the theme and stamps this month! Finally, for a little extra “peer pressure”, I added the “wish you were here” sentiment on the inside, stamped again with Onyx Black ink. I really enjoyed stamping these images directly on the card front which avoids the ‘border’ when you die-cut the images with the dies. And a really fun pun too!


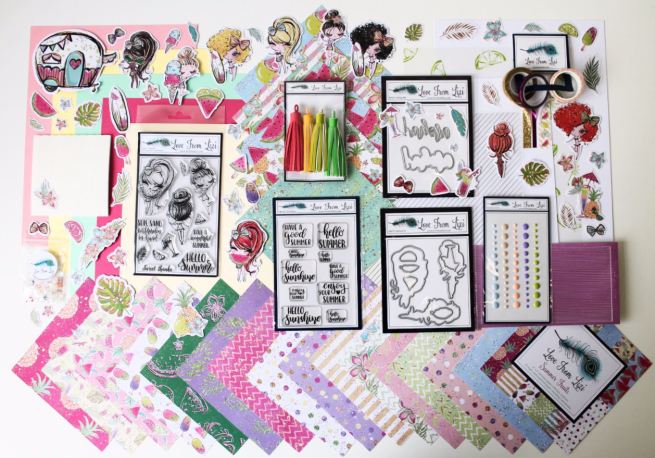
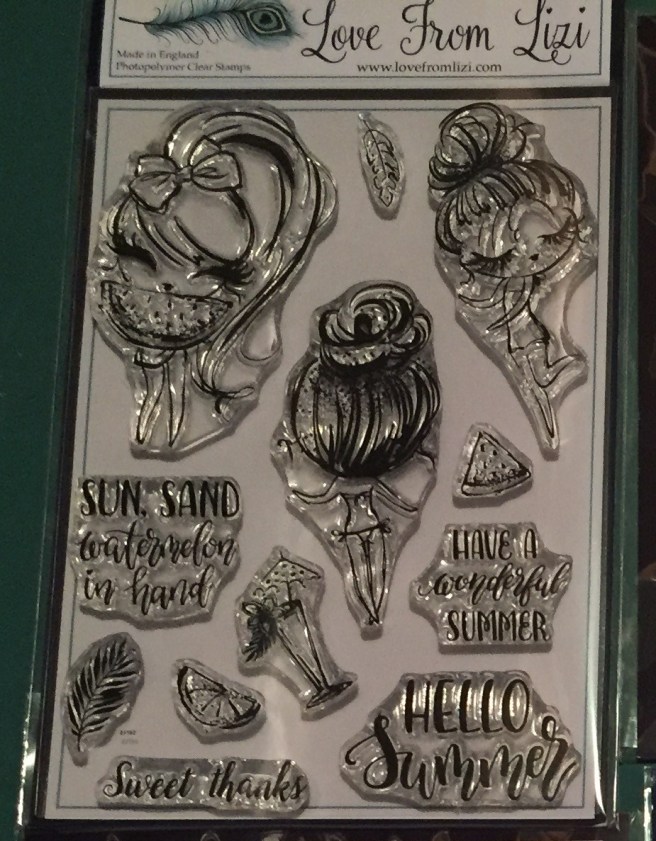
 the two add on stamp sets – “Summer Loving” (on the left) and “Summer Girl” (on the right) which gives me another two of the ‘eyelash girls’ and that terrific camper stamp! Since Lizi provided us with some extra copic-friendly card stock this month, I decided to go ahead and stamp all of the image stamps on a half-sheet of that card stock using

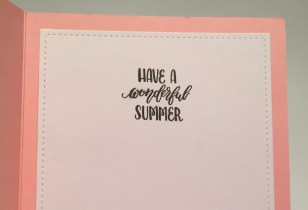 squares included in the kit, and embellished with three blue enamel dots. They match the bow and skirt on the girl perfectly! (both paper pieced) I did continue the sentiments on the inside of the card stamping the “Have a wonderful Summer” on the inside writing surface. I think all three of these sentiments work very nicely together! I like how the Pink and Raspberry Pink card stocks and the green ink blending on the white card panel echo a watermelon! And if that slice of watermelon is any indicator, then that watermelon must be bigger than her head! LOL!

 Did you notice the asterisk at the end of the sentiment? Oh yes… there is more to come! Seems like there’s always a condition when someone says they love you more than something (or someone) else! “Unless it’s mint chocolate chip” is printed on the inside of this card just the same as the sentiment on the front. Now THAT makes me laugh! A nice valentine or ‘love you’ card that doesn’t necessarily have anything to do with summer!
 mirror washi tape on either side and then thin strips of the Raspberry Pink card stock to the outside of the washi tape. The smallest Bubble peel offs fit on those strips perfectly, and I added a super thin strip of both to anchor my girl mounted with foam squares. A few sequins for more sparkle on this shimmer pattern paper and I also stamped the “sea you soon” sentiment on the inside – gives us a little purpose for this card! And it’s a nice pun!

 (from the
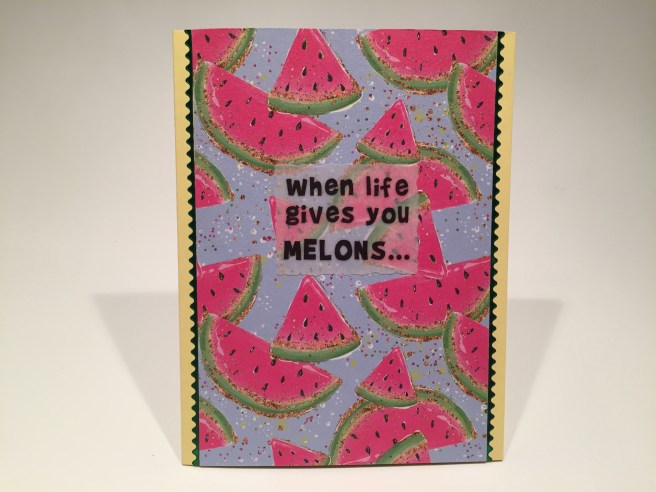
 The big kick comes on the inside with the completion of this sentiment – “you just might be dyslexic!” That makes me giggle every time I say it! I added the small watermelon wedge and the lemon from the stamp set(s) around the inside sentiment to kind of drive home the whole melon = lemon gag. A simple card with a terrifically funny sentiment. Sometimes I just can’t help myself!
 inks and my
  I cut a slot for the hinge in the card panel above the camper roof and added a pull tab so it would flip the front of the camper open. I also cut out the window on the front of the camper to give a hint of what’s inside. I printed the sentiment on my last Mint card panel using the


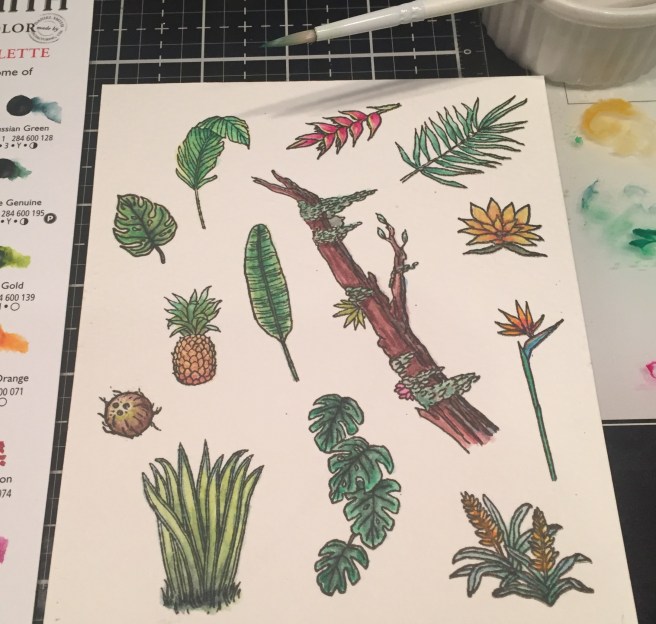
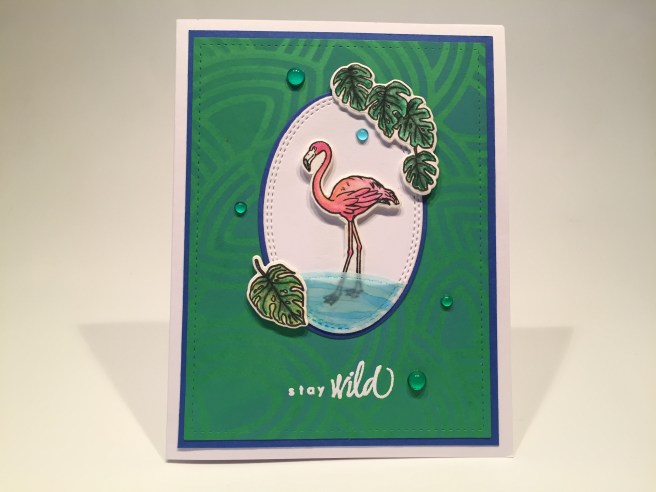
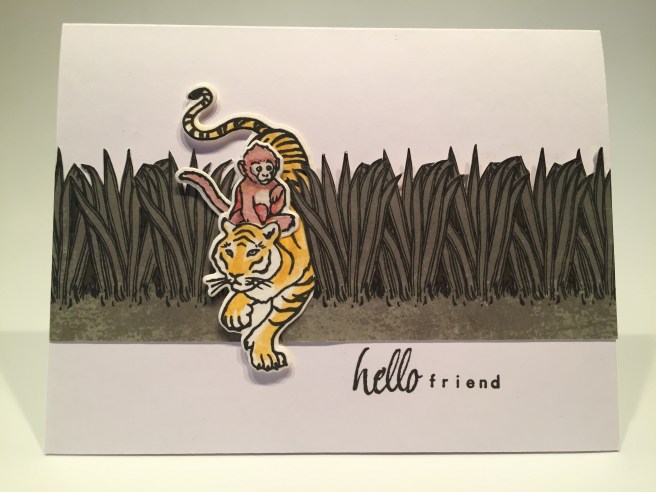
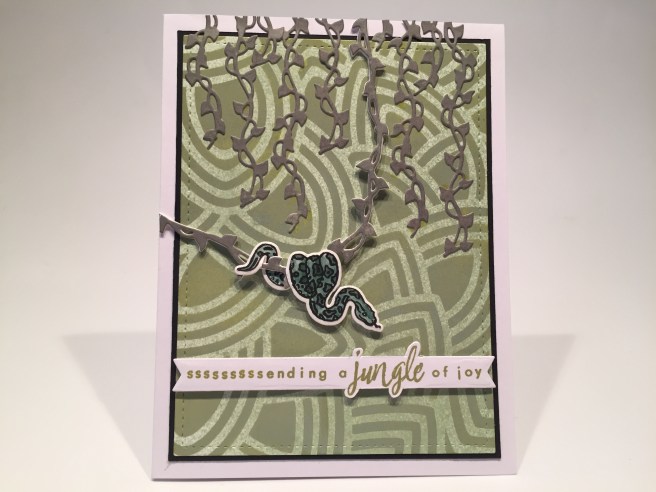
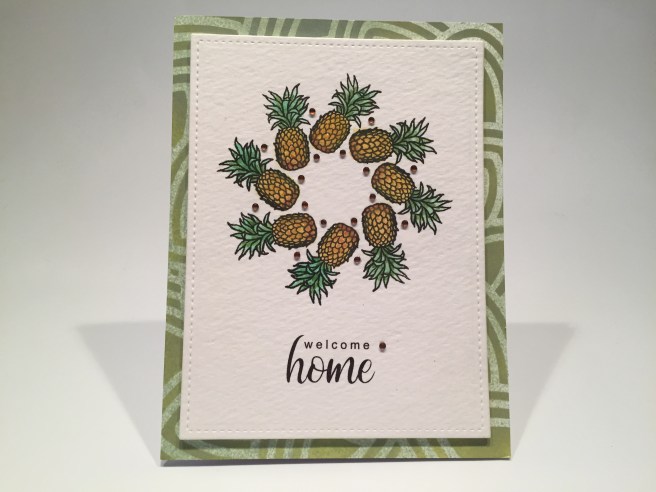
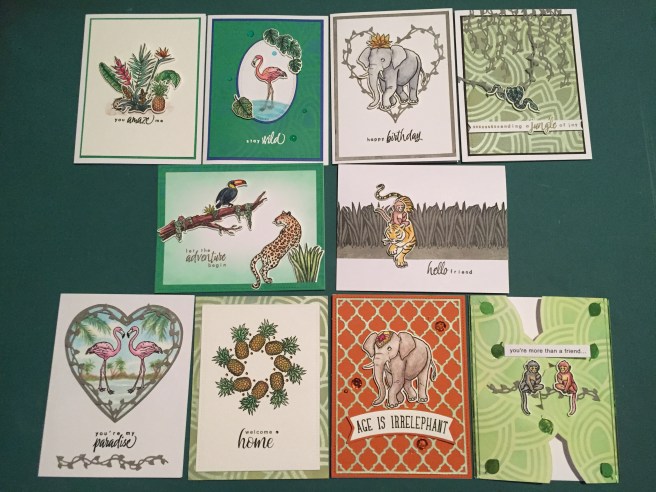
 Flowers and leafy images along with realistic animal images make up our 6″ x 8″ clear stamp set paired with seven different sentiments. Ous dies include twenty coordinating frame cuts along with two Jungle Vine Fancy Dies! We are treated this month to a Daniel Smith Watercolor Dot card “Jungle Palette” created especially for this kit. I guess we’re going to be watercoloring this month! This kit is rounded out with a 6″ x 6″ leaf pattern stencil and a brand new black dye ink cube that is darker than Hero Arts Intense Black ink – they are calling this INTENSE-ified Black Ink. I always love getting ink cubes in our MMH kits – this looks like a great kit to color and play with!


 Of course I justified this sentiment by adding a second sentiment on the inside. Using my


 I fashioned that sentiment to fit my
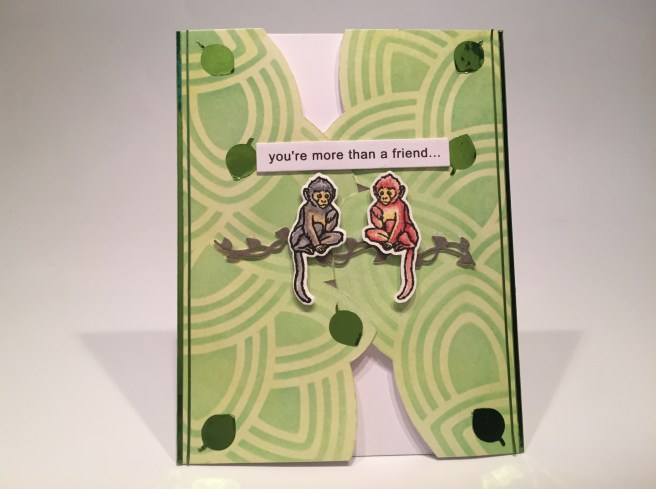


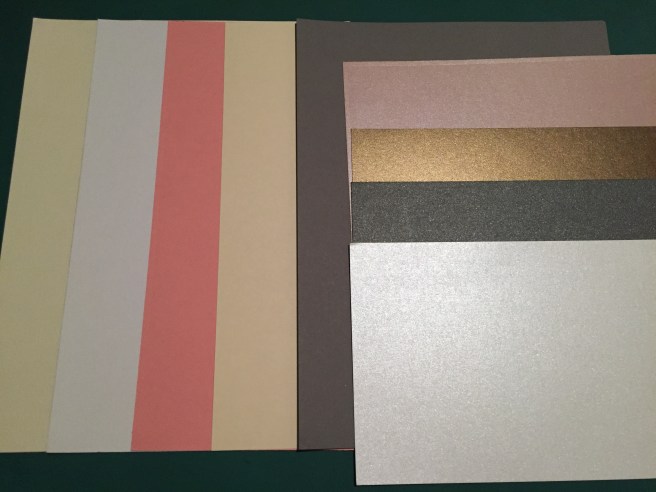
 This month, I decided to cut the card stock in half and use half of each sheet for card bases and trim the other half down to Acard-sized panels. I augmented the card bases from the kit with five white card bases from my stash, and I kind of like the option of having extra colored card panels to play with!
 panels on one side. Along with the two 12″ x 12″ cut-apart sheets also included in this kit, we have an embarrassment of cut-apart riches this month! I think it must have been that teal ombre, the wreath, and the dandelion panel that made me want to play with these. I went right ahead, and, disregarding the patterns on the back of these, cut both sheets down to eight panels. I wasn’t quite in the mood for a sympathy card right off the bat, so I decided to turn one of these panels into a masculine valentine.


 I did go ahead and add a sentiment on the inside of this card. One of the small sentiment strips from the sticker sheet went perfectly with this sentiment and is a great prelude to a personal note. More pretty!


 I actually did a little stamp surgery on the “Forever in our Hearts” stamp from the
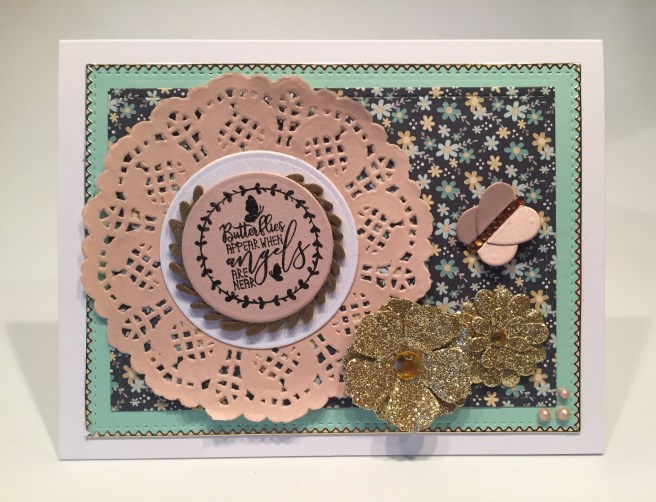


 On a Teal card base I grabbed my home-made ‘water ripples’ stencil and stenciled the bottom half of the card base using Salty Ocean Distress Oxide ink. I stamped the sentiment with the same ink and clear embossed that as well. I die-cut the two swans and three water lilies from our White specialty card stock and cut the hearts from a scrap of white glitter card stock. I took some green alcohol markers to the leaves of the lilies and glued everything flat to the card front except for the second swan who is mounted with some foam tape. I added two Teal mirror Sway peel offs (add-on peel off bundle) to the top and bottom edges of this card for a final pop of shape and shine.
  Of course, I cannot leave you without any puns this month, so on the inside of this card we get “You’re the swan that I want” (you are the swan I want – ooh, ooh, ohh, honey!) This is printed on a die-cut white writing surface using the
