
Hello Folks! Scott here with my 10 cards inspired by the My Monthly Hero June 2021 Kit. Sorry I’m a little late this month… I got called to Grand Jury Duty on the 8th and it’s so hard to feel creative after 8 full days of crime and mayhem…! One more day to go, and I’ll have fulfilled my civic duty for another four years! Now back to MMH!
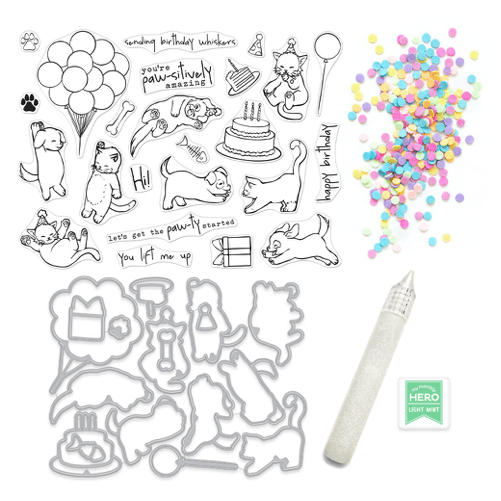
This month we are celebrating birthdays with adorable cats and dogs, who are partying it up at a birthday soiree. Our 6″ x 8″ stamp set includes four puppies and four kittens in various poses along with balloons, birthday cake, a gift and six pun-y sentiments. We get a set of 17 coordinating frame cuts for die-cutting all the images, as well as a Light Mint Dye ink cube, a Sparkle Lacquer pen, and a pack of round Clay Sprinkles. Should be enough here for LOTS of Birthday Parties!
I recently got some Stonehenge White card stock (recommended for colored pencils by Sandy Allnock) and figured I’d use my colored pencils and give this new card stock a try. I stamped all the images using HA Intense Black ink on some Stonehenge White card stock and got out my Prismacolor colored pencils and just started coloring. I find this is a great way to gin up some inspiration without any pressure to make any cards.

I’m quite impressed with this Stonehenge White card stock! It seems to just grab the color from your colored pencils and has a really nice texture that feels kind of furry on these cute critters. I like that the animals aren’t detailed very much – you can make them look like most any puppy or kitten. Maybe the card recipients pet?! Of course, I also die-cut all of the images too!
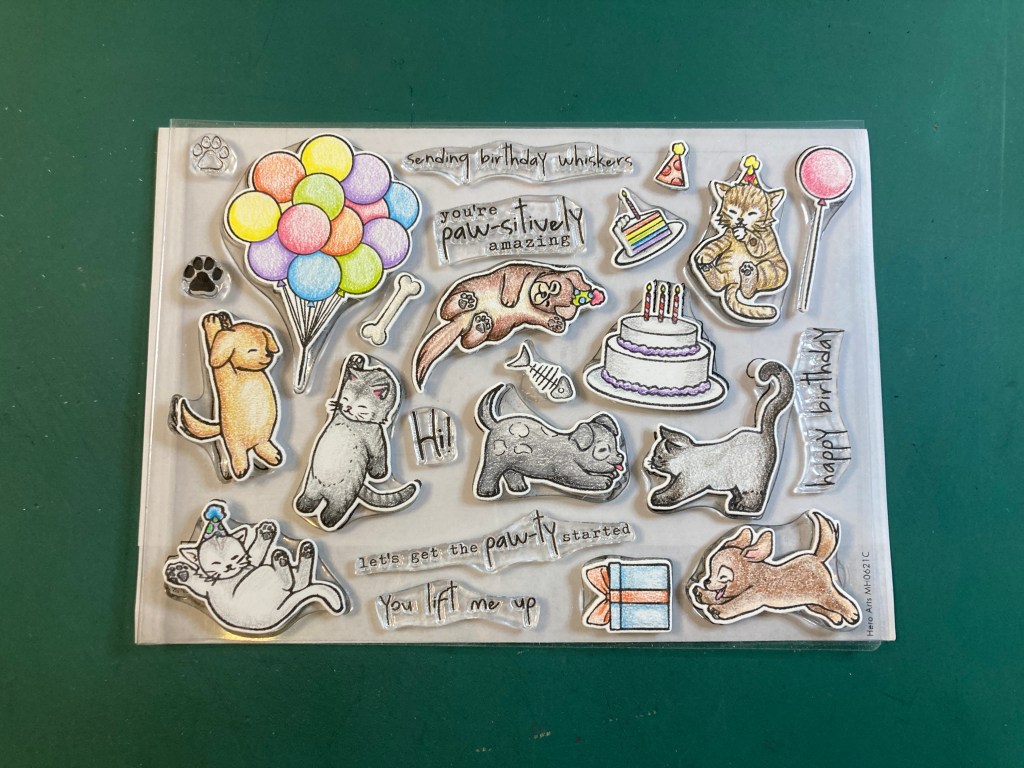
Though I don’t do it very often, I really like these colored and die-cut images placed on top of the stamp set. Really brings the stamp set to life! Okay… let’s make some cards… How about a slimline card to kick us off?
My first card is a standard slimline card – 8.5″ x 3.5″ (card stock cut to 7″ x 8.5″) The background (3″ x 8″) is ink blended using a MFT Cloud Edges stencil and HA Splash reactive ink, matted on a thin mat (8 1/8″ x 3 1/8″) of Hero Hues Mist card stock and then down to a Neenah 110# Solar White card base. I stamped the sentiment with Splash ink and embossed it with some clear embossing powder. Then I attached the animals and the balloons together and mounted them with foam tape. When I combine die-cut images together, I like to trim away the white border where the images overlap. Then the white border frames the entire collage and makes the whole assemblage appear seamless. I figured the pup with both arms in the air was perfect for hanging on to the kitten’s leg. This really fills up a slimline card!
This kit is leaning heavily on the Birthday theme so let’s roll with it. I always need Birthday cards in my stash!

I love this little kitten serving up a slice of cake! And a slice of rainbow cake is certainly recognizable and very trendy! On a Neenah 110# card base, I ink blended some HA Lemon Drop reactive ink very lightly just above the middle of the card. I stamped the sentiment using Intense Black ink and embossed it with Clear embossing powder. I combined the two images together taking care to trim away the excess white border on the cake plate, and added them to the card front with foam tape. A few of the Round Clay sprinkles adds to the party atmosphere, and I don’t even mind the false pun! I do think I would be hard pressed to use this sentiment with one of the puppies – Cats have whiskers, dogs don’t!
And the kitten sitting up and licking her paw? She must have gotten into the cake!

Using the Hero Arts Infinity Circle dies, I die-cut three circles from red, yellow and blue card stock from my stash. I glued those the the front of another Neenah 110# card base, stamped the sentiment using Candied Apple Distress Oxide ink and clear embossed that. I glued the cake, party hat and balloon string flat to the yellow circle, and added the kitten with foam tape. I don’t mind the border on these images since they are layered and not necessarily interacting with each other. I added foam tape behind the balloon itself, and more Round Clay Sprinkles to add to the party. I did take the Sparkle Lacquer pen and added a nice touch of shiny sparkle to the balloon itself. Tons of sparkle in that lacquer! Looks kind of amazing in real life! And the kitten has a touch of purple icing on her left paw… YUM!
I thought these two puppy stamps were absolutely the most adorable critters in this set.

Continuing with my colored pencil practice, I colored a bit of a background for these pups on a piece of Stonehenge card stock die-cut with a Lawn Fawn Stitched Rectangle die. I stamped and embossed the sentiment with Splash ink, added a thin plaid mat (Lawn Fawn Gotta Have Gingham Petite paper pad) and glued this to a Neenah 110# card base. I added the pups with foam tape and I think this is such a cheerful greeting card that any recipient couldn’t stifle a smile!
We have more pun-y sentiments in this set and these two critters are looking at each other in the stamp set so it only seemed natural to use them together for this card.
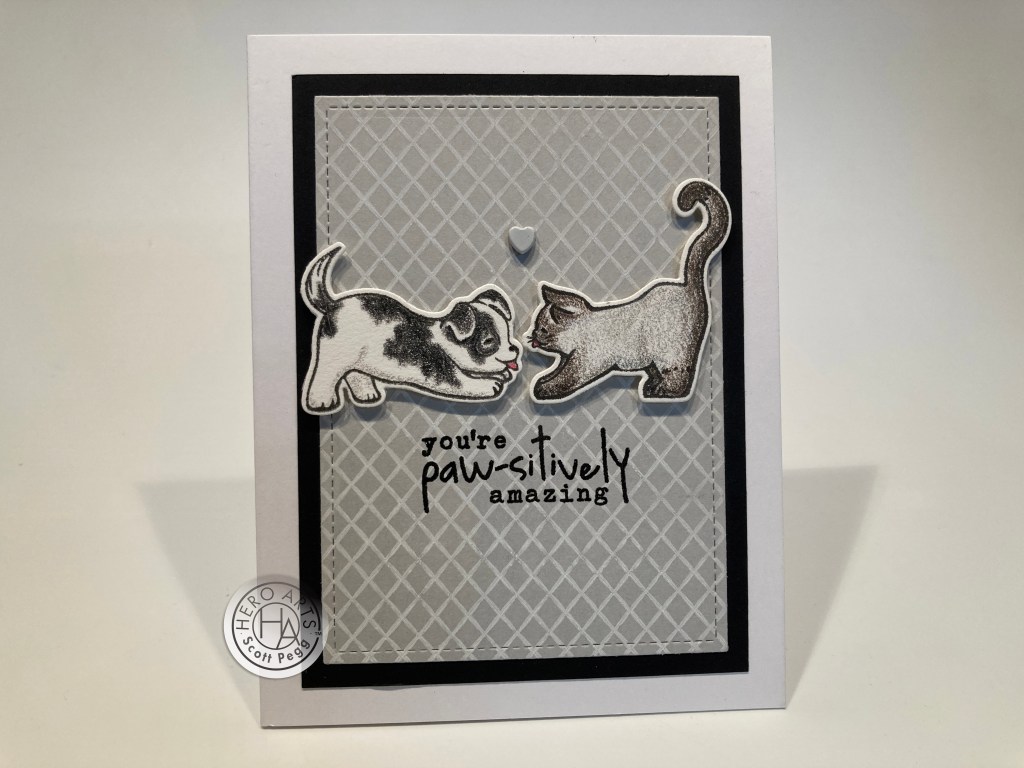
The background is a piece of Staples Grey card stock stamped with a Carta Bella Designer Diamond A2 stamp using HA Sea Salt Reactive ink. I thought that was a nice suggestion of a chain link fence..! When that dried, I die cut it with another LFSRdie, added a black mat, and glued those to a Neenah card base. I stamped another pup on more Stonehenge card stock, and colored him to go along with the siamese, and die-cut him out. I mounted the pup and the kitten with foam tape, and added a white heart brad between them. YES! that heart brad is actually white! But the grey/white background makes it look grey… very interesting optical illusion! These two look like they’ll be life-long friends!
I started wondering if one of these small pets could wreak a true birthday disaster, and what would that look like?

I’m not sure if kittens have a sweet tooth, but this one certainly does! Quite a mess! I stamped a new kitten and three birthday cakes on Neenah 80# card stock and die-cut them out. I chopped up the cakes and created this mess using some darts to suggest a collapse, and created some extra pieces as well. I was careful to extinguish the flames on the candles less we burn the house down, and this kitty looks totally pleased with herself! I colored these with my Spectrum Noir alcohol markers and tried to keep the border consistent around the cake.
I cut a piece of Gingham pattern paper to 2.25″ x 5.5″ and used markers to create a surface for the mayhem. I glued that to a Neenah 110# card base and lined the edges with some Love From Lizi Clear Glitter peel offs. I stamped and embossed the sentiment (I couldn’t come up with a petter pun…!) and glued the cake and kitty to the card front – I did add an extra piece of card stock to the back of the images for a tiny bit of dimension. A few Round Clay Sprinkles desperately try to keep the party going, but the festivities seem unsalvageable to me! This one gives me giggles!
We’ve got two paw print stamps in this set… I couldn’t help but think of this classic sympathetic phrase.

I thought the arch of rainbow paw prints was a nice nod to the rainbow bridge our pets pass over, and the sparkle lacquer prints felt like an absence to me. A very sweet pet sympathy card! I stamped the prints in Grape Slush, Blue Hawaii, Green Apple, Lemon Drop, Creamsicle, and Fruit Punch Reactive inks, and the outlines in Intense Black ink and I filled those with the Glitter lacquer. I printed the sentiment on the panel using my Silhouette software and an old clip-art phrase. I die-cut the stamped panel with a HA Rounded Rectangle infinity die and added a thin black mat and glued both to a white card base. Plain and simple and perfectly attuned to the moment! And I hand-stamped all of this!!
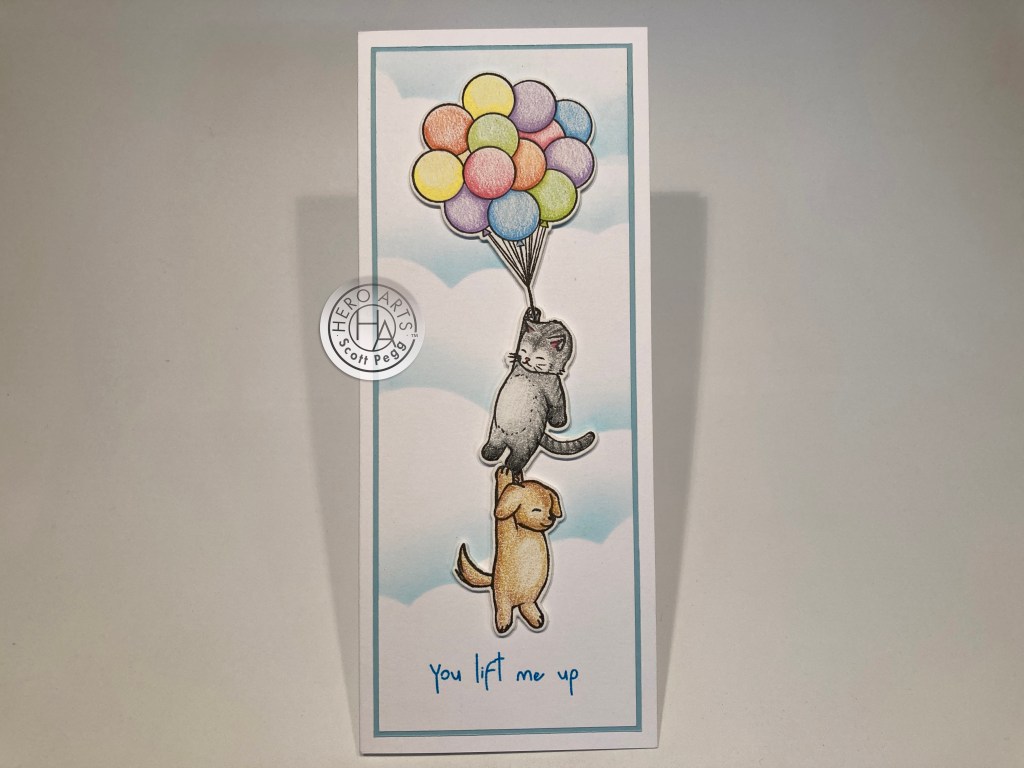
The pup on his back wasn’t giving me any brilliant ideas, but I realized he did have a paw ‘up in the air’, so I thought I’d set him afloat with another balloon. Now, I don’t think I’ve ever made a Mini Slimline card before, so lets try one now!

I can buy it that this pup is floating…! I stamped and colored three more balloons the same as the others, but cut off their stamped strings in favor of some bakers twine strings. I cut the bow away from the present, glued it to the bone and tied a red balloon to that. I attached the other balloon strings to the pups outstretched paw. Instead of clouds, I thought this old watercolor polka-dot pattern paper would work, but the background was white – a little TOO much contrast – so I ink blended Splash Reactive ink over the pattern paper. I cut that to 2.75″ x 5.75″ and added a thin blue mat. The card base was cut at 6″ x 6″ and scored at 3″” to make a Mini Slimline card. I glued the background to the card front, then stamped and embossed the sentiment as regular. I added the pup and balloons with foam tape, and, though you can’t see it in the picture I did add lots of glitter to the balloons with a Spectrum Noir Sparkle pen. I love the bone gift and this card size!
I have to admit that this Mini Slimline card is actually quite adorable – I might like this more than a regular sized Slimline card! However, you can mail a regular Slimline card in a #10 business envelope but this Mini Slimline card doesn’t have a ready-made envelope for it. I know some companies have the correct envelopes for sale, and there are some dies out there for making your own, but I though there must be a way to cut and fold my own Mini Slimline envelope. This is what I came up with:
Cut your pattern paper or card stock to 7″ x 7 3/4″. With the short side (7″) at the top of your score board, score it at 1 7/8″ and 5 1/8″. Turn the longer side to the top and score it at 1/2″ and 6 3/4″. Trim away the squares on the four corners, fold the long sides together and glue at the seam then fold the 1/2″ tab up and secure it for the bottom of the envelope. Perfectly sized for Mini Slimline cards and all you need is a paper cutter and score board!
I cut apart my original colored present for that last card so I needed a card with some gifts on it…

I think this puppy is my favorite stamp in this set! Using some minimal masking, I stamped all the images on some Neenah Solar White 80# card stock and colored them with my alcohol markers. I did partial die-cutting to cut this collage out – three times – two gifts and one pup. Very pleased with that consistent white border! The floor is cut from the same card stock using a Penny Black Wood Floors die, colored with alcohol markers and glued to a white card base. I stamped and embossed the sentiments as usual, added the pup and presents with foam tape and glued a few sprinkles on for good measure! Now THIS is a little touch of mischief I think any puppy would get into!
I really do like those Clay Sprinkles and felt a little obliged to make a shaker card this month. Oh Yes! I also haven’t used the Light Mint ink cube that came in this kit! Let’s remedy that right now!
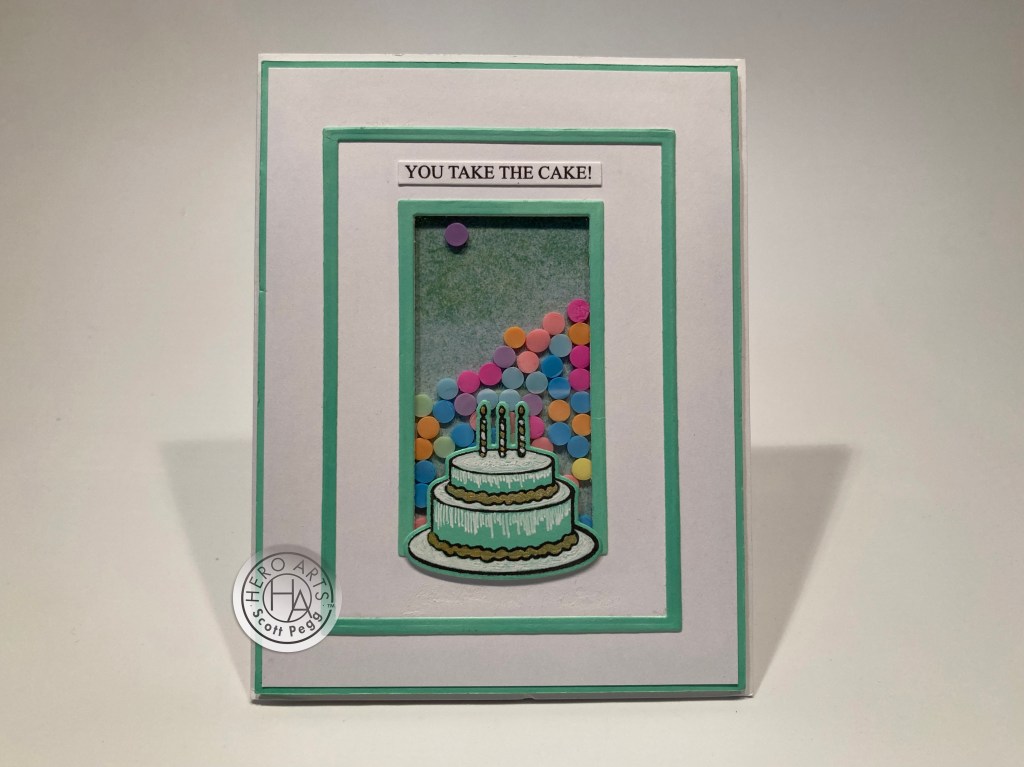
All of the background here is die-cut using the HA Rectangle Infinity dies. I simply colored card stock with the Light Mint ink cube cut the two frames from that. I die-cut the background panel and the window with the same dies, added acetate behind the window and added a thin mat of the Mint Green. I did cut out the center of the mat to make room for the window. I added a single layer of foam tape on the background (I thought it would be interesting to see the Sprinkles stack up on each other instead of randomly shaking around) added sprinkles and glued a small piece of pattern paper behind the window. I stamped the cake on more Light Mint card stock, die-cut it out, and colored it with White and Gold gel pens. I glued the cake to the bottom of the window, and printed this sentiment on a scrap of white card stock using my Silhouette software and the Times New Roman font. Look at all that minty goodness! I really like the ‘stacked’ sprinkles and the cake stamp is super useful. Happy Birthday!
And that’s my 10 cards using the My Monthy Hero June 2021 Kit. I do believe this is my first stamp set with cute puppies and kittens – always handy to have in your stash!

Lots of Birthday Cards this month, but we also have a nice encouragement card, a pet sympathy card and a terrifically cheerful hello card! You can use those balloon stamps on so many cards, the cake is a handy stamp to have on hand, and those puppies and kittens are adorable. I actually missed using the fish bone stamp – though I colored and die-cut it, I think I just forgot about using it! So I ALMOST used every stamp in this kit! This is a totally cute group of cards though, and it’s always a good thing to keep my Birthday card stash stocked up!
This kit is still available at Hero Arts, if you’re looking to supplement you stash with some cute kittens and puppies I would grab a kit for yourself right away! My Monthly Hero kits are always a great value! If you do go shopping at Hero Arts, please use my links – that helps support this channel and is always truly appreciated!
My Monthly Hero June 2021 Kit: https://shrsl.com/30hjc
Hero Arts: https://shrsl.com/1f7qx
Thank you so very much for sharing your time with me here! Your support and encouragement never goes unnoticed! Please remember to Like me, List me, Pin me, Post me, Share me with all of your friends, Don’t forget to help control the pet population by having your pet spayed or neutered… and as always, I wish you Cheers and Chuckles and Happy Crafting!
DISCLOSURE: This site contains some affiliate links to products. I may receive a commission for purchases made through these links (at no cost to you). As an Amazon Associate I earn from qualifying purchases. Thank you!

2 thoughts on “10 Cards 1 Kit • My Monthly Hero • June 2021 Kit”