
Hello Folks! Scott here with our new My Monthly Hero November 2022 Kit! Another Christmas themed kit with a huge bunch of detailed dies… Ornaments, tags, and, yes, cards are the order of the day with this surprising Holiday Kit!

KIT INCLUDES:
• 3″ x 4″ Clear Stamp Set
• 31 Ornament-building Fancy Dies
• 6 Sheets of Acetate Panels
• 10 Sheets of Deluxe Smooth White Card stock, 5.5″ x 8.5″
• Scarlet Satin Ribbon, 1/4″ wide, 3 yds.
• Snowflake Sequins
Looks like we’ll be doing a lot of die-cutting this month! Everything seems to be oriented around this 3.25″ circle die, so it seems a wreath is the obvious choice to get us off and running!

For some reason, I thought glitter paper was the way to go for our first ornament card – it really does have some nice sparkle! And I wanted this ornament to be double-sided, so I thought I’d start with an acetate circle and build my wreath up from that. I did die-cut two of the stick wreaths for my base layer (front and back) from some HA Colors of Earth card stock, and glued those to both sides of the acetate window. I die-cut four of the large-leaf swags from some dark green glitter paper, added some shading with alcohol markers, and glued those (two to a side) on the sticks. I die-cut four of the small-leaf branches out of a lighter green to highlight the poinsettias and set them aside.
I die-cut two poinsettias and four of the small flowers, added shading with alcohol markers and gave the petals a little shape with a medium-sized ball stylus. I added small white pearls to the centers and glued the flowers (along with the light green foliage) to the front and back. A couple of bows for the two sides and a loop of ribbon finishes off the wreath and some small red gems add more sparkle along with the suggestion of berries.

I failed to take into account that the back of glitter paper is generally white, so I did have to color the back sides of all my glitter die cuts so you wouldn’t see white from the other side. That wouldn’t be an issue with colored card stock!
I actually considered just making 10 ornaments this month, but receiving a Christmas card that has a removable ornament on it is like getting twice what you paid for! I die-cut some purple-y watercolor pattern paper (and one white blank) with a HA Tag Frame Infinity die and glued them together for a little extra strength. I embossed the sentiment in the center of the Tag frame using HA Intense Black ink and Clear embossing powder, and glued those down to a White A2 card base. My favorite adhesive to use when attaching an ornament to a card is removable sticky dots – I like ZOTS Removable Clear Adhesive dots. One dot behind the hanging ribbon will hold the ornament securely to the card until removed! And since the sentiment is stamped on the card base, there’s no worry about a reverse sentiment on the acetate. Just the right size for a big Christmas tree!
Okay… I’ve shifted my mind set from ornaments to cards… I guess I truly am a creature of habit!! When I was die-cutting the stick wreath, I noticed the the negative die-cut made a perfect circle with some twiggy flourishes on the edges…
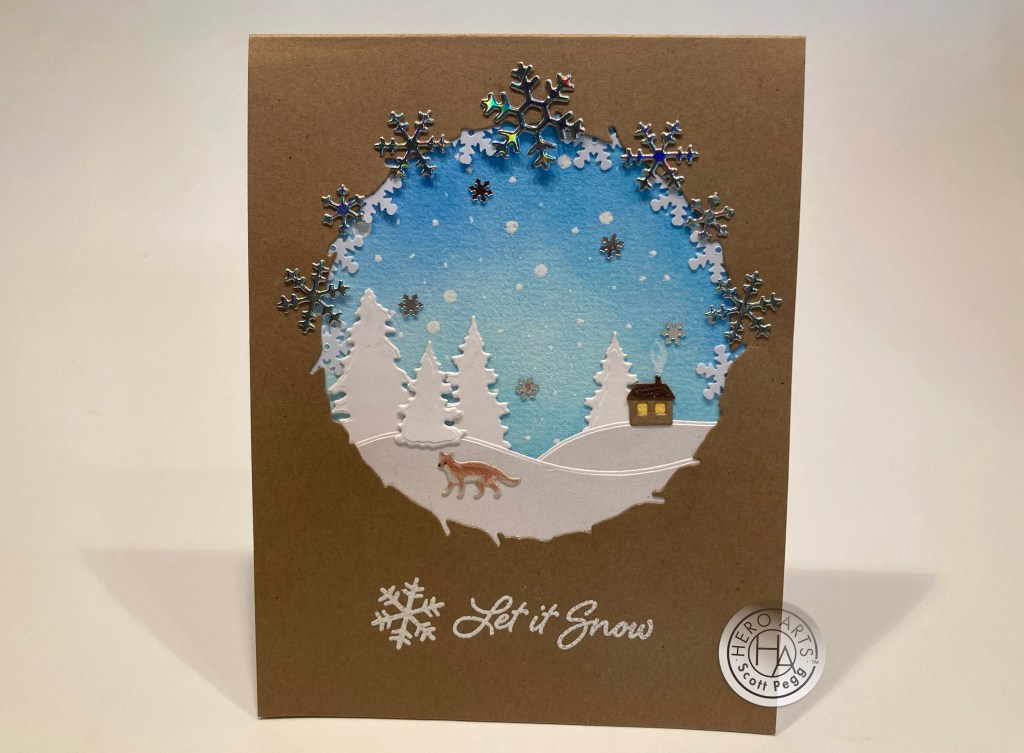
On a Kraft card base, I die-cut the stick wreath to give me an opening on the front of the card. I had some wild idea about building a scene on the front of a card going backwards…! I die-cut two of the snowbank dies from some White pearlescent card stock and glued those behind the bottom of the opening. I die-cut all three trees (just remove the star topper on the biggest tree) from plain white card stock, and the little house from scraps of brown. I did add some yellow in the windows for a “lived-in” look! I arranged the trees and the house on the hills, and die-cut the little fox and added some color to him with colored pencils.
I took a piece of watercolor card stock and cut it just under 4.25″ x 5.5″ to be the backing for my scene – I can just glue that to the back side of the card front! I ink blended HA Splash and Blue Hawaii Reactive ink onto that panel referencing the opening to be sure I got the sky in the right place. I added some snow to the sky using a SSS Falling Snow stencil, HA Embossing and Watermark ink, and HA Detail White embossing powder. I added small dots of White gel pen for a little more snow coverage.
I die-cut the three snowflake dies from Silver Holographic card stock and glued those to the top of the opening, and filled out that framing with some of the White Snowflake sequins glued to the back of the opening. I glued the sky panel to the back of the card front and embossed the sentiment and snowflake with HA Unicorn White ink and White Detail embossing powder. I added a little smoke coming from the chimney using a Micro-brush and HA Sea Salt reactive ink, and glued some of the small silver Snowflake Sequins in the sky for the final touch.
I started worrying that all of my cards would end up with 3.25″ circles as their focal point, so I decided to see what I could use in this kit to break me free from that template… maybe that circle die can be used for hills…

The background is a piece of watercolor pattern paper cut to 4 1/8″ x 5 3/8″ and embossed with the same Falling Snow stencil as the last card. That background is glued to a White card base. I die-cut three half-circles from White pearlescent card stock, and two of the small-leaf swags from dark green card stock. The buildings and the tree are die-cut from plain White card stock and I die-cut an extra star from Holographic card stock for the top of the tree. I did back the windows and door with yellow card stock as well.
The arch is an extension of the small-leaf swag die. I cut one of the swags in half to add to the sides of the other one (they are seamed together behind the snowflake dies on the sides) making the sides more vertical and less curved. I glued everything to the card front using a little foam tape behind the church for a little dimension. The snowflakes are die-cut from more White pearlescent card stock and glued to the arch. The sentiment is stamped with Forest Moss Distress Oxide ink and embossed with Clear embossing powder and highlighted with more Holographic snowflakes. This kind of feels like a snow-globe scene to me!
I guess I might as well embrace the circle and see where that takes me… another ornament that’s NOT a wreath..?
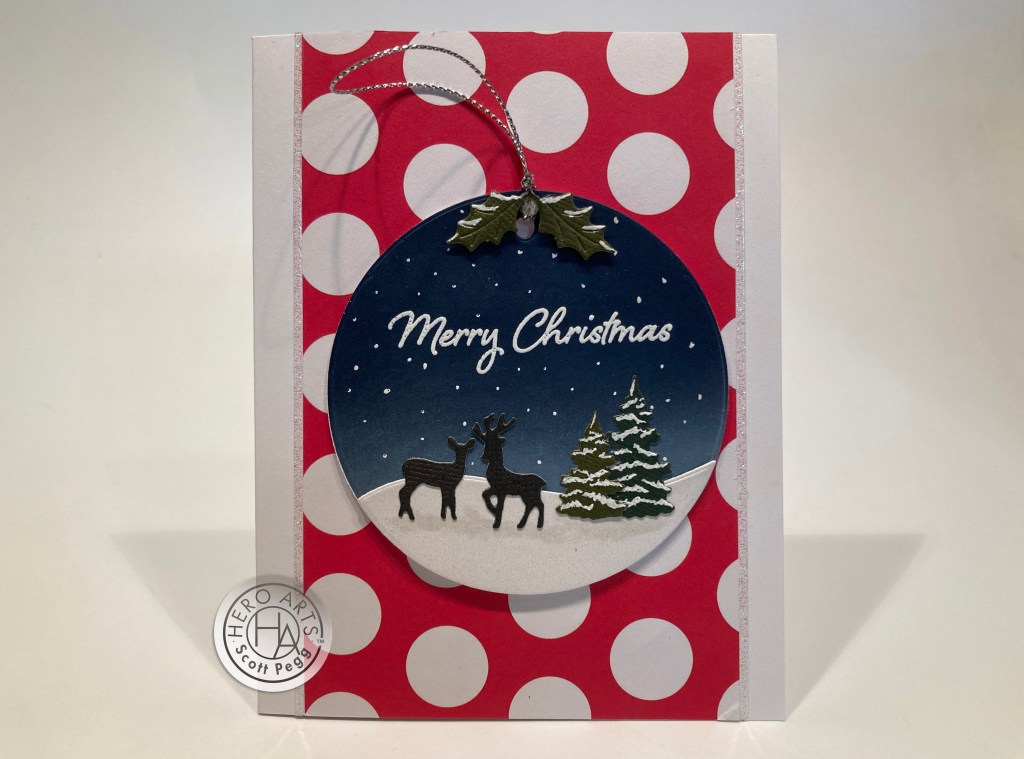
I die-cut our circle from Hero Hues Nautical card stock and ink blended some HA Sea Salt Reactive ink along the edge of the snow bank that I cut from Pearlescent White card stock. The trees and holly leaves are die-cut from dark Green card stock and the deer are cut from dark brown card. I used the Tim Holtz Nostalgic Collection color core card stock for a lot of my die-cuts this month. I like using textured card stock with these small detailed dies. The sentiment is stamped in Unicorn White ink and embossed, and I used a white gel pen for the dots of snow as well as the snow on the tree and holly. I added a touch of shadow in the snow with a light grey alcohol marker and glued everything together.
I die-cut another circle from 110# card stock and glued that on the back of the ornament for added strength. Some silver cord is tied through the hole for a hanger. I cut a piece of polka-dot pattern paper to 3.5″ x 5.5″ and glued that to the front of an A2 White card base and added some Clear Glitter peel offs along the edges. I did stamp our “handmade for you by Scott and Joel” on the back of the ornament, added a removable ZOTZ and attached that to my card. Two-for-One!

The larger mistletoe die in this kit will work perfectly all on it’s own, and provides us with a nice pun as well!

I die-cut the mistletoe and bow from the White card stock in our kit and colored them up with my Spectrum Noir alcohol markers. The sentiment is printed on the card base using my Silhouette Software with the Precious font, and a strip of green glitter tape runs down the left side. More white pearls are used for the mistletoe berries, the bow is glued to the mistletoe and all are attached to the card front with small tabs of foam tape. I really like these two dies together… and you know I love me some puns! This card is actually simple enough to mass produce!
I wanted to spend a little more time with the poinsettia die… I didn’t think the glitter card stock did much for that die…

I die-cut these flowers from some textured red card stock and did some shading with alcohol markers. Once again I added a little shape to the petals with a ball stylus, and simply used a White gel pen for the centers. I die cut two large-leaf swags and two small-leaf swags from some textured green card stock and added some alcohol marker shading to all of those as well. The small pinecones are die-cut from two colors of brown textured card stock and shaded too. This sentiment (from last month’s kit) is embossed on flat red card stock with Unicorn Ink and White embossing powder and die-cut with the matching die.
I glued the large-leaf swags to the two corners, cut the small-leaf swags in half and glued them on top, and then glued the flowers into position. I added the pinecones and another flower in the top right corner. I also added some highlights to the flower petals with a Micro-brush and Sea Salt reactive ink. I’m liking that ink more and more…! The sentiment is attached with foam tape, and a few red crystals add a little sparkle. This is a nice arrangement using the leafy swags that doesn’t feel like a wreath or a circle! Love the red and green on white… very Christmas-y!
I was fiddling around with the swag of stars die, trying to see if I could come up with a unique arrangement…

I like this one!! If you take two star swags and glue them together – the first star glues on top of the fifth star on the other die and visa-versa. That makes a very interesting eye-shaped galaxy swirl! I die-cut six of the star swags from Silver Holographic card stock, and glued them together in pairs, and then arranged those three pairs into this fun pinwheel of stars! I was especially pleased to see that I could get the whole arrangement on an A2 card! In this case I used an old White glitter card base and glued the pinwheel to the front.
I printed this sentiment on a scrap of white card stock using the Orbit-B BT font, trimmed that to size and added a Holographic mat. I die-cut the five-pointed star and two of the four-pointed stars from more Holographic card stock and glued those in position – really needed that extra star in the center! This would make a fun Birthday card as well!!
A wreath is certainly a perfectly fine focal point for a card… let’s ignore ornamentation and just make a card!
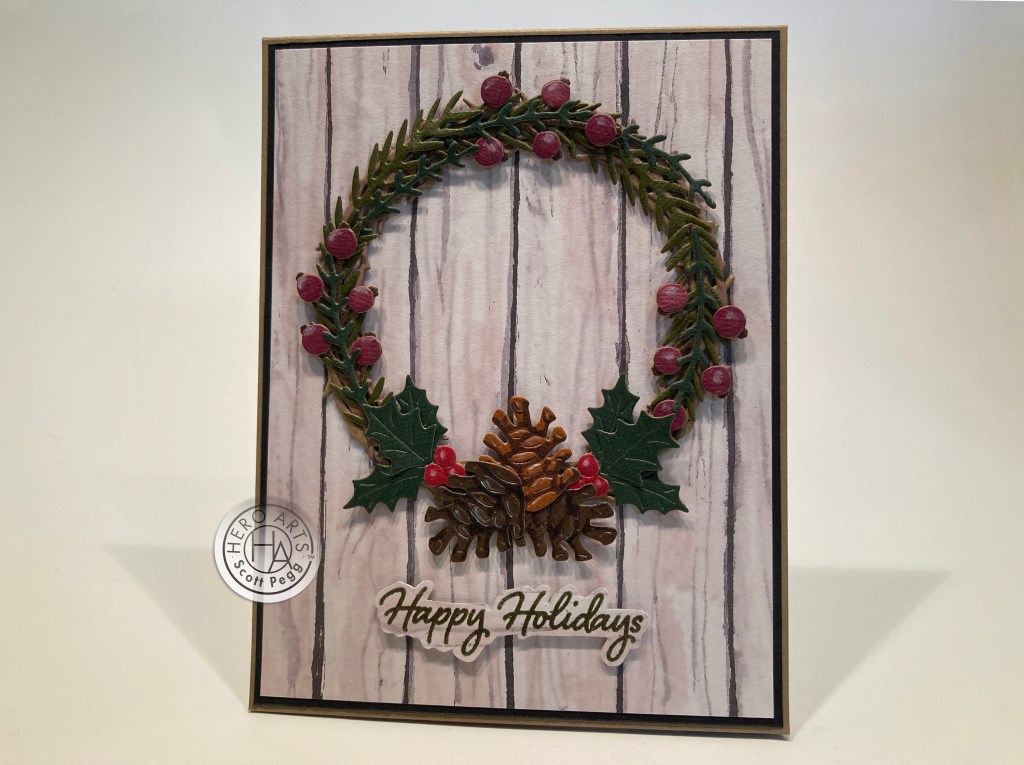
This wreath started with three twig wreath die cuts glued together – just for a little dimension. Then we have three sets made of the big-leaf branch, small-leaf branch and berry branch glued together, and two sets of the big and small branches glued together. One berry bunch is glued to the top of the wreath, then the plain branch bundles to the sides, and then the other two berry branch groups. I did die-cut the berries from some darker red card stock, fussy cut them out and added them to the top of the berry branches. I die-cut two of the Holly/berry dies (layering red berries on top) and two more holly leaves for the arrangements around the pinecones. The pine cones are die-cut from two colors of brown card stock and shaded with alcohol markers – this big pinecone die is terrific!! Some Sea Salt ink highlights on the berries and pinecones add just the right touch to this very autumnal wreath!
The wooden background is more pattern paper from my stash cut to 4″ x 5.25″, glued to a thin black mat and then down to a White card base. I stamped and embossed the sentiment on a scrap of that pattern paper, fussy-cut it out and attached it to the card front with thin foam tape. The wreath is finally glued to the card front, and I resisted the urge to add any sparkle or bling… a little more of an organic wreath for this card. Love it!
I was determined to make an ornament with this kit that wasn’t a wreath or a circle. The swag of stars might work!

I think this ornament will actually go on my own Christmas tree this year! I die-cut six star swags from 110# white card stock and glued them all together with a hanger of thin Silver Metallic thread glued in the middle behind the second star. I die-cut two more swags from Silver Holographic card stock – one cut from the back to use on the back of the ornament – and glued those to the two sides of the stacked swags. I really like the balance of the hanger on the second star – feels a little more active!

I printed the sentiment on a piece of photo paper (for a really black black) using my Silhouette software and the Comic Sans MS font. I think this MLK Jr quote is quite appropriate and even works nicely as a holiday card! I die cut the printed photo paper with a 3.25″ Nesting Circle die and cut another blank from Black card stock to glue behind the photo print for more strength.
I positioned the swag on the circle and marked where the hanger fell, and cut a tiny slot on the side of the circle to slip the hanger into. I added the circle to an A2 card front with foam tape and hung the ornament using the small slit. Though this was a tiny bit fiddly, I think this is my favorite ornament this month!
I still haven’t used the snowman die in our kit – he did feel a little out of scale to me… he’s almost as tall as the church!
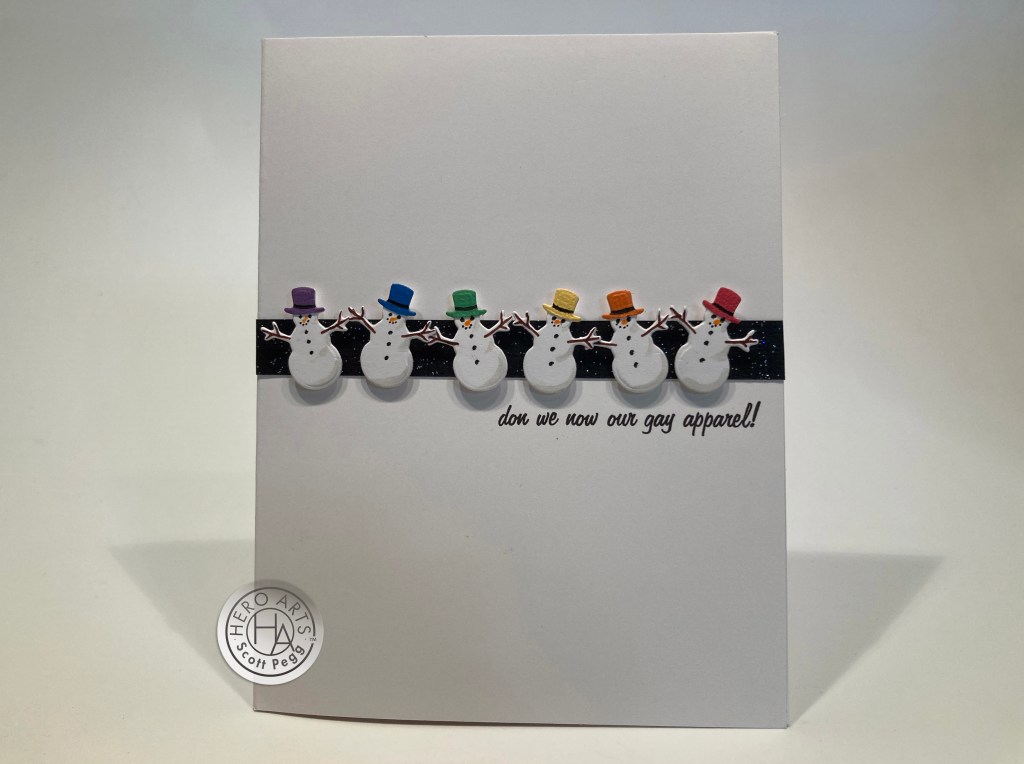
That’s when my mind shifts to featuring this snowman all by himself – well – with five other friends! I’m also always in the mood for more color! Six snowmen die-cut from 110# White card stock, and six hats die-cut from some rainbow card stock and fussy-cut to glue on the snowman heads. I drew in the hat bands, faces and accessories using black Pigma Micron pens and a Brown pen for the arms. A light touch of grey alcohol marker gives us a little shading on our balls of snow, as well as some orange marker for the tiny noses!
I printed this pun-y Christmas sentiment on a White card base using the Freehand 575 BT font. I cut a half-inch strip of black glitter paper and glued that above the sentiment. I attached all the snowmen with foam tape giving everyone a slightly jaunty pose. I did add the “Warm Wishes” sentiment on the inside of this card – perfectly appropriate! This card really satisfies my love of white space, and the size of these tiny snowmen are totally charming! Warm wishes indeed!
And that completes my 10 Cards inspired by the My Monthly Hero November 2022 kit! I stuck with cards this month but managed to included three ornaments, and a nice variety of styles and even some non-holiday ideas as well. I LOVE the pinecone dies, the bow, and poinsettia dies and all the foliage dies will come in handy all year long!

I did manage to use every single die in this kit – all 31! And though I didn’t use every stamp, I did use the most of the sentiments and we even got a pun or two as well! I didn’t make any tags this month… I am not really a fancy tag person… My family has a tendency to go a bit overboard at Christmas, and presents literally end up getting forcibly stuffed under the Christmas tree – which is not particularly good for tags! After many years of always having a few presents that lost their tags, I have fully embraced the peel-and-stick tags that promise to stay put on every package! Obviously this kit is perfect for you tag lovers out there.
However, this kit has already sold out! One of the fastest sell-outs this year! If you managed to snag a kit for yourself, I hope I was able to give you a few ideas about expanding its usefulness beyond just the ornaments and tags, and possibly even the holidays! Let me know which card(s) are your favorite this month, and I’d always like to see what creations of yours I might have inspired!
Of course, add-ons this month are still available with lots more ornament and tag making products! If you do go shopping at Hero Arts , please use my links… it help support this page and is always truly appreciated!
Hero Arts MMH November ’22: http://shrsl.com/3slpy
Please remember to Like me, List me, Pin me, Post me, Friend me, Follow me, share me with all your crafty friends… Oh, my heavens, I can’t believe Thanksgiving is right around the corner! I am sending you and yours Love and Light, Peace and Joy, Warm Holiday Wishes, and, as always, Happy Crafting!!
DISCLOSURE: This site contains some affiliate links to products. I may receive a commission for purchases made through these links (at no cost to you). As an Amazon Associate I earn from qualifying purchases. Thank you!

Fabulous makes as usual! Happy holidays to you!
LikeLike
Aww, you really put me in the mood for the holidays! My favorites are the MLK Jr card (love how the star swag curves around the quote), the let it snow card, and the pinecone wreath (lots if depth with those highlights). Nice variety! Cheers to you!
LikeLike
I wasn’t fast enough to get this kit, but I truly enjoyed all the ideas you shared. My favorite is the Shining Star card. This would be a perfect graduation card.
LikeLike