
Hello Folks! Scott here with my 10 cards created using the My Monthly Hero December 2022 kit! We are headed skyward this month with a kit featuring a big Celestial Cling Stamp, stars, moons, planets, galaxies, and some cute “space cadets” (Hero Arts terminology – not mine!)

KIT INCLUDES:
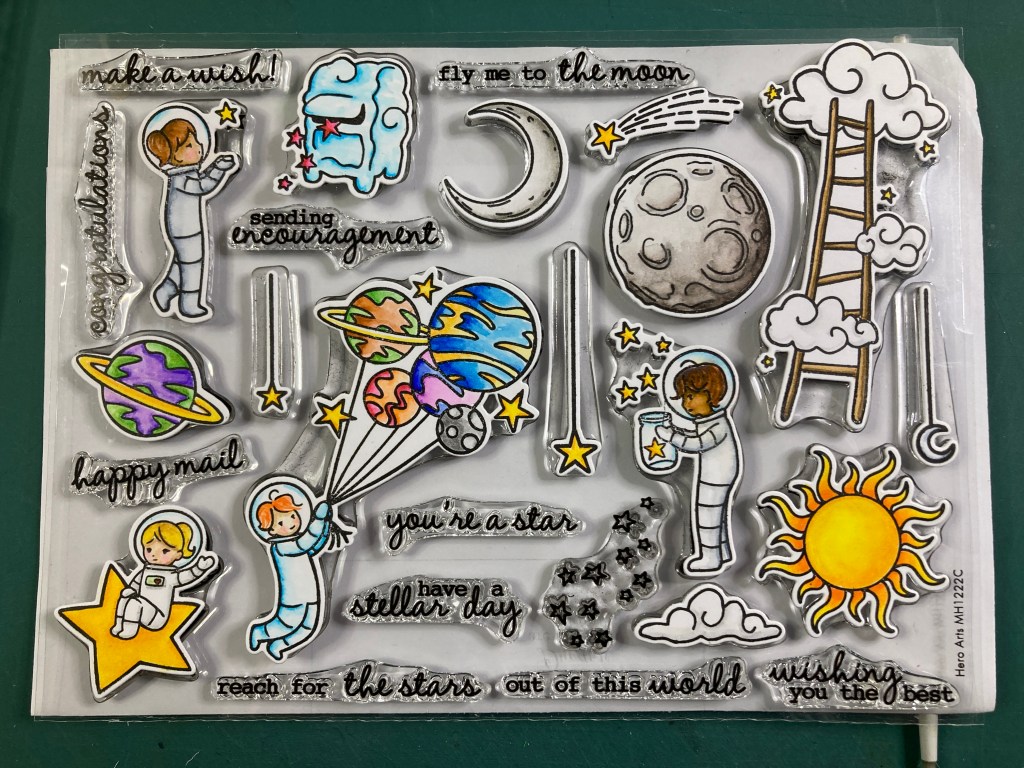
• 6″ x 8″ Clear Stamp Set
• 15 Coordinating Frame Cuts
• Cling Stamp, 4.625″ x 5.875″
• 4 Sheets of Pitch Black Cardstock, 5.5″ x 8.5″
• Rose Gold Pigment Mini Ink Pad
When I first laid my eyes on this kit, I was immediately hesitant thinking I would have to create 10 different galaxy / night sky backgrounds, but, upon further examination, realized that there were some creative ways around that! I do always try to use every stamp in a kit, and since there are 10 sentiments in this stamp set, I set about trying to bring all of them to life!
I don’t always do this, but I thought stamping and coloring and die-cutting all of the images in the stamp set would be a good way to work my way into the theme this month. Everything is stamped on Bristol Smooth card stock with Intense Black ink and colored with my Zig Clean Color Real brush markers. As usual, the dies included with the kit cut out all the images precisely!
I also did some preliminary backgrounds before I started working on specific cards… I stamped the cling stamp on some Black card stock from my stash using the Rose Gold Mini ink pad… that worked better than I thought! I also did a double panel of a watercolor galaxy using my Daniel Smith watercolors and some Black Soot Distress Oxide ink. I tried a new medium for my spatter stars – Dr. Ph Martin’s Bombay India Ink in White. I’m loving that ink! No thinning down needed, just dip in a paintbrush, wipe off the excess, and spatter away! (the smaller the brush, the finer the spatter)!

One of the easiest ways to create a “galaxy” background is to just spatter some stars on Black card stock. The Pitch Black card stock in this kit is perfect for this… If she’s flying to the moon, then the night sky can be just black and white – there aren’t any colorful stellar nurseries or beautiful nebulae in our immediate vicinity, so simple stars it is! I spattered a 4.25″ x 5.5″ panel of the Pitch Black card stock with stars, let that dry, and split the panel in half vertically.
I stamped the star cluster on the front of an A2 card base using Intense Black ink, embossed them with clear embossing powder, and colored them with my Zig markers. I glued the star panel to the center of the card front, added some black glitter peel-offs to the edges, and added the two die-cut images with foam tape. The sentiment is stamped on a scrap of Black card stock with Unicorn White ink and embossed with White embossing powder, and glued to the card front. With her arm up in the air, it almost feels like she’s riding a bronco… but I trust her trip was smoother than that!
Lots of “star” sentiments this month… and most of them are fairly generic in tone… HEY… The sun is a star…!

I think this may be my favorite stamp in this stamp set! I die-cut a panel of White card stock with a Lawn Fawn Stitched rectangle die, stenciled the sunburst rays with Lemon Drop and Creamsicle Reactive inks, stamped the sentiment with Intense Black ink and embossed it with clear embossing powder. I added two thin mats of black and yellow behind that, and glued those down to an A2 card base. Lastly, I added the die-cut sun with foam tape. Love that stamp!
We have a stamp in this set that was more cloud-centric than star-centric… don’t need a galaxy for this one either!

I cut a panel of white card stock to 4″ x 5.25″ and embossed that with an old Darice Clouds embossing folder – I was thrilled at how well the folder clouds matched up with the stamp clouds! I glued that to an A2 panel of Hero Hues Periwinkle card stock and down to a White card base. The sentiment fit perfectly between the embossed clouds (Intense Black ink, clear embossing powder) and I stamped, colored and die-cut a few extra stars on strings that I attached to the top with foam tape and glue. Finally, I attached the ladder to the card front with small pieces of foam tape. Delightful!
Now to those characters outfitted with space suits… I guess I can’t avoid a galaxy background forever…!

This is one-half of my water-colored galaxy background that I added a little sparkle to with some Sheer Shimmer Spritz. I die-cut that background to 3.25″ x 4.5″ and added a thin black mat to the back. I stamped the sentiment using Unicorn White ink and embossed that with White embossing powder – shows up on that galaxy background perfectly! I glued the background to an A2 card base at a jaunty (weightless!) angle and added the two “space cadets” with foam tape. Either they’re collecting stars or distributing stars, but either way I’m sure they are having a stellar day!
Now we can take a look at that cling stamp and how well it stamped on Black card stock using the Rose Gold ink!

There is a nice shine to that ink that isn’t readily apparent in the picture… and I’m very impressed with all of the delicate line work in that stamp! I trimmed that background to 4″ x 5.25″ and glued it to a White A2 card base. I trimmed the other half of my Black spattered card stock to 1.75″ wide, glued that to the center of the card front, and added more black glitter peel-offs to the edges. I stamped the sentiment on a scrap of Black card stock with Unicorn White ink and embossed it with White embossing powder, trimmed it to size and added three more layers behind. I glued the sentiment flat to the card front and mounted the shooting star with foam tape. “Starlight, star bright, first star I see tonight: I wish I may, I wish I might, have this wish I wish tonight.”
Now that I’ve used that big background cling stamp once, let’s try adding some color to it this time!

Splash, Blue Hawaii, and Purple Galaxy Reactive ink direct to the stamp with some light feathering between using blending foam. Three or four stampings for each color gives us this brightly colored cosmos background. Even though it takes a lot of ink, I am liking this cling stamp more and more every time I use it! I did add some Sheer Shimmer Spritz to the background for some extra sparkle. (I can’t resist!)

I trimmed that panel down to 3.75″ x 5″ and added a thin Black mat behind, and glued those to an A2 White card base. I attached our balloon boy with foam tape, and couldn’t bring myself to cover up any more of that fun, colorful background, so I stamped the sentiment on the inside of the card using Intense Black ink. He seemed the most likely candidate for a congrats card!
There is that one stamp in our set that took me a while to wrap my head around… the “cloud mailbox”… ??

I’m supposing that a “cloud mailbox” wouldn’t be in outer space… so I ink blended some clouds on the background panel using Splash Reactive ink and a MFT Mini Cloud stencil. I trimmed that to 2.25″ x 4.25″ and stamped the sentiment using Splash Reactive ink embossed with Clear embossing powder. On a White card base, I stamped the “happy mail” sentiment with Splash Reactive ink repeatedly down the left side of the card front. I glued the cloud panel to the upper middle of the card and added some blue metallic card stock strips to the edges.
I stamped, colored and die-cut two more of the clouds, the big Star on a string (w/no string) and our balloon boy (w/no balloons) on Bristol Smooth card stock and colored all with my Zig markers. The clouds are glued flat to the card front, the star is glued to our cadet’s hand, and the “cloud mailbox” and cadet are mounted with foam tape. I tried really hard to justify these stamps and sentiments and create a usable card within the parameters of this kit. I think this works!!
That card used up two of our ten sentiments, so I only have two more sentiments to go…! I had an idea on how to use the crescent moon stamp suggested by the DreamWorks logo..!

I think she looks absolutely adorable sitting on that crescent moon!! I stamped her (along with the extra shooting star) on Bristol Smooth card stock, colored with Zig markers, die-cut them both and cut her away from the star she was originally sitting on, and nestled her onto the crescent moon. This is the second-half of my water-colored galaxy (with sparkles!) attached to a thicker Black mat and glued to a White card base.
I performed a little stamp surgery to remove the “you’re” from the “you’re a star” sentiment and stamped that along with the “out of this world” sentiment on a scrap of black card stock using Unicorn White ink and White embossing powder. After trimming that compound sentiment to size, I added two more layers of Black card stock behind and glued the stacked sentiment to the card front. All the die cuts are then mounted with foam tape. I really like just about everything about this card! Not sure why the “out of this world” sentiment didn’t have a subject, but this works!
One more sentiment to go! And I can use that cling stamp in the most basic way imaginable – black on white!

Of course there’s some Sheer Shimmer Spritz on this galactic background as well! I stamped the cling stamp with Intense Black ink on White card stock, trimmed to 3.75″ x 5″, matted on some yellow card stock, and glued to a White A2 card base. I stamped our extra cadet on Bristol Smooth card stock and colored her with my Zig markers and die-cut her out. I stamped and embossed the sentiment on a scrap of White card stock, trimmed it to size and glued that flat to the card front. I didn’t manage to get a picture of it, but I did stamp a Happy Birthday on the inside of this card. Our cadet is attached with foam tape and some yellow gems add a little matching color and sparkle for a final touch. Love how the star is shining on her and her helmet, and I really like the simple black, white and yellow color scheme.
Now I have used every single stamp and every single die in this kit. It occurred to me that the cadet holding the planet balloons would make for a terrific birthday card too…!

I thought I’d try a pop-up shadow box card! Perfect for someone floating through space! I stamped, colored and die cut our balloon cadet as I have all the images this month, and I stamped the big blue planet a second time, colored it, fussy-cut it out and added it on top with some foam tape for a little extra dimension in those balloons! I did die-cut one more blank to glue to the back of the colored image for a little added stability.
I took a piece of the Pitch Black card stock, cut it to 7.25″ x 5.5″, and scored the two ends at .5″, 1″, and 1.5″ (to accordion fold both ends to give us the pop-up action). Once scored, I took a 3″ x 4.25″ Nesting Rectangle die and die cut a window in the center. I attached our balloon cadet with some small acetate strips to the back of the frame, and proceeded to accordion fold the edges. I glued the back flap of the folds to the front of a White A2 card base.
The sentiment is an old Lawn Fawn Scripty border die which I die-cut three times from 110# white card stock and once from some iridescent white card stock and glued all those layers together for a very sturdy sentiment. I glued that across the opening on the front of the card.
The background is made with Altenew Wide Galaxy Washi tape burnished to a piece of white card stock and glued behind the folds to the card front. Naturally, I couldn’t resist adding another sentiment to this card – on the inside. I printed this using my Silhouette software with the Times New Roman and Dream State fonts. I know plenty of “space cadets” who would love this card!

And that covers all ten of my cards using the My Monthly Hero December 2022 Kit! Though I originally thought this kit was fairly limited in its variety, I came to realize that there’s actually a lot that can be done with everything in this kit!

I truly love that sun stamp, and the cadet with balloons is perfect for any high-flying birthday, and the cling stamp is a unique combination of clouds stars and galaxies perfect for a wide arrange of backgrounds! We have a little bit of everything here from very simple to fairly complicated, and not too many galaxies…!!
This kit is still available at Hero Arts! If you like what you see, and I was possibly able to inspire your galactic imagination, I suggest grabbing a kit for yourself before they are all sold out! If you do go shopping at Hero Arts, please use my links below. That helps support this page and keeps the crafty goodness coming your way!
My Monthly Hero December 2022 Kit: https://shrsl.com/3unhg
Hero Arts December 2022 Collection: http://shrsl.com/3unkx
Thank you so much for sharing your time (and another year!) with me here. It is so supremely appreciated, and I am truly grateful for all your support and encouragement. Please take a moment to Like me, List me, Pin me, Post me, Friend me, Follow me, share me with all your crafty friends… remember… don’t run with scissors… and I wish you and yours a Happy and Healthy Holiday Season and a New Year filled with Light and Laughter! Thanks for everything!
DISCLOSURE: This site contains some affiliate links to products. I may receive a commission for purchases made through these links (at no cost to you). As an Amazon Associate I earn from qualifying purchases. Thank you!

Love your cards! Great job on coloring all of the images (and using them all, for that matter)! Love your galaxy backgrounds. My favorite cards are “you’re a star” and “wishing you the best”.
LikeLike
As usual, gorgeous cards! Happy Holidays to you and yours! jeanne t 🤓
LikeLike