
Hello Folks! Scott here with my 10 Cards 1 Kit post featuring the new My Monthly Hero October 2022 kit! Winter is right around the corner and this kit ushers in the holiday season and takes us right to the North Pole. The stamp set of solid silhouettes can be combined to create a myriad of scenes featuring Santa Clause (or not!), and the dies this month have (what may be a first in a MMH kit) dies for all four of the sentiment stamps! Love that!!

KIT INCLUDES:
• 6” x 8” Clear Stamp Set
• 19 Coordinating Frame Cuts
• A2 Cling Stamp
• 2 Ink Cubes in White Reactive & Unicorn
• 2 Sheets Diamond Glitter Paper, 5.5″ x 8.5″
• 2 Sheets Snow Glow Paper, 5.5″ x 8.5″
• 2 Sheets Lapis Half Sheet, 5.5″ x 8.5″
Since there are only four sentiments in this stamp set, I decided to poach some extra holiday sentiments from past MMH Christmas kits. (Oct. ’19, Nov. ’19, Nov. ’20, and Oct. ’21) There is also a Project Idea on the backer card for a tri-fold card with a unique card idea from Libby Hickson. That inspired my own tri-fold adventure.
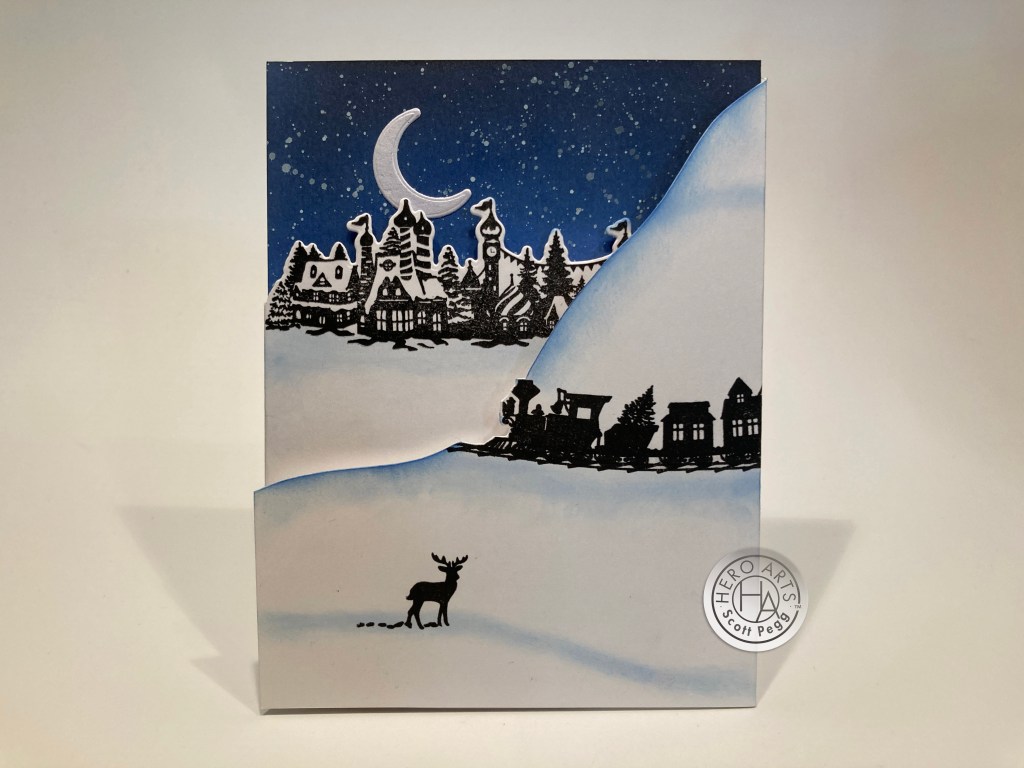
I went with a more traditional side-to-side tri-fold card, starting on the side of a mountain with the train rounding the bend and the village in the background. All under the watchful eye of a reindeer…

Flip that right panel open and the village is fully revealed with railroad tracks and a someone waiting on the hillside…
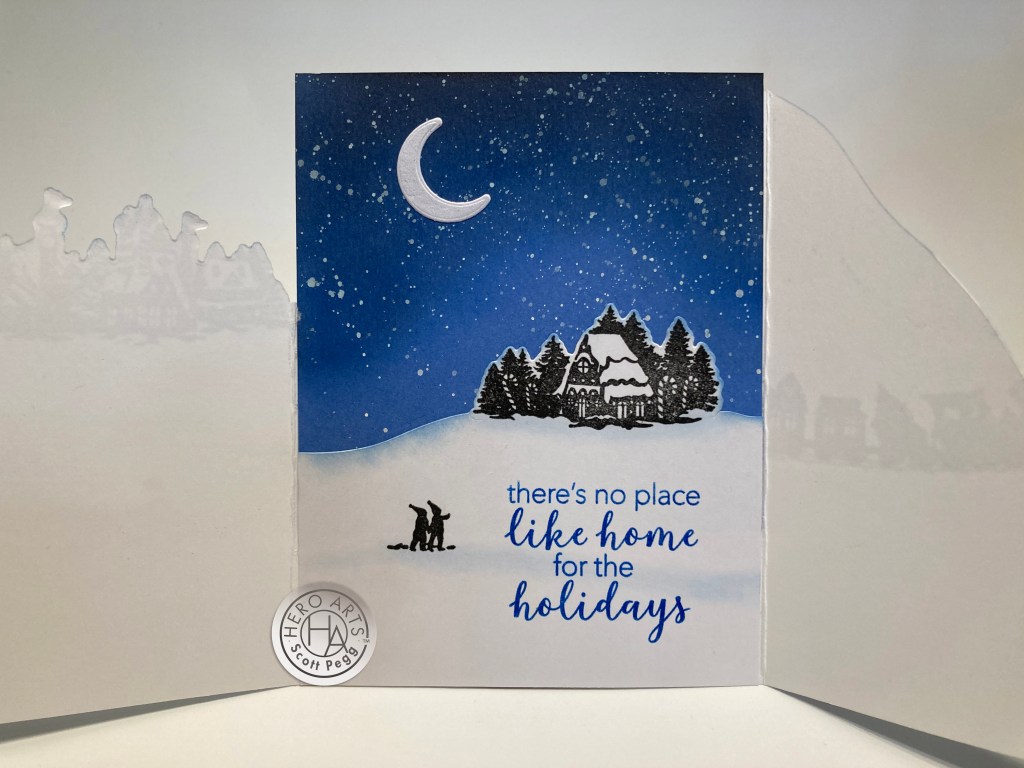
One more flip to the left and we have our final scene… looks like someone finally made it home! Also, the moon has risen higher in the sky… I guess it took a little while for that train to come in..! I love it when a tri-fold card tells a story… and the stamps in this kit are perfectly suited for that task.
All of the stamping for this card is done on Neenah Solar White 80# card stock. For the first layer, I curved the train and track stamp to suggest a mountain curve, stamped those (and the reindeer) in Intense Black ink, and fussy-cut the mountain and the little bit on the front of the engine. (this layer was done on the back side of a folded A2 card base) I blended Blue Reactive ink on edges of the mountain and a couple other contours in the snow. Of course we can see the village and the sky and moon in the background… and I think the simple curve on the train gives a good suggestion of it going around the mountain.
The second layer started on a full A2 card base – I stamped the village and the train tracks in Intense Black ink and did a partial die-cut on the village leaving the bottom of the card base intact. A little ink blending on the village and tracks grounds them in the snow. I stamped our little fellow on another panel and used the die to partially cut him out and I finished the cut putting him on a snow covered hill. More Blue Reactive ink blending on the edges of the hill and I glued that panel flat down on that layer.
I wanted to use the Lapis card stock for the sky, so I quickly realized that I didn’t need the entire back half of the 2nd layer, so I trimmed that off leaving just a small flap to glue to the back of the first layer’s card base. THEN I’ll add the sky and another die cut hillside to the center layer (effectively covering the flap of layer 2). I ink blended Blue Reactive ink and Black Soot Distress ink in the sky and splattered some stars using some Holbein white gouache. I die-cut the moon from the Snow Glow paper, added that to the sky, and glued the sky to the back of the card (covering the layer two flap).
For the final scene, I stamped the house and the couple with Intense Black ink, did a partial die-cut on the house and finished it off with a bit of a hillside, and ink blended the edges and a little snowy contour for our couple with the Blue Reactive ink. The sentiment is from the MMH November 2019 kit, stamped with Blue Hawaii Reactive ink and embossed with clear embossing powder. I glued that panel on top of the Lapis sky and the story is complete! This sentiment (and the prompt from Hero Arts) inspired this story-telling tri-fold card. And, I hadn’t seen any of our designers use the train stamp. I am totally in love with this card and how the story unfolds (pun intended!).
Of course silhouette stamps lend themselves to shaker cards as well…! Snow globe or Christmas ornament this month?

Since I don’t have a specific snow globe die, I decided to go for an ornament this month! Hero Arts Infinity Nesting Circle dies make a perfect ornament! I used the 3.5″ and the 3.25″ dies for this card. I die-cut some Lapis card stock with the 3.5″ die, stamped Santa in Soft Granite ink, the moon with Unicorn White ink, and the spray of stars with Embossing and Watermark ink, and embossed them with WOW! Cloud 9 embossing powder – though you can’t tell from the photo, the stars are VERY sparkly! I used a white gel pen to draw in some stars in the sky.
I taped the two circle dies together as evenly as possible and die-cut the Lapis frame and four more frames from thick white card stock. I glued the four white frames together and then down to the background. I filled the interior with some micro beads (love how those roll around in a shaker card) glued a 3.5″ die-cut acetate circle on top of the frame, and finished it off with the Lapis frame glued on top. I fussy-cut an ornament cap from some holographic card stock and added a double bow to the top of that.
I die-cut a piece of (way old) pattern paper to 4″ x 5.25″ and stamped the sentiment (from the Oct. 2020 kit) with Soft Granite ink, and glued that to a White A2 card base. I contemplated making this a removable ornament, but, since I didn’t actually make a hanging ring, I decided to just glue it to the card base. The simple sentiment adds a lot I think!
I really like the North Pole Sign stamp and die, but thought the pole should be taller for how large the sign was…

That feels a little bit better as far as the perspective of that sign goes! This is all done with partial die-cutting (on Neenah 80# card stock) like the tri-fold card, but with all the layers glued flat. The background is ink blended with Splash Reactive ink and then some Sea Salt Reactive ink coming down from the top. The cling stamp is stamped (sideways) with Unicorn White ink and embossed with White embossing powder.
The house layer is stamped with Soft Sky ink, with a partial die-cut and fussy-cut hillside. The sleigh layer is stamped with Reactive Early Dawn ink with a little of that ink blended on the edges of the hillside. Santa’s layer is stamped and ink blended with Splash Reactive ink. I did cut one more corner of snow for the North Pole sign to live in.
Since I wanted to extend the pole, I stamped the sign using TomBow markers direct to the stamp. I used a couple of browns that gave me a nice mottled wood tone on the sign, and left the sign detail itself to be finished with a stamping of Caramel Core ink. I extended the pole using the same TomBow markers, and partially die-cut the sign (without cutting the bottom) and finished out the length by hand. I admit to taking my craft knife and fussy-cutting the scrollwork detail around the sign… I can be a little anal-retentive that way…!
Everything is glued flat to an A2 card base with some foam tape behind the top half of the sign. I have to admit that when I first saw that deer stamp I thought the ‘footsteps’ were poop… and I realized that the partial die-cutting on this card put the “footprints” on top of the snow… unlike the tri-fold card where all the footprints are below the edge of the hills… these die-cuts tend to look a little more like poop than footprints…! Just be aware of that if you’re doing partial die-cutting on the characters in this set… Makes me laugh!
The large solid pine branches stamp caught my eye and the curve of the branches suggested an oval to me.

This is my Currier and Ives Christmas card! On a piece of Canson Mixed Media card stock, I lightly ink blended Soft Sky ink over the entire panel and did a light spattering of the same ink. I picked an Oval Infinity Nesting die that was 3 3/8″ wide on the narrow side, and cut my card panel to 3 1/2″ wide. I stamped the pine branches using Pine Core ink on the two edges of the panel, and centered those branches in the oval die for die cutting – the branches follow that oval quite nicely! I did ink blend a little Antique Linen Distress Oxide ink around the edges of the oval for a finishing touch.
I thought I’d try a little no-line coloring, so I stamped the house using Contour ink and colored it all using my Zig Clean Color Real Brush markers. I felt the need to have a super fine point on whatever medium I used for coloring in this tiny image! It was easy to color right over the candy canes, (love that!) and I did use my White Gouache watercolor and a small white gel pen to keep some of the snow nice and bright. Far from perfect, but I think it does have a nice hand-painted feel. I stamped the sentiment (from the MMH Nov. ’20 kit) with Root Beer Reactive ink and embossed that with Clear Embossing powder.
I cut another piece of that old pattern paper (snowflakes are so useful!) to 4″ x 5.25″ and glued that to an A2 White card base. I picked the next size larger Infinity Oval die and die cut a piece of Auburn Pearl card stock and three more blanks from white scraps and glued those all together for a little dimension. I glued the colored panel on top and then down to the card front. Those pine branches look much more detailed if you can avoid over-stamping them, and they read really well in this oval format. I did pick this sentiment before I stamped the house to make sure everything fit, and I am very thrilled at the nostalgic feel of this card. Not bad for a silhouette stamp!
I thought the large and small Christmas trees in our stamp set would be perfect partners for a more graphic layout.

I stamped the large tree (masking off the star) using Pine Core ink for the first pass and Lime Green for the second stamping… that gives a subtle variation in the greenery that isn’t particularly noticeable, but actually adds a lot to the tree. Then I masked off the tree and stamped the star with Embossing ink and embossed that with Gold embossing powder. I die-cut the tree and two blanks and glued them all together.
I cut a panel of White card stock to 2.5″ x 5.5″ and stamped the smaller trees in a line across the center. I knew the big tree was going in the center, so I stamped the trees from the right and left to the center – not worrying about the spacing between the center trees necessarily matching up. That’s Forever Green on the edges and Forest, Pine and then Lime Green in the center. The sentiment (from the MMH Oct. ’19 kit) is embossed in the same Gold as the star.
I cut a piece of old pattern paper to 3″ x 5.5″ and glued that to the center of a White card base, and glued the tree panel on top. I glued the big Christmas Tree in the center and adorned all the ornament openings with PinkFresh Studio Gold Metallic pearls. I also have these crystal tree gems in my stash and they fit perfectly between the lined up trees. A couple Gold Holographic peel off stickers outlining the stamped panel adds one last touch of bling to this very sparkly card! Just to note… this sentiment had already been divided in half… that also influenced my choice here!
I guess I should spend some time with the sentiments that are actually in this stamp set! And the cling stamp too!
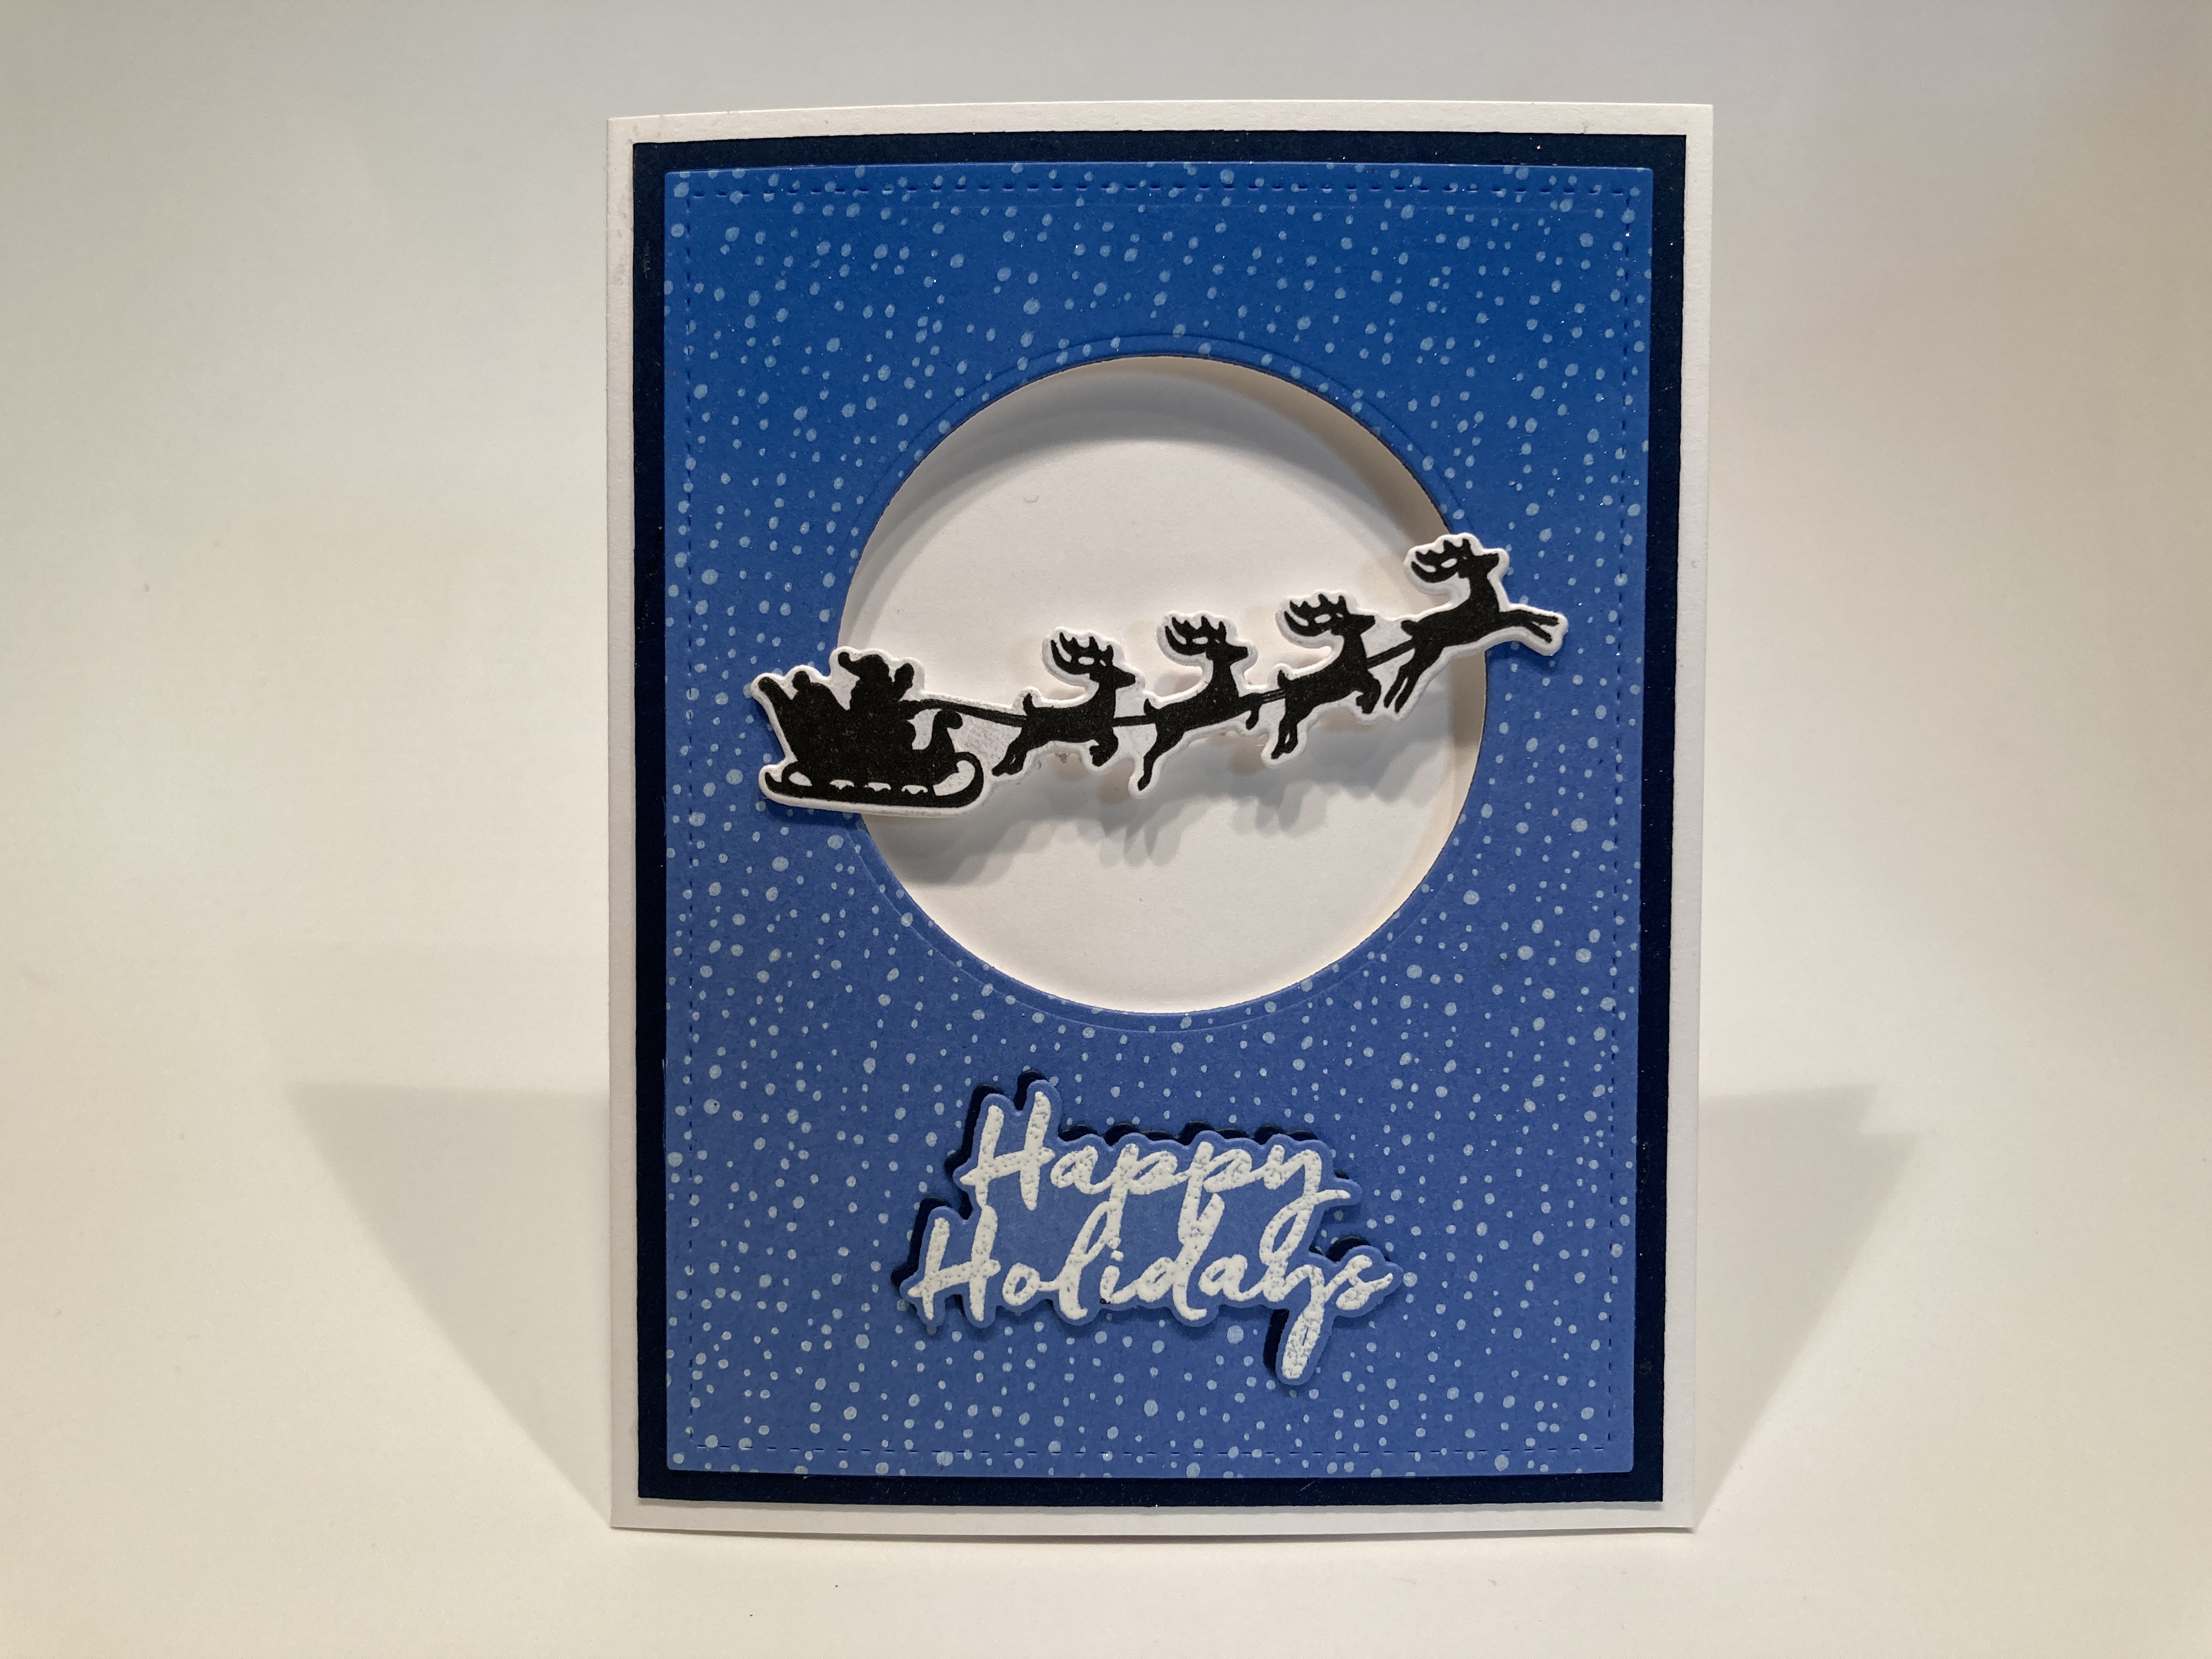
WOOOOOOOOOSH! And he’s gone! I think this is a very fun visual! I stamped the cling stamp on a panel of the Lapis card stock (with a little Blue Hawaii Reactive ink blended in at the top) using Unicorn White Pigment ink. I tilted the stamp just a little bit to try to get a touch of movement from an otherwise straight up and down snowfall. Perfect! I die-cut the background with a (3.75″ x 5″) Lawn Fawn Stitched Rectangle die and centered a 2.5″ Nesting Circle die towards the top of my background and die-cut the “moon”. I cut a mat (4″ x 5.25″) of Hero Hues Nautical card stock, marked where the “moon” was, die-cut the circle through the mat and glued the two panels together. I spritzed these both with some Sheer Shimmer mist for some all-over sparkle. I marked the “moon” position on the front of a White card base, die-cut the circle and glued the matted panels in place.
I stamped Santa using Intense black ink and die cut him out along with two more blanks and glued them all together for a good, sturdy embellishment. I stamped the sentiment on Lapis card using Unicorn White ink, embossed that with White Embossing powder and die-cut it with the matching die. LOVE the sentiment dies in this kit!! I was afraid the sentiment might get a little lost on the Lapis background so I die-cut a blank sentiment from Nautical card stock and glued it to the back of the sentiment for a touch of a drop shadow. I glued Santa over the moon cut-out and glued the sentiment below.
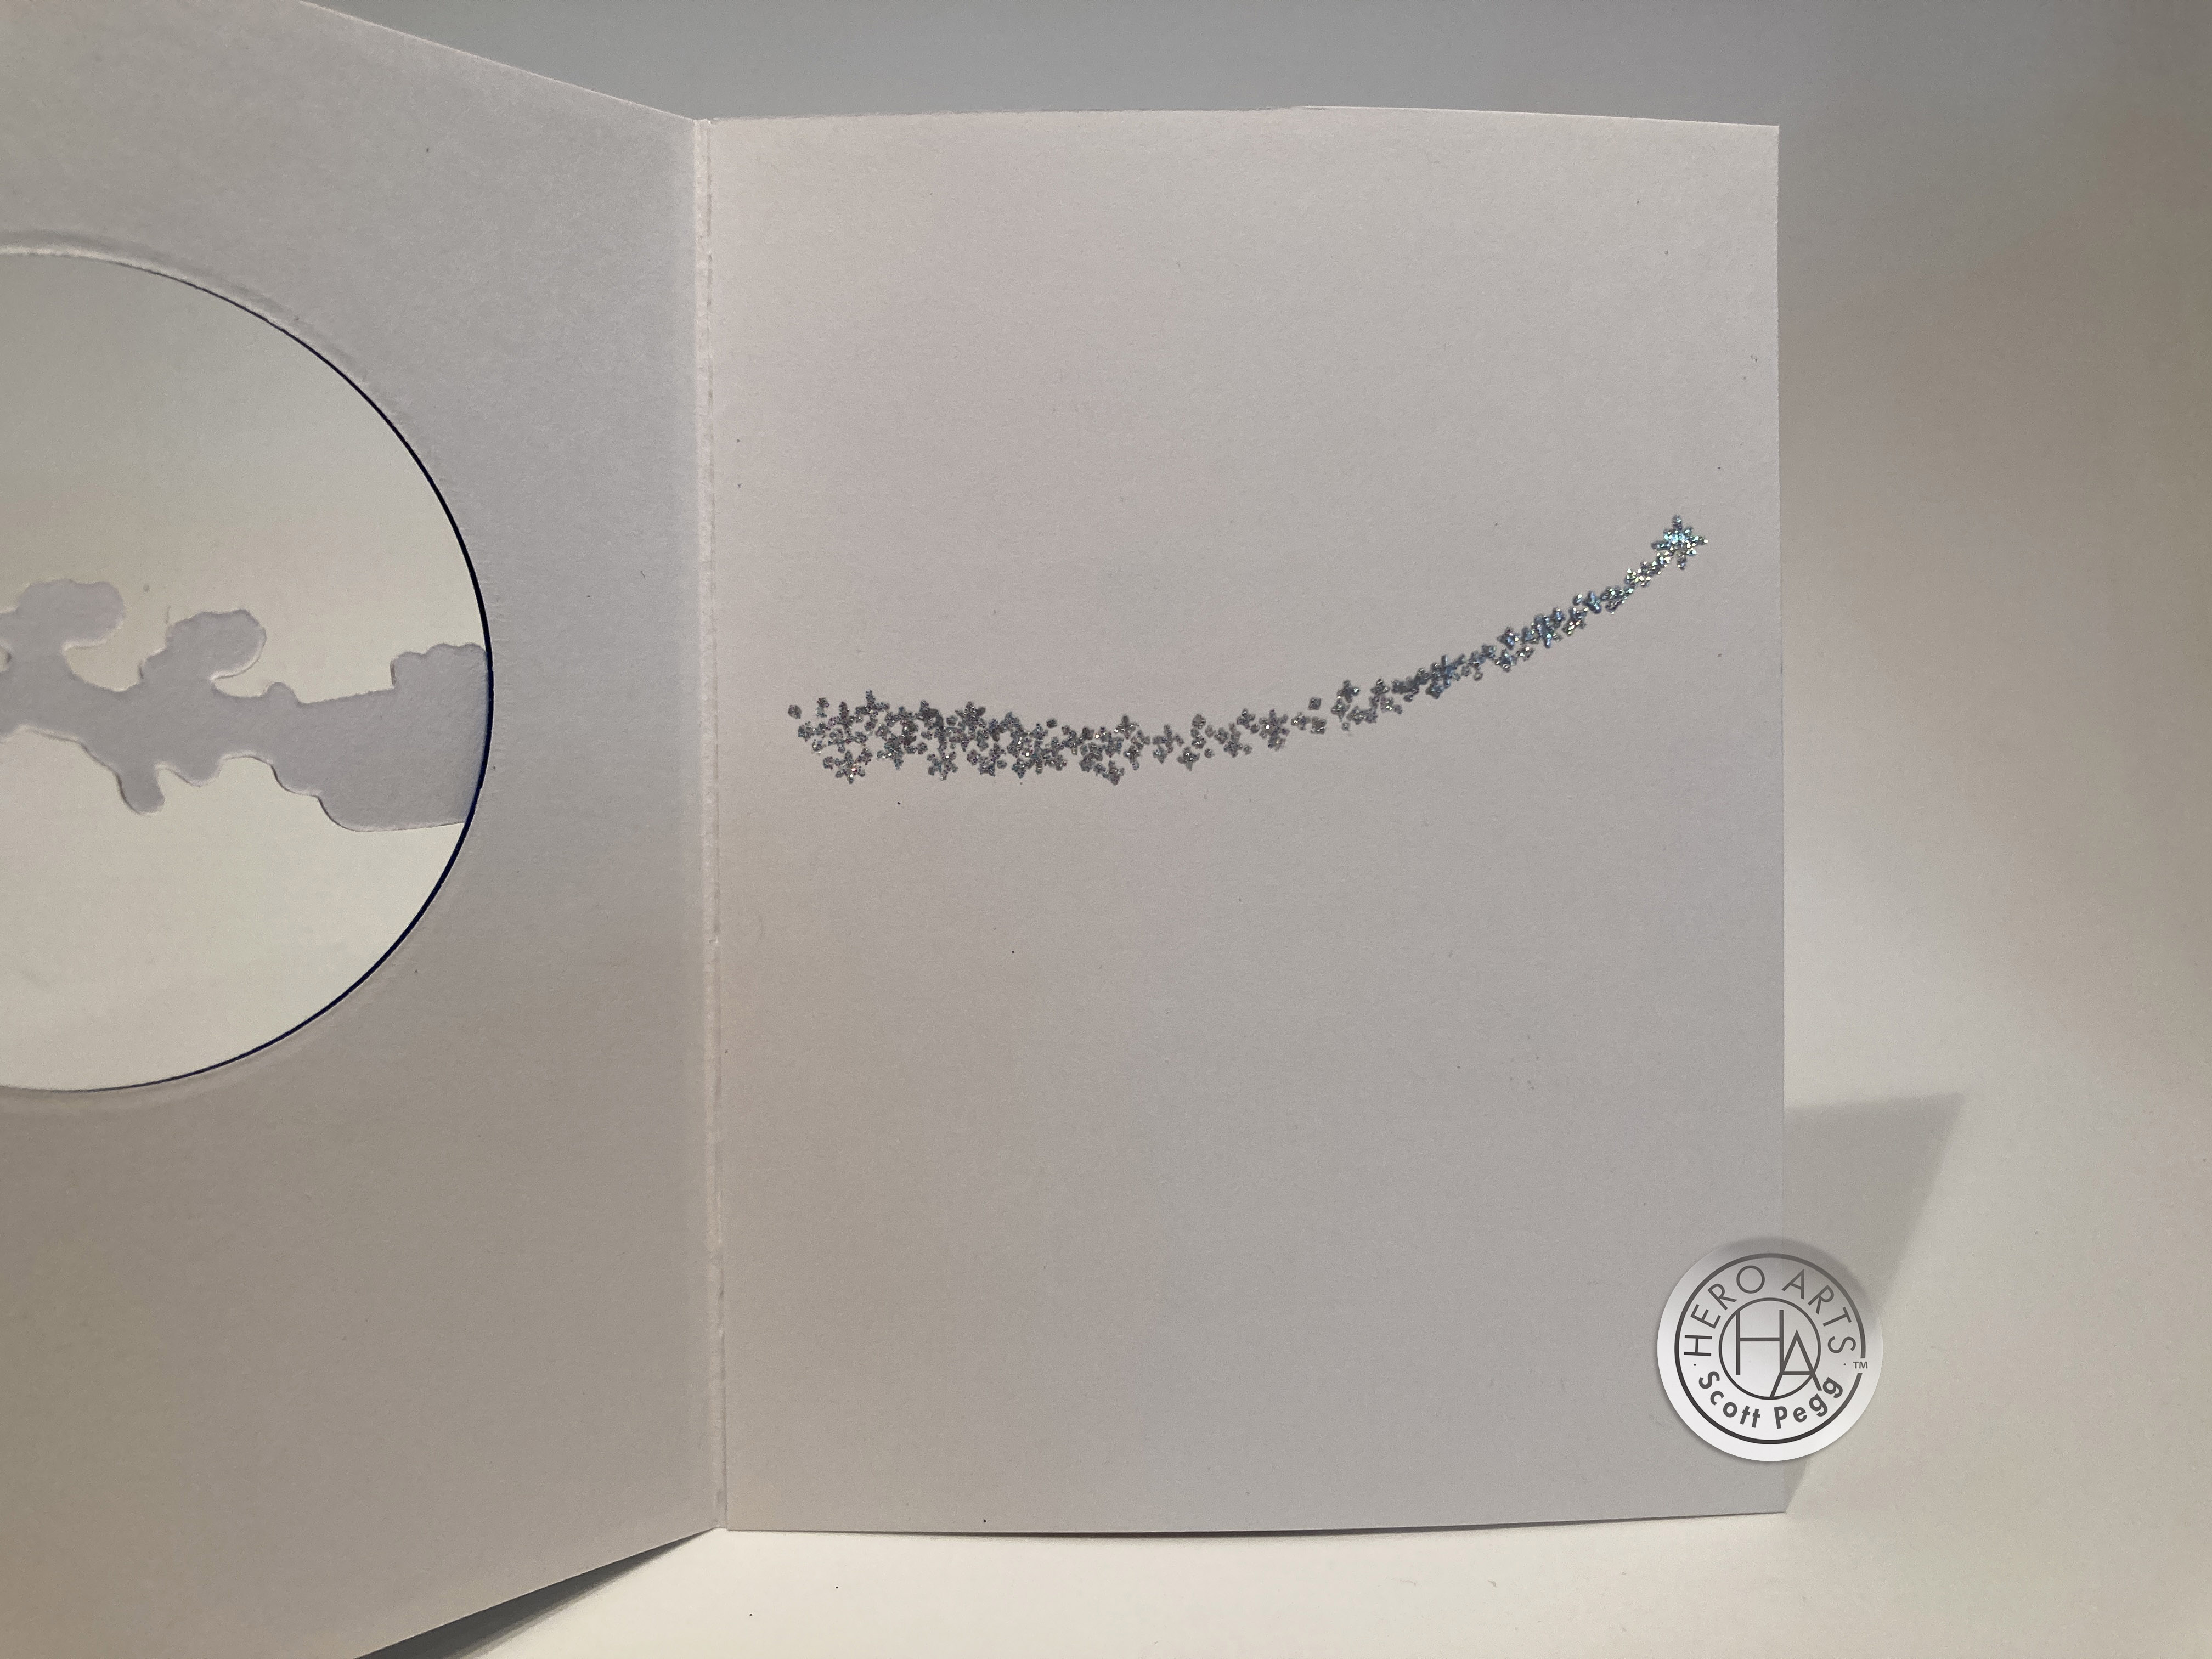
It wasn’t until I put this together that I thought of adding the ‘star swoosh’ to the inside. It hides behind Sant and his sleigh perfectly. I stamped that on the inside with Embossing ink and used the WOW! Cloud 9 embossing powder for LOTS of sparkle.That’s another stamp you want to avoid over-stamping with! Take care not to lose the details and all those tiny stars read beautifully! WOOOSH! He’s gone!
When we were kids, after we put the Christmas tree up, (and before the presents came out) we would often decorate the bottom of the tree with a little Christmas village. I thought the train stamp and pine branches might replicate that!

I think I’m mostly thrilled with my tree stand here..!! The pine branches are stamped on Hero Hues Pesto card stock with Forever Green ink (darker) and Pine Core ink (lighter). I die-cut both boughs leaving extra room at the top of the darker layer. I used the Woodgrain Texture Fancy die to cut my trunk from some brown card stock and cut that to an inch wide. The tree stand is smallest Rounded Rectangle Infinity die cut from brushed silver and the black legs are cut from a double thick oval frame. I think that looks just like an old tree stand!
The train is masked and stamped in Red Reactive, Pine Core, Blue Reactive, Butter Bar and Tangerine inks. I stamped the village on a piece of Arctic card stock using the Blue Reactive ink, and did a partial die-cut across the top. I stamped the railroad tracks, the people and the sentiment with Blue Reactive ink and embossed the sentiment with clear embossing powder.
I took a thin piece of Grey card stock and embossed that with a striped embossing folder and glued that to the front of a White card base. I was a touch worried about thickness with this card so I pressed the embossed stripes flat – it still reads as a subtle wallpaper. I glued the dark pine branches to the top, then the trunk, then the lighter branches, and assembled the stand on the trunk. I glued the stamped panel flat to the bottom of the card and added the train with foam tape.
I thought a couple of ornaments dangling from the tree would really drive the point home, so I die-cut two circles from some metallic card stock, created a couple ornament caps and glued them into the branches of the tree. This is a really fun way to use that pine branches border stamp, and it could be infinitely variable depending on what you want to put under your tree! I really enjoyed putting this card together!
I was a little bit over the holidays at this point (it IS only October) and had an idea for a non-holiday card…

A colorful Birthday card using that star swoosh stamp! I used the Gina K. Wreath Builder Template to stamp this circular blaze of colorful stars. If you notice there are 16 strips so I did 8 strips to begin with, then repositioned the stamp for the second eight. These are stamped with the same inks as the train in the last card with the addition of Grape Juice ink for the purples. Once all was stamped, I trimmed the panel to 3.75″ x 5″ and misted a light Sheer Shimmer mist over the whole panel. I glued that to a holographic card stock mat and down to a White card base.
I thought of using the Merry Christmas stamp from this kit and looked at a couple of HBD stamps when I came across this small HBD stamp from an old freebie stamp set from Simon Says Stamp. I stamped that on a scrap of white card stock with Intense Black ink and embossed it with some clear embossing powder. I die-cut that with a 1.25″ circle die and die-cut more holographic card stock with a 1.5″ die. I glued those together and down to the card front. For a final touch of Birthday sparkle, I added little sequin stars between the colorful stripes. I LOVE this image… almost feels like fireworks going off…! I imagine you could get more of a curve out of that stamp as well if you so desired! Of course a MISTI (or any stamping platform) is most useful, and Gina K. designs Wreath Builder Templates are a must have in anyone’s stash!
That was a nice break from the impending holidays, but I did want to try and colorize the big village stamp…

Well, it took a little while, but I did manage to get a nice village colored with pencils. On a sheet of Stonehenge card stock, I stamped the village with Contour ink ( a few times) and colored all with my Prismacolor colored pencils. I had to keep the points really sharp, and went very lightly as I added layer after layer of color. Again, this is far from perfect but it is a very colorful rendition of that silhouette stamp. I did some light stump blending in the sky and added some White gel pen and Stardust Sparkle pen stars in the sky. I trimmed the colored panel down to 4″ x 5.25″, added a thin black mat and glued those to a White card base.
I stamped the sentiment on a scrap of White card stock with Blue Hawaii Reactive ink, embossed that with Clear Embossing powder and die-cut it out. I also stamped and embossed the star (Unicorn White ink and White embossing powder) on a scrap of Pitch Black card stock, and die-cut it out as well. I added a couple of die-cut blanks behind the sentiment and glued that and the star to the card front. I think the charm of this card comes from the simple fact of the miniature size of this village… there’s a lot going on in less than 1.5″ of stamping. Not recommended for multiples…!
The tri-fold suggestion from the backer card was still in the back of my mind when I created this dimensional scene.
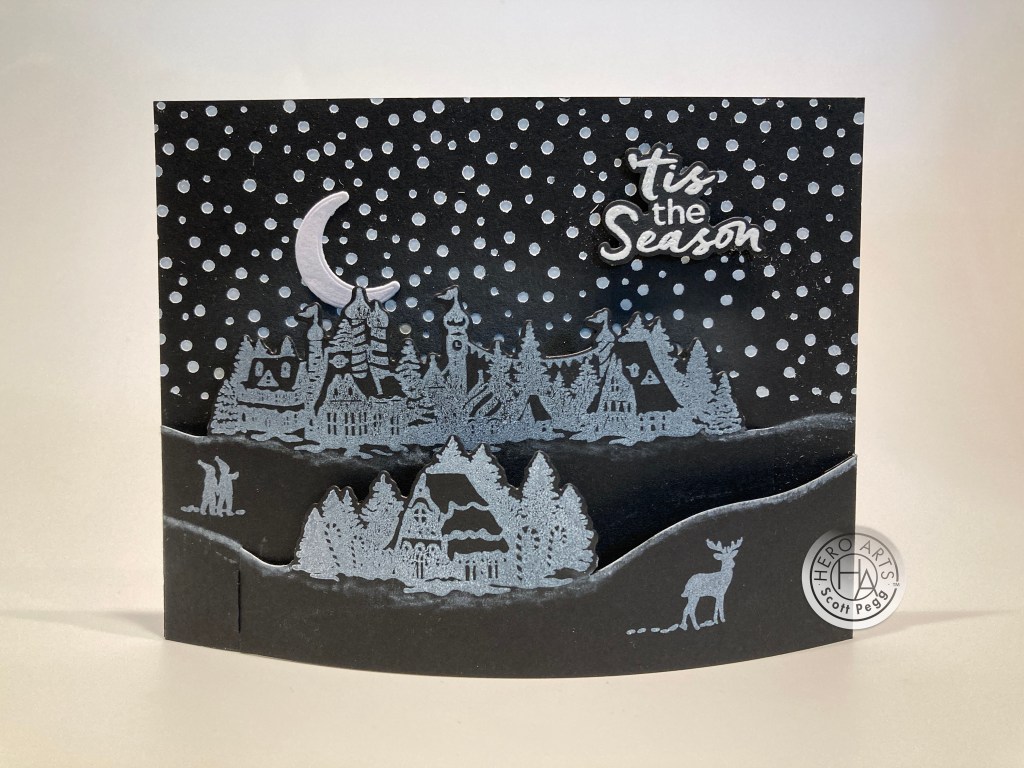
First, I must mention that I broke down and joined the foiling revolution with the purchase of my own Spelbinders Glimmer machine. (I did manage to grab one on sale at Spellbinders for $90.00!!) Now that Hero Arts is getting into the hot foiling craze, I figured I should jump on the bandwagon too! The background snow is foiled on Pitch Black card stock using the Twinkle Lights hot foil plate and Opaque White foil. I have to play with that machine some more, but so far so good!! I may be hooked! I trimmed the background to 4.25″ x 5.5″ and added a moon die-cut from the Snow Glow paper and the stamped, embossed, and die-cut sentiment with some foam tape.
I stamped the village and people, and house and deer with Unicorn White ink on 5.5″ wide Pitch Black card stock and did more partial die-cutting finished off with fussy-cutting to add some hillsides. I used some micro brushes to add some Unicorn White ink to the edges of the hillsides and below the buildings. I also ink blended a light touch of Sea Salt Reactive ink on the background behind the village.
On the village piece, I scored a fold line at 1/4″ on the left side, and on the house piece I scored a fold line 1/4″ from the right side. I cut little 1/4″ wide tabs on the opposite sides of the folded tabs on both pieces being careful to hide the tab on the village panel behind the house panel. I glued the folded tab of the village piece to the left side of the background, curved it up a little and marked on the background where to cut the slot for the tab. The slot is 5/8″ from the right side of the background. Then I glued the folded tab on the house panel to the right side of the background, curved that up a little more, and marked on the village panel where to cut the slot for that tab. That slot is 3/4″ from the edge of the village panel. I did add an “A” and a “B” to the matching slots and tabs with a white gel pen… Un-slotted, this card will travel flat, and I think the matching “A”s and “B”s are enough of a prompt for assembly. And it stands up all on it’s own! I did add a White card panel on the back (careful not to glue the slot shut…!) which provides a perfect place for your personal message. I think the black/white scheme is very striking, and I totally love the curved dimension when assembled!
And just like that, we’ve covered all ten cards this month! I felt a strong pull towards blue this month (all that snow!), but tried to keep a good amount of color going for those of us unwilling to admit that the holidays are coming!

I really enjoyed using all these different holiday sentiments – not a single repeat here! And I think the Birthday card was a great surprise. I actually used all the stamps this month, and most of the dies, inks and papers… I couldn’t find a use for that Diamond Glitter paper (I tried die-cutting a moon from that but it looked like fish scales) I’m sure I’ll find some use for it someday! There really is no end to the scene-making possibilities with a kit like this. I hope you enjoyed my sometimes wacky take on this classic kit. I think I’m ready to start working on my own Christmas cards for this year!
This kit is still available at Hero Arts! If you see something you like, or if I’ve possibly inspired you to create some North Pole vibes of your own, you should grab a kit for yourself before they sell out. If you do go shopping at Hero Arts, please use my links below. It is greatly appreciated and helps support this page. Thank YOU!
My Monthly Hero October 2022: http://shrsl.com/3r0nv
Hero Arts October 2022 Release: http://shrsl.com/3r0o8
Thank you so much for sharing some time with me today. Let me know witch card(s) is your favorite! Remember to Like me, List me, Pin me, Post me, Friend me, Follow me, and share me with all your card-making friends! Don’t run with scissors… and as always, I send you and yours Love and Light and Happy Crafting!!

Hello Scott,
Again I am amazed by all of your cards!
Happy Holidays!
LOL!
LikeLiked by 1 person
Thank you, Victoria! Much obliged!
Scott
LikeLike
I LOVE the big tree with the town and home under the tree! makes me feel and know how small yet significant we each are. THANK YOU!
LikeLiked by 1 person
Thanks Pam!!
LikeLike
You are so very talented Scott! Great makes from your kit and stash! Thanks.
Delina
LikeLiked by 1 person
Thank YOU, Delina! Always appreciated!
Scott
LikeLike
Love what you did with the kit this month….unique….thanks
LikeLiked by 1 person
Thank You, Patricia! Much obliged!\
Scott
LikeLike
I some how missed my email to this posting last month! What a fun batch of cards! My favorites are the tree stand (awesome!) and the colorful village scene on the Sending Holiday Cheer card – what a gorgeous sky!
LikeLike