
Hello Folks! So nice to be here and share my 10 card creations using the My Monthly Hero December 2021 kit.

This MMH kit is a reminder that no matter where we live, near or far, in cities or in neighborhoods – through it all we’re here for each other. The kit includes a lively 6″ x 6″ cityscape cling background stamp, a beautiful new cover plate die, and a 4″ x 6″ clear stamp set containing useful messages for welcoming new neighbors, or letting friends and family know you are thinking of them. The images in the clear set have coordinating dies as well. Rounding out the kit is our popular Pitch Black cardstock, ink cubes (Lemon Drop, Fruit Punch and Berry Smoothie Reactive inks) and (just for fun) mini clothespin embellishments.
That is an amazing cityscape cling stamp and the cover plate die is absolutely stunning. As a city dweller, I really appreciate this kit – I don’t have anything quite like it in my stash! Let’s go to town! (pun intended!)
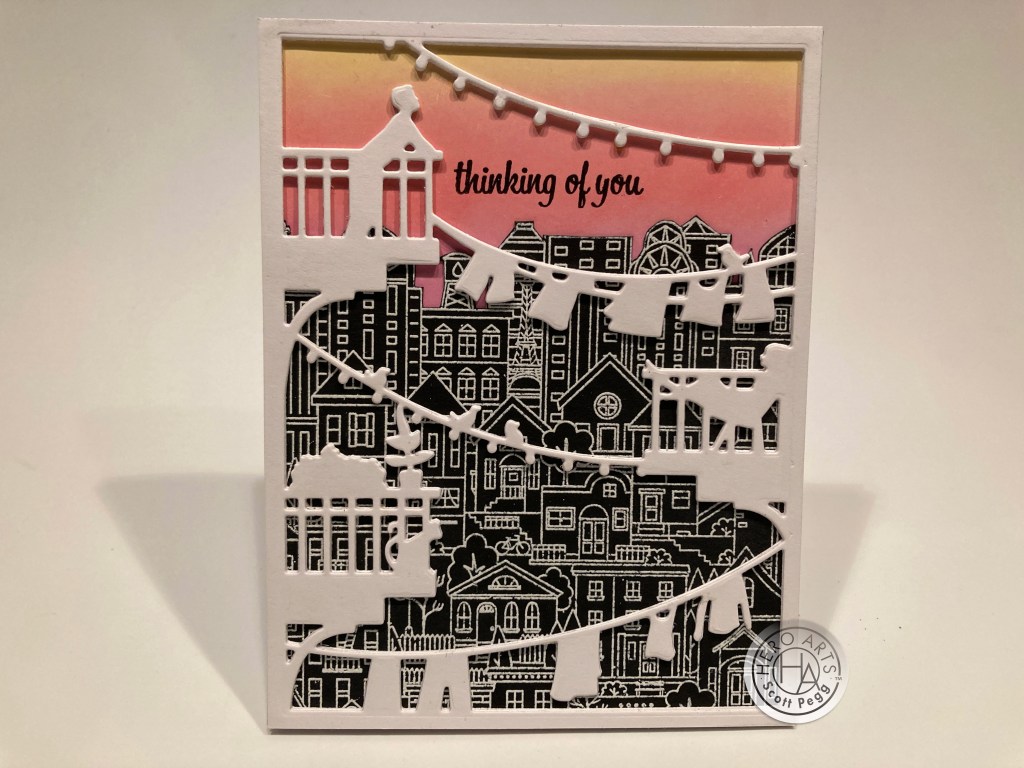
Naturally I started with the Cling stamp and the cover plate die! I stamped and embossed the cling stamp on Pitch Black card stock with HA Embossing and Watermark ink and HA White Detail embossing powder. I die cut the cover plate die three times from some 110# white card stock and glued those layers together. I ink blended the top of my A2 White card base using the included Reactive inks, and stamped the sentiment with HA Intense Black ink and embossed it with some Clear Embossing powder. I fussy-cut the top edge of the cling stamp and trimmed it down to glue on top of my card base. I added the stacked die-cuts on top of that and we have a fun “reverse silhouette” card. That city stamp is incredibly detailed and I have to admit I LOVE this cover plate die!
I just happened to have a piece of Pearlescent Blue card stock hanging out on my desk… that inspired this card.

That die works perfectly well all on it’s own! I covered an A2 White card base with the Pearlescent blue card stock and embossed the sentiment with HA embossing ink and Fine Detail White embossing powder. The die is cut twice from that Pitch Black card stock (I swear this is the absolute BEST black card stock out there – LOVE IT!) and the two pieces glued together before gluing them to the card front. Some Nuvo Simply White Crystal Drops on the die-cut ‘lights’ brings another touch of white to our card and pulls it all together. Love the beautifully detailed embossed sentiment and the simple shimmery sky on this card! And I think the Nuvo Drop “lights” really make this card pop!
I also love the fact that the Cover plate die doesn’t have a square outline frame cut – that presents us with LOTS of possibilities! Top of my list was the possibility of a Slimline card that might enhance the vertical aspects of a city.

This is an 8.5″ x 3.5″ Slimline card (8.5″ x 7″ white card base). For some reason, I was totally enamored with the “guy leaning on his fire escape” portion of the cover plate die. So I die-cut the cover plate die in the middle of one of the Pitch Black card stock sheets, and fussy-cut all the extraneous bits away to leave me with just the one fire-escape on a long black edge.
I stamped the cling stamp on a piece of plain grey card stock using Intense Black ink, fussy-cut the top edge, trimmed it to 2.5″ wide, and ink blended some Pumice Stone Distress Ink from the bottom edge. I took another 2.5″ piece of the same grey card stock and ink blended the Berry Smoothie ink along the top where it will show behind the city stamp. I glued both grey pieces together to make a 7.5″ background and added some thin foam squares behind the fussy-cut edge. I glued that to a 3″ x 8″ Pitch Black mat and glued those to center of the card front. I stamped the sentiment with Intense Black ink and embossed it with clear embossing powder.
I mounted the die-cut piece on the card front using foam tape (double thick behind the fire escape) and now we have what appears to be a little context for why our character is gazing out over the rooftops…! Maybe it’s that graceful arch under the fire escape that I am so enamored with… LOVE the sense of height this card conveys!
I thought of another way to give our gent something tangible to be gazing at… yet another way to trim out this die!
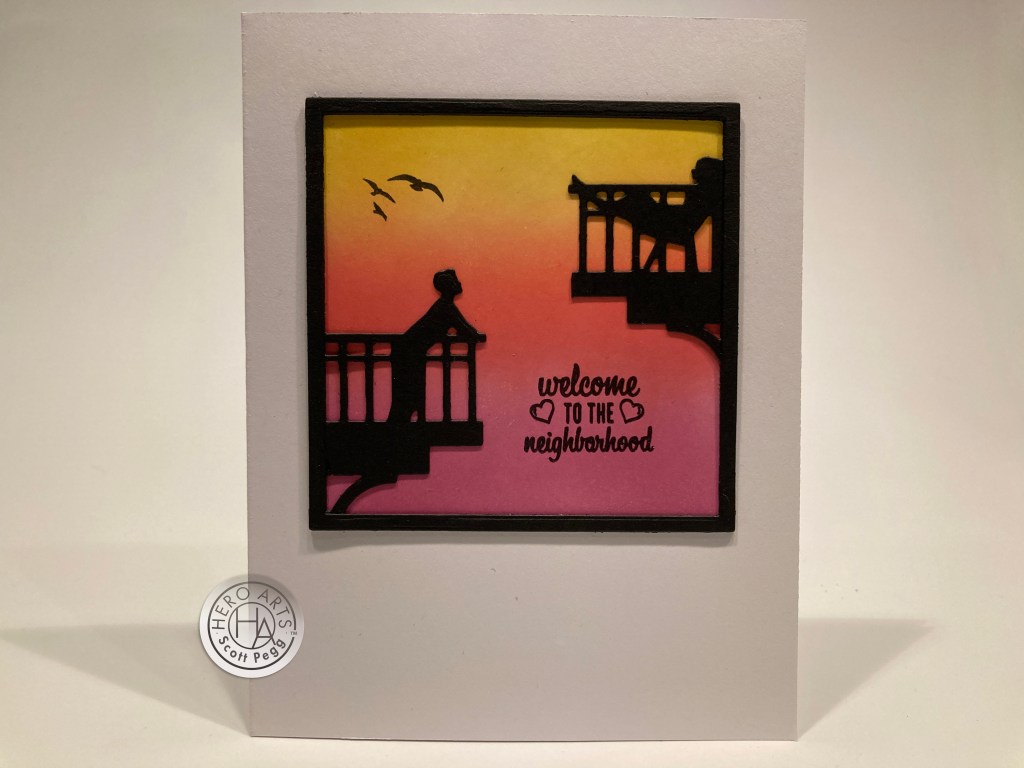
I took two HA Square Infinity dies (3.25″ and 3″) taped them together to die-cut two Pitch Black frames. I ink blended a 3.25″ square of white card stock with the included inks and glued one frame to the background. I die-cut another cover plate die from Pitch Black card stock and fussy cut the two occupied fire escapes leaving just enough of an edge to glue to the frame. I stamped and embossed the sentiment as usual, and added a few birds (from the MMH April ’19 kit) to help round out this “meet cute” vignette.

I glued those to an A2 card base, and finished off the edges by gluing the second frame over the top. That makes everything seem like all one piece. There are so many sentiments in our stamp set that I went ahead and added an inside greeting as well for this card… a tiny bit of a joke there…! This arrangement satisfied my urge to give this fellow something to look at! That die is SO versatile!
I’ve been neglecting the rest of the stamps in our stamp set, and, though I have every intention of coloring that City Cling stamp, I am still putting that apparently immense chore on the back burner… Maybe just ONE house!
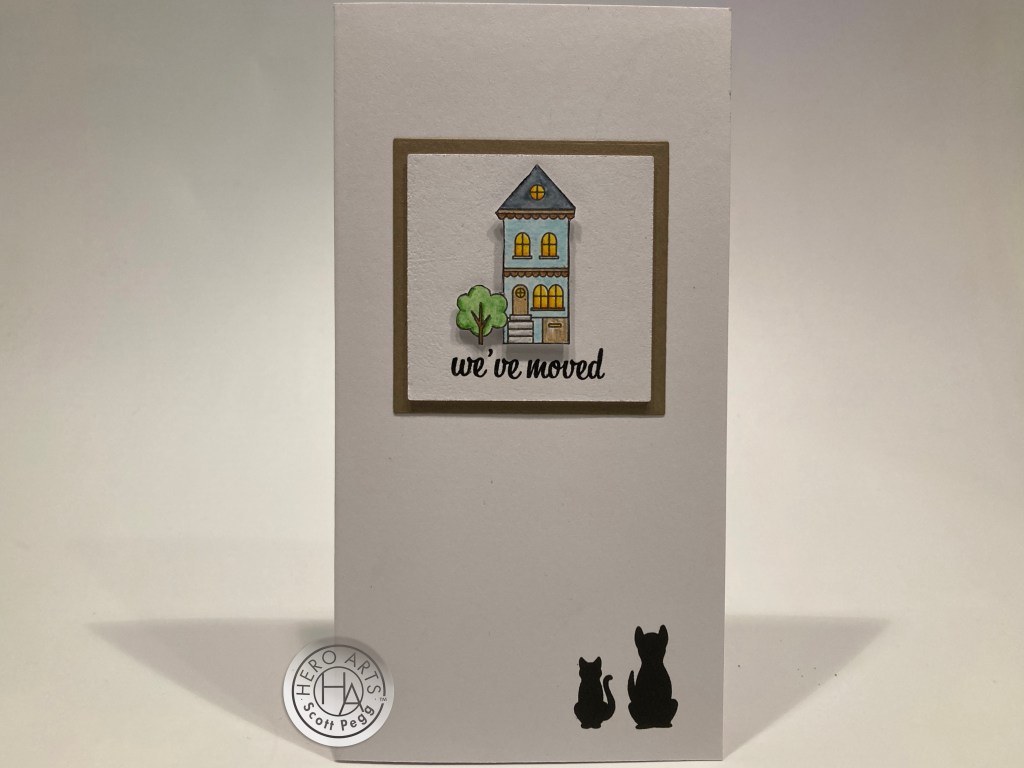
And here we have a Mini-Slimline card! This card is 3.25″ x 6.25″. I stamped, colored and fussy-cut one of the houses from the bottom of the cling stamp on white card stock using Intense black ink, and colored it with my Zig Clean Color Real Brush Markers. Using the Infinity Square dies, I cut a 2″ square from white card stock and a 2.25″ square from Kraft card stock and glued them together.

I stamped and embossed the sentiment as usual, and glued those down to my card front. I stamped the silhouettes directly on the card front with Intense Black ink and mounted the fussy-cut house with foam tape. And, because it’s included in our stamp set, I did add the “new address:” sentiment on the inside of the card. I wish I was moving into this nice house!
Some of the sentiments in this stamp set were more oriented towards friendship – this makes sense to me!

I stamped and embossed the silhouettes and sentiment as usual on a scrap of white card stock and die-cut it with a 2.25″ Hero Arts Infinity Circle die. I die-cut the next three larger circle dies from more white card stock and the fourth circle from Pitch Black card stock. I ink blend the three middle circles with the inks form the kit, glued them all together and down to an A2 card base. I rounded the corners of my card base with my Corner Chomper and we get a nicely colorful and graphic friendship card!
We have another set of silhouette stamps in our set with our cat and dog in profile – basically looking at each other.

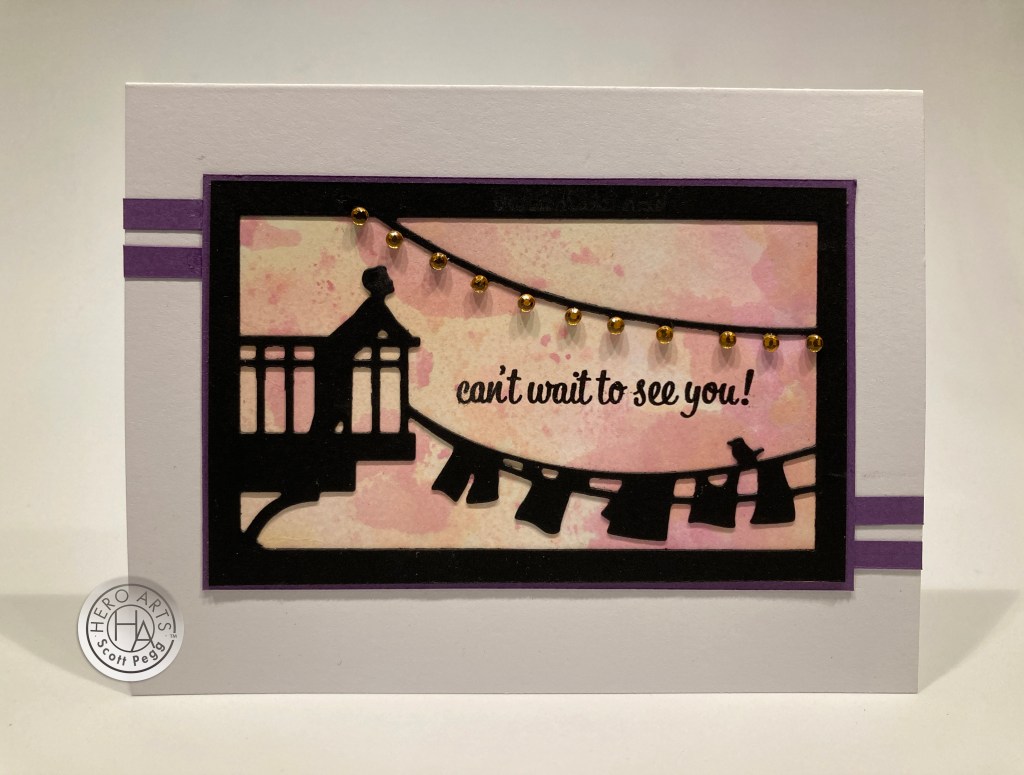
A fun vignette using the cling stamp and another friendly sentiment! I stamped the cling stamp on three shades of purple card stock from my stash (Recollections (Michael’s) Purple Passion Card Stock Pack) using the Berry Smoothie Reactive ink, fussy-cut the front and middle layers and ink blended more Berry Smoothie on the bottoms of the middle and top panels. I lined those panels up together and die-cut them all with a Lawn Fawn Stitched Rectangle die. I glued all the layers together with thin foam tape along the fussy cut edges and stamped the silhouettes with Intense black ink, and stamped and embossed the sentiment as usual.
I took two of the Stitched Rectangle dies taped together and cut two frames from Pitch Black card stock and glued them together before gluing everything down to a White A2 card base. I really like this little scene… THROUGH IT ALL (the big, crowded, scary city) I’m here for you (dog and cat). This makes me smile..!
I was looking at that cover plate die and trying to figure out if there was yet another way to cut it that I hadn’t thought of.
Some partial die-cutting gave me this terrific landscape die cut using just the top third of the die – I stopped the die-cut right at the top of the seated woman’s head and then hand cut the bottom edge of the frame. I ink smooshed the background using the inks from the kit – keeping the smooshing fairly light, and glued that behind my die-cut. I stamped and embossed the sentiment as usual, and added a dark purple mat. I also added a couple of “racing stripes” to the top left and bottom right when I glued everything to a White A2 card base. Some tiny yellow gems brings some sparkle (and light) to this scene, and again, I LOVE that guy on his fire escape! You CAN use that die on a landscape card!
You may know that one of my goals with these kits is to try to use every stamp in our stamp set… that’s eight cards already and I haven’t really spent much time with the stamps… Let’s remedy that now!
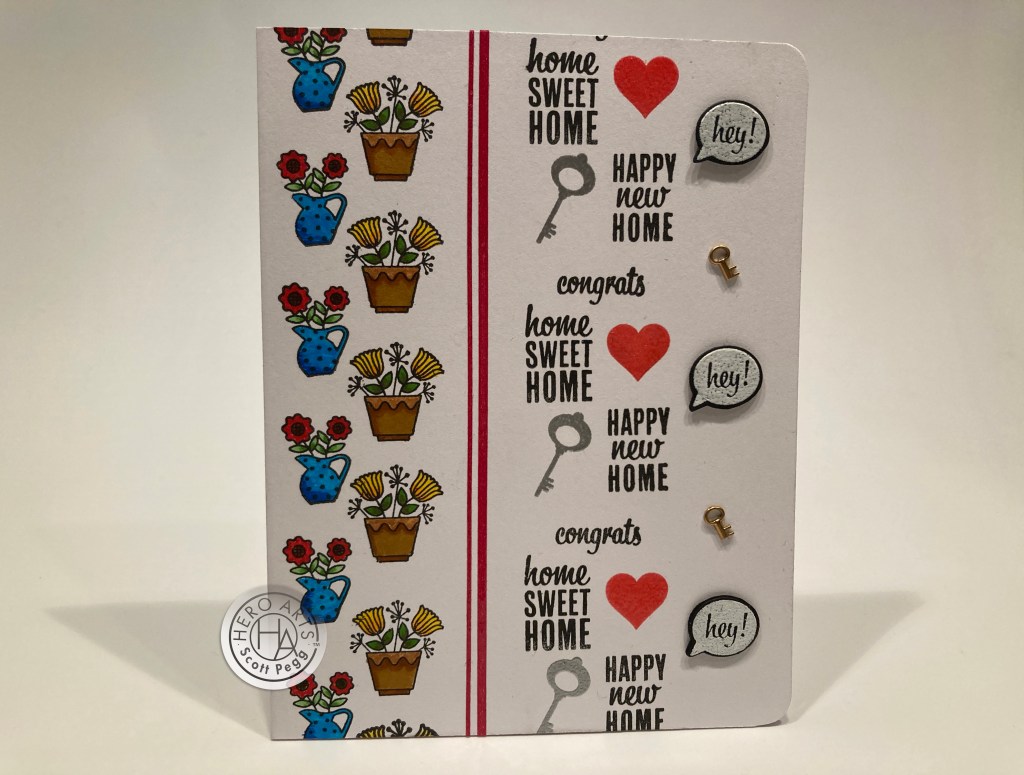
Eight stamps used on one “congrats on your new home” card! I stamped the two flower arrangements on the left in a repeating pattern on top of my White A2 card base, and colored them with my Zig markers. I stamped the repeating sentiments on the right with Intense Black ink, stamped and embossed the key stamp with Silver embossing powder, stamped the heart with Fruit Punch Reactive ink and embossed the hearts with clear embossing powder. I stamped the speech bubble on scraps of Pitch Black card stock, embossed those with Detail White embossing powder and die-cut three with the matching die. I mounted those with foam tape and added two tiny little keys (from the MMH September 2019 kit) to finish out the pattern. A couple of Red Glitter peel-offs pull this card together and add a little more sparkle! This would be the perfect card to accompany a gift of a potted plant to someone moving into a new home! Very graphic!
If you follow me on Facebook or Instagram you probably saw the post of my watercolored City background cling stamp.

Oh my heaven’s I love this! This took me three evenings to paint this stamp (using my giant Daniel Smith watercolor dot card (thank you, Pat) and my Zig watercolor markers for fine details) and I believe it was worth every minute I spent! I’m particularly proud of the stained glass on the church, and the big picture windows (and awning!) on the shops in the lower center. Initially, I thought that I could simply cut this in half and make two cards from it, but I was extremely hesitant to chop this up in any way. Not after I spent so much time coloring it! I solved that problem with this card.

Joel is the one who actually suggested the possibility of using the entire image on the inside of a card… and I realized that by simply folding the 6″ x 6″ panel in half, it would give me a Mini-Slimline card! Fortunately, the back of my watercolor card stock was nice and clean (no idea how I managed that!) so I stamped the left side of the cling stamp on the right side of the back of the image using HA Contour ink – the lightest grey ink I have in my stash. I found this Thoreau quote on-line and printed it over the stamping using my Silhouette software and the Lucida Grande font. My piggy-back printing method helps my printer (Canon Pixma MX922) handle this 140# watercolor card stock with no problem! Then it was a simple task to score and fold the watercolor card stock to make a 3″ x 6″ Mini-Slimline card!

“I’m so lucky to have you” is the absolute PERFECT sentiment to go along with the Thoreau quote from the front of the card. I cut the “”in my life” portion away from that stamp and stamped the remaining sentiment on a scrap of White card stock using Intense black ink, and stamped the heart with Fruit Punch ink. I trimmed that to 3″ x 5/8″ and fussy-cut the right edge of the heart to make this simple pop-up greeting. I folded the strip at the center of the heart and 1/4″ from the end of the right side (that leaves us 1/2″ from the center of the heart to the 1/4″ fold.) and folded a 1/2″ from the left end of the strip. The 1/2″ fold on the left gets glued to the left side of the card at the fold, and the right 1/4″ fold is glued down at the appropriate space on the right side. I absolutely love this card!
(I actually scanned this painted scene into my computer before assembling this card… now it’ll always be in my stash!)
And that completes my 10 Cards 1 Kit post featuring the My Monthly Hero December 2021 Kit! When I first looked at this kit, I was a little concerned that there was enough variety here to make 10 cards, but soon discovered how versatile the cover plate die and cling stamp are!
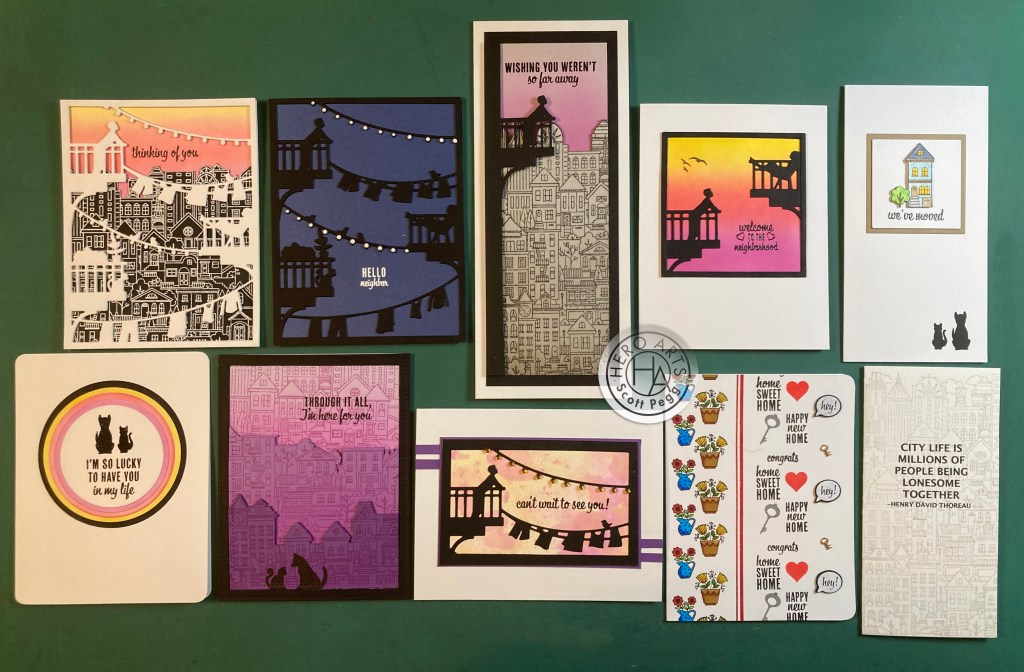
I LOVE that cover plate die and the City Cling stamp! There are lots of moving / new house / welcome to the neighborhood sentiments that will prove very useful in the long run, and I love the fun variety of cards this month. A couple of Mini-Slimline cards, a full size Slimline card, friendship, miss you, welcome cards in a fun variety of colors, sizes and styles!
This kit is still available at Hero Arts! If I’ve managed to catch your eye or your imagination, I would grab a kit for yourself before they are all sold out. Please use my links when you do go shopping at Hero Arts! It is supremely appreciated and helps keep this channel alive and kicking!
My Monthly Hero December 2021 Kit: http://shrsl.com/3b8zs
Hero Arts: https://shareasale.com/r.cfm?b=855179&u=1697228&m=65361&urllink=&afftrack=
I must take this time to offer you all my love and supreme appreciation for your support and encouragement. I have pared my postings back a little this fall, and am touched by your patience and humor. It’s not getting any easier at work here in NYC, but we are healthy and safe and looking forward to the holidays! I send you and yours my most sincere wishes for a delightful holiday and hope you can spend time with your families and friends and all the people who are important to you! Remember, YOU are important to me, and I”m send everyone Best Wishes for a thrilling New Year!
DISCLOSURE: This site contains some affiliate links to products. I may receive a commission for purchases made through these links (at no cost to you). As an Amazon Associate I earn from qualifying purchases. Thank you!

Happy Holiday,
I just ordered this kit through your link.
I appreciate the variety of techniques you include in your 10 cards and enjoy reading through your process.
LikeLike
Thank you, Victoria! Always much appreciated! Happy New Year!
Scott
LikeLike
Said it before and will say it again, “you are a cardmaking genius!” This kit really didn’t inspire me but your cards really made me see things differently. They were all so beautiful and clever, I can’t pick a fav but kind of lean toward the inside full panel. Thank you for sharing your talent and giving me some much-needed inspiration! Merry Christmas to you & yours.
LikeLike
Thank Judy!
Happy New Year! Always good to hear from you!
Crossing my fingers but not holding my breath for 2022…!
Onward and upward!
Scott
LikeLike
Thank you so very much Judy! Sending Cheers and Chuckles your way!
Scott
LikeLike