
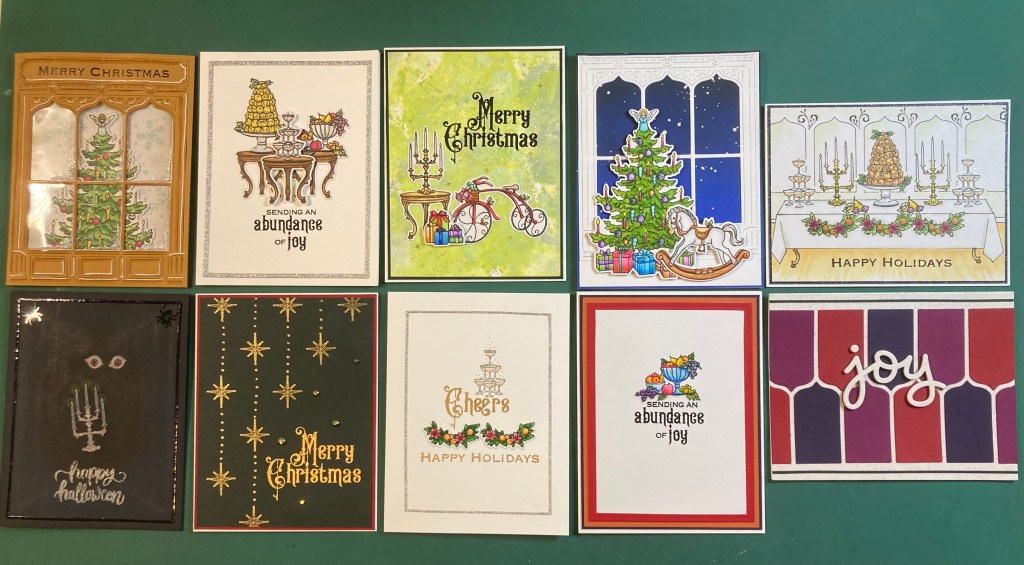
Hello Folks! Scott here with my 10 cards inspired by the My Monthly Hero October 2021 Kit. I’m a little late with this post this month… my old Cuttlebug die-cutting machine decided to give up the ghost right in the middle of this kit. I was actually a little surprised how that broken tool seemed to stifle my motivation and creativity this month!

This month’s kit includes Victorian Christmas-inspired imagery in a large 6×8 stamp set and a gorgeous window die that will set the stage for a variety of holiday scenes. I LOVE the Victorian font on those larger sentiments! We get 12 coordinating frame cuts as well as that nifty Window Shop Cover Plate Die. For our extras this month, we get seven 8.5″ x 5.5″ sheets of assorted Holiday Jewel Tone card stock, six 4.25″ x 5.5″ sheets of acetate (biodegradable!) and a half ounce pot of Prisma Glitter. And everything now comes in the new Hero Arts reusable 8″ x 10″ zipper pouch! It’s not Halloween yet, but Christmas has already started!!
The Window Shop Cover Plate Die comes in two pieces – the windows / architectural elements and a 4.25″ x 5.5″ outline die. I’m not sure why I chose to start this way, but I decided to use the light brown card stock for my card base and I cut the window die directly on the front of that colored card base.

I was definitely winging it with this first card…! I took a piece of acetate and glued that to the back of the card front. I stamped the “Merry Christmas” sentiment using HA Intense Black ink, and embossed that with some clear embossing powder. I used a Spectrum Noir alcohol marker and white gel pen to add some shadows and highlights to the decorative elements of the die cut. Now I have a window on the front of my card… what to put behind that?
I was particularly intrigued by how nicely the angel tree-topper fit in the center of the arched window frames, so I stamped the Christmas Tree with Intense Black ink on some Neenah Solar White card stock, and colored the tree up using my alcohol markers. I often complain that my Spectrum Noir markers don’t have as fine a point on them as Copic markers do, so I sometimes have a hard time coloring small images – like the ornaments on this tree! I took extra care with this image and was able to color all the tiny bits with no extraneous bleeding. I die cut the tree with the matching die, and cut one more layer from white card stock to glue behind the tree for a little bit of dimension.
Now I had to decide whether to put the tree on the inside of the card base – effectively limiting space to write a message – or figure out a way to attach that tree to the front panel of the card. I cut a piece of Kraft card stock from my stash slightly smaller than the card front, and I glued some simple snowflake pattern paper to the front of that card stock. I did some distress ink blending on the sides of the pattern paper with Pumice Stone ink. I glued my stack of trees to the pattern paper and glued the whole piece to the back of the card front. For a final touch I added some of the Prisma Glitter to the bottom right corners of the windows to suggest a bit of sparkly snow. I guess this is kind of a reverse-engineered shaker card front – there is some nice dimension to the tree but this is certainly much thinner than a standard shaker card! A perfectly framed Christmas tree on prominent display.
I did notice that a lot of our stamp images in this kit were items that you would put on a table – obviously that lovely three-legged table included in the stamp set. But there’s not much room for more than one item on the table at a time.

I stamped three tables, the champagne, fruit bowl and croquembouche (stack of profiteroles) on more Neenah card stock and colored all with my alcohol markers. I die-cut everything with their matching dies and glued the treats on top of the three tables. I did trim away the white border on the treats where they overlapped the tables before gluing them together – I think that makes it look more like one complete stamp instead of two pieces glued together.
I stamped the sentiment on a white card base using Intense black ink and embossed that with some clear embossing powder. I added a pre-cut silver glitter frame from the Altenew Fine Frames Cover die, and glued the back two tables flat to the card front and mounted the center table with foam tape. Just having three tables feels very abundant to me – not to mention the treats on top! Looks like it’s party time! And I really do love the font used on these bigger sentiments.
And we have a candelabra stamp in our stamp set too… something else to put on a table!
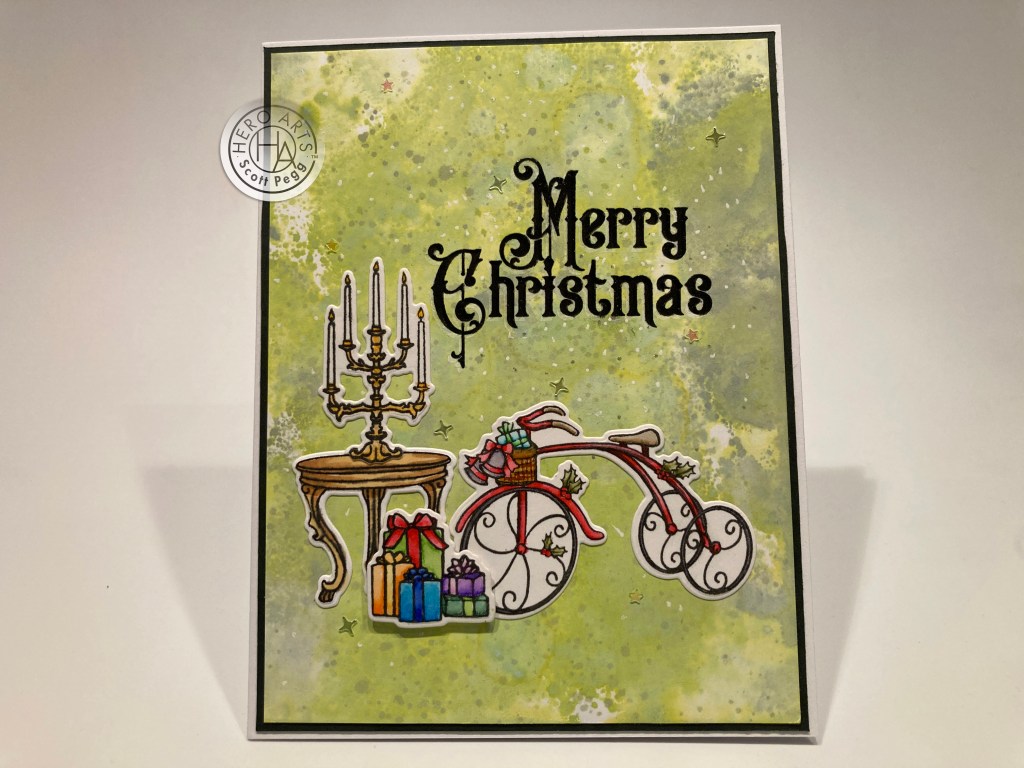
This feels like a vignette from a Liberace Christmas! I ink smooshed this background using Twisted Citron and Bundled Sage Distress oxide inks. When that was dry, I stamped the sentiment using Intense Black ink and embossed that with some clear embossing powder. I cut that panel to 4″ x 5.25″ and added a thin black mat and glued it down to a white card base. I also added some white gel pen to the background for a little more texture.
I stamped these images on some Bristol Smooth card stock and colored them with my Zig Clean Color Real Brush markers – now those markers have extremely fine points! I glued the candles to the table taking care to fussy cut the white border away from the bottom of the candelabra. The table and the tricycle are glued directly to the card front and the presents are attached with foam tape. Some star shaped sprinkles add more sparkle and I think it’s interesting how well the candelabra and trike go with the sentiment. Love that font!
I’ve used the Shop Window die from the outside looking in… let’s try one from the inside looking out..!

This is the card that killed my Cuttlebug! LOL! I die-cut the window die from some 100# white card stock and trimmed off the top “signage” section and replaced that with plain white card stock on the bottom – you got to have a floor to put the tree on! I trimmed that whole die cut panel down to just smaller than 4.25″ x 5.5″. I took a full size piece of blue card stock and did some ink blending from the top down using Hero Hues Blue Hawaii reactive ink, and Blueprint Sketch and Black Soot Distress Oxide inks. When that was dry, I spattered some “stars” using some Permanent White Gouache watercolor paint. I glued the sky and the window together – leaving a thin outline of blue around the die cut – and glued this to a plain white card base.

The tree and hobby horse are stamped on Bristol Smooth card stock and colored with Zig watercolor markers. I die cut both with their matching dies, glued the horse to the tree and mounted them both with foam tape. I couldn’t bring myself to clutter the front of this card with a sentiment, so I stamped the “Merry Christmas” sentiment on the inside. This scene feels classically victorian and is perfectly reinforced with that great sentiment on the inside!
I was so surprised how the death of my Cuttlebug really crushed my creative mojo…! It’s one layer cards for now…
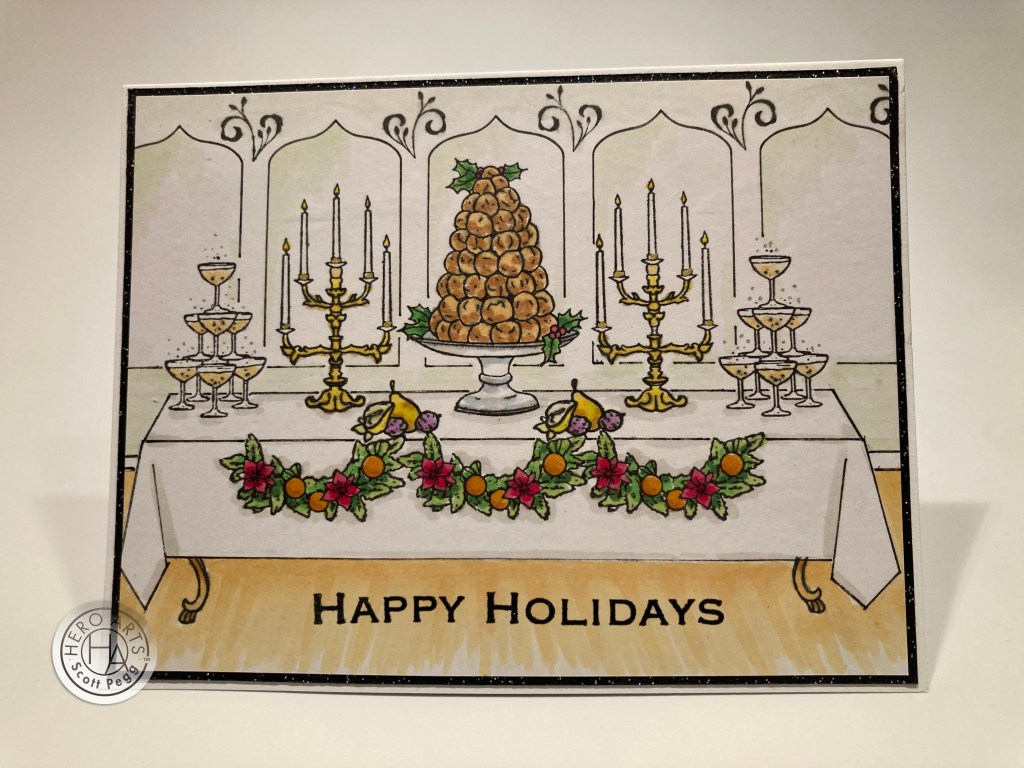
Here’s a big fancy spread in one-layer with almost no masking! I stamped everything on a panel of Neenah Solar White card stock and sketched in the surroundings as I went. I sketched out the table before stamping the garland and table legs, and colored everything with my alcohol markers. I was about to try some kind of a wallpaper pattern on the back, when I realized I could use the window die to create our background. I lined up the die and traced the arched openings with a pigma micron pen. I traced over my pencil sketches with the same pen, and added some of the stamp flourishes around the “windows”. I shaded the wall with a light grey alcohol marker, and it kind of feels like some grand rotunda! I filled in a simple wood floor beneath the table and stamped and embossed the sentiment as usual. Very little masking needed on this card – just the ends of the garland and the table legs. The scale here may be a little off… When paired in this arrangement, that’s a very large croquembouche! Big enough to be cream puffs instead of profiteroles!!
And how about something for Halloween?
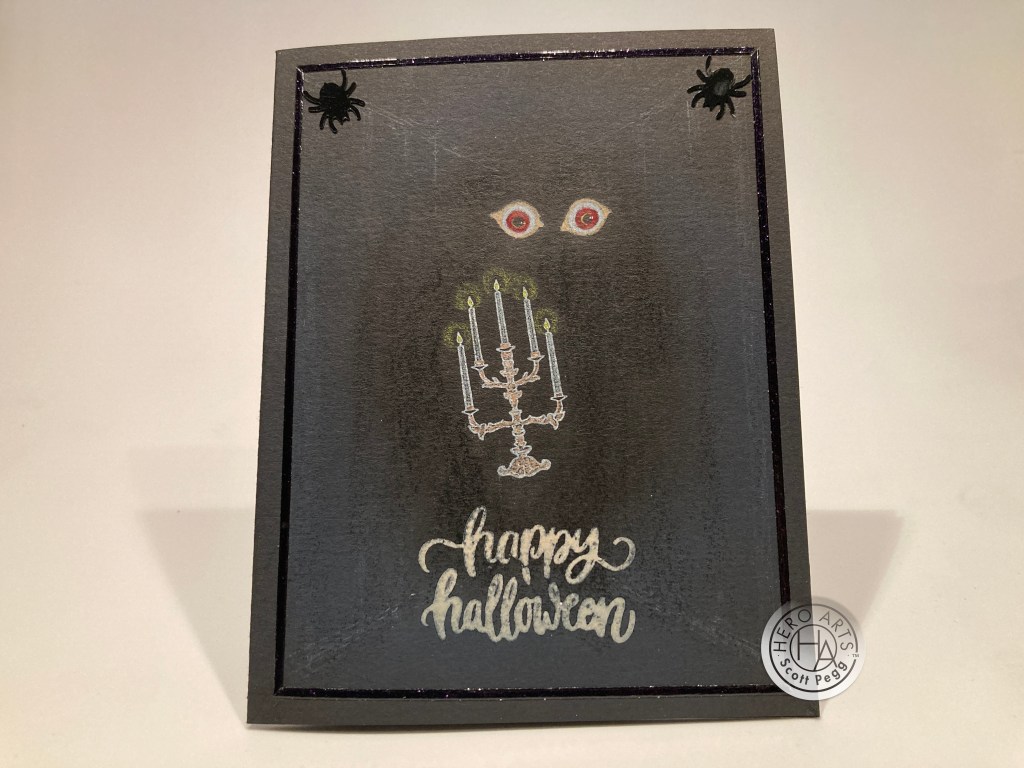
The candelabra stamp reminded me of the floating candelabra in Disney’s Haunted Mansion – in the middle of a long hallway with no visible means of support. I stamped the th with HA Unicorn White pigment ink on a Hero Hues Pitch Black card base. I lightly sketched a vague representation of a hallway with a white colored pencil, and ink blended the edges with Blueprint Sketch and Black Soot Distress Oxide ink. I don’t think I could draw a convincing “endless hallway” to support the illusion, so I just drew in a pair of disembodied eyes! There’s the creep factor! The sentiment is from the September 2018 Love From Lizi card kit stamped with Embossing and Watermark ink and embossed with off white powder. Finally, I framed the scene with some Black Glitter peel-offs and a couple of spider sequins in the top corners. Halloween is coming!
Still waiting for my new die-cutting machine, so how about a simple gold embossed card!
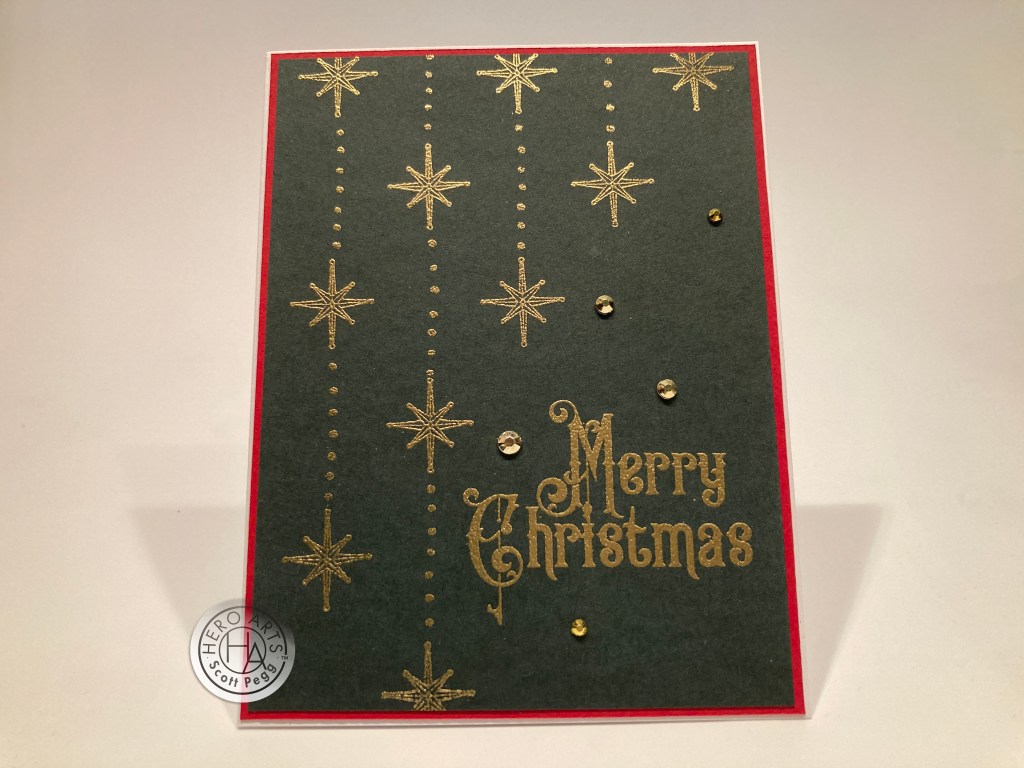
I stamped the star from the stamp set in a pattern on a piece of the dark green card stock from the kit, and used a VersaMarker pen to add the connecting dots. I first thought of drawing the dots with a gold gel pen, but then realized that the VersaMarker would make everything match perfectly. I stamped the sentiment and covered everything with HA Gold embossing powder. When that was melted I trimmed the panel down to 4″ x 5.25″, glued that to a thin Red mat (from the card stock in our kit) and down to a white card base. A few gold gems from my stash add a little more bling. Clean and simple, yet very effective!
I thought the “Cheers” sentiment and the stack of champagne glasses were a natural pairing just waiting to happen!
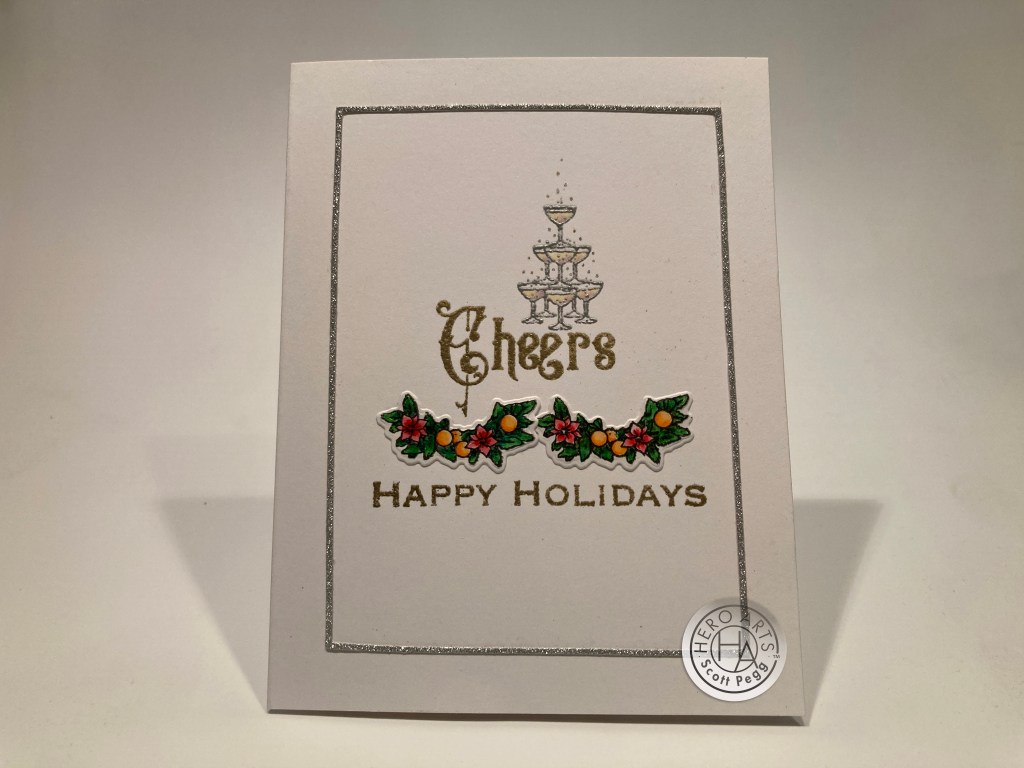
I stamped and embossed the sentiment in Gold, then stamped and embossed the glasses in Silver on a white card base and thought that was going to be the whole card, but suddenly, those two stamps seemed awfully lonely on a big card. AND my new Platinum 6 die-cutting machine showed up! I stamped the garland twice on some Bristol Smooth card stock, colored them with my Zig markers and die-cut them with their matching die. I added a touch of color to the champagne with alcohol markers. I stamped and embossed the “Happy Holidays” sentiment in gold and added a thin silver glitter frame (another from the Altenew Fine Frames Cover die) to the card front. I glued the garlands flat to the card front and that was just the right pop of color this card was asking for. Cheers indeed!!
Of course I thought the bowls of fruit and the “abundance” sentiment were perfect partners too.
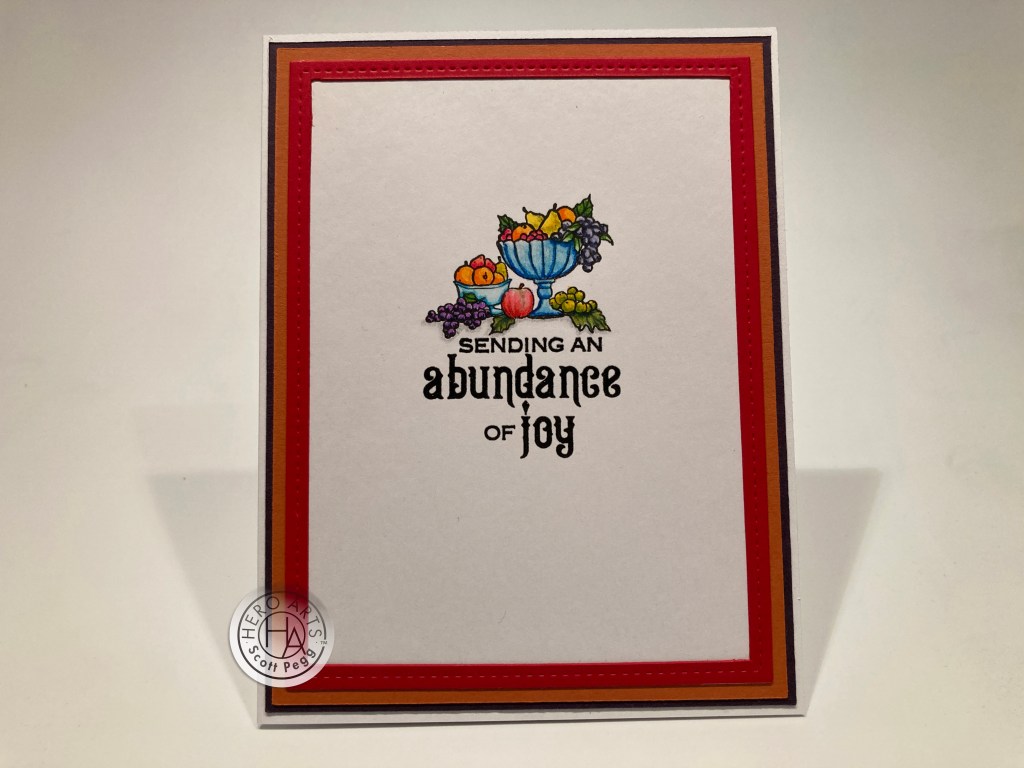
Both the sentiment and fruit are stamped with Intense Black ink and colored with my Zig markers. The sentiment is embossed with some clear embossing powder for some dimension and shine. Maybe it’s the addition of color in this pairing, but I didn’t feel the need to add any more to this card. I matted the panel on some red, orange and purple mats cut from the card stock in the kit, and glued everything down to a White card base. I do tend to gravitate to my Zig real brush markers when trying to color such small images… Very pleased with the coloring on this one!
I had a bunch of the curved window cut-outs sitting on my desk, and I started playing around with them.
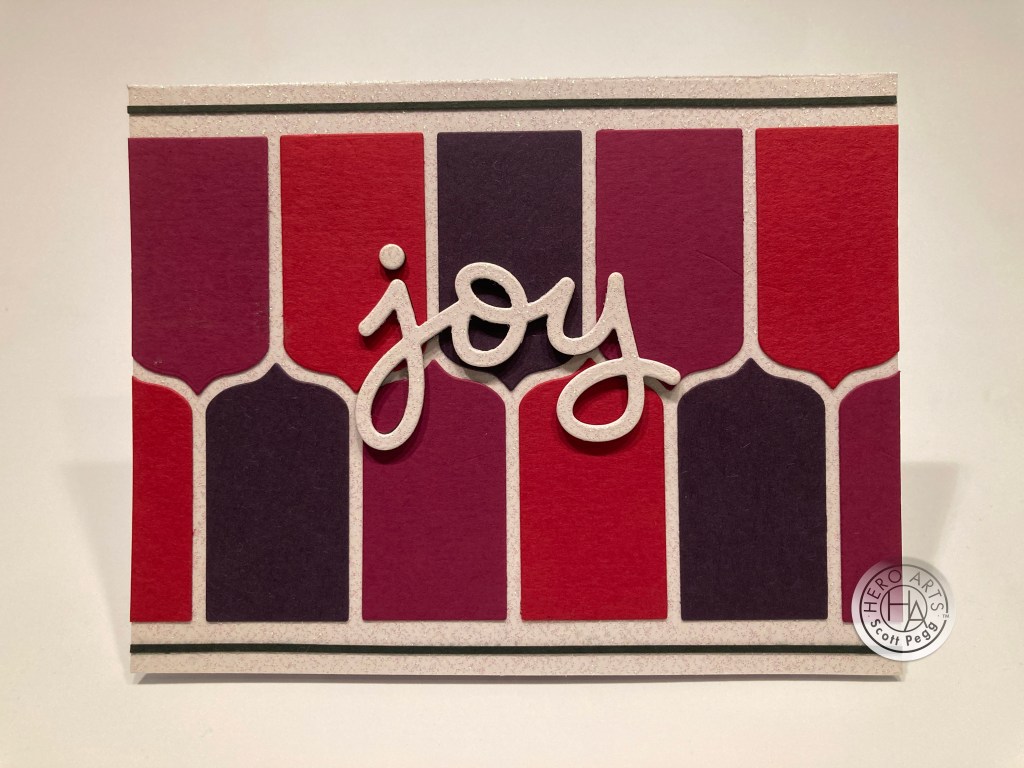
Not your standard Christmas card here… but this is quite graphic and I really love the pattern of the window die cuts! I cut four Red and Purple, and three Blue window pieces with 2″ strips of our Jewel Tone card stock. On a white glitter card stock panel, I glued the center blue panel on the top and then used the actual die cut to space the rest of the top row. I did the same with the second row – gluing one pane in place and using the actual die cut to space the rest of the row. I added thin strips of the dark green card stock across the top and bottom and glued the whole panel to a white card base.
I didn’t want to cover up any of this fun pattern with a sentiment, so I reached for an old Lawn Fawn Scripty Word die and cut one layer from the same glitter card stock, three layers from white card stock and two layers from black card stock. I glued those all together with the glitter on top and the black on the bottom and then glued that to the front of the card. I thought about adding a sentiment on the inside, but decided that this didn’t have to be a Christmas card! This would work as a birthday card or a new baby card or a nice upbeat congratulations card!
That covers my 10 cards inspired by the My Monthly Hero October 2021 Kit. I really do love the Victorian theming in this kit – the Window Shop Cover Plate die is a delightful stash-builder, and I particularly love the big Holiday sentiments.
I also had a great time figuring out how to make a number of cards that required no die-cutting! Without have to do a lot of masking either! It was quite nice to zen out with some detailed coloring with these cards. Lots of Christmas this month with a little nod to Halloween as well!
I’m not sure how I feel about the new Hero Arts reusable 8″ x 10″ zipper pouches that our kits will now come in. The pouches are great, mind you, but they don’t quite fit in the bin I use to store My Monthly Hero Kits! Argh!!
This kit is still available at Hero Arts! If I’ve sparked some ideas or captured your imagination and you want to grab a kit for yourself, please use my links below! It is always truly appreciated and helps support this channel!
My Monthly Hero October 2021 Kit: http://shrsl.com/37ur6
Hero Arts October Release: http://shrsl.com/37urb
Thank you so much for sharing some of your precious time with me here! I’ve cut back on my crafting a little bit this fall – still trying to get used to all the new brew-ha-ha at work while still managing my own mental health as well! PHEW!! I appreciate your patience and your support even if I’m not posting as often as some..! Please remember to Like me, List me, Pin me, Post me, Share me with all your arty friends, Don’t run with scissors… and as always, I send you and yours Love and Light and Happy Crafting!!

Hi Scott. I was impressed as always with this latest group of amazing cards. I was wondering why there were not any Happy Hanukkah stamps or menorahs or other symbols for that holiday. And to make your site even more perfect, FYI, “brew-ha-ha” is actually spelled brouhaha. It’s a French word. And this minor correction is just to let you know that I do read every word of your emails. 😘👍❤️ Faith
Sent from my iPhone
>
LikeLike
Love what you did with this kit, even with a “broke die cut machine’.
LikeLike
Thanks Patricia!! Always appreciated!
LikeLike
As always your cards are delightful and imaginative. Love the table you created after you had to go to a one layer card when your Cuttlebug died.(sniff). It is amazing what you did. Sketching in the window for the background was truly inspired. I’m glad your Platinum 6 arrived in time to finish the cards. I enjoy using mine and I’m sure you will too. I keep nursing my ‘Bug along and still use it for less detailed dies. Throwing in the haunting Halloween card was truly inspired.
LikeLike
Thank you, Judy! Always a treat to hear from you! That window die should prove very useful over the years!
LikeLike