
Hello Folks! Scott here with my 10 Cards 1 Kit post featuring the My Monthly Hero March 2021 Kit! If you, or anyone you know loves books, then this kit is perfect for all those bibliophiles on your list!

Our 6″ x 8″ stamp set features three readers in various poses along with a sleeping cat and some extra props, a large tree with unusual items amongst the branches, and even some graphic examples of what our readers might be reading about! There are six sentiments in this kit with a nice grouping of book-centric wishes and puns! We get seven coordinating Frame Cuts, a Rainbow Reactive Palette ink pad, a Water Flow brush, six large bookmarks cut from Pure White card stock, and six meters of Rainbow Hemp Cord. Everything we need to celebrate those with a penchant for books and reading!
Before we get into the cards this month, I have a winner to announce from last month’s HA Giveaway! If you missed the MMH 2/21 Hawaii Kit giveaway it was only announced in the video description last month – just to see if anyone reads those things…! Some people do!! The winner of a My Monthly Hero February 2021 Hawaii kit is Noreen Hennessy from Poughquag, NY! Congratulations, Noreen! Your kit is on the way!! For those who missed out on this prize, I promise not to be so coy the next time I do a giveaway!
At first glance, I think my favorite “reader” is the young lady in the chair. At least she has something to sit in/on!

First I stamped the coffee stool on some Bristol Smooth card stock using HA Intense Black ink and I fussy cut a mat for that with some Post-it Tape. I masked off the stool and stamped the occupied chair with the same ink. I stamped the sentiment the same, but embossed it with some clear embossing powder for a little texture and shine. I used my Stabilo watercolor markers to color this image – nice bright colors but they don’t move as freely on Bristol card stock as the Zig markers do. Still, I am able to get some decent shading with those markers.
I die-cut the colored panel with a Lawn Fawn Stitched Rectangle die, glued that to a thin blue mat and a thin green mat (both from previous MMH kits) and glued those to my White card base. I really like this stamp – could be used for so many different occasions and it certainly makes for a lovely “miss you” card!
For some obsessive reason I wanted to get the prone “reader” stamp using the tree to lay her head upon.
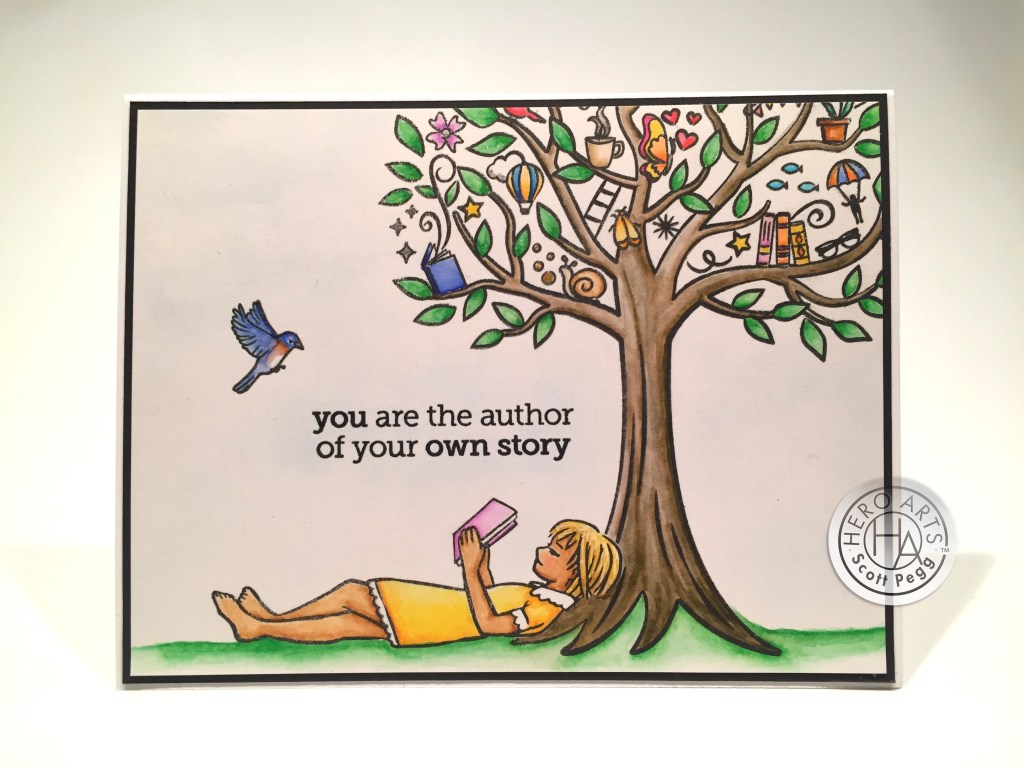
I stamped our reader on Bristol Smooth card stock and masked her head and shoulders before stamping the tree. Looks pretty darn natural to me! I did use my Zig Clean Color Real Brush markers to color this image, and embossed the sentiment with clear embossing powder as well. I also added the slightest hint of blue to the sky using my chalk pastels. I trimmed the colored panel to 4″ x 5.25″, added a thin Black mat and glued both to a white card base. I still needed something on the left to help balance things out… This bird is from the MMH October 2018 kit – I thought he worked perfectly with this scene – like he’s coming in for a landing on the sentiment! I added some Stardust Gel pen for bits of highlights among the paraphernalia in the tree, and even glittered up the leaves with a little Spectrum Noir Sparkle pen. I think the tree illustrates this sentiment nicely, and I swear I can almost smell the cut grass…!
I was tickled that there is a birthday sentiment in this kit… and it’s even a pun! Birthday cards are always useful!

Does this count as a pun!? I’m not completely sure, but this tickles me nonetheless! I stamped the stack of books on some Bristol Smooth card stock with Intense Black ink and colored them with my Stabilo markers. I cut a Post-it Tape mask for the stack of books, masked them off and stamped the text behind them using HA Soft Granite ink. That text stamp is from the MMH January 2020 kit. That kit was voted last year’s favorite and the stamps and dies are now available in the New Hero Arts Catalogue. I stamped and embossed the sentiment as before. .
This “cake” of books needed a candle, so I found one in the MMH February 2020 kit. I stamped, colored and fussy-cut the candle and glued it on top of my books. I die-cut that panel with a LFSRdie and some partial die-cutting to achieve the right dimensions. I cut a piece of plain Red card stock from my stash to 3.75″ x 5.5″ and stamped the text stamp along the two sides using Hickory Smoke Distress Oxide ink. I glued that to a White card base and added two Red Mirror peel offs to the edges. I glued the die-cut panel to the card front and added a touch of Spectrum Noir glitter to the flame. This is the PERFECT Birthday Card to accompany the gift of a book..!!
There is that one stamp that has a book and “relax, read, repeat” making a stem for a flower. For some reason that stamp reminded me of a bookplate – I thought it would be nice to highlight that one all by itself.

I masked off a 1.25″ x 4″ area in the center of a White card panel, and ink blended the opening with Hero Hues Splash Reactive ink. I stamped the image with Intense Black ink and cut up the sentiment so I could stack the words vertically and embossed the sentiment as before. I originally thought I would use my colored pencils to color to this image, but that proved to be a futile attempt to cover that Reactive ink. I colored the flowers with my Stabilo Markers – bright enough to read well on top of the blue – and I simply stamped an extra book, fussy cut it out, added a touch of shading and glued it on top of the blue book. I cut that panel to 4″ x 5.25″, glued that to a thin blue mat (again, past MMH kit stash) and then down to a White card base. Some dots of sparkle with my Stardust gel pen and this is a great pun-y encouragement card! Is this a pun or a double-entendre? I like it either way!
We do have another “reader” to stamp, and all those imaginative graphics. I was a bit surprised that those all fit together!

A Slimline card! This is a 3.5″ x 8″ card (cut at 7″ x 8″). On some Bristol Smooth card stock, I stamped the boy and the imaginings all together with Intense Black ink. I was thrilled to find the three upper stamps fit together so perfectly! I colored everything with my Zig markers then stamped and embossed the sentiment. I cut the colored panel to 2.5″ x 7″ and cut another panel to 3″ x 7.5″ and inked the edges of that with the Palette ink pad from the kit. I love that the purples kind of match on either side, but the rest of the rainbow is shifted – can I get some pattern paper like that? Both panels are glued flat to the card base and my Stardust gel pen adds some highlights to the “thoughts”. Hell, this card is a bookmark in and of itself!
I had miss-stamped this image a couple times before I got the imaginings correct, so I had to put the extras to use…

And now we have a square card!! Has Scott lost his mind!? This is a 4.25″ square card – that means you can mail this in a standard A2 envelope! AND it’s the perfect size for a gift card! I colored this guy with my Zig markers and embossed the sentiment right underneath him. I partial die-cut the stamp stopping at his elbows, and then trimmed around the sentiment to complete the image. I cut the blue pattern paper (old Graphic 45 I believe) to 2.5″ x 3″ tall, added a thin White mat and a thin Black mat and glued those to the card base. Our “reader” and sentiment are mounted with foam tape – finally there’s some dimension! I love his dirty (at least used) white socks!
A recent Sunday NYTimes published an excerpt from the new Danielle Steel novel that was a full double-wide sheet of newspaper that you fold together four times (staple the spine and cut the folds) to make a little 31 page booklet of “THE AFFAIR” It seemed like it might be the right size to use on a literary card… I’m glad we hadn’t recycled that section!

I’m loving this! I was actually able to trim down a sheet of that booklet to 3.75″ x 5″ – perfect size for an A2 card! I distressed the edges of the newsprint with a small amount of Pumice Stone Distress ink, glued it down to a black mat and then down to a White card base. This time our prone reader is using the cat as a pillow! She doesn’t seem to mind… and she fits perfectly! This time I colored all with my Zig markers after adding some polka-dots to the dress with a Pigma Micron pen. Again, I embossed the sentiment right under the stamps and partial die-cut both the girl and the cat keeping the sentiment attached and trimming that to match. I think that’s a really effective way to give these kids something to ground them without having to draw in grass or cushions..! I thought this page of the novel was a fun tidbit (go ahead, read it!) and I was happy that the title and page number were able to be included. Page Turner Indeed!
Oh yes! Bookmarks! Well, the boy with the imaginings is almost the perfect size to fit the included bookmarks – and he does quite well – though with out the sentiment. I went ahead and stamped four of the bookmarks sans sentiment.
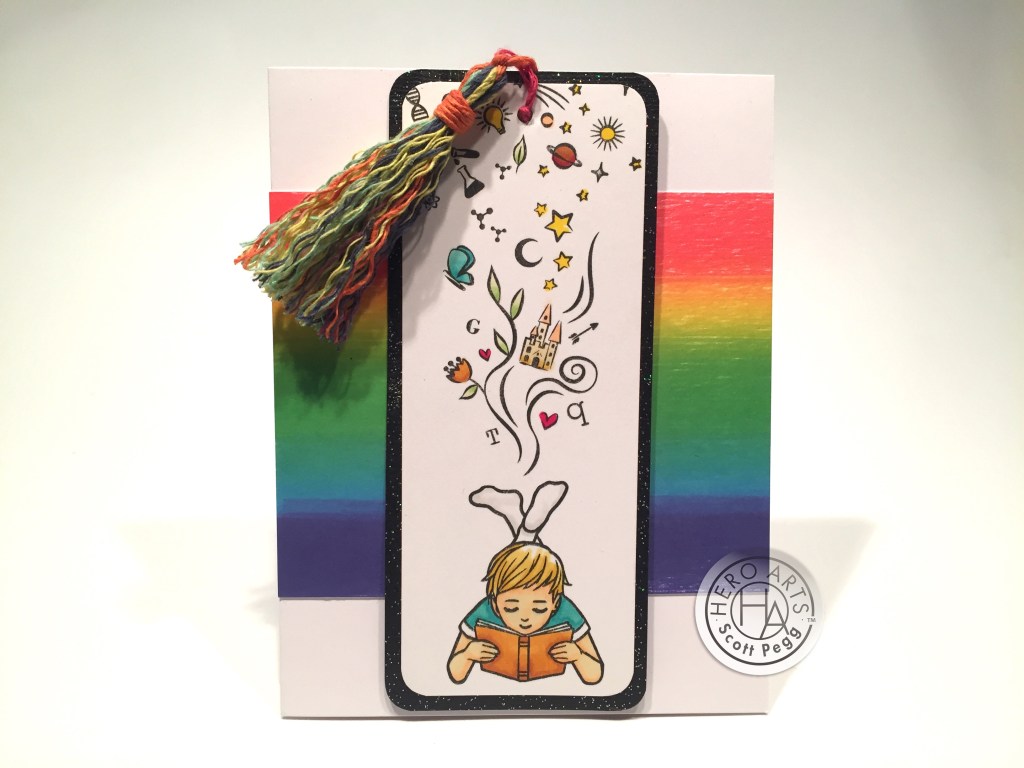
I’ve always thought one of the easiest ways to include a bookmark with a card is to just attach one to the card front! I like using Zots Clear adhesive removable dots – they will keep the bookmark in place and still come off the card and bookmark with no problem. I trimmed one of my stamped bookmarks to 2″ x 5 1/8″ (trying to keep as much of the stamped image as possible) and colored that with my Spectrum Noir alcohol markers. I rounded the corners with my 1/4″ corner-chomper. Alcohol markers do bleed through the Pure White card stock, so I added a thin mat of Black Tie Glitter card stock cut to 2.25″ x 5 3/8″ with the corners rounded as well. I stamped the sentiment on the back of the bookmark with VersaMark ink and embossed that with White Embossing powder.

I took our reactive ink pad and swiped that (repeatedly) across some White card stock for my rainbow background – cut to 4.25″ x 3.5″ and glued to a white card base. I did make a tassel for this bookmark using the Rainbow Cord from our kit – there is a decent How-To Tie a Tassel a minute and a half into the My Paper Pumpkin July 2016 video: https://www.youtube.com/watch?v=cOEO5euP76E&t=90s. I did separate the strands of the cord to fluff up the tassel. Attach the bookmark to the card with the Zots and you have a greeting card and a gift all in one!
I have used every stamp and sentiment in this stamp set now, so I thought I’d come up with my own literary sentiment!

Now there’s a proper pun! I stamped the pile of books on one of the Pure White bookmarks, masked it off and stamped the chair reader over that. I colored all with my alcohol markers and die-cut them out using partial die-cutting and some extra care – I actually die-cut the wrong side of the book die (you can see the cut lines where the books meet the chair) but I taped them back together and flattened the seam as much as possible. Not too noticeable!
I stamped and embossed the sentiment on a LFSR die-cut (2.75″ x 4″) piece of White card stock. I ink blended some HA Lemon Drop Reactive ink lightly behind the chair and then used a Sunburst stencil to add some darker rays to that halo. I cut a piece of Yellow Linen card stock to 4″ x 5.25″ and glued that to a White card base, I added some Beige Linen triangles to the corners on the right and a couple of thin strips on the left to make a little faux book cover background. I glued the die-cut panel to the card front and added our “reader” with foam tape.
I don’t know if anyone remembers Fernando Lamas – or, more importantly – Billy Crystal’s impersonation of him, but I think “you book mah-velous” is quite funny and a perfectly appropriate pun for this kit! Great encouragement card!
I feel like I haven’t given that tree stamp it’s proper due, and we could certainly stand to have another bookmark card…

I’ve used just about all of my coloring mediums on this kit so far, so I thought I would make a card using my colored pencils. I stamped the tree on some Kraft card stock using VersaMark ink and embossed that with Gold embossing powder. I colored all with my Prismacolor colored pencils and die-cut the tree with the matching die. I also die-cut two more trees from the same paper and glued them all together for a nice sturdy tree. I originally thought I would just die-cut the top edge of the tree and slip the bookmark behind, but figured it would be a touch more magical with a different background! I cut a background for this (4 1/8″ x 5 3/8″) from a piece of Green Metallic Confections Kraft card stock – that will leave a thin white frame from the card base.
I cut one of the included bookmarks in half lengthwise and stamped this arrangement using Intense Black ink and Clear embossing for the sentiment. I masked off the book and ink blended Splash Reactive ink starting at the bottom and fading out towards the top. I colored the rest with my Stabilo markers with a few glitter highlights from my Stardust gel pen. I rounded the corners with my Kadomaru Pro corner rounder (love the very small rounded corners) punched a 1/8″ hole in the top, and threaded a couple strands of the Rainbow cord through the hole. A couple of matching Pony Beads adds some weight and dimension to the bookmark cords.

To get the bookmark to hide behind the tree and background, I added two layers of scrap card stock (about 1.25″ wide) to the sides on the back of the background – leaving a channel in the center open for the bookmark. I added a thin double-card stock strip on the bottom between the side pieces to keep the bookmark from falling all the way through. I also added the same along the top edge to avoid any “dips” when the background is glued to the card base. Then I cut a slot in the background an inch and a quarter below the top edge and also cut the sides of that slit about a half an inch up towards the top. When you glue that background to the card base, add some glue to the top edge of the slot so it will glue down to the card base and leave the bottom edge open to accept the bookmark. Then, when you glued the tree in place, just make sure NOT to glue the center where the bookmark slides in. It may seem complicated but it’s really a very simple way to hide something behind your background!
I stamped and embossed the front sentiment on a scrap of Kraft card stock and mounted that to the card front with foam tape. I think the dangling cords coming from the top of the tree beg to be pulled on, and I really like the embossed and colored tree – a completely different look while still preserving the whimsy of that tree stamp. Now we have an interactive card with with a hidden bookmark! Love the shine on this card!
And that wraps up my 10 cards using the My Monthly Hero March 2021 Kit. I did get a pretty good assortment of cards – a “miss you” card, birthday cards, lots of encouragement cards and some useful thank you cards too!

I did manage to use every stamp in our stamp set – most of them more than once! Lots of coloring this month, but not a lot of coloring on any one card! I had much more fun with this set than I thought I would… those three “reader” stamps are so cute and fun to color… that is certainly an interesting tree stamp… and I don’t think I’ve ever created a rainbow as quickly as I did with this palette ink pad! Let me know which card is your favorite!
If you know anyone who loves books, if you have children or grandchildren you’d like to encourage to read more, or if you belong to a book club or the like, this is a great kit for all the readers in your life! Never trust anyone whose TV is bigger than their bookshelf! My love of books was instilled in me at an early age…! I do my best to pass that on!
This kit is still available at Hero Arts! And there is a great assortment of add-ons that compliment this kit including some terrific sentiment stamp sets. If I have managed to capture your imagination or maybe inspire some new ideas, you should grab a kit while they’re still available. Once they’re gone they’re gone! Please use my links when you do go shopping with Hero Arts – it is always supremely appreciated and doesn’t cost you a thing! Thank you!
My Monthly Hero March 2021 Kit: http://shrsl.com/2uew1
Hero Arts: https://shrsl.com/1f7qx
I extend a heartfelt Thank You to you for sharing your time with me here today! Your support thrills me and truly keeps me inspired! Remember to Like me, List me, Pin me, Post me, Share me with all your crafty friends… don’t forget to return your Library Books! I send you and yours Abundant Cheer, Love, Gratitude, Health and Happy Crafting!
DISCLOSURE: This site contains some affiliate links to products. I may receive a commission for purchases made through these links (at no cost to you). As an Amazon Associate I earn from qualifying purchases. Thank you!

Thanks for another great, inspiring video. I love how you created the bookmark hidden behind the tree.
LikeLiked by 1 person
Thanks Judy! Always appreciated!
LikeLike
I really enjoyed your post snd the amazing work and detailed information! I just saw this (October 2021) but am completely impressed. As a former teacher and someone who lives to read I enjoyed each image you used and your creativity in using them!
I look forward to your future postings.
Vicki
LikeLike
Thanks Victoria! Welcome aboard! So nice to have you here… I’m working away on the MMH 10/21 kit now…!! All my best! Scott
LikeLiked by 1 person