
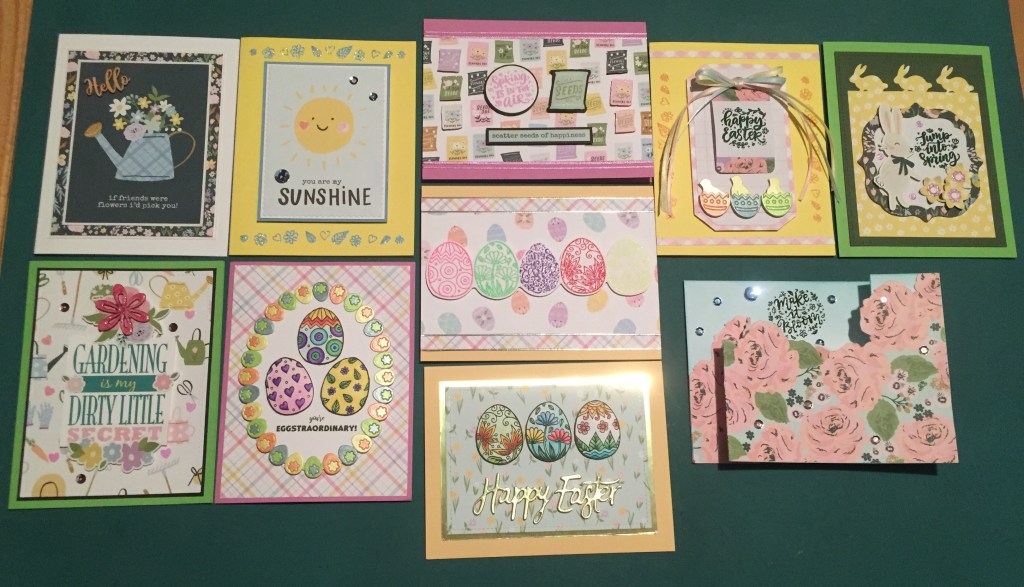
Hello Folks! Scott here with my 10 Cards 1 Kit post featuring Lizi’s “Make it Bloom” Card Kit! This kit is a big harbinger of Spring with some references to Easter, and, of course, a huge collection of coordinated supplies.

I do always make A2 (4.25″ x 5.5″) card bases from the 5 card stock sheets included in the kit – though I do swap out Lizi’s alcohol marker-friendly White for a plain 110# card stock from my stash. This month our kit featured a number of cut-apart sheets that make it easy to create lovely, useful cards! I couldn’t resist this one.

This is always a great sentiment, and I do love the plaid watering can on that dark background! I matted the cut-apart on a thin White mat, then to a thicker mat of that matching pattern paper and then another thin White mat just for good measure. I glued those all down to a White card base and added the wood-veneer “Hello” after covering that with my Spectrum Noir Sparkle pen. A little bit of sparkle for this sweet and simple card! There are 8 cut-apart pieces this size in our kit – that’s eight terrific cards right there!
There was one other cut-apart that really caught my eye this month!

Another smashing cut-apart! I cut this one out using a Tonic Scalloped Square die for a small scalloped edge, and glued that to a thin White mat. I stamped a garland of all 11 small stamps in this stamp set on the top and bottom of a Warm Yellow card base with VersaMark ink and embossed that with the LFL Baby Blue Party Embossing powder.
I dug around in my stash looking for card stock that would match that embossing powder, and finally landed on the Hero Hues Periwinkle card stock. I added a thin mat of that behind the white mat, and then sprayed all three layers with some Sheer Shimmer spray for a touch of sparkle. I attached all to the card front with foam tape and added some blue sequins from our embellishment bag – and a couple of the hearts on the cheeks! That embossing powder is crazy sparkly – this whole card twinkles! You are my Sunshine!! C’mon… everybody! You are my Sunshine…!!
I do challenge myself to use all the stamps in our stamp set, and we have five sentiment stamps so let’s look at those!
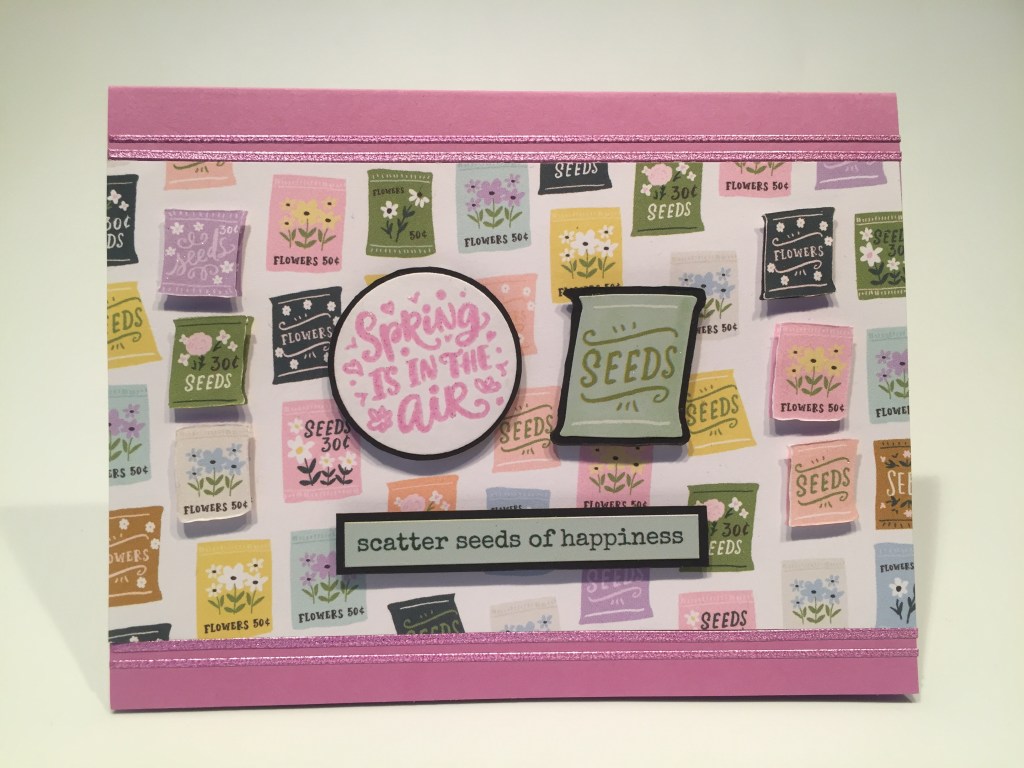
I really like this card – thematically, it’s right on the money! I cut a 3.25″ x 5.5″ piece of the seed pattern paper and glued that to a Lilac card base. I added two Mauve Moondust peel offs (from the Make It Bloom Pin Stripe peel off pack) to the top and bottom edges of the pattern paper. I fussy-cut six matching seed packets from the rest of the patten paper and used foam tape to add them to the card front.
I stamped and embossed the “Spring is in the air” sentiment using Pink Sparkle embossing powder from the My Monthly Hero January 2020 kit – really a great match to that Violet card stock. I die-cut that sentiment with a HA Circle infinity die, glued that to a scrap of black card stock and fussy-cut the thin black mat. I added the same black mats behind the seeds sticker and sentiment, and used foam tape to attach all to the card front. Some Spectrum Noir Sparkle pen on the seed packets, and we have a very spring-y greeting. I do LOVE that “scatter seeds of happiness” !!
We actually have a couple “Happy Easter” stamps in our stamp set this month, so let’s look at that holiday!

This kind of feels like a big Easter basket to me! I stamped and embossed the sentiment on this ephemera tag using LFL Forest Green Embossing powder – that’s another one of my favorites! I mated that piece with another ephemera piece – the long, ruled octagon with the printed bow on top, and added a mat behind that with the pink gingham pattern paper. I punched a hole and tied all the pieces together with this triple bow in yellow, pink and blue.
I stamped the same small stamp garland on the sides of this Warm Yellow card base, and embossed those with the Pink Sparkle powder – reads a little different on the yellow, but still plenty of sparkle! I added two strips of the gingham paper paper to the top and bottom of the card front and mounted the assembled “tag” with foam tape. I grabbed the Chick and Easter egg die from our embellishment bag and die-cut them from Orange, Slate Blue, Green and Yellow card stock – from the Make it Bloom Pearlescent card stock pack. I cut apart the eggs and added the chicks inside before mounting them to the card front with foam tape. Love those long tails on the bow! VERY EASTER-Y!
We have a “Jump into Spring” stamp in our stamp set… a bunny is the perfect way to illustrate that sentiment!

Fortunately, we have this fun bunny sticker in our kit! I stamped and embossed the sentiment with the same Forest Green embossing powder on the decorative ephemera label. I cut a piece of the yellow daisy pattern paper to 3.25″ x 4.5″ and die-cut the bunny border using the die from our kit. I die-cut a piece of Dark Green card stock from my stash with a Lawn Fawn Stitched Rectangle die and glued that to the Zesty Lime Green card base. I glued the die cut panel on top of that and added the label with foam tape. I de-stickified the bunny sticker with my Embossing Magic bag, and mounted him to the label with foam tape as well.
I die-cut the large flower die from more of the yellow daisy pattern paper, and die-cut the flower centers from the end panel of the Mauve Moondust peel offs, and some scrap White card stock. I glued the flowers together, curled up their petals a little bit, and glued them to the label. I also added the three Mauve Moondust dots (from the center of the small flower die) across the label. I love that die-cut border, and I think the flowers really make this card! It’s almost like the daisies on the pattern paper escaped and became three-dimensional!
I have room to try some of my own sentiments with this kit this month. I wanted something to go along with the ‘gardening’ pattern paper and I think this is great fun.
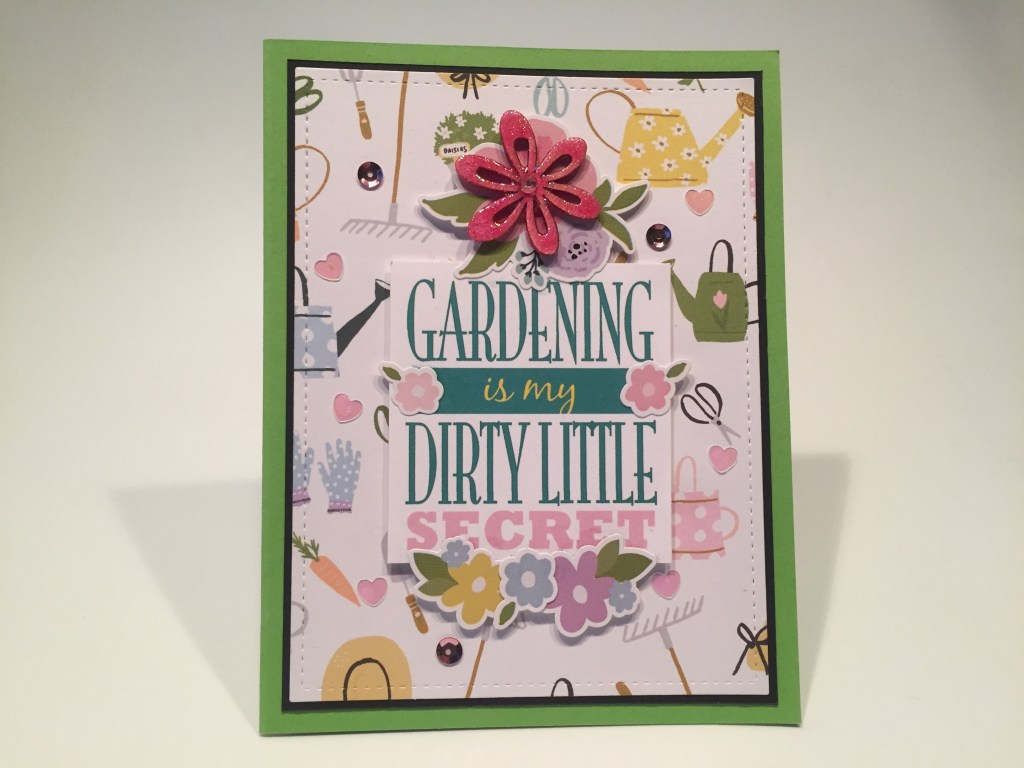
I created this fun “ephemera” sentiment piece using my Silhouette software and the Mona LisaSolid ITC, BlackJack, and Rockwell Extra Bold fonts, printed that on a scrap of White card stock, and trimmed it down to 2 1/4″ x 2 3/8″. I glued the flower stickers to the sentiment turning that simple rectangle into a bona-fide ephemera piece!! I die cut the pattern paper with a LFSRdie and added a thin Black mat before gluing both down to the Zesty Lime Green card base. I added the assembled piece to the card front with foam tape, and sprinkled a few sequins around for some sparkle. I also embossed the wood-veneer flower using the Pink Sparkle embossing powder – a good three layers of embossing plus a pink gem in the center – that adds a great deal of sparkle and really pulls your focus to the top of the sentiment.This all works great with that “gardening” pattern paper!
I did take some time to stamp and color all the egg stamps. VersaFine Onyx Black ink on Bristol Smooth card stock and colored with my Zig Clean Color Real Brush markers.
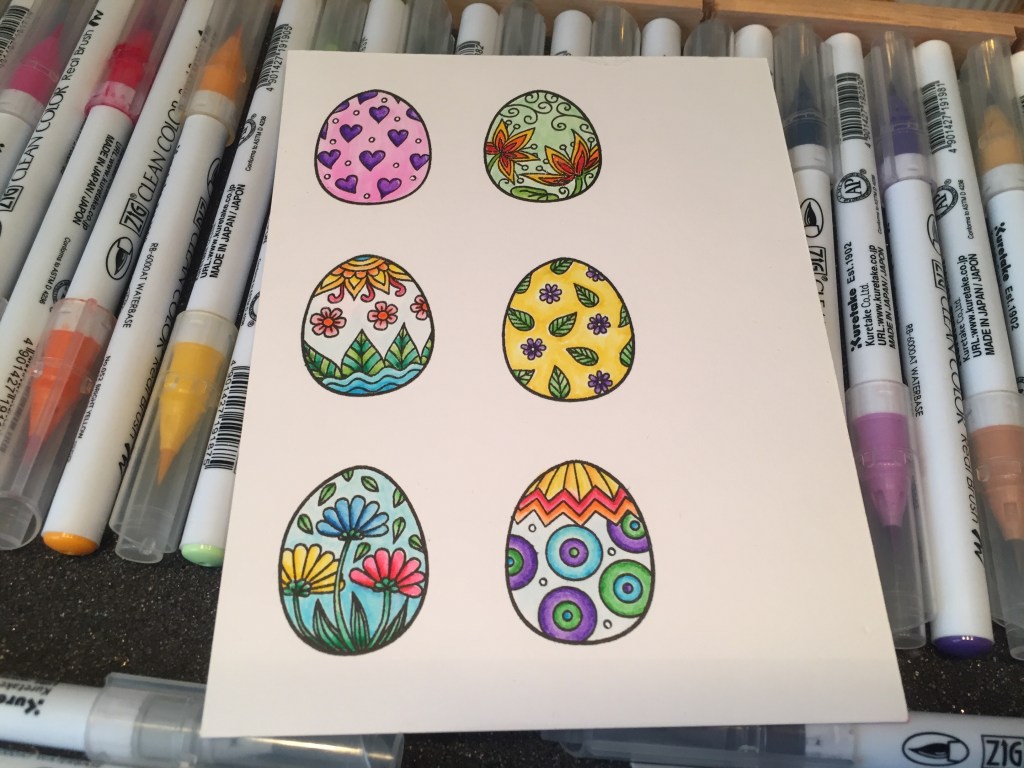
There is enough detail on these stamps to make for perfect embossings, but you know me… I do like losing myself in a long session of coloring…!

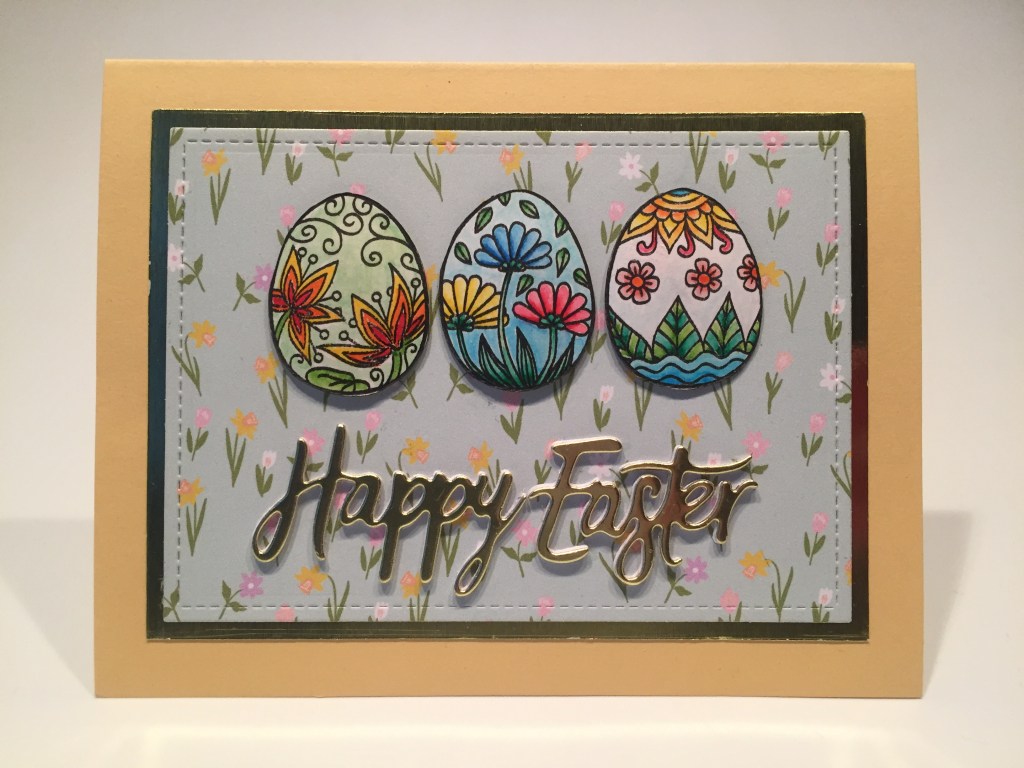
I’m loving this card! I printed this sentiment on scrap of white card stock using the Raustila and Stars and Stripes fonts. I die-cut that with the largest Gina K Oval die, and was contemplating a mat or more pattern paper or…? when I came up with the idea to make an “egg frame” on the oval using the small egg die in our kit! I die-cut that egg 28 times from the pearlescent card stock pack and glued them all along the edge of the oval. Really happy with that!
I cut a piece of that fun pastel plaid pattern paper to 4″ x 5.25″ and glued that to the Lilac card base, and mounted the oval with foam tape. I fussy-cut all my painted eggs and added the three more ‘graphic’ eggs to the oval with foam tape. This would make a great Thank You or Congratulations card or even a fun Birthday card for those born around Easter!
So let’s look at these egg stamps and how well they do with embossing!

My favorite part of this card is the fact that you don’t see the sentiment right away – at first glance it looks like there’s no sentiment at all! I cut the egg pattern paper to 3″ x 5.5″ and glued that to the Buttercup Yellow card base. I added two 3/8″ strips of the pastel plaid paper to the top and bottom and trimmed all with the Glossy Pink w/ Silver peel offs. I stamped and embossed the sentiment egg in the center of White card stock using Wilted Violet Distress Oxide ink and then embossed the eggs using Love From Lizi Neon Grapefruit, Neon Lime, Cherry Red, and Neon Lemon embossing powders. Great texture with all that embossing! I fussy-cut my egg line-up and foam taped that to my card. Love it!
We also have a “Happy Easter” sentiment die in this kit – I don’t have any of those in my stash – and I do have three more eggs already colored – let’s try it out!
Totally different feel with this card! I found some yellow Metallic Confections card stock in my stash and die-cut the sentiment from that along with three more in white card stock. I glued all four layers together to make this nice chunky sentiment. I die cut the flower pattern paper with a LFSRdie, added a yellow metallic mat and glued this to the Buttercup Yellow card base. I added the other three colored eggs to the card front with foam tape, and glued the sentiment beneath. This feels very formal to me, but still spring-y… stained glass windows and yellow gold, daffodils and daisies… ahhhhhhh..!
This last card was inspired by a number of things – the 6″ x 8″ pattern paper, one of the ephemera pieces, and the theme of this kit – Make it Bloom – also inspired me to – literally – make it bloom.
These pop-up ‘wipe’ cards are really very easy to make. Two sheets of 4.25″ x 7.5″ card stock, score one side of both at 1.5″ and 2.5″, make a “z” fold on both pieces, layer one fold to the left and one fold to the right and you have your basic mechanism to make bunches of pop-up ‘wipe’ cards. I made my front piece with that floral pattern paper fussy-cut to a rough triangle – tall on the right and shorter on the left. I did glue that pattern paper to a thin piece of card stock to add a little strength to this pop-up card. That fussy-cut piece is scored and folded on the left.
The back piece is 4.25″ x 7.5″ with some Broken China Distress Oxide ink blended on the top and left sides – that is scored and folded on the right. The riser (pop-up) piece is the matching flower from our sticker sheet stuck to a piece of 2″ wide card stock that extends 1.25″ below the sticker. On the bottom right corner of that riser piece, measure an inch to the left along the bottom edge and an inch up on the right side – connect those points, score that (45 degree) line and fold it towards you. That triangle is the only part of the riser that gets glued down – behind the fold-over on the right side of the back piece. I do have a how-to for this card on my coordinating video post if you want to know more!
I stamped the sentiment on the back piece using Onyx Black ink and clear embossing powder, and added a good amount of sequins for a bit of sparkle. I LOVE the fact that the sentiment stays nice and exposed even after the pop-up is revealed! A fun and floral interactive card highlighting the theme for this Love From Lizi March 2021 Card Kit!
That wraps up my 10 Cards 1 Kit post featuring the LFL March 2021 Card Kit! This is certainly a very spring-y collection with a few Easter cards, a number of spring cards, friendship and thank you cards! And not too terribly pink..!!
I did manage to use every stamp in our stamp set! I thought my ‘little stamp garland’ was particularly inspired..! I used 10 of the 12 pattern papers, I believe I used all of the dies in this kit, two of the wood-veneer pieces, a number of stickers and ephemera pieces, ribbons and sequins (gobs more left!). I didn’t use any of the 12″ x 12″ tag cut-apart sheet and I didn’t use any of the pre-tied white bows, but I made a pretty good dent in all the rest. Of course, all my leftovers will find a loving home in my stash!
I really had a great time creating all these cards. Whether you observe Easter, or not, this is a great collection for celebrating spring and sharing a little seasonal rejuvenation with those you love. If you would like my “Gardening is my Dirty Little Secret” ephemera sentiment, send me your request to cardcutups@gmail.com – let me know if you would like the Silhouette file or just a PDF and I’ll gladly share!
As of posting this kit is still available at Love From Lizi, along with most of the add ons and March releases. If I have managed to ignite your imagination or inspired an idea or two, please use my links when you go shopping with Lizi. Thank you so much for that – the help is most appreciated!
Love From Lizi March 2021 Make it Bloom Card Kit: https://shrsl.com/2tftn
Love From Lizi March 2021 Release: https://shrsl.com/2tftq
Thanks for spending some time with me here today! Your support and encouragement warms my heart on these cold winter days… let’s bring on some SPRING! Please remember to Like me, List me, Pin me, Post me, Share me with all your crafty friends… don’t run with gardening shears… I send you and yours warmth and wellness, cheers and chuckles, and as always, Happy Crafting!
DISCLOSURE: This site contains some affiliate links to products. I may receive a commission for purchases made through these links (at no cost to you). As an Amazon Associate I earn from qualifying purchases. Thank you!
