
Hello Folks! Scott here with my 10 Cards 1 Kit Post using the My Monthly Hero February 2021 Kit. We’re taking a trip to Hawaii this month, and, what with a foot of snow on the ground here in NYC (and more on the way), it couldn’t be a more welcome escape!

Our 6″ x 8″ stamp set features a plethora of Hawaiian images; a hula girl, a ukulele player, a palm tree, surfboard, tropical cocktails, assorted animals and plants, a volcano and other scene building elements. We get 21 Coordinating Frame Cuts, and we get a custom roll of washi tape, more of the terrific Sand embossing powder, and six sheets of 8.5″ x 5.5″ card stock – 2 each of Turquoise, Marrs Green, and Coral. Beach, please!
When I get a stamp set like this – featuring a lot of smaller images, I will often just stamp, color, and die-cut all of the stamps just to give my brain a jump-start! I stamped everything using Hero Arts Intense Black ink on Bristol Smooth card stock, and colored all with my Zig Clean Color Real Brush Markers.

I love the Zig markers for these kind of stamps – the brush tips are fine enough to get in every detail! There are no dies for the fish, flowers or the island – I just fussy cut the island and left the others as is.
Since I do challenge myself to use all the stamps in a kit, I often will just pick one of the sentiments and go from there – Lots of pun-y sentiments this month! There’ll be more!
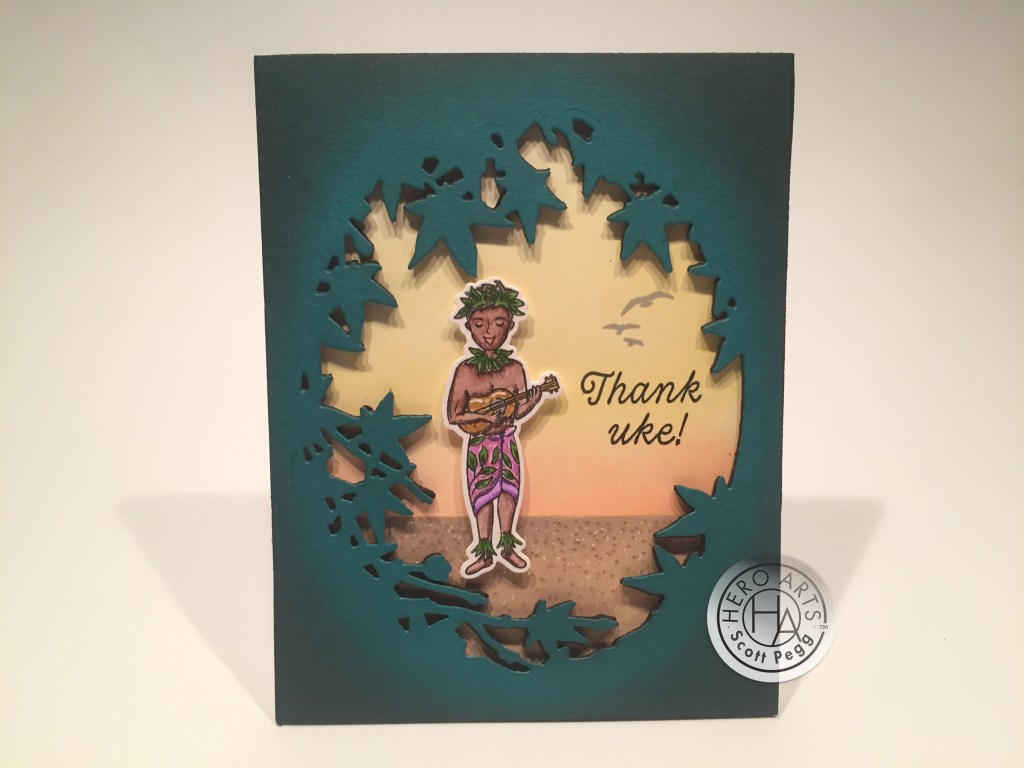
To tell you the truth, I wasn’t looking froward to ink-blending a bunch of tropical sunsets and bucolic ocean vistas… but that’s where I started! I ink blended the background using Frayed Burlap Distress Oxide ink, Hero Arts Creamsicle and Lemon Drop Reactive inks. I added a little sand texture using Walnut Stain Distress Oxide ink and a white gel pen.
I took a piece of the Marrs Green card stock and die cut the leafy opening using the fancy die from the MMH Sept. 2018 kit. I ink blend the edges using Black Soot Distress ink, and die-cut a matching piece of black Fun Foam to add some dimension. I stamped the sentiment using Intense Black ink, and embossed that with some clear embossing powder for a tiny touch of shine. I added the stamped birds (from the MMH April 2019 kit) with Hero Arts Soft Granite ink. Just the right touch to bring the background to life!
I glued the background to a White card base, and glued the leafy foam and card stock on top of that, added my ukulele gent with some foam tape, and there’s our first card! I’m not completely sold on the “uke” pun. As a ukulele player myself, I’ve never referred to my ukulele as a “uke” and rarely hear anyone else use the term either. Ce La Vie! If you’d like to see me playing my ukulele, click here.
I often turn to “still life” arrangements with smaller images and thought this worked well.
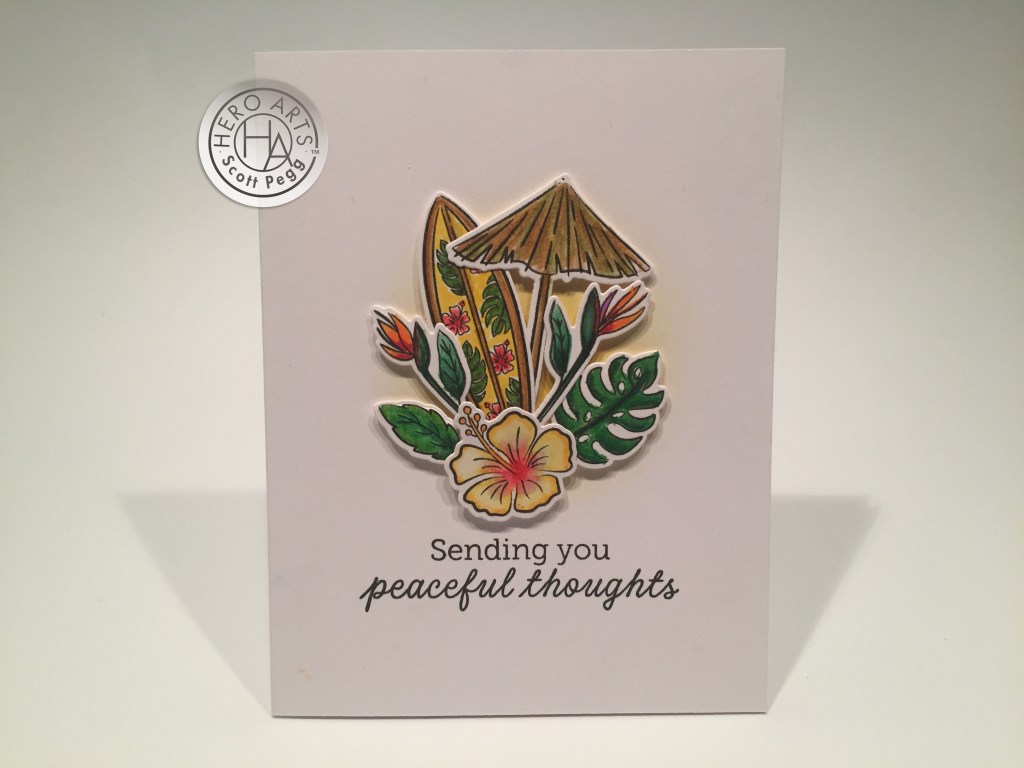
I ink blended some HA Lemon Drop ink in the center of this white card base, and stamped the sentiment using Intense Black ink. Then I simply attached the images using foam tape in a fun arrangement. This feels quite peaceful to me, and it certainly puts me in a tropical frame of mind. “Still Life with Umbrella and Surfboard”!
I’m always happy when I can riff on a sentiment stamp included in our stamp set.
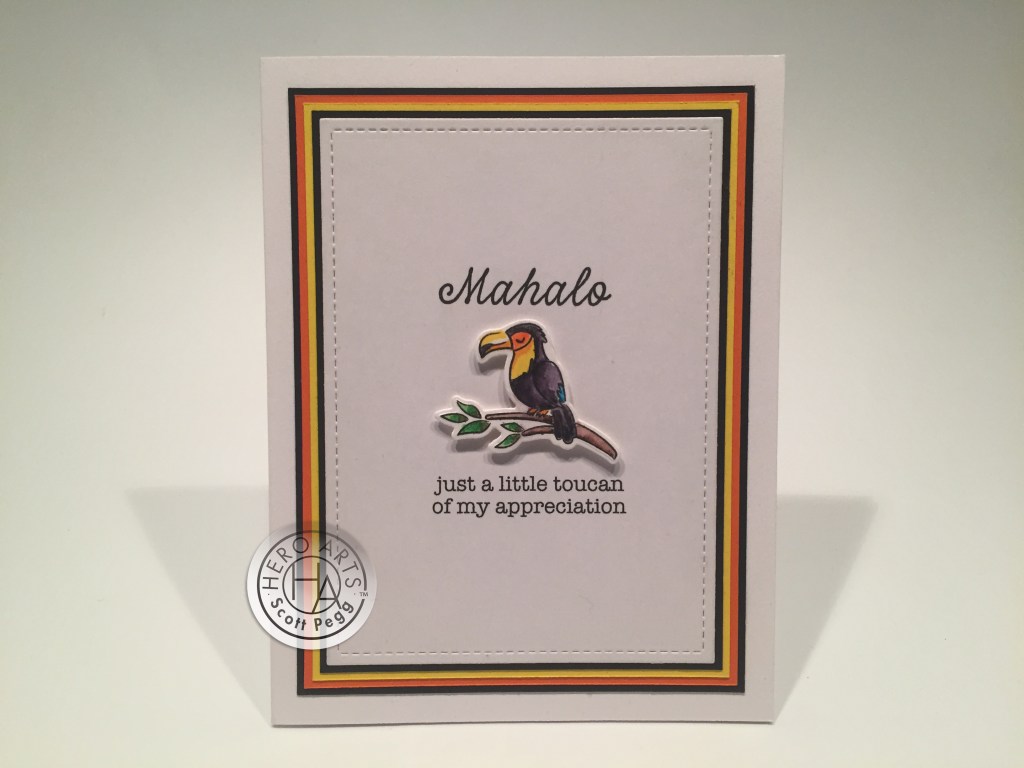
“Mahalo” means Thank You in Hawaiian, and this toucan pun works perfectly with that! I stamped the sentiment with Intense Black ink, and printed the pun using my Silhouette Software and the American Typewriter font. I die-cut that panel with a Lawn Fawn Stitched Rectangle die, and added thin mats in black, yellow, orange black again, and glued the whole stack to a white card base. Add the toucan with some foam tape and we have another pun-y Thank You card! Love those mats and all that white space!
We also have a “Lei” pun with one of our sentiments… seems I should make a Lei then…
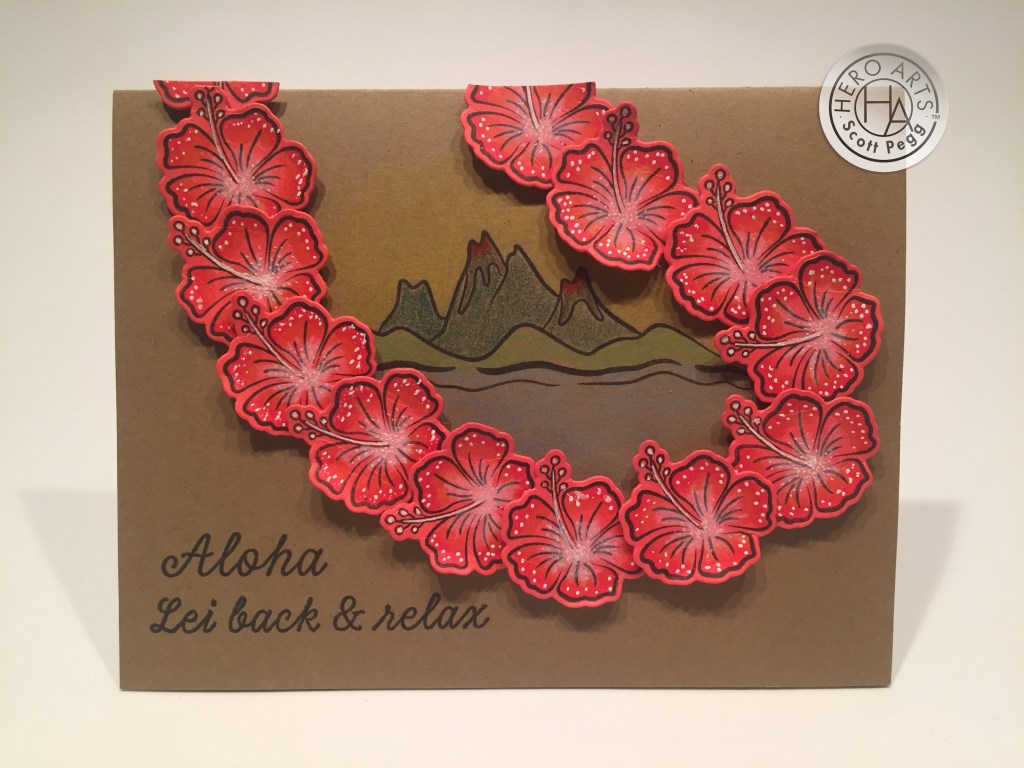
I stamped a dozen hibiscus flowers on the Coral card stock, added a little color to them with my Spectrum Noir alcohol markers, some Hero Arts Unicorn White ink and my white gel pens. I die-cut them all out and arranged them to make our Lei.
I stamped the island and the water lines with Intense Black ink on some Kraft card stock and lightly colored that with my Prismacolor colored pencils. I stamped the two sentiments with the same black ink and mounted the Lei with foam tape. I did add a little ‘curl’ to the flower petals as I attached them, and I really like the dimension that adds. This feels like a retro travel advertisement for Hawaii! Or maybe a hotel greeting card!
We do have one more “uke” pun with our sentiments, so I might as well get it over with..!
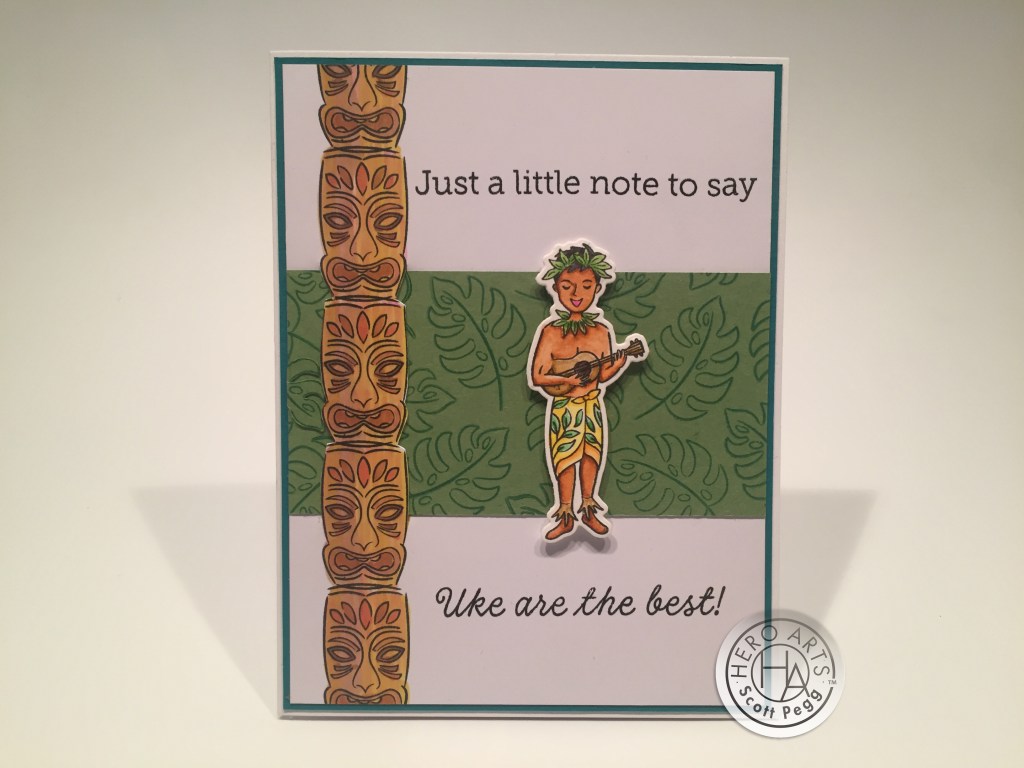
I really like my Tiki Totem here! I stamped 5 tiki’s on top of each other on some Neenah Classic Crest 80# card stock and colored them with my Spectrum Noir alcohol markers. I trimmed that panel down to 4″ x 5.25″ and stamped the sentiments with Intense Black ink and embossed them with some clear embossing powder.
I cut a 2″ piece of Hero Hues Kiwi card stock (from the March 2020 kit) and stamped the monstera leaf all over that piece using some Archival Emerald Green ink. You really do need a permanent ink when stamping in the same color as the card stock. Using my craft knife, I fussy cut the edges of the totem where I wanted to slip the Kiwi piece behind. I glued those two pieces together, trimmed the edges, added a thin green mat and glued all down to a white card base. I added our second ukulele gent with more foam tape. Though stamped and colored the same as all the other stamps, I really like my coloring on this guy. I think the yellow sarong works better than the purple sarong!
I couldn’t help but think of our large and small turtle stamps as a mom and her child…
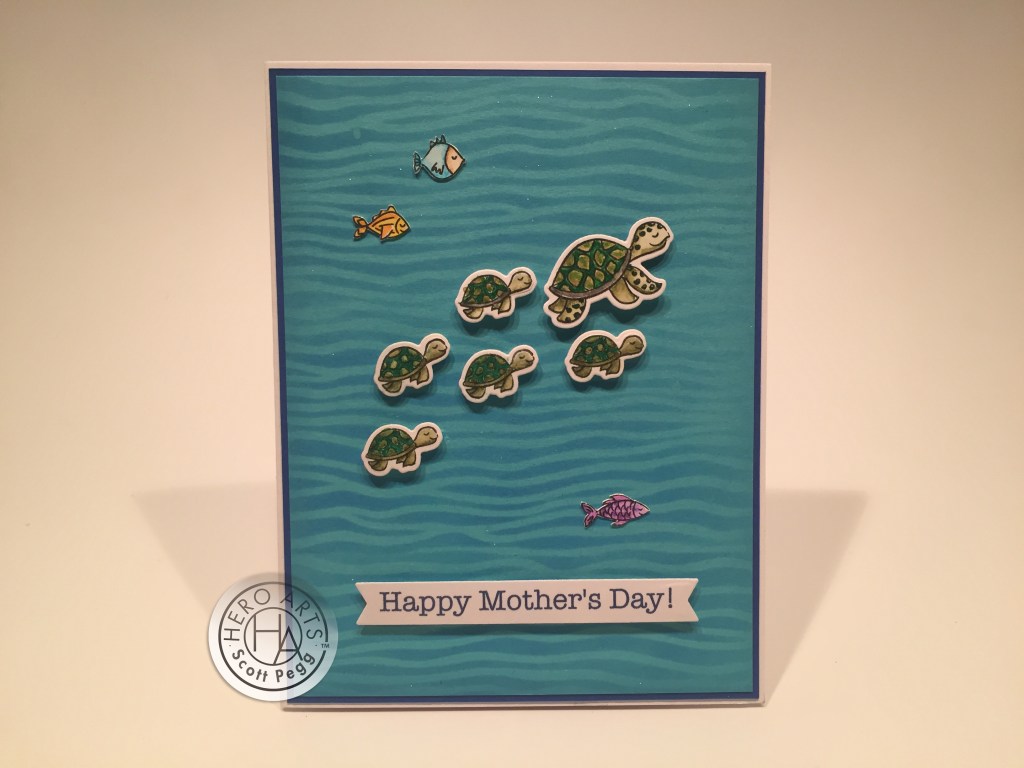
Mother’s Day IS just around the corner! I took a piece of the Turquoise card stock in our kit and stenciled the water ripples using the stencil from the MMH April 2020 kit. I masked off the sky on that stencil and repeated the water stencil three times using Hero Arts Blue Hawaii (how appropriate) Reactive ink. I added a little sparkle to the water with some Sheer Shimmer Craft Spray, let it dry, and trimmed it down to 4″ x 5.25″. I added a thin blue mat behind that and glued those down to a White card base.
I stamped, colored and die-cut 4 more of the little turtles and arranged them on the card front using foam tape. I fussy cut the fishes with my craft knife, and glued them flat to the card front. I printed the sentiment using my Silhouette Software and the American Typewriter font on a scrap of white card stock and die cut that with a Lawn Fawn Everyday Sentiments die and added that to the card front with more foam tape.
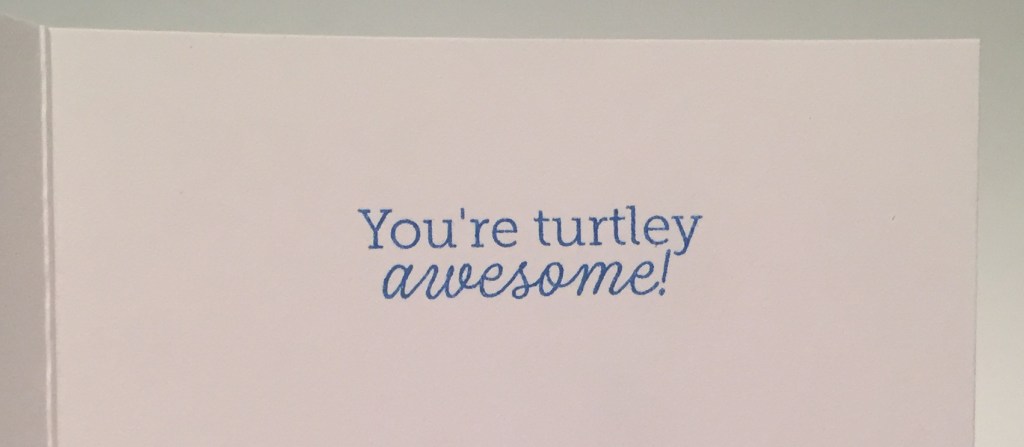
Of course I had to use the “You’re turtley awesome!” sentiment from our stamp set. I stamped that on the inside of this card using the Blue Hawaii ink. This is a terrific pun and a fun Mother’s Day card! Love those little baby turtles..!!
I’m feeling the need for another “still life”… I have lots of images still to use from this kit!
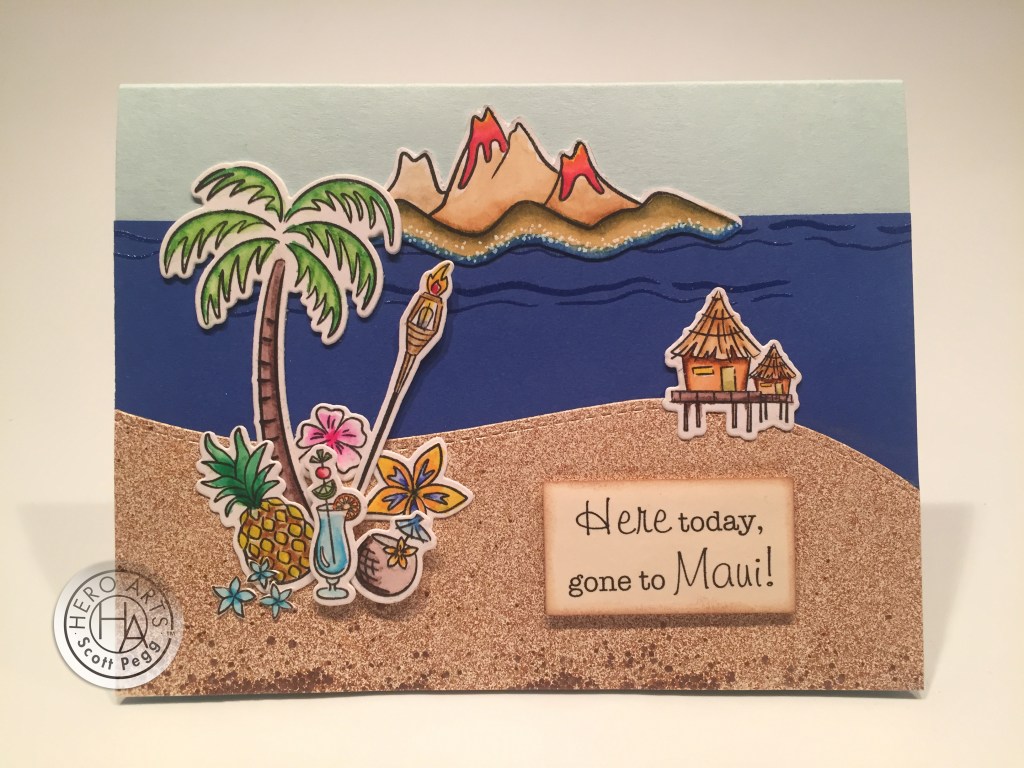
And I haven’t used the Sand Embossing powder yet! I inked a piece of ivory card stock with VersaMark ink, and coved it all with the Sand embossing powder. When that was all melted with my heat gun, I die-cut it with a Lawn Fawn Stitched Hillside Borders die. I cut a 2″ piece of Blue card stock from my stash and embossed the water line stamp on the top edges (a few times) with some clear embossing powder.
I glued those two pieces together and down to a Hero Hues Arctic card base (from the MMH April 2019 Kit). I arranged the colored and die-cut images on the left of the sand with the cocktails popped up on foam tape (note the tiny flowers fussy cut and glued down by the pineapple – matches the tall cocktail!). I added the island and the hut and turned to my Silhouette software to create this pun-y sentiment. Very Hawaii-centric! This uses the Freehand 501 BT font along with the typewriter font. I printed that on a scrap of Ivory card stock, trimmed it to size, ink blended the edges with a little Vintage Photo Distress Oxide ink and added that to the card front with foam tape.
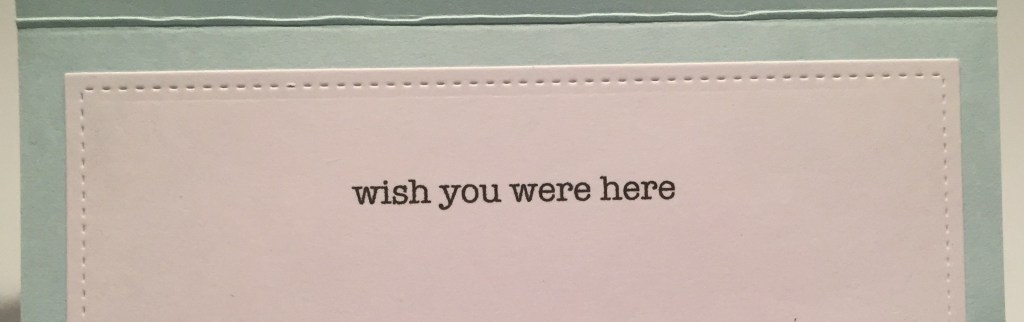
I do try to have a purpose for my cards – a simple pun isn’t always enough for me, so I added this common sentiment on the inside writing surface. Now this is a useful card!
Valentine’s Day is a couple days away, and I simply couldn’t resist this perfectly appropriate Hawaiian pun!
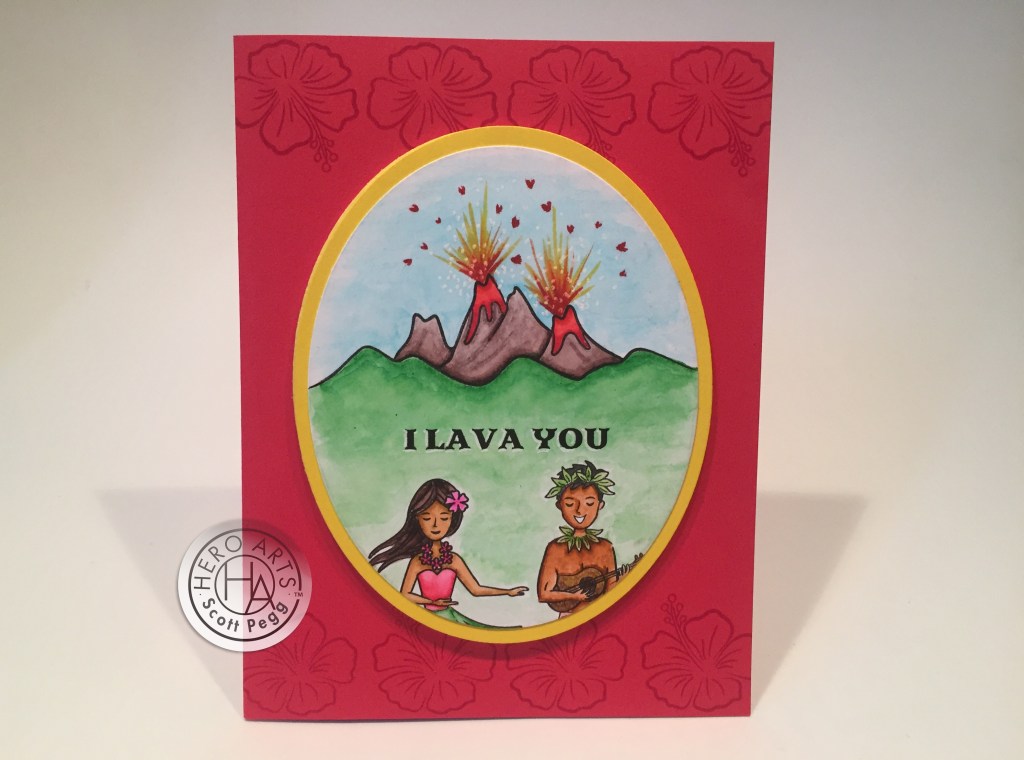
I stamped the island and the kids on Bristol Smooth card stock using HA Intense Black ink and colored this all with my Zig markers. I did do some palette painting with this – putting the markers on an acrylic block and picking up the color with a paint brush – but I was really pleased at the coverage I was able to get with those markers! Very watercolor-y!!
I printed this great pun directly on my painted panel using my Silhouette Software and the Antelope Island font. I die cut the card front and a mat using my HA Oval Infinity dies and glued them together. I took a plain red card base from my stash and stamped the hibiscus across the top and bottom using Vermillion Archival ink. I find using a permanent pigment ink in the same color as my card stock is a quicker way to create a tone-on-tone stamping than waiting for VersaMark ink to dry..! I mounted the card front with a die-cut piece of yellow fun foam for a touch of dimension. I LAVA THIS CARD!
I had another piece of the Sand embossing powder card stock from the Maui card, and another Arctic card base begging to be used!
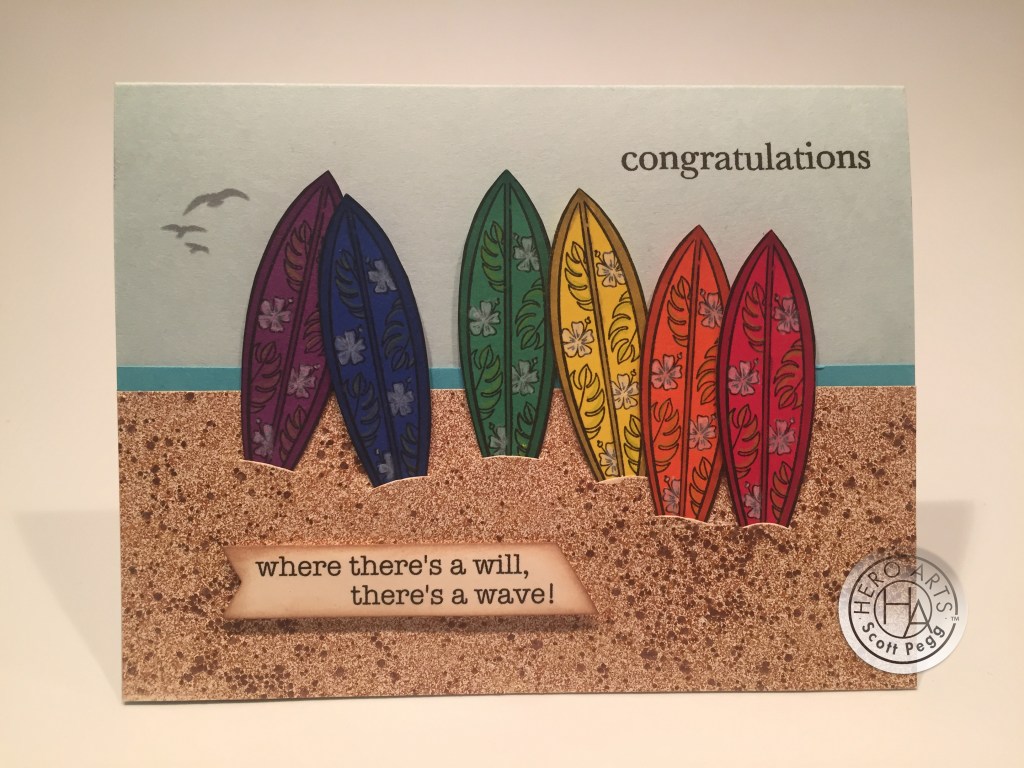
I stamped the surfboard on a rainbow of card stock from my stash, added a touch of color to them all with alcohol markers and colored pencil, and fussy cut them out. I trimmed down my Sand piece to 2 1/8″ tall and backed that with a thin strip of the Turquoise card stock. I cut little slits in the sand to stand my surfboards up, and taped them in place on the back when I was happy with the arrangement.
The “congratulations” is from the HA Many Everyday Messages stamp set, stamped in Intense Black ink on the Arctic card base, and the birds are back with Soft Granite ink. I printed the pun-y sentiment on a scrap of Ivory card stock , die-cut it with another LF Everyday Messages die, inked the edges with Walnut Stain Distress Oxide ink, and used foam tape to mount it in place. I think this is a fun pun and perfect for a congrats card!
I have one more sentiment stamp to use in this kit. A minor pun, but a major card!
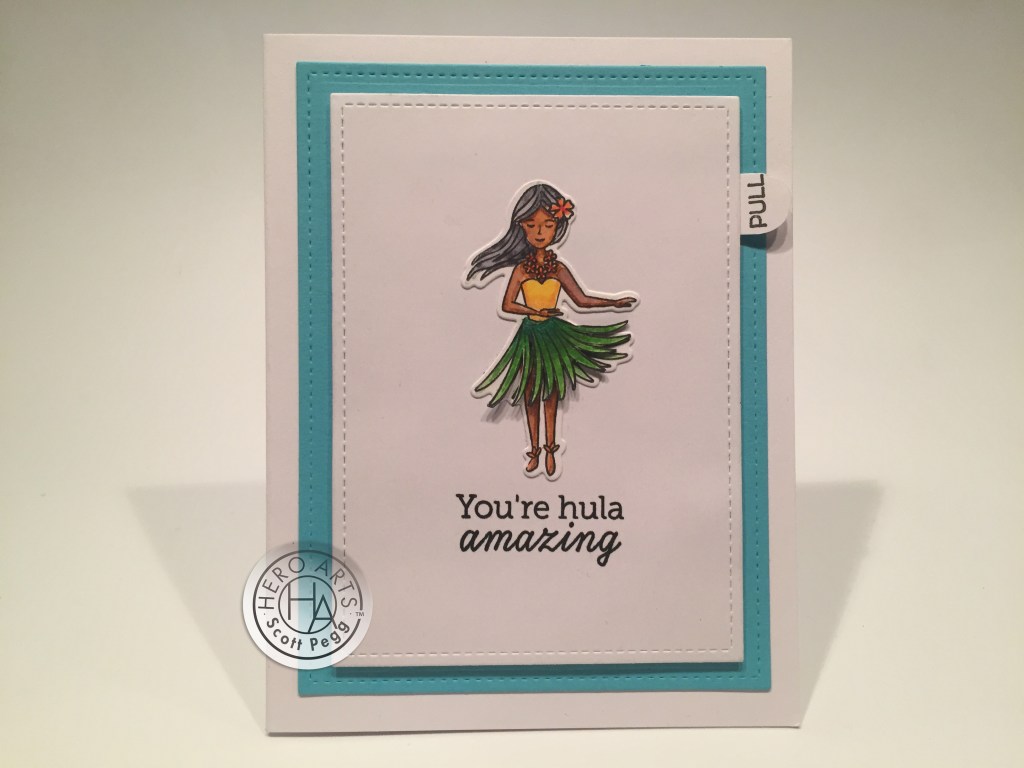
I guess you just HAVE to pair these two together! Thats a Turquoise mat on a White card base and our hula girl with the sentiment stamped in Intense black ink (clear embossed) on a white die-cut panel (LFSRdies). There is a tempting “pull” tab up on the right begging for a little attention…
Hula, hula… Hula hula… This makes me laugh! First I stamped and colored an extra skirt and fussy cut that out using my craft knife. I cut a 1/8″ piece of 110# card stock to be my lever, and cut a matching slot just below the waistband on the die-cut girl. I positioned her on the sentiment panel and copied that slot to the card front, and cut that out too.
I glued our hula girl to the card front and slid the 1/8″ lever through the slot – just enough to stay hidden behind the skirt. Then I glued the skirt to the lever matching the skirt position on the girl. I cut a 1/2″ piece of 110# card stock to be my pull tab. I positioned the pull tab where I wanted it, and punched a hole in the pull tab where the lever crossed, then fed the lever through the hole and folded it back on itself. That holds the lever in place while allowing the tab to move back and forth. Then it’s a matter of using foam tape on the back of the panel to create a path for the pull tab and room for the lever. I have a pretty good how-to for this card in my corresponding 10 Card I Kit video on YouTube – I think it explains the assembly nicely! This card is hula amazing! Love it!
That’s my 10 cards created with he My Monthly Hero February 2021 Kit. A bright, bold, colorful batch of cards sure to break through anyone’s winter doldrums!

We have a pretty good variety of useful cards here! A Valentine, Mother’s Day, Congrats, Thank you cards and more! I did manage to use every stamp and die in this kit and a lot of the card stock. I did use the embossing powder but I seem to have forgotten the washi tape. I’m not much of a washi tape crafter so I literally forgot about it till I was done. I contemplated adding it to a card until I realized the blooms on the washi tape are quite pink. I don’t have any quite pink cards here, so I’ll just add that roll to my stash!
I had so much fun with this kit without actually having to ink blend endless tropical horizons! Yea! Let me know which card(s) are your favorite! This kit is still available at Hero Arts, along with a lot of the coordinating releases! If you do go shopping with Hero Arts, please use my links… it is always greatly appreciated! Thank you!
I do have an extra kit this month for a free giveaway!! To enter, send an email to me before March First at cardcutups@gmail.com and tell me if you’ve ever been to Hawaii! I’ll announce the winner in my March video!
Hero Arts: https://shrsl.com/1f7qx
My Monthly Hero February 2021 Kit: https://shrsl.com/2scpx
Hero Arts February Release: https://shrsl.com/2se72
Thank you so very much for sharing your time with me here. Remember to Like me, List me, Pin me, Post me, Share me with all your friends (Hawaiian and otherwise!) Don’t run with scissors…! I send you and yours Healthy Wishes and Cheerful Thoughts, and, as always, Happy Crafting!
DISCLOSURE: This site contains some affiliate links to products. I may receive a commission for purchases made through these links (at no cost to you). As an Amazon Associate I earn from qualifying purchases. Thank you!

Scott, Uke are hula amazing. It’s hard to pick just one favorite. I really like the lei you created around the volcano, but that last card with the hula skirt swaying in the breeze – awesome! Thanks for a great video and so much inspiration.
LikeLike
OMG! These are punalious! I think tees are most favorite set of cards yet, or maybe I just wish I was in Hawaii. It is 7 degrees here in KC today. Thanks for warming up my heart!
LikeLike
Thanks Sarah!
LikeLike