
Hello Folks! Scott here with a new 10 Cards 1 Kit posting featuring the Love From Lizi January 2021 Card Kit. This is Lizi’s “Fresh Start” kit and it features lots of florals and a palette of soft colors to welcome in the new year and encourage a Fresh Start for us all!
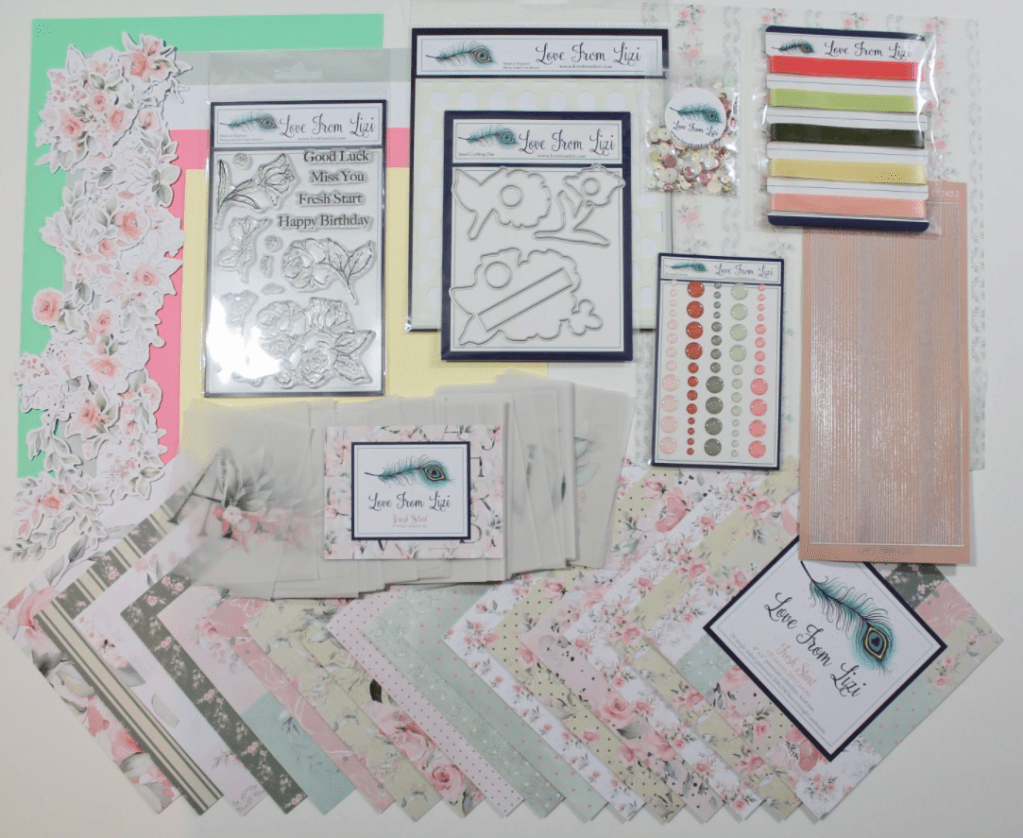
I did take the colored card stock in the kit and cut them in half to make my card bases. Sometimes the color of the card base is all that’s needed to inspire a card from me!
We had a very interesting sheet of pattern paper that was a cut-apart sheet but with three different panels instead of 4, 6 or 9… and two of those panels featured a highlighted section. This piece caught my eye to begin with, and influenced my first card.
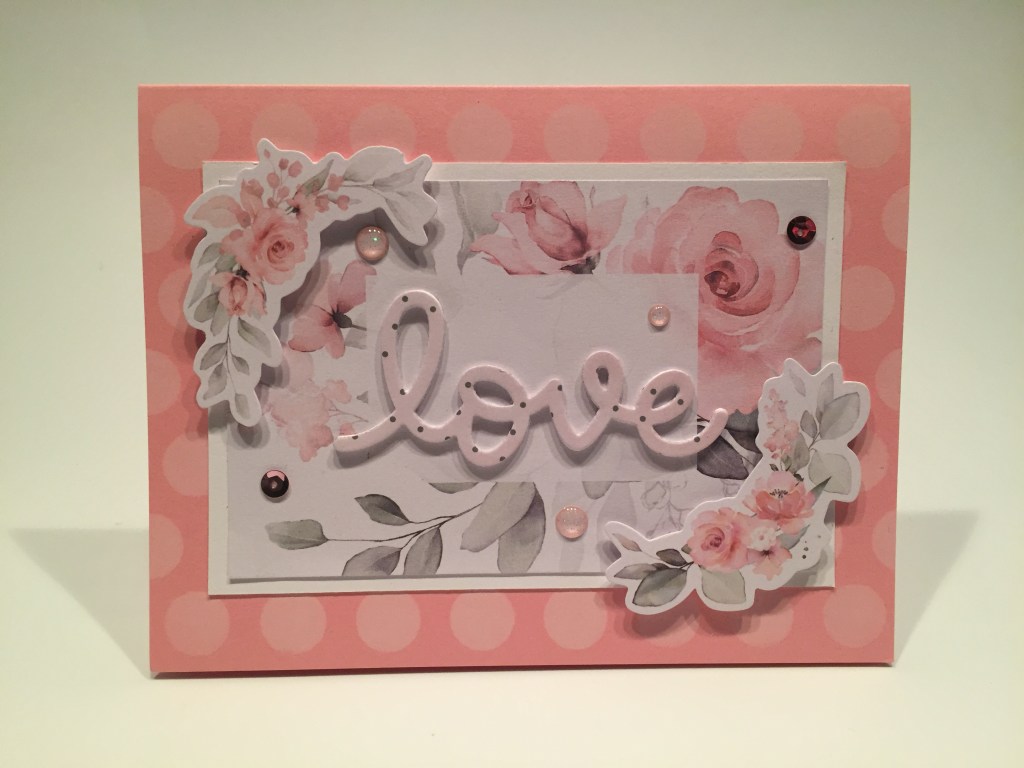
This panel from our cut-apart pattern paper measures just over 4 1/4″ x 2 7/8″. I cut a white mat to go behind that panel at 4 5/8″ x 3 1/8″ and glued the two together. I inked up the Poker Stencil from the kit on the Bright Pink card base using Hero Arts Unicorn White pigment ink – I think that adds a touch of whimsy to this rather formal floral valentine.
I glued the matted panel to the card base, added two ephemera floral pieces with foam tape and grabbed my Lawn Fawn Scripty Love die for the sentiment. I die cut that from white card stock three times and glued those all together and topped that off with one more die cut from the soft pink dotted pattern paper. I glued that chunky sentiment to the card front, added some of the soft pink Glitter Enamel dots and a couple pink sequins for some sparkle and bling. A very traditional Valentine’s Day card. ‘Tis the season!
I was looking at our stamp set and pattern papers, and realized that one of the bloom stamps was the exact same size as the matching white bloom on the pattern paper.
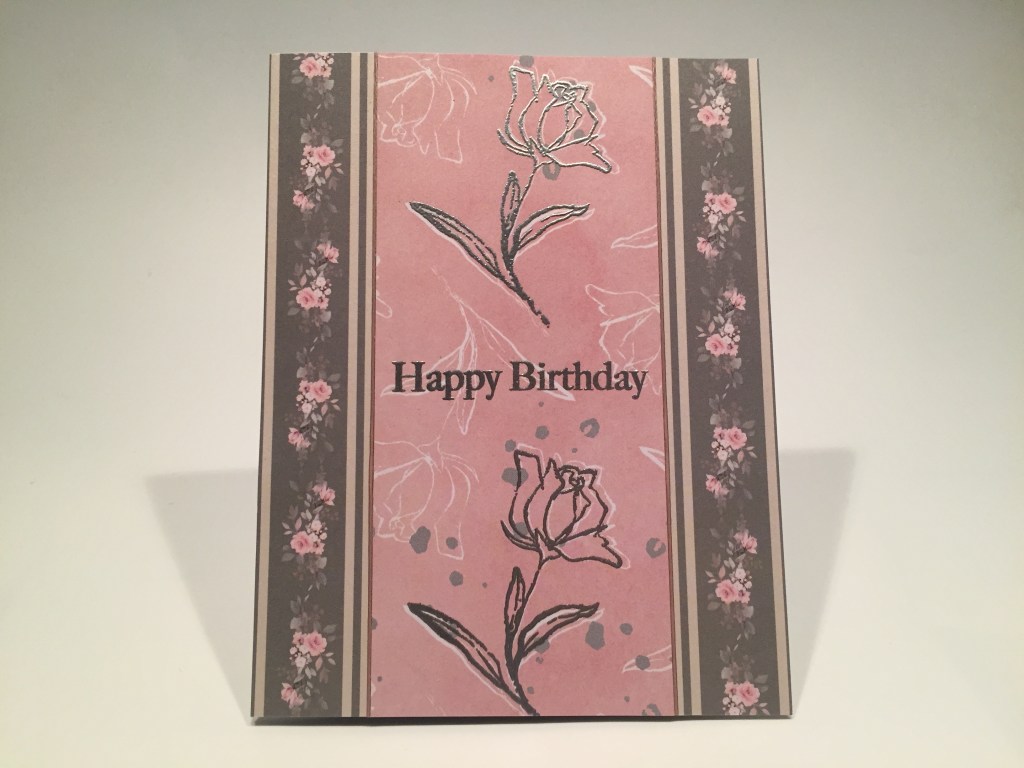
I found the perfect spot on that pattern paper to stamp the flower on top of the pattern using VersaMark ink and embossed them with the LFL Silver Dollar embossing powder. Then I did the same with the Happy Birthday sentiment stamp. I trimmed that down to 2 3/8″ x 5 1/2″, and added two strips of the ‘wallpaper-y’ pattern paper on the two sides – both cut to 15/16″ x 5 1/2″ – you can cut them to 1″ wide and hide the edges under the center panel. I glued the pattern papers to a Soft Grey card base and added two thin Mink Mirror peel off strips to the edges of the center panel. That’s all the extra shine needed on this Birthday card – that Silver Dollar embossing powder is super shiny and I love the fact that the stamp is the exact same size as the bloom on the pattern paper.
I was looking forward to doing some coloring this month, so I stamped all three of our floral stamps on a piece of Bristol Smooth card stock with VersaFine Onyx Black ink.
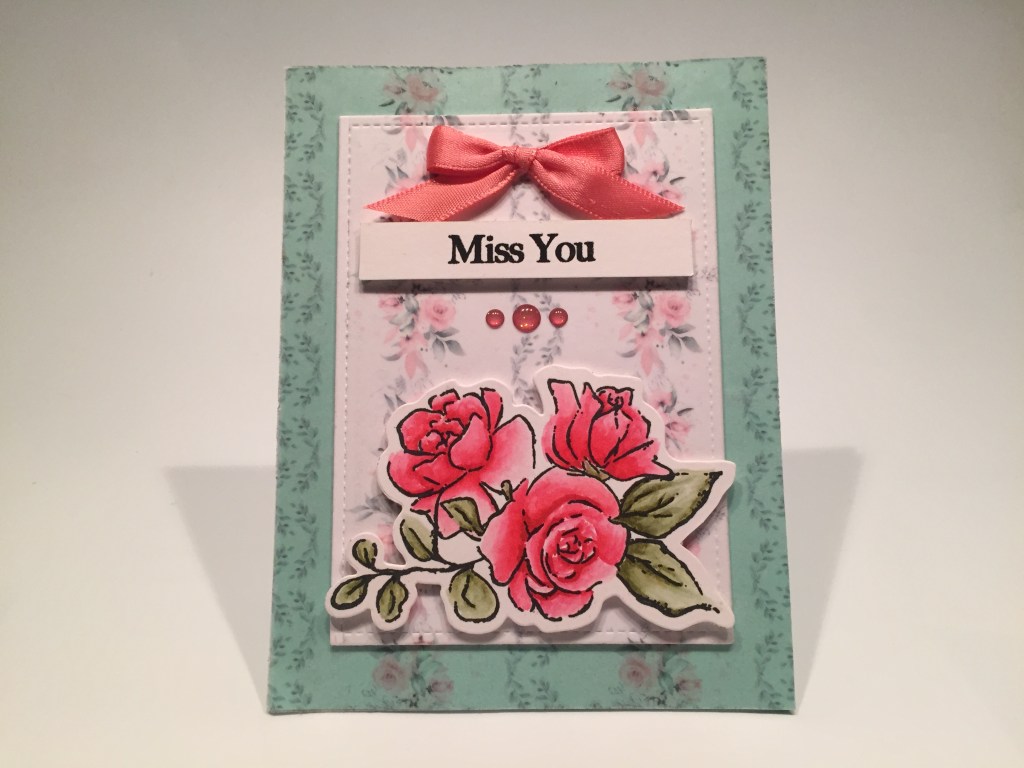
I colored this arrangement using Crimson Red and Olive Green Zig Clean Color Real Brush markers, and die cut it with the matching die. I took our printed vellum sheet and cut it into four card size panels (4.25″ x 5.5″), and chose one that had the pattern nicely centered. I die-cut the middle of that vellum panel with a Lawn Fawn Stitched Rectangle die, ran that through my Xyron sticker maker and glued that to a scrap of white card stock. Then I die cut the card stock to the same size, and glued two layers of matching white card stock behind that for a thick dimensional panel.
I ran the leftover ‘frame’ of the vellum through my sticker maker all on its own, and carefully glued that down to my Mint card base. I glued the white panel to the center of the ‘frame’, and mounted the colored bouquet with foam tape. I stamped the sentiment using VersaFine Onyx Back ink on a strip of white card stock (a touch wider than our included banner die), embossed that with some clear embossing powder, trimmed it to size and added that to the card front with foam tape. A simple bow from our ribbon pack and some Glitter Enamel dots adds a finishing touch. I LOVE that the vellum pattern matches across both layers of the card front. And I miss so many people these days…!!
Those Vellum Alphabet tiles were calling my name and I wanted to see what could be done with them. A simple monogram card seemed the best option to start with!
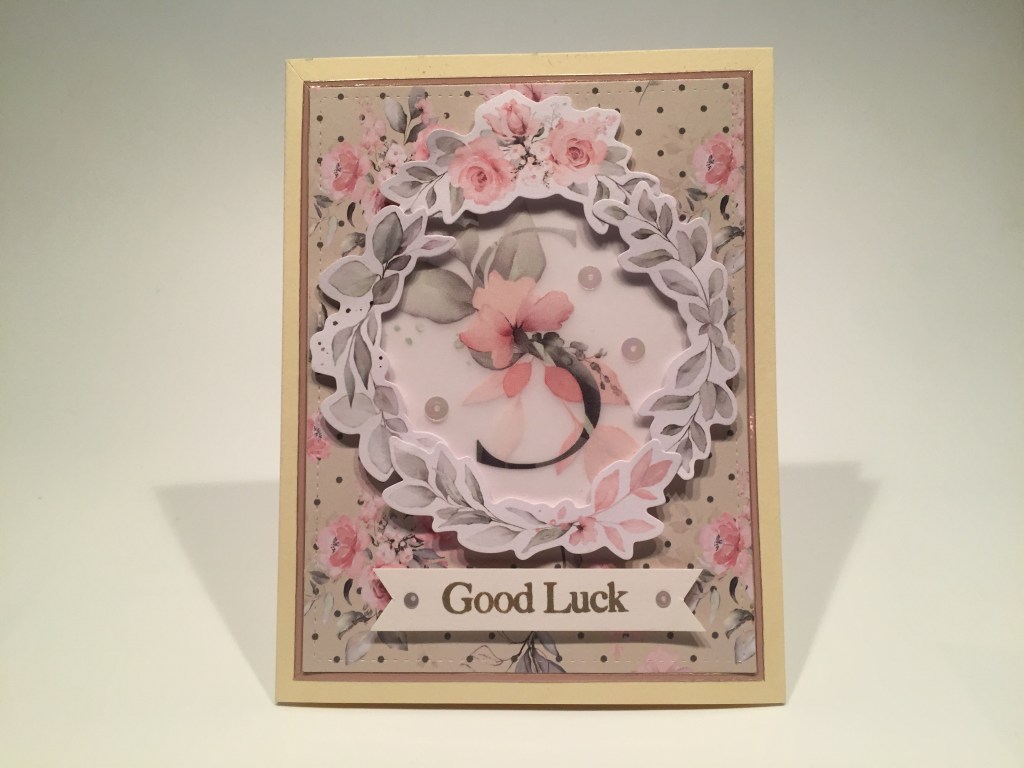
I picked four ephemera pieces that formed a properly sized wreath around the vellum “S”, picked a corresponding circle die to fit (3″), and cut a scrap of white card stock to go behind the “S”. I glued the “S” tile to the white circle on the edges, and trimmed the excess vellum away. I die-cut the pattern paper background with another Lawn Fawn Stitched Rectangle die, and glued that to one of the Cream card bases. I outlined that panel with the large Mink Mirror peel offs and mitered the corners with my craft knife.
I glued the monogram on white circle to the front of the card and added the ephemera pieces using foam tape. I stamped the sentiment on another strip of white card stock (still a little wider than the die in our kit) using Frayed Burlap Distress Oxide ink and embossed that with clear embossing powder. I trimmed that into a banner and foam taped it to the card front. A few sequins from our sequin mix add more sparkle, and I think this is a great encouragement card for a friend embarking on anything new – as long as they have an “S” name!
I love bright colors, and wanted to see if I could use this kit to create a card (or two) that reaches beyond the soft color palette in this kit and gives us all a bright pop of color.
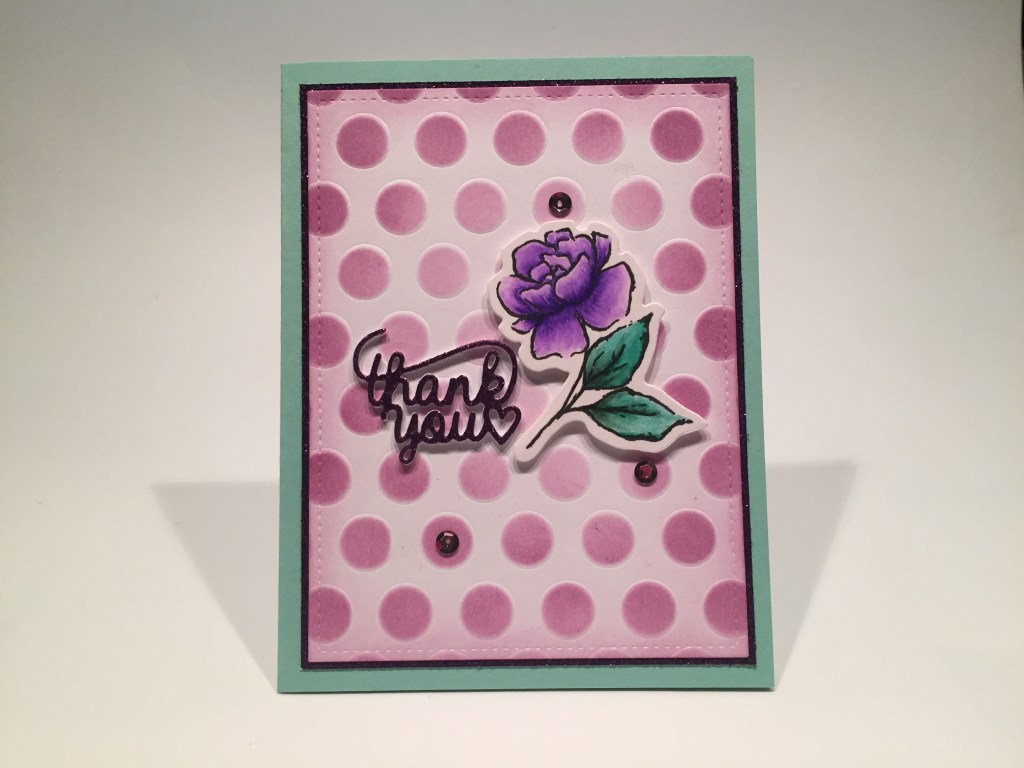
Poker Stencil to the rescue! On a panel of white card stock, I inked (and dry embossed!) the stencil using Seedless Preserves Distress Ink – keeping the center of the panel a little lighter than the edges. I die-cut that panel with a LFSRdie and added more ink blending to the edges. I glued that panel to a mat of purple glitter card stock from my stash, and glued that to the other Mint card base.
I colored this stamped bloom with Violet, Green and Deep Green Zig markers, die-cut it with the matching die, and mounted it to the card front with foam tape. I took an old “thank you” die (from the LFL December 2018 Card Kit) and die-cut it three times from white card stock and once from the purple glitter card stock. I glued them all together for a nice chunky sentiment, and glued that to my card front. A few of the pink sequins (they look purple on this card!) add a little more bling, and we end up with a bright, colorful thank you card! I think that Poker stencil will come in quite handy over the years!
I have one more bloom from our stamp set left to color, and I got a new Tonic Studios Scalloped Square Layering Basics die set for Christmas that I was dying to try out!

I colored the bloom with Pink, Light Pink, and Pale Pink Zig markers and die cut that with the matching die. I took the other printed vellum panel with the centered pattern and ran that through my Zyron sticker maker and glued it down to a white card stock panel. Then I took the 3 3/4″ scallop die and die-cut the panel into a rectangle by partially die cutting both ends of the square die. The scallops matched up perfectly! I’m not a huge fan of scallop dies but this set features very small scallops – I like that quite a lot! I glued that panel to the front of the Bright Pink card base.
One of our pattern papers matched the printed vellum with the exception of another floral stripe instead of the greenery stripe on the vellum. I die-cut a 2 3/8″ scallop square of that pattern paper matching the center stripe to the center of the (turned 45 degrees) scallop die. I matted that on a 2 1/2″ square of white card stock and foam taped that to the upper portion of the card front, and foam taped my bloom on top of that.
This card felt like an anniversary card to me (4th Anniversary is Fruit or Flowers), so I dug out this sentiment from my Hero Arts Many Everyday Messages stamp set, stamped it on a scrap of white card stock with Onyx Black ink and embossed it with clear embossing powder. I did die-cut this sentiment with the included banner die. This sentiment is a little bit longer than the die so I used partial die-cutting to extend the die to fit this stamp. I mounted the sentiment banner with foam tape and added a couple glitter enamel dots for a little highlight. Again, I love that the floral stripes on the background match the floral stripes on the diamond. A lovely Anniversary Card!
I thought it would be fun to see if I could use the Poker stencil to add a little more detail to some of our plainer pattern paper – and I wanted to use some of those tiny stamps too!
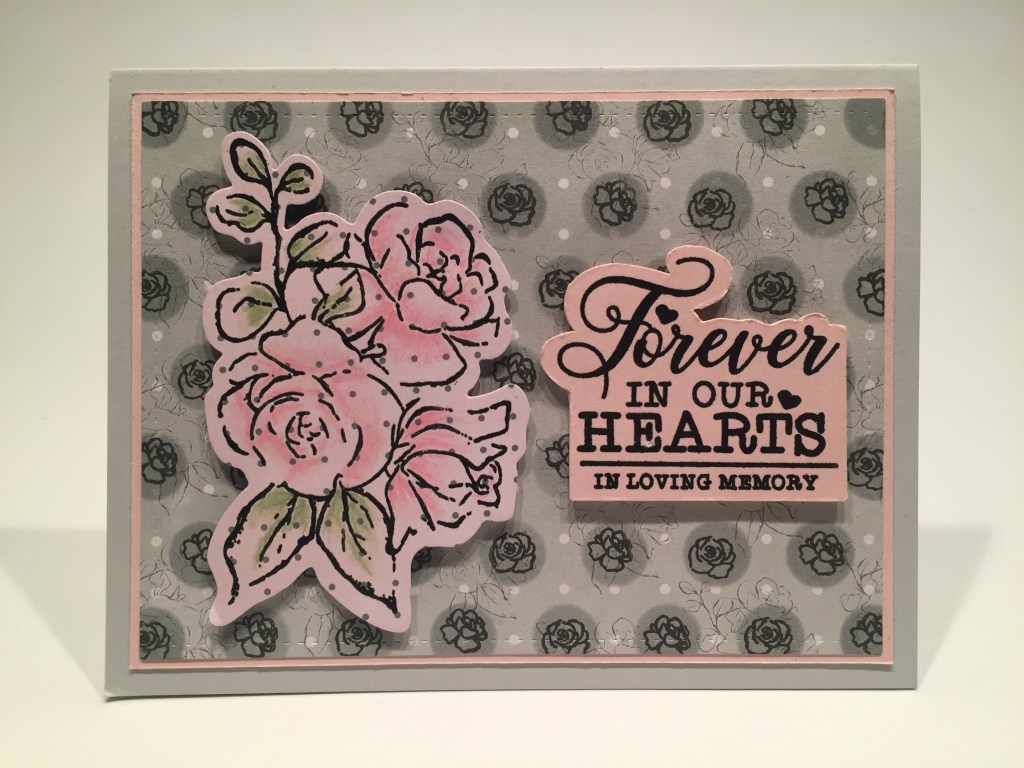
I took the sheet of green pattern paper with the white dots and floral sketches and stenciled the Poker dots on top using Iced Spruce Distress Oxide ink. Then I took the two tiny bloom stamps and stamped them in the dots using Onyx Black ink. I think that’s very interesting and changed the tone of that pattern paper completely! I die-cut that with a LFSRdie and matted that to a piece of Hero Hues Peony card stock before gluing both down to the Soft Grey card base.
I stamped the bouquet stamp on the light pink dotted pattern paper with Onyx Black ink and embossed that with clear embossing powder before die-cutting that with the matching die. I added light touches of color to that stamp using my colored pencils and added that to the card front with foam tape. I dug out this sentiment from the “Heaven Held” add-on stamp set from June of 2019, stamped that on more Peony card stock and embossed it with clear embossing powder. I fussy cut the sentiment and mounted that with foam tape. This card is kind of a racket of dots, but this works so very nicely as a sympathy card!
I still wanted to try and spell something with the vellum Alpha tiles, but realized that I’d have to do some fussy-cutting to make that work…!
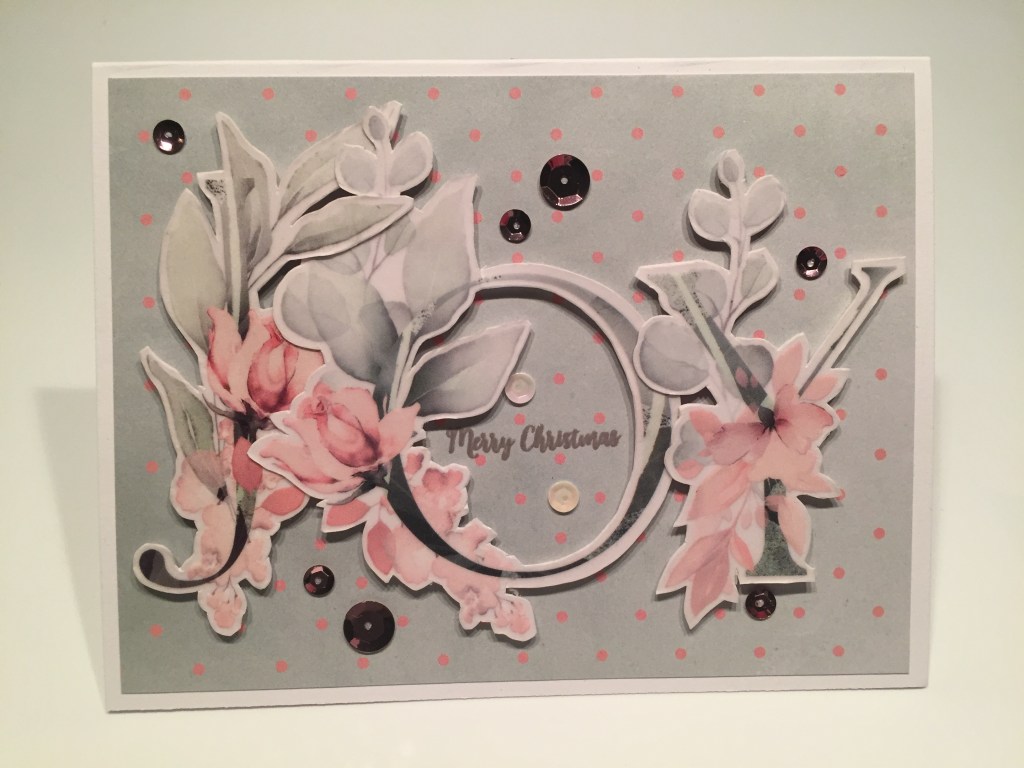
I ran the “J”, “O”, and “Y” tiles through my sticker maker and glued those to some white card stock and proceeded to fussy-cut them out. A little detailed, but not horribly difficult! I cut the background pattern paper to 4″ x 5 1/4″ and glued that to a white card base. I glued the letters together where they overlapped and figured out where they would mount to the card front. This gave me enough room to stamp the “Merry Christmas” sentiment (from the LFL November 2017 Card Kit) inside the “O” using Hickory Smoke Distress Oxide ink and I went ahead and embossed that with some clear embossing powder. I mounted the “JOY” with foam tape, added a nice assortment of sequins, and we have a very classy, very formal Christmas card!
I was trying to figure out some way to use the three circle dies included in our die set, and finally came up with a New Years card – it WAS December 31st when I made this card!
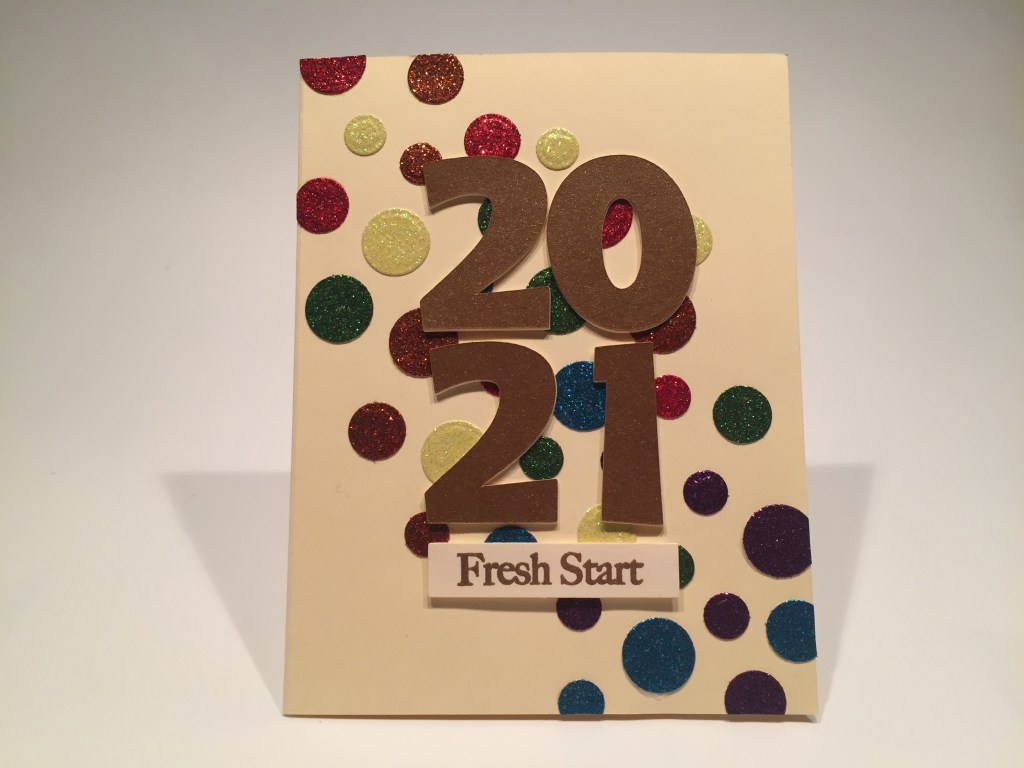
I die-cut all these confetti circles using the three dies in our kit and my Glitter Silk card stock, and arranged them on my last Cream card base. I turned to my Silhouette Portrait to cut the “2021” (using the Stars and Stripes Silhouette font). These are right at 1.5″ tall – any large number die would work as well! I cut three layers from some Ivory card stock in my stash (good match to the Cream card base) and the top layer from some old Auburn Pearl card stock. I glued all four layers together and then glued them to the card front.
I stamped the sentiment on a scrap of Ivory card stock using VersaMark ink and embossed that with LFL Copper Rose embossing powder. I die-cut the sentiment with the banner die in the kit, trimmed the edges a bit and mounted that with foam tape. This feels like a perfect use for the “Fresh Start” sentiment, though I will have to use this card soon or it will become obsolete in just a month! Feels like a party to me!
Lizi almost always includes some of her super-smooth alcohol-friendly White card stock in her kits. I thought I would put that card stock to good use and color that fun bouquet stamp using my Spectrum Noir alcohol markers.
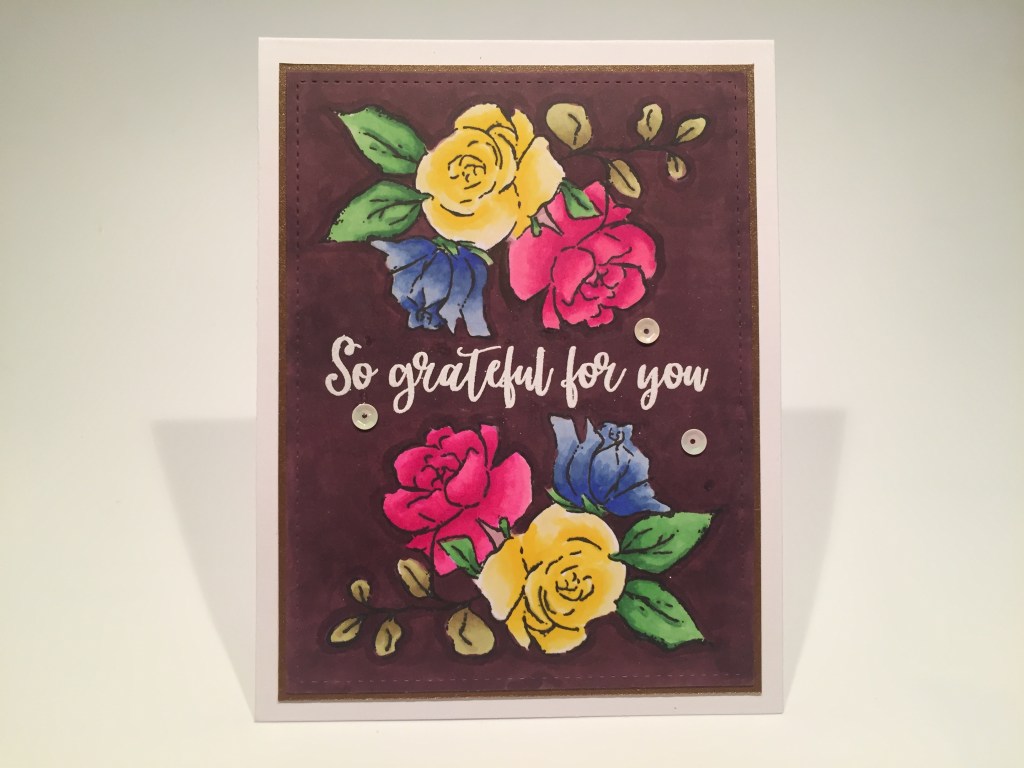
I took a panel of Lizi’s White card stock, stamped the bouquet on the top and bottom using Onyx Black ink, and colored the whole panel using my alcohol markers.
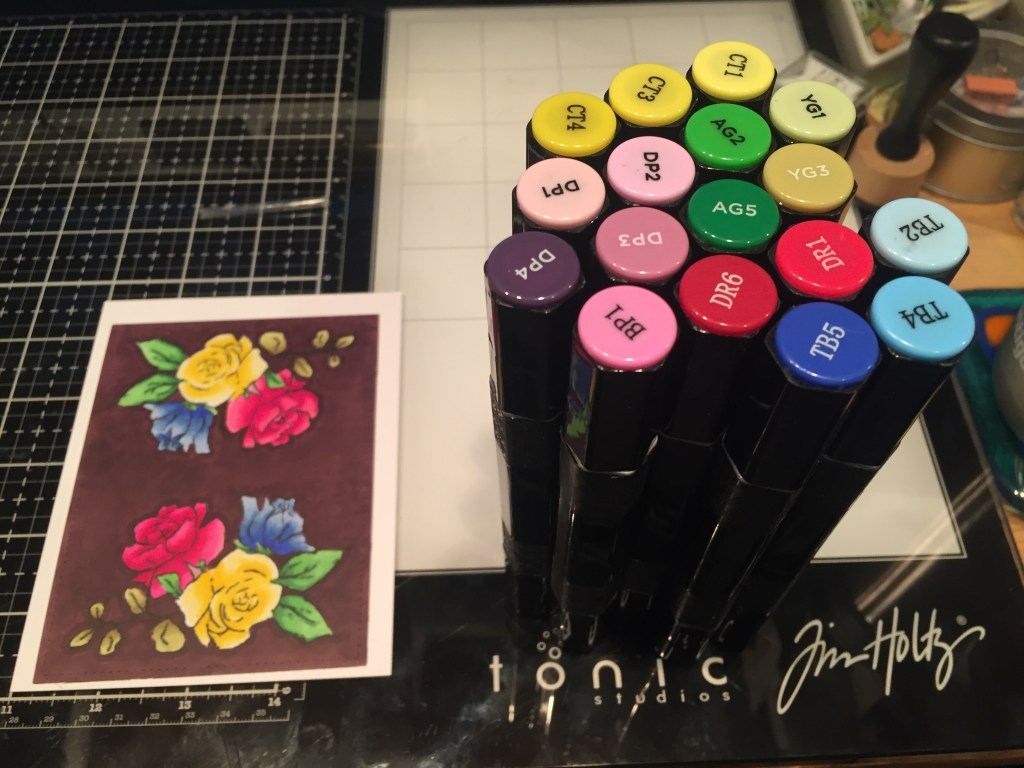
I tried to keep this fairly simple yet brightly colored. Here are the markers I used to color this card front. At first, I considered leaving a white background, but finally decided to color in the background using the Dusty Purple alcohol markers.
This is one of the few times I have tried filling in a background with my Spectrum Noir markers and I am very pleased with how well it came out! It did take a little time (and a lot of ink) to achieve this background, but I think the final result kind of looks like leather. And the colorful bouquet certainly pops! I die-cut the panel with a LFSRdie and glued that to a thin Auburn Pearl mat and then down to a white card base.
I stamped the sentiment (from the LFL September 2019 “Warm Thanks” Card Kit) with VersaMark ink and embossed it with some White embossing powder. A few sequins from our mix finish out this fun colorful card. A lovely thank you for someone who has done you a great service – this year or any year! I am still striving to be a little more brave with my alcohol markers and this card pushed my comfort zone a little bit more…! Love it!
That’s my 10 cards using the LFL January 2021 “Fresh Start” Card Kit. I was initially hesitant to dig into this kit… so many florals and so much pink… but I persevered and am very pleased with the wide assortment of cards I was able to create.
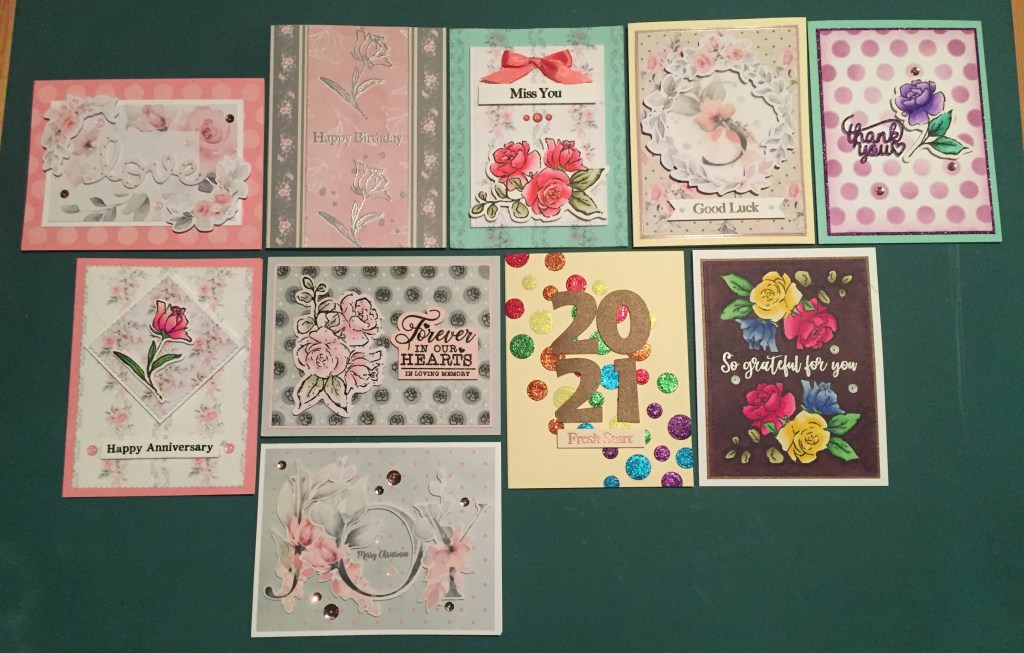
We have a Valentine, a couple of thank you cards, a Happy Birthday card, Miss You card, encouragement card, anniversary card, sympathy card, Christmas card, and a New Year’s card. I am kind of amazed that this kit would generate so many different kinds of cards – I do think that is one of the advantages of this months offering – you can make almost any kind of card! And this group doesn’t feel too awfully pink to me… coloring the stamps is one way to bring some different colors into the mix!
I did use a little bit of everything in this kit… I used all the stamps except for the two tiny leafy stamps, I used 8 of the 16 pattern papers, I used the stencil 3 times, I used four of the Alpha tiles, half of the vellum sheet, ALL of the dies, some pieces of ephemera, some ribbon, some sequins, some enamel dots, and some of the new Mink Mirror peel offs. Feels like I put this kit through it’s paces this month! This is a great kit for making almost any type of card – from a monogram birthday to a sweet sympathy card this kit can become almost anything you ask it to be!
At posting, this kit is still available! If you do go shopping with Lizi, please use my links:
Love From Lizi January 2021 Card Kit: https://shrsl.com/2ox2p
LFL January Release: https://shrsl.com/2pjo7
If you would like to subscribe to the monthly Love From Lizi Card Kits:
LFL Subscription in the US and Canada: https://shrsl.com/23usr
LFL Subscription in the UK: https://shrsl.com/2b1ev
LFL Subscription in the EU: https://shrsl.com/2b1es
LFL Subscription Worldwide (EXCEPT US Canada and EU): https://shrsl.com/2b1ey
Thank you so much for sharing your time with me here, and for your continued support and encouragement – It is always supremely appreciated! I send you and yours all my blessings for a happy and healthy New Year! Please remember to Like me, List me, Pin me, Post me, Share me with all your crafty friends… Don’t run with scissors… and as always, I wish you Happy Crafting!
DISCLOSURE: This site contains some affiliate links to products. I may receive a commission for purchases made through these links (at no cost to you). As an Amazon Associate I earn from qualifying purchases. Thank you!
