
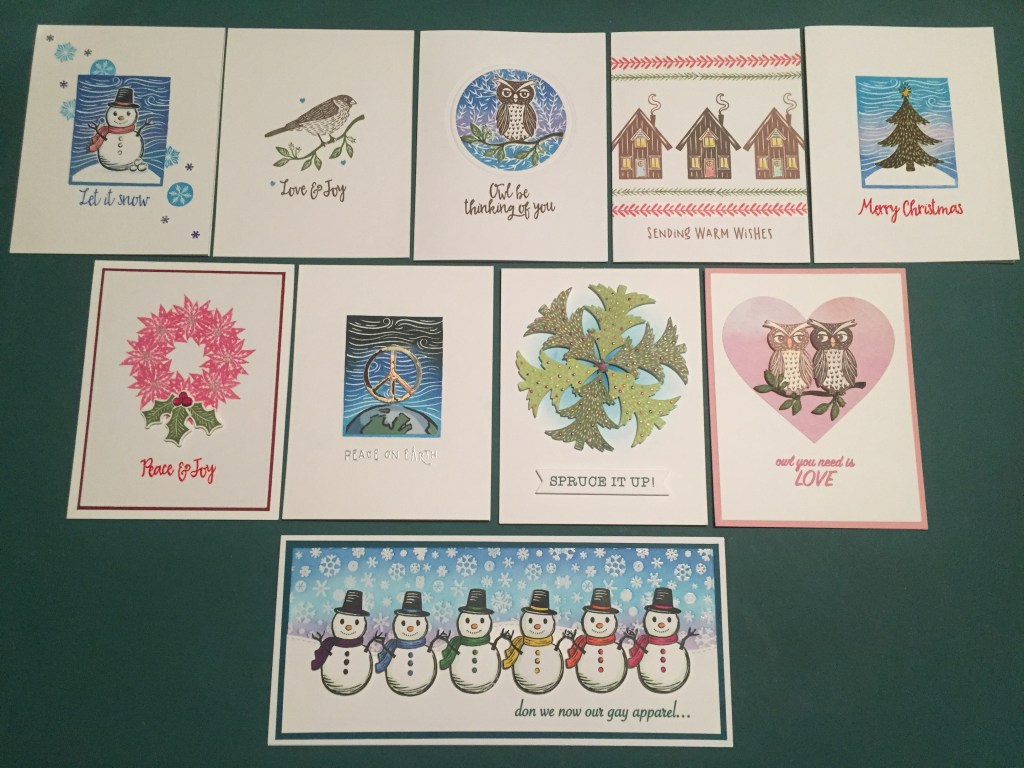
Hello Folks! Scott here with my 10 cards created with the MMH November 2020 kit. This kit is inspired by classic linocut art which I remember doing in High School art class. Carving on the back of linoleum a negative image to make a positive stamp – kind of the poor man’s wood block printing! And we get new Masking dies!
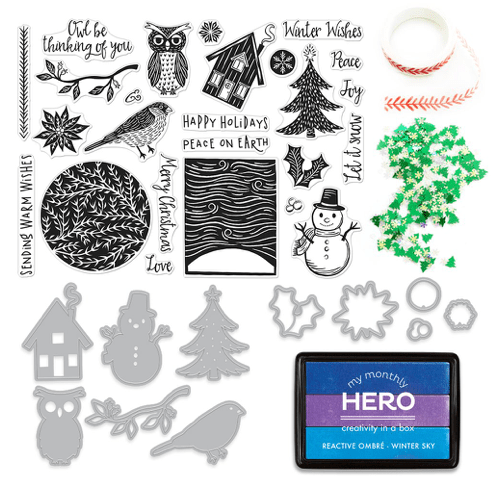
Our 6″ x 8″ stamp set features all these great block print images and 2 backgrounds along with 10 sentiments, an ampersand and a short leafy border. We get 5 coordinating Frame Cuts and 6 coordinating Masking Cuts – those dies will cut out the stamped images right on the outline – no white border! That means you can stamp your image, die-cut a mask, mask your stamped image and stamp a background on top – preserving your original stamp. That’s amazing!
We also get a new Ombre stamp pad – “Winter Sky” (Blue Hawaii, Thistle, and Splash Reactive ink colors). A roll of Red Vine washi tape and a pack of Winter Forest sequins. This looks like fun! Obviously others think so too… this kit has sold out already!
I decided to dive in and start layering right away – it seems that this kit is begging for it!
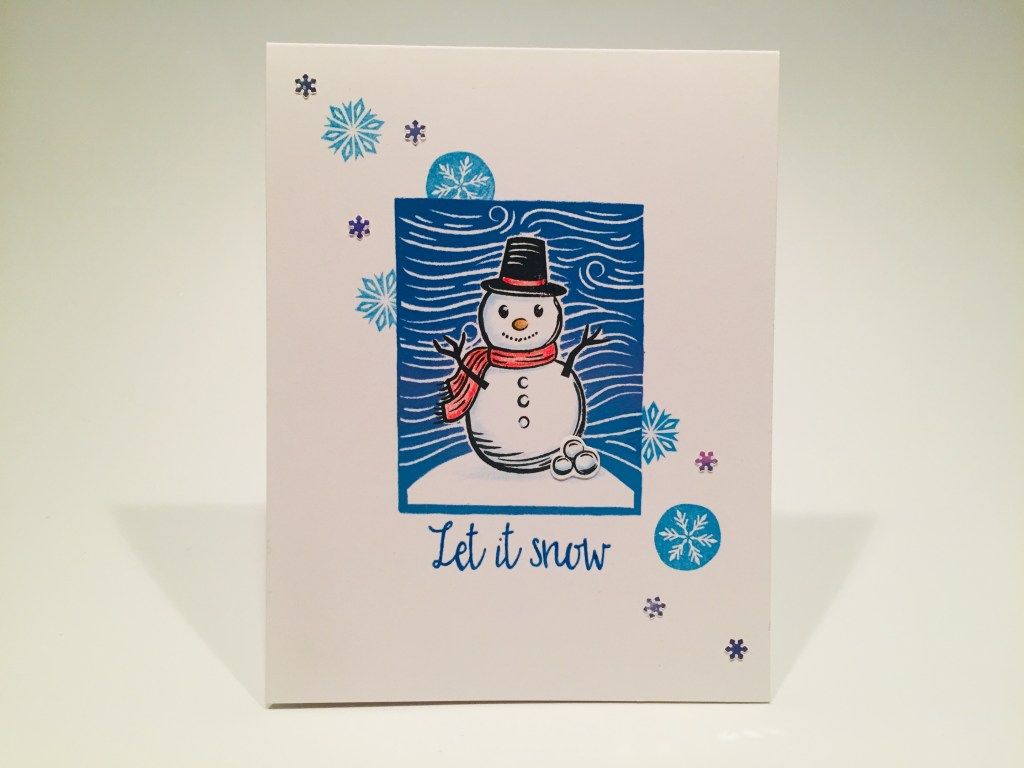
I stamped the snowman in the middle of a white card base with Hero Arts Intense Black ink, and die-cut a snowman mask from my Inkadinkado stamping mask paper, and laid that over the stamping – it covers the image perfectly. Using my HA MISTI, I positioned the background over the mask and stamped it with the Winter Sky ombre ink pad – I did stamp it about three times so I started to lose the lighter colored Thistle (the purple) in the middle…
When I was happy with the stamping, I removed the snowman mask and there he was! Perfectly stamped in that background! I stamped the two snowflakes a few times using Splash ink and masking the background with sticky notes. I added some color to my snowman with my colored pencils, and stamped and die-cut the snowballs before gluing them to the base of my snowman. I first thought this stamp was berries to go along with the holly leaves, but realized they could just as easily be snowballs !
I stamped the sentiment using Blue Hawaii ink and embossed that with some Clear embossing powder. Finally, I added a few snowflake sequins from the Winter Forest mix, and WOW! This card makes me so happy! I love these stamps and dies! I think this kit really plays into my own artistic sensibilities – you know I like my vignettes!
I wanted to see how these stamps held up on their own – without a background…

I think this really looks like a wood block print! So simple and so sweet! I stamped the bird with HA Cup O’ Joe ink, die-cut the matching mask from my masking paper and masked off the bird, then I stamped the branch with HA Moss ink. Remove the mask and our birdie is standing right on that branch! I stamped the assembled sentiment (I really like the included ampersand) with more Cup O’ Joe and added a few heart sequins from my stash for a touch of color and shine. Love AND Joy and great stamps!
Let’s try some more layering with the round leafy background circle.
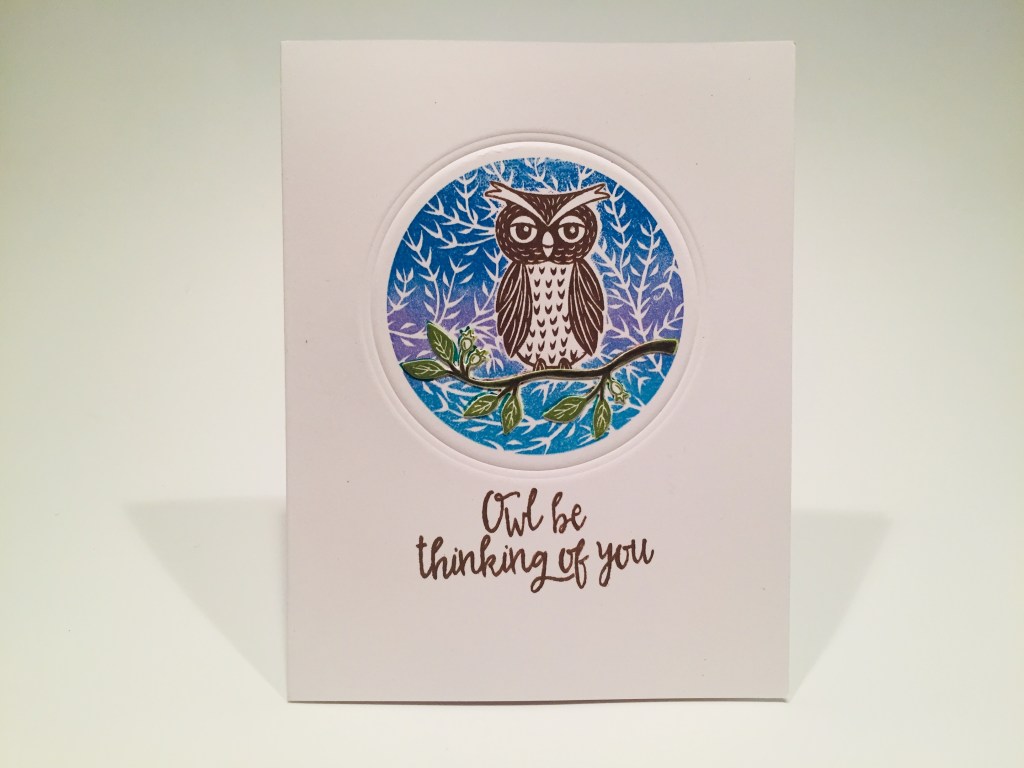
I stamped the owl first with Cup O’ Joe ink – masked that off and stamped the branch with Moss ink – masked that off and stamped the background – the Winter Sky ombre ink worked better here I think because this background is shorter than the rectangle one, so you’re not shimmying the stamp pad back and forth so much. I embossed a HA Circle infinity die around the stamping for a nice textural ‘frame’, and stamped the sentiment in Cup O’ Joe ink. I thought the branch was getting lost among the leaves of the background, so I die-cut and stamped another branch using Moss ink and colored the branch part with a Tombow Marker. I glued that over the stamped branch and I think you can see the branch a little better that way! I love the nice pun here… and not even a holiday card!
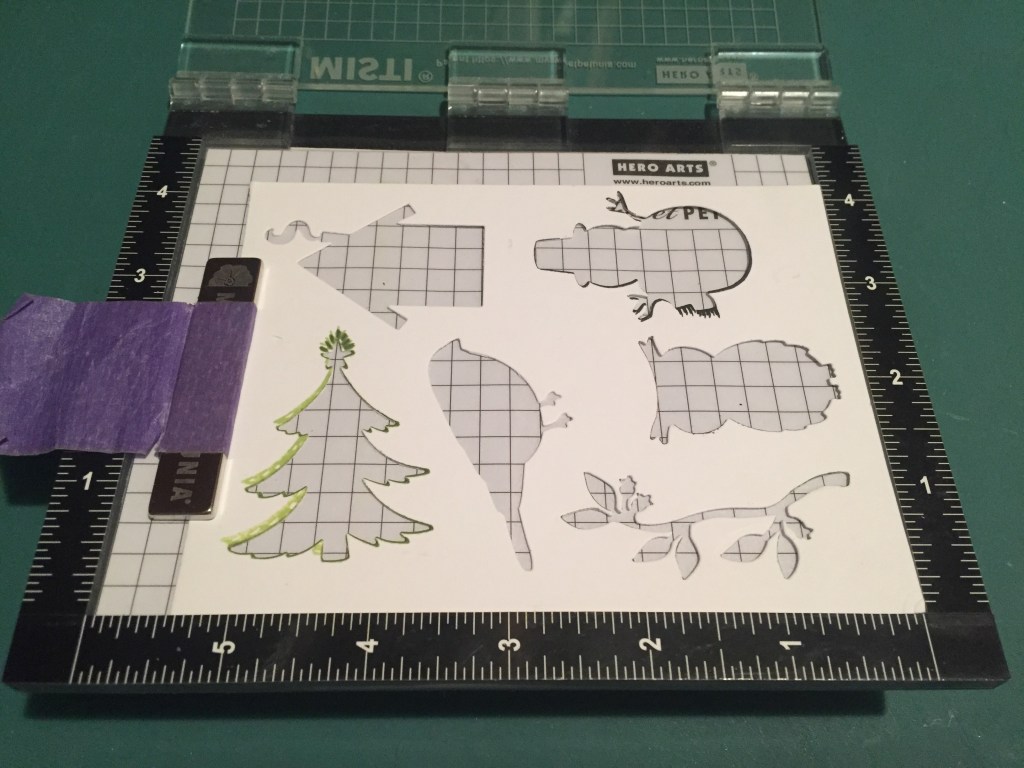
I found it very easy to die-cut your Masking dies in some thick card stock, put the negative in your MISTI, line up your stamp in the opening – it will practically ‘click’ right in! Pick up the stamp with the lid, add your positive die-cut piece back into the negative opening and stamp away. I actually die cut all six of the Masking dies on one sheet of 110# card stock to use as a template for stamping multiple copies of all the images!
I’m not sure what inspired this card, but I know I stamped one house in the center of this card base and thought it seemed lonely all by itself!
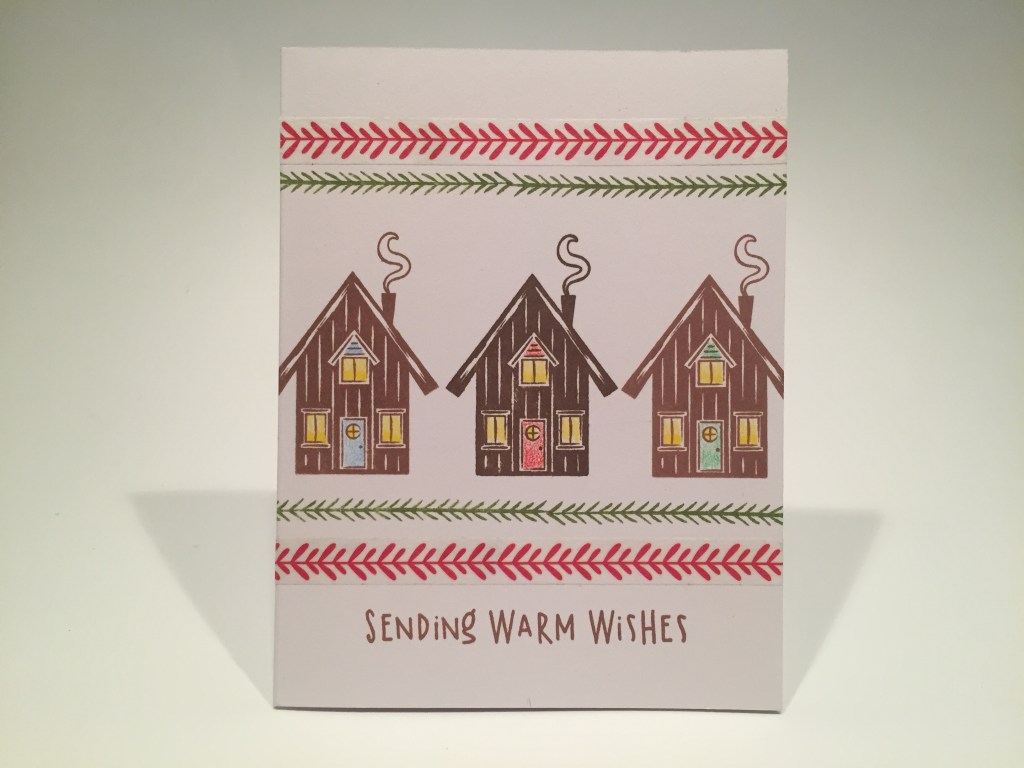
I stamped the houses in Cup O’ Joe and Sand Stone inks, and added spots of color with my colored pencils. I was struck by the similarity of the Red Vine washi tape and the short border stamp, so I stamped the garland twice above and below the houses with Moss ink and added a strip of washi tape next to both – notice both pairs go in two directions – top to the left, bottom to the right. I think that really compliments the houses so well! To finish up this cozy card, I stamped the sentiment with Sand Stone ink. Again, so simple… but it makes me smile and gives me the warm fuzzies..!
Let’s look at that Christmas tree stamp – seems like it belongs on the hill in the rectangle…
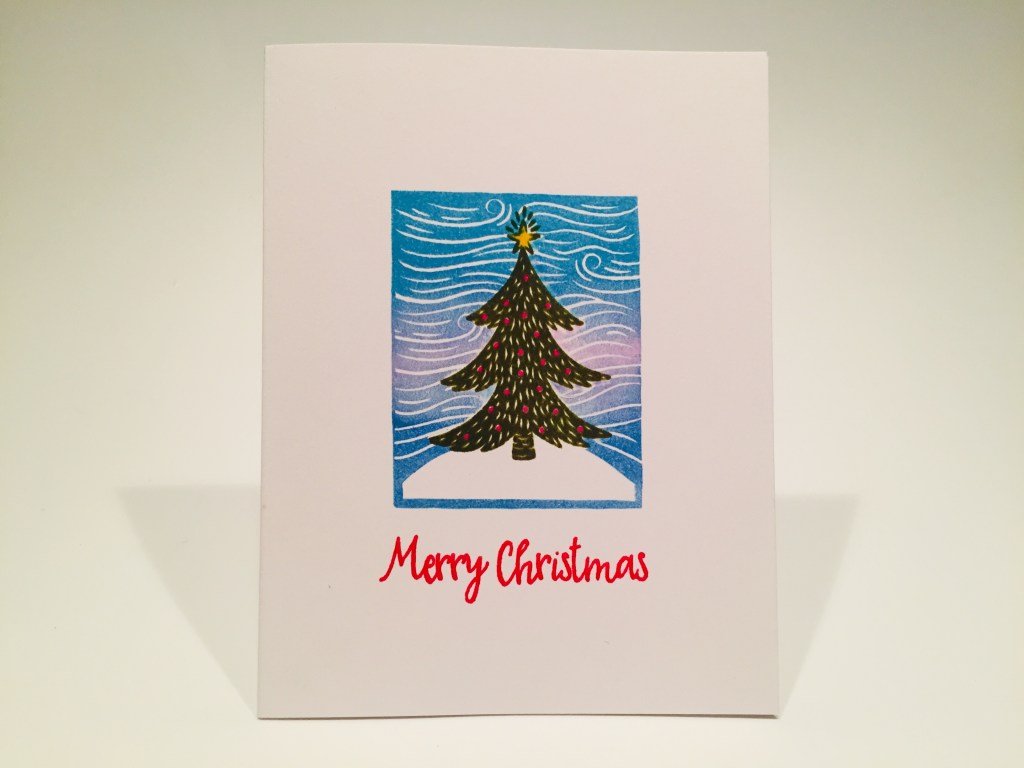
Another terrific little vignette card! I stamped the tree in HA Moss ink and left the tree stamp parked in my MISTI. Then I masked off the tree and stamped the rectangle background. I used the individual ink pads for this background instead of the ombre pad and I was able to maintain the Thistle in the middle. Once I was happy with the background, I removed the tree mask and re-stamped the tree with Forest Moss Distress Oxide ink and embossed it with clear embossing powder. That gives some great shine on this tree! I filled in the ornament dots and star with gel pens, and embossed this sentiment using HA Red embossing powder. I am totally enamored with the functionality of these stamps and dies! This kit lends itself to some easily mass-produced holiday cards!
There’s a couple more image stamps I haven’t used yet… and it is the season, so…
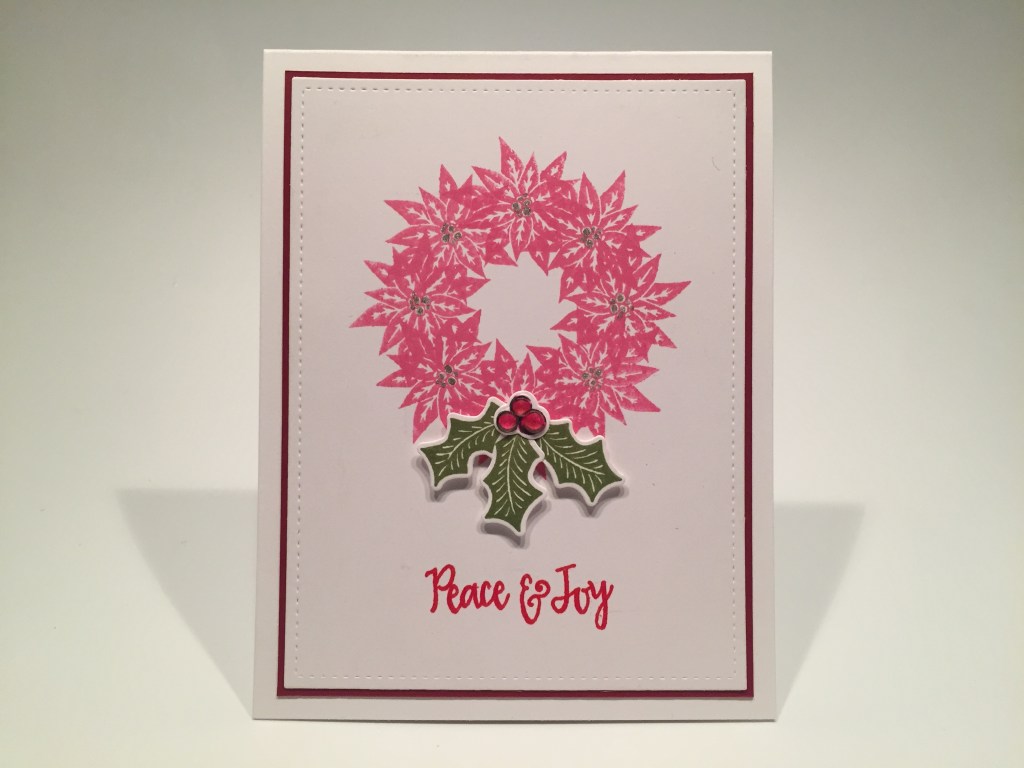
Who would have thought I’d be doing such a cute, yet very PINK wreath! I LOVE it! Using my homemade wreath builder template, I stamped the poinsettia stamp using the Hero Arts Rose Madder hybrid ink. This started out a bit more red, but dried down to this bright pink. I’m surprised how much I like that! I die cut my wreath panel with a Lawn Fawn Stitched Rectangle die, matted that on a piece of dark red card stock and then down to my white card base.
I embossed the assembled sentiment with HA Red embossing powder, and stamped the holly stamp with Moss ink twice, and the berries with HA Intense Black ink. I colored the berries with my Spectrum Noir alcohol markers and then die cut the leaves and berries. I cut away the extra holly leaf, and attached them to the wreath with some foam tape. There’s the first little bit of dimension in this set of cards! I found some small clear crystals in my stash to glue on top of the berries, and I used my Sakura Stardust gel pen to add some glitter to the centers of the poinsettias.
I am surprised how much I like this wreath – I really love the darker pink where the stamps overlap – and I did go ahead and stamp another sentiment on the inside of this card using Intense Black ink. I think that adds a nice touch to this cheerful PINK holiday wreath!
There was one sentiment in our stamp set that didn’t have any corresponding stamps…

The only part of “Peace on Earth” that might be reflected in our stamp set was the little hill in the rectangle background stamp – I thought that was the perfect place for “earth”! I did grab my HA wood block From The Vault Earth stamp but, alas, it was too small for this opening. So I found this clip-art earth in my image stash, sized it to fit the hill, and printed it on some plain printer paper. I stamped the bottom portion of the background stamp on a scrap of card stock and cut out the hillside to give me a template for cutting out the earth. I only used the template for the bottom and side edges on the earth, and let the curve of the planet dictate the upper edge.
I stamped the background in the middle of a white card base using Intense Black ink, then Blue Hawaii, and Splash Reactive inks. I glued the earth into place, and stamped the sentiment with HA Embossing and Watermark ink and embossed it with HA Silver Embossing Powder. I turned to my Silhouette Portrait for the peace sign – I created this many years ago, and sized it appropriately before cutting it from some Chrome Card stock (from the MMH October 2019 kit). I also cut it three times from some white card stock. I glued all four layers together to make a chunky embellishment, and glued that down to my card front. I really like this card! That chrome almost looks like a piece of jewelry… and I will remember how well that earth clip-art fits in the opening of this background stamp! Should prove quite useful!
So far, all of these cards are basically one-layer cards (minor exceptions) but I do want to play with some stamped die-cuts using those great Masking dies. And maybe a pun!
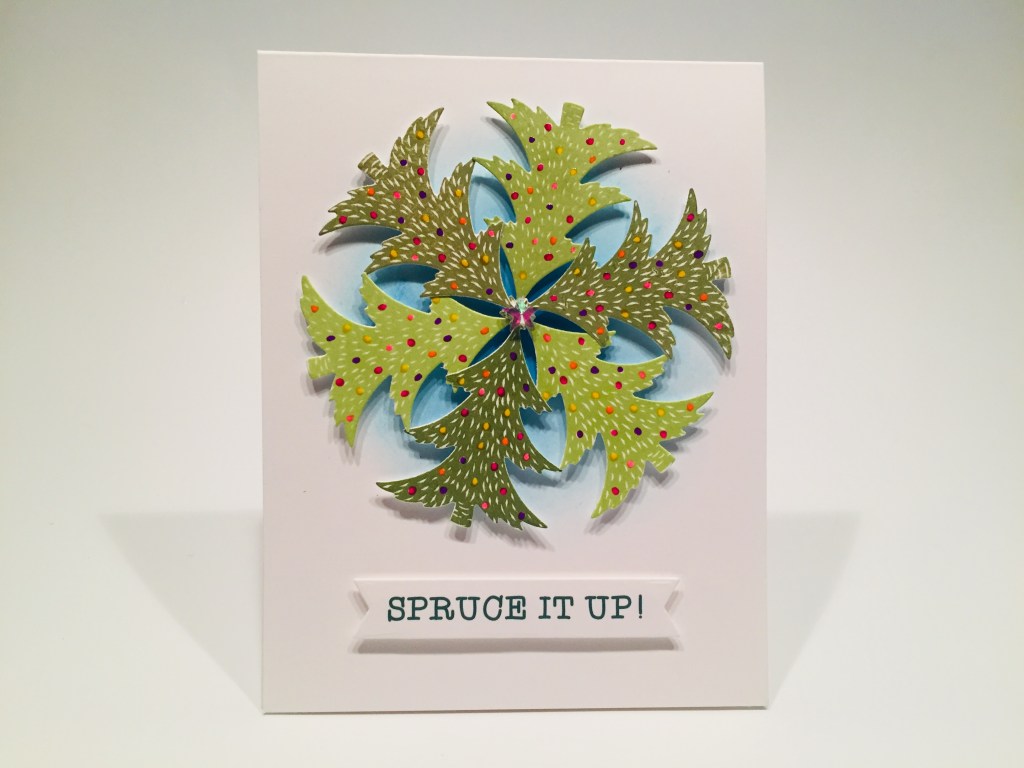
I mentioned after card 3 how easy it is to stamp these die-cut shapes… Using the negative space template and my MISTI, I stamped these six die-cut tress in Moss and Lime Green inks, and used my gel pens for all the colorful ornaments. I ink blended some Splash on the white card base in a circular fade, and added the trees with foam tape. These are pretty easy to space out… two trees do form a good 60 degree angle! I printed this sentiment on a scrap of card stock using my Silhouette software and the TypewriterHand font, and die-cut it with a Lawn Fawn Everyday Sentiment die.
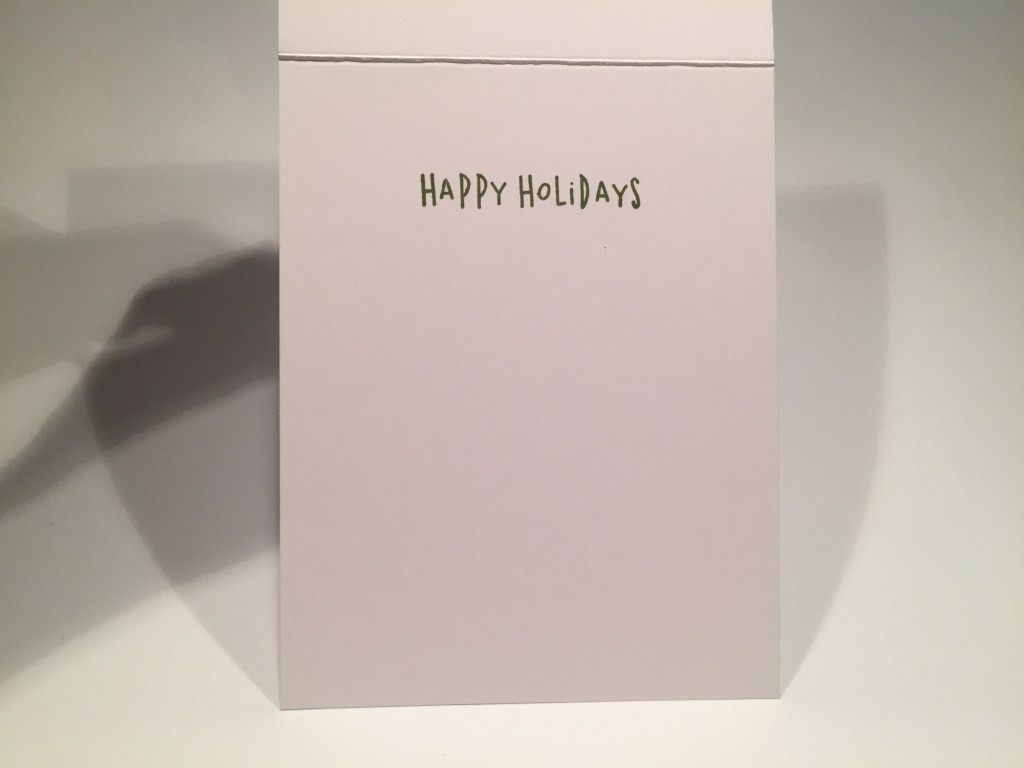
I added that banner with more foam tape and glued a crystal star in the center of the trees – it was just the right size to cover the stamped stars! I also stamped the final sentiment from this set on the inside using Moss ink. “Happy Holidays” seems to go perfectly with “Spruce it up”! I really love these die cut trees… and NO fussy cutting!
After only eight cards, I have now used every stamp in our stamp set. WOO-HOO!!! Let’s play with those great dies some more! How about a Valentine!?!!
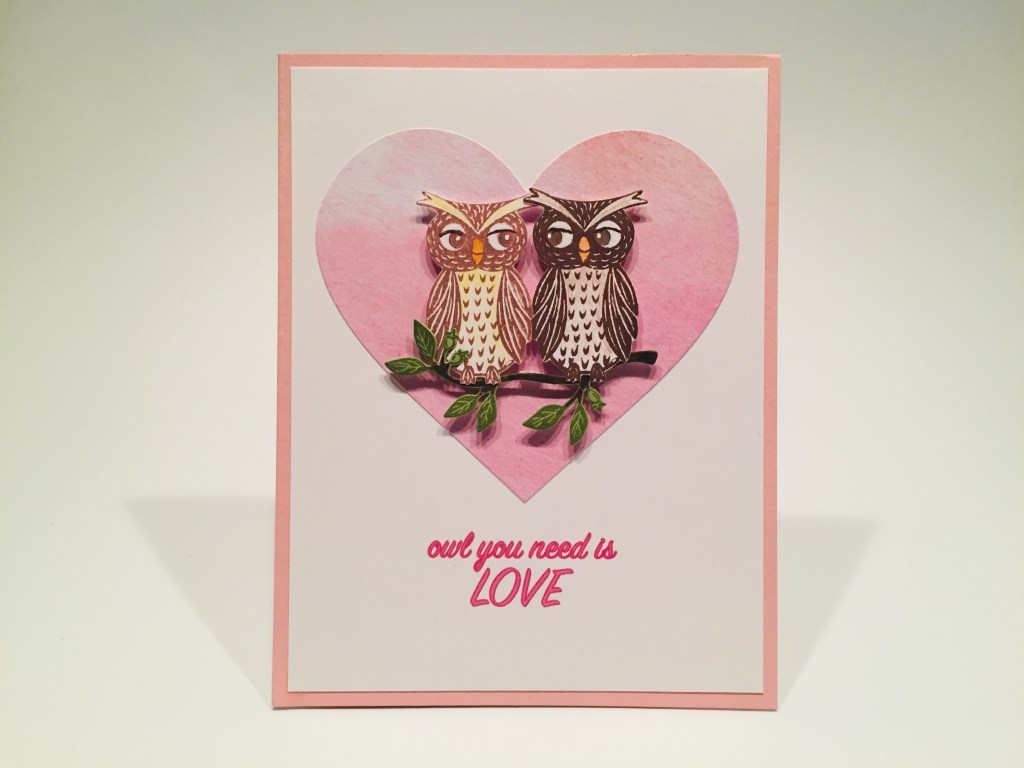
Oh my heavens, this card tickles me in so many ways! I got this wild idea to see if I could make the eyes in the owl stamp look in a different direction…! I found a small 3/16″ hole punch in my stash, and punched a couple dots out of my masking paper to cover the pupils on the stamp. I inked up the stamp (Cup O’ Joe and Sand Stone inks) then – don’t forget to remove the pupil mask – stamp away. I think 3/16″ is correct – you want a mask that will cover the whole pupil but not the whole eye. Then I just drew in the pupils using a disposable micro-applicator and matching ink. I also redrew the eyelid curve with a Brown Pigma Micron pen. I also added some light touches of color on the owls with my colored pencils. My mom has always had a big thing for owls! These are adorable!
I stamped the die-cut branch on some Hero Hues Kiwi card stock using Moss ink and colored the branch with a Tombow marker. I created this pun-y sentiment and printed it on a panel of White card stock using the Sign Painter font. I cut that down to 4″ x 5.25″ and glued it to a pink card base. I die-cut a piece of “watercolor” pattern paper from my stash with a HA Nesting infinity heart die and glued that to the card front. I glued the owls to the branch and mounted them to the heart with foam tape. Who’d a thunk you could get a great valentine out of this kit!? Love this pun (you can sing it!) and love those owls!!
Of course I had to play with the die-cut snowman stamp! This card was inspired when I was playing with a couple of snowmen, and realized that, next to each other, they appeared to be holding hands… I couldn’t resist! Six die-cut snowman stamped with Intense Black ink and colored with my Spectrum Noir alcohol markers! Looks like they’re getting ready to take a bow!!
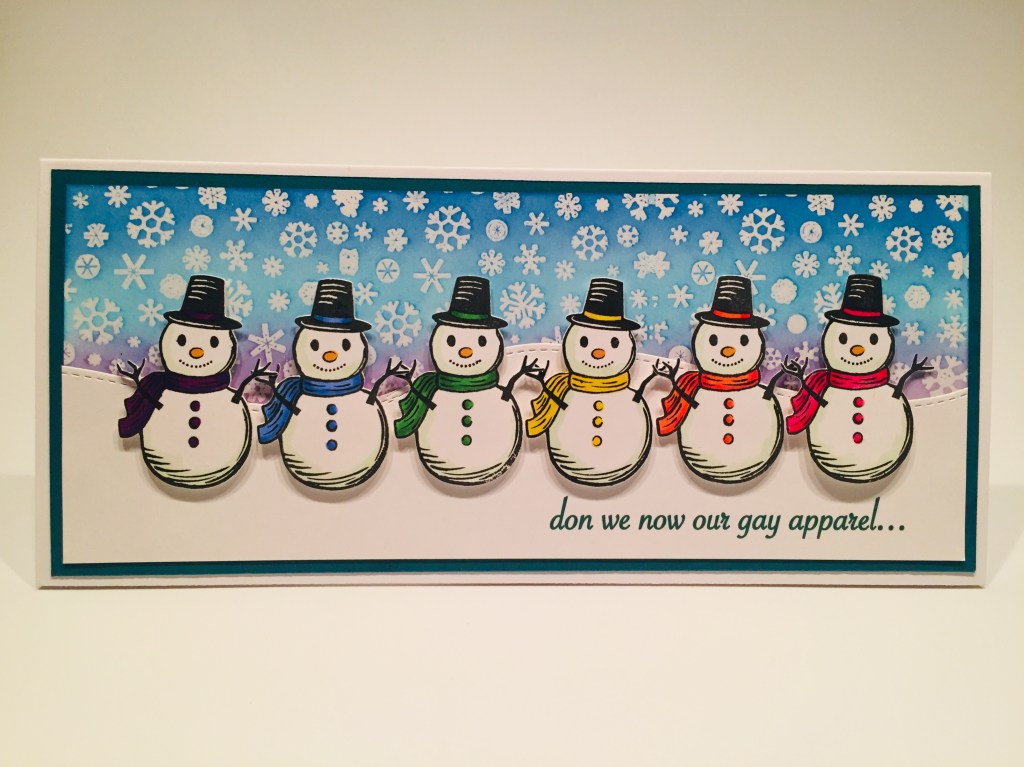
I cut a panel of white card stock to 3.5″ x 8.5″ and wanted to do some kind of a snowy background, but didn’t have any extra long stencils or stamps… I thought about spattering some white paint, when I remembered this great Snowflake Infinity stamp I have from an old Love From Lizi Kit – the Nov. ’18 Fantasy Forest kit. I stamped that three times across the panel using embossing ink and used clear embossing powder to set them. Then I ink blended our same three colors over the embossed snowflakes – this time moving the Thistle color to the bottom – a dry paper towel wipes off any of the extra ink on top of the embossing and I love this background! There’s a Winter Sky for ya!
I used a stitched hillside die to cut our snowbank on another piece of 8.5″ long white card stock, and printed the sentiment towards the bottom using the Savoye LET font. I glued the printed snowbank to the background, glued those to a dark blue-green mat and then down to a 4″ x 9″ white card base. Then it was a simple matter to mount my snowman chorus line with foam tape!
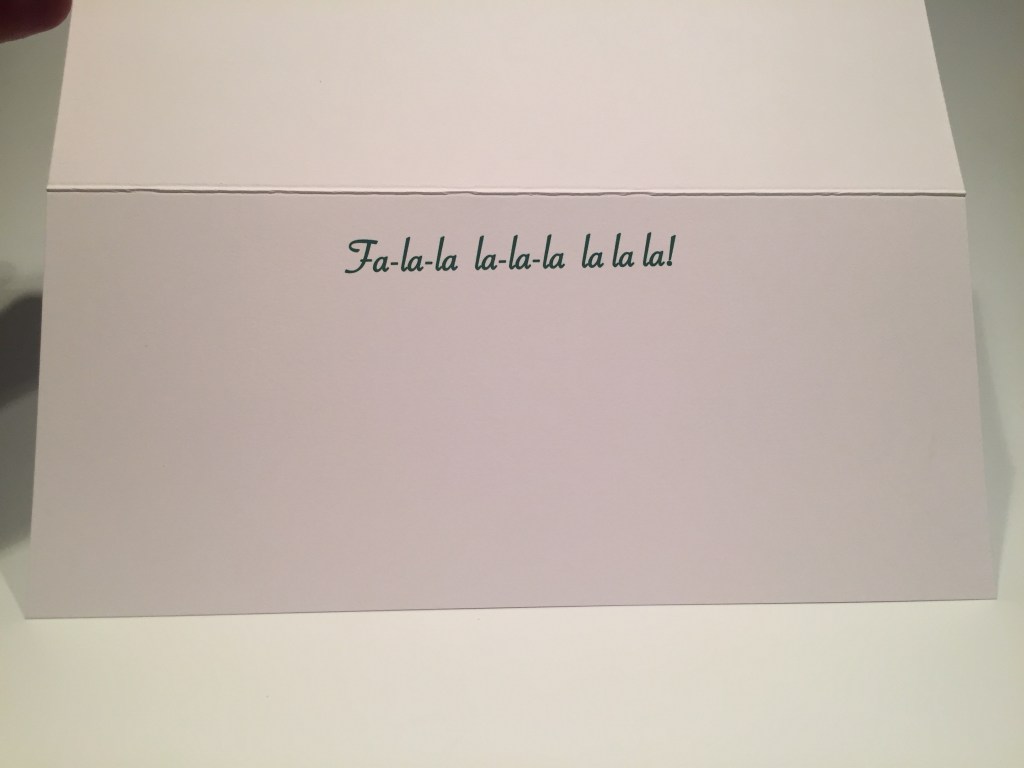
Of course I wasn’t quite done here… you know you can’t give me a snippet of a song and I’m not going to want to finish it out…! Yes.. I do complete this musical phrase on the inside of the card… I believe it’s perfectly accurate! LOL!
That completes my 10 Cards I kit post featuring the My Monthly Hero November 2020 Kit. I had a great time with this kit and I love the results – a little different than my usual line up, but I adore these linocut art stamps, and hey, hardly any mats or frames here at all!
This kit has sold out already – This one must have struck a chord with many people! I hope I was able to share a few unique ideas with you, and have inspired you to some glorious creations of your own. Thank you so much for sharing your time with me here – you know I appreciate it very much! Please take care of yourselves and your loved ones – wear a mask, wash your hands, avoid crowds – we’re still not out of the woods yet! It would be much appreciated if you would Like me, List me, Pin me, Post me, Share me with all your crafty friends… Don’t run with your Thanksgiving turkey…! And as always, I wish you Health and Happy Crafting!
DISCLOSURE: This site contains some affiliate links to products. I may receive a commission for purchases made through these links (at no cost to you). As an Amazon Associate I earn from qualifying purchases. Thank you!

Hey Scott! I don’t get this kit, but I got some great ideas. Thanks!!
LikeLike
Thanks Jeanne! You know I appreciate hearing from you! Health and Happiness to you and yours!
LikeLike
Another fabulous array of card making inspiration. Unfortunately I didn’t get the kit, but I enjoyed seeing what you did with it. LOVE the owl and how you created the Valentine and those eyes! The poinsettia wreath is wonderful, but you definitely saved the best for last with your chorus line of snowmen. Soooo cute.
LikeLike
I got so excited this morning when I saw your picture on Hero arts as a video artist. I must have missed the announcement. Congratulations to you and Tina. You are both awesome. So happy for you both in a year where you’ve both are having tough times. Despite everything, you always make me smile. Thanks and be safe. BTW, I don’t know what I did to be ggcrafter, but I’m the same old Georges Gentry that comments on you tube. YT is about the only i understand, lol
LikeLike
Thank you so much Georges!!
You know that means a lot to me!
I’m kinda over the moon today…!!
Happy Holidays!!
Scott
LikeLike
Thanks so much Judy! That means a lot to me! Happy and Healthy Holidays to you and yours!
LikeLike