
DISCLOSURE: This site contains some affiliate links to products. I may receive a commission for purchases made through these links (at no cost to you). As an Amazon Associate I earn from qualifying purchases. Thank you!
Hello Folks! Scott here with my 10 Cards 1 Kit post featuring the My Monthly Hero October 2019 kit. Featuring a retro 1950’s Christmas theme, this kit is “ultra-modern”!

Our 6″ x 8″ clear stamp set features a terrific car stamp, a stone fireplace, two Christmas trees and assorted retro furnishings just begging to create some nostalgic holiday scenes. We get 19 coordinating frame dies, Two 5.5″ x 8.5″ sheets of Chrome card stock, Six 5.5″ x 8.5″ sheets of Neon card stock, a package of clay snowflake embellishments and a 0.5 oz. pot of Prisma Glitter. A terrific kit for a trip down memory lane and a fun holiday extravaganza for any baby boomer!
I am a little tardy with this post… I have had a very busy month that has kept me away from my craft desk, and I have to admit these ten cards did not come to me a quickly as one might expect.

I did stamp most of the images on some Bristol Smooth card stock using VersaFine Onyx Black ink, and, for a bit of a change, reached for my Spectrum Noir alcohol markers to color them. It is a little difficult coloring these small images with those alcohol markers (they do not have as fine a point on them as Copics do) but I was pretty pleased with my first stab at coloring all these images. I did try to stick to a 50’s color palette – I was aching to color that car a nice turquoise green! After coloring, I die cut all the colored images and readied myself to start assembling some cards!


Now, I am not the world’s biggest pattern paper fan – I find that I have more opportunities to create and work on backgrounds when I’m not trying to use pattern papers – and that’s one of the reasons I like the MMH kits so much – we rarely get patterned paper! I always feel so obliged to use the pattern paper when we get it in a kit. BUT… there’s always an exception to the rule!
I did have a rather perfect paper pack to go along with this 1950’s themed kit. The Sizzix Geometrics 6″ x 12″ Cardstock Pad. I thought a lot of the patterns were very period appropriate and the colors were spot on as well! I really like the 6″ x 12″ size of this paper pad, and with 48 double-sided sheets you end up getting four sheets of each pattern – plenty to go around!
I had to use that great car stamp first, and Hero Arts practically commanded us to make this card in their on-line description of this kit!

On a white card base covered with that groovy blue pattern paper, I stamped the sentiment and the ‘sparkles’ and ‘star’ using VersaMark ink and embossed them with Ranger Gold embossing powder. I added a couple of white snowy hills using my Stitched Hillside dies and decorated them with a thin stripe of the Prisma Glitter on the top edge. The back hill is glued directly to the card front, and the front hill is attached with foam tape. I colored the ornaments on the tree with a Uniball Gold gel pen, glued it to the top of the car, and attached those to the card front with more foam tape.  I added a bunch of the clay snowflake embellishments in the sky and I simply had to use another sentiment from the kit on the inside of the card.
Since the car suggests that we’re going somewhere, I figured the “see you soon” sentiment was a perfect match. The car is colored with the Green Turquoise Spectrum Noir markers (GT1, GT2, GT3) I really love that color, and it’s very period as well. I think having the car follow the curve of the hill adds a lot of movement, and overall, I’m very pleased with this first card. A Sakura white gel pen adds some light touches of highlighting on the car as well…. Very Sharp!
Other than the car, all the other stamps are kind of ‘interior living room’ oriented – AHA! the perfect way to use some of that pattern paper – as wallpaper!
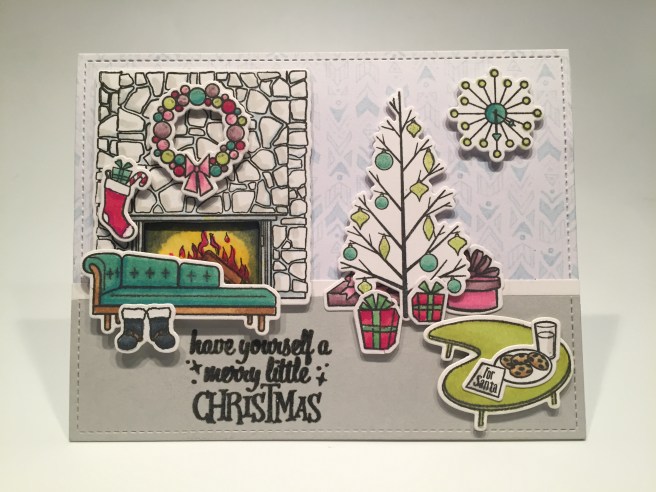
Hmmm… looks like that chaise sofa matches the car!! On a white card base, that subtle blue pattern paper and some plain grey card stock from my stash glued together and die-cut with a Lawn Fawn Stitched Rectangle die. A 1/8″ strip of white card stock provides a baseboard at the bottom of the ‘wall’ and I did fussy cut the inside of the fireplace for a little added dimension on that stone chimney! The sentiment is stamped with VersaFine Onyx Black ink and embossed with Ranger Clear embossing powder.
I placed the coffee table on the lower right corner so it would seem closer to us since it appears we’re decidedly looking down on the table top. Some odd perspectives and scales with these stamps..! Everything is glued down to the card front or attached with foam tape to complete this scene. There are light touches of the Prisma Glitter on the tree ornaments, and the wreath has some glitter highlights from my Sakura Stardust gel pen. This does feel like a retro 50’s living room… and surely this is what Hero Arts was envisioning with this kit, and that pattern paper makes for the perfect wallpaper!
Some folks over on the Hero Arts Kit Fanatics Facebook group suggested that I combine the dancers from the MMH February Kit with the “Rockin’ around the Christmas Tree” sentiment in this kit. Those dancers are circa 1920’s but I think we can make this work!

Again on a white card base with pattern paper die-cut for the walls and the floor, and a 1/8″ strip of white card stock for the baseboard. (I did draw in the tile line on the floor with a Pigma Micron pen). The record player was from my original alcohol marker coloring, and I stamped another tree and colored that with my Zig Clean Color Real Brush markers. The sentiment(s) are stamped with Onyx black ink and embossed with clear embossing powder. The tree and phonograph are attached with foam tape.
I stamped the dancers first using Twisted Citron Distress Oxide ink for the lady, and Broken China Distress Oxide ink for the gentleman. I masked off the ‘tail’ of the gentleman’s topcoat, and I actually wiped away the lady’s fringe skirt (and knees) and her hair ornament before stamping her. Then I simply traced the outlines of both stamps using my Pigma Micron pen before adding a little color for their skin. It wasn’t too hard to change those silhouette stamps into what appears to be outline stamps! Very pleased with that! I die-cut both using their matching dies and trimmed away any extras. I think the addition of these dancers really makes the music come alive on this card!
Hmmm. Card three and I’ve already used all the images in this stamp set… I can’t make seven more living room cards, so, I once again turn to showcasing individual stamps…
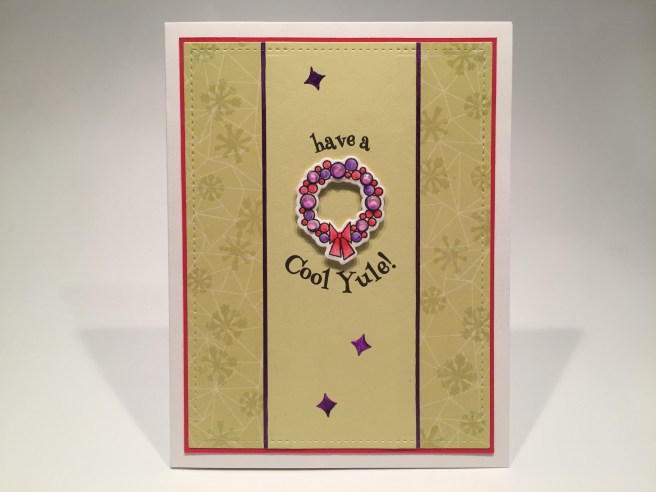
I really love that wreath stamp so I thought I’d highlight it on this card! On a white card base, I used some more pattern paper clear embossed with the “snowflake” stamps and glued to some plain chartreuse card stock and die cut with another LFSRD. That is matted on a thin red mat from the Neon card stock in the kit, and some Love From Lizi Purple peel off stickers finishing the seams. I created this sentiment using my Silhouette software and the Henny Penny font and printed it directly on the card front.
I stamped the wreath on Bristol Smooth card stock with Onyx black ink, colored it with my Zig markers, die-cut it out and added some Hero Arts Clear Lacquer on the top of the larger baubles. I attached that to the card front with foam tape and added some punched “sparkles” using the peel off border and an old star punch from my stash. I like this sentiment quite a bit – and though “cool” wasn’t coined in the 50’s it was widely used!
I must take a moment to pontificate about these “snowflake” stamps… Snowflakes do not have eight points. All snowflakes contain six sides or points owing to the way in which they form. The molecules in ice crystals join to one another in a hexagonal structure, an arrangement which allows water molecules – each with one oxygen and two hydrogen atoms – to form together in the most efficient way. Simple as that. It is a big pet peeve of mine to see snowflakes with eight points… trust me, Hero Arts is NOT the only company perpetrating this inaccuracy! Sigh… That concludes this month’s lecture!
We have a “Thank You” sentiment in this stamp set… what would one be thankful for…?

I think that just about says it all! I stamped the three presents with Onyx black ink on Bristol smooth card stock, colored them with my Zig markers and die-cut them out. I die-cut two plain white card panels with my LFSRDies, stamped and clear embossed the sentiment on the front panel, matted that on the blue Neon card stock from the kit. I matted the larger white panel with a piece of the green Neon card stock and glued them all together and down to a white card base. A perfectly appropriate thank you card!
I cannot resist that terrific car stamp and thought it would make a fun birthday card!

I stamped the car using Onyx black ink on Bristol smooth card stock once again, but I wanted to go for a more red-violet color (complimentary to yellow-green), so I reached for my Stabilo watercolor markers instead of my Zig markers. I have many more red options in my Stabilo pack.  These are the markers I used on this car. I die-cut another pattern paper with a LFSRD, and added a thin silver mat using the chrome card stock from the kit, and glued that to a white card base.
I thought the die for the coffee table in this kit would make a perfect retro shape for this additional birthday sentiment. I created the “you’re a Classic!” sentiment using my Silhouette software and the Freehand 521 font for “you’re a” and the Henny Penny font for “Classic!” Though not a perfect match, I think that Henny Penny font captures the playful nature of the sentiments in this stamp set. I printed that on the Neon card stock from the kit, die-cut the table shape and trimmed off the legs. I did the same to a piece of the Chrome card stock and layered them together with a bit of an offset, and attached them to the card front using foam tape.
I cut the Chrome oval base for the car using my Silhouette Portrait – I just don’t have any oval dies this flat…! This makes me think of a car on display at a fancy car show..! I glued the oval to the card front, fussy cut the car and attached it on top of the oval with foam tape. I also added some Love From Lizi Silver peel off stickers to highlight the chrome strips on the car. The thin ones fit perfectly!! The sentiment is die cut from more of the Neon card stock using the Lawn Fawn Happy Birthday Border die, the two layers are offset and glued together then glued to the card front. I die-cut more of the Chrome card stock with the largest flourish die in the kit, mounted that with foam tape to the top right and added a couple Simon Says Stamp Moonshine Confetti sequins to keep it company. LOVE THIS! A Total Classic! And NOT a Christmas Card! Happy Birthday indeed!!!
I really like that fireplace stamp, and wanted to see if I could make that stone wall taller…

Mission accomplished!! WOO HOO!! I LOVE THIS!! I arranged this fireplace stamp nice and straight on my stamp platform, and masked off the top edge before stamping it on Bristol Smooth card stock with VersaMark Onyx Black ink. Then I cleaned off the stamp, masked off the fireplace and the bottom of the stamp, and stamped that above the original stamp with a little gap in between. Then it was easy to ‘connect the dots’ and complete the stones in the gap using my Pigma Micron pen. The “seam” is actually just below the center of the clock. Really very hard to tell where it is!! I colored this using my Zig markers and actually managed to die-cut the wall as well. Just partial die cutting from the bottom and then the top and it looks completely seamless! I loved doing this! (and I like this Zig fire much more than the alcohol marker fire..!)
I die cut more of the Neon card stock with a LFSRD, and stamped the sentiment and the flourishes (jacks?) using Hickory Smoke Distress Oxide ink and embossed those with clear embossing powder. I die cut a frame from a real wood sheet, and glued both to a white card base. The ‘wall’ (and the clock) are attached with foam squares. A perfect sentiment for a fireplace! And that rock wall is pretty impressive! And it’s not necessarily a Christmas card either! I think that’s three for three!! Can you dig it??!!
I was eager to color a RED car and I also found some 50’s slang that inspired this card.

“Classy Chassis” is slang for “hot body” – a perfect pun for a Valentine card! I stamped and colored and die-cut the car using the same ink, paper and my Zig markers. I had fun adding some extra spiffy shadings on the side… I did trim off the trunk lid and added more Love From Lizi Silver peel off stickers for the chrome trim on the side. The die-cuts are from the Sizzix Atomic Elements die set and are cut from more of the Neon card stock. Another Chrome oval cut with my Silhouette Portrait for my car platform (I couldn’t resist!), more pattern paper matted with a thin black mat for the background and glued down to a another white card base. I did take a tiny hole punch from my stash and punched out a bunch of Chrome card stock dots for the accents on the die cuts. Finally, I did use foam tape to add the die-cut car.
I created this sentiment using my Silhouette software and the Henny Penny font, and printed it directly on my pattern paper.  Of course there is more on the inside – that’s where this pun-y sentiment really pays off! I printed the “Wanna ride?” on the inside of the card base again using the Henny Penny font and my Silhouette software. Totally innocent, I’m telling you! This makes me laugh out loud… a very unique love card in perfect step with the retro theme of this kit!
I was having a hard time with the “from our Family to Yours” sentiment – there are no people or “family” stamps in this set… but we do have two very different Christmas trees!
Here we have a great tri-fold Christmas card. I stamped the “traditional” tree on Bristol card stock with Onyx Black ink and colored that with my Zig watercolor pens. I die cut the red and green ovals from the Neon card stock using my Thermo-web/Gina K. Oval die sets. I embossed the white card front using an old Darice snowflake embossing folder, glued the matted oval(s) to the card front and mounted the die cut tree with foam tape.
I stamped the “mod” tree on a scrap of black card stock using VersaMark ink and embossed that using the Love From Lizi Tutu Pink embossing powder. I colored the ornaments using a silver colored pencil, and die-cut the swoosh(s) from more Neon card stock using the Atomic Elements die set. I embossed this card front using the Darice Paisley embossing folder, glued the swooshes to the card front and mounted the die-cut tree with foam tape.
I did cut this sentiment stamp apart and stamped the two sections on some scrap white card stock using Onyx Black ink and embossed them with clear embossing powder. I die cut them with a couple of my stitched Oval dies and mounted them using foam tape. The “Merry Christmas” sentiment is stamped on the inside in the same fashion. I glued the card “backs” together to make this tri-fold, and I think this is a fun inter-generational Christmas Card – traditional vs. modern, old vs. young… (of course traditional always wins in the end!) I think the embossing folders add just the right touch with this card!
Needless to say, music was a big part of the 50’s, and I had one idea I couldn’t ignore.

Back to the living room for our final card this month. Everything is stamped on light blue and dark blue card stock from my stash and embossed with Silver embossing powder and (forsaking the fireplace and the “sparkles” stamped on the blue card panel) die-cut. I used some Broken China Distress oxide ink to stencil a little carpet pattern (Stampendous Dreamweaver Flourish metal stencil) and a little highlight on the wall around the fireplace. I added some shading details to all the images using my colored pencils, matted the panel with some of the Chrome card stock, glued it to a matching blue card base, and mounted all the die cuts using foam tape.
If you haven’t been singing it, then maybe you’re thinking it… Elvis Presley cemented the status of “Blue Christmas” as a rock-and-roll holiday classic by recording it for his 1957 LP Elvis’ Christmas Album. Perfect time frame for this scene, and a little bit more than a simple Christmas card! Of course I do have to explain myself on the inside of the card. I printed the inside sentiment (Silhouette software and the Henny Penny font) on a piece of my light blue card stock, die cut that with a LFSRD and added that piece to the inside of this blue card base.
I debated adding the parenthetical sentiment at the bottom, but figured it was necessary just in case the card recipient had been living in a cave for the last 62 years…!! Always good to explain yourself just in case…!
I think this card certainly qualifies as a non-traditional Christmas Card, and I think the single pair of boots and the solitary stocking suggest that someone is (unfortunately) spending the holidays alone this year. I really enjoyed creating this card, and what better way to wrap up my 10 cards this month than with a song from “the King”.

So that’s my 10 cards from the My Monthly Hero October 2019 card kit. Six Christmas cards, a thank you card, a birthday card, a warm wishes card and a bit of a steamy Valentine card! I used most every stamp in our set this month except for the “enjoy” sentiment and the little pom-pom stamp. I had a great time using that pattern paper pad with this kit, and adding in the dancers from the February MMH kit, and I’m actually surprised at how much of the Neon card stock I used. I really like this set – I think that car stamp and fireplace stamp will get plenty of use over the years!
As of posting, this kit is still available at Hero Arts! If I’ve managed to give you some ideas and you’d like to get a little retro Christmas in your stash, please use my link when shopping at Hero Arts! http://shrsl.com/1f7qx
Which brings us to our GIVEAWAY!!! I have a complete My Monthly Hero October 2019 kit to give away this month! To enter the drawing, email me at cardcutups@gmail.com with GIVEAWAY in the subject line, and tell me what your Christmas plans are for this year. Entries will be accepted through November 8th (first shipping date for the MMH November Kit). I will randomly select one winner to receive this kit, and will announce it no later than my 10C1K posting for the MMH November Kit. Please share this post and giveaway details with all your friends and acquaintances, and remember to Like me, List me, Pin me, Post me, and don’t clump the tinsel on the tree! Thank you so much for sharing your time with me here… It is always greatly appreciated! Happy Crafting!!

These are so cool! My favorite is number two. Brings back old memories. Thanks for sharing!
LikeLike