
DISCLOSURE: This site contains some affiliate links to products. I may receive a commission for purchases made through these links (at no cost to you). As an Amazon Associate I earn from qualifying purchases. Thank you!
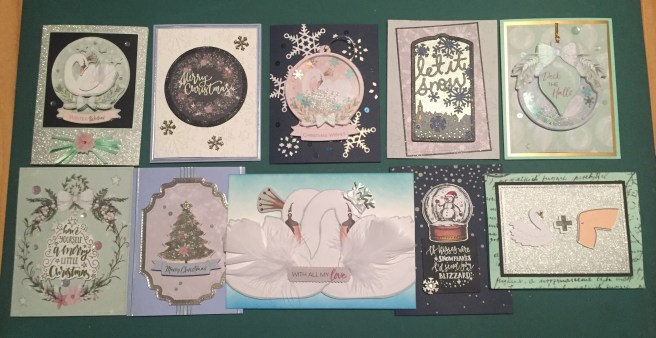
Hello Folks! Scott here with my 10 Cards 1 Kit post featuring the Love From Lizi Card Kit for November 2019! Lizi is calling this the “Enchanted Lake” kit and it features a variety of swans, feathers, snowflakes and trees.

As usual, I do take the 8.5″ x 11″ card stock in the kit and cut them in half to create my 10 cards bases. We did get those two silver glitter card bases in the kit this month, so I simply set aside the sheet of super smooth alcohol-friendly white card stock from the kit. The glitter card bases are apparently cut from A4 paper so they are actually 4.125″ wide and 5.85″ long. In order to fit into an A2 card envelope, I trimmed the long side down to 5.5″ – that gives us some extra strips of that silver glitter card stock!
In my unboxing, I mentioned my puzzlement of swans on Christmas cards, and lots of folks responded reminding me of the Seven Swans a Swimming in The Twelve Days of Christmas. Okay… but I’ve never seen a Leaping Lords Christmas kit or a Milking Maids Christmas kit.. so I did do a little research, and it seems that in England, from the 12th century onward, swans were eaten as a special dish at feasts, served as a centerpiece in their skin and feathers with a lump of blazing incense in the beak. They were particularly associated with Christmas, when they would be served in large numbers at royal feasts; forty swans were ordered for Henry III’s Christmas celebrations in 1247. Swan remained a delicacy eaten as part of Christmas celebrations right up until the 18th century. During the Victorian period, swan fell out of fashion as a dish, and by the 20th century was rarely eaten. So… my crack about roasting a swan for Christmas wasn’t completely off the mark! Let’s dig in!!
I always adore Lizi’s decoupage die-cuts so let’s start this collection with one of those!
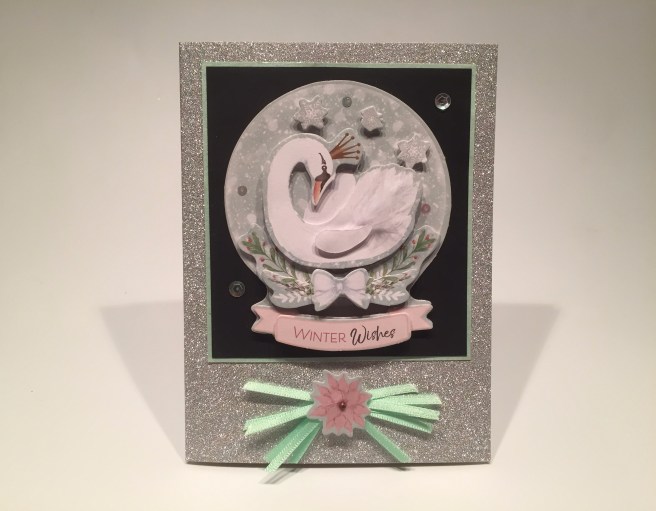
I used all of the different layers as indicated on the die-cut decoupage sheet (short of a few flower and star embellishments) and I layered them all together with the thinnest foam squares I have in my stash. I wasn’t quite sure where the small ‘wing’ piece belonged… so I ended up reversing it and mounting it to the side of the swan with a trimmed bit of a feather for some added texture.
I mounted the completed decoupage image to a 3 3/8″ x 3 3/4″ piece of black card stock sprayed with some Sheer Shimmer Mist, and attached those to a thin mat of Pearlescent Mint card stock and glued everything down to one of the Silver Glitter card bases. I cut some short pieces of the Mint satin ribbon and tied them together to make a bit of a ‘spray’, and glued that to the card front with one of the decoupage flowers over the knot. A sprinkling of sequins from our sequin mix and one Copper gem (from the LFL March 2018 kit) in the center of the flower provide a finishing touch of sparkle. You have to love that decoupage “snow globe”! Very pretty!
That covers the winter season… let’s move on to some actual Christmas cards now!

I die cut this wreath from one of our “cut-apart” pattern papers using a 2 3/4″ Stitched Circle die and embossed the “Merry Christmas” sentiment using VersaMark ink and the Love From Lizi Very Vanilla embossing powder. I matted that on a piece of black card stock die cut with a 3 1/4″ Stitched Circle die and covered with some sparkle using my Spectrum Noir Sparkle pen. I trimmed a piece of white card stock to 3 7/8″ x 5 1/8″ and embossed that with the snowflake embossing folder in our kit. I glued that piece to a soft Blue card base and outlined that panel using the peel off stickers in our kit. The wreath is mounted to the card front with foam squares and three of the wood-veneer snowflakes from our embellishment bag add the requisite sparkle to finish out this card. That’s a non-traditional color palette for a Christmas card, but I really like that delicate wreath!
We received two shaker tags in our kit and I couldn’t resist taking advantage of them!

I die-cut three snowflakes from some white glitter paper in my stash and arranged them on the Navy Blue card base. I did add the die cut pieces from the center of the snowflake for a couple of smaller “snowflake shapes” on the card front. I did cover the “Winter Wishes” sentiment on the bottom of this shaker tag with the “Christmas Wishes” sentiment from our die cut topper sheet. I used more foam squares on that for a little added dimension that more closely matches the thickness of the shaker tag. I replaced the gold cord with some silver cord from my stash and attached the shaker to the card front using some removable glue dots.  Those allow the recipient to remove the shaker tag and use it as an ornament or as – dare I say… a TAG! I elaborate my ‘Christmas Wish’ inside the card with the ‘New Year’ sentiment stamped (VersaFine Onyx Black ink) on the writing surface. Some dark blue sequins from our sequin mix finish out this card nicely, and the Navy Blue card base almost completely neutralizes the pink shaker tag!
That glitter card stock inspired me, so I reached for the Let It Snow die for my next card.

I used some of Lizi’s Grey Pearlescent card stock to die-cut the base of this die. I added scraps of yellow card stock behind the windows and doors of the village, and also die-cut this from a piece of Twilight Glitter card stock (from the MMH October 2018 kit). I trimmed all of the snowflakes from the twilight piece and glued them to the top of the grey base snowflakes. The bottom snowflake and two stars are inlaid. I cut this die once more from a piece of Black Tie Glitter card stock and trimmed everything away except for the ‘frame’, and glued that to the top of my layered pieces. Lastly, I glued all the pieces on top of another piece of white glitter card stock and trimmed all the edges to match. I did cut off the hole at the top of this ‘tag’ as I was only using this as our focal image for this card.
I used another snowflake embossing folder from my stash to de-boss the front of this soft Grey card base, cut a piece of the grey snowflake pattern paper to 3 1/8″ x 5″ and matted that to more of the Black Tie Glitter card stock.  That panel is glued to the card front at a jaunty angle, and the layered die cut is foam taped to the top of that. I thought the seasonal sentiment on this die lent itself to another sentiment stamp from this kit, so I stamped the “Sweet Season” sentiment on the inside of the card. I really like the soft muted colors here! The glitter and pearlescent pieces add a really nice sparkle.
I was fiddling around with pieces from our die-cut topper sheet and came up with this…

Another shaker card! Who can resist those pre-made shaker tags?? The “Deck the Halls” ornament from the die cut topper sheet went with this shaker tag perfectly and added a little more interest (and a sentiment) to the front of this card. I simply slipped the die-cut piece under the edge of the shaker front and glued it directly to the acetate. I like the extra pop of red as well! I die-cut a piece of the ornament pattern paper with a Lawn Fawn Stitched Rectangle die, wrapped the cord from the shaker tag over the top, and matted that to a piece of Tim Holtz Kraft Core Metallic gold card stock. I glued those to a Mint card base and glued the shaker directly to the card front. You’d have to be very careful if you wanted to remove and save this shaker tag..!  Since there’s a little bit of ‘magic’ in every shaker card I decided to add this sentiment from our stamp set to the inside of this card. I think it really completes the “Deck the Halls” sentiment on the front! More sequins scattered around for a final splash of sparkle and we have another interactive Christmas Card done up in a non-traditional color scheme!
One of our pattern papers featured a very large wreath with a swan in the middle…
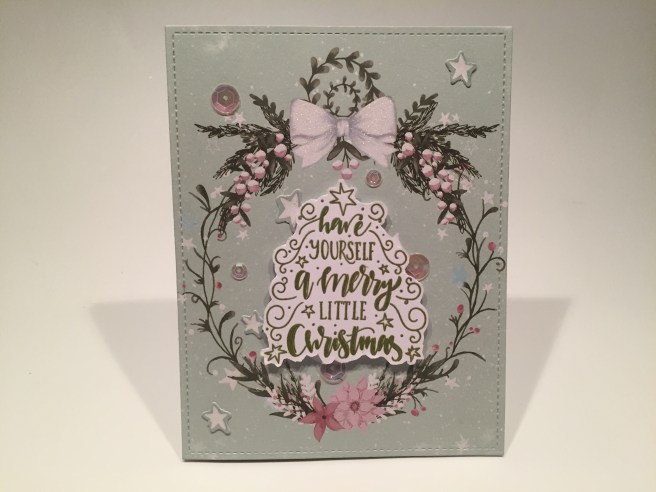
No more swan! I die cut that pattern paper using the largest LFSRD (4.25″ x 5.5″) (that wreath JUST fit!!) and glued that to our second soft Grey card base. I stamped the sentiment on a scrap of white card stock using Forest Moss Distress Oxide ink, and embossed that with some clear embossing powder. I fussy cut that sentiment out and attached that over the swan using foam squares. I added the five-pointed stars from the Mint decoupage sheet to help hide the swan’s crown and finished embellishing this card with more sequins from our sequin mix. I REALLY liked this wreath but was getting a little tired of the swans at this point… and the glitter on that white bow makes me happy!
I haven’t used any of the five ephemera pieces yet, and I did like that Christmas tree…
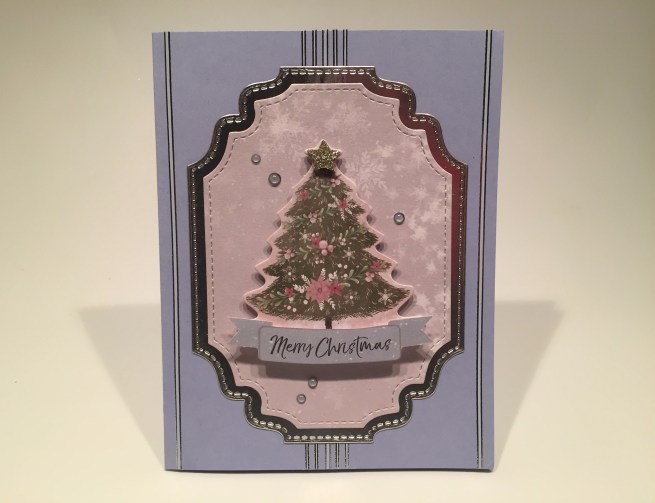
I grabbed an old LDRS Fancy Rectangles and Layers die for the background shapes for this card. I cut the smaller rectangle from the grey snowflake pattern paper and the larger mat from some Tim Holtz Kraft Core Metallic silver card stock, and glued those pieces together – what a perfect ‘traditional’ shape for a Christmas Card! I added a bunch of kit peel offs to the soft Blue card base and glued the background directly to the card front. I added the “Merry Christmas” banner from the die-cut sheet over the “Winter Wishes” banner on the tree ephemera piece with some foam squares, and mounted that piece to the card front with more foam squares. I covered over the gold glitter on one of our wood veneer die-cut stars with silver glitter and glued that to the top of the tree,  and added some small dots of our Steel Blue Jewel Drops for a little more shine and dimension. One more sentiment stamped on the inside of this card and we have another thoughtful holiday expression for loved ones or any one dear to you. And you hardly notice that tree is on a pink background..!!
I was thrilled to receive the Silent Night Stamp Set this month and was ready to color..!
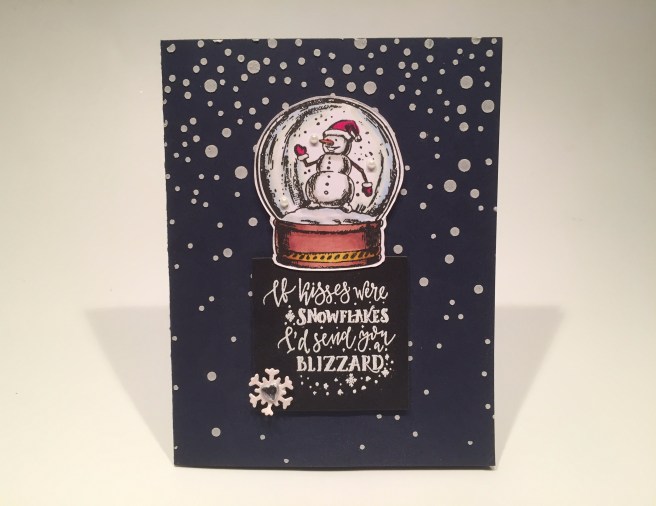
I stamped the snowman snow globe using Onyx Black ink on some LFL super smooth alcohol friendly card stock and colored him with my Spectrum Noir alcohol markers and fussy cut him out. I embossed this sentiment on a scrap of black card stock using VersaMark ink and some white embossing powder. This stamp had a bit of a typo on it – “If kisses were a snowflakes I’d send you a blizzard” – I simply trimmed the “a” away from the stamp to correct it. I die cut that sentiment with a Darice Nesting Square die and glued that to the bottom of the snow globe.
On the Navy Blue card base, I used the Simon Says Stamp Falling Snow stencil and my Ranger Opaque Matte Texture Paste to add the snowfall background. I was going to add the snow powder to these dots but that paste dried so quickly, by the time I removed the stencil nothing would stick. Oh, well!! I mounted the snow globe and sentiment using foam squares, and embellished this card with a few white pearl dots from my stash (inside the snow globe) and a white glitter snowflake cut from the Let It Snow die with a heart gem (from the LFL October 2019 kit) on the bottom of the sentiment. I did wrap up this card with the “Merry Christmas” sentiment stamped on the inside writing surface. Very cute…!
By this time, I’m starting to get a little silly, so for something completely different…
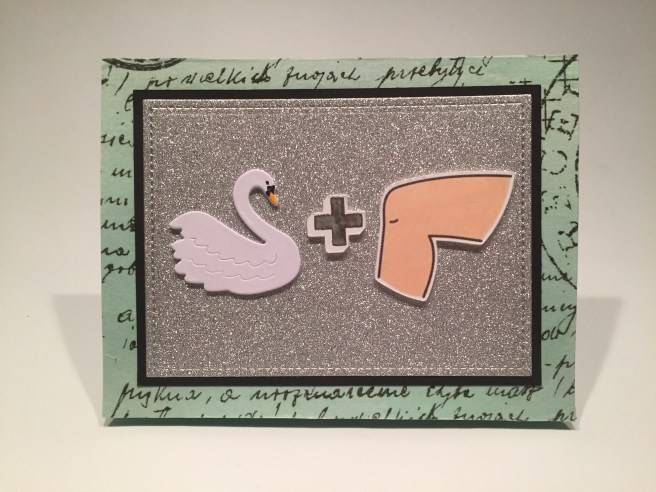
It’s been a while since I did a rebus on a card! This one is so simple and made me laugh so hard, I couldn’t resist! Of course swan + knee = Swanee and on the inside…

No Christmas here, but a funny musical Valentine card! On my second Mint card base, I glued a piece of Tim Holtz Postal tissue paper over the top to add a little texture and interest to the card front. I die cut a panel from our second glitter card base with a LFSRD and matted that to a plain piece of black card stock before gluing that to our card front. I die cut the swan die 4 times and glued them all together adding a little detail on the top piece. I found this picture of a knee in my image stash, imported it into my Silhouette software, printed the knee and the ‘+’, and cut them both out 4 times and glued them all together. That makes all of these pieces nice and chunky and very dimensional! I glued our images to the glitter card panel, and printed the inside sentiment using my Silhouette Software and the Henny Penny font. Nice and playful, and good for a laugh!
We did get two swan-shaped card bases in this kit. I though the most interesting thing about those pieces was the fact that the swan was printed on the front and the back of the card – thus giving us a pair of mirrored swan images!

For our last card this month, I have a big 5″ x 7″ card featuring the two swans with their necks intertwined! I fussy cut the front and back of one card base removing the area underneath their heads. Then I cut the top of the head away from the swans back on the left swan wrapped the two necks together and taped the left head back to its cut line. I did remove the gold crown from the right swan and added the small satin bow and 3 sprigs from one of our silver die cut snowflakes. I added more of those mini copper gems to the points of the golden crown and covered that crown with my Spectrum Noir Sparkle pen. For a final touch, I poked small hoes in the sides of the swans and fed two feathers through the holes and glued them down on the back.
I cut a piece of white card stock to 10″ x 7.5″, scored and folded it in half to make a 5″ x 7″ card base. I ink blended some Salty Ocean Distress Oxide ink on the bottom and Broken China Distress Oxide ink on the top. I mounted the swans to the card front using foam tape, trimmed off the back of their tails at the edges of the card base, and added the die cut topper sentiment in the middle with foam squares. I love this! I don’t often make a card this size, and I think the feathers really make this card come to life! A beautiful, soft and fuzzy Valentine!
That wraps up my 10 Card 1 Kit post for the Love From Lizi November 2019 “Enchanted Lake” Card Kit. A batch of very interesting holiday cards in a mostly non-traditional color palette, and I did manage to squeeze in a couple Valentines too!
I used all but two of the stamps from our stamp set, and I believe I used some of everything in this kit except for that snow powder and the acetate sheet… so close!! And I’m especially pleased that I managed to create 6 cards without a swan on them! LOL! Pass me a drumstick, please!
At posting, this kit is still available at lovefromlizi.com… a rarity among Lizi’s kits… If I’ve managed to capture your imagination or encouraged your interest in this unique holiday card kit, please use my link when you go shopping with Lizi! http://shrsl.com/1wqc7
Thank you so very much for your time, your encouragement and your support. It means more to me than you will ever know! Please remember to Like Me, List Me, Pin Me, Post Me, share me with all of your friends… don’t wait til the last minute this year, and as always, Happy Crafting and a warm Happy Holidays to you and yours!
