
Hello Folks! Scott here with my 10 cards featuring the Love From Lizi July 2018 Card Kit. This kit celebrates summertime with a unique ‘infinity’ shell stamp, lots of colorful card stock and pattern papers and eight decoupage sheets. Now, UK decoupage is all about layering up with foam spacers to create dimension, versus American decoupage which is all about gluing layers down as flat as possible. I have been with Lizi for just over a year now and this is the first time we’ve gotten decoupage in the monthly kit!  I was really intrigued with that infinity stamp, so the first thing I did was grab my VersaFine Onyx Black ink pad and some Bristol Smooth card stock and stamped that infinity stamp six times – trying to be very careful with my placement.
 Came out GREAT! Now, if you look very closely you can see some seams that are slightly off, but due to the nature of this illustration, it is virtually unnoticeable! This stamp has starfish, conch shells, whelk shells, nautilus shells and some oyster shells. I was eager to do some coloring on these groovy seashells, and knew that I wanted to use my Zigg Clean Color Real Brush markers so I could color these shells with some really fine detailing.
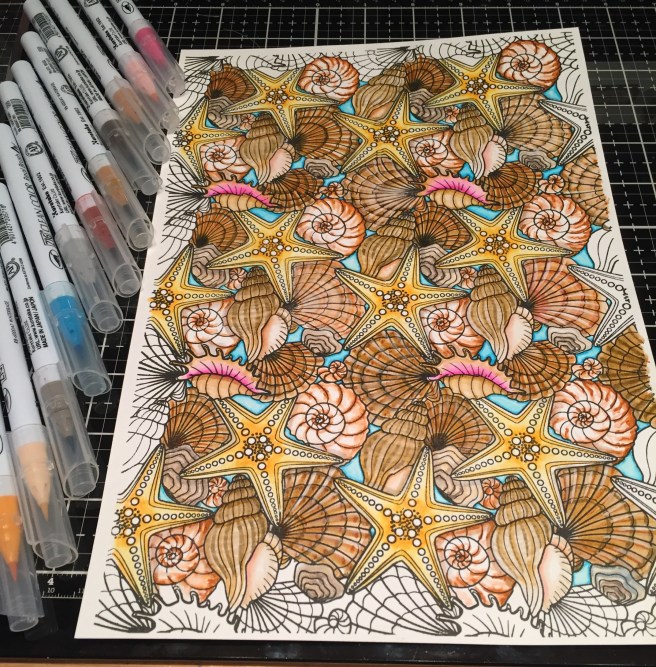 That’s why I chose to use the Bristol Smooth card stock. I put some music on and lost myself in this pattern for a couple hours. I realize that the Zigg markers will blend with each other, but I have always liked using water and a brush to move these markers around… and besides, I was shooting for more of a realistic look and didn’t want the shells to be too bright. I was completely thrilled with how nicely this turned out! I should be able to get a number of cards from this (just under) 12″ x 8″ infinity pattern. As I was coloring, I was looking for a shell that would lend itself to being cut out from the pattern, and, if you look at the stamp itself, there is only the one whelk shell (next to the starfish) that is on top of all the other shells and ready to be cut out. However, if you stamp the repeating pattern, you do end up with one Starfish (down the center) and the conch shells (though rather small..) that are on top of the other shells too, and can be fussy cut away from the pattern. Hmmmm…!
I did take the colored card stock from the kit and cut them all in half to make card bases, with the exception of one of the sheets of smooth copic-friendly white card stock (in case I was going to do some alcohol marker coloring). I replaced that with a sheet of my Recollections Kraft card stock thinking that would be a good color for this kit. I wasn’t quite prepared to start cutting apart my colored stamping yet, so I reached for the decoupage sheets to get myself rolling with these 10 cards.

I liked the Happy Birthday decoupage sheet (despite all the pink!) and grabbed the striped pattern paper that matched the fabric on the beach chairs for my background. On the Sky Blue card base, I cut the pattern paper to match the width of the image minus the frame and glued that down to the card base. I added three strips of the glitter peel-offs on the middle horizon of the card and then built the decoupage in the center. We did receive some foam squares to use with the decoupage this month, but I grabbed my own ek tools 3-D dots just because they were a little bit thinner than the squares provided. When you have three, four, or five layers the thickness adds up! I enjoy and appreciate the fun dimension that decoupage adds to the card front, and this card is very cute (a kitten, a puppy , a bear – how could this be anything BUT cute!!) LOL!! I tied a double bow from the 1/8″ Teal Zeal satin ribbon for the top of the frame, and added one of the large sequins from the sequin mix to the bottom. Very cute birthday card, oriented towards a younger crowd, but that’s okay… I have plenty of youngsters in my life!
 Time to start cutting the seashells apart…!!! I wanted to feature one of the starfish on this card and found a way to fussy cut an edge on this stamped pattern in line with the starfish, and also fussy cut one starfish completely away from the pattern. I wanted to use the sand included in the embellishment bag to cover some of my ivory card stock to go under the cut edge of my pattern, but I realized the sand was a touch damp (I know retailers dampen play sand to cut down on the dust) so I was having a hard time getting it to stick to anything. I threw all my sand in a low oven to dry it out and reached for my new Sand embossing powder from the My Monthly Hero June kit and used that for this card instead. That works terrifically well with this stamp – very nicely in scale with the shells! I glued the embossed ivory card flat to the Kraft card base, before adding a thin black mat on the square side of the shells and foam taping that up on the card base. I added some sparkle to the fussy-cut starfish with my clear Spectrum Noir glitter pen and foam taped that up on top of the star in the center before adding a few Nuvo Drops on the center five dots. I do want that one starfish to be the ‘focal point’ on this card so I didn’t add any sparkle or Nuvo drops to any of the other shells. I go to my computer and the Silhouette software for my sentiment here which I ‘sketched’ on some scrap ivory card stock (Papyrus silhouette font) using a brown Pigma Micron pen, and die-cut with a small Lawn Fawn Stitched Rectangle die. I added the sentiment with some foam dots (tucking a corner under the starfish) and this “Wish Upon A Star” sentiment is useful for birthdays and other important occasions. I really like the cut edge on this card – looks like a big pile of shells has just washed up on the shore.
 Besides the stamps, most of the images in this kit are on the decoupage sheets, so I started looking for images that would pair with the sentiments in the stamp set. The only decoupage that had any ‘waves’ was the sailboat sheet that had a “By the Sea” sentiment printed on the background (layer 1) piece. I cut a piece of scrap white card stock to match the dimensions of the ‘layer 1’ piece and added some clouds to that with a My Favorite Things Mini Cloud Edges stencil, some Broken China Distress Oxide ink and my Inkylicious Ink Duster brushes. This is one of the easiest and most effective ways of adding some clouds to your background, and the Broken China ink is a very good match with the blue on the decoupage sheets. I then went ahead and built the decoupage image on the cloud background (still using my thin foam 3-D dots) and matted that on some yellow and black card stock from my stash. I stamped the “Happiness…’ sentiment in SSS Watermelon Hybrid ink on a scrap of the same yellow card stock, embossed that with clear embossing powder, die-cut that with a stitched circle die, sponged a bit of the SSS Orange Slush hybrid ink around the edges, and mounted that to the card front with some foam squares. Kind of echoes the look of the sun high in the sky. Everything is mounted to the Red Berry card base and a few red sequins from the sequin mix add a touch more bling to the top and bottom of this card. “Happiness comes in Waves” makes much more sense to me than “By the Sea” ever could..! LOL!
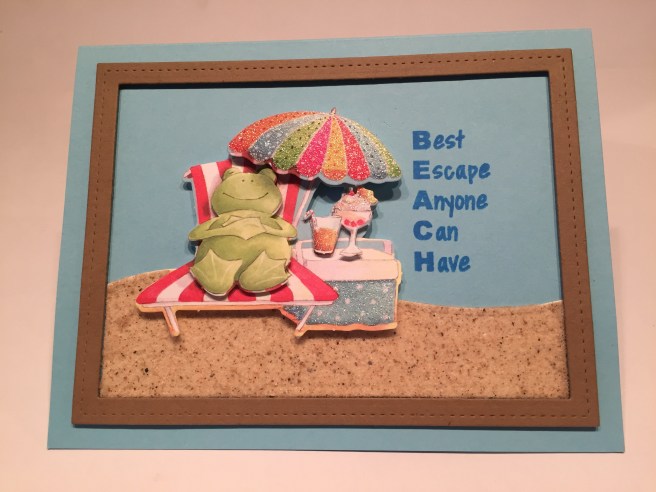 By now my sand is nice and dry from it’s slow bake in the oven so I wanted to try using that again. I cut a Kraft frame with two stitched rectangle dies and cut a piece of ivory card stock with a stitched hillside die to make a bit of a ‘beach’ that fit inside that frame. I covered that piece with double-sided adhesive from my ATG and the sand stuck beautifully. I added the Kraft frame to the Sky Blue card base with some foam tape and glued the sandy beach flat to the card front. The decoupage piece of the frog lounging in a beach chair under an umbrella, has a “Just to Say…” sentiment printed on the background (layers 1 AND 2) and I wanted to use the “Best Escape Anyone Could Have” sentiment from the stamp set, so I built the decoupage image on the ‘sand’ starting with layer 3. I stamped the sentiment directly on the card base using Hero Arts Summer Sky ink pad and, what with all the glitter on the decoupage pieces, I thought there was no need for added embellishments. I really like the Kraft frame on this card and how the blue card base becomes the blue sky inside the frame – and that sand looks terrific!
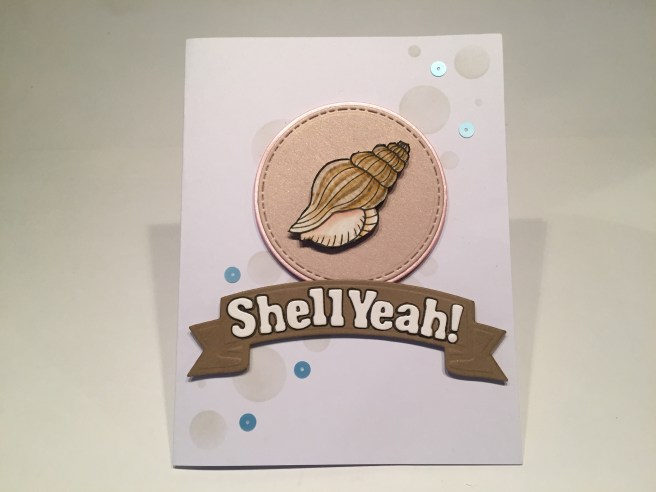 I mentioned the whelk shell from the stamp that was a complete shell just waiting to be fussy cut, so that’s what I did for this next card. On a white card base, I stenciled some ‘bubbles’ using the stencil included in the kit from the bottom left to the top right using some SSS Barely Beige ink and my finger sponges. I did selectively mask off some of the ‘bubbles’ to get the pattern that I wanted, and I really liked the soft tones that ink gave the stencil. I fussy cut one of the whelk shells from my colored sheet and mounted that to some circles die-cut from the Blush and Pink specialty shimmer card stock. I glued the circles together and mounted them to the card front with foam squares from the kit, and mounted the shell on top of that with the same. I die-cut and embossed a banner from Kraft card stock with one of my Darice Banner dies, and die cut that sentiment from the Oyster White specialty paper with an old alphabet die “Little Lizzie” I don’t think I’ve ever used this alpha die before and I really like it!! The “Shell Yeah! fit on that banner perfectly, and I traced around the letters with one of my Pigma Micron Pens for some extra contrast.
  I attached the banner to the card front with more foam squares, added a few sequins from the Summer Sprinkles sequin mix, and to finish this card up, I stamped a ‘congratulations’ sentiment (from the Hero Arts Many Everyday Messages stamp set) on the inside. Love how the die cuts echo the stencil and everything highlights that shell! I love the bright simplicity of this card!
 We received a great ice cream cone die (with a Flake die!) in our kit this month and I wanted to do some fiddly inlay work with it! The cones are die-cut from Kraft and Ivory card stock and the ice cream is cut from the Pink and Oyster White specialty card stock and I dug up this ‘chocolate’ shimmer paper from the August 2017 Love From Lizi Card Kit (I TOLD you I keep all my scraps!! LOL!!). I simply colored all the cut out detail pieces with my alcohol markers before gluing them back in place. On the white card base, I glued a 3″ wide panel of the Blush specialty card stock down the middle and added the three small satin ribbons from the kit on the sides. I do run my ribbon through a Zyron Sticker maker to add complete coverage of adhesive to their backs, and can trim them off right at the edge of the card. I die-cut the glittery ice cream pattern paper with a stitched circle die, and used my ek success Orbis Circle Scissor to cut a blue mat for that. Those are foam taped to the card front and the cones are foam mounted to the pattern paper circle. That Oyster White shimmer paper didn’t shimmer as much as the other two so I added some sparkle with my Spectrum Noir glitter brush. Once again, I turn to my Silhouette software for this sentiment using the Smoothie Shoppe font (naturally!) and printed on a scrap of the Oyster White specialty paper. I die-cut that sentiment with a stitched rectangle die and attached that to the card front with foam squares. And, no… I didn’t forget a couple of Flake chocolate bars (that chocolate shimmer paper again) stuck into the strawberry and vanilla cones! This card feel like a whole ice cream shop to me! And I think that is a really sweet sentiment perfect for a loved one or a valentine!
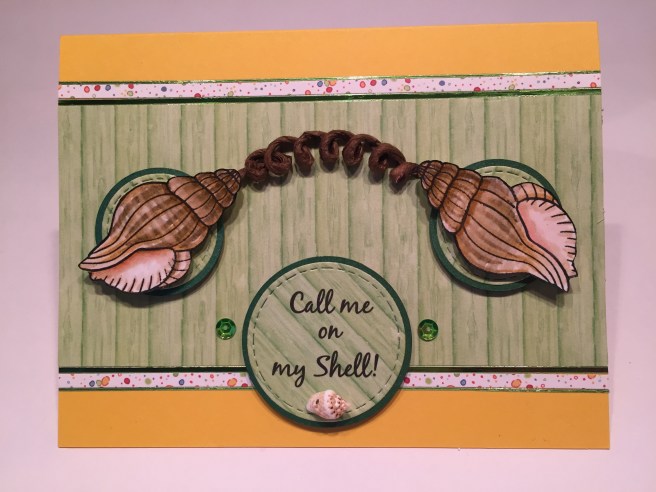 I was so enamored of that whelk shell, that I cut two more out of my colored stamps for this fun card. On the Golden Sunshine Yellow card base, I glued down a 2 and 5/8″ strip of the green wood plank pattern paper, outlined that with some LFL Mirror Green peel-offs (from the LFL January 2018 kit – perfect match!) then a small strip of the dotted pattern paper and another thin green peel-off. I die cut three circles from the same pattern paper with my stitched circle dies and cut mats for them from the Forest Green specialty card stock with my Orbis circle cutter (I’m starting to love that circle cutter)! The sentiment was printed on the larger circle in the Black Jack font before I die-cut it. The circles are mounted to the card front with foam tape, and the shells on top of their circles with the foam squares. I dug out some of that paper wrapped wire from the LFL March 2018 card kit and coiled that around a paintbrush to make my ‘phone cord’. LOL! I think that wire was the perfect choice here and once I flattened it down a little, it doesn’t add too much thickness to this card. A couple of sequins and one of those small shells adds the perfect finishing touch to this pun-y card! Love the image of the two shells connected together!
Okay, I’ve still got one more good card front I can use from my original colored stamping, and that great pun of a sentiment from the stamp set. I trimmed the stamped and colored shell sheet down to 5″ x 3.75″, and matted that on a thin black mat. On my Kraft card base, I ran some 1/4″ scor-tape around the edges of the card and added the sand all the way around. It added some great texture and color, but it reads much better on a lighter color like ivory. I foam taped the background to the card front, stamped all the rest of the shells from the stamp set and colored them with my Zigg markers and fussy cut them all out. The four scallop shells mount in the corners with foam squares, and the three tiny shell stamps get covered with Nuvo Crystal Drops in Morning Dew for a little clear shine and I stamped the sentiment with Vintage Photo Oxide ink on a scrap of my Ivory card stock and embossed that with some clear embossing powder as well. I curved the stamp to fit another one of my Darice Banner dies, and mounted that with foam squares on the card front. The mini shell stamps adorn the sentiment and do double duty as the shiny bits on this card. WOW! Talk a bout a SHELLabration!! This card sports all of the image stamps and now I have actually used all of the stamps in this stamp set! YES! LOL!!
 I was kind of itching to use this sentiment on a card this month, and I thought the little beach house decoupage was the perfect image to go along with my “Beach, Please!” LOL! Once again, the “Summer Fun” sentiment printed on the beach house background (layer 1) really didn’t appeal to me, so I assembled the decoupage starting with layer 2. I cut a piece of light blue card stock from my stash to 5.5″ x 3.75″ and distressed the edges with Peacock Feathers Distress ink and glued that to the Red Berry card base. I cut a piece of my ivory card stock with a stitched hillside die and ink blended the beach with Antique Linen and Vintage Photo Distress inks before printing the sentiment (Noteworthy font) on my computer. I glued the beach hill on the blue sky and built the decoupage with layers 2, 3 and 4. On layer three I fussy-cut the windows on the doors out for a little backwards dimension (the decoupage sheet actually has those windows as another part of layer 4 but I thought the windows should go in instead of out! Since this little beach house had some banner hanging from the roof, I added a swag of banners across the sky with the puffy stickers. The sticker swag was a touch wider than my background, so I added a couple of thin white strips down the edges of the background for a final pop of white and to match the white outlines on those stickers. I think this would be a great card to send to someone to finagle an invitation to their beach house this summer!! LOL!
Now we get to my favorite pun out of this whole batch of cards…!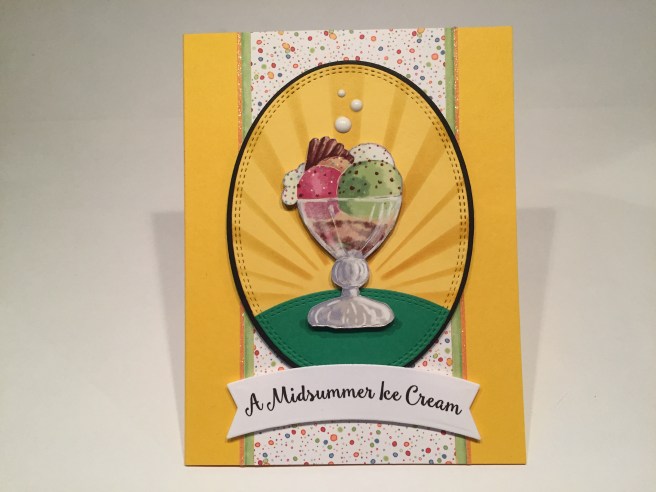 Of course, “A Midsummer Ice Cream” is a pun on Shakespeare’s “A Midsummer Night’s Dream”! This makes me giggle uncontrollably! I used the ice cream sundae ephemera piece for this card after fussy-cutting it away from it’s pink background! I used my Gina K. / therm-o-web stitched oval dies to cut some yellow and green card stock from my stash and the black mat behind. I used my stencil I made last month again here, sponging with SSS Orange Slush Hybrid ink behind the green ‘hill’. On the Sunshine Yellow card base, I glued down a 5.5″ x 2.5″ strip of the dotted pattern paper, outlined that with thin strips of the green pattern paper and finished that off with some of the glitter peel-offs. I mounted the ovals to the card front with foam squares and the sundae on top of that with more foam squares. I printed the sentiment using my Silhouette software on a scrap of white card stock in the Smoothie Shoppe font (I couldn’t resist!), die-cut that with my Darice banner die, and mounted that with foam squares as well. A few drops of the Simply White Nuvo drops above the ice cream finishes off this card very nicely and echoes the dotted pattern paper.
  Of course, I can’t leave well enough alone, and came up with a double pun for this card. On the inside we get “Lord, what cool these morsels be!” (Lord, what fools these mortals be!) LOLOLOL!! Knowing what’s inside sends me into fits every time I look at this card. I may have a warped sense of humor but I love the look of this card (invitation to an Ice Cream Social??) and I think that pun-y sentiment is terrifically funny and figure that most people probably know what A Midsummer Night’s Dream is, even though they may not recognize one of the most famous quotes from that play. I hope it tickles you as much as it does me!!
 That wraps up my 10 cards for this month, folks! I really enjoyed working with this kit a lot, and I think I did pretty good job of avoiding all the pink…!! LOL! I really loved coloring that stamp and think I managed to come up with quite a wide variety of cards that are fun and unique! I hope you enjoy them as much as I do! As usual, I have gobs of leftovers including one sheet of smooth white card stock, four complete decoupage sheets, lots of pattern papers, some specialty card stock scraps, and loads of embellishments including one whole sheet of foam squares. I did manage to use a little bit of most everything in this kit but I didn’t get to any of the wood veneer die cuts, printed or not. I love that infinity stamp, and that, with all the extras (including the ‘Bubbles” stencil) will find loving homes in my stash! Unfortunately, this card kit has sold out already, but I do know that Lizi still has the decoupage sheets, pattern papers and add-ons available, and will very likely release the ‘infinity’ shell stamp set for sale in her mid-July release! If you want MORE decoupage… Lizi has an Oh, Baby mini kit available (my Oh Baby kit video here) at a very reasonable price. Remember, if you go shopping at LoveFromLizi.com please use my link: http://bit.ly/LFLlink. Thank you SO MUCH for sharing your valuable time with me – it means so much! Please share this post with anyone you think might be interested, don’t run with scissors, and HAPPY CRAFTING!!

Your ” Midsummer. . . ” Still has me smiling ; )Thanks for sharing your genius.
LikeLike
Thank YOU, Alice! Always appreciated!
LikeLike