
Hello Folks! Scott here with my 10 cards from the Love From Lizi June 2018 Card Kit. Lizi  refers to this kit as the “Makers Gonna Make” card kit featuring lots of colorful papers, cut apart sheets, chipboard stickers and an exclusive ‘build-a-bust’ stamp set. Initially, I was a little intimidated by this kit because it is rather aggressively ‘girly’, but after a little bit of experimenting, I figured out some unique ways to use these supplies and was actually able to create some truly masculine cards.
As usual with the LFL kits, I did cut and fold the included card stock sheets to A2 size for use as my 10 card bases. We received three 12″ x 12″ cut apart sheets in this kit that had some great images and pattern papers on them, and this 4″ x 6″ sewing machine cut apart caught my eye first, so I figured why not add some stitching to this paper?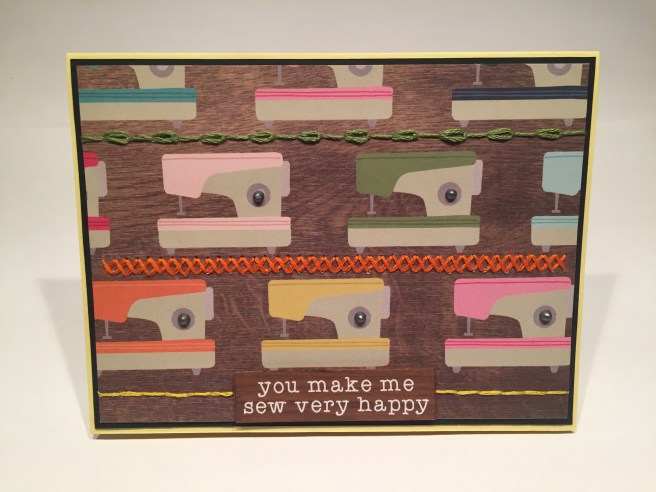 I broke out the embroidery floss and my Tim Holtz Design Ruler along with my retractable craft pick to punch holes in the card stock for my stitching.
  I picked three colors of DMC floss (#3347-medium yellow green, #947-burnt orange, #973-bright canary) to match some of the sewing machines on the pattern paper and, with three strands of floss, I did a simple back stitch on the bottom, a cross stitch in the middle and a chain / straight stitch on the top. The sentiment on this cut apart was a simple ‘sew very happy’, so I went into my Silhouette software and expanded that sentiment to be ‘you make me sew very happy’ (in the Typewriter Hand font) and sized that to cover the original sentiment at the bottom of the page. I matted the sewing machines to a thin black mat and glued those down to the Sunshine Yellow Card Stock. I mounted the printed sentiment up on some foam tape and added dots of the Nuvo Crystal Drops from the kit to the centers of the ‘stitch regulator’ dials – love that Liquid Mercury color! I confess I have a hard time NOT sewing on any pattern papers referencing stitching or sewing! Got to love the texture that adds! This is a fun, colorful, ‘crafty’ card with a little text adaptation granting us a useful sentiment!
 Lizi usually gives us the option of purchasing matching chipboard stickers with the add-on products offered along with the subscription kits, but this month she included them in the kit to begin with! Plus for Us! There were three lady chipboard stickers and I noticed that two of them looked very similar… almost like sisters… and that prompted this card. For the background, I trimmed a piece of the lilac plaid pattern paper down to three and a half inches wide and (after splitting the lilac heart shaped ribbon down the middle) added those ribbon pieces to the two sides and glued that down to the Cerise Pink card
 base. I went back to my Silhouette software for the sentiment on this card using the Bradley Hand font and printing directly on the plaid pattern paper. “You’ll always be my sister…” on the front and we finish that out on the inside with “my OLDER sister! HAPPY BIRTHDAY!” LOL!! I added some tiny gems for earrings on the girls, and a sequin to the hair flower on the right girl and then finished the card with some Soft Lilac peel offs down the two edges of the plaid pattern papers. Nothing crafty here – just a fun Birthday Card for your older sister! Though I am nobody’s sister, I’ve got to use those pink card bases somewhere! LOL!
Now let’s play with the stamp set and see what we can come up with. The main ‘head’ stamp didn’t have a top to the head (so you could add one of two hairstyles) so… my devious mind began imagining what other things could be on top of this head… LOL! 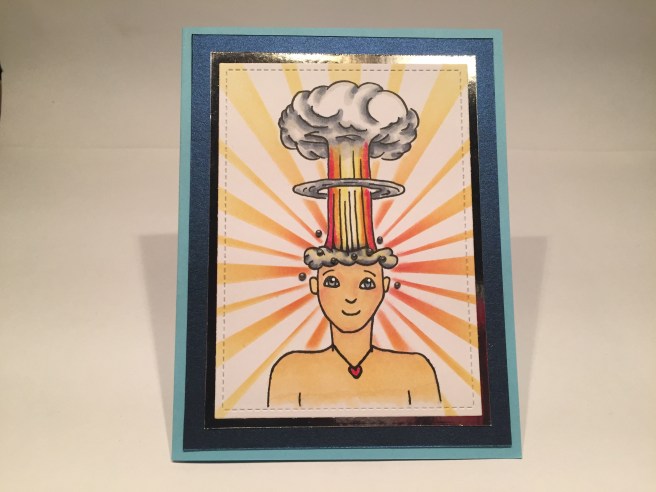 So I ended up creating this fun image. I did a quick search for ‘mushroom cloud cartoon’ and found this usable image that I was able to size correctly.
 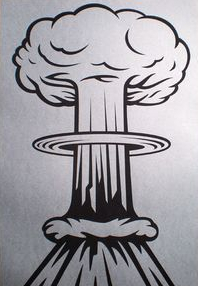 I did stamp the head with VersaFine Onyx Black ink on a piece of the ‘copic-friendly’ white card stock included in the kit, and simply traced the mushroom cloud on top of the stamped head with my Pigma Micron Pen. I did have to cut a mask for this image so I could do the circular ray stencil on the background – I didn’t have a stencil like this in my stash, so I tried using the “Pretty Plaid” stencil from the kit but was not very successful with that. SO… I turned to my Silhouette Portrait to create my own stencil! I like the alternating wide and thin rays that I achieved with my new stencil. I actually used the Silhouette Stencil Material for the very first time to cut out this stencil, and am thrilled with the results! They sell this stencil material in sticky or non sticky versions (I went for the ‘sticky’ of course!) and now I have a great ‘starburst’ stencil in my stash that is unlike any other stencil out there! I LIKE that! I used my ink blending brushes to ink blend the rays with my Simon Says Stamp Hybrid Inks in Watermelon, Orange Slush and Lemon Zest, and then colored the image with my Spectrum Noir Alcohol markers. One (or two) things to be aware of when using this head
 stamp — there are no pupils in the eyes (so you can make the image ‘look’ in any direction) and there are no eyebrows on this face! I thought this face was a little alien looking when I first stamped it, and it took me a while before I realized that there were no eyebrows – so don’t forget to add eyebrows!! After coloring, I die cut it with my Lawn Fawn Stitched rectangle dies, and I matted the image on a thin mat of the silver mirror specialty paper and a wider mat of the dark blue shimmer specialty paper and added that all to the Sky Blue card base. Of course, the “you blow my mind!” sentiment is printed on the writing surface inside the card in the Superclarendon font. LOVE this colorful, fun card! You can put anything on the top of this head stamp!
The dies included in this month’s kit were six assorted button dies, so I started wondering what I could do with some die-cut buttons! After belaboring every ‘toggle’ button pun I could think of, I ultimately came up with this very masculine card! Why not take advantage of some of that great “Got to Have Gingham” pattern paper from Lawn Fawn! Here we have a really nice representation of a shirt front… I cut the straight grey gingham with a stitched rectangle die, and cut a piece of the diagonal gingham at 2″ wide. I scored and folded that piece one half inch from each side so my ‘placket’ would have two folded edges. I drew some ‘stitches’ down the sides of the placket with a grey watercolor marker and glued that to the center of the card front. All that was left was die cutting 12 of the four-hole buttons from gray card stock, gluing four layers together for each button and threading some DMC floss (#3072-light beaver gray) through the holes. I attached the buttons on top of the placket with foam dots for a touch more dimension, and mounted the gingham to a thin black mat and then down to the Medium Gray card base.
 So whats
 inside?? I had a bit of a dilemma with this sentiment so I just went ahead and created two sentiments that would work with a card like this. Of course, I ultimately went for the pun-y sentiment but I really like the thanks for helping sentiment too! Both of the sentiments I created using my Silhouette software and the Typewriter Hand font printed on some plain white card stock from my stash and die cut with my stitched rectangle dies. I love the grey gingham and the grey buttons and the ultimate simplicity of this card – not to mention that this is great for a guy! Very masculine!
I do try my best to use as many items in these card kits that I can, and, though I would never call myself a ‘doily’ person, I was drawn to the large double layered crocheted flower ‘doily’ included in our embellishments bag. Can I color that with my alcohol markers? Yes I can!! So I colored the double layer doily in oranges and yellows and colored the small flower doily in a couple of greens. I did add lots of white glue to the back of the small doily knowing that I was going to cut it apart to make leaves! Once dried, that small doily made perfect leaves! The texture and dimension that these pieces add to this card is so cool! I cut a piece of the blue gingham pattern paper with a stitched rectangle die and used the thinnest stripe on the “Pretty Plaid” stencil to ink in a
 stem with Mowed Lawn Distress ink. I matted that to a thin frame of the dark blue specialty paper and mounted all directly to the Sky Blue card base. My Ranger Multi Medium Matte was the perfect glue to attach the flower and leaves to the card front, and I added one of the faceted heart gems from the kit to the center of the flower. I created the sentiment using the Marker Felt font, and cut four of them with my Silhouette Portrait out of white card stock to glue together for a thick chunky sentiment on the front. On the inside, I just printed the rest of the sentiment on white card and cut it out with my stitched rectangle die. This is actually a quote from Picasso that I paraphrased a bit in order to make it gender neutral. I’m sure back in Picasso’s time it was generally assumed that all artists were men! Once again, here’s a terrific, colorful card that isn’t particularly feminine, and can be used for both young AND old artists! Now that’s my kind of card!
I thought the ‘measuring tape ribbon’ included in the embellishments bag was was far too interesting to pass up, so I chose to pair that up with a couple more of the chipboard stickers for another sewing themed card. 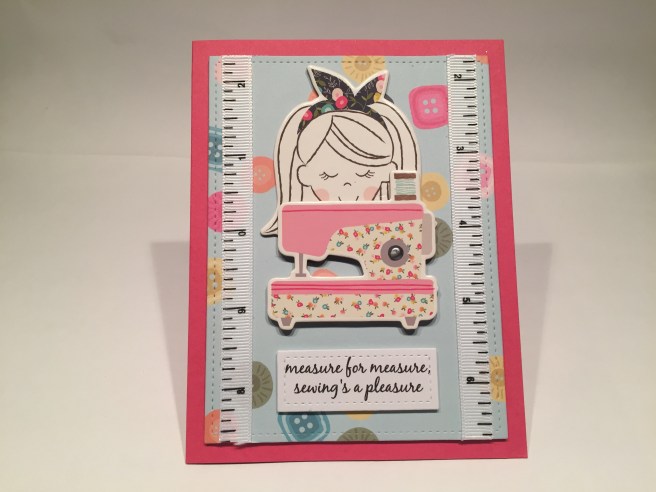 On the Cerise Pink card base, I used the button pattern paper from one of the cut apart sheets die cut with a stitched rectangle die, added that cool ribbon down both sides, and mounted that to the card base with foam tape.
 I do like to run my ribbons through my Xyron sticker maker to completely cover the back with adhesive – be sure to burnish the adhesive into the ribbon well – then I can simply trim the ribbon off at the edge of the card stock instead of folding it behind. You occasionally may need a touch of liquid glue to tame the cut ends but over all, I like how secure it holds the ribbon and the fact that there’s very little waste! I noticed that last girl chipboard sticker was very much in the same scale as the sewing machine sticker, so I decided to seat her ‘behind’ the machine as if she was sewing away..! I did add foam dots on the bottom of the sewing machine to level it up on the card front, and added this sweet sentiment that calls attention to that special ribbon. “measure for measure, sewing’s a pleasure” was printed in the Black Jack font and sized to fit my smallest stitched rectangle die. Another big dot of the Liquid Mercury Nuvo Drops on the ‘stitch regulator’ dial and a little ‘just for you’ sentiment on the inside completes this gift card that’s perfectly matched to any hand-made treasure you may be gifting! This is a new font in my library, and I like it very much – particularly the ‘just for you’ on the inside of the card is so very nice.
 Since I made my first card from a 4″ x 6″ cut apart, I turned to the 4′ x 4″ cut apart sheet and chose the text that was the most graphic for my next card. I fussy cut all these letters away from their background to use on the front of my card – I did reinforce the white outlines once the letters were cut out with my white fine point Sharpie poster paint marker – just a loosely sketched outline was sufficient to add a little pop and provide some contrast between the letters and the background ‘watercolor’ swatches paper which matches the colors of the text perfectly! I did use my largest stitched rectangle die (4.25′ x 5.5″) to get the biggest possible die cut from the background piece so there would be plenty of room for the text.
 I also added some nice sparkle to the background card stock with some Sheer Shimmer Spritz
  and glued that to a plain white card base. I did mount all of the letters to the card front with foam dots and added the paint pallet and brush chipboard stickers along the bottom. The real fun of this card comes when you open it. The “Art is cheaper than therapy” sentiment is printed in the Marker Felt font on a piece of scrap white card stock die cut with a stitched rectangle die. LOL!! Boy, ain’t that the truth!! LOL!! I did add a small ‘create’ sticker to the bottom right corner on the inside, and I love the dictum to ‘create’ coupled with a very good reason to do so! And this sentiment certainly applies to ALL!!
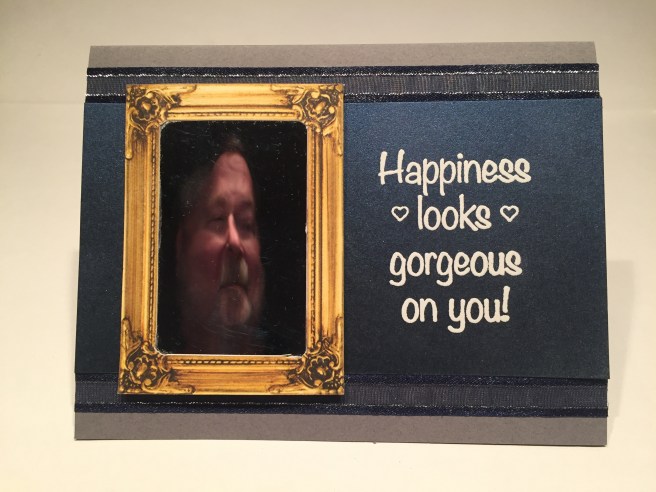 I couldn’t resist using this sentiment from the stamp set on a ‘mirror’ card! I have some old mirrored mylar in my stash and dragged that out to glue behind a frame cut out from one of the LFL November ’17 kit cut apart sheets. I told you I keep all my extras..!!
  Despite the ‘gorgeous’ in the sentiment (rather feminine) I was determined to make this as gender neutral as possible, so I embossed the sentiment on the dark blue specialty paper using VersaMark ink and my fine detail white embossing powder. I glued that down to the Medium Gray card base and added some of the dark blue ribbon to the top and bottom edges. Yes, I did use my Xyron Sticker Maker on the back of these ribbons too. I mounted the framed ‘mirror’ up on some foam tape and added a “Congratulations’ sentiment to the writing surface on the inside of the card using the Noteworthy font. I don’t think you can get much more interactive than a card that shows you your own reflection! Granted, a mirror has got to be absolutely flat to reflect correctly, but a little bit of distortion can be overlooked. On future cards, I would probably mount the mylar to a piece of chipboard to (hopefully) provide a perfectly flat surface for the mirror so the reflection would be more accurate, but you can certainly see yourself on the front of this card! Quite fun!
For the second month in a row, we received a stencil in our kits. This month it was the “Pretty Plaid” stencil which basically consisted of 7 different widths of stripes and a dashed line on one 4″ x 6″ sheet. Well… owing to my obsessive nature and my desire to 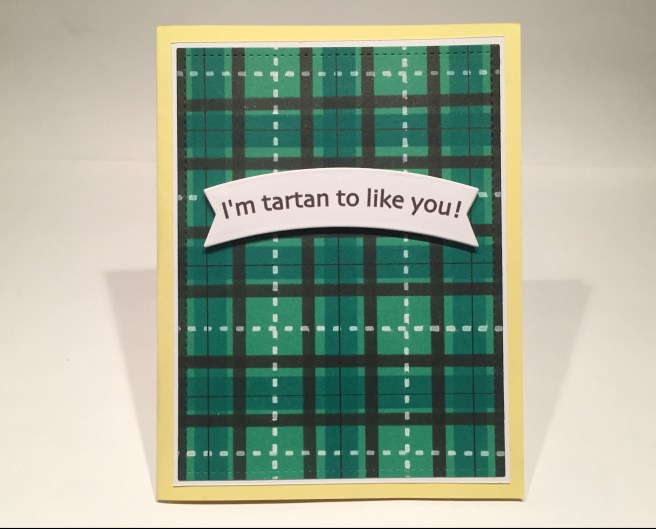 create as many masculine cards as possible, I thought I would use the stencil to create an actual ‘tartan’ plaid. Though not a completely accurate representation,
 I did base this plaid on the Scottish Lion tartan. On a piece of plain green card stock from my stash, I sponged the next to the widest stripe on the stencil with Peacock Feathers Distress Ink both vertically and horizontally. Then I sponged Black Soot Distress ink in a smaller stripe on both sides of the first blue-green stripes. Then I used my Avery Elle pure White pigment ink to sponge in the dashed line stencil in the open green spaces. Finally, I drew a thin black line through the middle of the blue-green stripes with my Pigma Micron pen. That was the final little detail that really sold this simplified tartan plaid pattern. Though it was extremely fussy and involved a lot of measuring and masking, I think this plaid came out terrific! VERY masculine!! LOL!
  Of course I have to use a little pun for this card – “I’m tartan to like you” I find extremely funny and unique! I used the Skia font and my Silhouette software to make this sentiment to fit one of my Darice Banner dies and cut 4 of those from white card stock and glued them together for a nice thick banner. I cut a thin white mat for behind the tartan plaid and mounted those both to the Sunshine Yellow card base and used some foam dots to mount the sentiment banner. Of course, why use only one pun when you can have TWO!! LOL!! On the writing surface inside the card, we get a little continuation of the front sentiment with “and I’m so plaid!” LOL! I couldn’t resist! I truly adore this card – not only for the unique puns but for the truly striking tartan plaid I was able to create on the card front. I think it would be interesting to try some other ‘Scottish clan’ tartans with this stencil. I do wish the stencil was 2″ longer than it is because then you could do a diagonal plaid on an A2 card front, but regardless of size limitations, I do love this very masculine card!
I have to admit that when I first saw Lizi’s un-boxing of this kit I started wondering if I could possibly turn the woman on this ‘build-a-bust’ stamp set into a man… maybe something as simple as a different hair style could change the whole look… so I started experimenting with different ways to use these stamps and different things that I could accessorize the main stamp with. I fiddled around quite a bit and finally hit upon the idea for this fun card that actually goes with the “Perfect, just as you are” sentiment brilliantly! So… In honor of June being Gay Pride Month, this is my final card this month.
Now this whole three-layer card lay-out was dictated by the arrangement of the third ‘dressed up’ image since that was where I wanted to put the sentiment. Since this stamp doesn’t have anything below the shoulders I knew I had to put some sort of a frame around the image. I reached for my stitched circle dies and chose a frame just large enough for the stamp with the up-do hair style. That fit well with the sentiment below, so I stamped the head on all three layers in the same place. I used my colored pencils to color all the images on this card because I didn’t want any alcohol marker bleed-through on the back of the three layers. I did wipe away the junction of the neck and shoulders on the first image before stamping so I could put our subject in a robe, but the other two heads were stamped with the complete stamp. For the first image, I used my Pigma Micron pen to sketch a robe and a towel-wrapped head as if he had just stepped out of the shower. A little beard stubble and some straight bushy eyebrows and VOILA! we’ve created a guy out of this stamp! For the second image, I simply sketched in some slicked-back hair on the top of the head (the top of the bangs on the up-do hair stamp is a good indication of the top of this head), removed the stubble (he just shaved!) and plucked his eyebrows down to an attractive curve and added some false eyelashes. I did try repeatedly to stamp the eyelashes using the stamp from the stamp set, but no matter how hard I tried or how careful I was, I could not get those eyelashes stamped correctly. After a while I just gave up and drew in my own eyelashes. I added a bit of a slip to his shoulders (maybe it’s a brassiere) and colored him with a little more blush and some eye shadow as if he were in the midst of putting on his make up. Finally, we go all out for the last image using the up-do hair stamp and adding the lips stamp to his sly smile. The blush and eye shadow gets a little more color, and I dressed him up in a nice sparkly gown using the tiny teal sequins from the sequin mix. I added more of the same sequins around the base of the bun on the hair, and dug up the smallest clear gems I had in my stash to give him some matching earrings and necklace. I die cut three frames from my Kraft card stock to go around my three images (kind of looks like a big bathroom mirror) and added a 1″ strip of the blue plaid gingham pattern paper to the first image, the lilac gingham pattern paper to the second image and two 1/2″ strips of the pink gingham pattern paper to the sides of the final image. This card makes me laugh out loud every time I open it up. What FUN I had working with this stamp set to create something completely unexpected! And this “Perfect, just as you are” sentiment is particularly meaningful taken in the context of Gay Pride Month! I hope you enjoy this card as much as I do! I had a bit of a debate about whether to include this card with my 10 card video or not… I truly hope I don’t offend anyone… (and I hope Lizi doesn’t mind that I turned her into a drag queen! LOL!) but, as you know, I try to always think outside the box and aim to create as many designs as possible that push the envelope and shows you options for using your card kit supplies in new and unintended ways. LOL!!
 So that’s my 10 cards featuring the Love From Lizi June 2018 “Makers Gonna Make” card kit! I actually ended up having much more fun with this card kit that I originally thought I would! I think this is a very eclectic group of cards that highlights how many different directions you can go with this kit! Of course I have lots of leftovers but I did manage to use a little bit of most everything in the kit. As of the original date of this post, this kit is still available, so if you’s like to play along, please use my link to shop at lovefromlizi.com: http://bit.ly/LFLlink. ALSO, Lizi has re-released the Oh, Baby special edition decoupage kit in a new mini-pack. I did do a 10 card video and posting for the original release – you can link to that video here: OH BABY! and to the original web posting here. Remember if you are a subscriber you get free shipping on any product you add to your monthly kit, and the Oh Baby mini-pack is quite affordable! Please use my link to pick one up for yourself!: http://bit.ly/LFLlink. Thank you SO MUCH for joining me here and for sharing your valuable time with me. Let me know what you think of this batch of cards and remember – your support means everything! Spread the Cheer!

I love them all…of course! I’ll have to get on my laptop later to see your last card, since I can’t see it on my iPad, but I think that will be my favorite from what I can see in the group shot. Thanks for sharing!! 🤓
LikeLike
Thank YOU, Jeanne! Always good to hear from you! Spread the Cheer!
LikeLike
Hey Scott.
My friend Sue turned me onto your blog and I had to leave a comment to tell you that you seriously think outside the box!!! I love these cards and cannot figure out which I love more. You have a new fan and I cannot wait to see what you come up with next.
Michael
LikeLike
Thank you so much Michael! That means a lot to me! Welcome!! Your support and encouragement is what inspires me! Spread the Cheer!
LikeLike