
Hello Folks! Scott here with a special showcase of the Flavor of the Month Card Kit by Scrapping for Less for May 2018 – “In the Countryside”. Teresa Russell – the owner of Scrapping for Less – asked me if I would do a feature for her May Card Kit, and, since I had considered this subscription kit for my “A Year With…” series, I readily accepted! 
A unique feature of the FOTM kits is that they usually consist of four “collections” that are kind of like four little mini kits that comprise the ‘Double Dip Sundae’ level and an available extra collection of goodies that bumps you up to the ‘Banana Split’ level. Here’s a quick breakdown of all the supplies included in this kit:  Collection One: Six 6″ x 6″ ‘Country Kitchen’ pattern papers from Carta Bella; the Brutus Monroe stamp set: ‘Farm Emblems’; some Carta Bella Frames and Tags (ephemera); an alphabet sticker sheet (mine are pink!); and a small packet of matching Kennedy Grace Creations sequins. Collection Two: Six 6″ x 6″ ‘Down on the
  Farm’ pattern papers from Doodlebug; the ‘Miss Moo’ stamp set from Sunny Studio (exclusive for Scrapping for Less); Down on the Farm Chit Chat (ephemera) and Mini Icons (stickers); and another small pack of matching KG sequins. Collection Three: Six 6″ x 6″ ‘Tiny Checks’ pattern paper from My Favorite Things; the ‘Piggy Picnic’ stamp set from Scrapping for Less, about 12″ of Yellow
  Gingham Ribbon; Farm Animal Stickers from Pebbles; and more matching KG sequins. Collection Four: Six 6″ x 6″ ‘Farmhouse’ pattern papers by American Crafts, the ‘Barnyard’ stamp set from Avery Elle created exclusively for Scrapping for Less; about a foot or so of black and white twine, Farm Friends stickers (nice acetate stickers with glitter accents!); and another matching packet
  of KG sequins. In addition to the four ‘collections’, you also receive four envelopes and a great stack of letter-sized card stock (Scrapping for Less is now sending six sheets of colored card stock and two sheets of white in their card kits) – I believe all the colored card stock is from My Favorite Things – Wild Cherry, Sour Apple, Banana Split, Whip Cream, Kraft, and Black Licorice. And the two sheets of white card stock
  is Neenah 110# smooth white solar crest card stock. All the card stock is terrific! You get all of these collections at the Double Dip level and you can upgrade to the Banana Split level for even
 more goodness! This month, the Banana Split level treated us to one full-size bottle of Nuvo Jewel Drops in Strawberry Coulis, Orange Marmalade, or Sea Breeze (I got the orange); a Rooster, Hen and Chick die from Frantic Stampers; about 16″ of 2.5″ wide burlap ribbon; and the ‘Faith, Family, Farming’ rubber stamp from Technique Junkies. Since the pattern papers , ephemera, stickers and the like are divided up in these collections, you may not receive the exact same items as other people.
Another interesting feature of the Flavor of the Month Card Kits is the four Card Sketches that Teresa provides for every kit. I am familiar with card sketches, have seen them around and in the free craft magazines you get from scrapbook.com, but I don’t think I have ever actually used a sketch to make a card. Now, Teresa said I didn’t have to use the sketches for my showcase, but I figured I’d give them a whirl and see what inspiration they provide. Then, of course, to make the challenge a little more thorough, I decided I’d make the four sketch cards using only items from one ‘collection’ at a time. I didn’t plan on it originally, but I ended up using sketch #1 with Collection One, sketch #2 with Collection Two, etc… Once I get through 4 cards using the sketches (and one card from the extra ‘banana split’ supplies) then I’ll open up the rest of these cards to a free-for-all!
 Now, Collection One – ‘Country Kitchen’ didn’t have any sentiments in the stamp set, and the ephemera that I received only said ‘Home’, ‘From My Garden With Love’, ‘Homemade with Love’, and ‘Tomatoes’, so I decided to create my own sentiment using the alpha stickers included in the collection. I was inspired by the two chicken emblems from the stamp set, and the chicken outline pattern paper, and that great salmon plaid pattern paper (hey, the alpha stickers are pink!). So, on a Whip Cream card base I assembled my first card using the suggested Sketch #1 and a fun sticker-ed birthday greeting. This birthday card makes me giggle!!
 I did decide to use the black card stock (and some of the white) included in the kit for mats, accents and stamping instead of card bases, and I also used the second half of the Whip Cream card stock as the base for this sentiment and the round chicken stamp. I stamped the second chicken stamp on a strip of the background paper for my vertical stripe, then matted the sentiment with the chicken pattern paper and I am actually surprised at how closely this follows the card sketch. Other than my VersaFine Onyx Black ink, everything here is from Collection One.
 Moving on to Card 2, Collection Two (Down on the Farm), and card sketch #2, my second card is created using only the kit supplies. Okay, I did use a stitched circle die on that last card, and here I use a stitched oval die from my stash, and you know I cannot live without my Lawn Fawn Stitched Rectangle dies, but beyond my dies, inks, coloring mediums and one sheet of Bristol Smooth card stock, everything on all of these cards is straight from the kit itself. I stamped that cute cow stamp using VersaFine Onyx Black ink on a piece of the Neenah smooth white solar crest card stock, and colored her up with my Spectrum Noir Alcohol Markers before die cutting her out in a nice oval.
  That fun ‘cow on a blue field’ pattern paper and the cow hide pattern paper provided the stripes on the Sour Apple card base. I did stamp the little flower from the stamp set using SSS Key Lime hybrid ink along the right edge of the card base, and mounted everything up on some foam tape. You know I love me some puns, and this Sunny Studio Stamp set has three nice pun-y sentiments including this “Cow are you?” sentiment. Very cute card and, I was able to follow the card sketch pretty closely! Love that flower in her ear!
 Card 3, Collection Three (Tiny Checks), sketch #3, and we’ve moved into the piggy stamp set (with a ‘tiny check’ stamp)! And that MFT Tiny Check pattern paper, so I wanted to play with some patterns on this card. Again, my card is very faithful to the card sketch, but I managed one piece of interesting construction here. I cut the light blue check pattern paper on a diagonal with a stitched rectangle die, and then I attached that to the dark blue check pattern paper and matched the pattern and then cut the dark blue into an eighth-inch mat before matting that on some more Black Licorice card stock. It is almost unnoticeable, but you can see it if you’re looking – I do think that it really pulls your eye in to the center image.
 On the Banana Split card base, I glued down my background layers and then stamped the check ‘tablecloth’ stamp using the SSS Watermelon Hybrid ink on the Neenah card stock – fussy cut those rectangles out – and mounted them to the card front with foam tape. I stamped the two pigs in VersaFine black ink and colored them with my Zigg Clean Color real Brush Markers with a little blue halo from an alcohol marker. ‘Enjoy Life It’s Delicious’ was one of the fun sentiments from this stamp set, so I curved that to match one of my Darice Banner dies, and stamped that in black as well. I used one of my Darice Nesting Heart dies to cut out the pigs, and everything gets some thin foam dots before mounting to the card front. I really like the colorful sequins here and the pigs are so cute.
 Card number 4, ‘Farmhouse’ Collection 4, and sketch #4 bring the cute lambs out to play. I stamped and masked the lamb stamp to make a pyramid of sheep with VersaFine black ink on the Neenah card stock and colored the sheep with my alcohol markers. There was some really beautiful pattern paper in this collection, so I paired up the green leaf pattern with the little flowers pattern paper and matted those on the Black Licorice card stock before gluing them down to the Kraft card base. I trimmed the stamped piece down to size, matted that on some black and added that to the card front with some foam tape. The sentiment is
  stamped in black on the Neenah card stock, matted on the black card stock and foam taped to the card front. As I was finishing up this card, I thought I would use some black glaze pen to add some shine to the sheep’s eyes but my glaze pen was too big and all my little lambs started looking crazed. Big fail! So I stamped six new sheep heads, colored them the same, fussy cut them out and added them back to their bodies with some foam dots. WOW! That really made this card POP! I added a small bow to my black sheep using the black and white twine and I have to admit that this card actually thrills me! SO nice!! I did enjoy using the card sketches for these first cards and was truly surprised at how closely I adhered to them. I can see their usefulness in providing folks with inspiration!
The extra goodies in the Banana Split level has a large rubber stamp this month so I decided card five would focus on that stamp and the materials included with it. I did use some of my Bristol smooth card stock and stamped this image using my SSS Intense Black ink – this is such a finely detailed stamp that I needed to use my ‘least-juicy’ stamp pad to get all the small details. I colored this image with my Zigg markers in a little bit of a vignette style and used one of my stitched rectangle dies to cut the stamp out. On the Wild Cherry card base, I added a 3.75″ strip of the red check pattern paper from Collection Two, and trimmed that with a couple of thin strips of the Black Licorice card stock on the edges. I used some spray adhesive to mount the burlap ribbon down the center of the card front, and used the included dies to cut a chicken family from the licorice card stock to parade across the bottom of this card. I love this barn, but am at a bit of a loss as to the meaning of this sentiment… feels more like a scrapbook sentiment than a card sentiment: “Here we are when we helped the Johnson’s add a second hayloft to their barn!” I do like that barn though, and these colors, and all those cute little chicks!
Now that we have covered all the card sketches and all the ‘collections’ we can have a little more fun combining all the materials for the next group of cards. I was lucky enough to get this ADORABLE cow sticker with my Sticko ‘Farm Friends’ acetate stickers. I actually found the whole sheet of stickers available on Amazon if you’re interested!!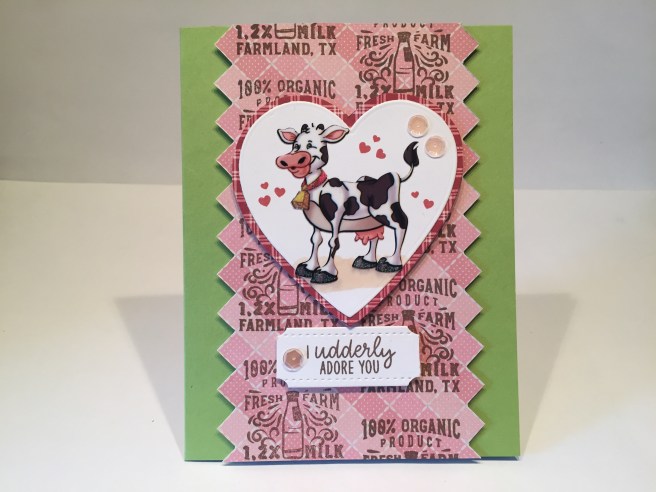 On the Sour Apple card base, I used a strip of the salmon check pattern paper (collection four) cut to 3.5″ wide and fussy cut along the long edges following the checked pattern. I don’t have any fancy scallop dies or straight decorative die cuts (really, my LF stitched rectangle dies are the only card-size dies I own) so I find it very effective to fussy cut pattern papers along the pattern lines. I stamped the ‘milk’ stamp from Collection One using Distress Oxide Walnut Stain ink in two rows on the pattern paper for a little more detail on the background. The cow sticker is attached to a piece of the Neenah card stock and cut with a heart nesting die, and then matted on a piece of the dark red check pattern paper from the same collection. The sentiment is from the ‘Miss Moo’ stamp set in Collection Two, stamped in Distress Oxide Walnut Stain ink on more of the Neenah card stock and die cut into my shaped sentiment. The heart shape and the sentiment are foam taped to the card front and I added a few heart stamps around the cow using a Paper Pumpkin stamp from the January 2017 kit stamped in Distress Oxide Fired Brick ink. That matches the dark checked mat perfectly! I added a little shadow under the cow with an alcohol marker and finished off this card with a few sequins. I think this cow sticker is SO cute and, though I am not a huge fan of stickers, I am tempted to buy some of the complete sticker sets from Amazon. Adorable card with a funny pun-y sentiment!
There is still one more pun-y sentiment from that Sunny Studio stamp set in Collection Two that I am eager to use, so that sentiment is what inspired my next card.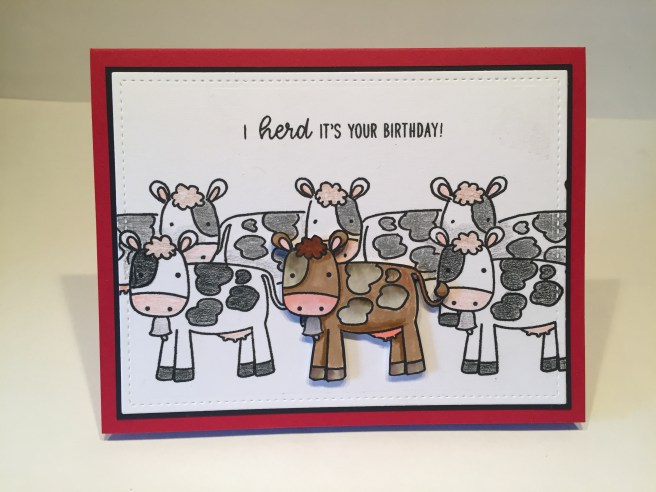 On a piece of the Neenah white card stock I stamped the cow from the ‘Barnyard’ stamp set in Collection Four six times. I actually stamped the back row on the BACK of the card stock so I could trace them on the front and have my ‘herd’ facing in different directions. So I really didn’t need any masks at all! I stamped one more cow on a scrap of card stock and colored her with my Zigg Markers and fussy-cut her out for my main image. To reinforce the pop of the brown cow, I colored all the other cows in black and white using colored pencils – nothing highly detailed, just enough to give them some color. I cut the card front with a stitched rectangle die, matted that on a thin piece of Black Licorice card stock and glued that all down to the Wild Cherry card base. The brown cow is attached with foam dots, so she’s the only real dimension on this card. I did add a touch of my Wink of Stella glitter pen to the bell on the brown cow, but that’s the only sparkle on this card. I really like the fact that this sentiment stamp came in two pieces so you could stamp a stacked or a straight sentiment as I did here with VersaFine Onyx Black ink. Such a fun birthday card that’s really pretty simple but packs a pun-y punch!
I really liked the barn stamp included with the Banana Split level extras but wanted to use a different sentiment with it, so I simply cut the ‘farming’ sentiment off of the stamp.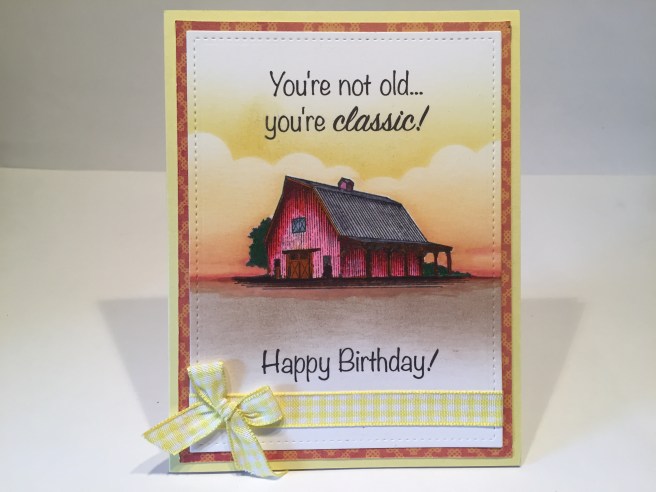 I stamped this barn using my SSS Intense Black ink (my least juicy black ink pad) on a piece of my Strathmore Bristol Smooth card stock. I did cut a mask for the barn and colored the background using my Distress Oxide inks in Walnut Stain, Fired Brick, Spiced Marmalade and Fossilized Amber using my Ink Duster brushes. I did use the My Favorite Things Mini Cloud Edges stencil for a touch of clouds above the barn. I colored the barn with my Zigg markers and turned to my printer and my Silhouette Software to create this fun birthday sentiment. This is printed directly on the card front with the Noteworthy font and the Sign Painter font for the cursive ‘classic’. I love being able to create my own sentiments on my cards, and I have a more in depth video explaining my printing process here: https://www.youtube.com/watch?v=V9YuZSqC9fo&t=1s. I wrapped the yellow gingham ribbon from Collection Three around the bottom of the card front and added a little bow to the bottom left (it is a birthday card after all!!). I matted the card front on a piece of the orange-y pattern paper from Collection Four and glued all down to the Banana Split card base. I love this background combined with the barn and, since we are ALL getting older, (or at least know people who ARE) I think this is a very fun and useful birthday sentiment. Again… I really LOVE that barn image!
I knew I wanted to use those cute ‘chick’ stamps from the Avery Elle ‘Barnyard’ stamp set in Collection Four, but (possibly because I am a guy) I felt that the ‘you are one of my favorite chicks’ was a touch misogynistic…! LOL!! So let’s do another printed sentiment!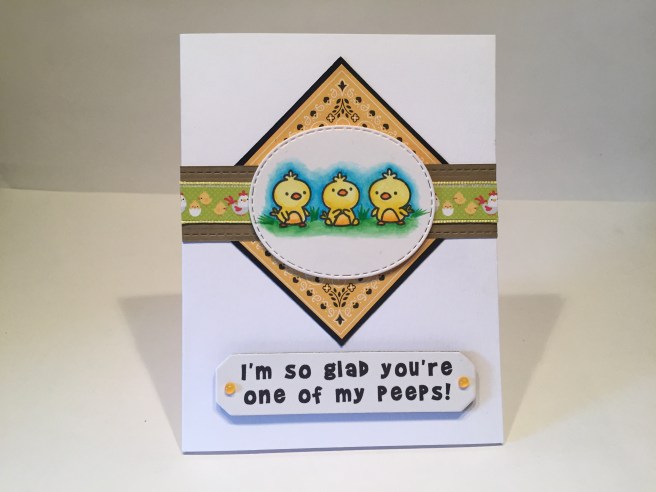 I stamped the three chick stamps on a small piece of Bristol Smooth card stock and colored them with my Zigg clean color markers, and die cut that out with one of my stitched oval dies. I cut the strip of hens and chicks from the stripes of pattern paper in Collection Two and used the yellow gingham ribbon (Collection Three) for a little trim on the edges of that strip. I cut a one inch strip of my own kraft card stock and used my Ellen Hutson Stitching Lines die to add the stitch lines on the top and bottom of that strip. I decided I needed something more on my focal image so I cut out the yellow bandanna square from the Doodlebug pattern paper in Collection Two, matted that on a thin black mat and cut that in half to go above and below my accent strip. I glued all the background pieces to a Neenah white card base, and mounted my chick vignette up on foam tape. Back to the printer and my Silhouette software for this fun sentiment printed in my favorite Brady Bunch Remastered font on some scrap white card stock and die cut with the Tim Holtz Compass Blueprint die. I cut three more of those shapes out of the Black Licorice card stock and glued them all together with the sentiment on top for a nice chunky chipboard-like sentiment. I added the sentiment to the card front with some thin foam dots and used my Orange Marmalade Nuvo Jewel drops for the two accent spots on either end of the sentiment. I like this ‘peep’ sentiment much more that the ‘chick’ sentiment and I adore these three little chick stamps! A very cheerful friendship card!
If you have followed me at all over the last couple of years, you know how much I love using puns and song lyrics as sentiments on my cards. Thus we have arrived at card #10.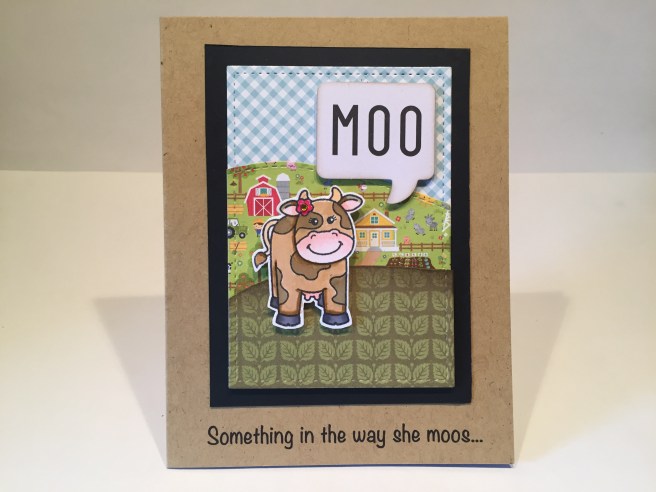 Go ahead… sing it to yourself… this is a GREAT pun for a cow card! I created this fun scene using a stitched hillside die and pattern papers from Collection Four (leaf pattern) Three (check pattern for sky) and Two (farm pattern). I did a little ink blending on the edge of the front hill with Distress Oxide Walnut Stain for a little added definition, and cut all three pattern papers out with a stitched rectangle die and matted those on a larger frame using some black card stock from my stash (not enough Black Licorice card stock for this last mat!). The front leaf hillside is mounted with some foam dots to intensify the perspective of this scene. I stamped the ‘Miss Moo’ cow from Collection Two on a scrap of Bristol Smooth card stock, colored her with my Zigg Markers and fussy cut her out leaving a small white border to help her pop. I mounted her and the ‘Down On The Farm Chit Chat’ “MOO” to the card front using foam squares and that completes this fun scene.
 Back to my printer for this sentiment using the Noteworthy font again and I was able to print the sentiments directly on the last Kraft Card base. Of course the sentiment completes on the inside (I couldn’t resist a double-pun!) and I am laughing even as I write this! SO MUCH FUN!
 Though I have lived in New York City for almost 30 years now, I was raised in Kansas and still have those ‘countryside’ roots embedded in my psyche, so this was actually a fun kit for me – almost felt like a vacation! I have gobs of supplies left over, as well as those fun stamp sets! A big thanks goes out to Teresa Russell at Scrapping for Less for letting me experiment with her May Flavor of the Month card kit. I enjoyed the variety of supplies included in the kit and the great variety of stamps included as well. Most of the stamp sets here are exclusive to this specific card kit, so that’s something very special for subscribers. I do know that there are more “In the Countryside” Card Kits available in both the Double Dip and Banana Split levels, so if I have managed to pique your interest, head over to Scrapping For Less and get one for yourself – and if you like the huge variety Teresa includes in her Flavor of the Month Card Kits go ahead and subscribe!. Thank you so much for taking time out of your busy day to visit with me here, please share this post with all your friends, don’t run with scissors, and Happy Crafting!!
