
Hello Folks! Scott here with a new 10 Cards 1 Kit video featuring the March 2022 My Monthly Hero Kit. Looks like we’re going to the Art Museum this month! I suppose all the Surrealist art last month, was just a harbinger of more art!

Looks like we’re turning to some Jackson Pollock abstract expressionism with this trip to the museum! The 4″ x 6″ stamp set features two paint splatter stamps and four complimentary sentiment stamps. To give the paint splatters some dimension, we have four embossing powders in bold colors of Goldenrod, Orange, Blue, Purple and an Embossing and Watermark ink cube to get us started! The Fancy Window die is the star of this show with museums patrons gazing up at a large piece of framed art. We also get two 4.25″ x 5.5″ pieces of extra thick canvas texture paper and one 5.5″ x 8.5″ piece of regular canvas texture paper. Everything you need to start making your own works of art!
I couldn’t wait to die-cut this window die… in fact, I figured I’d start by using almost everything in the kit!
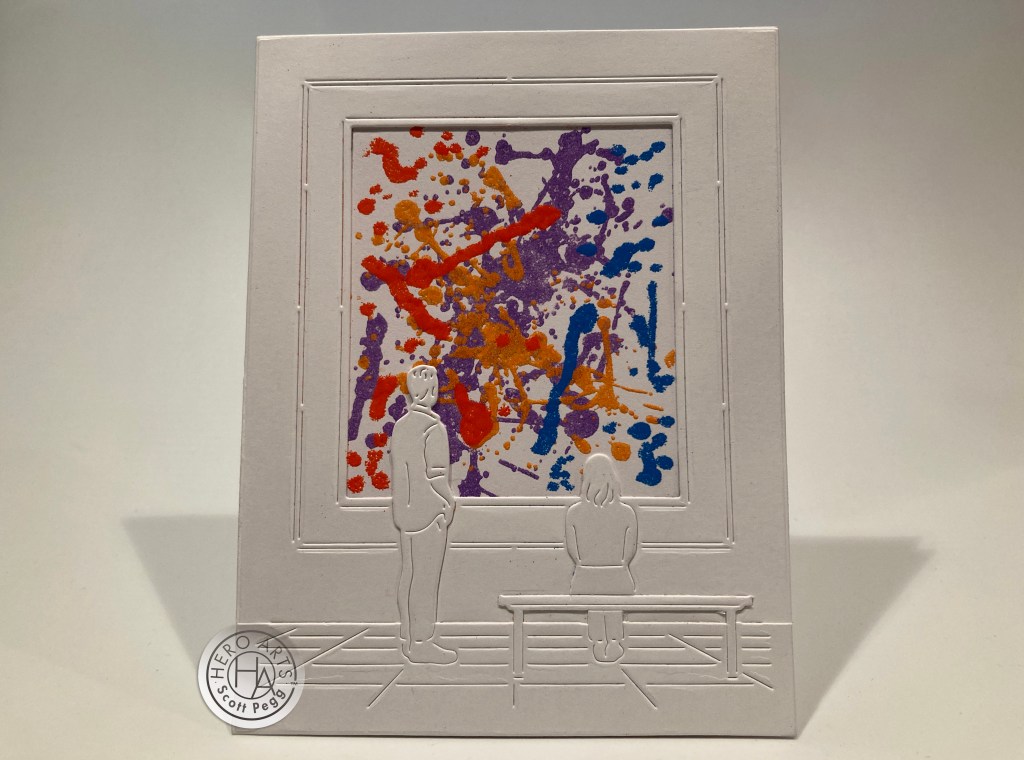
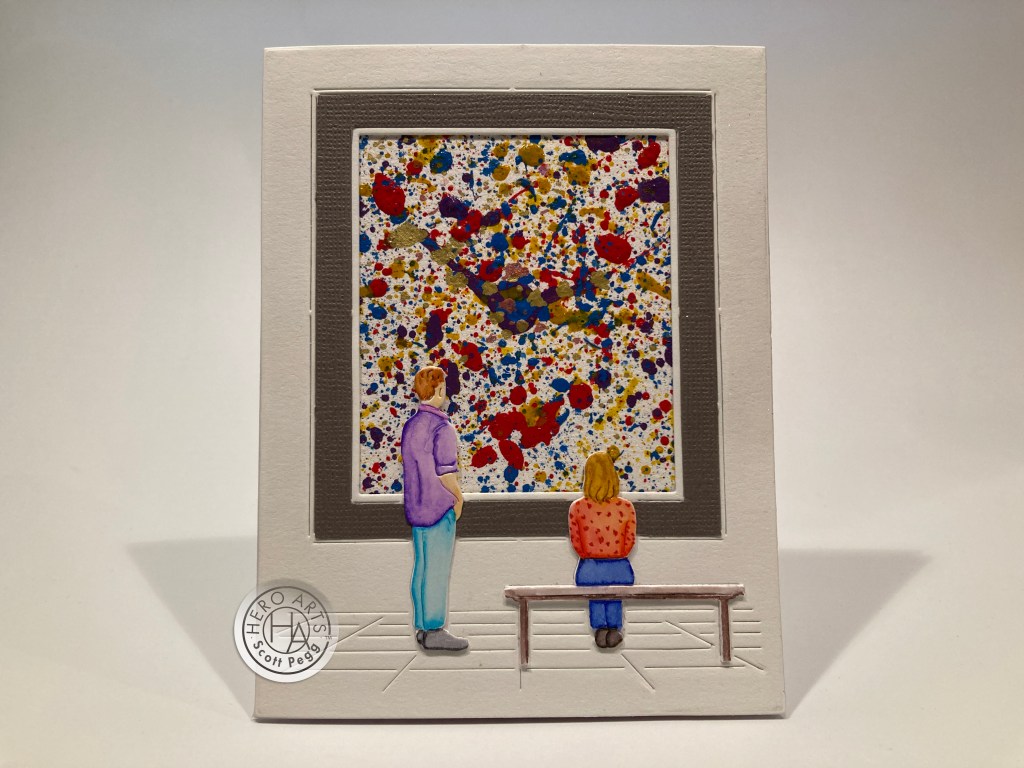
I die-cut the cover plate die using 110# card stock and did a second die-cut of the patrons and floor in the same White card stock. It was easy to trim out the patrons, bench and floor from the die cut, and I glued those on top of the original (full) die cut – that gives them both a touch of dimension and pulls them away from the painting. I stamped the bigger splatter stamp with the Embossing ink cube and embossed it with the Purple embossing powder. I stamped and embossed the smaller splatter using the Goldenrod powder. I thought those looked great together, so I trimmed the stamped piece to size and glued it behind the frame.
The more I looked at this card the more I realized that the two-color splatter needed some help… but I had already glued the “painting” to the frame. Aha! I grabbed a Versamarker pen and added the Orange (looks red to me!) and the Blue embossing powders with a little freehand splatter drawing. That filled in our art piece perfectly. And those four colors go together brilliantly.
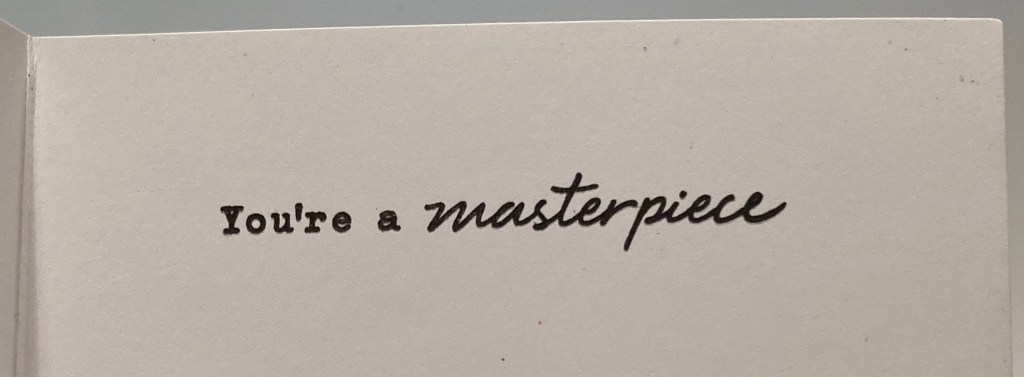
I did stamp the “You’re a masterpiece” sentiment on the inside of the card. The embossing powders gives the painting great texture and shine – actually kind of looks like paint!
So lets see how many pieces of art we can come up with using this kit… I think a better picture frame may be called for!

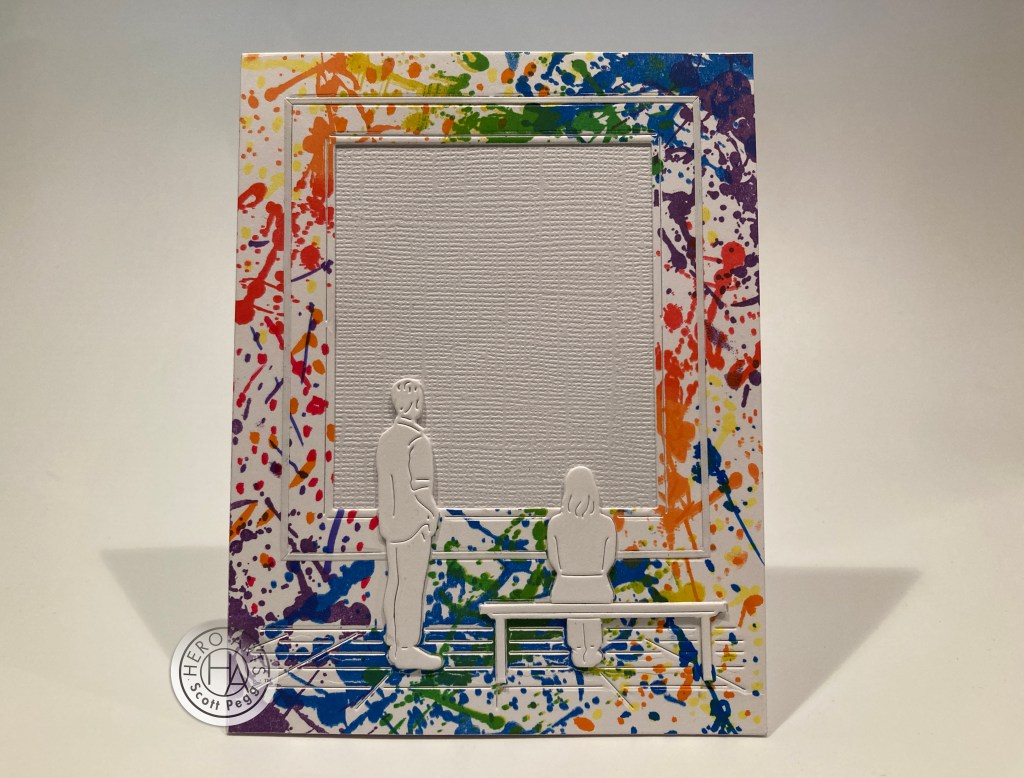
Well! This is inherently more dramatic than the first card. I die-cut the cover plate die using some 110# Neenah Solar White card stock and started coloring the frame with Spectrum Noir alcohol markers. That’s all okay… but of course I couldn’t color the thin strips on the edges without making a mess… so I colored the inner thin “mat” the same as the frame, and ended up completely trimming away the outer thin edge.
I die-cut two more pairs of patrons (w/bench), stacked them together and glued them in place on the card front and added touches of shading with a light grey alcohol marker (on the floor as well) I stamped and embossed the big splatter stamps in Orange (red) and Goldenrod, and the smaller splatter in the Blue and Purple on some Pitch Black card stock.. I do think the more colors the merrier…! Go ahead and fill up that space! I glued the “painting” in the frame, trimmed the die cut panel to 4 1/8″ x 5 3/8, and glued that to a 4.25″ x 5.5″ panel of Pitch Black card stock. That gives us the black outline on the frame!. I reached for some Love From Lizi Black peel-offs from my stash to line the inner edges of the frame as well.
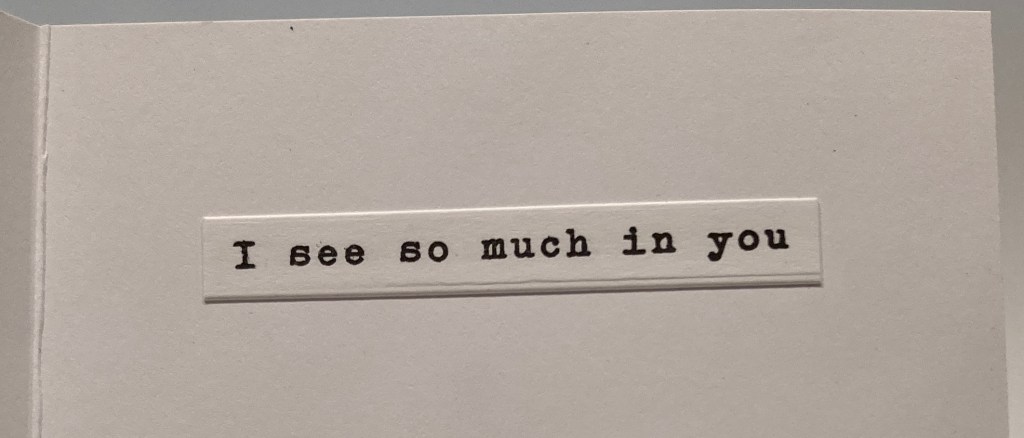
I did stamp the “I see so much in you” sentiment on the inside – I just couldn’t come around to putting a sentiment on the front of these great scenes yet! The frame details and the black background really make this card pop!
How about some other colors of embossing powders? I have some fun colors in my stash… let’s experiment!

This “painting” embosses the big splatter with HA Red and Yellow Prisma embossing powders, and the smaller splatter is HA Green Gold (MMH 11/18 kit) embossing powder. The Yellow Prisma (from the MMH 12/20 kit) is a bit translucent and adds a little sparkle as well! The cover plate is die-cut from some Grey card stock and I cut a second pair of patrons from slightly darker grey card stock and added some shading on them with my alcohol markers and glued them in place. Everything is glued down to a Grey card base. I stamped the sentiment on a scrap of matching Grey card stock using Intense Black ink and embossed that with some clear embossing powder. I fussy-cut the sentiment and added it to the front of this card with some foam tape. I think those splatter stamps will work with any colors you’d like!
That’s a good idea… let’s get away from embossing and do some good old-fashioned stamping!
I die-cut the frame die from 110# Neenah Solar White card stock and stamped the splatter stamps all over the place using HA Reactive inks in Lemon Drop, Creamsicle, Fruit Punch, Green Apple, Blue Hawaii, and Grape Slush.I glued a piece of the thin canvas paper in the picture frame, and die-cut our pair of patrons (and the bench) two more times from 110# White card stock. I stacked and glued our museum-goers to the card front and added some LFL peel-offs in White to the outer edge of the frame – just to break it up a bit. I printed the sentiment on the inside of the card using my Silhouette Software and the Dream State and Times New Roman fonts. This card makes me very happy!
Now ANYONE can make a splatter painting! When I first moved away from my hometown, (1,000 miles away..!) money was tight and in order to communicate with hometown friends, (way before computers and smart phones) I’d grab a sheet of poster board at the drug store and use whatever paints were available (yes, even house paint) to do a big splatter painting covering the whole poster board. When the paint dried, I cut the poster board apart into postcard-sized pieces and would get a bunch of “original art” postcards for very little money! I used Arteza acrylic paints for this splatter art…
I used similar colors to the embossing powder we got in the kit to splatter paint this art on a piece of the thin canvas texture paper. I did add a little gold ink splatter as well…! The great thing about splatter painting is you can let the splatters fall where they may (to coin a phrase) or you can get a little controlling and paint your splatter on dot by dot..!
Cover plate-die cut from 110# Neenah card stock, the frame is also die-cut from some textured grey card stock in my stash, then trimmed away and glued over the white frame. I noticed a lot of folks on the inter-webs were coloring their museum patrons so I thought I should color at least one couple – I die-cut and trimmed out the pair two times, colored one layer with my Zig Clean Color Real Brush Markers, and glued all three layers together on the card front. I’m not very thrilled with that… the patrons seem to compete a little with the art…! However, I think the size of the splatters on this “art” feels a little more in line with the scale of the frame and the patrons. I think it has a nice Jackson Pollock feel!
Of course you don’t have to use the cover plate die to use the splatter stamps. One advantage to these stamps is you can create something seemingly random in no time at all! These stamps should come in handy for some arty backgrounds.
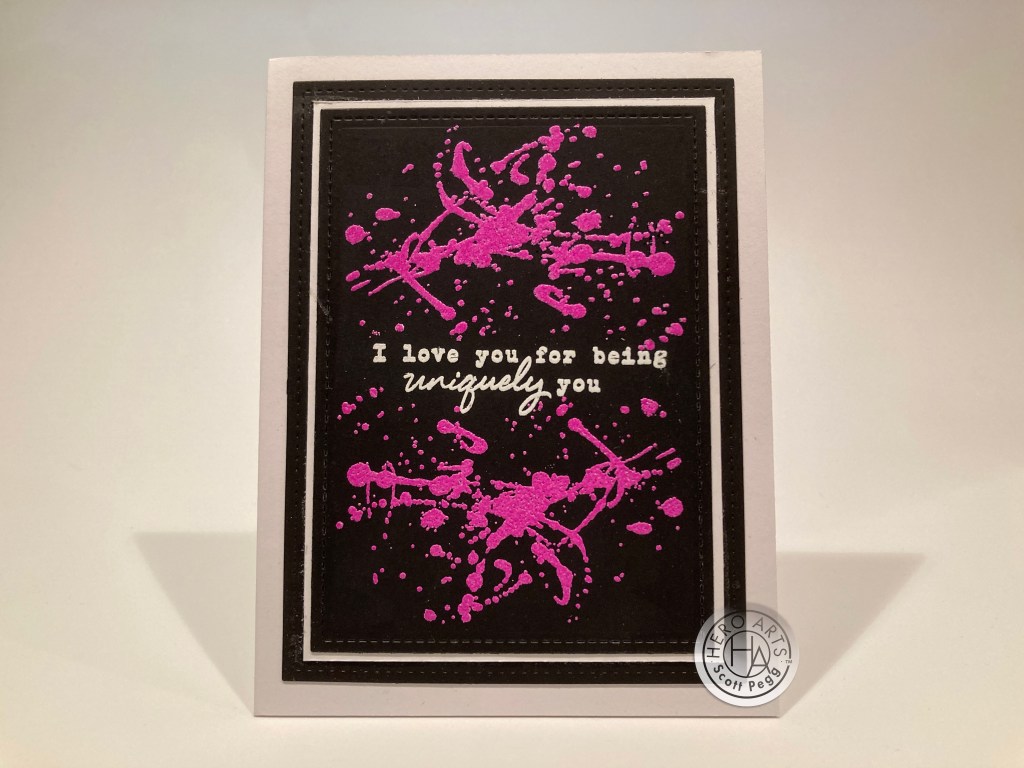
This is stamped and embossed with Peony Purple embossing powder (from Love From Lizi) on Pitch Black card stock and the sentiment is embossed in white. That panel is die-cut with a Lawn Fawn Stitched Rectangle die (3.25 x 4.5), glued to a thin white mat and then to another black mat cut with a LFSRdie (3.75″ x 5″) and glued to a white card base. Now here’s a hot pink I can actually live with! Nice touch of purple in there!
Due to the simple fact that we have a “You’re a Masterpiece” sentiment meant I HAD to do one of these cards…

I created my own frame for this card using two HA Infinity Square dies cut from some textured grey card stock and then filled in with my new plastic mirror sheets – I’m loving those mirror sheets! I die-cut and trimmed away the patrons and the floor from 110# card stock, added two more 110# layer of patrons and bench, and slipped my framed mirror in behind them. That left me with enough space to stamp the sentiment over the “painting”. HELLO!! You can see how nicely that plastic mirror works! This one seemed a little like a no-brainer to me… and I LOVE it!
When was the last time you were searching for something on the internet and this suddenly comes up on your screen:
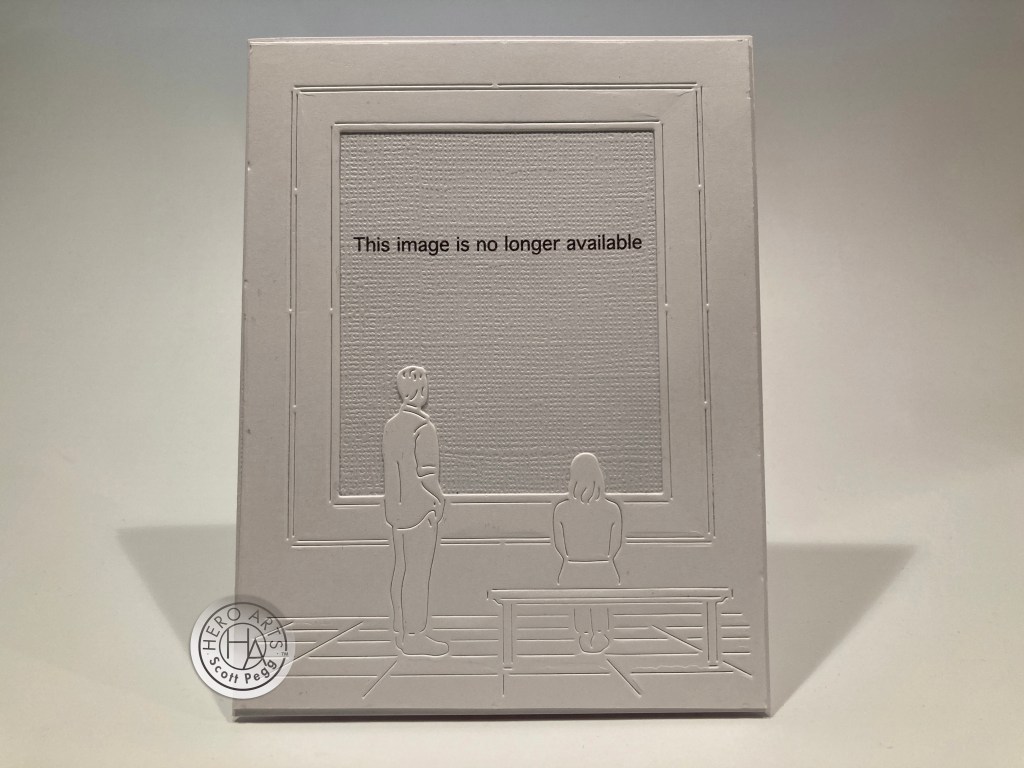
In the context of an Art Museum this tickles me SO MUCH! I don’t think you can get any simpler and say quite so much!

Only one 110# cover plate die for this card, and I printed the sentiment on the thin canvas texture paper. I printed the inside sentiment on a white card base using my Silhouette Software. As you probably know by now, I have spent my life working in the Arts. Theatre Arts specifically, but ALL Arts need as much support as they can get! SUPPORT YOUR LOCAL ART INSTITUTIONS! And there’s our lecture for today! Thank You!
That card got me to thinking about the new ways we interact with art – especially in the last couple of years…!

This is my Black counterpoint to my previous White card! I do love the simplicity of this! And the QR Code works too! Cover plate die-cut from Pitch Black Card stock – the QR Code and sentiment were printed on the canvas texture paper and all is glued to a white card base. The gold frame highlights are Love From Lizi peel-offs again – clear with gold outlines – those thin black pinstripes are SO classy! The patrons are die-cut and trimmed out of more gray card stock and highlighted using HA Sea Salt reactive ink applied with micro-applicator brushes. Let me know if you decide to take the plunge and follow the QR Code! I hope so!
As you can tell, I was die-cutting A LOT of “patrons with bench” for this batch of cards. In an effort to conserve card stock, I would cut them out of either end of a 4.25″ x 5.5″ panel of card stock using partial die-cutting to preserve the second half of the panel. Without planning for this at all, I suddenly got a panel that was double cut PERFECTLY.

This one was a complete surprise for me, but when I saw it, I knew I had to make a card from it! Now, granted, you could view any of the splatter paintings right-side-up or upside-down, but my “staircase to nowhere in two directions” card from last month was still fresh in my mind, so I naturally thought of MC Escher! This, of course, is probably his most famous piece – “Relativity” with staircases goin in all directions as well as the people traversing them. And some Silver Love From Lizi peel-offs give some perfect definition to the frame
The title of this piece obviously influenced my sentiment printed on the inside of the card in the Brady Bunch Remastered font. Makes me laugh!
Now… there’s a bit of a secret to this card as well – if you turn the card upside down, it still opens to the exact same sentiment! This tickles me to no end! A perfect encouragement card with lots of humor to cheer up anyone’s day! LOVE THIS!
And just like that, we have wrapped up all 10 of my cards created using the My Monthly Hero March 2022 Kit. Those splatter stamps are perfect stash-builders, and the cover plate die is just as versatile and I’m sure will get lots of use!
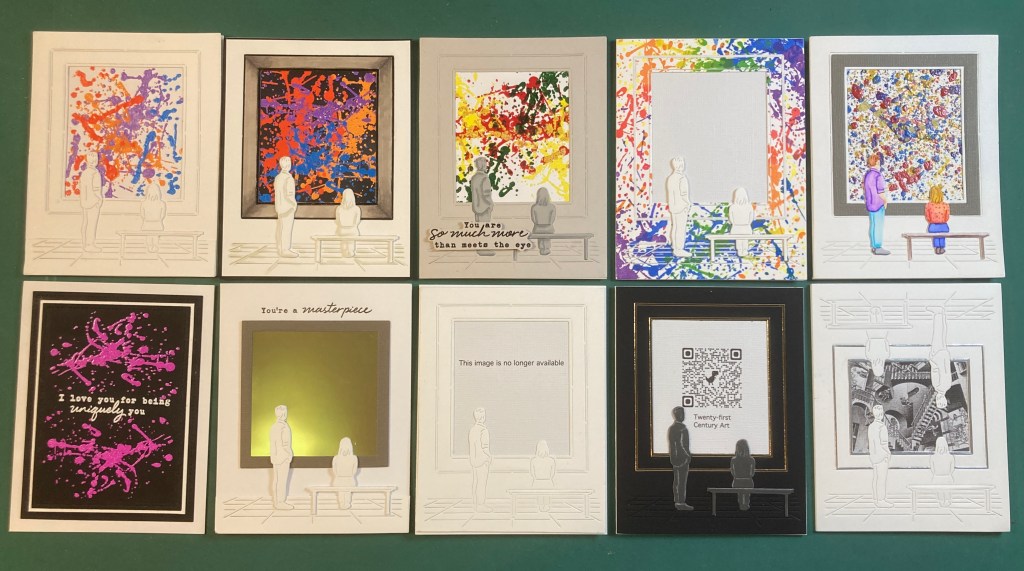
It kind of looks like I went into a deep depression as I worked on this card kit… everything’s bright and colorful to begin with, but it soon devolves into blacks whites and grays! I promise I’m okay! I think this is a terrific set of encouragement cards with a couple thoughtful notes along the way! It’s been a long time since I’ve had all ten cards from a kit all in the same portrait orientation! I do really like keeping the museum patrons monochromatic and really focusing on whatever art you might like to showcase! I did consider using many different images as the “art” on these cards – from last months’ Dali rip-off to my colored City Cling stamp from the December kit, to actual pieces of recognizable art – how about a card with the Mona Lisa that says “Smile” on the inside!! The possibilities are almost endless! I easily used all the stamps in this kit as well as all the embossing powders… and I gave that die quite a work-out!
This kit is still available at Hero Arts! I hope I was able to inspire the artist in you and give you some fun ideas on how to use these stamps and dies! If you’re ready to start framing your artwork, and want to grab a kit for yourself, please use my links when you order from Hero Arts. It helps support this channel and keeps me stocked with paper! Thank you!!
My Monthly Hero March 2022: https://shrsl.com/3fic3
Hero Arts March 2022 Release: http://shrsl.com/3ficc
Thank you so very much for sharing your time with me here! I hope I was able to bring a smile to your lips and share a little inspiration as well. Please remember to Like me, List me, Pin me, Post me, Share me with all your crafty friends (and enemies!) remember don’t run with scissors… and I send you and yours love and laughter, warm days and restful nights, and as always… Happy Crafting!
DISCLOSURE: This site contains some affiliate links to products. I may receive a commission for purchases made through these links (at no cost to you). As an Amazon Associate I earn from qualifying purchases. Thank you!

You are so creative. I’m inspired!
LikeLike
Thanks Jennifer! Always appreciated! Mission Accomplished!!
LikeLike