
Hello Folks! Scott here with my 10 Cards 1 Kit post featuring the Love From Lizi September 2021 Card Kit!
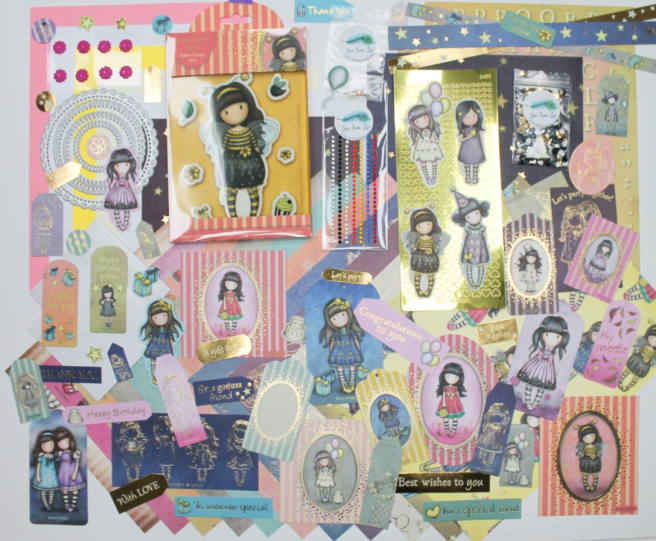
HAPPY 5TH BIRTHDAY, LOVE FROM LIZI! Yes, LFL turns five this month! Normally, our September kits would be a SUPER CARD KIT to celebrate, but, due to some manufacturing and shipping hold-ups, Lizi is saving the birthday SUPER CARD KIT for October! To tide us over, our kit this month features the Santoro (of London) Gorjuss Girls. I’ve seen some Gorjuss Girl products over the years, and they seem to be something of a big deal, with limited editions and the like. Needless to say, I was almost overcome with girls this month!
I did begin by making six card bases from the colored card stock in the kit. And there’s a sheet of decoupage in this kit, featuring two different Gorjuss Girls, and I do love the European version of decoupage where you stack the layers instead of gluing everything flat… this one is fairly small and a bit fussy… but came out so well…
I do believe it is rare to find a sheet of die-cuts that is PERFECTLY cut… especially when cutting detailed images in small sizes… the margin for error is just SO thin. These die-cuts were just a tiny bit off, but no more than one would expect.
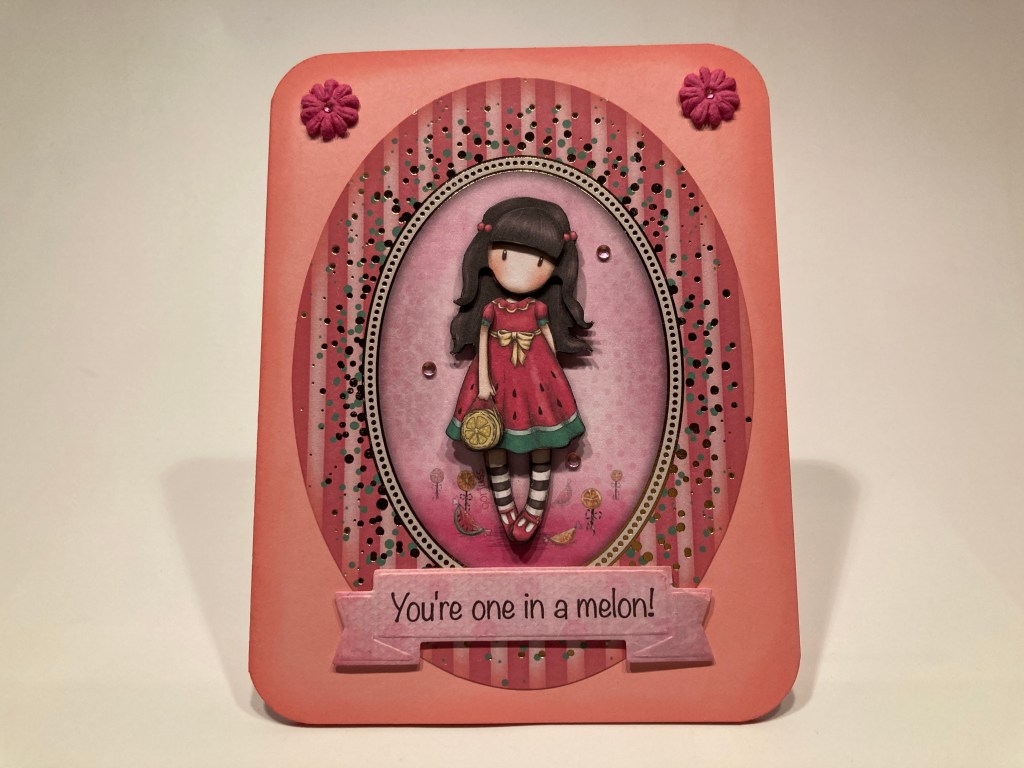
I rounded the corners of the Pink card base with a 1/2″ corner chomper and ink blended Worn Lipstick Distress Oxide ink around the edges. I glued the oval layer B1 flat to the card front. I always take the time to trim away any “flashing” on the die-cut pieces (where the pieces are attached to the sheet, a little bump protrudes when popped out). I also fussy-cut all the edges of the over-cut pieces – the die-cutting will simplify the cut around her hair, and include some of the background within the cut, as well as any cuts that are just slightly off.
When everything is cut to the outlines, I color the white edges of the decoupage pieces with a Memento dual marker. That will make everything look like it is perfectly cut out. I only used the Girl piece of B2 (not the oval) to start layering up our decoupage using the foam tape in the kit. Her purse is the fifth layer of the decoupage (B6 on the sheet) and she looks terrific! Although she is a little pigeon-toed!
I printed this sentiment on a piece of the Watermelon Girl pattern paper using the Noteworthy font, die cut it with an old banner die, and inked the edges with more Worn Lipstick ink. I mounted the sentiment banner with foam tape (conveniently covering over the SANTORO logo), added a few pink gems and two of the pressed paper flowers for a final touch of decoration and sparkle. If you take your time with these, they are truly kind of amazing to behold!
Looks like I may be doing a lot of fussy-cutting with this kit… what else do you do with the two large girl pattern papers?
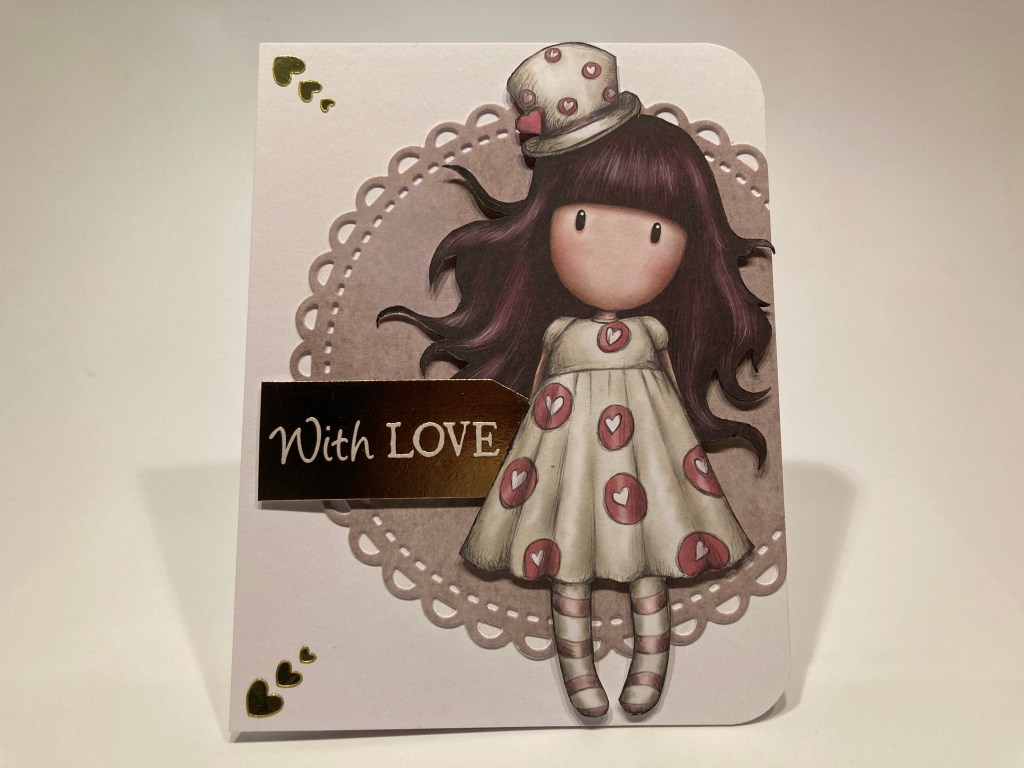
This is the girl from the large Heart Girl striped pattern paper – fussy-cut and the edges colored black. I die cut the large doily die from the neutral pattern paper and glued that to the right side of a White card base and trimmed off the excess. I rounded the two right corners with 1/2″ corner chomper. I added the Heart Girl with foam tape, tucked the gold foil sentiment tag under her arm and added gold mini-heart peel offs to the two left corners. Lovely! And heartfelt!!
The sheet with the six die-cut Gorjuss Girls has borders around the girls. I just have to fussy-cut the borders away…!
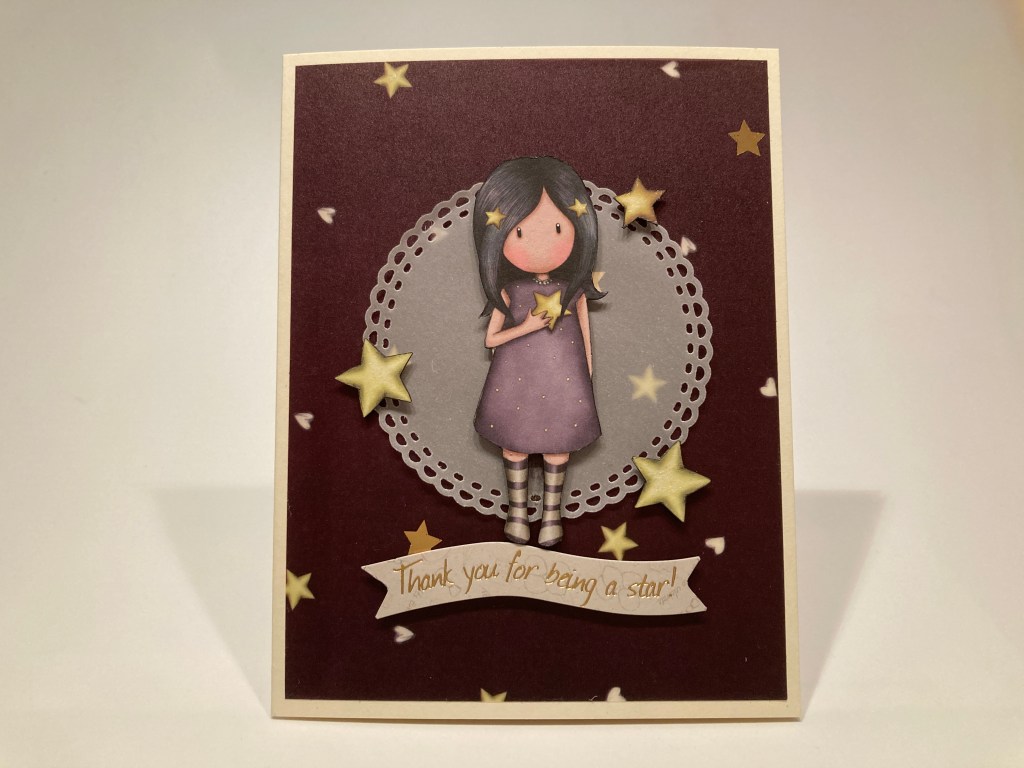
I ran a 4″ x 5.25″ piece of the aubergine vellum through a Zyron sticker maker and glued that to the front of the Ivory card base. I cut some 40# vellum with the third smallest doily die and glued that to the card front with a line of double-sided adhesive down the center. I fussy cut the Star Girl, blackened the edges and glued her to the center of the vellum with foam tape. The stars were on the same page as the girls – I popped them out, trimmed their borders away, and inked their edges as well and added them to the card with more foam tape. I trimmed the sentiment banner down to be a little shorter and foam taped that below her feet. I did add some glitter to the die-cut stars with a Spectrum Noir Sparkle pen. I think this is the plainest Gorjuss Girl in the kit… certainly the easiest to fussy-cut!
I really liked the Blue and Aubergine vellum sheets in our kit this month… Let’s use that blue one now..!
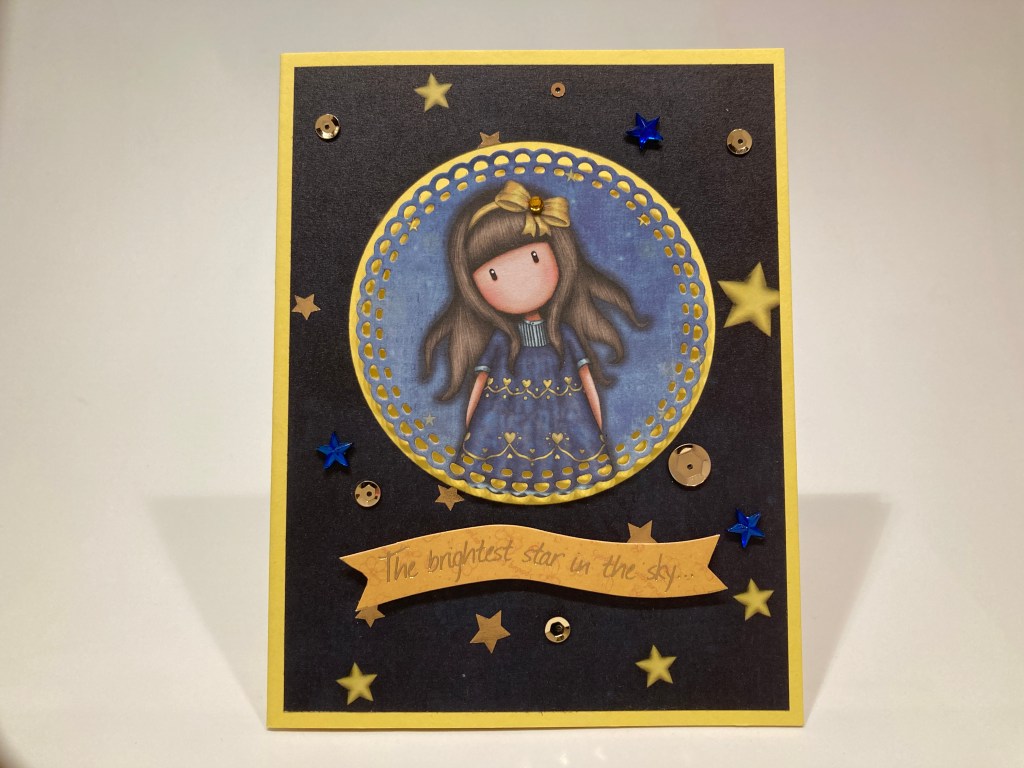
I took a 4″ x 5.25″ piece of the blue vellum, die-cut a circle in the center with a nesting circle die, ran that through the Zyron and glued it to the Lemon Yellow card base. I die-cut the blue girl with a doily die – it actually defines the bottom of her dress – and foam taped her in the center opening. Again, I trimmed down the sentiment banner and added it with more foam tape. Gold sequins and some blue crystal stars add a lot more bling and a yellow gem from the kit highlights the center of her bow. A really nice complimentary / encouragement card for your favorite Gorjuss Girl!
Now it’s time to tackle that stamp. I didn’t realize it when unboxing, but that girl cling stamp is almost 6″ tall!
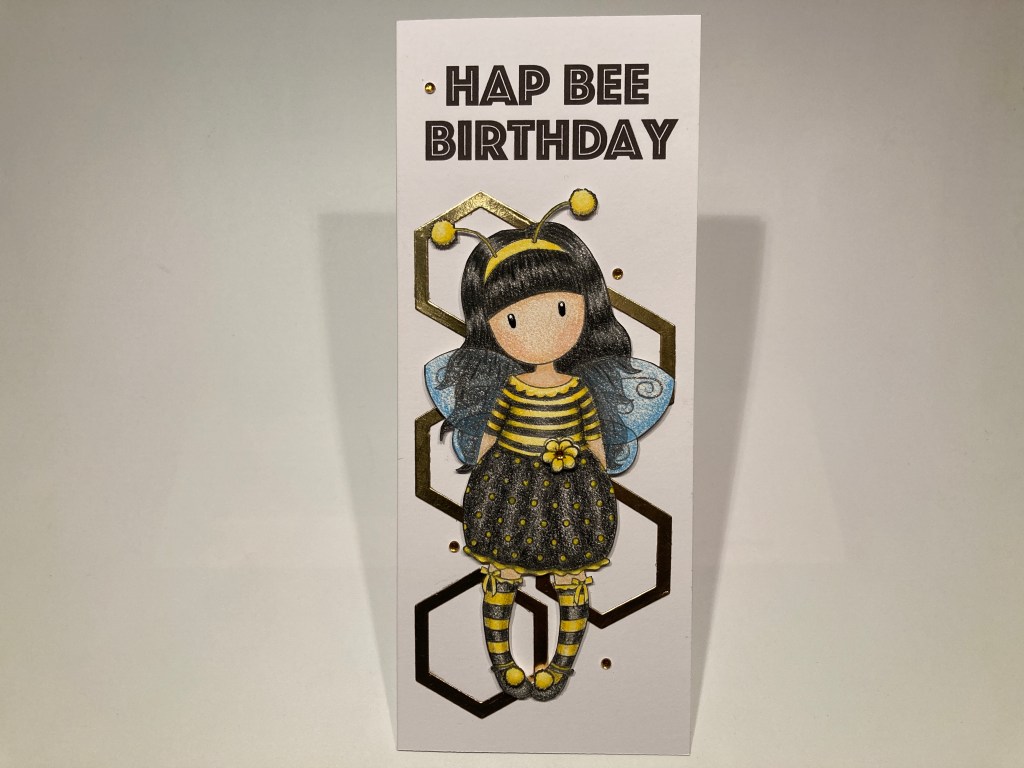
Slimline card to the rescue! 3.5″ x 8.5″ is plenty of room for that Bee Girl! I stamped her and the flower on some Stonehenge White card stock using VersaFine Onyx Black ink, and colored her with my Prismacolor colored pencils. I tell you, that Stonehenge card stock loves colored pencils – I didn’t use any Gamsol or other blending solution… this is just colored pencils. I fussy cut her out (beware those antennae!)(and the flower!), colored the edges of the card stock with a Memento Tuxedo Black marker, and added some black and white gel pen to her eyes for a little shine.
I printed this sentiment directly on the White card base using my Silhouette software and the Phosphate font. If you don’t give me some bee puns I’ll make my own! I die-cut the gold hexagons using the 2 smallest hexagon dies from the LFL March 2018 card kit, and glued those flat to the card front. I added the girl with foam tape (careful with those antennae!) and added more yellow gems for sparkle. I did add some Stardust Glitter Gel pen to the curly-que’s on her wings so they catch the light quite nicely. I don’t think my Spectrum Noir alcohol markers would get into some of the tiny spaces on this stamp and I”m very pleased with the results I got using colored pencils… This is a much brighter rendering than the suggested coloring on the back of the stamp. Really nice slimline birthday card!
This card is simply inspired by this fun sentiment! After all, a little party never hurt anybody!

This Party Girl is from the six die-cut girl sheet, fussy-cut and edged in black. I even fussy-cut the sentiment down – getting rid of the balloon and keeping the matching hat. The three-scallop tag with purple stripes had a Girl in the center, so I cut that oval out and glued the tag to the matching tag that had no image in the center. I added a thin purple mat behind the sentiment, and wrapped a short piece of purple ribbon through the hole in the tag(s).
I die-cut the pattern paper with a nesting scallop die and added a very thin purple mat behind that, and glued those flat to the other Ivory card base. I glued the tag(s) flat to the background and added our Party Girl and sentiment with foam tape. More of the Mini Gold Heart peel offs on the corners finishes this card off. I did add a Happy Birthday stamp on the inside of the card just for those who need an excuse to party! Love the diamonds/stripes and the matching party hats!
I was loathe to tackle the other decoupage image because I didn’t want to fussy-cut those antennae, so I compromised.
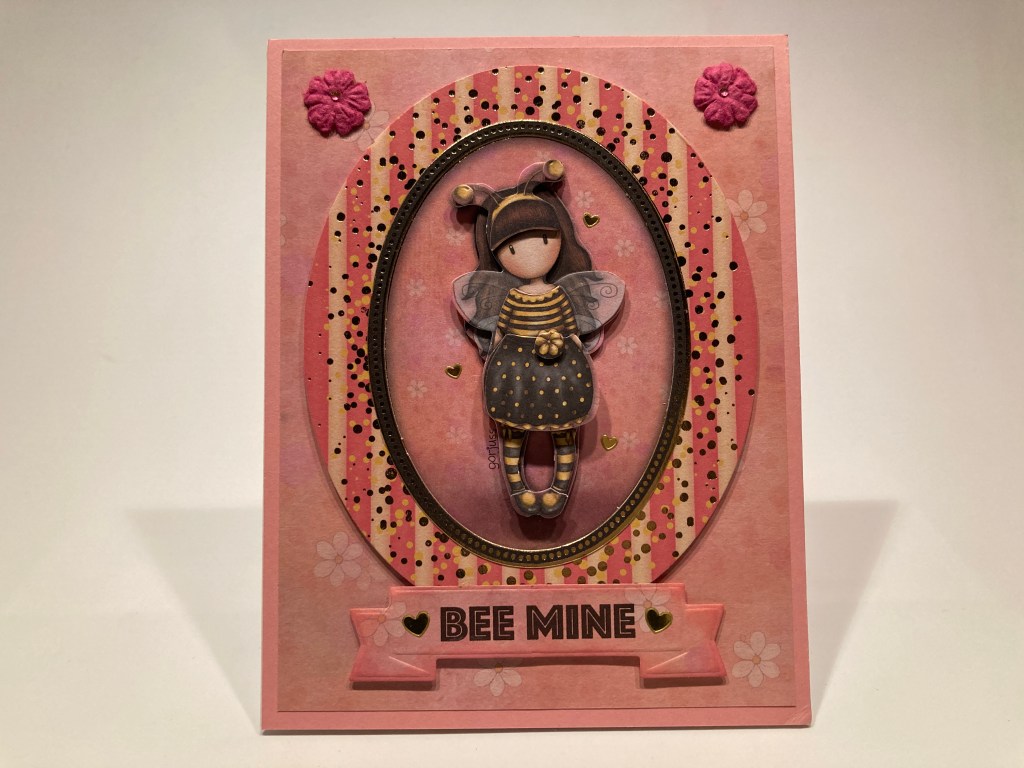
I assembled this decoupage straight from the sheet – I did trim away the “flashing’ spots, but assembled the Bee Girl with no extra fussy-cutting. This looks perfectly fine, but the dimension feels a little “blurry” to me… you can see the extra background to the right of her skirt, left of her legs, bottom of her wings, and, of course, around the antennae. I glued a 4″ x 5.25″ piece of the flowery pattern paper to the other Pink card base, and assembled the decoupage with foam tape behind the oval.
I printed the sentiment on a piece of the background paper using the Phosphate font, die cut it with my old banner die, and attached that with more foam tape. More Mini Gold Heart peel offs compliment the gold foiling on the oval, and two more of the pressed paper flowers adorn the top corners. Almost identical to my first card, but I do think it’s interesting to see how much difference there in in the two styles of decoupage. Makes the tedious fussy-cutting worth it!
We did a slimline card, how about a mini slimline card! There are a couple images of two Gorjuss Girls together…
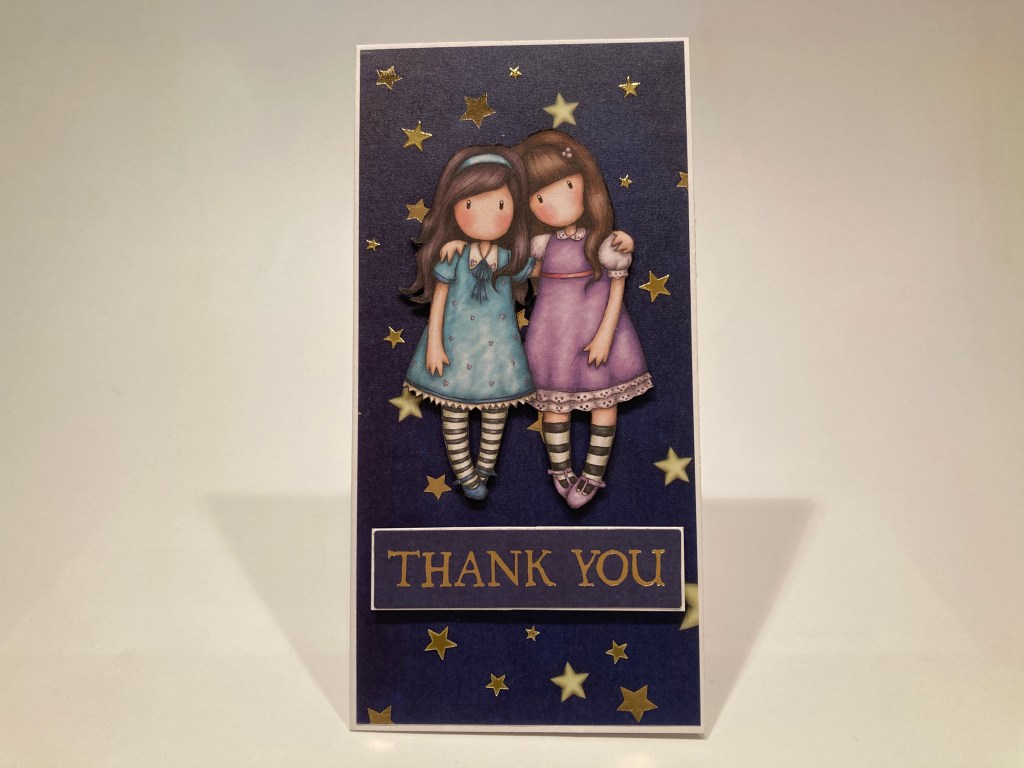
This is a 3″ x 6″ mini slimline card. I cut another piece of the blue vellum to 2.75″ x 5.75″, ran that through the Zyron sticker maker and glued that to the White card base. I fussy-cut the girls and colored the edges with black marker, and attached them to the card front with foam tape. I added a very thin mat behind the gold-foil sentiment and used foam tape to attach that to the card front. I added a bunch of the Mini Gold Heart peel offs to fill in the background, and that gives us a terribly sweet mini slimline thank you card! Just for your BFF!!
I was desperate to make a card that DIDN’T have a Gorjuss Girl on it, but it appears my choices were pretty limited…
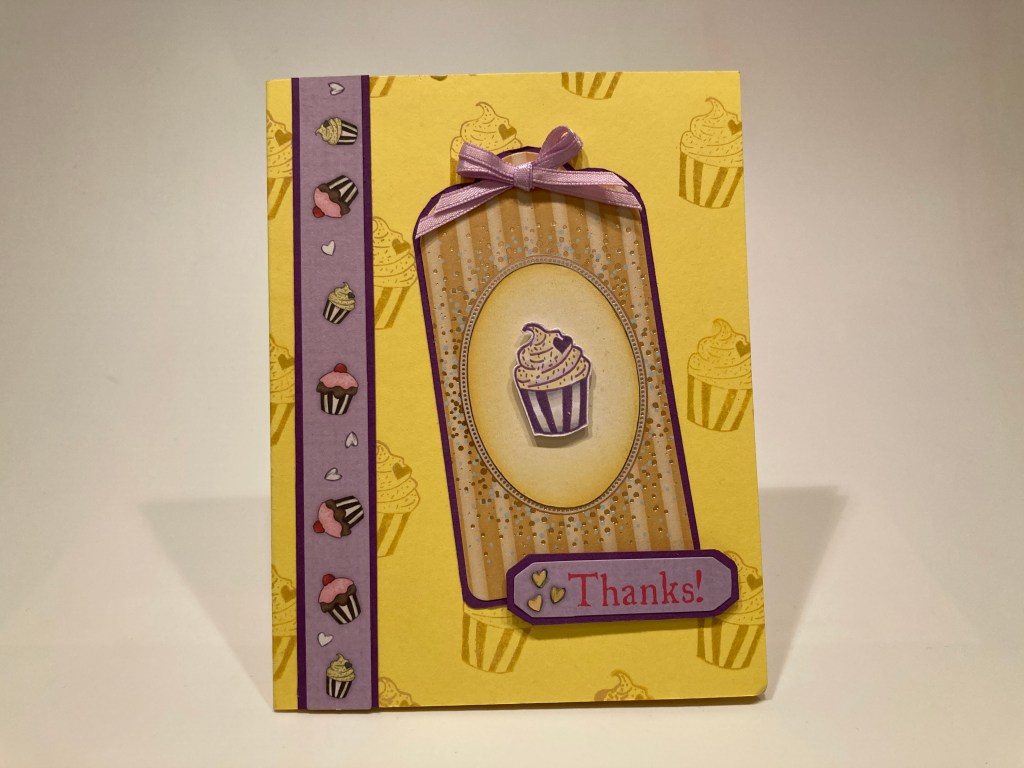
I think this will do fine! Not my favorite cupcake stamp, but it’s not bad! I stamped the cupcake in a pattern on the Lemon Yellow card base using Fossilized Amber Distress Oxide ink. I took another three-scallop tag and added a purple mat behind that and glued it flat to the card base. I took the back of the oval I cut out of the purple stripe tag and ink blended that with Fossilized Amber and glued it over the girl in the center of the yellow stripe tag. I embellished the top of the tag with a double bow of thin purple ribbon.
I added more of the purple behind the die-cut cupcake strip and glued those down to the left. I added a purple mat behind the sentiment tag and attached those with foam tape. I stamped the cupcake on a scrap of White card stock using Hero Hues Thistle reactive ink and embossed that with some clear embossing powder. I added a little more color to the cupcake with my alcohol markers, fussy-cut the cupcake leaving a thin white border, and attached that to the center with some foam tape. A perfect card to go along with a Thank You Cupcake! Still pretty sweet, but no Girls!
I was determined to find another way to use that big Bumblebee Girl stamp, and this is what I was able to come up with.
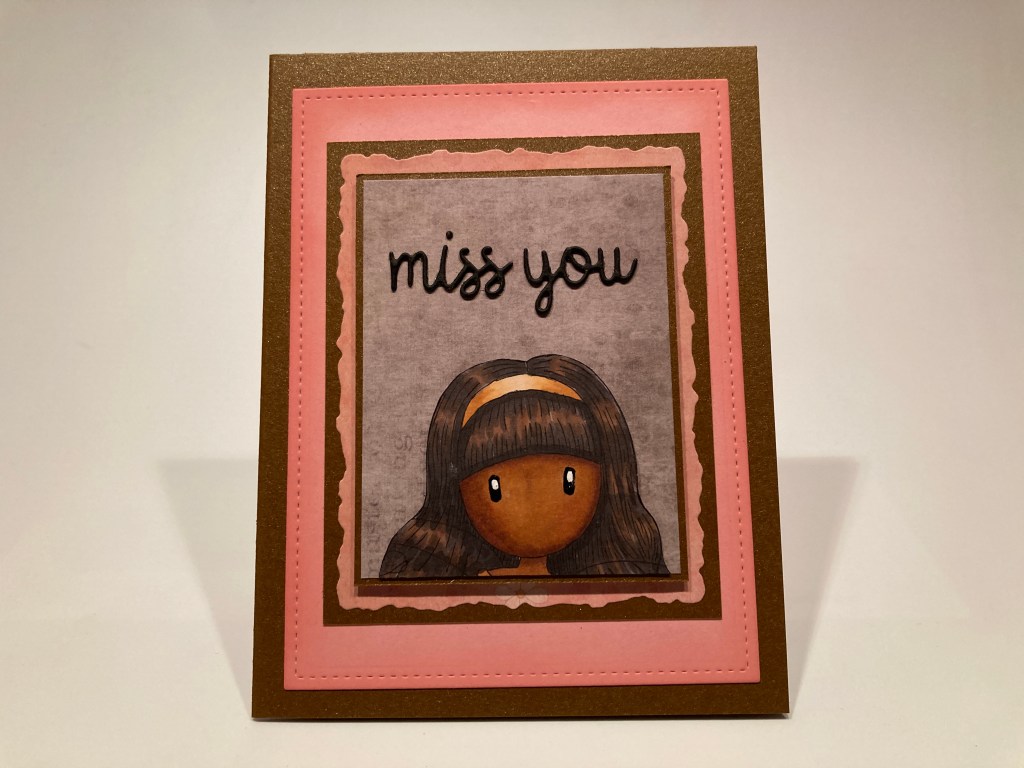
I stamped just her head and shoulders on some of Lizi’s alcohol-friendly White card stock using an Intensified Black ink cube – you can control where you stamp using a smaller cube – I just didn’t stamp the antennae. I completed the missing hair and head band lines with a Pigma Micron pen and colored her with my Alcohol markers. I’m slowly getting better with my hair coloring, and it was great fun to give her a little ethnicity too! I just ignored the top of the wing lines figuring her hair should mostly cover those up. I fussy cut her and colored the edges of the card stock with black marker.
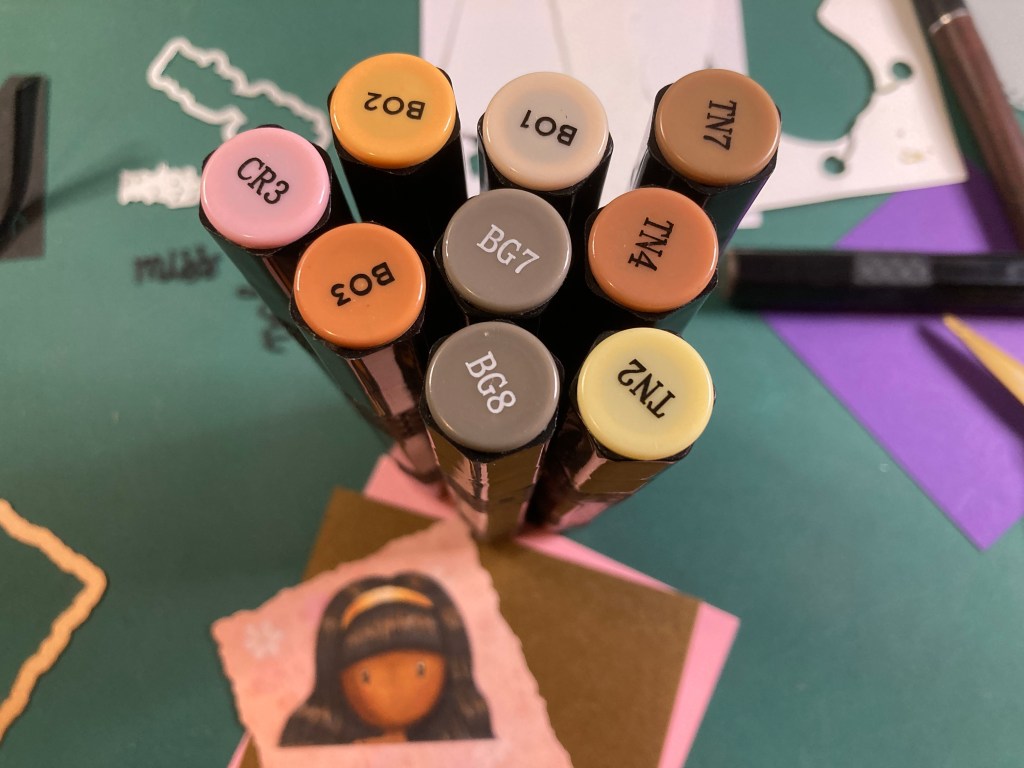
These are the markers I used to color this girl. There should be a BG10 in that stack too…!
I glued her bottom edge to a 2.5″ x 3.25″ square of the neutral pattern paper and gave her some dimension with foam tape behind her head. I added a thin mat of Auburn Pearl card stock from my stash to finish our centerpiece.
I die-cut more of the flowery pattern paper with a Spellbinders deckle edge die and matted that to a 3.125″ x 4″ square of the same pearl card stock. I die cut the last quarter of pink card stock with a Lawn Fawn Stitched Rectangle die, inked the edges with Worn Lipstick and glued that to an Auburn Pearl card base.
Everything is glued flat to the card front except for the girl/pattern paper/mat layer mounted with foam tape. I die-cut this sentiment using the Miss You die from the LFL June 2020 Card kit. I die-cut that twice from thick black card stock and glued the pieces together and then down to the card front. I did add more black and white gel pen for some shine in her eyes, and might have gotten a little over-eager with the white, but that just seems to add to her forlorn expression. A really sweet Miss You card and I didn’t have to color the entire stamp!
That’s about all the cute little girls I can handle this month! They make for some really cute very feminine cards…
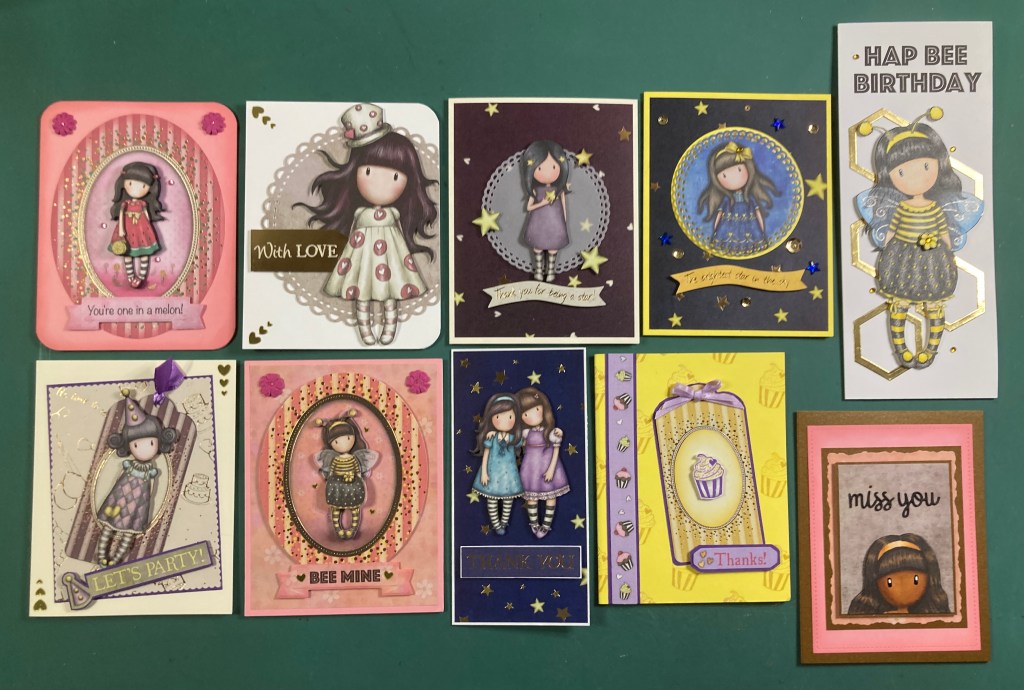
I think I used just about every version of the Gorjuss Girls included in this kit, and only duplicated the Bumble bee Girl once. I did manage to get a few simple puns in this month, and we have a very useful assortment of cards. A few thank you cards, a couple of birthday cards, some complimentary and encouragement cards, a Valentine and a miss you card!
I have tons of supplies left over from this kit. I used a little something from all but two of the die-cut sheets, I have six untouched pattern papers, I didn’t get to the alpha stickers (I tried!) but I used most of our embellishments. This kit sold out very quickly this month… I told you those Gorjuss Girls are popular!
This also marks my fourth year being on the Love From Lizi Design Team. I do feel that it is time to step back and give someone else the opportunity to work with Lizi. My real job is kind of kicking my butt with all the new protocols and procedures we must follow, and I can certainly use a bit of a break. Lizi asked if I would be available to be a guest designer on occasion and I naturally agreed… You won’t be rid of me entirely! I have had so much fun with all the Love From Lizi kits and I have to compliment Lizi for always challenging me and keeping me on my toes!
Thak you so very much for sharing your time with me here. Your support means the world to me! Please remember to Like me, List me, Pin me, Post me, Share me with all your friends, Don’t run with scissors… and I send you and yours Light and Laughter and as always, Happy Crafting!
DISCLOSURE: This site contains some affiliate links to products. I may receive a commission for purchases made through these links (at no cost to you). As an Amazon Associate I earn from qualifying purchases. Thank you!
