
Hello Folks! Scott here with my 10 cards created using the My Monthly Hero July 2021 kit. This month, we’ll travel to a magical woodland forest, full of mushrooms, ferns, and fairy doors that are sure to put a smile on your face.
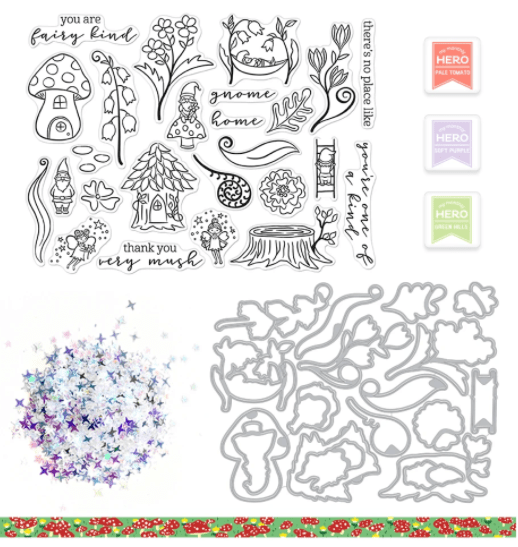
Our 6×8 Clear Stamp Set includes a couple of fairies and a few gnomes along with two dwellings, a bunch of assorted flowers and greenery, and some pun-y sentiments. We get 18 Coordinating Frame Cuts for every single little gnome, fairy and flower. Our extras this month include three ink cubes (Green Hills, Soft Purple, Pale Tomato), exclusively designed mushroom washi tape, and a mix of stardust sequins. I believe these are the very first gnomes in my stash!
For some reason, I automatically started thinking about masking stamps to create some scenes… I didn’t just stamp everything and color it and cut it out… not sure what made me think in this direction, but, as a result, I have quite a number of (mostly) single-layer cards this month!
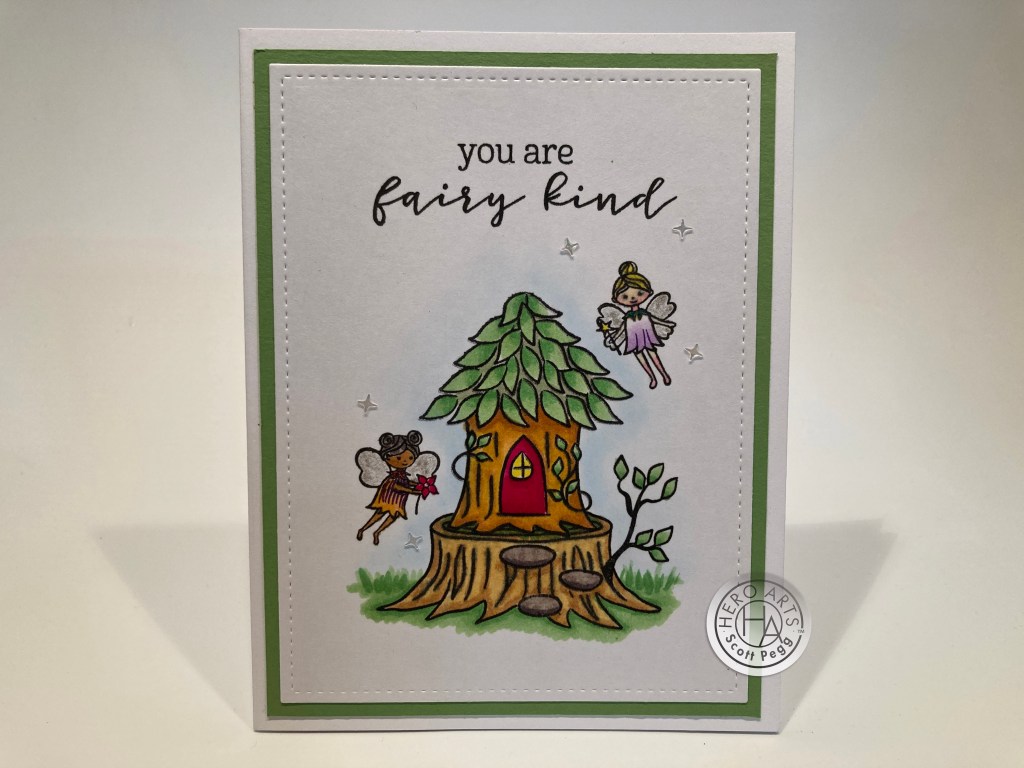
There’s a few puns in our sentiments this month, so that’s where I started! On some Neenah Solar White 80# card stock I stamped the stone steps and the house with VersaFine Onyx Black ink. I masked them off (inkadinkado mask paper) then stamped the stump and fairies. I did a little stamp surgery on the fairies, and removed their sparkles before I stamped them. I was very careful and should be able to add their sparkles back whenever I want. I colored all with my Spectrum Noir alcohol markers, stamped the sentiment with the same ink and die-cut that panel with a Lawn Fawn Stitched rectangle die. This qualifies as a one-layer card!
These fairies are pretty tiny… not to mention some of the leaves! I think Copic markers must have a finer point on their brush tip than Spectrum Noir markers do. I find it a little nerve-wracking trying to keep my coloring constrained within the lines on small stamps. Some of the extra detail on the orange fairy was due to some alcohol marker mishaps..! I did add a blush of blue around the scene using a Pebbles chalk palette. That makes it quite easy to get a very light hint of sky around our house without it becoming distracting. I matted my colored panel to a green mat and glued those to a White card base. I added some of the stardust sequins and colored our fairies wings with a Gelly Roll Stardust glitter gel pen. Nice and sparkly without having to stamp any sparkles! The stone steps look perfectly useful too!
We have that “thank you very mush” sentiment in our stamp set (why it doesn’t say “thank you fairy mush” I’ll never know?!) and I decided “very mush” must mean a whole bunch of mushrooms…!
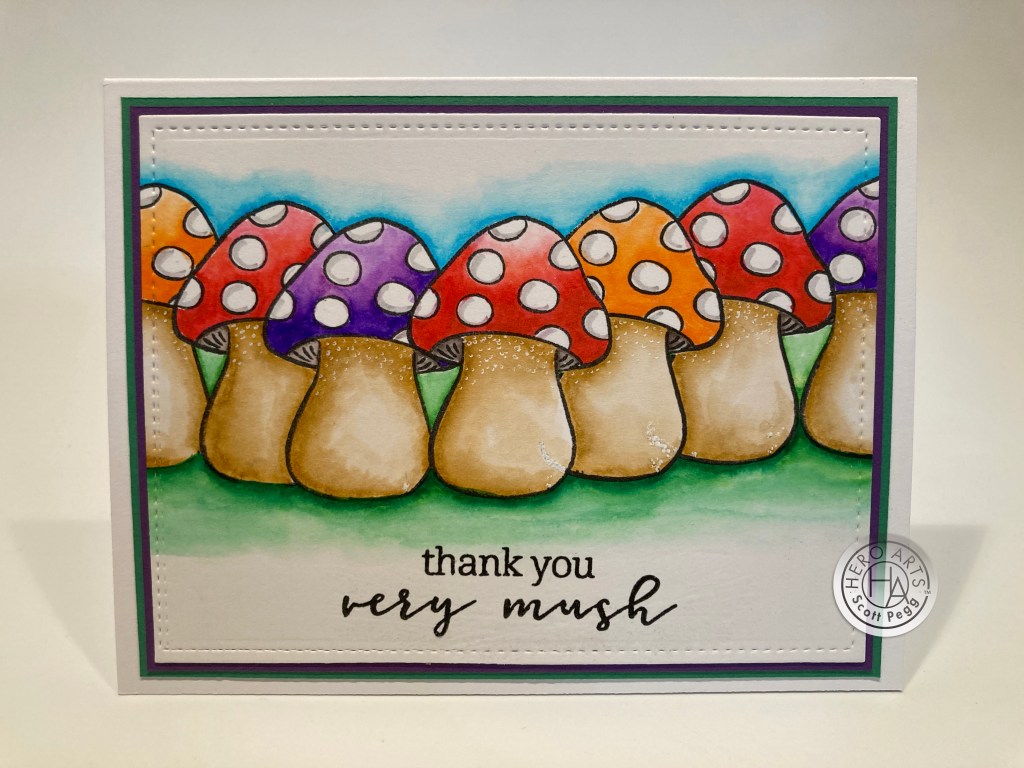
Remembering my stress with the alcohol markers, I stamped these mushrooms on Bristol Smooth card stock with Onyx Black ink. I masked off the door and window on the stamp, inked it up, removed the mask, and stamped a plain mushroom. I cut a mushroom mask and masked off the stamped mushroom to allow me to stamp the additional ‘shrooms. I did move them around a bit so they weren’t in a perfectly spaced straight line – I think that helps them look more unique! I colored these with my Zig Clean Color Real Brush markers and realized that without the door and window, these would have been fairly easy to color with my Spectrum Noir markers… ce la vie!
I stamped the sentiment with VersaFine ink and embossed it with some clear embossing powder, and die cut the panel with a LFSRdie. I matted that on a thin purple and then a thin green mat, and glued those to my white card front. I added a bit of texture to the mushroom stems (and hid some mistakes) with a white gel pen. I decided I really liked the watercolor look that the Zig markers gave me – these mushrooms really pop in person! Another one-layer card!
Since that coloring expedition went so well, I thought I would channel my inner Sandy Allnock and try my hand at coloring a whole background with my Spectrum Noir markers. Trust me, I don’t do this very often..!
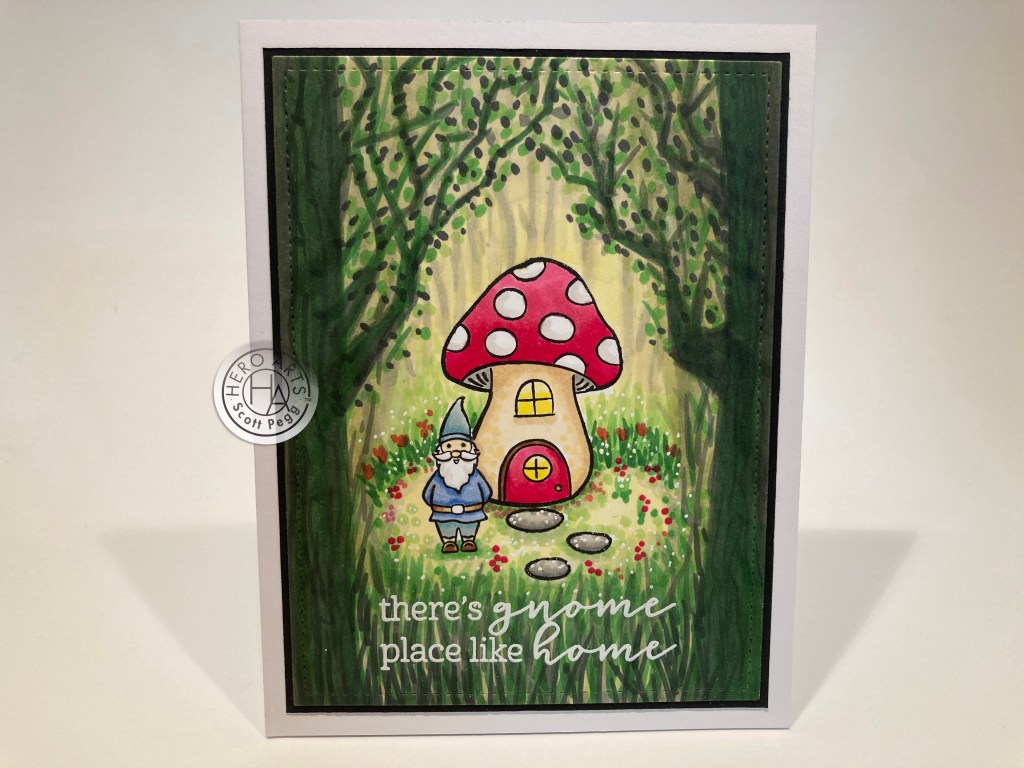
I stamped the gnome and stones first, masked off the left side of the gnome and stamped the mushroom. Then I colored everything with my alcohol markers. I worked from light to dark on the background, and tried to create a little clearing in the glen for our gnome home. Because I do this so rarely, it did take me while to complete, but I’m very happy with the results! Here’ a shot of the colors I used on this piece.
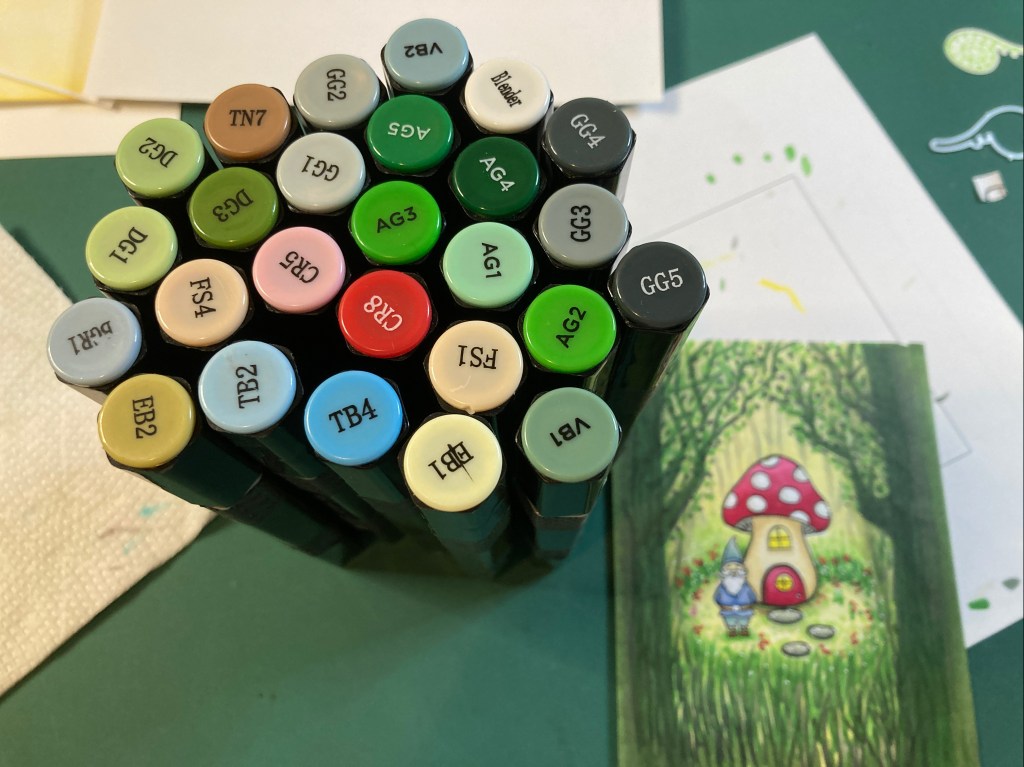
Not a terrifically extensive bunch of colors! I should probably practice my alcohol marker background skills more! I die-cut the scene with a LFSRdie, matted that to a thin black mat and glued them down to a white card base. The stamp set gave us the sentiment option of “there’s no place like” “home” or “gnome” so I just cut out the “no”, added the “gnome” and used both nouns in one sentiment (or an adjective and and noun if you reference the pun)! I stamped the new sentiment line by line with VersaMark ink and embossed this with White embossing powder. Perfect! Of course I added white gel pen for some small details and I think Sandy would be proud of me! Yet another one-layer card for this month!!
The little gnome napping in a hammock is one of my favorite stand alone stamps in this kit. I couldn’t help but think that his hammock seemed like a pea pod strung up between the flowers… so I added some peas!

I stamped this on Bristol smooth card stock with VersaFine Onyx Black ink, and drew in some peas on the ground with a black Pigma Micron pen. I wanted to include them with the die-cut so I placed them close to the stems. I colored all with my Zig Watercolor markers, and did a partial die-cut on the top 2/3 of the stamp, then used my mat knife to finish the cut around the peas. Looks like it was meant to be just like this!
I found this old Julie Balzar TCW Mini Swirly Garden stencil in my stash and though it would work nicely with this kit. I used HA Key lime Fizz Reactive ink on some white card stock to stencil this background, keeping it a bit lighter in the center. I printed this sentiment on the stenciled piece using my Silhouette software and the Times New Roman and Dream State font… a great pun and a sweet “I miss you” card! I die-cut the background with a LFSRdie, matted that to a thin green mat and glued that to a white card base. I attached my die-cut over the sentiment with some foam tape for a little dimension. I pulled a thin thread of green twine from a strand of white/green bakers twine, added some glue to it and wound it around a toothpick to dry. It was fairly easy to slip off and add to the peas… another allusion to this hammock being a pea pod! I think it’s perfectly obvious! The stencil worked great, and I get a kick out of those peas!
Mini-slimline card time! This actually started out as a “miss you” card but then I noticed a different sentiment…
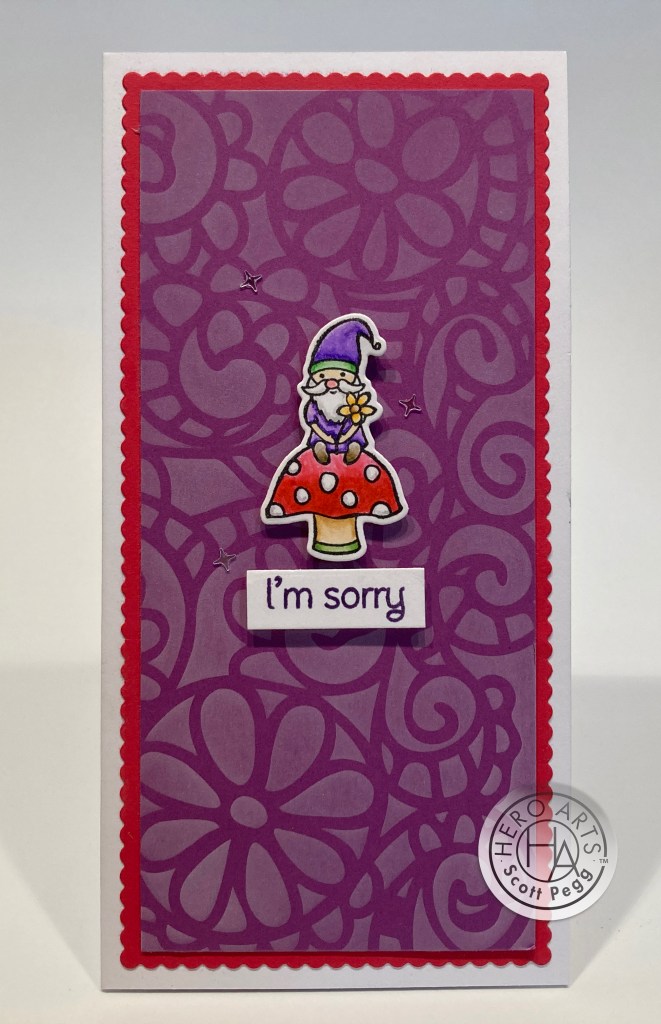
This little gnome holding a flower and sitting on a toadstool seems so forlorn that I thought an “I’m sorry” sentiment was the perfect way to go! I found that sentiment on the Hero Arts Many Everyday Messages stamp set – where I usually go for the “miss you” sentiment. I stamped the gnome on Bristol Smooth card stock with Onyx Black ink, colored him with my Zig watercolor markers and die-cut him with the coordinating die. This card base is 3″ x 6″, so I cut a piece of purple card stock to 2.5″ x 5.5″ and stenciled the Swirly Garden using a fairly light layer of HA Unicorn White pigment ink. I matted that on a red scallop mat I cut with my Tonic Scallop Square Layering Basics die set.
The sentiment is stamped on a scrap of white card stock using HA Grape Slush Reactive ink and embossed with clear embossing powder. I die-cut the stamped sentiment with a Lawn Fawn Everyday Sentiment Banner die, trimmed the ends and added it to the card front with foam tape. I love this little card and this little gnome and this little sentiment. I think one could be forgiven for most anything with a card like this!
I seem to have forgotten all about the flower and foliage stamps in this kit – and there’s still an unused sentiment too!
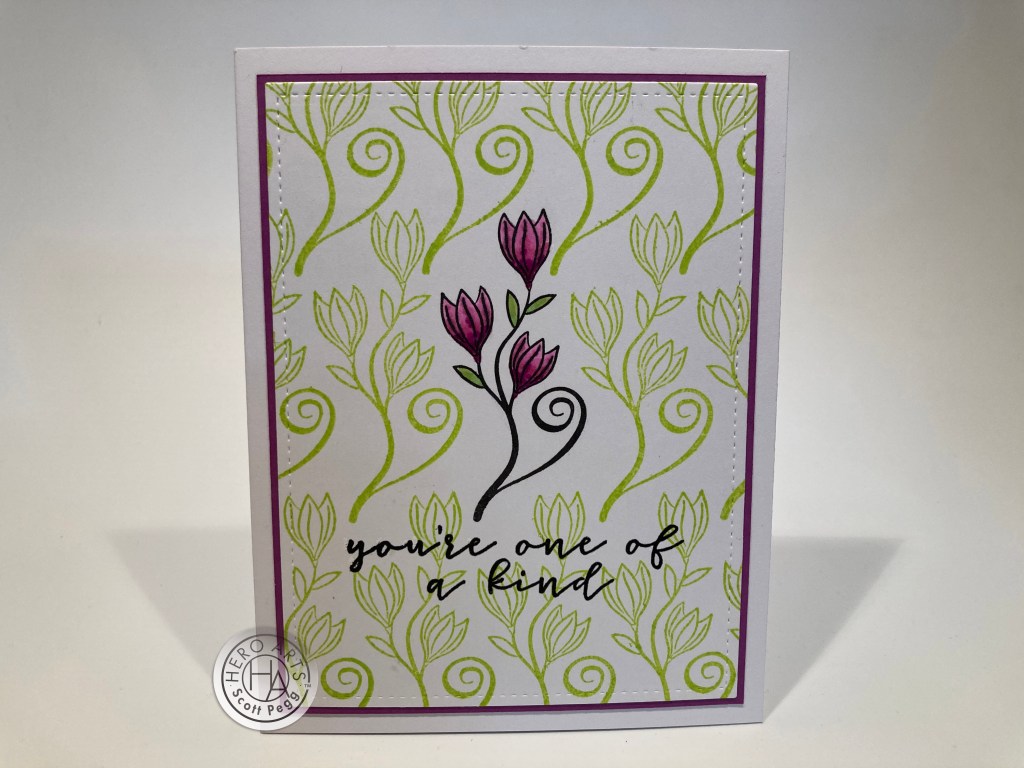
I thought this stamp was the best flower in our set – must be that curly-cue! On a piece of Neenah Solar White card stock, I stamped the center flower with Onyx Black ink and stamped the repeating flowers using the Green Hills stamp cube included in our kit. It’s so easy to stamp patterns like this with a Hero Arts MISTI Stamping tool. I colored the center flower with alcohol markers, stamped and embossed the sentiment as usual, die cut that panel with a LFSRdie, matted that to more purple card stock and glued those to a white card base. Simple, elegant, and another one-layer card!
Let’s go all out with the flowers and foliage stamps! There’s actually nine of those in this stamp set. Can I use them all?

Yes, I can, but the gnomes and fairies get left behind! I took a panel of Neenah Solar White card stock and ink blended the edges with Key Lime Fizz ink and stamped all the flowers and greenery with VersaFine ink – I did stamp the fiddle ferns in the Green Hills ink. I colored all with my alcohol markers, trimmed that panel to 4″ x 5.25″, added a thin black mat and glued those to a White card base. I die-cut the Lawn Fawn Scripty Thanks sentiment four times from plain green card stock and once from the pearlescent green. I stacked and glued all the layers together for a nice chunky sentiment, and glued that to the card front. I added all these green petal-like shapes (and some sequins) in the open spaces – the petal shapes are all the cut-outs from the thanks die! No gnomes or fairies but a lovely thank you card!
I had a wild idea to see if I could possibly make that tree-home stamp into a multi-story unit. One thing led to another…
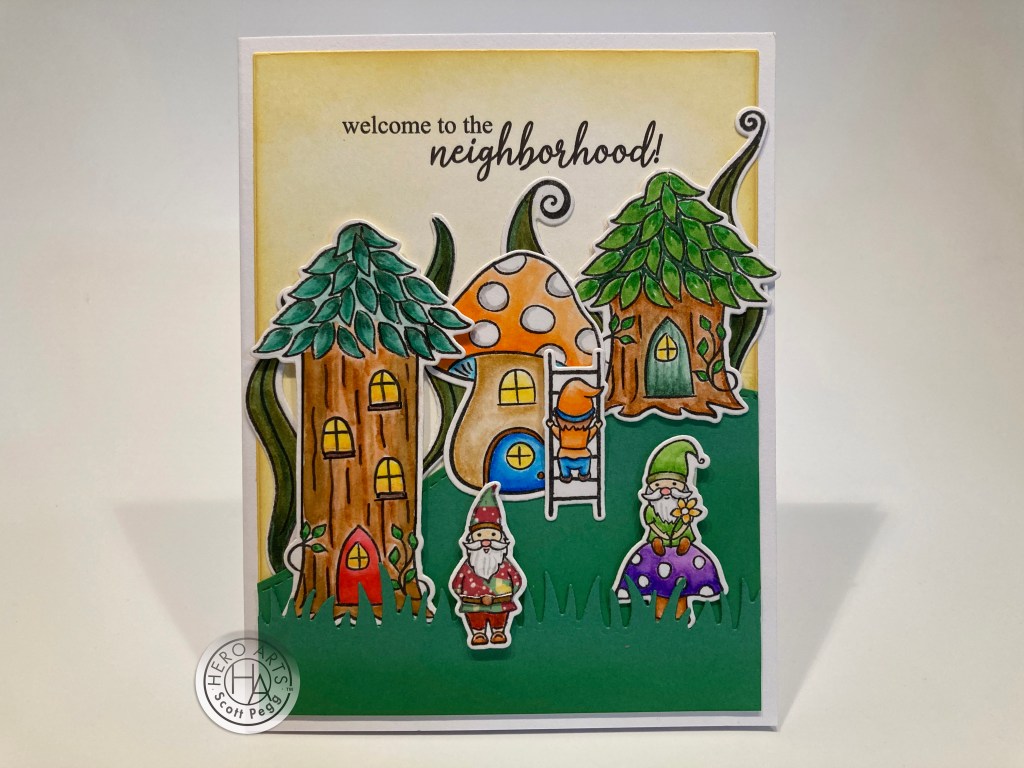
A little urban development going on here! I think it’s kind of amazing how different the two tree-homes look! Everything is stamped on Bristol Smooth card stock with VersaFine ink, colored with Zig watercolor markers, and cut out with their coordinating dies. I created the multi-story house by masking off the leaves and just stamping the trunk, then sliding my card stock down a little more than an inch, and masking off the trunk to stamp the leaves. Then I just used a ruler and a Pigma Micron pen to attach the top to the bottom. I drew in three more windows, and used partial die-cutting to cut the top and bottom separately and connected the cuts on the sides. Very effective, and really pretty easy!
The background is a panel of White card stock ink blended with HA Lemon Drop reactive ink and the sentiment is printed just like the gnomies card. Two layers of plain green card stock die-cut with a stitched hillside and a grassy border die are glued to the background. There is a touch of ink blending on the bottom of the green pieces using the Green Hills ink. Everything is mounted to the card front with glue and strategically placed pieces of foam tape. If you look closely at the center gnome, you can see that I “paper-pieced” his tunic and hat using the mushroom washi tape. Okay, so that was incredibly fussy, but I wanted to use that washi tape somehow! Now this is certainly not a one-layer card, but probably more indicative of how most people will use this kit. I do love this little scene and sentiment!
I had some extra fronds left over from that last card and I started playing around with them, and the fiddle fern stamp…
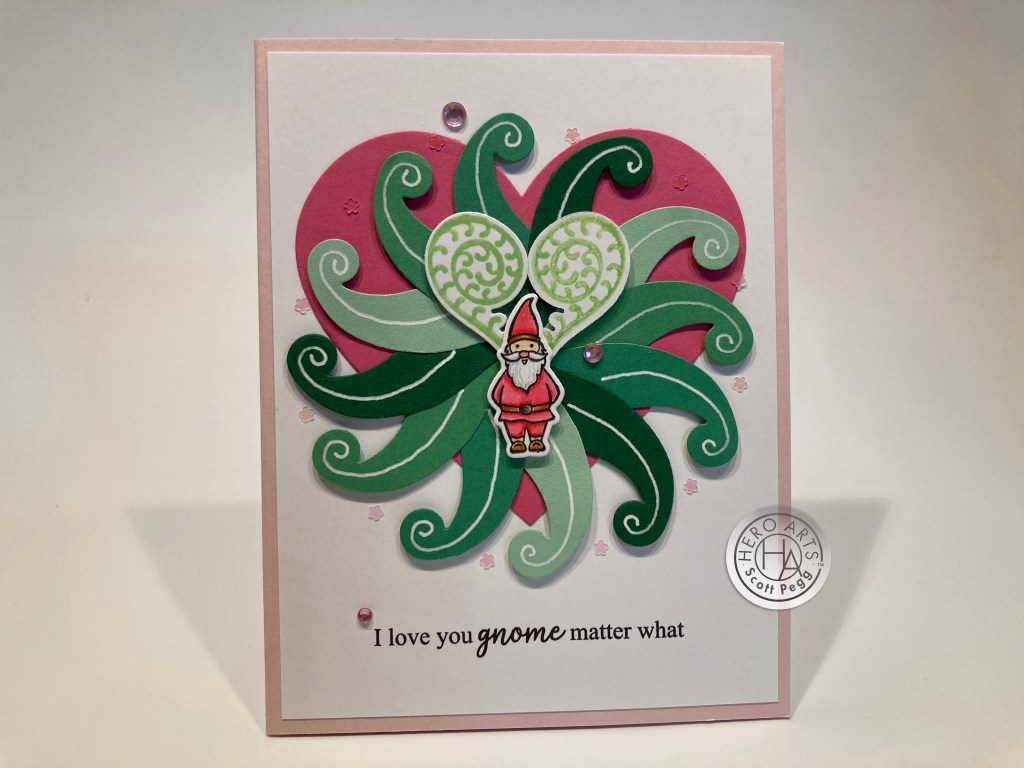
A wild valentine card featuring another gnome pun! I die-cut (no stamping!) the shorter fern from 4 colors of green card stock and arrangement them into this fanciful plant shape – I did add quick “veins” with a white gel pen. I stamped and die-cut one fiddle fern normally, and reverse-stamped (and die-cut) a second one using the Green Hills ink. Together they make a perfect heart and an exotic center to our fern.
I printed the sentiment (like the others) on a 4″ x 5.25″ piece of white card stock and glued that to a Pink card base. I die-cut a pink heart using a HA Infinity Nesting Heart die, arranged our plant on top of that, and glued them to the card front. I did add foam tape under the tips of the ferns, and behind the top of the fiddle ferns. Our Gnome is stamped, colored and die-cut like the rest, and mounted with some foam tape. More stardust sequins around the edges of the fern and a few pink sequins give this “love you” card some nice sparkle – I love that fiddle fern heart! And a perfect pun!
I can’t resist the urge to make a Christmas card with a non-holiday kit whenever I get the chance. Another pun too!
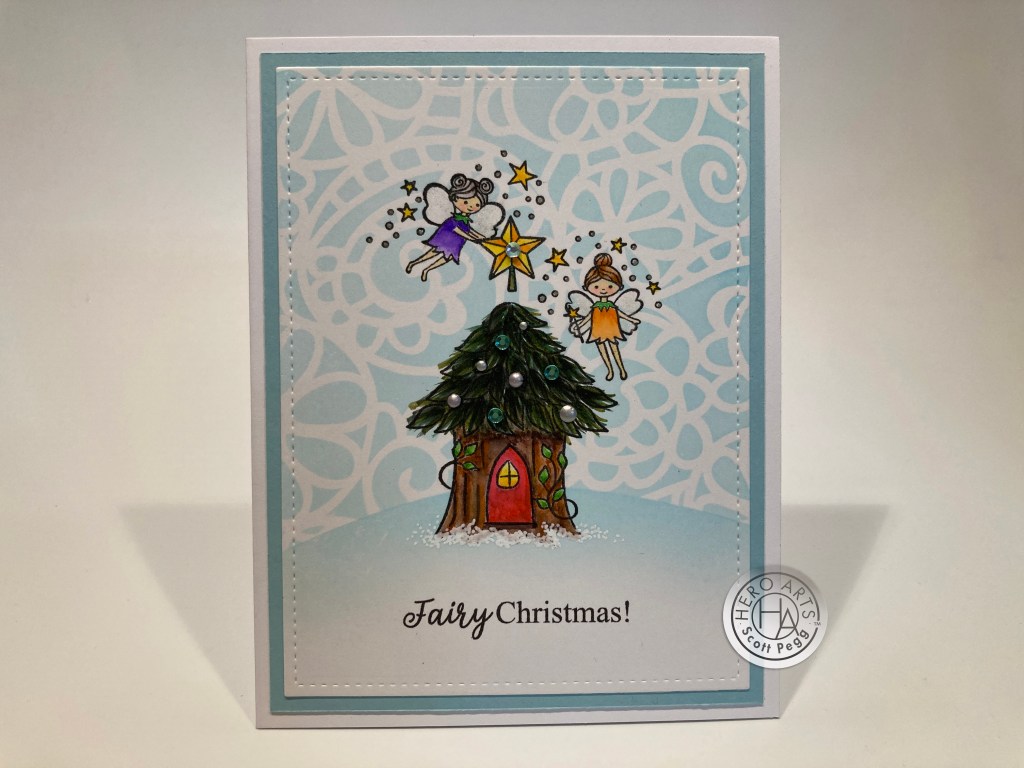
This one truly makes me giggle! If you don’t count the decorations, this is a one-layer card too! I cut a quick hillside mask from a scrap of white card stock, placed that on the bottom third of a Bristol Smooth card stock panel, laid the Swirly Garden stencil on top and lightly blended Splash reactive ink through that for our wintry sky. I took the negative of my cut hillside, masked off the sky, and blended the edge of the hillside. I printed the sentiment on the inked panel using my Silhouette software and the same fonts (I thought those matched the style of this kit quite nicely). Then I stamped everything with VersaMark ink. The star stamp is from the MMH October 2018 kit and I stamped that before stamping the fairy on the left. I positioned her to look like she was holding the star, inked the stamp, wiped away the flower in her hands, and stamped her down. Then it was easy to extend her arms with a Pigma pen.
I purposefully kept the ink blending on the background as light as possible thinking my Zig watercolor markers would color over the top of that ink with no problem.That worked quite well! I colored the “roof” more like a pine tree than a deciduous tree, but kept the rest of the coloring pretty straight forward. These fairies are back to normal with their sparkles intact after removing them on the first card. That their sparkles have stars, is perfect for the task at hand! I did add some white gel pen “snow” at the foot of the tree. I die cut the colored panel with a LFSRdie, mounted that to a mat of Hero Hues Mist card stock and down to a White card base. Some silver Nuvo Drops and a few green gems decorate the roof, and a crystal gem lights the center of the star. The dots of fairy sparkle are colored with a Stardust gel pen, and the fairy wings are glittered with a nice touch of Spectrum Noir sparkle pen. Plenty of holiday fairy sparkle here!! That stencil works great as a winter sky, and I simply like the idea of a soft blue Christmas card! Fairy Christmas!
That completes my 10 card fantasy adventure with the My Monthly Hero July 2021 Kit. What a bright colorful collection!
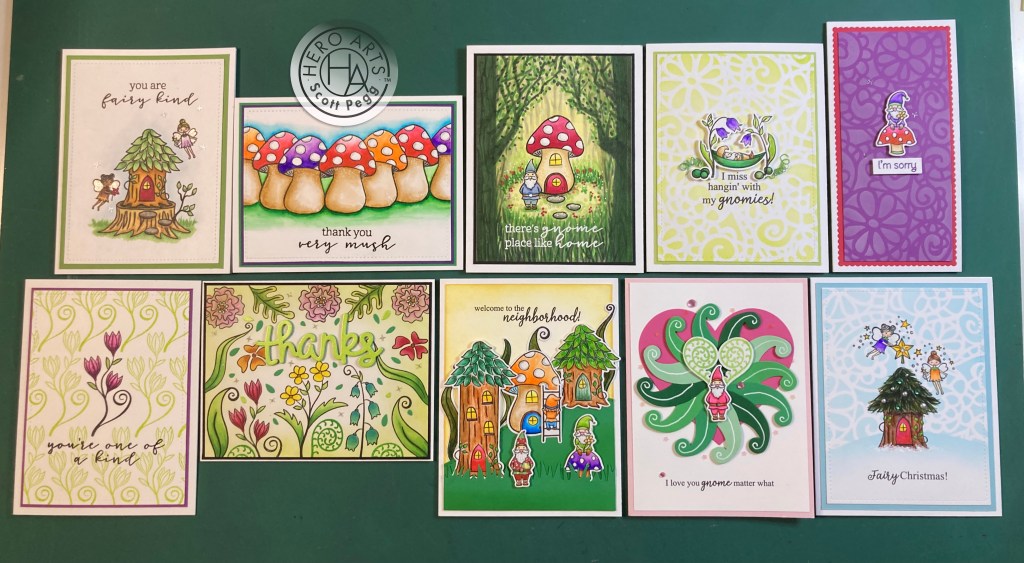
And a great assortment of cards as well! A few Thank You cards, simple greetings and encouragement cards, an apology (or sympathy) card, a valentine and a Christmas card! Plenty of useful sentiments for any stash! I really liked that Swirly Garden stencil and thought it worked with this set in a nice variety of ways, and if you take some time, these stamps are more versatile than one might think at first glance! Though it felt like I had conquered this kit after I created card number three, it was fun to keep digging a little deeper and see what else this kit might inspire. And though these are the first gnome stamps in my stash, I do wish they were a little larger..! And I would have loved to have some mirror image stamps of some of the flowers – the bluebells and the fiddle fern, maybe?
I did manage to use every stamp in this stamp set – well, except for the “no” in the “there’s no place like” sentiment!! I seemed to have gotten a little distracted by the gnomes in this kit and didn’t get to the Soft Purple and Pale Tomato ink cubes but I did manage to use a little washi tape and plenty of the stardust sequins! For some reason, this kit is still available at Hero Arts – I expected this one to sell out quickly! I figure there are lots of gnome stamp sets out there as it is! If I did manage to catch your eye or give you some ideas of your own, and you’d like to grab this kit for yourself, please use my links! It helps support this channel and is supremely appreciated!
My Monthly Hero July 2021 kit: http://shrsl.com/32qfj
Hero Arts July 2021 Release: http://shrsl.com/32qfv
All in all, I had so much fun playing with this kit… I know lots of folks aren’t necessarily into coloring, but I can easily get into the zen of coloring… just put some music on, give me some good markers and I’m happy! Thank you so very much for sharing your time with me here. You know by now how much I appreciate it! Please remember to sign up to follow this blog, follow me on instagram (#cardcutups) and at CardCutups on YouTube, and share this post with any like-minded crafters and card makers! I send you and yours Fairy Mush Love, Light and laughter, and happy crafting!!
DISCLOSURE: This site contains some affiliate links to products. I may receive a commission for purchases made through these links (at no cost to you). As an Amazon Associate I earn from qualifying purchases. Thank you!

This kit was not my cup of tea, but as I always I enjoyed seeing how you made use of all the stamps in the set. Your coloring is wonderful.
LikeLike
Thanks Judy! Much appreciated! All my best to you and yours!
LikeLike
Lovely cards.
LikeLike
Thank you, Cindy!
LikeLike
Scott I was really inspired by your cards and actually pulled out some gnome stamps i’ve had but never used. How can i share the pictures with you?
LikeLike
Delina!
Thanks so much!
You can email me pics directly at cardcutups@gmail.com…! Or, if you tag me on instagram (#cardcutups) I’ll get a notice as well!
Can’t wait to see what you’ve come up with!
Scott
LikeLike