
Hello Folks! Scott here with my 10 cards created with the NEW Love From Lizi April 2021 Card Kit. This is the “Really Dig You” kit with a gardening theme and another cute Eyelash Girl in a pair of wellingtons. Very Springy!
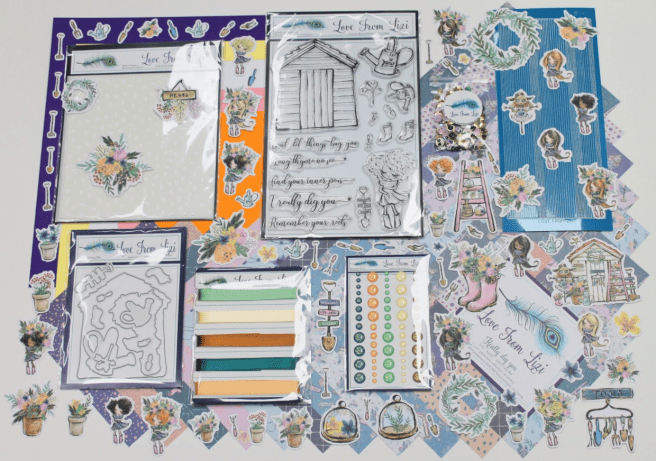
I did make my 10 card bases using the five sheets of card stock included in the kit – swapping out the alcohol-friendly White for some plain White from my stash. At first glance, I wasn’t quite sure which direction this kit was pointing me to, so, I turned to the stamp set for ideas. It seemed to me that the the position of the Eyelash girl’s arms seemed like she could actually be holding the shovel… let’s try that!

A little bit of careful masking and stamping, and sure enough, our Eyelash Girl is holding that shovel perfectly! I stamped the shovel on some LFL alcohol-friendly White card stock using Versafine Onyx Black ink, and stamped it again on some Inkadinkado Stamping Mask paper, cut it out carefully (including the signage) and placed the mask over my stamped image. Then I lined up the Eyelash Girl stamp and stamped her on top of the shovel mask. I stamped and cut out the girl from the Stamping Mask Paper and covered the stamped image with that mask. Then I stamped the shed “behind” her using Hero Arts Sand Stone ink. I went with brown so the shed wouldn’t compete too much with the girl. I stamped the weathervane, watering can and gardening tools with Black Onyx ink to fill out the whole scene.
I colored the shed and ground with Prismacolor colored pencils, and colored our gardener with Spectrum Noir alcohol markers. I ended up re-stamping, coloring and fussy cutting the body of the watering can and the signage on the shovel. Because I didn’t mask off the watering can, I couldn’t obliterate the shed lines, and the shovel signage wasn’t staying as clean and pristine as I wanted. I glued those pieces in place and added some sky and clouds with my alcohol markers.
I trimmed my colored panel to 4″ x 5.25″ and considered stamping the sentiment on the inside of this card. I ended up stamping the sentiment with Onyx Black ink and embossing it with Clear Embossing powder over the top of the shed. I thought that fit nicely there, and think it came out quite readable! I added a thin brown mat behind the colored panel and glued those to the Soft Lemon Yellow card base. For a final touch, I added a Red Glitter Mini Heart over the heart at the end of the sentiment – a tiny touch of sparkle for this outdoor scene… though I do find it a little hard to imagine that anyone would wear a nice frilly dress to work in the garden! Maybe it’s an old dress…!?
Though it wasn’t intended, I used the vast majority of our image stamps on this first card! So I figured I’d play with some of the ephemera pieces now… and see how many of the sentiment stamps I can use!
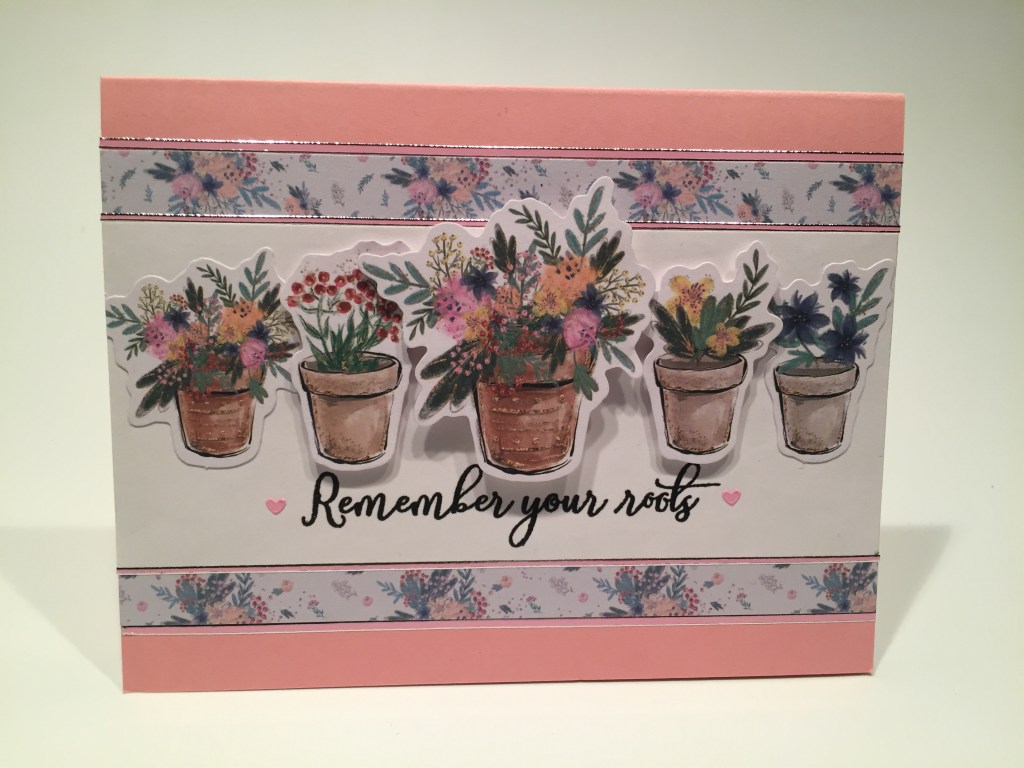
Here’s the perfect opportunity to use a bunch of our potted plant ephemera and this affectionate sentiment! I cut a scrap of White card stock to 2 3/8″ x 5 1/2″, stamped and embossed the sentiment in the center towards the bottom. I added a piece of pattern paper behind that cut to 2 7/8″ x 5 1/2″ and glued both to the Pink card base. I outlined all of the edges with the Pink/silver Pin Stripe peel offs we got in last months kit. I glued the pots on the sides flat to the card front, added the next two pots with foam tape and mounted the largest pot with two layers of foam tape. A couple of Pink Mini Heart peel offs from the Really Dig You Variety peel off pack highlight the sentiment and match the pin stripe peel offs perfectly! I like the dimension on this card and can imagine a variety of uses for a sentiment like this!
One sentiment really had me scratching my head. “Don’t let things bug you” is a perfectly fine sentiment, but I was having a hard time figuring out how to illustrate that sentiment on a card.
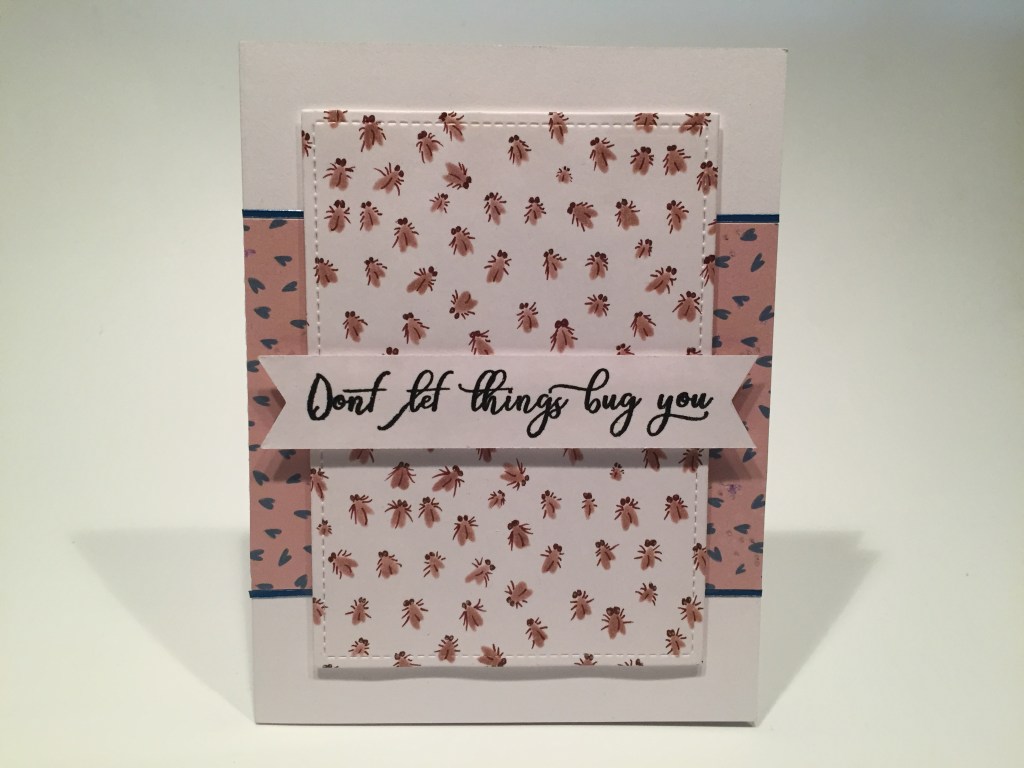
Scattered Hearts Stencil to the rescue! I realized those little hand-drawn hearts would make perfect bugs! I used my HA Sand Stone ink to stencil all the hearts on a panel of White card stock and took a brown Pigma Micron pen to add eyes and legs to all the “hearts” – instant infestation! I even added tiny dots of my Stardust Gel pen to all the “eyes” to give the bugs a touch of life. Once I had “bugged-out” all the hearts I die-cut that panel with a Lawn Fawn Stitched rectangle die. I cut a piece of the scattered hearts patten paper to 3″ x 4.25″, glued that to a White card base and added some of the Petrol Blue Pin Stripe Peel offs to the top and bottom edges.
I mounted the bug panel with foam tape and stamped and embossed the sentiment on a scrap of White card stock. I die-cut the sentiment with a Lawn Fawn Everyday Sentiment Banners die and mounted that to the top with more foam tape. This makes me giggle a lot… certainly not what one would expect to find on a greeting card! Call the Exterminator!
You know I like puns, and we have a nice “thyme” pun with our sentiments… seems we only have one item in this kit actually alluding to thyme… or any herbs as the case may be.

Again I used the Scattered Hearts stencil to add gold foil to the purple plaid pattern paper. I used a 2.25″ x 5.25″ piece of that pattern paper and stenciled the hearts using Deco Foil Transfer Gel. I let that dry completely, added some Gold Deco foil on top, and sent it through my laminator. I admit I love this Deco Foil process – I think it’s one of the least expensive ways to add real foiling on a card – no fancy heating machines or expensive foil plates needed. I added a thin white mat behind my foiled panel and glued that to the left side of the Royal Purple card base.
I stamped the sentiment on a lighter piece of purple card stock from my stash, embossed that with White Embossing powder and fussy cut that into a thin banner. I added that and the “HERBS” ephemera piece with foam tape and finished this card out with some gold sequins from our sequin mix. Nice pun! Though I don’t know of many flowering herbs..!
One more sentiment from this stamp set! It’s a pun and another head-scratcher as far as what’s included in this kit.
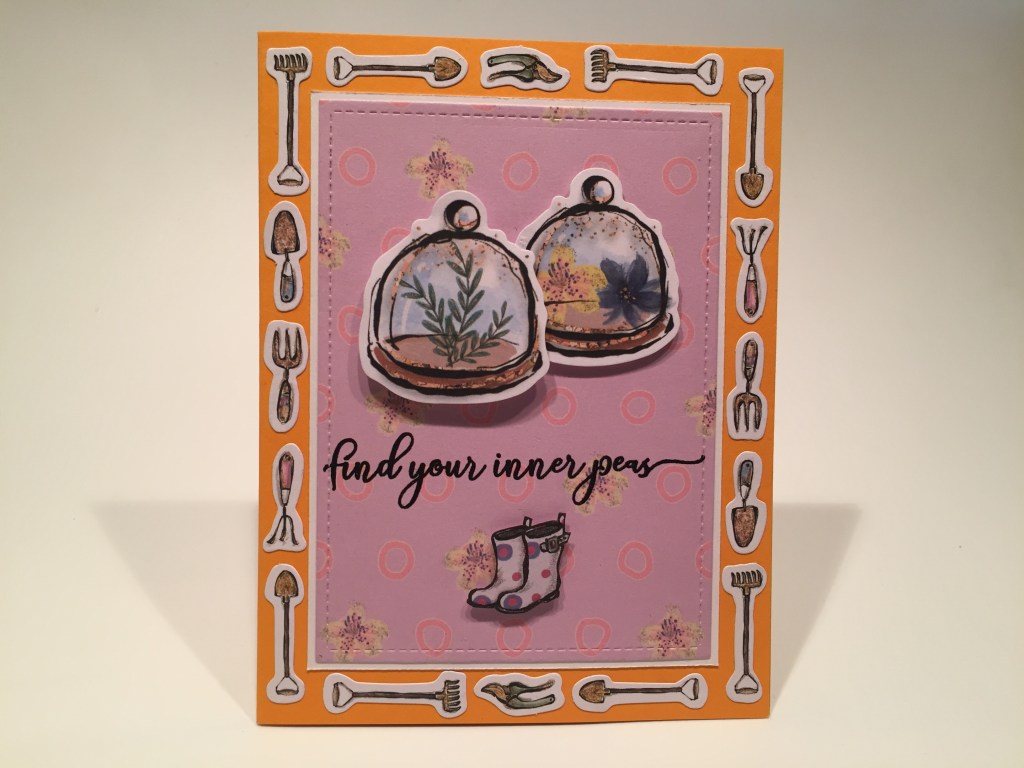
I couldn’t find any peas in our kit, so I figured these glass domes would work to give us some sense of “inner”..!? LOL! I die-cut this pattern paper with a LFSR die, and stamped and embossed the sentiment in the lower third. I added a thin white mat behind that and glued those to our Orange card base. I stamped the boots on the polka-dot pattern paper, added a little shading with colored pencils, fussy cut them out and glued them together. I glued the garden tool ephemera pieces all around the edge, and then mounted the two domes and the boots with foam tape – two layers on the left dome. This is a really bright card! The orange circles on the pattern paper match the card base nicely, though I would generally never pair pink and orange together – but it works very nicely here! Another note… I believe the greenery under the left dome would pass as thyme…!
That takes care of all the sentiments in our stamp set! Let’s move on to some sentiments of my own…!

I was sorry our ephemera pack only had one of these female scarecrow pieces… I thought they were unique and unexpectedly charming! I die-cut the stitched ovals (scarecrow pattern paper and a white mat) using the Gina K / Therm-o-web Oval dies and glued them together. I added short strips of the Mauve Moondust Straight Peel offs (from the Variety pack this month) to the center of the Royal Purple card base and glued the oval on top. I printed this sentiment on a scrap of card stock using the Brady Bunch Remastered font, trimmed that down, rounded the corners and mounted that and the scarecrow with foam tape. We had no purple enamel dots in our kit, so I found these purple enamel dots from a prior LFL kit and added them to the sentiment.
Okay, I did address the “crazy” eyes on our scarecrow (note the pattern paper) with a white gel pen and black Pigma Micron pen. I understand that the eyes are supposed to be buttons, (with eyelashes!?!) but I do think they make our scarecrow look positively demented! Is there such a thing as a Zombie Scarecrow?? I did like giving her a little bit more personality with some normal eyes! I think this pun is appropriate and gently giggle-inducing!
Mothers Day is on the horizon, and I couldn’t resist using this great ephemera piece and a bit of a pun…
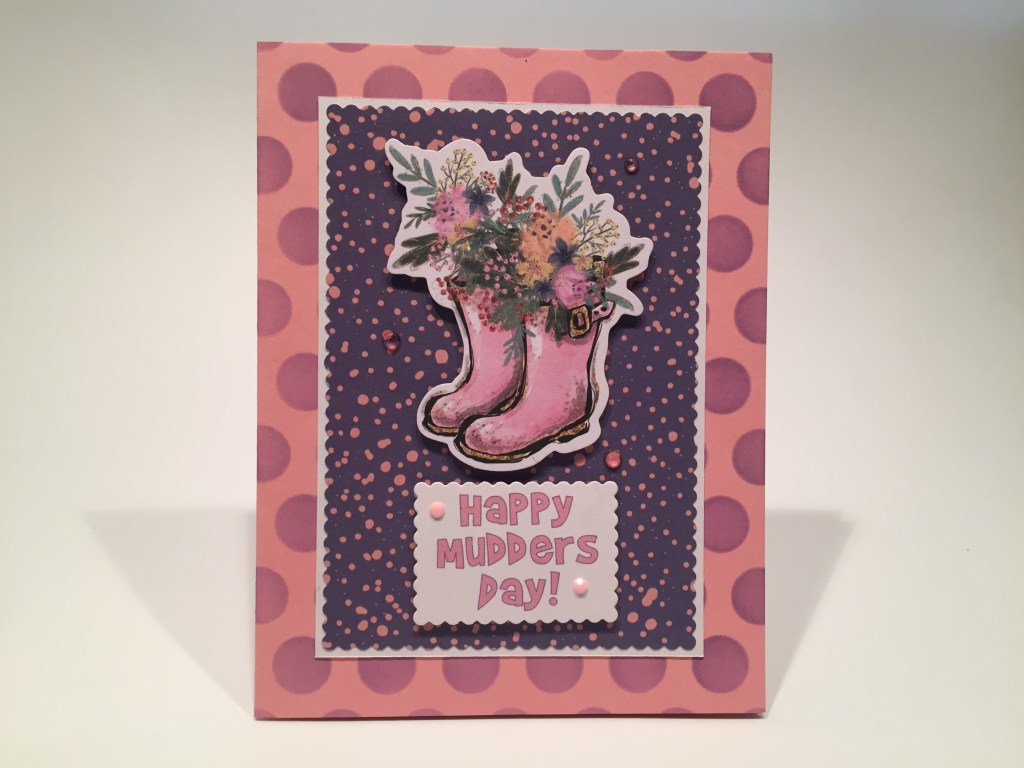
I die-cut the dotted pattern paper with a Tonic Studios Scalloped Square Layering Basics die – I used the 3.75″ square die and partially die cut that square, shifted the die down to about 4.5″ and finished die-cutting the rectangle. A little scalloped border is nice and feminine. I took the Poker Stencil from the LFL 1/21 Kit and blended some Hero Arts Thistle Reactive ink through the stencil on the Pink card base. I figured the pattern paper was pink dots on purple so… … … … ! I added a thin white mat behind the scalloped pattern paper and glued those to the card base. I printed this sentiment on a scrap of card stock again using the Brady Bunch Remastered font, and die-cut it to size using a smaller Tonic scallop die. I mounted the ephemera piece and the sentiment with foam tape, and added some Studio Katia Cupid’s Kiss crystals for a touch of sparkle. This just might be the card I send to my Mother this year!
I did want to try our Eyelash Girl stamp (with the shovel!) again without all the background noise…

I stamped / masked / stamped / colored and die-cut (with the matching die) our eyelash Girl and the shovel on some LFL alcohol-friendly card stock. I took a scrap of Kraft card stock and die-cut this wooden frame using a Hero Arts Wood Frame Infinity die and covered the back of that with a piece of velum. I punched a border on the orange card base using an old American Crafts Border punch, and added a piece of Kraft paper behind that to complete the card front. I ran a piece of the orange ribbon down the left side of the card front and added a small bow. I stamped and embossed the sentiment as usual, (masking off the trailing end), glued the frame to the card front and mounted our gardener with foam tape. I added some heart shaped glitter and discovered that glitter fit inside the heart die-cuts almost perfectly! Really digging this card! Sweet and fairly simple, but kind of stunning all the same!
I had another idea for a truly affectionate card using one of the smaller stamps in this stamp set:

Love that white space!! LOL! I stamped the top of the shed and the weathervane on some LFL alcohol-friendly White card stock and colored them with my Spectrum Noir Alcohol markers. I was going for a verdigris patina on the weathervane and referenced the Statue of Liberty for that color choice. Perfect! I die-cut the image and Kraft mat with my Hero Arts Circle infinity dies and glued them together. I printed this sentiment directly on the card base using my Silhouette Software and the Book Antiqua font (caps) and the BlackJack font (script). I mounted the matted image with foam tape and added some of the brown Glitter Enamel dots for some highlights. I LOVE THIS CARD! I realize that a weathervane only points north when the wind is coming from the south, but I think this works perfectly for any kind of affection, love, or even a grateful Thank You card!
I did receive the Potting Shed Stamp set (add-on) this month and had to give that stamp a card of it’s own!

I stamped this on some Bristol Smooth card stock using VersaMark Onyx Black ink and colored all with my Zig Clean Color Real Brush Markers – I figured I needed the extra-fine point on those markers to color some of the tiny details in this stamp. Notice I did adjust the crazy eyes on the scarecrow again…! I trimmed the colored panel to 4.25″ x 3.75″ and added a thin mat of the boot plaid pattern paper behind. I added some yellow ribbon to the two sides and the Glitter Enamel dots on top. I printed this sentiment (Sign Painter font) on some scraps of White card stock and die-cut both lines with a LF Everyday Sentiment Banners die before mounting them to the card front with foam tape. I love this sentiment! It’s actually an old quote from Audrey Hepburn! Beautifully appropriate and extremely hopeful!
That completes this 10 Card 1 Kit post featuring the Love From Lizi April 2021 Card Kit. A really nice assortment of cards useful for a variety of occasions and all sporting a very colorful spring time color palette!
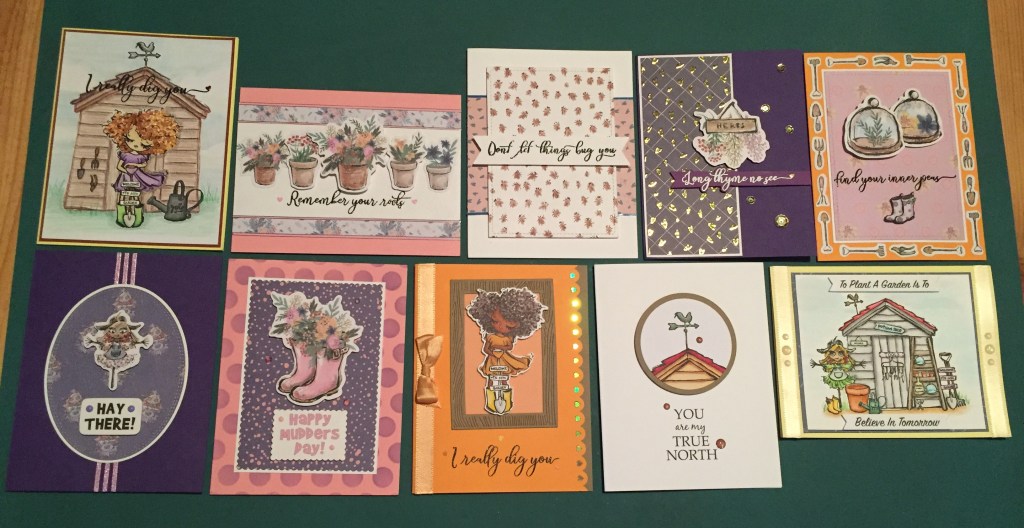
Now I have yet another Eyelash Girl to add to my collection! This kit presented me with a few head-scratchers but ultimately revealed itself to be a terrific collection of stamps and images perfect for any gardening enthusiast! I used all of the card stock and MOST of the stamps in this stamp set – I didn’t get to the larger watering can for some reason; I used 8 of the 16 pattern papers, I used the stencil a couple of times, one of the dies, a little of the peel offs, a few sequins, some ribbon, and a good amount of the ephemera. I used the add-on Potting Shed stamp and a few peel offs from the variety pack. A little bit of everything! Naturally, I have plenty of leftovers that will find a loving home in my stash!
As of posting, this kit is still available at Love From Lizi! If I’ve managed to inspire you or captured your imagination, I would recommend grabbing one of the kits sooner rather than later. Lizi’s kits most always sell out rapidly! If you do go shopping with Lizi, please use my links – It is supremely appreciated and incredibly helpful! Thanks!
Love From Lizi Really Dig You April 2021 Card Kit: https://shrsl.com/2va5m
Love From Lizi April ’21 Add-ons and Release: https://shrsl.com/2va5p
Thank you so much for sharing your time with me here. I am continually reminded of your generosity of support every time I post. If you haven’t already, please follow me here by clicking the follow link at the top of this page, remember to Like me, List me, Pin me, Post me, Share me will all your friends, don’t run with your gardening shears… and, as always I send you Love, Light, Health, Humor and Happy Crafting!
DISCLOSURE: This site contains some affiliate links to products. I may receive a commission for purchases made through these links (at no cost to you). As an Amazon Associate I earn from qualifying purchases. Thank you!
