
Hello Folks! Scott here with my 10 Cards I Kit post featuring the My Monthly Hero December 2020 Kit. I am SO PLEASED to announce that Hero Arts has added me to their team as a Video Artist! If you’d like to see the big blog announcement please click HERE. I couldn’t ask for a more terrific Christmas Present!! WOO-HOO!!
This month’s kit is an uplifting harbinger of a new (and better) year on the horizon!

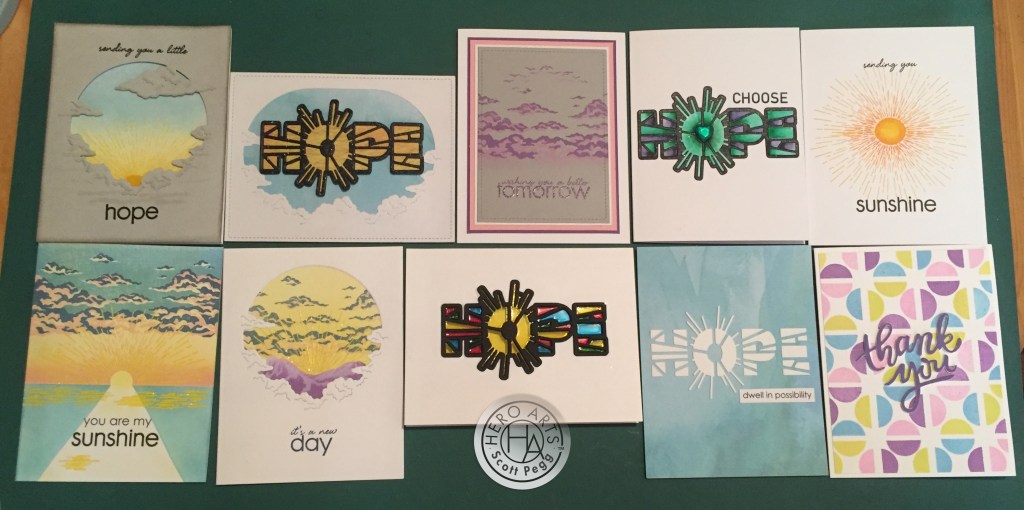
We get a 6″ x 8″ Clear Stamp Set featuring a layering stamp sky with clouds, sun and sunbeams, a terrific flock of birds and a few encouraging sentiments. We also get a Hope Word Fancy Die, a Cloud Fancy Die, and a Cloud Window Die. That Hope Word die looks amazing! Then we are treated to 4 Reactive Ink Cubes (Early Dawn, Morning Mist, Yellow Chartreuse, Thistle) and a 0.5 oz. pot of Yellow Prisma Embossing Powder with lots of glitter and shine!
To begin with, I die-cut all the dies from some scrap grey card stock in my stash just to see what we were working with here… The Cloud Window die inspired my first card.

I grabbed a white card base and ink blended some HA Lemon Drop Reactive ink and the Early Dawn ink cube on the front of my card base. Then I stamped the half-circle (sun) and the large sunray stamp using HA Embossing and Watermark ink, added the Yellow Prisma embossing powder, and heat set that till smooth and shiny. I added a little shading to the grey window die-cut with my Spectrum Noir alcohol markers, inked the edges with Pumice Stone Distress ink and stamped the sentiment using HA Intense Black ink, and clear embossed them. I attached the window panel to the card front with foam tape, and added the Cloud Fancy die-cut to the top of the opening. We can all use a little HOPE right now…! That’s the only thing that has gotten me through this year. Love those thin delicate lines in the sunbeam stamp and the glitter in the embossing powder! The grey clouds and colorful sky certainly drive the point home!
I wanted to see if I could adapt that window-die to work on a landscape card… and, of course, I’m itching to use that HOPE word die!

This works beautifully! I die-cut some white card stock to 4.25″ x 5.5″ with a Lawn Fawn Stitched Rectangle die, and used partial die-cutting to cut half of the window die from the right and left sides of the panel. I simply marked the center line of the window die and used that as my guide to die-cut the two halves. Then it was easy to connect the two halves on top by cutting a straight line, and I completed the bottom of the window by partially die-cutting the Cloud fancy die between the two sides of the window die. I was more that happy with how that turned out!!
The Hope Word Fancy die is in two pieces – an inner die and and outline die. I used them together to die-cut the words from some black card stock, and used the outline die to cut a piece of yellow watercolor pattern paper from my stash for the background. That makes it much easier than piecing in all those separate little pieces. I glued the black frame to the yellow watercolor, and decided we needed a touch of sparkle on this word, so I die-cut another frame from some Black Tie glitter paper and glued that on top of the original black outline. That added a little more dimension as well as some nice sparkle.
I cut a piece of blue watercolor pattern paper to go behind the window and glued that to a white card base, glued the cloud window on top of that, and mounted the HOPE word at the center with some foam tape. I like that this window actually encompasses the whole word, and fills up a landscape orientation nicely!

I wasn’t content to leave this simple sentiment on it’s own, so I stamped the “it’s a new day” on the inside of the card using HA Intense Black ink. I really like the larger window on this card, and that HOPE word die is pretty stunning. Kind of looks like a stained glass window!
Okay, that covers all the dies in this kit… let’s move on to those stamps!

To begin with, I stamped the three layering stamps using the Early Dawn, Morning Mist and Thistle ink cubes – just to get an idea of how these stamps and colors worked together.
Good to know that there is still some white in the clouds… we should be able use that to our advantage! I went back to my grey cloud idea from my first card.

On another piece of grey card stock I stamped the second and third cloud layering stamps with the Thistle and Morning Mist inks… just letting the gray card stock fill in the rest. I added the flock of birds at the top using both inks, and stamped the sentiment with the Thistle ink and embossed that with some clear embossing powder. I die-cut the stamped panel with another LFSR die, glued it to a thin white mat, then to a thicker pink mat and then to a thin purple mat before gluing all the layers down to my white card base. Love that sentiment – it should prove useful for many reasons beyond this crappy year!
I die-cut the Hope Word Fancy die a couple times from some Bristol smooth card stock thinking I could do some fun coloring with my Zig Clean Color Real Brush markers.
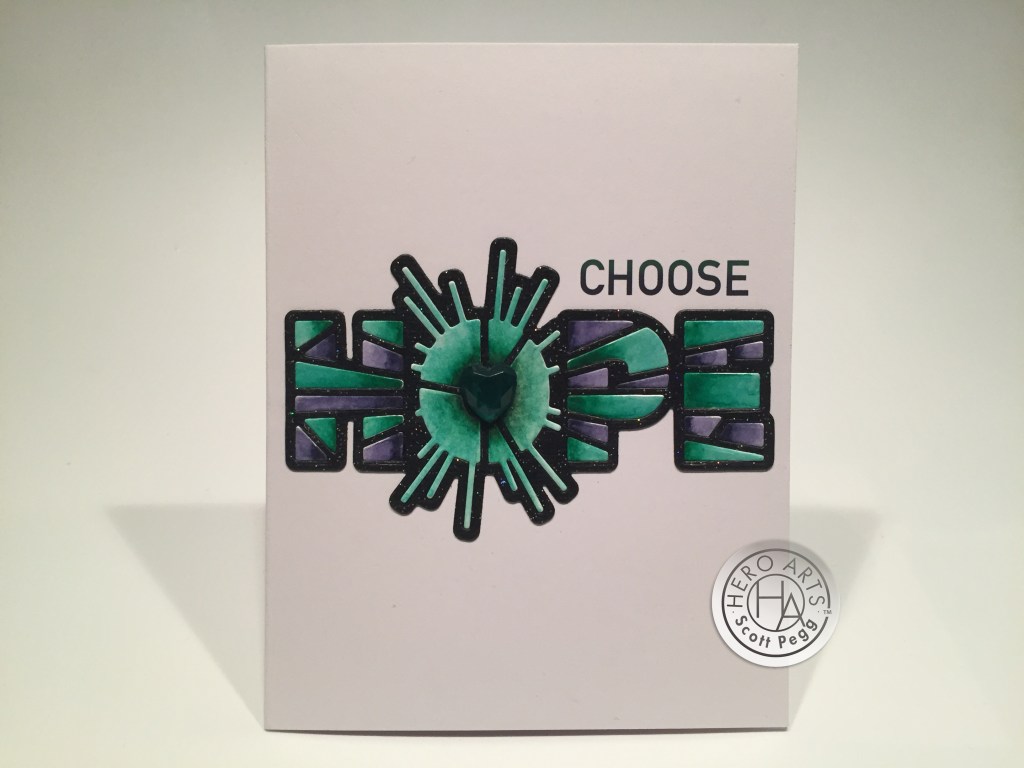
Interesting… the radiant “o” doesn’t have to be the sun… here it works perfectly well as the highlight for a green heart gem!
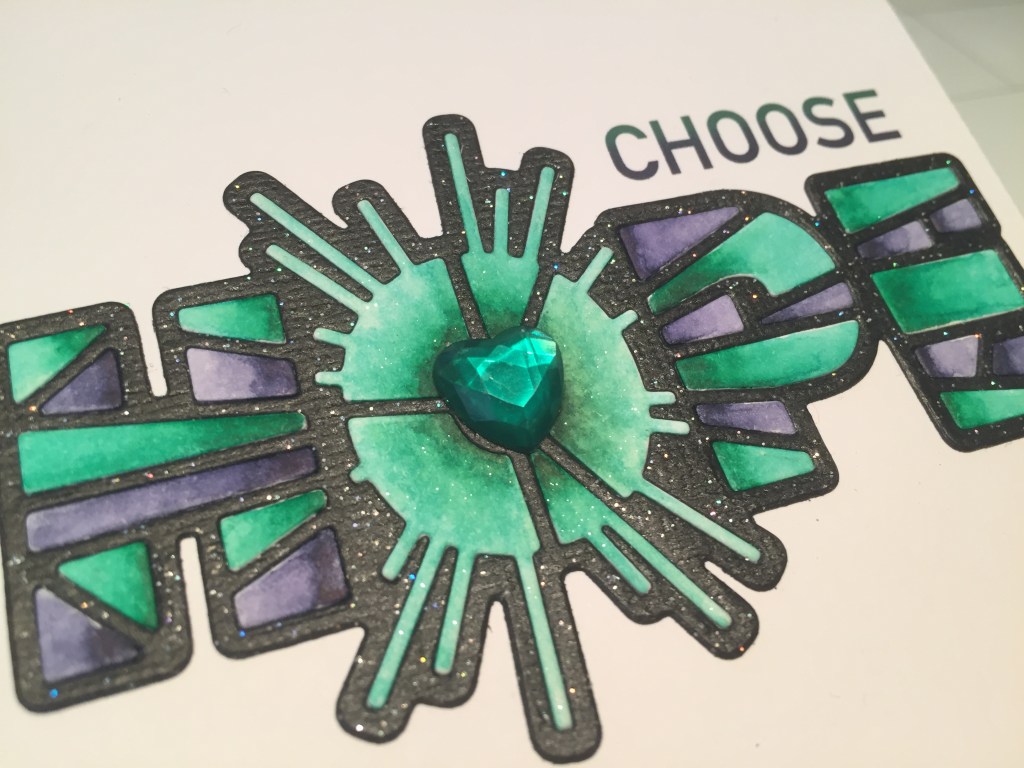
After coloring the die-cut segments with my Zig markers, I die cut a frame from my Black Tie glitter card stock. I printed the “CHOOSE” sentiment directly on the white card base using my Silhouette software and the DIN Alternate font. Then I glued the black frame in place and added the colored segments, and the heart gem. I love this sentiment, this color palette, and the gem… makes me think of the Hope Diamond – though that’s pale blue, not green, and naturally MUCH larger!!
I wondered if I could use the half-circle and the sunbeam stamps to make a whole sun…
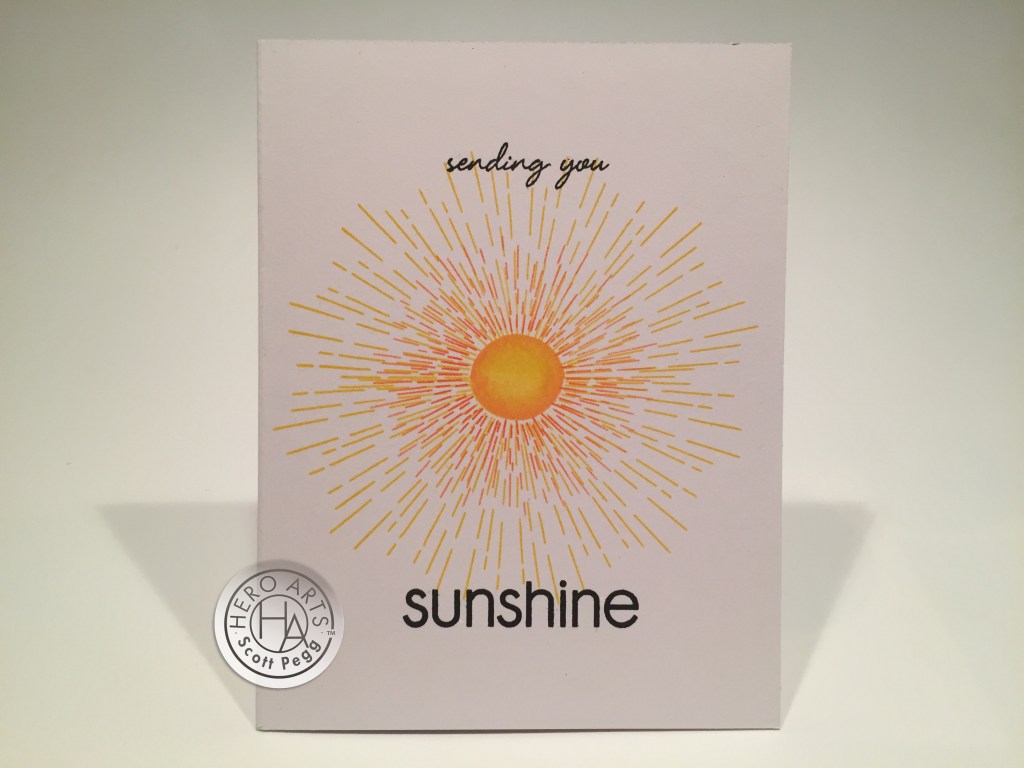
I did use the half-circle stamp along with Lemon Drop and Creamsicle Reactive inks to stamp the sun, taking care not to over-ink the center line… I don’t think that’s a perfect half-circle stamp… seems a tiny bit oval instead of perfectly round… but it works for me!! I stamped the small sunbeam stamp above and below the circle with the Creamsicle ink, trying to get a touch lighter at the outer edges, and stamped the big sunbeams with the Lemon Drop ink. Using both of the sunbeam stamps together really works well for adding some depth to the stamping! Sentiments stamped in Intense Black ink. No clouds, just lots and lots of sunshine – a perfect greeting card for friends living in the Pacific Northwest!
I’ve used all the stamps and dies in this kit already – that was fast! – but there is more!
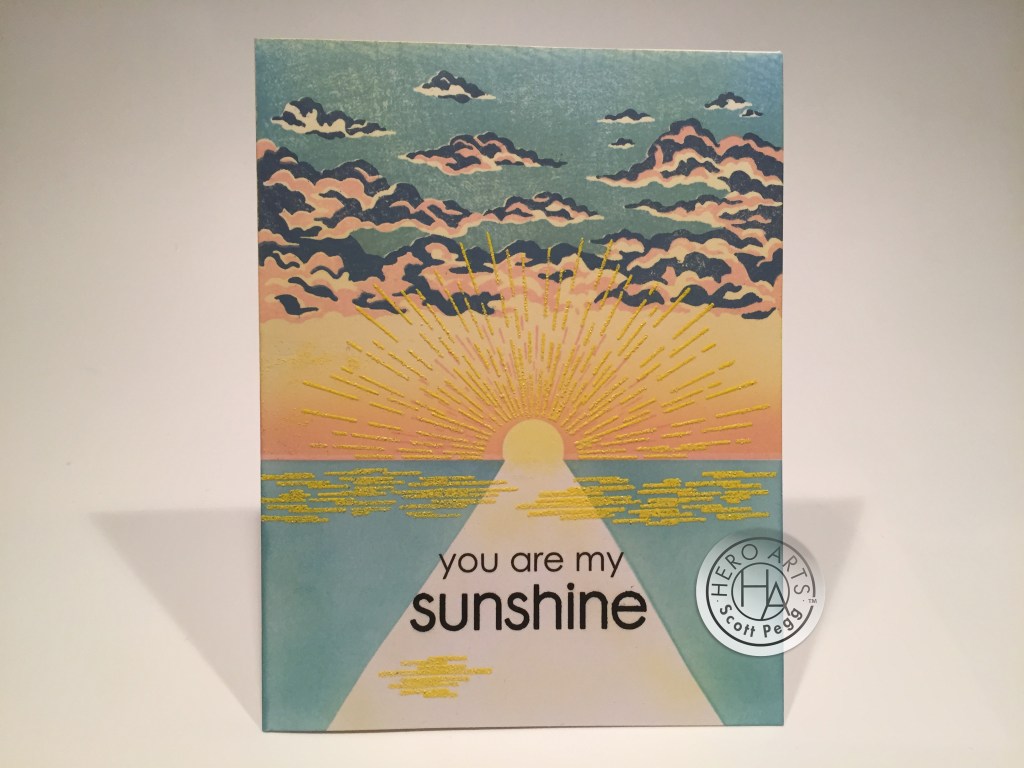
I used some masking tape to divide this card base in two, added a 1/2″ circle mask on the horizon, and ink blended the sky with Squeezed Lemonade Distress Oxide Ink, Lemon Drop Reactive ink, some Spiced Marmalade Distress Oxide ink and a little bit of the Morning Mist Reactive ink. Then I stamped the layering stamps in Early Dawn, Faded Jeans Distress Oxide Ink and Morning Mist Reactive ink. Then I masked off the triangle on the bottom and blended the sea with Early Dawn Reactive ink.
I printed the “you are my” on the card front using my Silhouette Software (remember, that software is free!) and the Century Gothic font (I believe that’s a perfect match for the block sentiments in this kit) and finished that out with the “sunshine” sentiment stamped in Intense Black ink.
I stamped the smaller sunbeams at the horizon, with Morning Mist ink, and then the larger sunbeam stamp with embossing ink and embossed that with the Yellow Prism embossing powder… the ‘ocean’ seemed a little tranquil to me, so I grabbed the MMH July 2019 kit and stamped and embossed the water ripples with more Yellow Prism embossing powder. Finally, I lightly blended some Squeezed Lemonade into the sun and water reflection. I realize the sun’s reflection on the water isn’t very realistic, but I wanted to really highlight the sentiment, and I’m very pleased with our little scene here!
That MMH July 2019 stamp set also has a layering mountain stamp… sounds perfect…

Some Purple Mountains Majesty…!! On a panel of 4.25″ x 5.5″ white card stock , I stamped the mountains in Thistle ink and the layering stamp with HA Unicorn White ink. I masked off the mountains (there is a die for that in the 7/19 kit) and blended the sky with Squeezed Lemonade Distress oxide ink, and stamped the two cloud stamps with Faded Jeans Distress Oxide ink and the Morning Mist Reactive ink. Then I stamped and embossed the sunbeams the same as the previous card.
I took a white card base (Neenah Solar White 110# card stock) and die-cut the window die on the front panel and stamped the sentiment with Faded Jeans Distress Oxide ink and embossed that with some clear embossing powder. I trimmed a little off the side of the stamped panel, and glued that behind the card front. I think the mountains add a lot to this and work well with the stamps and dies in this kit! And I really like the inked panel glued behind the card front – it adds the look of dimension without using any foam tape.
On December 8th, Channin Pelletier posted a Stained Glass technique using Glossy Accents and the Hope Word die from this kit, and that made me think of trying to turn that Hope word die into a “real” stained glass card.

Thanks to some new Cosmic Shimmer Crystal Tints, I was able to come up with this actual see-through stained glass window effect… I’m thrilled how well this works!

I die cut the outlines from black card stock with Scor Tape covering the back – I wanted to be able to glue the outline to some acetate and not have to worry about the colors seeping underneath. Then I simply filled in the spaces using the Crystal Tints. A little bit fussy making sure the color got into the thin openings on the ‘O’, but fairly easy to work with for my first time using this product! And the results are worth the fuss!
I took a 4.25″ x 5.5″ panel of white card stock and die-cut the HOPE outline in the center of that, matched it to the front of my card base, and die-cut the same outline through the card front. I glued the acetate to the card front and covered it over with the die-cut panel. I did add one more layer of the black outline on top (covers any mess from the Crystal Tints) and added another black outline die-cut on the inside (backwards) to make the inside of the card smooth and clean. LOVE THIS SO MUCH! I would recommend the card recipient cuts this card in half and mounts the front to a sunny window!
It appears I got a little obsessed with the stained glass approach using the Hope Word die and made all my outlines in black… but I wondered how this die would look WITHOUT using the outline at all!

That works better than I thought it would! I die-cut the Hope Word die from white card stock, lightly taped down the outline on a 4.25″ x 5.5″ panel of my blue watercolor pattern paper, and glued all the pieces into their proper positions. I took care to use just enough liquid glue to hold the pieces down without gluing the outline down as well. Then I just removed the outline and voila! Reads perfectly well without the outline!
I printed the extra sentiment on a scrap of white card stock using the Century Gothic font and trimmed it to a small banner before gluing it down to the card front. I really like this sentiment and the clean simplicity of this card!
Now for something completely different…! I hadn’t used the Yellow Chartreuse ink cube from this kit yet, and thought it would be fun to use all the inks together. The only stamp in this set that I thought would work to create a pattern was the half-circle sun stamp…

On a 4.25″ x 5.5″ panel of white card stock, and using my HA MISTI, I stamped this pattern using all four of the inks from this kit. It took a little bit of time, but was fairly easy enough to accomplish. All of the half-circle stamping is 1.25″ apart. I stamped the vertical rows first, and the horizontal rows second. My own pattern paper! I trimmed the stamped panel down to 4″ x 5.25″ and glued that to a white card base.
I dug out this old Darice “thank you” die from my stash (one of the largest sentiments dies I have), cut it out three times from white card stock, and glued them together to make a nice chunky sentiment. I just used the Thistle ink cube directly on the glued up sentiment to color the top layer – that worked extremely well – I’ll remember that technique when I want a die-cut sentiment colored with matching ink! I glued the sentiment to the card front and we have a delightful, colorful, almost retro, thank you card! Lovely!
That covers all my 10 cards using the MMH December 2020 kit. This month Hero Arts seems to have struck a nerve with their followers and sold out this kit in just a day or two! I did manage to use every stamp and die in this kit on these 10 cards – WOO-HOO!
I think right now, we are all feeling the need for some hope and optimism about the coming year. Thankfully, a vaccine has just been approved and I HOPE we can start clawing our way out from under this damn pandemic. Heaven knows we need to get back to some semblance of sanity! I am truly overjoyed at being invited to join the Hero Arts team this month, but I DO need to get back to work!! I think we all do!!
Thank you so much for sharing your time with me here! I appreciate every moment you spend with me! If you DO go shopping at Hero Arts, please use my links as it truly helps keep our heads above water in these unprecedented times: HERO ARTS
Please take care of yourselves and your love ones… this virus is kind of running rampant right now, and I hope (there’s that word again!) everyone will stay safe and healthy over the holidays. I send you and yours heartfelt blessings and wish you all Joy, Health and Happiness for the coming year. THANK YOU SO MUCH FOR ALL YOUR SUPPORT AND ENCOURAGEMENT – you have blessed me immeasurably this year and it means the world to me. Please remember to Like me, List me, Pin me, Post me, Share me with all your friends… Have a HAPPY HOLIDAY and as always, I wish you Happy crafting!
DISCLOSURE: This site contains some affiliate links to products. I may receive a commission for purchases made through these links (at no cost to you). As an Amazon Associate I earn from qualifying purchases. Thank you!

What awesome cards. I always look forward to seeing what you create with the kits whether I get them or not. Love the stained glass Hope. Congrats on joining the Hero Arts Design Team – it’s well deserved.
LikeLike
Thank you, Judy! So very much appreciated! Love and Hope to you and yours for a Happy Holiday and a better 2020!!
LikeLike
Another hit! Thanks for the video and instructions Scott! I think the cut out windows were my favorites! Have a Merry Christmas!
LikeLike
Thanks Gigi!! Always a treat to hear from you! Happy and Healthy holidays to you and yours!
LikeLike
Congratulations on making the Hero Arts DT!! A bit overdue, but I’m glad to see they chose you. Happy dance!! SO happy to see you on the roster! Okay, now I’m going to watch your card-kit video!! Go Scott!!!
LikeLike
Thanks so very much Jennifer…!! Best Christmas Present ever…!! Sending you and yours Peace, Health and Happiness this Holiday season!!
LikeLike
Can I order the December kit? I’m really looking fo4 the hope die. Can you help?
LikeLike
Sorry Jill…
Once the kit has sold out, it is not available anymore… Hero Arts might introduce parts of the kit in the coming months – your best bet would probably be to send them a note telling them how much you’d love to get one of those Hope Word dies! Happy Holidays!!
LikeLike
How creative you were to make a horizontal card using the die cut! I would never have thought to do that, but I will definitely have to try it. Thanks for the inspiration. Always enjoy your videos and ideas. Also, Congratulations on becoming a HA design team member! So excited for you-and I hope they will use your creativity in the “punny sentiments” for future kits.
LikeLike
Thank you, Linda! Much obliged!
The MMH January 2021 kit is filled with puns!!
Heres to a good new year!
Scott
LikeLike