
DISCLOSURE: This site contains some affiliate links to products. I may receive a commission for purchases made through these links (at no cost to you). As an Amazon Associate I earn from qualifying purchases. Thank you!
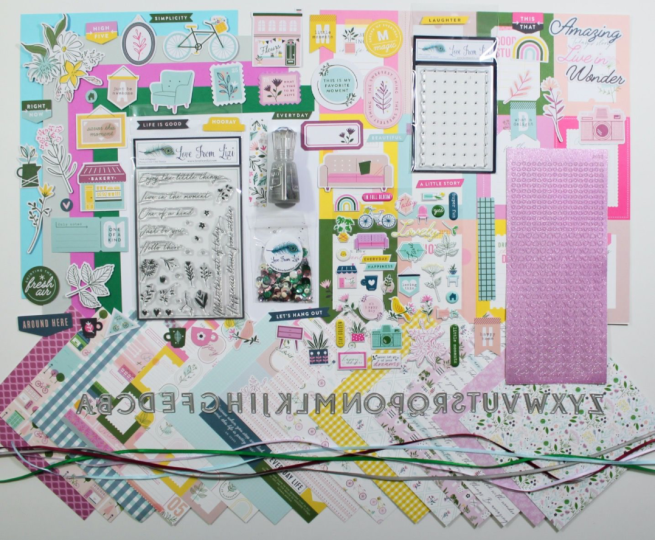
Hello Folks! Scott here with my 10 cards featuring the Love From Lizi August 2020 Card Kit. Lizi calls this the “Enjoy the Little Things” Card Kit, and we get all sorts of little things in this kit to help us make an amazing assortment of cards!
As usual, I do take the five sheets of card stock included in the kit, cut them in half and score them make my 10 card bases. Sometimes, when I’m looking for inspiration, the color of my card base will give me ideas for a card!
One of our pattern papers appeared to be a miniature cut-apart sheet, but upon closer examination, it looks like two pre-made collages ready for a card front!
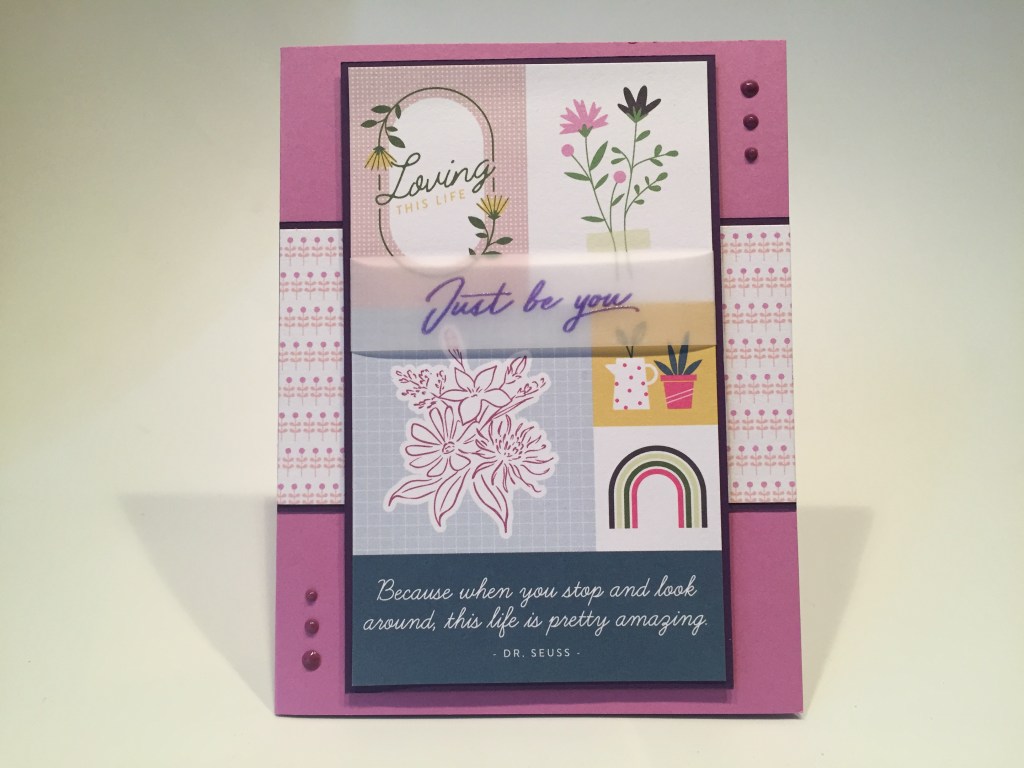
I simply can’t resist a good quote from Dr. Seuss! I cut the left half of that pattern paper down to size (3″ x 5″ – I just trimmed off the smaller top images). I stamped the sentiment on a piece of vellum using Deep Purple Archival ink and embossed that with some clear embossing powder. I trimmed the vellum to 3/4″ wide, wrapped that around the collage panel and secured it to the back. I glued that down to a dark purple mat from my stash.
I took a 2.25″ wide piece of the tiny flower stripes pattern paper, added a thin dark purple mat behind that, and glued that down just above the center of the Lilac card base. I attached the front panel using foam tape and added some Nuvo Plum Pudding Crystal Drops (from the LFL December 2018 kit) for a final touch. I think the dark purple additions work really well with that Lilac card stock and helps keep this from being too pink..! LOVE that Dr. Seuss quote which compliments the sentiment perfectly!
Looking at all the “journaling” cut apart pieces on our cut-apart sheet, I came up with an idea that would incorporate our alpha dies and a sentiment stamp!

I cut out this lilac panel from the cut apart sheet, and stamped the sentiment using Hero Hues Grape Slush Reactive ink, and embossed that with clear embossing powder. That matches my dark purple card stock perfectly! I glued the cut apart to a thin purple mat and cut a piece of the lilac pattern paper to 3.5/8″ x 4.1/4″. I die cut the U and the R from the center of that piece before glueing it behind the cut-apart and adding another purple mat behind that. Those are all glued directly to the Grey card base.
I cut another U and R from the dark purple card stock and glued those behind the lilac letters to add a bit of an offset shadow, and mounted both letters to the card front with small pieces of foam tape. I glued strips of the grey ribbon to the top and bottom of the card base, added a single bow to the top of the ‘tag’, and finished up with three little mini-heart peel off stickers from our kit. Yes, you ARE one of a kind!! (Thank heavens!!)
You probably know that one of my goals with these 10C1K posts is to use every stamp in the included stamp set on my 10 cards… Let’s keep using up those sentiments!
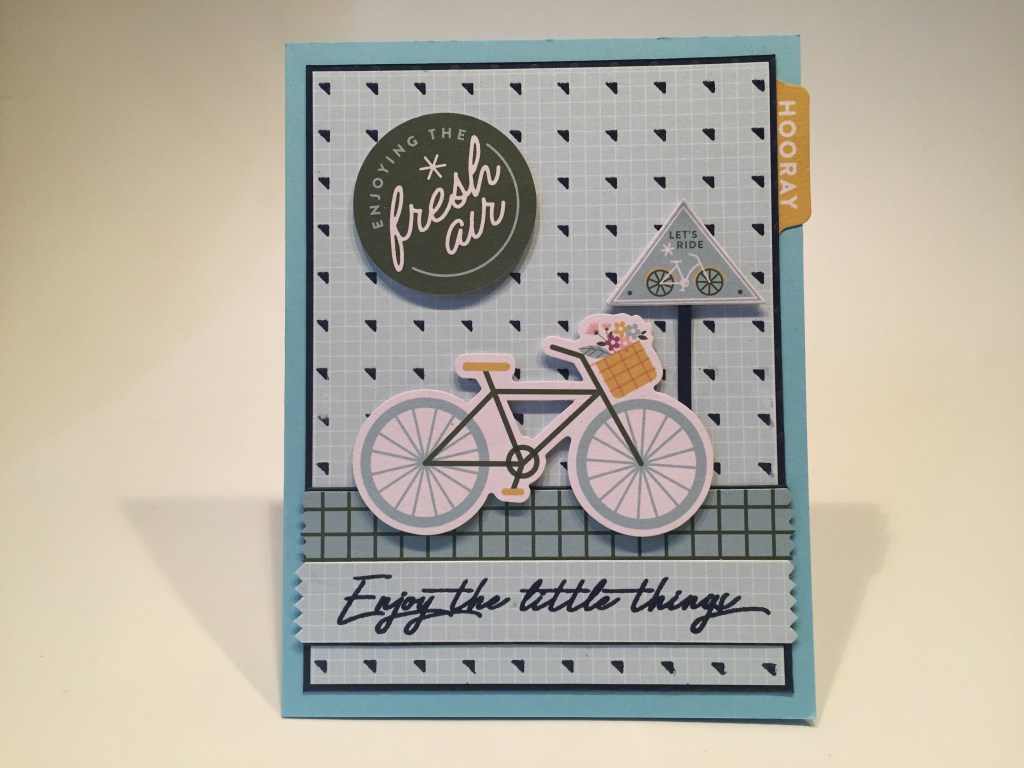
For this card, I cut the blue grid pattern paper to 3.75″ x 5″ and stamped the background builder stamp from our kit on that with VersaMark ink and embossed that with LFL Warm Navy embossing powder. It was pretty easy to stamp this pattern twice to fill up the background pattern paper, and that Warm Navy embossing powder has a lovely shine! I glued that to a thin dark blue mat and down to the Pale Blue card base.
I cut another piece of the blue grid pattern paper to match the gridded banner from the ephemera pack, stamped the sentiment on that with VersaMark ink and embossed that with the Warm Navy embossing powder. I glued those two banners together and added a super thin mat of the dark blue to the top and bottom before glueing those to the card front. I added a little signpost to the ‘Let’s Ride’ ephemera piece using the same dark blue card stock, and mounted the bike, the ‘sign’ and the circle ephemera pieces with foam tape. Lastly I added the Hooray file tab under the background piece on the right side of our card. It stuck out a bit on the side, but not enough to hinder going in an envelope. I really like this card and trust me, fresh air is one of the little things I truly have left to enjoy these days!
More sentiments in this stamp set…
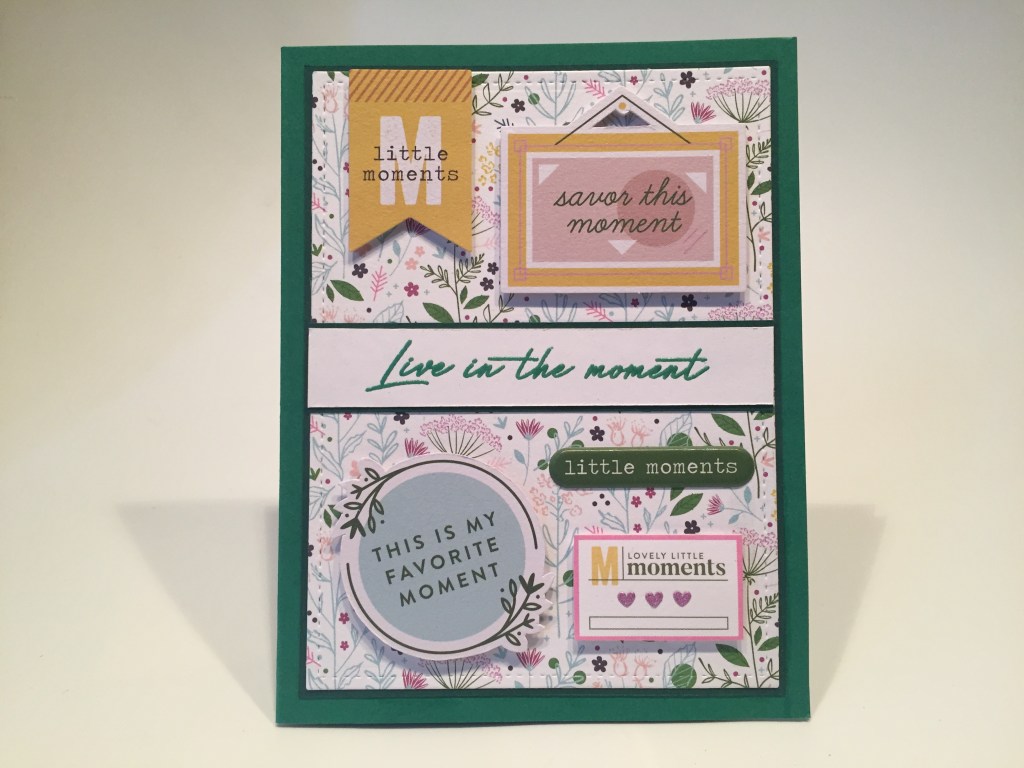
This one makes me giggle…! I die cut the floral pattern paper with a Lawn Fawn Stitched Rectangle die and matted that to a thin dark green mat and down to the Deep Green card base. I stamped the sentiment on a scrap of white card stock with VersMark ink and embossed that with the LFL Emerald City embossing powder. I trimmed that to 5/8″ wide and glued it to a thin dark green mat as well.
I glued the sentiment piece flat to the card base and added all the “moment” pieces from the kit I could round up. Three from our ephemera pack, one from the puffy sticker sheet and the ‘lovely little moments’ piece is from the piece of pattern paper I trimmed away from card one! All but the sticker are mounted with foam tape, and I added three mini heart peel offs to the pattern paper piece. Like I said… this makes me giggle – I love each and every moment collected here!
This next card is dedicated to Lizi…!! Since the alpha dies in our kit are all boxy capitals, I thought I’d try something out…
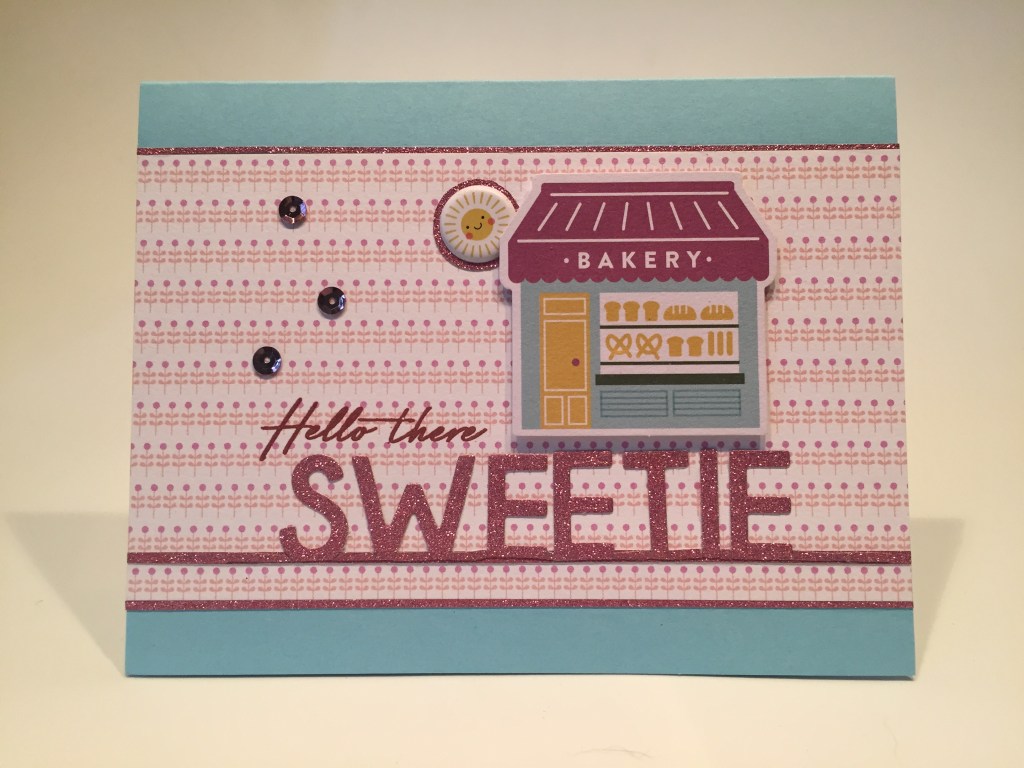
With some careful partial die-cutting, I was able to die cut this “SWEETY” from a piece of mauve glitter card stock from my stash leaving a thin line of card stock holding all the pieces together. There are some dies on the market that do this with some sentiments, but I thought we could accomplish the same thing with our alpha dies! This glitter card stock is DCWV Glitzy Glitter cardstock stack and the ‘pink’ glitter matched the roof of our bakery here almost perfectly!!
I cut more of the flower stripes pattern paper to 5.5″ x 3.25″ and glued that down to the Pale Blue card base. I cut thin strips of that glitter paper and glued them along the top and bottom edges of the pattern paper. I glued my die-cut “SWEETIE” to the pattern paper and stamped the sentiment using Aged Mahogany Distress Oxide ink and embossed that with clear embossing powder – another great match! I added the bakery ephemera piece with foam tape, cut a little glitter mat for the puffy sun sticker, and glued those peeking out from behind the building. A few pink sequins from our sequin mix and we have a fun, glittery card that completes the “hello there” sentiment perfectly!! This one’s for LIZI!!
I was determined to use some of those word ovals from our cut apart sheet…

I think we all need love and fun in every day… not to mention MAGIC!! All of the mats on this card are cut from some watercolor card stock that I colored with the Nuvo Lunar Rocket Shimmer Powder from our kit – nice and shiny! I cut the matching pattern paper to 3″ x 5.5″and glued that to our Grey card base. I edged the top and bottom with thin strips of the Lunar Rocket watercolor paper. I stamped the sentiment using VersaMark ink and embossed that with the LFL Silver Dollar embossing powder.
I fussy cut the two ovals from our cut apart sheet and added Lunar Rocket mats behind both of those as well as the “Magic” ephemera piece. A few sequins by the sentiment and on the ephemera piece finish out this card. I love the “seeker of everyday magic” and the shimmer mats actually provide a lot of sparkle to this card!
I have to admit, this next card was inspired by my incessant need to crack a joke!

I cut a piece of off-white card stock to 5.3/8″ x 4.1/8″ and stamped the sentiment using the purple section of the HA Ombre stamp pad from the My Monthly Hero December 2019 Kit. I traced the placement of the flower shop ephemera piece in the middle over the sentiment and stamped all the greenery and flower stamps coming out around the shop. I spaced the stamps out around the shop by stamping each stamp at least 3 times and continuing with more stamps until I filled in the whole square. All of these are stamped using the same Ombre ink pad and a variety of Hero Arts ink cubes. I used every image stamp here except the heart ones and the smallest rose.
I added a strip of dark purple card stock to anchor my shop, mounted the ephemera shop with foam tape, and glued the panel to a white card base. This was a very fun way of using all those small botanic stamps in our stamp set and, though not quite a pun, this is still a funny way of illustrating that sentiment!
That covers the seven sentiments in our stamp set! In my unboxing of this kit, I said those stamps were perfect for making wreaths… let’s experiment with that…
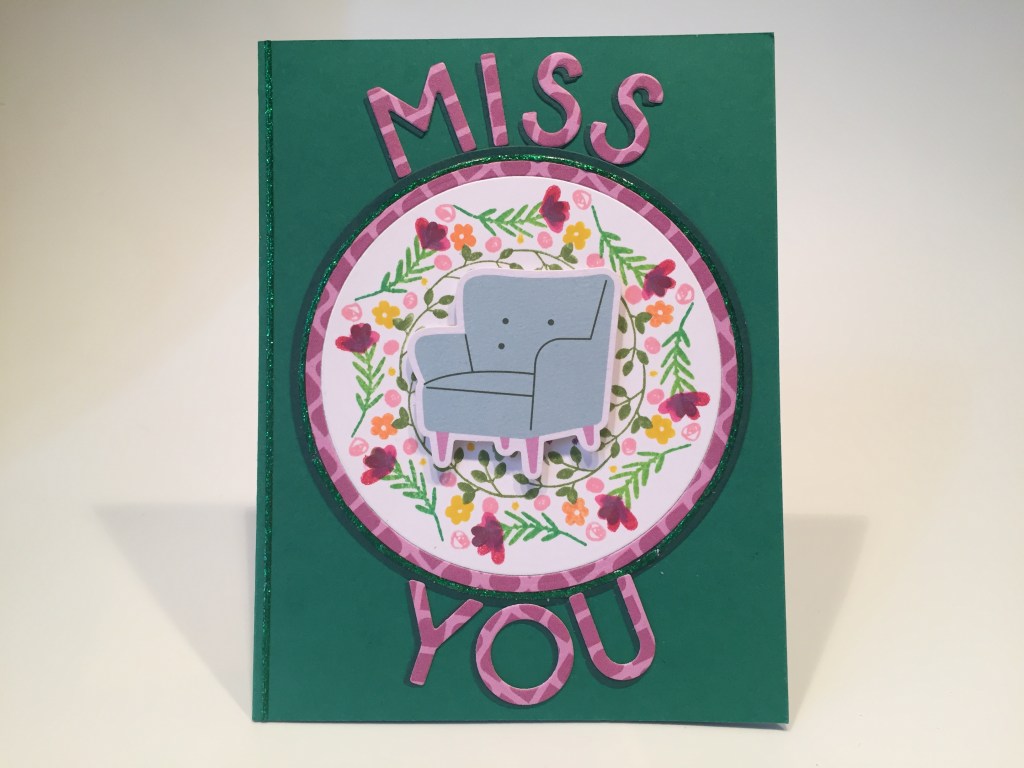
It seems I can’t get through most of my card kits these days with out a Miss You card…!! Oh so true!! This “wreath” started with the heart branch and grew from there… I used my Ombre stamp pad, and I did stamp the two smaller hearts on top of the heart branch to create more of a flower feel, and thought that worked pretty well, but, as is often the case, I couldn’t stop myself and soon filled this whole wreath all they way to the center. I do use my homemade wreath builder template, but I have to admit, it doesn’t give us much of a wreath when the whole circle is filled in, so I grabbed the empty chair ephemera piece to be the center of our stamping.
I die cut the stamped piece, a pattern paper mask and a dark green mask using my Hero Arts Nesting Circles Infinity dies, cut out the letters from the center of the pattern paper and the dark green circles, and then glued the circles all together. The dark green letters are offset behind the pattern paper letters and glued together. The matted stamping is glued to the Deep Green card base and the letters are glued along the edges. I mounted the ephemera chair using foam tape and added some LFL Green Glitter peel offs around the green mat and down the left side of the card front for a little sparkle. The thinnest pin stripe peel offs with often hold a curved shape if you burnish them down firmly! Pink and Green! Okay… Lilac and Green, but close enough! My furniture misses your butt!!
This IS the “Enjoy the Little Things” kit… I thought of a way to use that sentiment again!

Pattern paper cut with a LFSRD, matted to a thin white mat and glued to the last Lilac card base. Sentiment stamped on a scrap of white card stock using Seedless Preserves Distress Oxide ink and embossed with clear embossing powder. I trimmed the sentiment to 5/8″ wide, cut three more and glued them all together for some chip-board like dimension. I die-cut four of these 2″ circles using my circle dies and glued them all together as well. Everything is glued to the card front and all the “little things” are gathered from the puffy sticker sheet and arranged on the circle die-cut. I like the smallest piece… the center round sticker is a ‘home’ button! Perfect!!
Okay, I have one more chance to make an actual wreath from all these stamps!

Again, I used my wreath builder template and the HA ombre stamp pad, and started with the heart branch stamp, though this time, I didn’t bother to try to make the hearts into flowers. You can get a small curve going on that heart branch which helps a lot. I believe I got to the last few stamps I hadn’t used yet with this wreath – there’s the big heart and that tiny rose. The little blue dots I stamped using my Micro Applicator brushes. I stamped the dotted hearts border from the add-on Borders stamp set using a Hero Arts Cotton Candy ink cube. I trimmed my stamped wreath to 4″ x 5.25″, glued that to a thin dark blue mat, and down to my last white card base.
I attached a double bow tied from the green satin ribbon, and the ephemera sentiment and heart are mounted using foam tape. Some extra sequins from our kit fill in this wreath quite nicely! I believe “Let’s Hang Out” is as close to a pun as I can get this month! I will definitely remember that I have these small organic stamps and they should come in quite handy anytime I have the need for some wreaths!
And that’s my 10 cards featuring the Love From Lizi August 2020 Card Kit. I don’t know if you noticed, but I made all of these cards without using any black! I didn’t start out avoiding black but as I went along, it became one of my guiding goals for the cards!
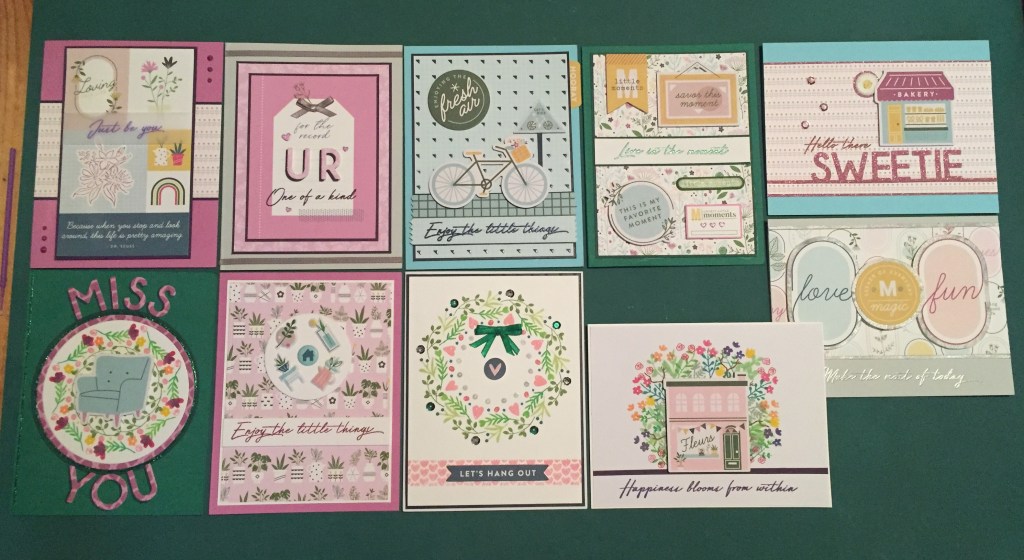
This proved to be much more fun than I initially thought it would be…! We have a great variety of sentiments and a good assortment of designs. No real puns this month, but I did manage a couple of light chuckles! I love the alpha dies and the little botanical stamps should prove very useful! Yes, there’s plenty of pink here, but I think it’s tempered a little by the Lilac and Mauve… I really LOVE the flower shop card – Plenty of flowers for you botanists out there!
I did use every stamp in this stamp set (WOO-HOO!) and the background builder stamp, and one of the add on border stamps. I used eight of the 16 sheets of pattern paper, I used a few pieces from the cut apart sheet, some of the puffy stickers, and a few peel offs too. I did use a little bit of everything in our embellishment bag – some shimmer powder, some sequins, the alpha dies, some of the satin ribbon and a good amount of the ephemera!
This kit has sold out, as most of Lizi’s kits do! If you want to join in on the fun I would suggest becoming a subscriber! Lizi constantly surprises us with kits that are unlike anything else on the market these days! And they are always stuffed full of supplies! If you do go shopping with Lizi, please use my links – it helps support my channel and I am always hugely grateful when you do! Love From Lizi: https://shrsl.com/1yyuw LFL subscriptions for US and Canada: https://shrsl.com/23usr LFL United Kingdom subscriptions: https://shrsl.com/2b1ev LFL European Union subscriptions: https://shrsl.com/2b1es LFL The Rest Of the World subscriptions: https://shrsl.com/2b1ey
Thank you so much for sharing your precious time with me here. I know everyone has a million things on their plates right now and I am so thankful for your attention! Please remember to Like me, List me, Pin, me, Post me, Share me with all your friends, Don’t forget to keep wearing a mask, and keep washing those hands!! I wish you and yours continued health, patience and Happy Crafting!!
