
DISCLOSURE: This site contains some affiliate links to products. I may receive a commission for purchases made through these links (at no cost to you). As an Amazon Associate I earn from qualifying purchases. Thank you!
Hello Folks! Scott here with my 10 cards from the My Monthly Hero June 2020 Kit. I received this kit on Monday, July Sixth – I know Hero Arts is still operating with a reduced staff, and San Francisco has rolled back some of their reopening restrictions, so the folks at HA seem to be doing a remarkable job catching up to the backlog of orders!
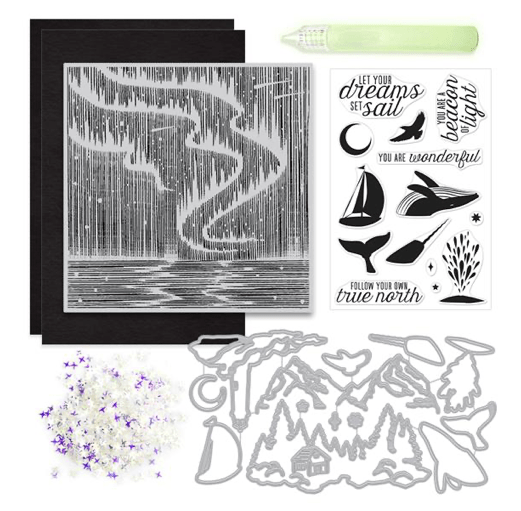
This kit takes us to the North and features this amazing 6″ x 6″ Northern Lights Cling Stamp! We also get a 4″ x 6″ clear stamp set with four sentiments and a variety of icons. Of course we get 10 coordinating frame cuts for those stamps and three Fancy Scene dies as well. Lastly we are treated to two 8.5″ x 5.5″ handmade watercolor papers in Black, a Glow in the Dark Lacquer Pen and a bunch of tiny silver stars
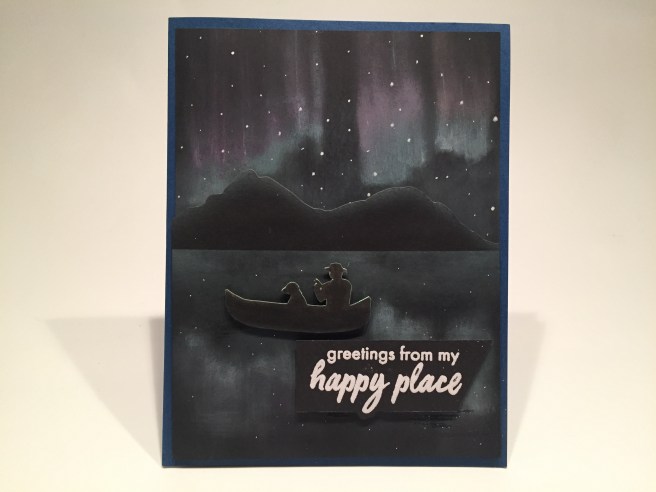
I know this may be far-fetched, but I do feel like I may have inspired this kit with this Northern Lights card I made with the MMH July 2019 kit. I know the folks at Hero Arts saw it because they commented on it… I’m just going to go ahead and make myself feel a little extra-special this month!!!

Enough with the self aggrandizing! To start this kit I took the three Fancy Scene dies and cut them out of some 110# Nina Solar White card stock. The mountains have an open bottom edge so you can make them as tall as you like, but I fell in love with that lighthouse right away!
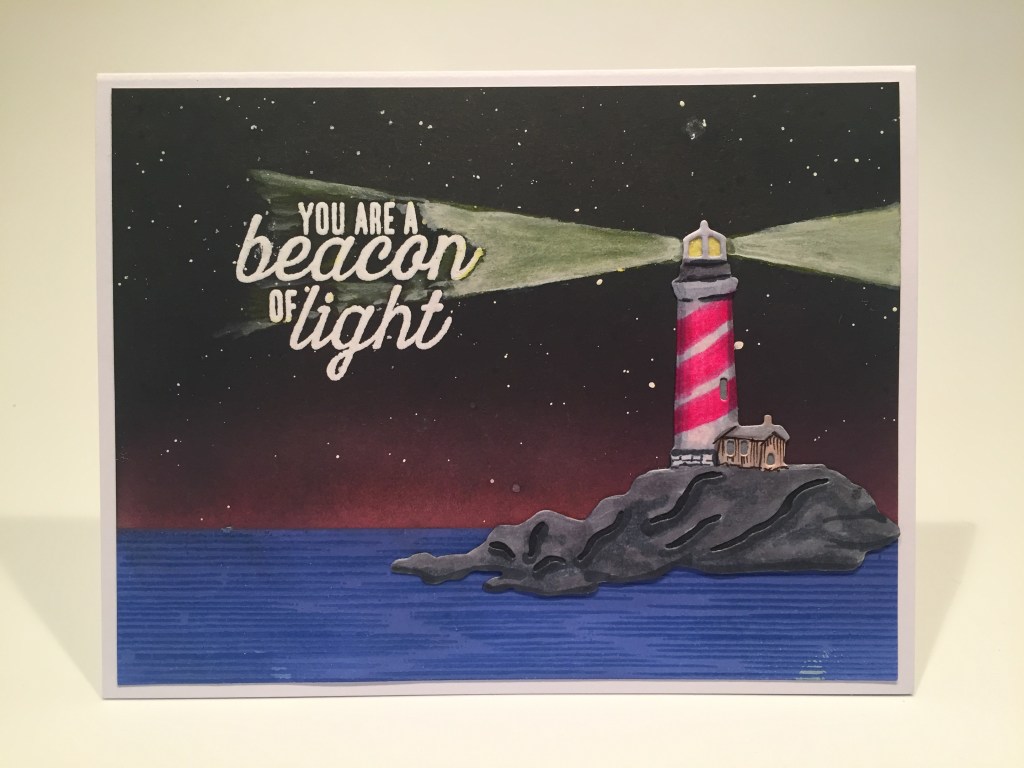
I colored my die-cut lighthouse piece with my Spectrum Noir Alcohol markers, adding a piece to the back to provide color for the openings – that’s actually a little glitter paper in the lamp house! And who can resist adding stripes to this lighthouse! I cut a piece of white card stock to 4″ x 5.25″ to use for my background. I masked off and ink blended the sea with HA Splash and Blue Hawaii Reactive inks, then embossed the bottom of the cling stamp over that with VersaMark ink and clear embossing powder.
I ink blended the sky with Fruit Punch Reactive ink and Black Soot Distress Oxide ink. I spattered the stars with Permanent White Gouache watercolor paint, let those dry, and then embossed the sentiment with white embossing powder. I marked where I wanted the lighthouse, and started coloring the light beam with a Prismacolor White colored pencil and added some light yellow to that, but I didn’t think it was quite bright enough. So I reached for my Permanent White Gouache watercolor paint again, thinned it down a bit and added that on top of the colored pencils… THAT seemed bright enough to me, and the gouache let some of the yellow colored pencil show through. When everything was dry I glued the background panel to a white card base, and glued the lighthouse die cut directly to that. I think that dark red horizon and the bright light beams really sell this card! Love it!
Now I think I’m ready to play with that big cling stamp and that black watercolor paper.
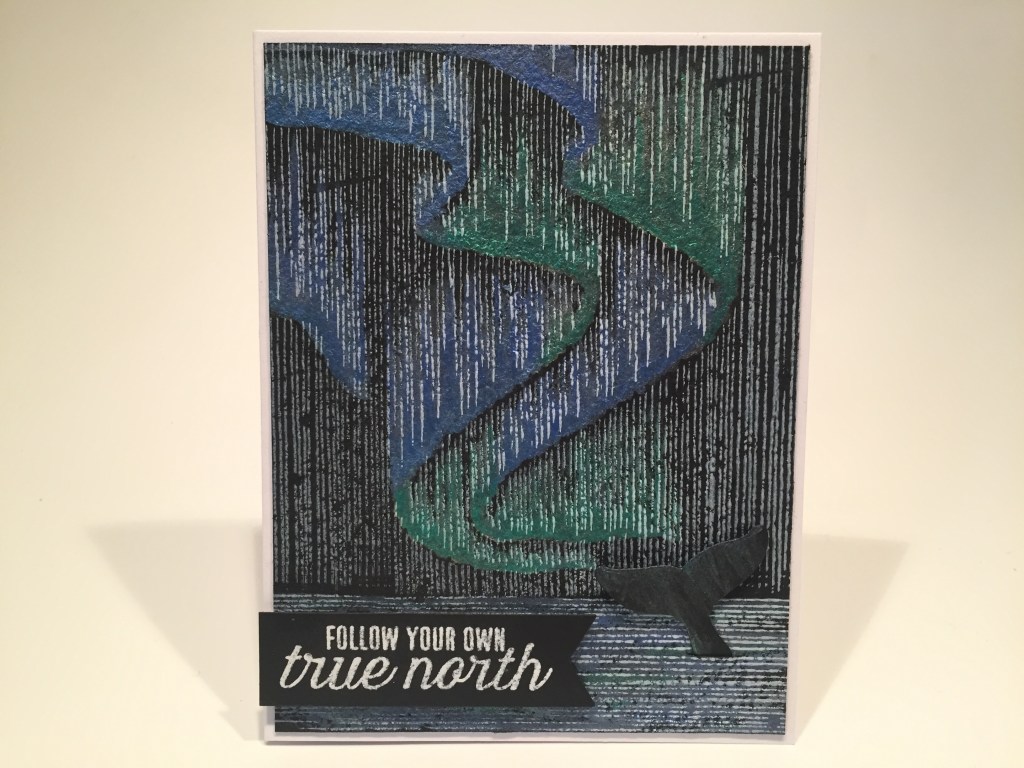
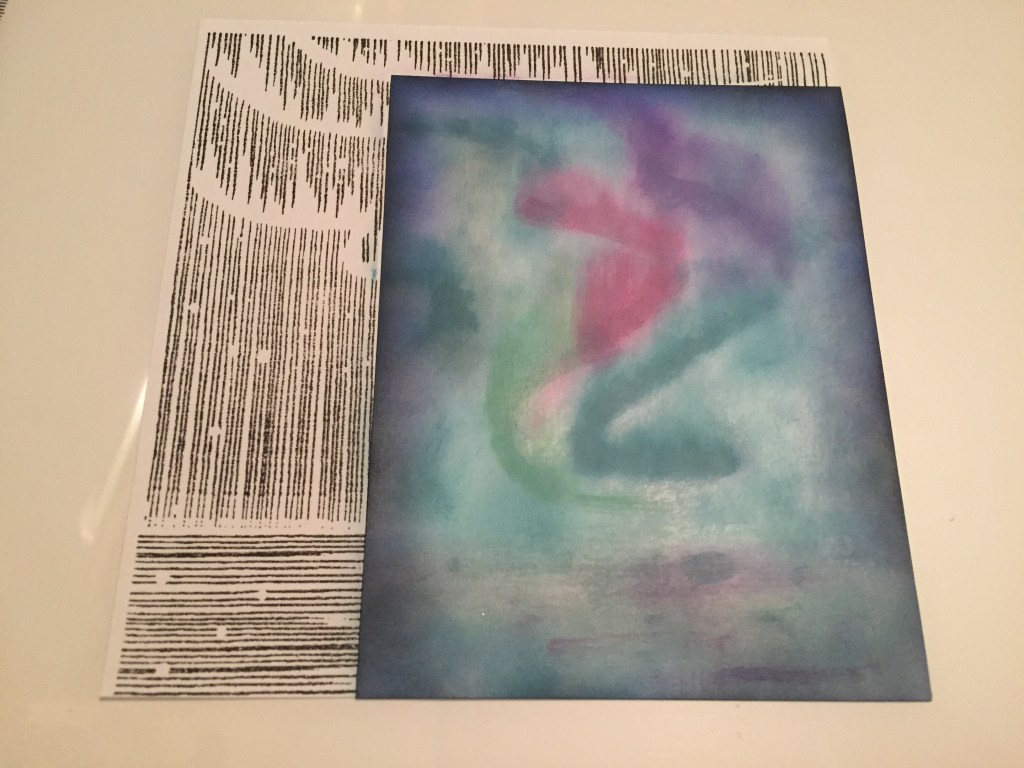
I loaded that cling stamp into my HA MISTI, and stamped a half piece of that watercolor paper with Unicorn Pigment Ink. I let that initial stamping dry overnight, then I took my Yasutomo Pearlescent Watercolor Paints and watercolored the blues and greens and the ocean as well. I was a little surprised that the watercolors did reactivate the Unicorn ink – even though it is a pigment ink – but I had prepared for that by leaving my cling stamp in its original place on my MISTI. Once the watercoloring was dry, I placed the panel back in my MISTI and stamped the cling stamp again using Unicorn Ink and then I clear embossed that stamp. That added all the fine white lines back on top of the watercoloring and the embossing matches the shimmer of the watercolors!
Once I was happy with my watercolor background, I trimmed that panel down to 4″ x 5.25″. I die-cut the whale tail from some Hero Hues Pitch Black card stock and did some dry-brushing on that with the same pearlescent watercolors. I cut a small slit in the ocean and slipped the tail into that slot. I glued the panel directly to a white card base (4.25″ x 5.5″) and added a spot of foam tape behind the tail. I stamped the sentiment on Pitch Black card stock, embossed it in white, trimmed it to size and added that to my card front with more foam tape. It doesn’t read well in a photo, but that pearlescent watercolor really looks like it’s shining – and the embossed stamping just adds to it!
I thought I’d try this same technique using some Glimmer Metallic Inks from Hero Arts..!
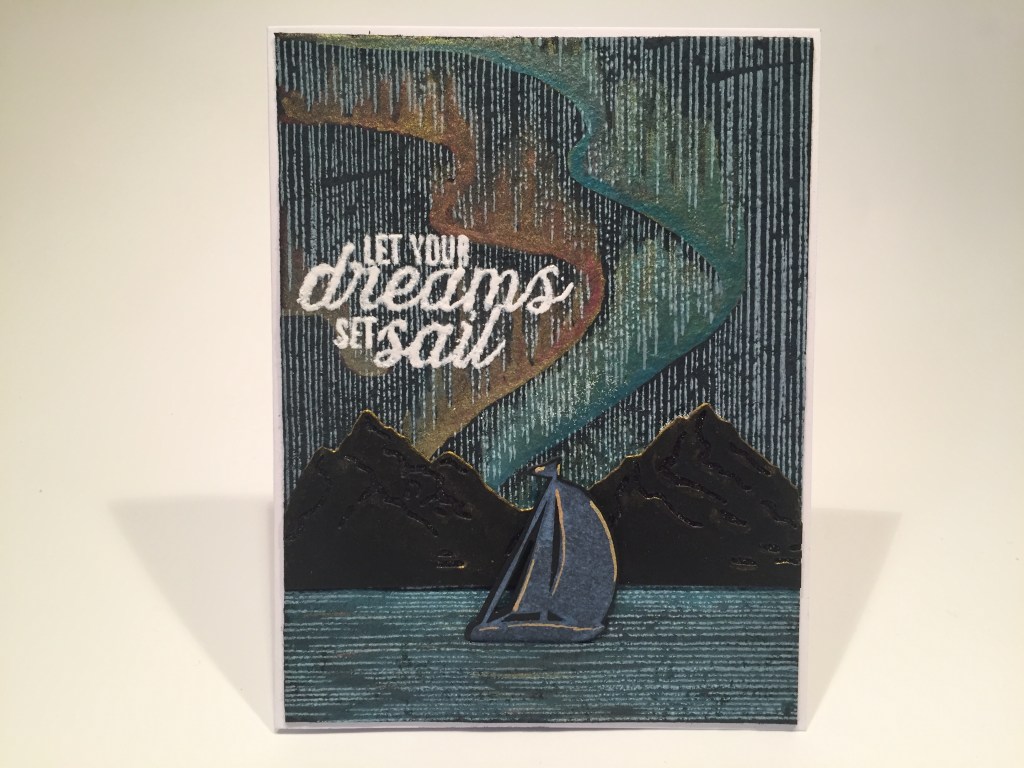
I created the background of this card exactly like the last one, but I used Glimmer Metallic inks in Aqua and Gold instead of the pearlescent watercolors. I did re-stamp the cling stamp with Unicorn ink and embossed that with clear embossing powder. Not quite the same effect of the watercolors but close! I die-cut the mountains from Pitch black card stock, backed the die cut with some black glitter paper and added a touch of gold highlight to the edges with the metallic ink. I stamped the sailboat with HA Soft Granite ink and Blue Hawaii Reactive ink, die-cut that out, and added some highlights with a Gold Metallic Sharpie.
I cut the background down to 4″ x 5.25″, cut a slit in the sea for the sailboat, glued that to a white card base and glued the mountain piece on top of that. I embossed the sentiment with white embossing powder. It’s a little bumpy because it is embossed on top of the embossed cling stamp, but I think it reads perfectly well. I slipped the hull of the sailboat into the slit and added a spot of foam tape behind the sail. Really pretty card, but I don’t think the Glimmer Metallic inks are quite as vibrant as the pearlescent watercolors.
Let’s see what happens if we stamp that background stamp in black instead of white!
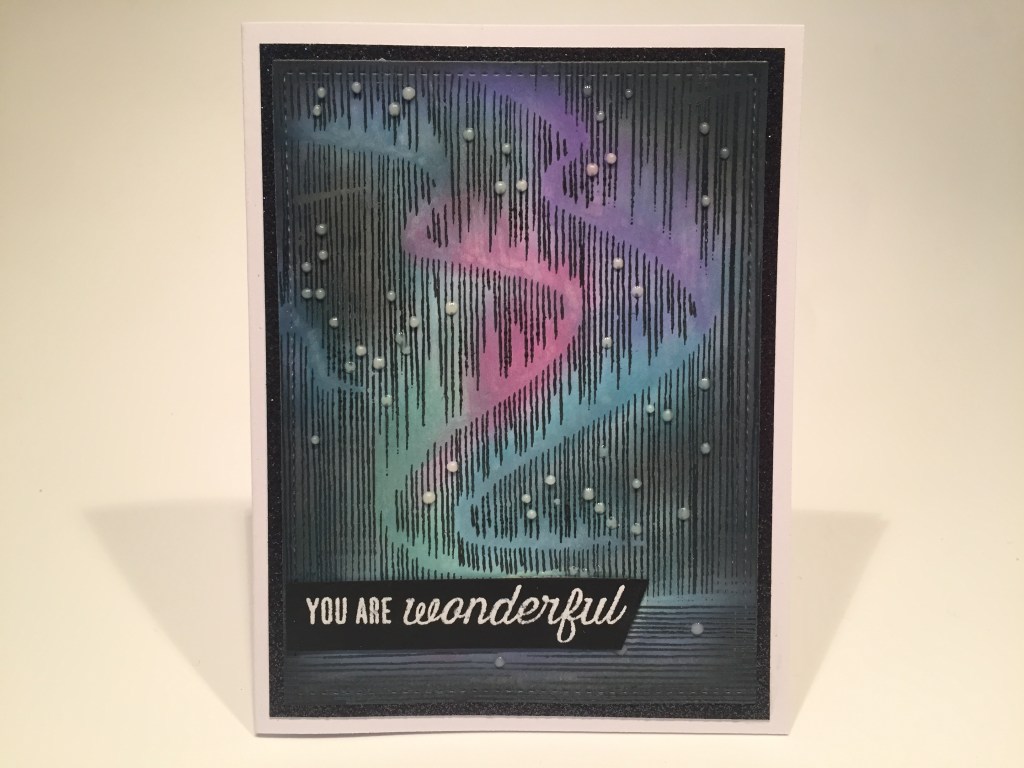
Now this card feels totally different! I stamped the whole cling stamp in black on a piece of plain paper, then layered some white card stock on top, and, using a light board, ink blended the background using Cracked Pistachio, Evergreen Bough, Broken China, Picked Raspberry, Blueprint Sketch, Wilted Violet, and Black Soot Distress Oxide inks.
Looks like a big hot mess without any stamping! After ink blending, I put this panel back in my MISTI and stamped the cling stamp using VersaFine Onyx Black ink and embossed that stamp with more clear embossing powder. I die cut the panel with a Lawn Fawn Stitched rectangle die and added more Black Soot around the edges and amongst the “lights”. Quite a different look than the white on black stamping!
I glued the background to a mat of Black glitter card stock and down to a white card base. I embossed the sentiment in white on some Jet Black card stock, trimmed it down and added it to the card front with foam tape. I added some Spectrum Noir Sparkle pen to the Auroras and finished this card with a generous sprinkling of stars using the Glow in the Dark lacquer pen! They really DO glow in the dark! This is a really sparkly card that actually feels like the Auroras are lighting up the sky!
That covers all the sentiments in our stamp set, but I do have one more stamping technique I wanted to try with that Aurora Borealis stamp!
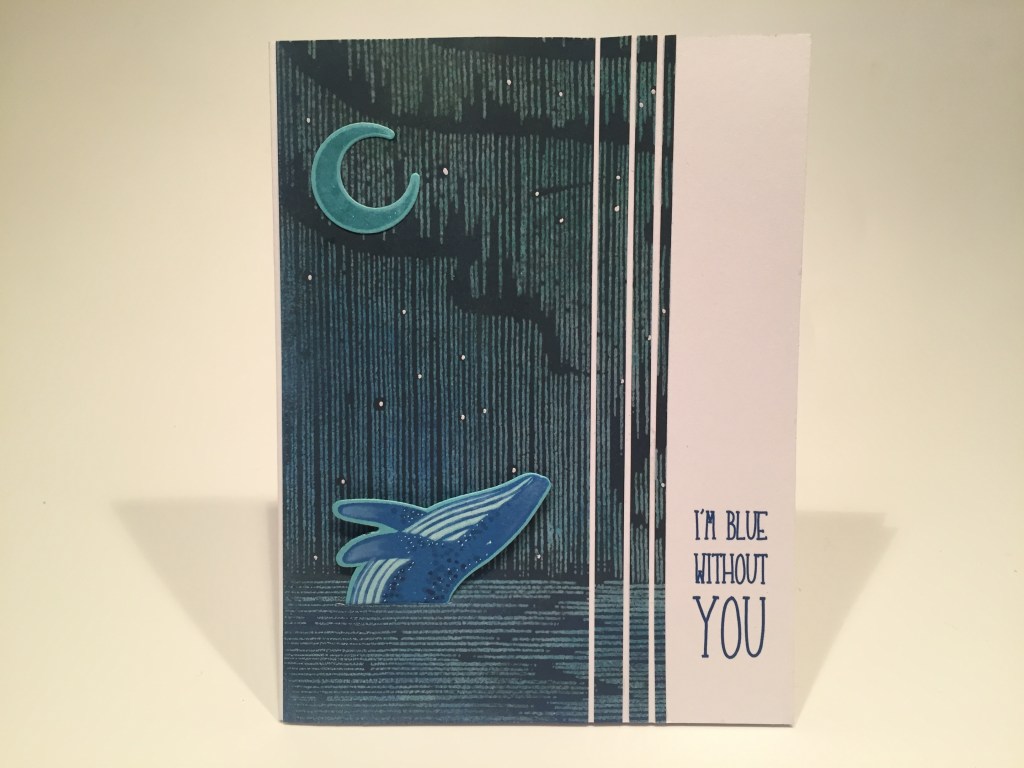
How about some emboss resist for this card! I stamped the cling stamp on a 6″ x 6″ panel of soft blue watercolor-y pattern paper using VersaMark ink and embossed that with clear embossing powder. Then I ink blended Blueprint Sketch and Black Soot Distress Oxide inks on top of the whole panel, and wiped the excess ink off of the embossed stamping. Again… a whole new look with that background stamp! I trimmed that piece to 3″ x 6″ and cut three slices in different thicknesses from the right side.
I stamped the moon on some light blue card stock using HA Soft Sky ink and the whale on the same card stock using Blue Hawaii Reactive inks. I die-cut both pieces with their matching dies, and again, cut a slit for the whale between the lines in the ocean. I added the white highlights on the whale’s belly and flippers using Unicorn ink, and added some texture to him with with my alcohol markers and a white gel pen.
I printed this sentiment directly on a White card base using my piggy-back printing method and the Paprika font. I glued the four background pieces to the card base leaving thin white spaces between them, slipped the whale into his slot and added a spot of foam tape behind his body. I added some shine to the moon with my Spectrum Noir sparkle pen and mounted that to the card front with more foam tape. Finally I added a sprinkling of stars with a white gel pen. This sentiment is perfect for this monochromatic card… I think we are all feeling a little blue theses days!
Okay, enough with that cling stamp! Let’s get back to our last Fancy Scene die!

I colored this die cut with my alcohol markers again, and added a backing piece as well. This time I colored the backing piece with highlights instead of shadows and I glued those pieces together. On white card stock I ink blended the ocean and sky just as I did on the lighthouse die cut. I did add Candied Apple, Spiced Marmalade and Squeezed Lemonade Distress Oxide inks for a bit of a halo around this cabin scene, and I did clear emboss the bottom of the cling stamp on the water. I die-cut the background with a LFSRdie and glued that to a black mat and then down to a white card base.
I printed this sentiment using the Copperplate Gothic Bold font, trimmed it down to a banner shape and clear embossed the whole sentiment. I added the scene and sentiment to the card front with foam tape. Yes, I know I’m missing an apostrophe on the “LETS” but (believe it or not) that was a design choice. I also added three of the little silver stars from our kit in the sky on the top right for a touch of sparkle. I think a little cabin on a remote island is about as socially distanced as one can get…! If only that was MY island! And the lights in the cabin are quite welcoming!
Now we arrive at that point in my 10 cards where I’m looking hard for new card ideas…!
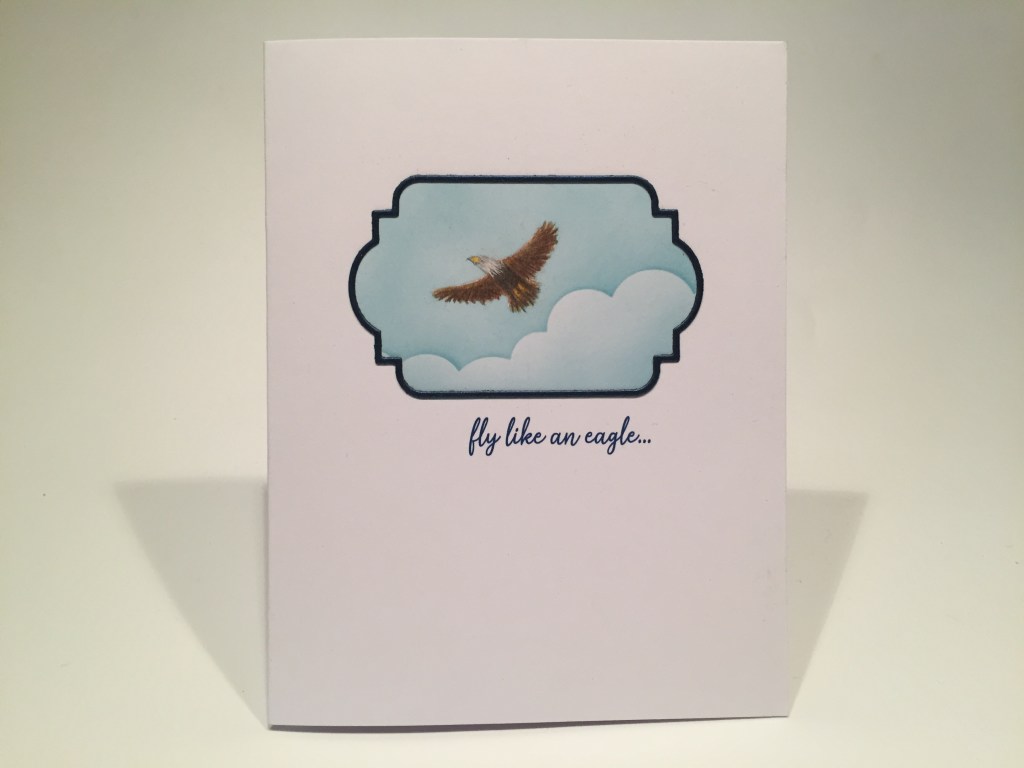
When I’m looking for new card ideas I often focus down on just one image from our kit. I think it really paid off on this card! I cut some masking paper with a Simon Says Stamp Frames die and masked off the top half of a white card base. I stamped the bird on some masking paper and fussy-cut it out and added that inside the frame mask before ink blending the sky with Broken China Distress Oxide ink. The cloud is stenciled with a MFT Mini Cloud Stencil. When I was happy with the background, I removed the masks and colored in the eagle using my colored pencils. I spent a good deal of time coloring this little eagle and used very sharp pencils to get a nice sense of feathers.
I printed this sentiment (Steve Miller Band anyone??) directly on the card front using the Dream State font, and then die-cut the thin frame from a piece of dark blue pearlescent card stock from my stash. I adore this card! You know how much I love white space, and I think this card highlights how much bang for your buck you can get out of a single small stamp in a stamp set! This card was quite a refreshing break for me!
Her come the puns. Here come the puns. Order in the Craft Room, here come the puns!
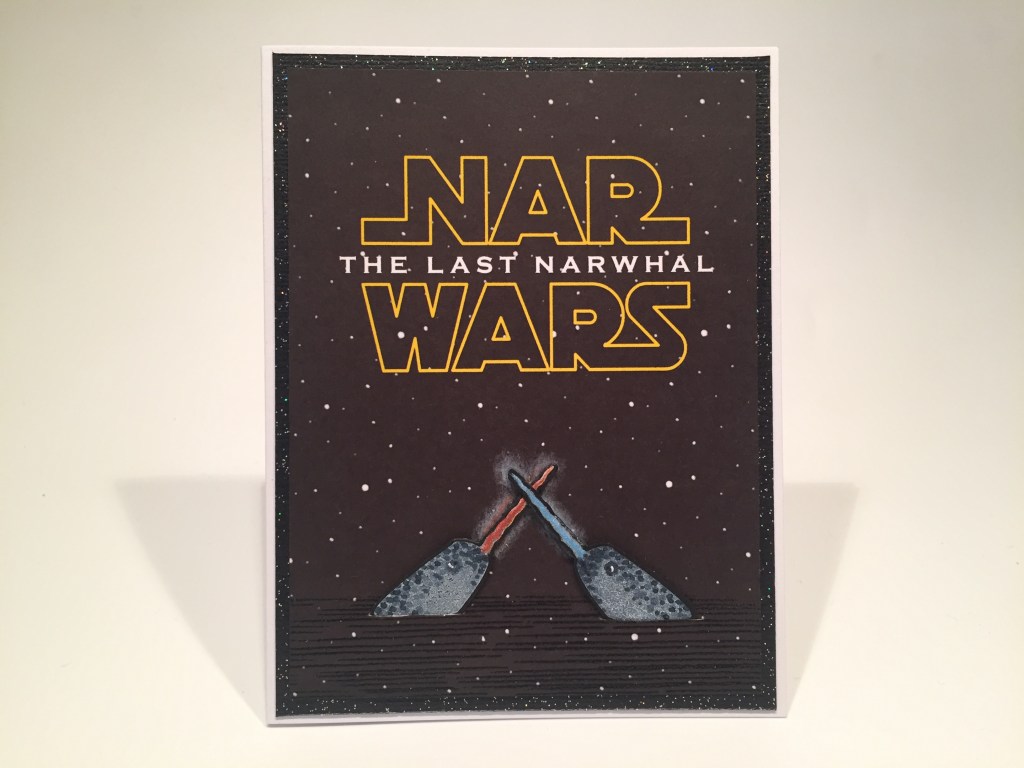
I simply couldn’t resist this one! Those cute narwhal stamps and dies were just begging for some puns! I created this whole background using my Silhouette Software (remember it’s FREE) and printed it out on some plain card stock. That is the Death Star font (I know, right!) and the Copperplate Gothic Bold font. I did again clear emboss the water lines from the bottom of the cling stamp on the bottom of this background panel. I will make a PDF of this and will be happy to share this background with anyone who would like it. Just send a request to me using the comments button on the top of this page!
I stamped the narwhals on Pitch Black card stock using Unicorn ink and colored them with alcohol markers and colored pencils for the “light saber tusks”. I did reverse stamp one of them to get them pointing in different directions. I do have a short video showing how I do reverse stamping here: https://videopress.com/v/Pzefmftc. I die cut the normal stamp and fussy cut the reverse stamp. I cut slits between the water lines to slip my narwhals into, and added highlights behind their tusks with Unicorn ink. Tiny pieces of foam tape add some dimension behind their heads and light sabres… I trimmed the background panel to 3.75″ x 5″, matted that on some black glitter card stock and glued everything down to a white card base. This card makes me laugh out loud, and would be a terrific greeting for any Star Wars fan or sci-fi geek on your list!
I know there are lots of whale puns out there but the narwhal is a little more unique!
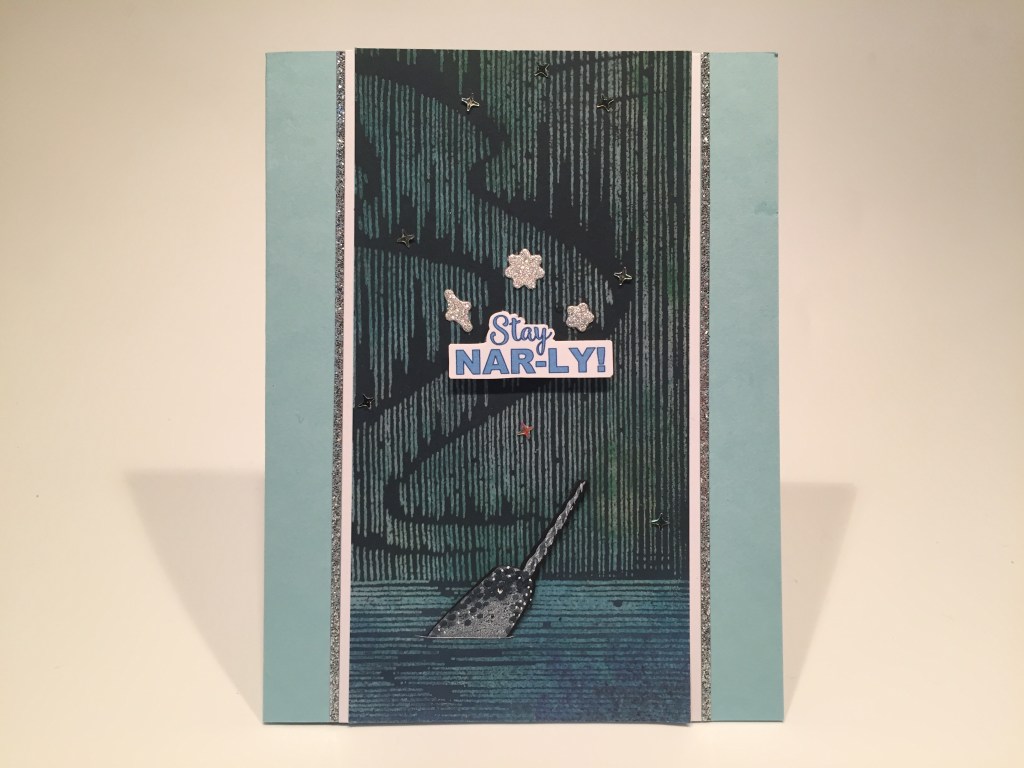
Okay, gnarly may be a bit past it’s prime as a slang term but this card still makes me smile! This is the other half of the emboss resist panel I made for my fifth card. I cut that to 2.75″ x 5.5″, glued that to a white mat and then down to a card base made from Hero Hues Mist card stock (we got some of that in our MMH March 2020 kit). I again stamped the narwhal on Pitch Black card stock with Unicorn ink and added some texture with my alcohol markers and a white gel pen. I cut a slit between the lines in the ocean for our narwhal and added a little foam tape for some dimension.
I printed this sentiment on some scrap card stock using the Smoothie Shoppe font and the Arial Black font, fussy-cut it out and mounted it with more foam tape. I die-cut our three star shapes from some silver glitter paper and glued those around the sentiment and added a sprinkling of the little silver stars from our kit as well. For a final touch of glitter I added two strips of Love From Lizi Silver glitter peel offs on either side of our center panel. This is a fun encouragement card especially for those of us who may be of a certain age! Makes me giggle! This is the first and only narwhal stamp in my collection!
It’s been a while since I did a double slider pull tab card and I thought the spouting whale stamp gave me the perfect opportunity for something new!

I stamped the two whale pieces on a piece of white card stock with some Soft Granite ink and masked them off before ink blending the ocean with Broken China and Blueprint sketch Oxide inks. Before removing the masks, I clear embossed some water ripples using my homemade stencil. I ink blended the sky directly on a white card base using Orange Marmalade and Squeezed Lemonade Oxide inks. I removed the masks from the sea and colored in the whales using alcohol markers and a white gel pen. You can see the little pull tab under the whale…
I stamped and white embossed the spouting whale stamp on some heat resistant acetate and die-cut it out using the matching die. I have made many of these double slider pull tab cards – it basically consists of creating a plastic (trash bags work well) “conveyor belt” wrapped around a channel cut into card stock and attaching your pull tab to one side and your cut out moving piece to the other. You can see an in-depth post on this technique here: https://cardcutups.com/2018/02/26/project-double-slider-pull-tab-cards/.
My big variation here was cutting this v-shaped notch from the top of the whale to the horizon. I glued this cut-out piece to the background to allow the spout to come out between the front and the back. I was trying to make it so the spout started out small and got larger as it went up… instead of coming out of the whale’s blowhole at full width. I think this works pretty good..! It certainly gets the idea across in a fun way! Of course I could have just stamped the whale on the horizon line and let the spout erupt as a whole, but I was in the mood to experiment a little!
I printed this sentiment on the inked card base using the Arial Black font, and stamped the birds (from the MMH April 2019 Italian kit) using Hickory Smoke Distress Oxide ink. After adding the sea and mechanism, I decided to add the extra “congrats” sentiment using the Lawn Fawn Big Scripty Words stamp and die. I really like this sentiment set – the dies are super easy to line up with the stamped words! A fun interactive whale card! HOORAH!
That covers my 10 cards inspired by the My Monthly Hero June 2020 Kit! I love that large cling stamp and I guess everyone else did too – this kit sold out super fast!
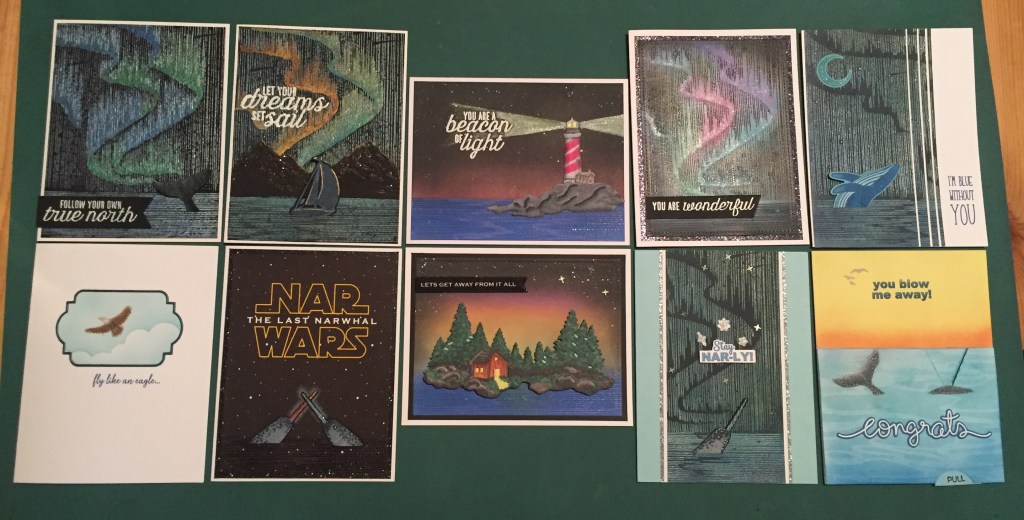
I used almost every piece of this kit on this fun set of cards! I used all of the Fancy Scene dies and five of my cards feature the Aurora Borealis cling stamp. Of course I love the puns and am totally into that eagle card – love me some white space! – especially in contrast with all of these full-image cards. Let me know which card(s) are your favorite!
It seems every time Hero Arts offers a cling stamp in a kit, it sells out almost immediately! If you don’t want to miss out on any of these value-packed kits I would suggest becoming a subscriber! If you opt for the six-month plan you can choose to skip a monthly kit anytime – in case it’s not to your liking. If you do go shopping at Hero Arts please use my links whenever you can! It helps this channel tremendously and is hugely appreciated! Hero Arts: https://shrsl.com/1f7qx MMH Six Month Subscription: https://shrsl.com/24ss0
Thank so very much for sharing your time with me here! I appreciate you all more than you can ever know! Please remember to Like me, List me, Pin me, Post me, Share me with all your friends – continue keeping yourselves and others safe and healthy – we aren’t out of the woods yet…! And, as always, I wish you Happy Crafting!!

your cards are wonderful and your videos are always entertaining, but this set of cards and accompanying video just sets, yet again, a new standard. Wishing you the best in these difficult times!
LikeLike
Thank you so much Deb! So very much appreciated! Sending you and yours Healthy and Happy wishes!! Scott
LikeLike
I love your cards from this kit, I’m sorry I missed it since it’s now sold out. The budgetary bind issue strikes once again! I would love to receive your PDF or SVG of your sentiments, I’ve used them before. I have a Star Wars crazed co-worker that has a BD in October, this would be perfect for him. He confessed that he and my other co-worker really look forward to the cards I make for them Last year I used the July Hero Arts kit and it was a big hit. Thanks for all you do, stay well during this pandemic! I too am not working, I’m in health care but am at high risk, so really not safe for me to work right now.
LikeLike
Sheri – Thank you so much! Yes… this kit sold out like hotcakes! I’m sending you my PDF of the sentiments I created for the MMH June 2020 Kit to your email at bzyptmom28@gmail.com… Hang in there… I’m hoping for a light at the end of the tunnel…! Be well!!!
LikeLike
I discovered your YouTube videos after I purchased the April Hero Arts kit and I was looking for inspiration and card ideas. I am enjoying them very much. I watched the June kit cards and you keep mentioning a Gouache white pen. I am not finding that on Hero Arts. Where did you purchase that, or is there something that can be purchased from Hero Arts that would work as well? Thank you for the wonderful videos.
LikeLike
Julie!
Great to hear from you! Thank you so very much! The Permanent White Gouache is a watercolor paint – in a tube… Unicorn White Pigment ink from Hero Arts works almost as well…! Dab a little on your palette, add just a little bit of water to thin the ink and it spatters pretty well! I hope that helps!
Scott
LikeLike