
DISCLOSURE: This site contains some affiliate links to products. I may receive a commission for purchases made through these links (at no cost to you). As an Amazon Associate I earn from qualifying purchases. Thank you!
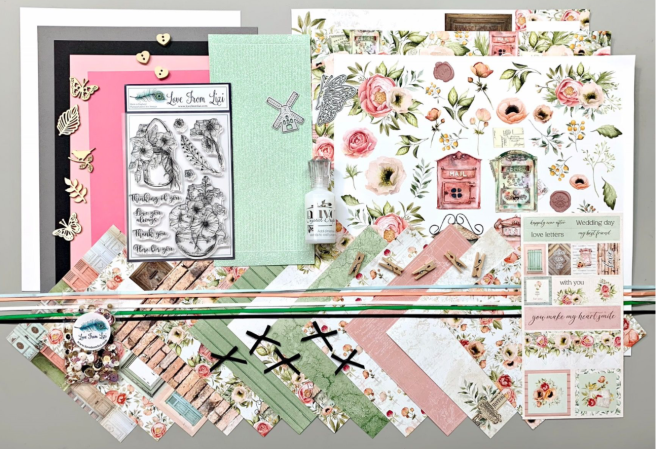
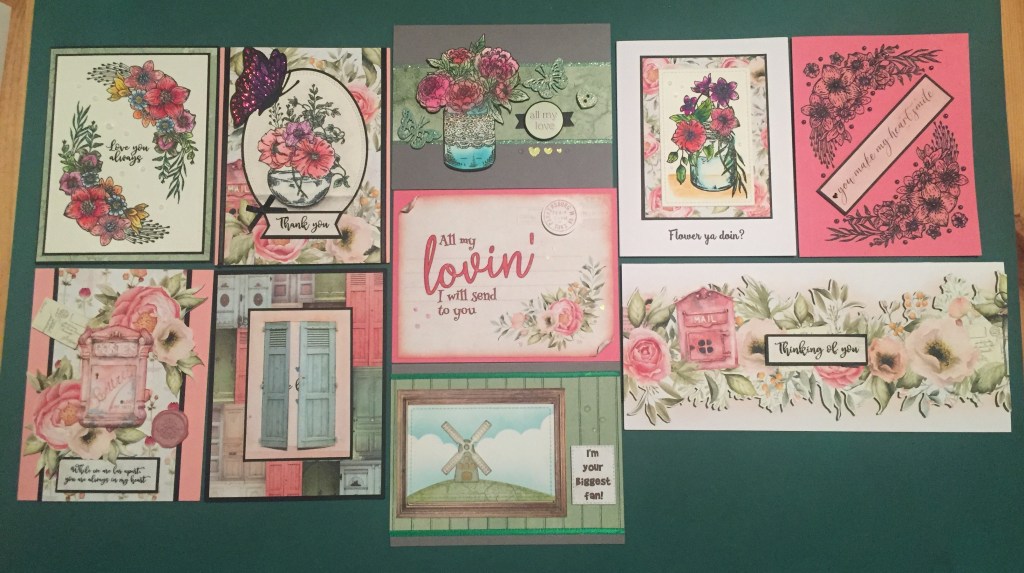
Hello Folks! Scott here with my 10 cards featuring the Love From Lizi July 2020 “Love You Always” Card Kit. This kit is unique in its plethora of flowers as both backgrounds and focal images, and lots of accessories to add to all your loving creations.
As usual, I do take the 5 sheets of card stock that come in our kit and cut them in half to make my 10 card bases. This month is World Watercolor Month, so I thought I would dive into this kit by practicing some watercolor techniques using different mediums and the stamps in our kit.
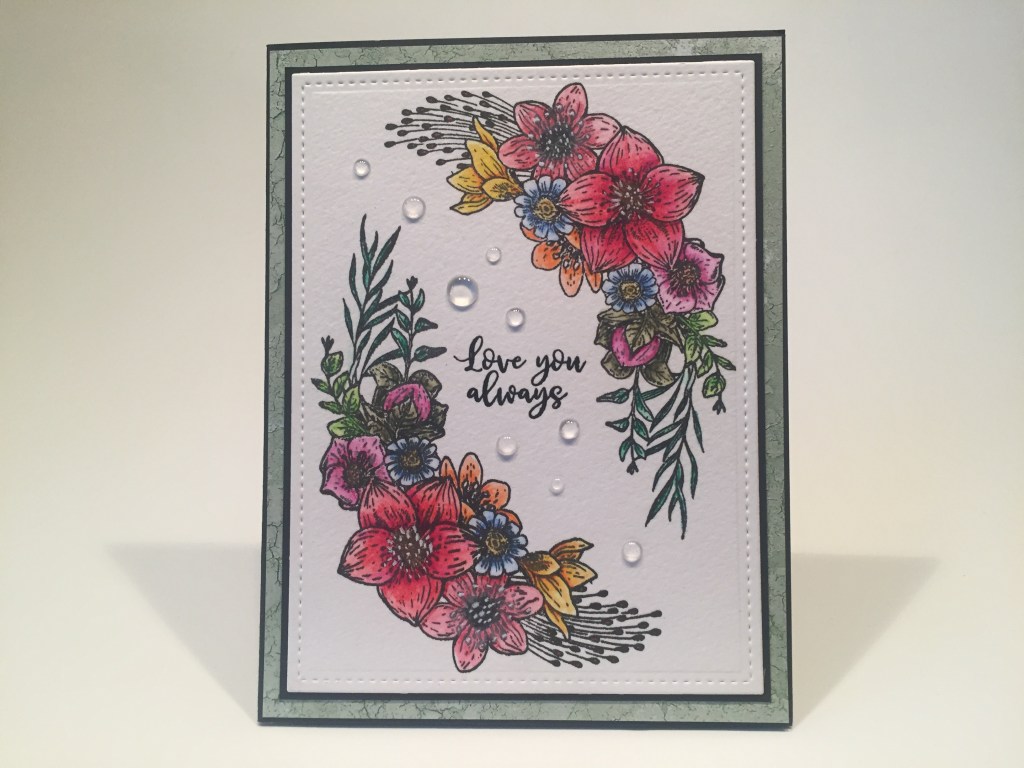
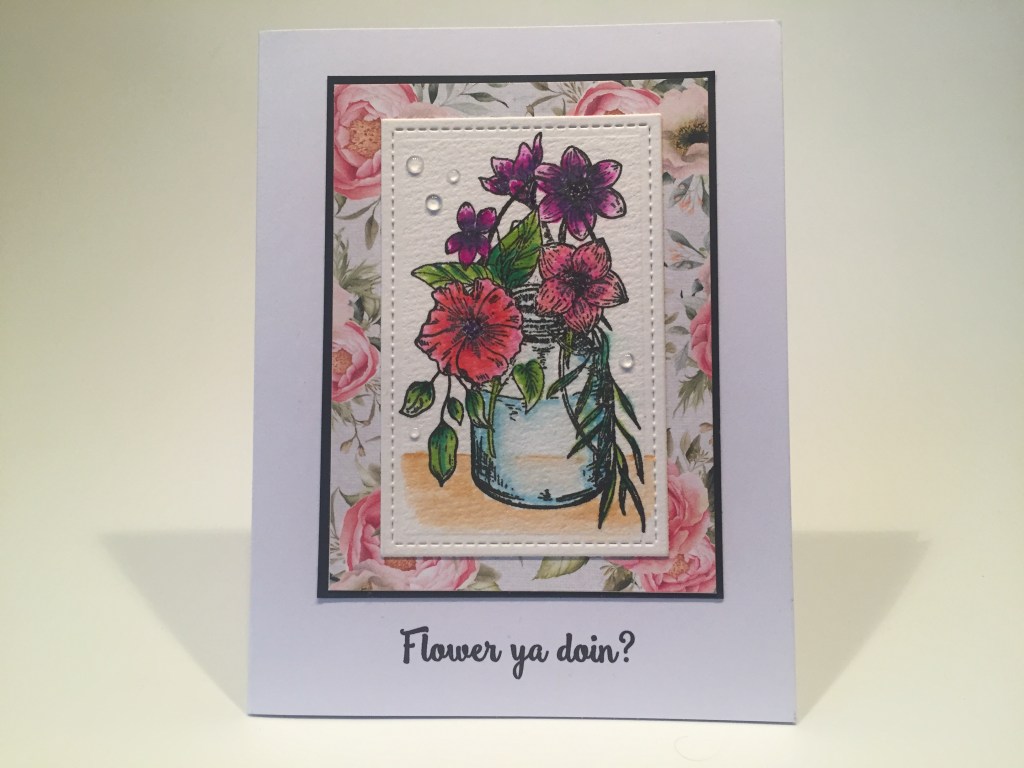
This is actually a stamp from the add-on “Just Because” stamp set. I really like this spray of flowers and the versatility it affords for using on a card. I stamped this on 140# Cold Press watercolor paper using VersaFine Onyx Black ink. I reached for my Derwent Intense Watercolor pencils (I don’t use these as often as I should!) to watercolor this card. I love the vivid colors these pencils provide! They melt like butter and layer just like any good watercolor paint should!
I stamped the sentiment from the “Love You Always” stamp set in VersaFine Onyx black ink, and embossed that with some clear embossing powder. I die-cut the watercolor paper with a Lawn Fawn Stitched Rectangle Die, glued that to a thin black mat, then to a thicker green “cracked paint” pattern paper mat and then down to the back card base. I added some Nuvo Morning Dew Crystal Drops from our kit for a sprinkling of shine and a touch of dimension. I really need to remind myself to use these watercolor pencils more often! They work so well and I truly love the watercoloring on this card!
Let’s use some Daniel Smith Watercolors for our next card…
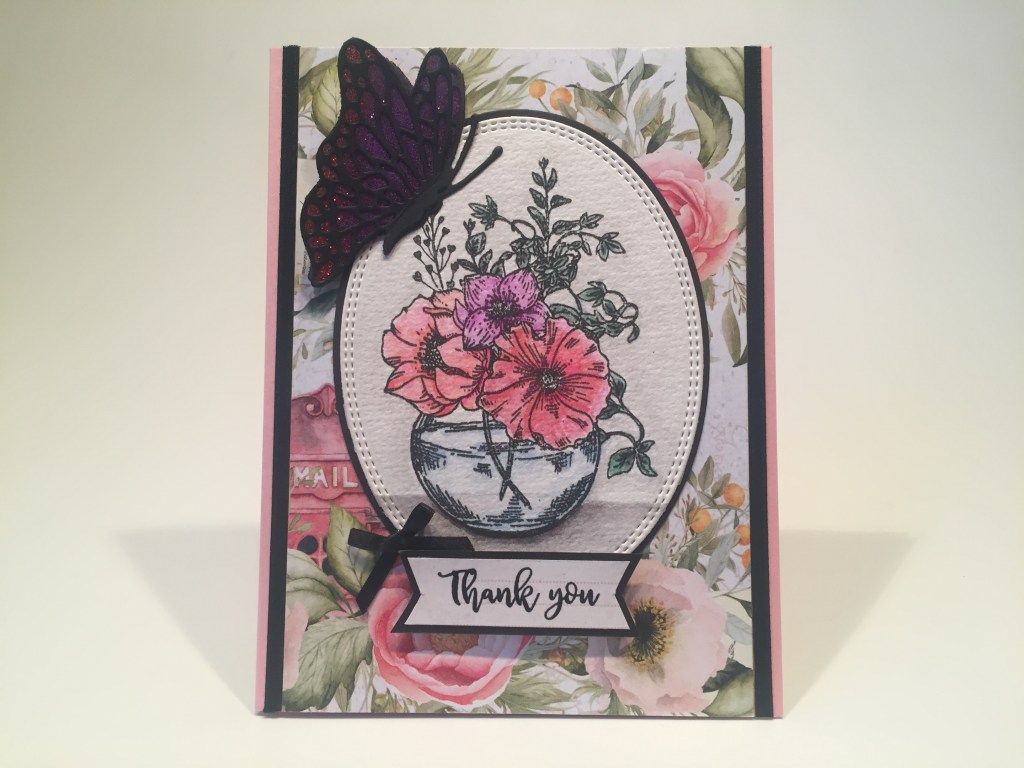
This is one of the stamps from our “Love You Always” stamp set. The same VersaFine ink, the same watercolor paper, but these DS watercolors feel like they were a little more in the spirit of this kit – quite a bit softer than the watercolor pencils! I did add the extra greenery sprig from the stamp set behind the flowers on the left. I die cut the colored stamp and the black mat using Gina K Designs Large and Small Oval Die sets. I love using this oval set because they are sized to work together to create a perfectly thin mat behind the double stitched main panel.
I cut a background (5.5″ x 3.75″) for this card using the large flower garland cut-apart sheet, glued that down to the Blush Pink card base, and glued some of our black ribbon along the edges. I glued my matted art directly to the card front, stamped and embossed the sentiment on a piece of pattern paper, cut that into a banner, added a black mat, and attached the sentiment using foam tape. I cut the Butterfly die from our embellishment bag twice from some HA Pitch Black card stock, attached some Scor-tape behind the wings, and glittered the open spaces with red and purple super fine glitter. It doesn’t read very well in this picture, but it’s beautifully sparkly in real life! I glued the two butterfly bodies together, added a touch of foam tape between the wings, and glued that assemblage to the card front. One of our black bows provides a final touch of class for the sentiment. I really like that round glass vase and think this Thank You card is the perfect embodiment of this kit!
Both of those cards took me about an hour each to watercolor. Let’s try something simpler…
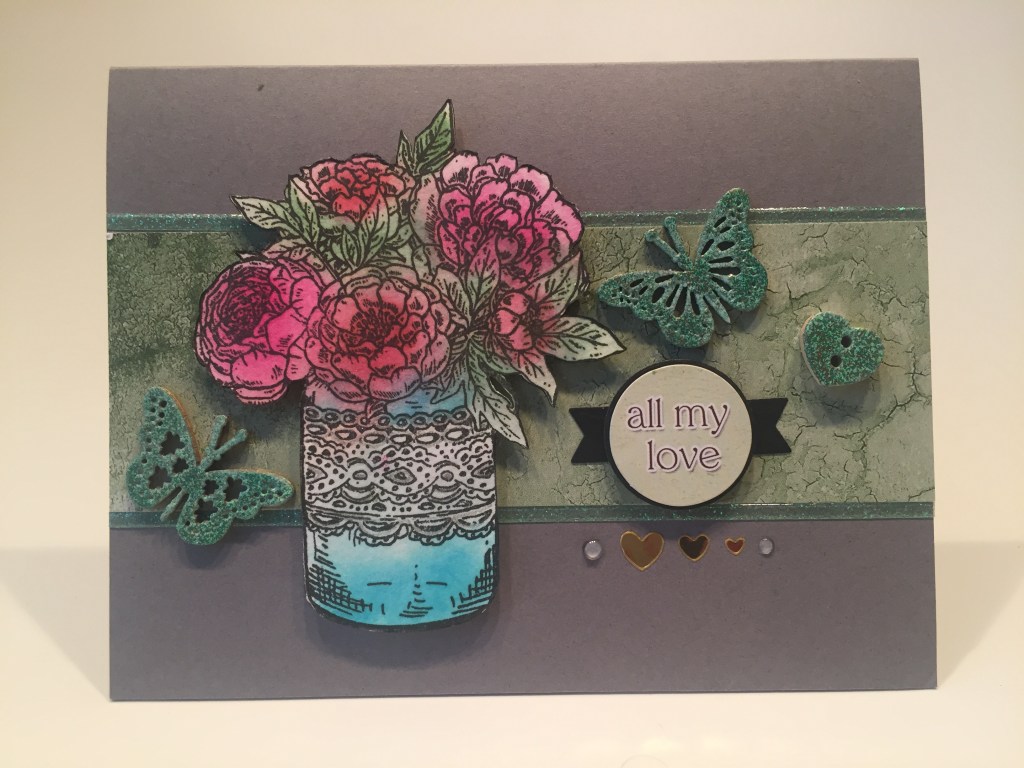
This is the other stamp from the “Just Because” add-on stamp set. Stamped with VersaFine ink on the same watercolor paper, but I sponged Distress Ink on the stamp using my small finger daubers and then sprayed the image down with a good amount of water. That gave me a nice, loose watercolor feel, but bled a great deal, so I fussy-cut the stamped image. The green “cracked paint” background pattern paper is cut to 5.5″ x 1 7/8″, glued to the middle of our Dark Grey card base, and lined with the Mint Glitter Straight peel offs from the kit. I added the fussy-cut colored bouquet to the card front with foam tape.
I embossed the tops of the two wood-veneer butterflies and one of the wooden buttons from our embellishment bag using VersaMark ink and the LFL Atlantis Green embossing powder. The sentiment is from the Circles and Sentiments add-on sticker pack, matted on a thin black mat and foam taped over a small black banner to the right of the bouquet. I glued the embossed die cuts to the card front and added two spots of our Nuvo Drops and three Mini Heart peel offs (from the Variety Bundle add-on) under the sentiment. Nice touch of bling and those hearts reflect the gold accents in that embossing powder. I did add some glitter to the lace wrapping on the jar with my Stardust Gelly Roll pen for a little extra sparkle. I think this is a very effective short-cut for watercoloring an image, and really like the final effect of this card!
One more image stamp from the “Love You Always” stamp set… Let’s try some watercolor markers for this one… I’ll try my Stabilo Markers for this one!
I did add the extra floral branch from our stamp set to this arrangement – I thought that filled out this two-blossom stamp quite nicely! Stabilo markers move quite well on watercolor paper, and I’m very pleased with how this one came out – kind of a midpoint between the watercolor pencils and the DS watercolors…! I die-cut the colored stamp with a LFSRdie, and glued it to this cut-apart floral frame – this is the cut-apart that has journaling lines in the center of the frame. I glued those to a thin black mat and added some Nuvo Drops for a little watery shine…!
I printed this pun-ny sentiment directly on the white card base using my Silhouette Software, the Smoothie Shoppe Font and my Piggy-back printing method. Makes me giggle! I glued the framed assembly directly to the printed card base. This is more vibrant that the DS watercolors, approaching the tones of the watercolor pencils, but I was able to get some better color mixing with the pencils… almost tit for tat, but I especially love the water in this vase!
I know a lot of you cringe at the thought of coloring anything, so I did one more stamped card with no coloring at all…!
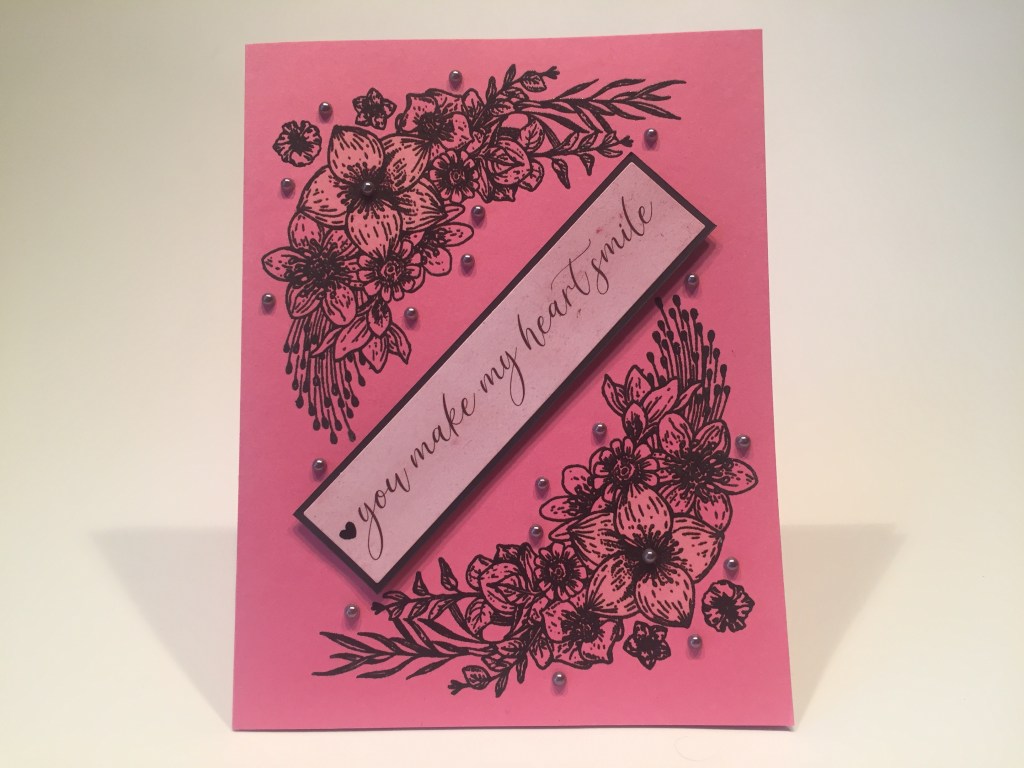
Here’s some hard-core pink for you! I turned to the floral spray stamp again, and stamped that directly on the Warm Pink card base with VersaFine ink, and embossed that with clear embossing powder. I also added the two small flower stamps to the corners of the sprays as well. I wanted a tiny bit of variety to the flowers, so I painted a little bleach on the center blossoms to lighten them up a touch… subtle, but recognizable, I think that added just the right touch to this arrangement. The sentiment is from our sticker sheet, matted on black and added to the card front with foam tape. A bunch of small metallic embellishments (can’t figure out which LFL kit these came from) and a black Mini Heart peel off on the sentiment itself add a final shiny touch to this very pink card! I really like the black and pink – very sharp and ultimately fairly simple!
It seems that “slim-line” cards are all the rage these days.. and we have a cut-apart sheet that I thought lent itself perfectly to that slim-line concept!
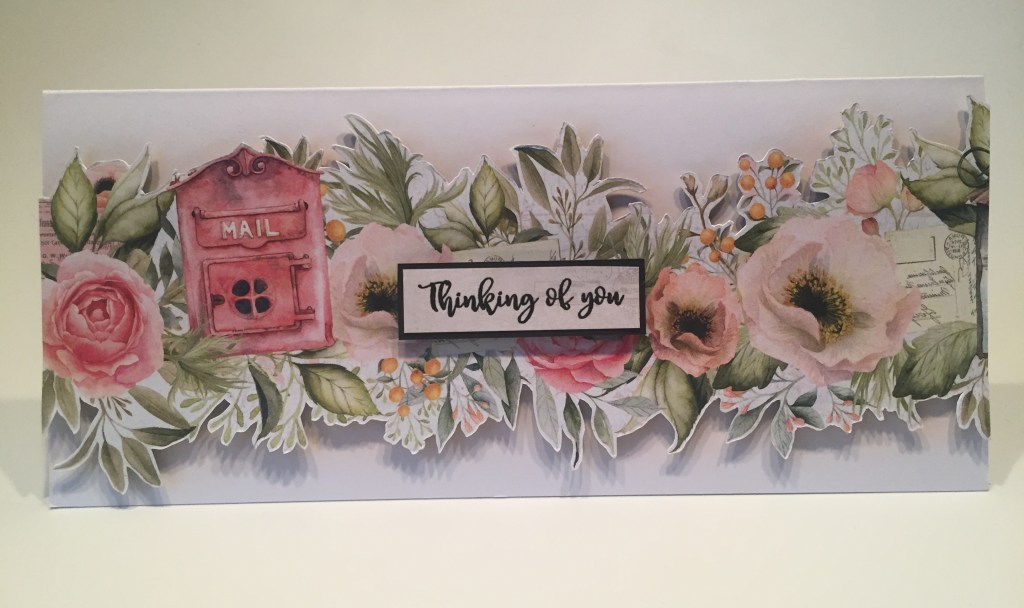
I fussy-cut a 9″ strip of the floral garland cut apart sheet – leaving a bit of a white border on the edges to make it easier to cut out. I ink blended some Tattered Rose Distress Oxide ink on this 4″ x 9″ card base (behind the edges of the garland) and mounted the garland with foam tape. I stamped and embossed this sentiment on a piece of pattern paper, added a black mat and mounted that to the center with more foam tape. This is a really impressive card that is ultimately pretty simple – especially if you like to fuss-cut! Very trendy and actually quite beautiful!
I’ve got my fussy-cut mojo running on full speed… let’s do a collage card now!
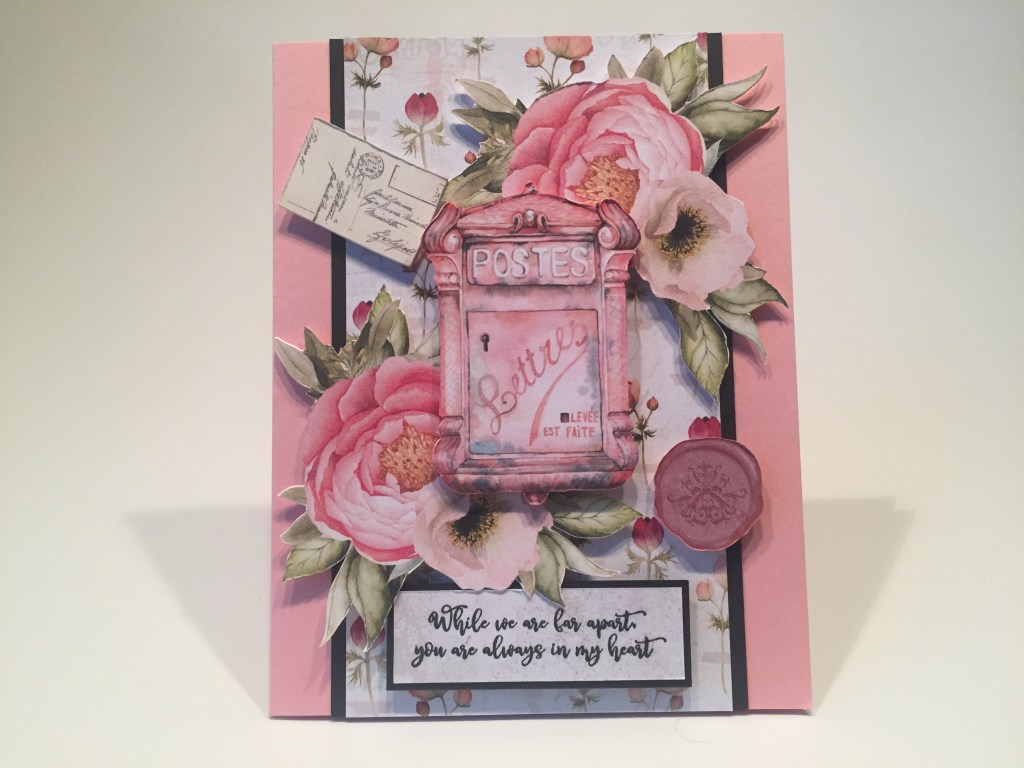
I cut a piece of the ‘taped single-blooms’ pattern paper to 5.5″ x 3″ and matted that on a piece of 5.5″ x 3.25″ black card stock and glued those to the Blush Pink card base. The flowers, letter box, postcard and wax seal were all fussy-cut from the large cut-apart sheet. I ignored the fine foliage around the blooms and just cut out the larger leaves. These are all attached to the card base with foam tape (double thick for the letter box). I stamped the sentiment (from the add-on stamp set) on a piece of pattern paper, trimmed that down and added a black mat, and foam taped that to the card front. I think these kind of cards are a perfect use for all the images in this kit. You’re going to have to do some fussy cutting, but I think the end result is certainly worth it! No sparkles or bling on this card – I don’t think any are needed… and seem to detract from the vintage feel.
One of our cut-apart panels featured a single shutter in a field of pink. Just the thing for a little interactive card this month!
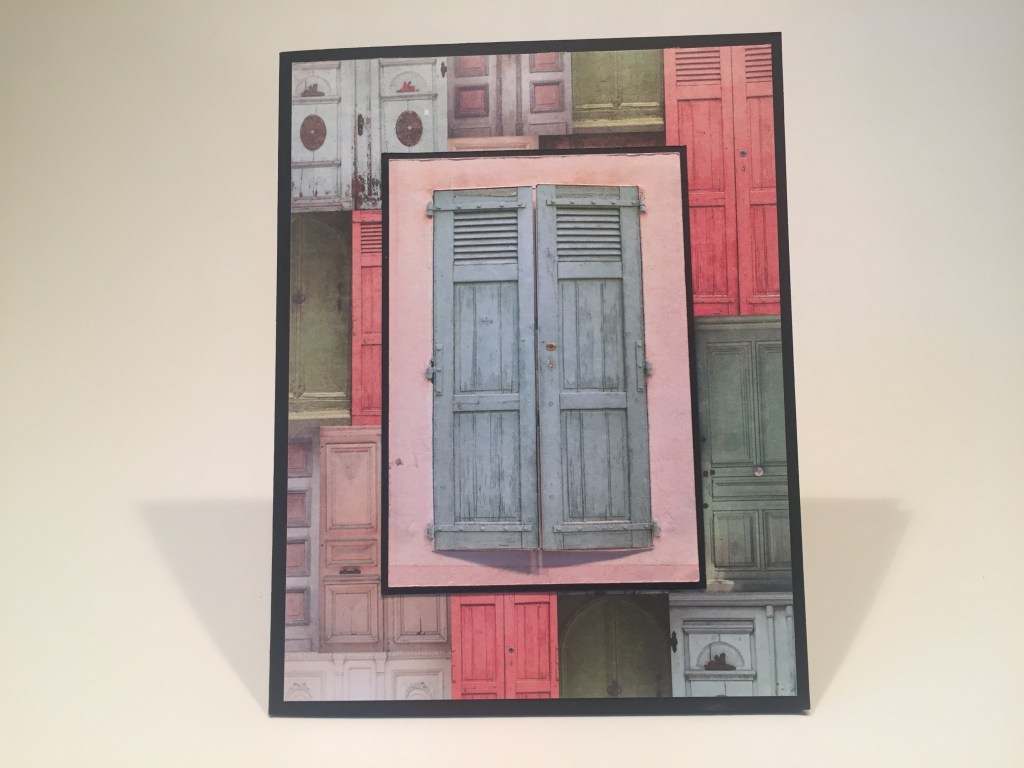
I cut one of the ‘shutter and doors’ pattern papers to 4″ x 5.25″ and glued that to the Black card base. I trimmed the single shutter cut apart piece down to 2.5″ x 3.5″, cut the shutters open (top, bottom and center) and scored the ‘hinges’ so the doors would open. I added a piece of the simple distressed beige pattern paper behind the opening, added a thin black mat behind that, and glued those to the center of the card front.
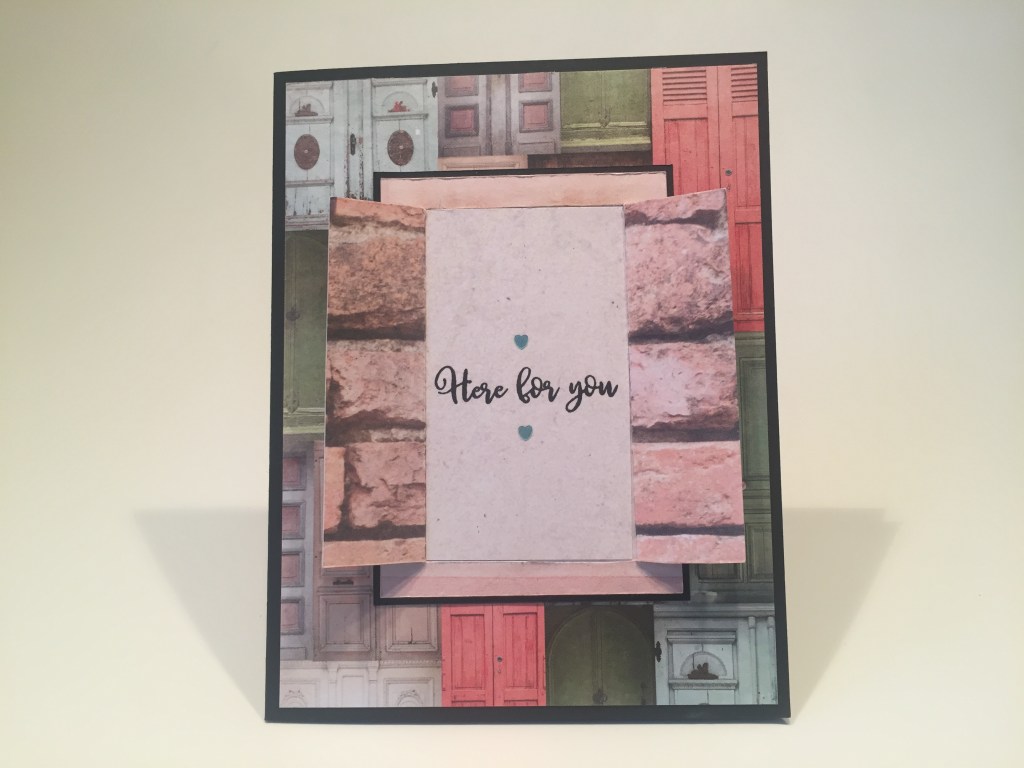
I stamped this sentiment from the “Love You Always” stamp set in the center of the open doors and added two little pieces of heart shaped glitter above and below. That’s all the bling this card needs… I thought about adding more stamps inside here, but was ultimately very pleased juxtaposing this simple sentiment with the nice open background. A really nice masculine card from a very feminine kit – I like this very much!
One of our cut apart panels was basically the front of a decorated envelope – with address lines and background post cancellations… I thought about making an actual envelope from that, but then came up with another idea…
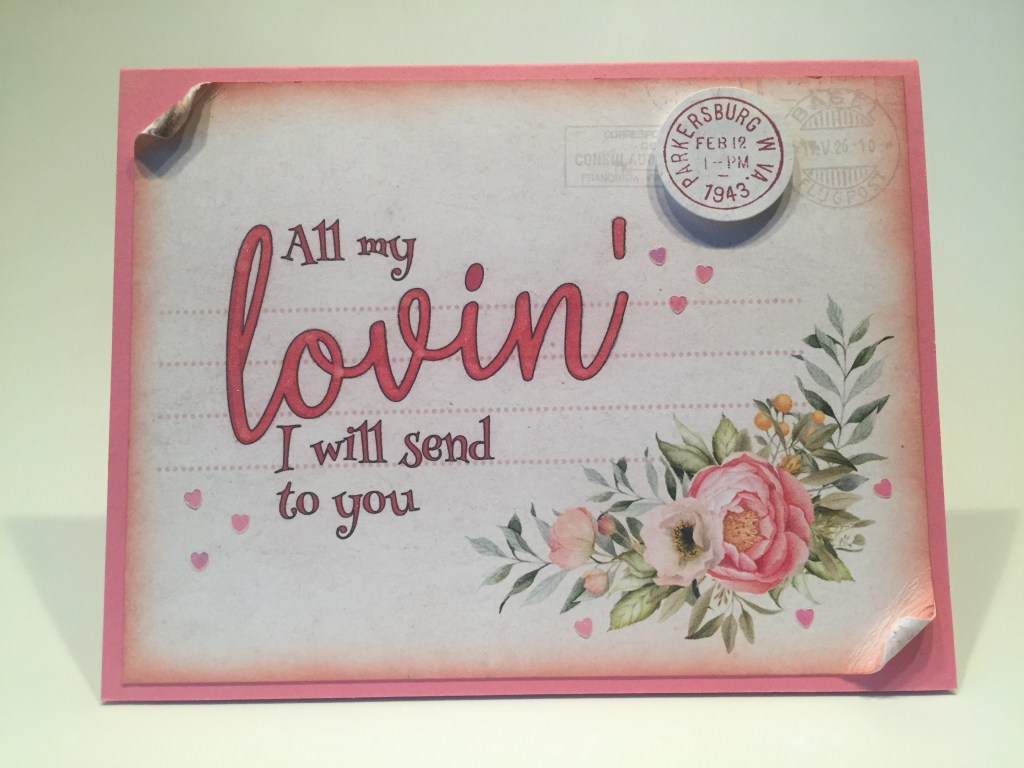
I trimmed that ‘envelope’ cut apart panel down to 5″ x 4.25″. I printed this sentiment directly on the cut apart panel using my Silhouette Software, the Henny Penny font and the Dream State font. I did use a light board to make sure that I was able to achieve proper alignment of the printing with the pattern paper. I ink blended the edges of that panel with some Fired Brick Distress Oxide ink, curled up the opposite edges and glued that to the Warm Pink card base. I added one of the postmark stickers from the Circles and Sentiments add-on sticker pack – removing the sticky with some powder and using foam tape to mount it. Little pink heart glitter pieces add some nice bling, and I did use my Spectrum Noir Sparkle pen to add some glitter to the large lovin’. Not only is this a great Beatles lyric, but I think it works especially well with this pseudo envelope panel!
I was determined to use that little windmill die we got in our embellishment bag…
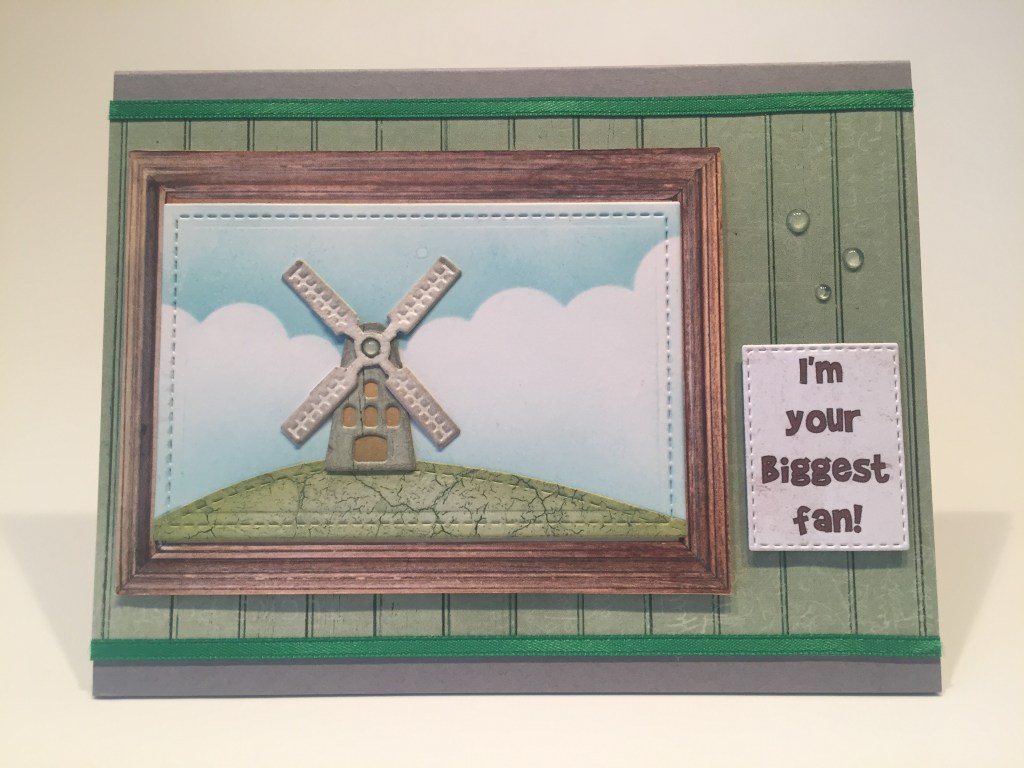
I die-cut that windmill from a piece of watercolor paper and trimmed out the fan blades and did some light ink blending on those with some Pumice Stone Distress ink. That really highlights the embossed details on those blades! I die cut the windmill a second time from the large green bead-board pattern paper and trimmed away the fan blades. I ink blended the building with more Pumice Stone ink, cut a piece of yellow card stock to fit behind the windows and door, and ink blended more Pumice Stone ink on that before gluing it to the back of the windmill. I glued the blades to the building and VOILA! A little itty-bitty windmill!
I die-cut the hillside using some the green ‘cracked paint’ pattern paper and a Stitched Hillside die, and did some ink blending on the edges of that piece with Peeled Paint Distress Oxide ink. I die-cut a piece of Bristol Smooth card stock with a LFSRDie and ink blended behind the hill with Broken China Distress Oxide ink and added the clouds using the MFT Mini Cloud Edges stencil. I glued the hillside to the cloud background and glued those to the cut apart panel that featured this nice wood frame.
I cut the small bead-board pattern paper to 5.5″ x 3.5″ and glued that to my last Dark Grey card base, and added some of our green ribbon to the top and bottom edges. I printed this sentiment on more pattern paper using the Brady Bunch Remastered font, and die-cut that out using the square die in the Background Builder Die Set 1 from the September 2019 LFL release. I mounted the framed background and sentiment with foam tape and glued the windmill to the top of the hill. A few Nuvo Drops – including one in the center of the blades – adds a little shine to this fun card. I love pairing the “biggest fan” sentiment with this tiny windmill! Makes me laugh! And, hey! We don’t need no stinking’ tulips!!
That’s my 10 Cards 1 Kit post using the Love From Lizi July 2020 Card Kit. I did manage to use every stamp in the “Love You Always” stamp set, and most of the stamps in the “Just Because” add-on stamp set. I have plenty of leftovers to add to my stash too…! I managed to use 6 of the 12 pattern papers, I used some of all three of the cut-apart sheets, some of the stickers, some of the peel offs, the Nuvo Drops, both dies, some ribbon, a button and a bow… seems I didn’t use any of the sequins or those pesky mini-clothespins..!
I’m quite pleased with the variety of cards I created this month! I think the only thing missing is a Birthday card! Of course this kit sold out almost instantly… most of Lizi’s kits do… so If you would like to get in on some of the excitement, I would recommend becoming a subscriber! If you do go shopping with Lizi, please use my links – It is always supremely appreciated! Love From Lizi: https://shrsl.com/1yyuw USA/Canadian Subscriptions: https://shrsl.com/23usr UK Subscriptions: https://shrsl.com/2b1ev European Union Subscriptions: https://shrsl.com/2b1es The Rest of the World Subscriptions: https://shrsl.com/2b1ey.
Thank you so very much for sharing your time with me here… I truly appreciate it whenever you visit my page! Remember to Like me, List me, Pin me, Post me, Share me with all your friends, PLEASE keep yourself and your loved ones safe… we’re not out of the woods yet…! Sending you and yours Healthy prayers and, as always, Happy Crafting!
