
DISCLOSURE: This site contains some affiliate links to products. I may receive a commission for purchases made through these links (at no cost to you). As an Amazon Associate I earn from qualifying purchases. Thank you!
Hello Folks! Scott here with my 10 cards (and 5 envelopes!) using the My Month Hero May 2020 Kit. After being on lockdown for a couple months, the Hero Arts staff is slowly getting back to work and trying to catch up on all their orders. I received this kit on Monday, June 15th, so I’m hoping you have your kit in hand already. You may not be able to be with friends and family at the moment, but you can let them know you’re thinking about them by sending a little sunshine their way! This release is all about the act of making and sending handmade greetings to the people you care about. And with this kit, the envelope can be just as cheerful as the card inside!
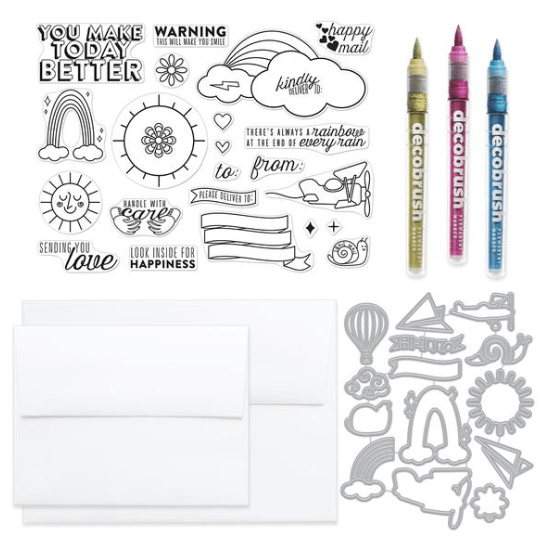
Our 6″ x 8″ stamp set includes some rainbows, clouds, suns, banners and a plane with a few sentiments and lots of envelope-appropriate images and sayings. We also get six coordinating frame cuts and eight envelope art icon fancy dies. Since we’re being encouraged to decorate our envelopes, we get five A2 envelopes (for 4.25″x 5.5″ cards) and five A7 envelopes (for 5″ x 7″ cards). Lastly, we are treated to three Karin DécoBrush Metallic Markers in Gold, Pink & Blue.
At first glance, I was concerned that I wouldn’t be able to come up with ten cards using this set, but, armed with my penchant for using every stamp in a set, I persevered! I did think the large unadorned sun might be the most difficult stamp to put to use…

Thinking along the lines of the sun traveling across the sky in the course of a day, I came up with my first card using that great big bold sentiment in our kit. I stamped the suns and the sentiment on Neenah 80# Solar White card stock using VersaFine Onyx Black ink, and colored the suns using my Spectrum Noir Alcohol Markers.

To add a little pop to this sentiment, I ink blended some Broken China Distress Oxide ink through my homemade sunburst stencil – centering that over the sentiment, and used my blending brushes to help avoid the sentiment and the colored suns.
This still needed something else, so I stamped one of the hearts from our stamp set in the middle of the center sun, colored that in with a Ranger Emboss It Pen, and embossed it using some Love From Lizi Lemon Zest Party embossing powder. THERE’S the sunny sparkle this card was asking for! I did add a little sparkle to the other suns with a light touch of my Spectrum Noir Crystal Clear Sparkle pen. I trimmed the stamped panel down to 5 1/8″ x 3 7/8″, added a thin black mat and glued those down to a Yellow card base. The yellow is certainly bright and cheerful, and I really like the simple two-color scheme.

Let’s go ahead and decorate an envelope for this card too! First, I stamped the triple address banner and the “Deliver To” banner on the front, and the “HAPPINESS” sentiment on the back flap. Then, I ink blended the same stencil on the top left fold of the envelope, die-cut the plane from a plain piece of red paper, sketched in some banner ties with a Pigma Micron pen, and glued the die-cut plane to the front.
I’ve never been much of an envelope decorator… I certainly don’t have the calligraphy skills of Kristina Werner, and I’m more than happy if the recipient keeps the card, much less the envelope! And of course, I worry about the wear and tear an envelope goes through as it makes its way through the USPS…! But, I do like the envelope flap sentiments and believe these are my first stamps of that sort!. They’ll get some use I’m sure!
On another “I’ve got too much time on my hands these days” side-note, after watching Sandy Allnock use her Copic Airbrush system numerous times, I remembered that I had an old Paasche air-brush and compressor in storage. Many years ago, I spent a summer air-brushing t-shirts across the Canadian mid-west with my brother who happened to be working with a carnival at the time. I recently purchased a set of Distress Oxide Sprays and thought they might be a good contender to send through the air-brush. I played with those sprays using my airbrush, and soon became confident enough to try it on a card.

I stamped the rainbow, and then using a fussy cut mask of the rainbow, stamped the sun using VersaFine ink on Neenah 80# card stock. I cut another mask of the Sun and placed both masks on the stamping, and airbrushed the sky using Mermaid Lagoon Distress Oxide Spray. That gave me a really nice, smooth gradient that laid down very quickly, and dried almost instantly! I peeled up the masks and colored the pristine white spaces with my alcohol markers. I die-cut the colored panel with a Lawn Fawn Stitched Rectangle die, mounted that to a thin white mat and then down to a Blue card base. I stamped the sentiment using VersaMark ink and embossed that with some white embossing powder.
I do have a little problem with this sentiment… rarely is there “always” anything…! And rainbows do not appear “at the end of every rain”. I’m being picky, I know, but, c’mon! Other than that, I love this card a lot! I like adding the big sun stamp to the rainbow with clouds stamp, and I really like this bright pop of colors and the intensely colored sky!

For the envelope, I masked off the bottom of the rainbow clouds and stamped that on the front and the “kindly deliver to:” sentiment in the middle. I colored this rainbow with my Prismacolor Colored Pencils. I stamped the “happy mail” sentiment on the back flap using Candied Apple Distress Oxide ink, and used the MFT Cloud Edges Stencil and some Broken China Distress Oxide ink to ink blend a few clouds on the bottom of the front and back flap. A little more ink blending around the edges and we have a nice coordinating envelope!
I wasn’t sure if this sentiment was meant for an envelope, or for a card, so…

I stamped the plane on some Bristol Smooth card stock and colored it with my Zig Clean Color Real Brush markers, and cut it out with the matching die. I wanted the hearts to match the plane, so I used the same markers to color a gradient swatch on the same card stock and die-cut the hearts using the smallest HA Nesting Heart Infinity die for the smallest heart and the double-heart die from the MMH May ’19 kit for the two larger hearts. Again, I ink blended the MFT Cloud Edges stencil on some Neenah 80# card stock using Broken China Distress Oxide ink, and stamped the sentiment with VersaFine ink and embossed that with some clear embossing powder. I die cut the background panel with a LFSRdie, added a thin black mat and glued those to a white card base. I die-cut nine of the swirly clouds from our kit (the three on top were cut from the airbrushed over-spray scraps) glued three layers together and glued the three clouds to the card front. Finally, I attached the plane and the hearts using foam tape. I really like this card! You can’t go wrong with red, yellow and blue…! And I think the little cloud die-cuts add a fun, whimsical touch.

For this envelope, I grabbed the airplane banner stamp from the MMH July ’18 (Carnival) kit and stamped that on the front with VersaFine ink and Candied Apple DO ink. Again, I ink blended some clouds on the front, and stamped the “to:” and “from:” stamps with more Candied Apple ink. A nice envelope hinting at what’s inside!
Just like the large rainbow stamp, the skinny rainbow only has four separate strips to color… that gave me an idea for this next card.

If I can’t get six colors in my rainbow, then I’ll just get six different colored rainbows! Using my Hero Arts Misti, I stamped this row of rainbows on Neenah 80# card stock by masking off the right cloud, and not inking up the two ‘sparkles’ on the right side of the stamp. I colored the rainbows using gradients of my alcohol markers. I printed this sentiment (one of my favorite rainbow sentiments of all time) directly on the card panel using the Smoothie Shoppe font, and trimmed the panel down to 5 3/8″ x 4 1/8″ and mounted that to a Gina K. Designs Sea Glass card base. I colored the larger stamped diamonds between the rainbows with the Metallic Blue Karin marker, stamped the diamond to the left of the sentiment using the Metallic Gold marker, and stamped the two ‘sparkles’ using the Metallic Pink marker. Lastly I added two strips of blue glitter card stock from my scrap drawer above and below the rainbows. Just the right touch!

I really like this matching envelope! I stamped the rainbows on the left side and colored them with my colored pencils. I stamped the “WARNING” sentiment on the back flap, and die-cut 7 clouds from masking paper, attached those to the front and ink blended Broken China DO ink from the right to the left. I think I’m getting a little better at this envelope decoration thing…!
I grabbed another one of my airbrushed panels for this next card.

This one is for all my crafty friends living in the American SouthWest! The background is airbrushed with Fossilized Amber, Spiced Marmalade, and Fired Brick Distress Oxide sprays. This colored gradient could turn me into an airbrush junkie! I LOVE IT! The ‘Monument Valley’ silhouette at the bottom is the negative die-cut of Venice from our MMH April ’19 Kit (still available!) cut from dark grey card stock and turned upside down. This sentiment is from an old Stamping’ Up! “Sky is the Limit” set stamped in VersaFine ink and clear embossed. I die-cut that panel and a black mat, with HA Nested Oval Infinity dies and glued those down to a white card base. I die-cut the three hot-air balloons from some Hero Hues Pitch Black card stock and colored them all with the Karin Metallic Decobrush pens. Lastly, I attached the balloons with some foam tape with the top one breaking the frame a little bit. Many of my southwestern friends mention the prevalence of hot-air ballooning in the SouthWest, and I think this card perfectly captures that.

This envelope goes back to the MMH July 18 (Carnival) Kit again. I had a precut mask created to mask off the long Carnival stamp from that kit. I use those masks and ink blended Frayed Burlap and Squeezed Lemonade Distress Oxide inks on the bottom of the envelope front. I stamped the small balloon from that Kit with VersaFine ink and colored it with my colored pencils. I really like this matching envelope too!
I did consider making these five cards and five envelops be my whole 10C1K post for this kit, but there were still more stamps and dies I wanted to use… and had a few ideas for…
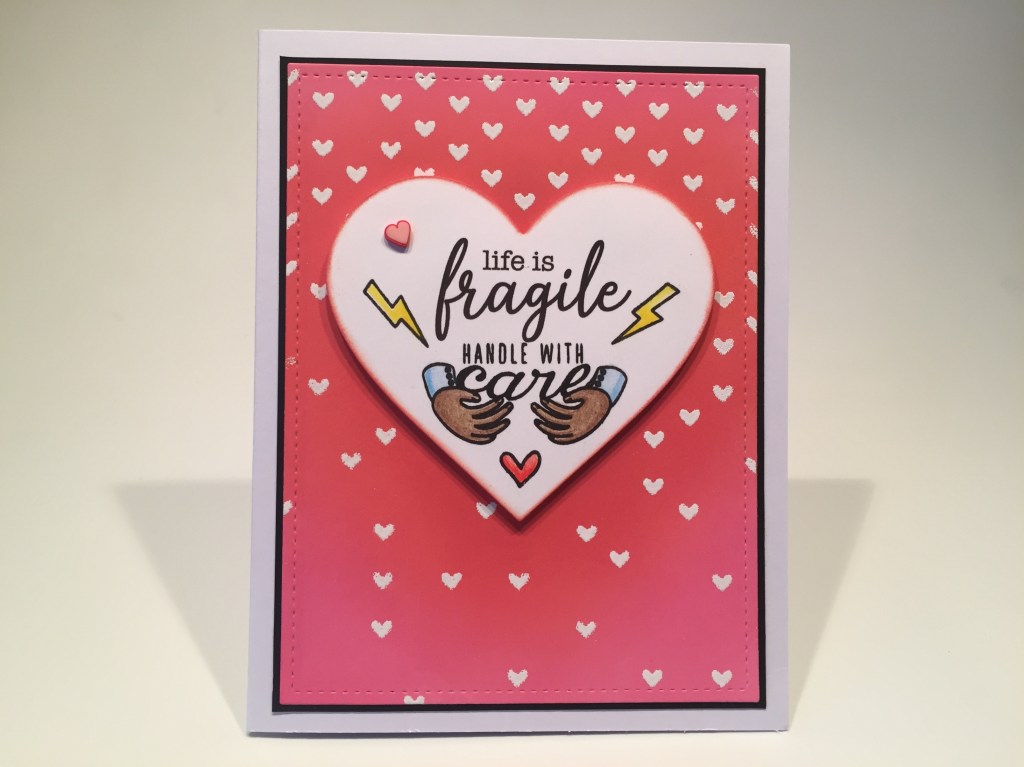
Back to regular ink-blending again… this is a really beautiful gradient on the background and makes me question the hassle of using my airbrush…! Hmmmm… This background is brush-blended with Picked Raspberry, Candied Apple and Fired Brick Distress Oxide inks. I did cut a heart mask (smaller than the sentiment heart) and attached that to Neenah 80# card stock to help me create this gradient in the shape of the heart. I used a SSS Falling Hearts stencil to emboss the white hearts on that background, added a thin black mat and glued both to a white card base. I stamped the (seemingly intended for envelopes) “Handle with care”, the lightning bolts and small heart on more Neenah 80# card stock and printed the “life is fragile” portion using the American Typewriter font and the Dream State font. I die-cut that with a HA Nesting Hearts Infinity die, colored everything with my colored pencils, added a little Fimo heart embellishment to the top left, and inked a little Candied Apple Distress Oxide ink around the edges. I mounted the completed heart to the card front with foam tape. This card feels especially topical these days… as we have learned and often experienced first-hand, life is indeed FRAGILE!
I still have that ‘snail mail’ stamp and snail die to use… let me see…

We have to have a Birthday Card this month! I was wondering how to use the snail die in our kit, and came up with this partial die-cut snail border – really cute…! I cut a piece of Neenah 80# card stock to 1.75″ x 5.5″, cut a simple ground mat from a piece of Post-it tape, and ink blended Antique Linen Distress Oxide ink for the ground, and Broken China for the sky. I glued that to my black snail border piece and trimmed the bottom to make a thin mat. I printed this sentiment on a Kraft card base using the American Typewriter font, and glued my matted piece to the card base. I stamped the snail on a scrap of Bristol Smooth card stock, colored that with my Zig markers, cut it out with the matching die, and mounted it to the card with foam tape. I added a little dashed trail with a Pigma Micron Pen and I have a belated Happy Birthday card with an implied excuse!
We received two paper airplane dies in this kit. One was pretty obvious on its own, but the other was just pieces of the plane with no background for them. Hmmmmm…
I made a background stencil with the separate pieces airplane die! And a bit of a pun!

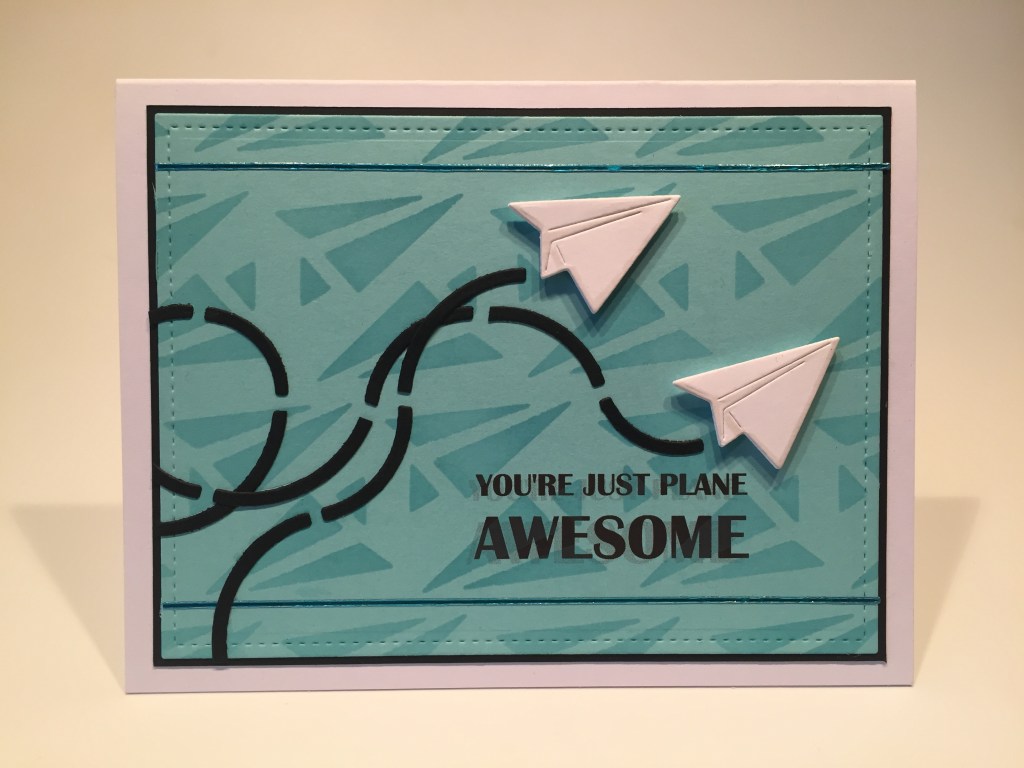
I started playing around with that die and figured out a nice pattern for a stencil. I die-cut all these paper airplanes from a 4.5″ x 6″ piece of 140# card stock. I ink blended Broken China Distress Oxide ink through that stencil onto a panel of Gina K. Designs Sea Glass card stock using my blending brushes.
I printed this sentiment on the stenciled background using the Britannic Bold font. I die-cut the background with a LFSRdie, added a thin black mat and glued them down to a white card base. I die-cut six of the paper airplanes and glued three of them together to make two chunky planes. I added a light touch of alcohol marker for a little definition on each plane. I die-cut the rainbow stripes on the cloud/rainbow art icon fancy die from HA Pitch Black card stock and arranged all the black rainbow pieces to be my “flying trails” for the two planes. I added two LFL Denim Blue Mirror Pin Stripe peel offs to the top and bottom for a little shine, and mounted both planes at the end of their trails with foam tape. I’m really thrilled with this stencil (I will definitely keep it!) and feel like I got a really fun, cohesive and punny card using just those three dies! You ARE awesome!
The “HELLO” banner die cut and the stamp banner die cut didn’t really go together – The HELLO had fish tails on both ends, and the stamp banner die only had one… It took a little finagling and some partial die-cutting, but I managed to get them to work together!

I stamped the plane on a panel of Bristol Smooth card stock and colored that with my Zig markers. I ink blended the MFT Cloud Edges stencil above and below the plane with Broken China DO ink. I trimmed that panel down to 4″ x 5.25″ and glued that to a card-sized piece of Gina K Sea Glass card stock and then down to a white card base. I die cut two stitched clouds from 80# Neenah card stock using My Favorite Things Stitched Cloud Edges die, trimmed them to fit the card front, and stamped this sentiment from the HA Many Everyday Messages stamp set using Wilted Violet Distress Oxide ink on the bottom cloud piece and added some clear embossing to that for a little shine. I glued the top and bottom edges of those cloud die cuts to the card front and used some foam squares to add some dimension to the stitched edges.
I die-cut the HELLO die from a piece of dark green card stock and carefully placed the stamp banner die over that (they do have the same curvature, just not the same ends) and did some partial die-cutting to avoid the flat end of the stamp banner die. I then fussy cut that right end of the HELLO die, glued it to a scrap of orange card stock and fussy cut the orange backing around the green frame. Looks like they were meant to go together! Lastly, I mounted that banner to the card front with foam tape. I really like the double clouds and the added dimension that gives this card. Doesn’t seem like I can make it through a 10C1K post these days without doing a “miss you” card… A sign of the times!
I still have the two flower stamps and the smiling sun stamp left to use…!

I stamped the two two flower stamps on some Neenah 80# card stock using a Gina K. Designs Wreath Builder template and then stamped the smiling sun in the middle. I added some leaves to this wreath using a stamp from the MMH April ’19 Kit (still available!) – I thought their curly stems echoed the curly cheeks on the sun. I colored everything with my Spectrum Noir alcohol markers and turned to my Silhouette Software to create this sentiment. This is printed on the colored panel using the Typewriter Hand font and the Dream State font. I trimmed my panel to 4 1/8″ x 5 3/8″ and glued that down to an orange card base. For a final touch, I added some Colorful Confetti sequins and some Moonshine Confetti sequins for a bit of sunshiny sparkle and extra color. “You are my sunshine, my only sunshine. You make me happy, when skies are grey.” Yes you do!!
That wraps up my 10 Cards 1 Kit post using the My Monthly Hero May 2020 kit! I did manage to use every single stamp in this stamp set and almost all of the dies. I used the Karin markers (I do think those are meant more for calligraphy than coloring) and all five of the A2 envelopes.
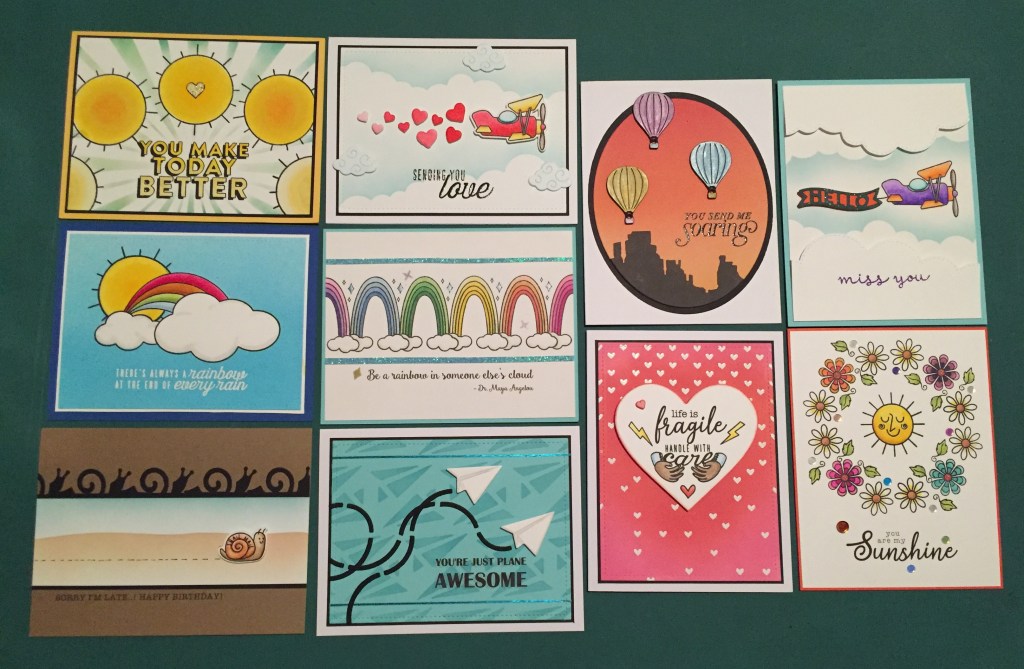
This is a fun, colorful assortment of cards with lots of practical sentiments and some matching envelopes as well! When I started, I never thought I’d be able to come up with such a variety of cards this month! This kit is still available at Hero Arts if I’ve managed to ignite your imagination or you need some fun envelope stamps to help cheer any and all recipients. I don’t know if this has changed my mind about decorating envelopes, but I will certainly put these envelope stamps to some good use. Please use my links when you do go shopping at Hero Arts. It is truly appreciated and helps me a great deal as I patiently wait to go back to work. LINKS: Hero Arts online and the MMH May 2020 Kit.
Thank you so much for sharing your time with me here. I hope I’ve managed to spread a little cheer in your life today. As our states start opening up again, please remember to stay safe out there! Remember to wear a mask, keep away from large groups in enclosed spaces, keep washing your hands and take care of yourselves and others! Please Like me, List me, Pin me, Post me, share me with all your friends, Don’t touch your face! Not yet!! And as always, I wish you happy crafting!

As always…you show me some clever bits…like the die cut snail for the border…the little curly leaf to go with the sun….how you even remembered that little guy…..
Sorry to hear about work. I am in NYC too. Been a rough ride. I suggest you apply now if possible as it is only about a week away….and by the time they process it you hopefully will not have too much of a break in time with the money.
Who knows? Maybe you will do what many of us have been and reorganize and purge the collection…or maybe you are better than we are and keep up with that all the time. Or maybe we will get more vids! 😀
Take care of yourself. Stay safe.
LikeLike
Thanks so much! Always good to hear from you! Unfortunately, you can’t apply for Unemployment until you’re actually furloughed… but NYS has a pretty good handle on their unemployment, so I’m hoping it won’t be a hassle!! Time will tell! I do hope to do some extra videos until I can get back to work! Bless you, dear, and be well!!
LikeLike
Thanks Scott! Love the snails card most! All are great!
LikeLike
I’m a new fan, I found you when I started “ My Hero kit club”.
I love your style, your hints, you are great.
Now,
Where are you?
I’ve got my Aug. kit…
Come back!
LikeLike
Patti – –
I’m here..! just posted my 10 Cards 1 Kit post for the MMH August Kit…!!
I hope you enjoy!
Scott
LikeLike