
Hello Folks! Scott here with my 10 Cards 1 Kit post featuring the My Monthly Hero September 2019 Kit. This kit features a “Cabinet of Curiosities” stamp and peek-a-boo door die much like last years’ Advent Calendar November kit, and the Venetian Neighborhood stamp and peek-a-boo door die offered as an extra with the MMH April 2019 kit. 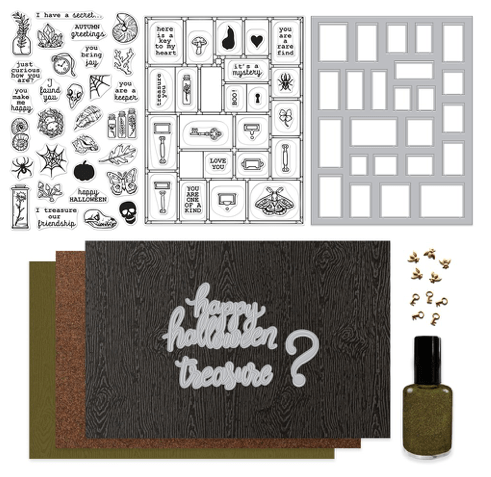
Our 6″ x 8″ stamp set includes the cabinet stamp, 16 sentiments, 6 different handles and label pulls, and 30 small image stamps. A few Halloween images and some Autumn images as well, but mostly general collectible objects. We get the Peek-a-boo Drawers Fancy Die and three fancy text dies as well as six sheets of 5.5″ x 8.5″ Decorative Paper in Rich Copper, Wood Abachi Solid, and Urban Basilia Black. Hero Arts rounds out this kit with some Bronze Silk Ink and ten tiny Bee & Key Charms. Once again, I am faced with the challenge of creating 10 different cards using a kit that seems like a one trick pony..!
Unfortunately, my cabinet stamp had some manufacturing defects that I noticed right away, but after contacting Hero Arts’ amazing customer service, they promptly set to shipping me out a new stamp set. I had to make something while waiting, so I reached for my homemade wreath builder template and the oak leaf stamp.

Although I know they are popular, I don’t tend to send out Halloween or Autumn themed cards, but I did think it would be fun to start with some autumn leaves. I stamped this wreath of leaves using VersaFine Onyx Black ink on a piece of Bristol Smooth card stock and colored them with my Zig Clean Color Real Brush markers. I thought the ring of leaves seemed a little sparse, so I added more leaves and the mushroom to the center… of course that kind of kills the ‘wreath’ idea, so I decided to die cut the arrangement with one of my Darice Circle nesting dies, and glued that to a thin black mat.
I cut a 3″ strip of the Basilia Black specialty paper from the kit and glued that to the center of a white card base. I trimmed the edges of that strip with some black pin-stripe peel-offs from Love From Lizi, and used foam tape to mount the ‘whirlwind’ of leaves on the card front. I stamped the sentiment on a scrap of white card stock with Onyx Black ink and embossed that with some clear embossing powder and then die-cut it with a Darice Leaves die and attached that to the card front with more foam tape. I really like the color journey that the leaf stamp takes here… green goes to yellow, to orange, to red, then back to green. I thought that was fun and made for a visually interesting ‘whirlwind’ of leaves on this card. I guess we can’t really call it a wreath anymore!
I felt a little lost without my cabinet stamp, so I decided to fussy cut a portion of the cabinet stamp that didn’t show any defects. Kind of like a Japanese Tansu Cabinet!
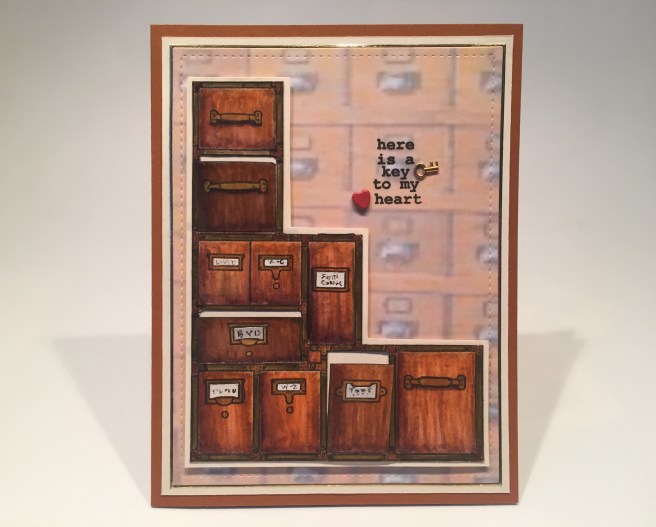
I stamped the handles and label drawer pulls in the same Onyx Black ink I had stamped the cabinet with (on some Bristol Smooth card stock), and I reached for my Zig markers to color the front of these drawers. (I did perform some stamp surgery and separated the two handle/label holder stamps so I could use the pieces independently from each other). I made the frame nice and dark to help hide stray connections to the rest of the stamp. I colored the handles and label frames using the Gold Glimmer ink from the August kit, and the cabinet connectors with the Bronze Silk ink and lastly, fussy cut three of the drawer fronts. I matted the cabinet on some of my standard Staples Ivory card stock,  and stamped the keyhole, key and heart (using MMH Red Reactive ink) on that mat before gluing both together.
I was looking for some pattern paper for the background of this card when I ran across a card catalog image in my stash. Using my Silhouette Software, I sized that picture up and printed it at 25% opacity – that’s what makes it look like it’s covered with vellum! I die-cut the background using a Lawn Fawn Stitched Rectangle die and matted that on more Ivory card stock. I outlined the background with LFL Gold Mirror peel-offs and glued the matted background to a brown card base.
I stamped the label drawer pulls on a scrap of parchment paper, and scribbled some text on the labels and fussy them to glue onto the drawer fronts… those are some TINY pieces! I added the cabinet assembly to the card front with foam tape, and finally, I stamped the sentiment on the background and added one of the small key charms and a red heart brad from my stash. There’s a nice option to using the entire cabinet stamp… you could actually create many different cabinet shapes using just a portion of that stamp! I really like the wood-grain look my Zig markers afforded me, and I think this is a really nice masculine valentine or I love you card!
This is the first Happy Halloween die that I own, and I was pleased by how big it is!
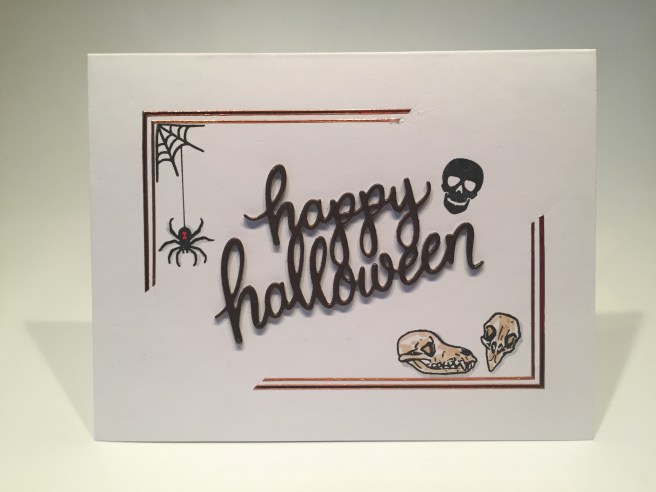
I die-cut that sentiment from the Rich Copper specialty paper in our kit, and die-cut two more from some white card stock and glued all three layers together – there’s a nice shadow cast by that thick sentiment! I lightly traced a rectangle on the card front and arranged the stamps inside of that rectangle and stamped them with Onyx Black ink. I added a touch of color to the stamps with my Zig markers and did a double partial frame around the card using the LFL Copper Mirror peel-offs. This seems like a very grown-up Halloween card to me, but I couldn’t resist adding the little BOO! sentiment on the inside. Nothing too cutesy with this card but I think it would make an excellent invite to an adult Halloween Party!
I had this idea for a card, and decided that I could probably camouflage most of the errors on my cabinet stamp with some darker colors… my new stamp isn’t here yet…
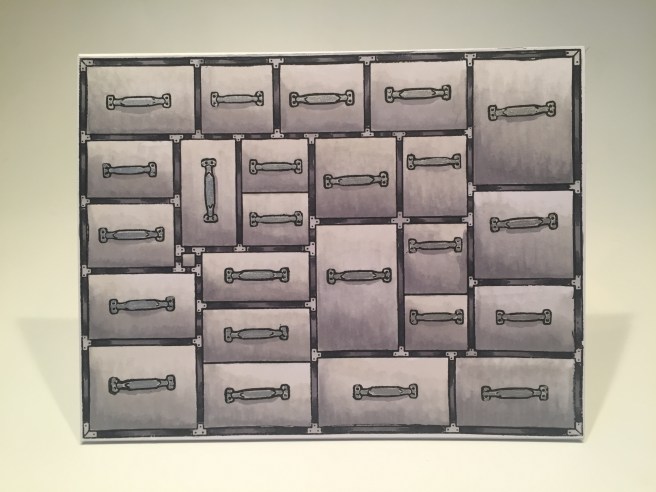
On some Nina Classic Crest Solar White 110# card stock, I stamped the cabinet stamp and all the handles using Onyx Black ink and colored everything using my Ice Grey Spectrum Noir Markers. I have to be careful… I think my IG1 pen is starting to run low…!! YIKES! I colored all the handles with a Silver fine-point Sharpie for a little bit of a metallic shine on these cabinets. I really like the monochromatic color scheme here and I love the fact that you have no idea what this card is about until you open it to reveal “you can handle anything”.  I printed this sentiment on the inside of a white card base using my Silhouette software and the Typewriter Hand font. Nice little pun! I LOVE THIS! This would be a great thank you card as well as a great encouragement card too!
We do have a pumpkin and a squash stamp in our stamp set, so I think I may have one more Halloween card in me for this month!

Using my stamp platform, I stamped the pumpkin stamp on some Nina Classic Crest Solar White 80# card stock using Hero Hues Creamsicle ink and added the shading using Spiced Marmalade Distress Oxide Ink. I stamped the squash stamp using Hero Hues Lemon Drop ink and added that shading with Fossilized Amber Distress Oxide ink. Those two brands of inks worked really well together, and provided some very nice subtle shading on these solid shape stamps!
After stamping these six rows, I die-cut the card stock with another Lawn Fawn Stitched Rectangle die and did a little ink blending on the edges with Antique Linen Distress ink. Then, using my Silhouette software, I printed the “Oh my GOURD! it’s” sentiment in the appropriate place on the card front (Typewriter Hand font again), and matted that on a thin black mat. Another thicker mat of the Hero Hues Mustard card stock and a another thin black mat behind that. One more thick mat of Hero Hues Pumpkin card stock and all layers are glued to a white card base.
I die-cut the sentiment from more pumpkin card stock and two layers of black card stock, and trimmed the “happy’ away before gluing all three layers together and then gluing that chunky sentiment to the card front. There we go! Another pun! And another terrifically non-cutesy Halloween card!
I still haven’t received my replacement stamp yet so I thought I’d just use the Peek-a-boo Drawers Fancy Die all by itself.
I die cut that fancy die from white card stock five times and trimmed off the doors on each before gluing them all together. I die-cut one more frame from some Kraft card stock and trimmed away all of the doors except one, and I stamped a handle on that door. I used the Bronze Silk ink from this kit to color the inside edges of all the boxes.
I arranged all the image stamps on the front of a Kraft card base and stamped them with Onyx Black ink and reached for my Prismacolor colored pencils to color all the images. Our stamp set has that one stamp of three plants in vials, and I did cut those three bottles apart so they could be used separately. In this orientation, the die cut has more vertical windows than horizontal ones so that surgery offered more vertical options.

I stamped the friendship sentiment on a scrap of Ivory card stock and die-cut it using the coordinating drawer portion of our die, distressed the edges with more Vintage Linen Distress ink, and just popped it into the appropriate drawer. I did punch a little notch in the top of that door in case the door gets stuck inside the die cuts – it’s not big enough for a finger, but I think it will help the recipient know that there is something behind that door! I did add two of the little bee charms for a pop of shine on this card front and added the “you are a rare find” sentiment on the inside writing surface. 
I like the shadow-box feel of this card, and I think only having a single door heightens the expectation of what might be behind there. And of course I love colored pencil on Kraft card stock. These sentiments work really well together and give us a really nice friendship card! I do feel like I’m getting closer to the actual intent of this kit, and can’t wait to get my replacement stamp!
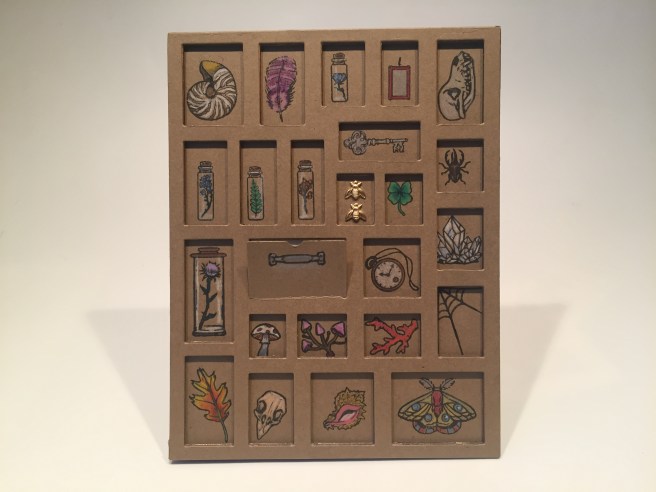
I got my new cabinet stamp and couldn’t wait to create a full-blown 24 door cabinet card!

My new stamp was clear of any defects, so I stamped it using Onyx Black ink on a piece of Nina 80# card stock. Josmary Gonzales from the Hero Arts Fanatics Facebook page, gave us a tip on using the Bronze silk ink without shaking up the sparkles in the bottle, so I painted this whole card front with that thinned down ink. I stamped all the handles, sentiments and label pulls in Onyx black ink, painted the labels with Holbein Permanent White Gouache (much easier than fussy cutting!) and colored the handles, pulls and cabinet with a dark brown Zig marker and polished up the joinery using my Uni Ball Signo Gold gel pen. Finally, I took great care to die cut my colored cabinet front.
I did use the die cut to create a template to help with the placement of all the image stamps on the inside of the cabinet. I stamped the images with Onyx Black ink on some Bristol Smooth card stock and colored everything using my Zig markers. I did make a feeble attempt at creating some dimension inside these drawers while still keeping the objects as bright and colorful as possible, but I don’t think that’s very necessary in this overall card design. Here I used 24 of the 32 image stamps (since I cut apart that 3-bottle stamp, I now have 32 image stamps) I didn’t use the solid silhouette stamps or the full spiderweb, the nautilus shell, or the moth stamp. I did take some time to color the back of the die cut piece with some Black Soot Distress ink (so the back of the doors are black) and glued the die cut piece to the background piece and then down to a Kraft card base.
I did add the “LOVE YOU” sentiment on the inside writing surface (Ivory card stock cut with a LFSRD) for a final compliment to the adoring sentiments on the front of the card. Finally, I have a card that exemplifies exactly what this interactive kit was created for. PHEW! That is a lot of work filling in all the drawer fronts and all the insides… truly this is a very cool card, but I can’t imagine creating more than one or two of these at a time! Of course, you don’t have to fill every space, and you can emboss the stamping and do less coloring, but I thought I would put this concept to the test and use as many of the stamps as realistically as possible. Again, we end up with a very masculine “LOVE YOU” card. Perfect for any collector or naturist or even your favorite hoarder!
I haven’t used the ‘treasure’ fancy die yet – and I couldn’t get this quote out of my head, and the “treasure you” sentiment stamp kept pulling my eye, so I fiddled around with those sentiments in my Silhouette software and came up with this.

This is the Typewriter Hand font printed on a piece of Ivory card stock and die-cut with a Spellbinders Deckled Rectangle die and the edges inked with Antique Linen and Walnut Stain Distress ink. I die-cut the ‘treasure’ die from black card stock three times and glued them all together. I was going to emboss the top of this die cut when I ran across a piece of gold vinyl in my stash… I adhered a piece of that vinyl to black card stock and die-cut it to become my final top piece. I really like how that looks – shiny and ’embossed’ but super smooth…! Very sharp! I glued the chunky sentiment in place and added a heart brad above the verse designation. You can also find this exact same Bible verse in the Book of Matthew from the Sermon on the Mount chapters.
I die cut a piece of our Wood Abachi Solid specialty paper with a LFSRD and glued that to a tan card front glued to a white card base. I added the Ivory piece to the card front using foam tape, and,  in an effort to shift the focus of this sentiment a little bit, I stamped “I treasure you” on the inside of this card. I did steal that “I” from the “I treasure our friendship” stamp. I think that transforms this slightly preachy sentiment into a masculine declaration of love!
One of my favorite image stamps in this kit was the cluster of crystals – that stamp didn’t seem to lend itself to a wreath, but I thought I could get away with one more little pun…!

I printed this sentiment using my Silhouette software and the Typewriter Hand font on a piece of Bristol Smooth card stock die-cut with a LFSRD. I stamped the crystals three times above the sentiment (I did mask off the center crystals) and colored them with my Zig markers. I added a sprinkling of glitter drops around their tops with my Sakura Stardust glitter pen and a little sparkle to the crystals themselves with my Spectrum Noir Sparkle pen. I matted the card front on a thin black mat and glued that down to a white card base. I LOVE the white space on this card – a great encouragement or congrats card!
That crystal card encouraged me to break free from the wood grain and autumnal color palette for this final card, and I went back to that fancy door die one more time.
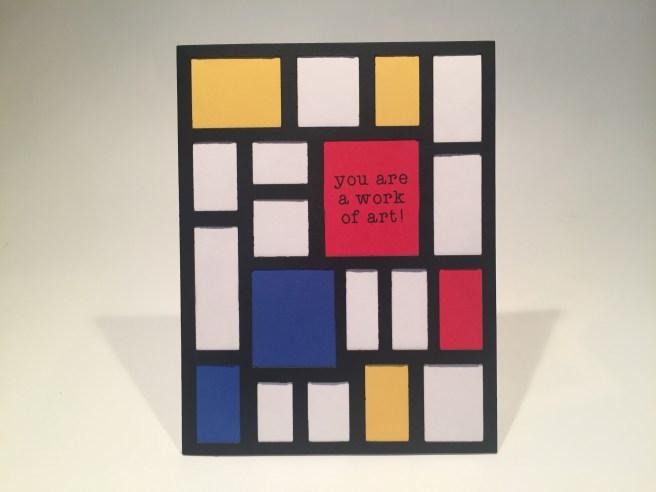
When I die cut that fancy die out of some black card stock, and trimmed off all the doors, I couldn’t help but think of Piet Mondrian and his color block paintings. I cut away some of the drawer borders to make the center red and blue squares larger, and the second white rectangle on the left side is two ‘drawers’ combined. Then it was a simple matter of cutting some red, blue and yellow card stock to size, printing the sentiment on the large red piece and then gluing everything to a white card base. These bright colors make my heart happy and I find this sentiment terrifically practical and lots of fun!
So that’s my 10 cards created using the My Monthly Hero September 2019 Kit. Though I didn’t use every single sentiment stamp in this set, I did manage to use every image stamp, a decent amount of the Bronze Silk ink, all three specialty papers, and 3 of the four fancy dies… I guess the question mark die just didn’t speak to me this month!
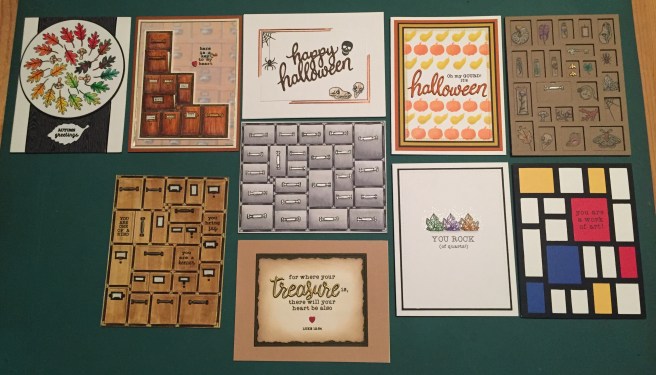
I’m very pleased with this wide assortment of cards and the variety of looks I was able to achieve using this kit. We managed to create a couple of Halloween cards, a friendship card, some valentine/ love cards and a few encouragement cards as well. A really nice collection of genuinely masculine cards with this kit! Many more option than I thought!
As of posting, this kit is still available at Hero Arts! If I’ve managed to pique your interest or inspire your imagination and you’d like to own your own Cabinet of Curiosities, please use my link when you go shopping at Hero Arts: MMH September 2019 for the kit and http://bit.ly/2sBmuMCHeroArts for the whole store. Your support means everything to me! Thank you so much for sharing your time with me here, please remember to follow me on Instagram at #cardcutups, please subscribe to CardCutups on YouTube, follow me and Pin me on Pinterest https://www.pinterest.com/cardcutups/cardcut-ups/, share this post with all your friends and any other interested parties. Remember, don’t run with scissors, and HAPPY CRAFTING!

Great ideas Scott! And your attention to detail! Love the ideas for the big “pocket” die. The “Mondrian” was my favorite. Thanks for all this! Your site and videos are so fun and helpful!
LikeLike