
DISCLAIMER: This site contains affiliate links to products. We may receive a commission for purchases made through these links.
Hello Folks! Scott here with my 10 cards featuring the Love from Lizi March 2019 Card Kit! This is the “Fairy Garden” card kit featuring 8 more sheets of Lizi’s fun European Decoupage with lots of butterflies and plenty of pink! If you’d like to follow along with the video, click here: https://www.youtube.com/watch?v=-JVxPejJ43Q Let’s play!

Of course, I turned to the decoupage sheets to begin with. I think this is my third set of decoupage from Lizi, and I always think these are fun to assemble and they look terrific!

I didn’t much care for the giant butterfly background on this decoupage sheet, so I created my own background with my LDRS Fancy Squares & Little Things dies – I cut a scrap of white card stock with the largest die, covered the edges of that die cut with VersaMark ink and embossed it with the new LFL Powder Pink Party embossing powder. Lots of sparkle and it matches the decoupage colors perfectly. I cut the smaller square from the pink text pattern paper and glued both of those together.
I grabbed a piece of Darice glitter pearl white card stock from my stash for my card base and used the half die from the LDRS set to die cut the bottom edge of the card front. I glued the background in place and added layers 3, 4, and 5 from the decoupage sheet using the foam squares included in the kit – that’s plenty of dimension for this card! I ran a piece of 1/4″ scor-tape across the bottom of the card base and embossed that with more  Powder Pink Party powder before foam taping the sentiment from the decoupage sheet over the pink stripe. A couple of flower stickers from the kit on the top corners adds a finishing touch and I love being able to see the sentiment on the inside of the card! I did add the matching sticker on the inside as well, so the sentiment wouldn’t feel lonely when the card is opened! LOL! Okay, now, that’s pretty darn pink, but I think it makes for a very attractive card! This is a good example of how versatile those decoupage sheets actually are – you can use all the layers or some of the layers – however you would like!
The ‘Magical Day Butterfly’ decoupage sheet has seven (count em’ 7!!) layers so I thought I could make two extremely similar cards from just one decoupage sheet.
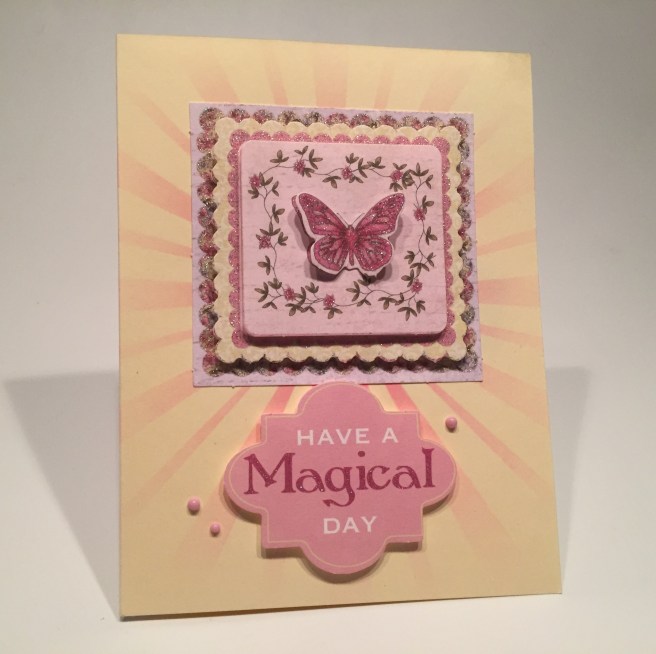
I thought a lot of our pattern papers in this kit were a little too busy, and I didn’t want to distract from the decoupage elements, so I grabbed my homemade sunburst stencil and some Picked Raspberry Distress Oxide ink to create this background on the Cream card base.
 I did fall victim to the new “Life Changing Blender Brushes” set that seems to be all the rage these days. HOWEVER, I opted for the $15.00 set from Amazon instead of shelling out big bucks for the Picket Fence Studios set. These are really nice blending brushes… especially if you’re going for a very light touch or want your colors to fade away. I haven’t tried the Picket
  Fence Studios brush set but I can’t imagine them working any better than this inexpensive set! Now here’s a background that really focuses on that great decoupage layering. This first card is layers 1, 3, 5, and 7 from the sheet and this second card is done on a piece of my Staples ivory card stock with layers 2, 4, and 6.

The “Just For You” decoupage sheet has the “extra” butterfly to top off the layering on this second card. I used foam squares between all the layers on both cards but simply folded the final butterfly wings up so I could glue the body right to the top layer. I used the original sentiment on the first card and the extra sentiment from the “With Love” decoupage sheet for this second card – both attached with more foam squares. I added a sprinkling of Sweet Lilac Nuvo Drops on the fronts and a couple butterfly stickers on the  insides for my final touches, and VOILA! Two cards with three layers of decoupage on both! I can only image how thick a card would be if it was made with all seven layers included on this sheet! I’m sure that card would require a box for mailing!! We are still working with a lot of pink here… and I can’t seem to get away from those butterflies, but these are both very handsome (and very pink) cards!
When I start playing with those decoupage sheets it’s hard to put them down! I think the purples on the “Just For You” decoupage sheet would match the new LFL Pastel Purple Party embossing powder so let’s do one more!! I’ll count the last two as just one! LOL!!

I wanted to use the embossing powder for the background, so I die-cut a a 3.5″ circle from a scrap of white card stock, added VersaMark ink around the edges and embossed that with the Pastel Purple powder. I glued that to a thin mat of the Gold Pearlescent specialty paper and attached both to the second Cream card base. I used foam squares to attach layers 2, 3, and the extra sentiment to my embossed background, and again folded layer 4 (the ‘extra’ butterfly) and glued that directly to the top. I ran a piece of our purple “With Love” ribbon through my Zyron Sticker maker and glued it down to the bottom of the card front – “Just For You” is not one of my favorite sentiments, but I thought adding the “With Love” ribbon completed the thought with just the right touch. I added some Gold  Moondust peel offs (from the LFL 11/18 kit) above and below the ribbon (matched that specialty paper perfectly!), a couple of sequins from our mix, and some Wisteria Purple Nuvo Drops (from the LFL 9/18 kit) for some last touches and splurged on the inside of the card using the matching sticker on the top. You know I’m not a big fan of pink, much less a fan of butterflies, but I think these four cards are truly lovely – that decoupage dimension is fascinating – and no fussy cutting!! I would be perfectly happy to make 10 decoupage cards, but there’s a lot more to this kit!
The stamp set in this kit has a nice dandelion stamp with five seed ‘parachutes’ that were just begging for me to use them. And lets try some more blending with my new brushes!
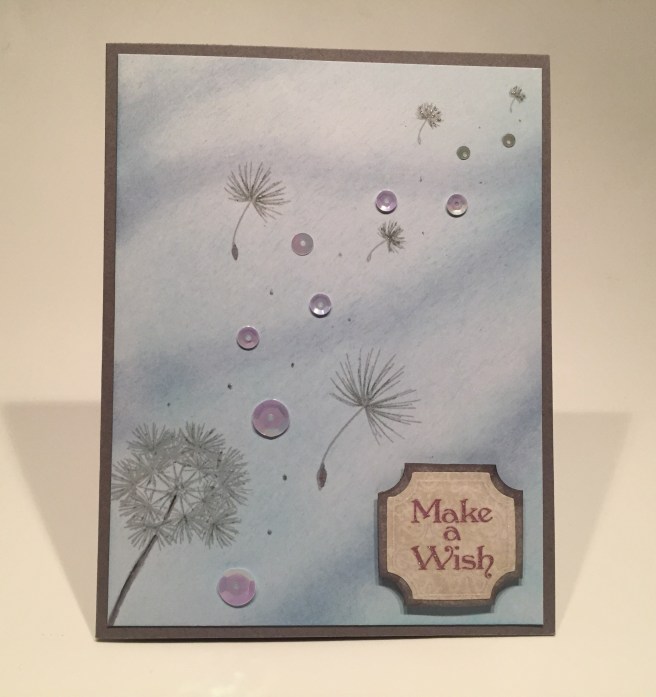
On a piece of plain white card stock I blended this background using Distress Oxide inks in Broken China and Faded Jeans. One of the most interesting things about those new brushes is the variety of sizes they come in – that made it pretty easy to create these ‘eddies in the wind’ on the background – I LOVE IT! I used Hero Arts Soft Granite ink to stamp (most of) the dandelion and the seeds as if they were all blowing away in the wind…! I did color the dandelion stem and a couple of the seeds with a grey watercolor marker and you can’t tell from the picture, but I did trace the ‘fluff’ on all the stamps with my Sakura Stardust pen so they do catch the light and glitter nicely – the little dots you see between the sequins (from the kit) are the Stardust pen too. I trimmed my panel down to 4″ x 5.25″ and glued it down to the Dark Grey card base.  When I was a kid, blowing the seeds off of a dandelion was an occasion for making a wish, so I grabbed this sentiment from the sticker sheets and glued it to a mat of the silver pearlescent specialty paper. I did darken that mat with an alcohol marker to bring it closer in shade to the card base, and I added that to the card front with some foam squares. Some sequins in graduated sizes for a little more sparkle on the front, and a simple flower sticker on the inside adds just the right finishing touch. I really like this card! Putting it together was actually quite peaceful and calming… especially after all that pink and all those butterflies…!! LOL!
I was very interested in the fairy die included in our kit. It doesn’t match any stamps or other images but I really loved the cut-out detail on her wings. Let’s play with that!

I turned to the silver specialty card stock to die-cut this fairy, and, realizing that the silver card stock was the same on both sides, die-cut another fairy so I could have a pair of fairies for this card! Of course the nature of a die-cut does produce slightly different results front to back, but it’s not really noticeable unless you look very closely!! I die cut a circle from the soft olive damask pattern paper and used my Silhouette software to print this sentiment using the Avenir font. I matted that with more of the silver specialty card stock and used foam squares to attach that down to a Dark Blue card base. I wanted to fill in the wing openings but didn’t want to do inlays, so I took some of my yellow glassine paper (vellum (colored?) would work too!) and glued that to the back of the fairies’ wings and trimmed away the excess… I really like that touch of transparent color!
I die-cut more of the same pattern paper with a Darice Border die and also cut some plain white card stock to match, glued them together, dry embossed the die and sponged some light touches of Cracked Pistachio Distress Oxide ink for a little dimension and definition to these two leafy borders! Those are both glued down to the top and bottom of the Dark Blue card base, and I mounted the two fairies with more foam squares. A sprinkling of sequins on the two leafy borders and a crystal heart between the fairy wands brings this card to magical life! I did add more of the song lyric on the inside of this card and originally thought of this as a birthday card, but realized it could be used for other occasions as well, so I didn’t add a ‘happy birthday’ on the inside. I did add a ‘fairy dust’ sticker for the final accent on the writing surface and I really like this fairy die. Although there isn’t much detail to the fairy body, the cut-out wings look great – especially with some translucent details!
Now lets turn to the “garden’ part of this kit and see what we get with the flower stamps.

I stamped this Japanese Lantern plant using Acorn Archival Ink on a card base of Lizi’s super smooth alcohol friendly white card stock, and broke out my Spectrum Noir alcohol markers to color this stamp. That took a little time… this is a very detailed stamp! If you are interested, I actually grabbed a picture of the markers I used coloring this stamp. Red Brown (RB), Coral (CR) Alpine Green (AG) and Green Grey (GG) I used the light grey to give a touch of shadowing under all the vines and flowers. Though not immediately noticeable, I think it adds a lot of dimension to this colored stamp! And I only used the blender marker to fix a few “outside of the line” mistakes… OOPS! LOL!
I masked out the “thanks” stencil on the card front and ran some DecoFoil transfer gel over the stencil with a palette knife and let that dry before covering it with some Silver Deco Foil and running it through my laminating machine. GORGEOUS! I love using Deco Foil on stencils – especially word stencils – and the “thanks” and “love” stencils in this kit are large enough to command attention on a card front – especially when foiled! I used my Sakura Stardust pen on all the stamped ‘dots’ to add a touch more sparkle and lined the top edge of the card with with a single Mint Moonstone peel off. Lastly, I defined the writing area inside the card with two of those nice vine stickers from the sticker sheets. Now, this is truly a “One Layer Wonder” card although I did cover the alcohol marker bleed-thru on the back of the card front with a piece of scrap white card stock. So sue me!! LOL!
That takes care of one of our ‘plant stamps’. The second ‘plant stamp’ in our set seems especially large to me… that gave me the idea to do a large format card! 
I stamped this plant stamp using Archival Emerald Green ink in the two corners of a 9.25″ x 4″ panel of plain white card stock – YUP! That’s the dimensions of this card! It actually fits in a #10 business envelope! I was going to try to color this with my Zigg markers when I realized I hadn’t used Bristol smooth card stock, so I opted for some “palette painting” using my Stabilo markers. I scribbled some marker on my glass media mat, grabbed my Spectrum Noir Sparkle pen to pick up the watercolor, and painted all the leaves with a light sparkly green. It doesn’t register in this picture but this whole card is super sparkly! I colored the buds in the same way with a light blue marker. After coloring the stamps I used a Life Changing Cheap blender brush to add some Cracked Pistachio Distress Oxide ink around the edges of the panel and behind the foliage. Very soft and very verdant! I printed “And though she be but little, she is fierce.” on the card panel using my Silhouette software and the Mona Lisa Solid font.
That’s a quote from Shakespeare’s ‘A Midsummer Night’s Dream’ and I do credit that on the inside of this card. This is a great encouragement sentiment and it seems very appropriate with our little fairy stamp..!
I do have to admit that I performed some stamp surgery on this fairy stamp before using her – that’s right! – I gave her a butterfly-ectomy!! It was killing the patient – ME! LOL!! I stamped her using VersaFine Onyx Black ink and colored her the same way I colored the plants… more glittery shine! I again used my Stardust pen to sparkle up all the stamped dots and continued those dots around the fairy – effectively, pulling her and the plants into the same picture. I was adding a few sequins among the plantings when I realized that our fairy seemed a little odd with her hands reaching out for nothing, so I grabbed a Moonshine Confetti sequin from Simon Says Stamp and gave her a little orb to play with – perfect!! I trimmed the front panel down a quarter inch and glued it to my card base (8″ x 9.25″ scored at 4″). For a final spot of green, I outlined the panel with more Mint Moonstone peel offs. I really like this tall card and thought this plant stamp lent itself to a larger format! A2 cards are still my preferred canvas but it’s fun to break out of the box on occasion!!
Putting that little moonshine orb in the fairy’s hands gave me an idea! Additionally, I was recently the happy recipient of another large batch of Chibi Lights sent to me by someone who didn’t think she would use them – A BIG SHOUT OUT GOES TO ANDREA! WOO-HOO! I am so blessed!! That’s what inspired this next card!
Talk about MAGIC! LOL!!! I cut a piece of my Staples Ivory card stock with my SSS Frames die and started digging around in my library to see if I had a font that matched the partial sentiments in this set. I do!! So the “SENDING YOU” is stamped, The “love” is Deco foiled again (in Gold), “AND MAGIC” is printed using the Avenir font (15pt.). I laid this all out using my Silhouette software, printed the magic part first, deco foiled the love stencil second, and stamped the sentiment last. Then I could get on with our fairy stamp!

Our fairy is stamped in Onyx Black ink and colored with my colored pencils – I gave her red hair and a red dress since the orb was going to glow red. I poked a tiny hole through the card front above the palm of her hand, then centered the front panel on the card base to mark through the hole for the location of the Chibi light. I wired the light directly on the card base making sure it lined up correctly. (there are TONS of wiring how-tos on YouTube!) Then I die-cut some gold card stock from my stash for the scalloped frame, taped that together with the Ivory panel, stamped the “press here” (MFT Interactive Labels stamps) in the correct location, and then mounted the front panel to the Dark Grey card base with a double layer of foam tape.  A few golden sequins from our mix highlights the sentiment and I did go ahead and designate this as a birthday card. I stamped the Happy Birthday from the add-on stamp set on the inside accompanied by the matching fairy sticker. I do believe this will be my niece’s next birthday card!! (though it’s 10 months away) I hope the battery lasts!! LOL! I love this card so very much!!! I think my niece will love it too. She’ll be turning 5!
I know all of you are patiently waiting for me to use the “Thank You, Fairy Much” sentiment from the decoupage sheet but, goodness, that is one terrifically big, pink sentiment! I thought everyone might be interested in something a little different from me… Sometimes I just can’t help myself!!

It’s never too early to start making your Christmas cards!! LOL!! The pun-ier the better! I think this is a hoot! This is the toadstool-sitting fairy from the “For A Special Friend” decoupage sheet. I thought I could give her something else to sit upon! I used my Silhouette Portrait to cut this ornament from the White and Gold pearlescent specialty card stocks. I glued the cut pieces together and added stripes of the Fairy Dust Party embossing powder to the ornament using my VersaMarker pen.
I used layers 4 and 5 of the fairy decoupage, and slipped a bit of her bottom wing behind the ornament as well for the illusion of more dimension. A bit of silver cord glued to the hanger and the ornament is ready to go! I printed and cut this sentiment using my Silhouette Portrait again, and the Smoothie Shoppe font. I embossed the cut sentiment shadow with more of the Fairy Dust Party Powder. I die-cut another scalloped frame from our white specialty card stock and glued that directly to the Navy Blue card base, mounted the ornament, fairy and sentiment using foam squares, and glued the cord to the top edge of the card. For a touch of bling, I trimmed the ring off the handle of the magic wand and glued that right under the sentiment. With all the sparkle on the fairy and the embossing powder, I didn’t think any extra sequins were needed, but I did add the green fairy sticker on the inside writing surface! Fairy Christmas!! I hope this card tickles you as much as it tickles me! Makes me giggle every time I say it!
That’s ten cards now, but we’re counting cards 2 and 3 as one card, so that means I have one more to go. I took Lizi’s theme of this kit “Fairy Garden” literally for our final card!
This card thrills me to no end! I don’t think I’ve ever seen a spinning shaker element on a card! This idea began when I was fiddling around with our fairy shaped sequins, and I glued their feet to a die-cut circle that was really close to the diameter of our round mini-shaker embellishment. That gave me the idea to do this spinning wheel card with a never-ending chorus line of fairies. A real “Fairy Follies” if you wish!! LOL!! The flowers stamp is from the add-on stamp set, and I stamped that twice (right next to each other) with Onyx Black ink on Bristol smooth card stock. I used my new blender brushes to add some soft Cracked Pistachio ink over the stamped images and colored the flowers with my Stabilo Markers. Then I took my craft knife and fussy cut the colored flowers and set them aside.

I thought I was going to get through all of these cards without using my Lawn Fawn Stitched Rectangle dies… but NO..! I used the largest LFSRD to cut an extra card front from one of the Warm Blue card bases. I stenciled some very light clouds on the panel using a MFT cloud stencil and some HA Unicorn White ink. That dried a little lighter than I expected, so I used the Stardust pen to give the clouds a little silver lining..!
My spinning wheel is a 4″ diameter circle that I lined up to the right side and the bottom edge of our card front to mark where the center spin hole belongs. Then it was a simple matter of aligning the space between the 2 stamps with the ‘spin hole’ and trimming the colored flowers down to size. The spinning wheel and the Fairy chorus line attach together through the hole marked on the card front. You need to make sure that both pieces are glued tightly to your brad – scor-tape and an extra paper patch will help with that. Ultimately, when you turn the spinning wheel you want the fairy chorus line to spin right along with it. I used a 1″ punch for the finger notch on the right side of the card, glued the round mini-shaker to the top of the fairy chorus line and mounted the card front to the Warm Blue card base with enough space so the wheel turns freely, and then added the flowers with foam squares to the top – taking care to leave room for the chorus line to spin around. Interestingly enough, the dome on the mini shaker helps to lift the flowers up enough that you don’t have to worry about your fairy sequins running into the fussy cut flowers. An added bonus with that mini-shaker!
I love this sentiment – “Leave room in your Garden for the Fairies to Dance” – you can take it quite literally,  or it can speak to you figuratively! I printed the sentiment using the Avenir font in italics and trimmed that down with the LFSRD before adding that at the bottom of the card – remember to leave room for the spinning chorus line…! I finished off the inside writing surface with a couple of the flower sprays from the sticker sheets and my new interactive card is ready for any occasion you deem worthy!! I think this perfectly embodies the theme of this kit and it’s just plain fun as well! Busby Berkeley eat your heart out!
 That’s my 10 cards (+1) for the Love From Lizi March ’19 Card Kit. I did manage to use all of the image stamps in the kit, and three from the add-on stamp set, but I only used a few of the partial sentiment stamps. I used both of the stencils, pieces from 5 different decoupage sheets and quite a number of stickers as well as three of Lizi’s new embossing powders! I did only use 2 of the pattern papers on these cards – I was much more interested in the stamps here, and I have no problems hording all those lovely papers!
I used a little bit of most all of the embellishments with the exception of the buttons – I guess they just didn’t call to me! LOL!! Again, Lizi’s kits are so chock full of supplies that it sometimes feels like I hardly make a dent in these kits even after my 10 cards are finished! That seems like a huge value to me!
As usual, this kit sold out in almost record time! If you want to get in on the fun I heartily recommend becoming a subscriber! If you do go shopping at lovefromlizi.com, or want to become a subscriber, please use my link: http://bit.ly/LFLlink !
I actually had much more fun with this kit that I initially though I would! I do think it’s interesting that after the first 4 decoupage cards, you don’t see any more butterflies and hardly any pink!! LOL! That’s a very telling little tidbit right there! LOL!! I hope you enjoyed these cards as much as I do. I am so very appreciative of the time you spend with me here! Let me know if you have any questions and which card(s) you like best! Remember to Like me, List me, Pin me, Post me, share me with all your friends, don’t frolic with fairies, and HAPPY CRAFTING!!

One thought on “10 Cards 1 Kit | Love From Lizi March 2019 “Fairy Garden” Card Kit”