
Hello Folks! Scott here with my ten cards featuring the Hero Arts My Monthly Hero August 2018 Kit. This is my fourth month with MMH, and I was excited about this kit because, believe it or not, I don’t have any coffee stamps in my stash whatsoever!

This month’s 6″ x 8″ stamp set features coffee cups and mugs in a variety of styles and 19 different sentiments (nineteen!) along with some flourishes, accessories, a wisp of steam, whipped creams, foamy latte art, and 11 coordinating frame cut dies. Looks like these are just begging for some coloring! This month we are treated to another 3.5″ x 4.5″ Fancy Window Die featuring some cafe tables in front of a coffee shop. Very intricate…! Our extras this month include a .5 oz. Lacquer Pen and White Puff Embossing Powder, and two 8.5″ x 5.5″ sheets of Coffee & Tea Dyed Decorative Paper. Those papers look like Granny’s old lace tablecloth that’s just begging for a nice long dip in some Oxy Clean!
For the first time in my MMH membership, I ordered some extras to be included with my kit. (I didn’t order any of the extras offered with this kit, but I did break down and get the Ornate Carousel stamps and dies from last month! LOL!) My first three kits from Hero Arts (with NO extras) shipped on Friday and I received them on Monday. This month’s kit, (WITH extras) didn’t ship till Tuesday and I received it on Thursday. Just something to think about if you are really eager to get your monthly kit! To bide my time while waiting for my kit to arrive, I fiddled around with some backgrounds that I thought might work well with a coffee themed kit.
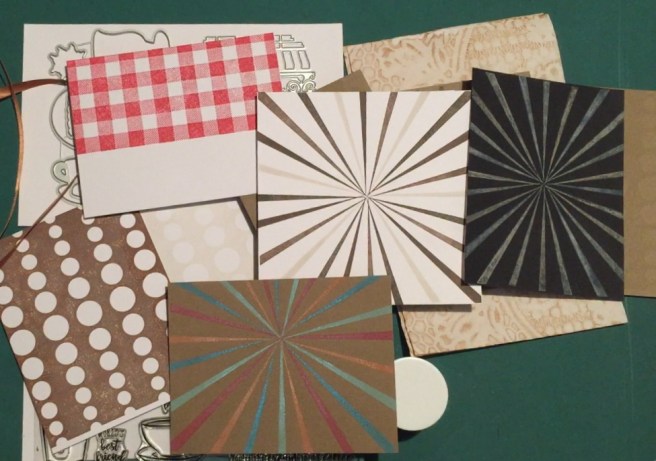
I have one actual, real bona-fide, rubber background stamp in my stash – those rows of circles in different diameters – (heaven only knows where I got that!) so I stamped some assorted papers with that stamp in a few different colors. I recently purchased the Plaid Background Stamp Set from Concord and 9th and stamped a simple red and white tablecloth using the Hero Arts Red Reactive ink that we received with the July kit. I have been fascinated with the Concord and 9th ‘Turnabout’ stamps since they came out, so I splurged on the Sunshine Turnabout Stamp Set a few months ago. I experimented with that stamp and managed to get some good results for my first time using a ‘turnabout’ stamp. I used all my brown inks on the white card stock, some muted Distress Oxide Inks on the black card stock, and brighter Distress Oxide inks on the kraft card stock. I have to admit that ‘turnabout’ stamp is great fun and works like a charm! I will have to resist the urge to buy every ‘turnabout’ stamp that they make! LOL! Okay! Lets make some cards!
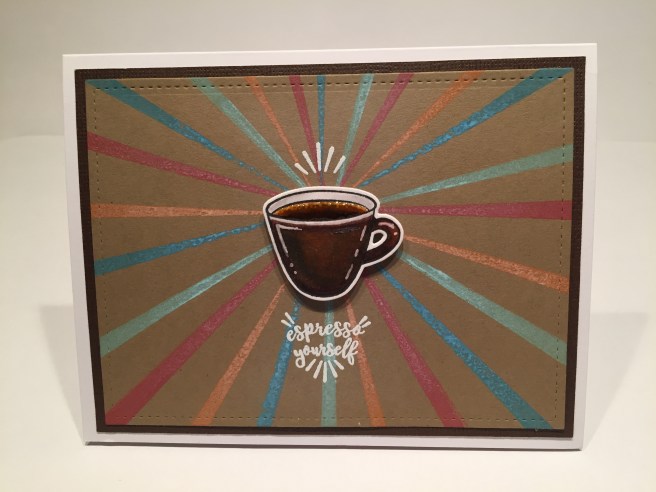
I grabbed my kraft cardstock Sunshine Turnabout background that I stamped in Broken China, Cracked Pistachio, Fired Brick, and Spiced Marmalade Distress Oxide inks for the background on this first card. I did do a light spray of water after stamping to activate the inks, and then cut that background with a Lawn Fawn Stitched Rectangle die and mounted it to a thin mat of Kraft-Core brown textured card stock and glued those both to a white card base. I stamped the small espresso cup with VersaFine Onyx Black ink on some Bristol Smooth Card Stock, and colored that with my Zigg Clean Color Real Brush Markers before die-cutting it out. My local coffee shop (NOT Starbucks!) has these lovely espresso cups with a deep brown exterior glaze and a white interior and rim – that’s what I modeled my cup after! I love using my Zigg markers on Bristol card stock – nothing better as far as I’m concerned! I used my white gel pen for some highlights on the cup and added some of the lacquer on the coffee in the cup for a little shine. I stamped this pun-y sentiment and the matching flourish directly on the kraft card stock with VersaMark ink and embossed both with Ranger ultra fine White embossing powder.  The cup is mounted to the card front with foam tape, and I couldn’t resist adding a little ‘bonus’ sentiment on the inside of the card. It took me a few minutes to figure out that some of the flourishes in the stamp set were perfect for underlining some of the shorter sentiments! I stamped those stamps with Ranger Acorn Archival Ink and I think that adds just the right touch to this colorful card featuring a great pun! It always thrills me to see puns included with any stamp set, and this kit delivers with a number of puns for our enjoyment!
I decided to tackle the big window die for my next card, and cut that from some 110# white card stock and saved the awning cut-outs to use on my card. This die made me think of the coffee shop on FRIENDS (Central Perk) which inspired this card from me.

I placed the die cut on another sheet of the brown Kraft-Core card stock and traced the window opening so I could use my craft knife to cut the ‘window’ out of the brown card. I used some Elmer’s Spray Adhesive on the back of the die-cut to attach it to the brown card stock – love using a spray adhesive for these intricate window dies! I colored the awning cut-outs with my Spectrum Noir alcohol markers (CR8 & CR11) and inlaid those back into their spaces with some Multi medium matte liquid glue. I cut a piece of my Heat Resistant Acetate to fit the window opening, and stamped the cup and sentiment with VersaMark ink, embossed them in white, and attached the acetate to the back of the window opening with some scor tape. It appears my little coffee shop here is called “A Cup of Joy” LOL!! I dug around on Google for an appropriate ‘coffee shop interior’ and hit the jackpot with this image which I was able to shrink to just the right size. I printed that at 75% transparency on plain paper so it would recede into the background a little bit, and glued it on the front of a white card base. I used some foam tape to attach the die-cut assembly to the card front and that gave a little bit more depth to complete the illusion. For some final touches, I wrote ‘Cafe’ on the little sign with a brown Micron pen, added a couple of pieces of star glitter, and stamped this great sentiment on the inside of the card with Walnut Stain Distress Oxide ink. I am very happy with this card! At first, I was at a loss as to what to do with this die , but once ‘Central Perk’ came to mind, I knew I could use this die to create an interesting hybrid of stylized and realistic images together on one card! The brown card stock behind the die-cut has a great brick-like texture and the bright red on the awning really pops! I’d go to this coffee shop anytime!! LOL!
Lawn fawn recently came out with their Double Slider Surprise Craft die, and reminded me of all the Double Slider cards I’ve made over the years, and that inspired this card featuring the Coffee and Tea Dyed Decorative Paper!

I stamped the cup on Bristol smooth card stock with Onyx Black ink and colored that with my Zigg markers. I stamped the ‘latte art’ with VersaMark ink and used the White Puffy Embossing powder on that stamp – very ‘foamy’! LOL! I die-cut three pieces of the dyed paper with my stitched rectangle dies, and, since that paper was thin and a bit wrinkly from the dying process, I ran them all through my Zyron Sticker maker. I mounted one of the papers to a kraft mat and then a thin grey mat for the card front, and attached the other two pieces to the inside (grey) slider pieces. I stamped the Thank You sentiment on the card front with VersaFine Onyx Black ink and embossed that with some Clear Embossing Powder for a little shine.
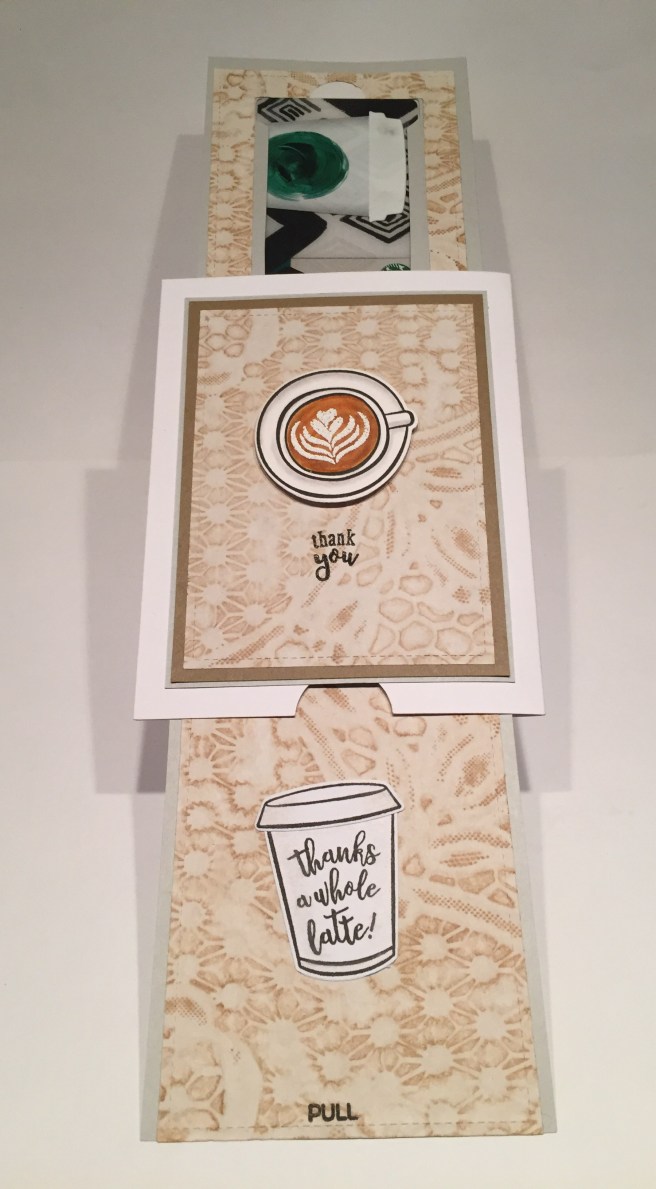
I stamped the to-go cup, lid and sentiment on some plain card stock with Onyx Black ink, did a tiny bit of shading with a grey colored pencil, die cut the pieces and glued them flat to the bottom slider panel and stamped the ‘pull’ at the center bottom using my MFT Interactive Labels stamp. The gift card holder on the top slider is a little proprietary something I created a number of years ago using my Silhouette Portrait. I really love all the Lawn Fawn Interactive Craft Dies they have come out with over the last couple of years, but they are all a little bit under-sized when compared with full-size hand-made versions. But regardless of size, these Double Slider Surprise cards are always a big hit – especially when sporting a gift card! I really like the effect of the decorative paper when this card is opened all the way. Very interesting paper and perfect for this card!
Last month I created a birthday card inspired by the Sunny Studios Sliding Window die, so I thought I would do another one this month continuing my Thank You gift card kick.
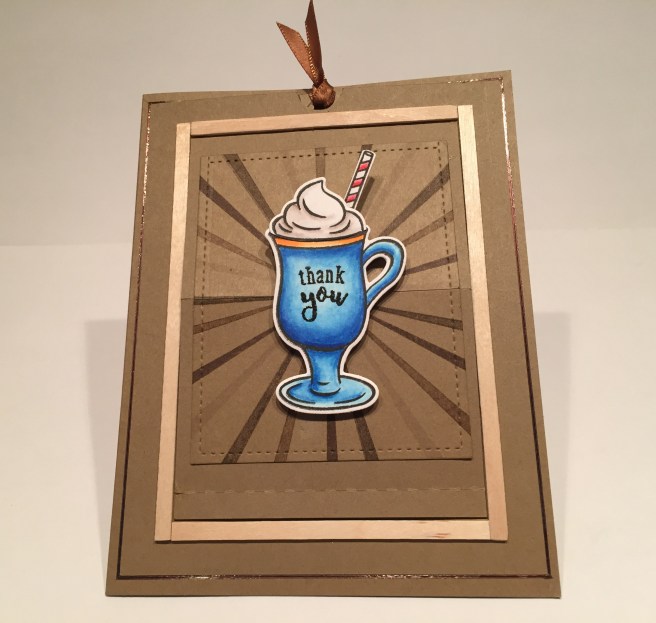
I went to the pedestal cup for this card, stamping it on Bristol smooth card stock with Black onyx ink and coloring it with my Zigg markers. I added the whipped cream and straw (or peppermint stick?), to the image and again stamped the Thank You sentiment with VersaMark ink and clear embossed that on the cup. I die cut another of my Sunshine Turnabout stamp backgrounds with a stitched rectangle die (stamped on kraft card with Stampin’ Up Tip Top Taupe, Early Espresso, Chocolate Chip, and Simon Says Stamp Barely Beige inks) and split that in half so it would fold easily when the ‘window’ opened. I went back to my Silhouette Portrait to cut another Sliding Window card front out of kraft card stock, but this time I removed the original circle ‘tracer lights’ around the window opening in favor of this nice wooden frame – made from – get this – coffee stirrers!! I have kept a batch of stirrers in my stash since November of last year when I did some stamping of wood-grained images on some wooden matchsticks…!
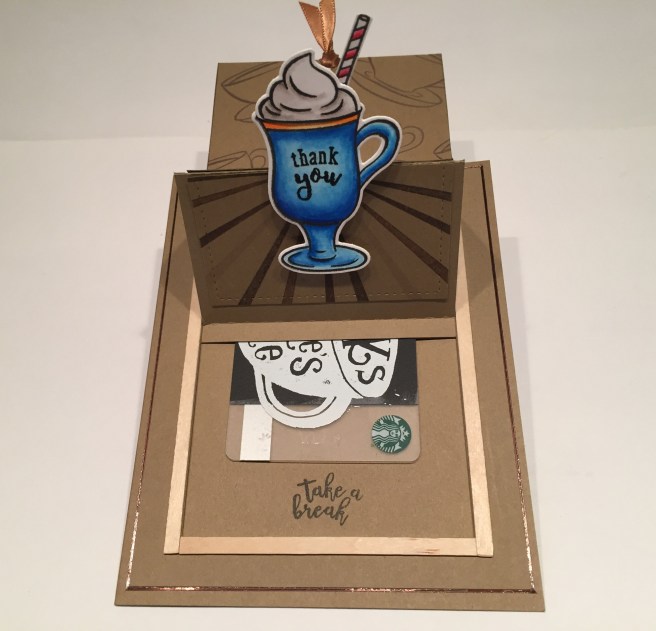
I did a little pattern stamping on the pull tab portion with the cup and saucer stamp using Ranger Acorn Archival Ink and added a little piece of the included ribbon to a hole punched in the top of that piece. The sliding window piece is attached to a kraft card base and outlined that with some thin Love From Lizi peel-off strips in brown. Inside the window reveal, we have a bonus sentiment and a gift card which leaves the whole inside of the card available for your personal message. I really like this bright blue mug on the kraft card, and the dimension of the image (with straw!) when the card is opened.
For my next card, I chose to use my red and white checked tablecloth for the background and paired that up with some grey card stock stamped with my graduated circles rubber background stamp using the SSS Barely Beige ink pad for a subtle diagonal pattern.

I cut the background pieces with a stitched rectangle die and glued those to a thin black mat before mounting them on a plain white card base. I stamped the two mugs, the whipped cream and the straw (I like that little curve!) with Onyx Black ink on Bristol smooth card stock and used my Spectrum Noir alcohol markers to color them using some softer shades this time. I stamped the sentiments and heart on the mugs after coloring, and stamped the main sentiment on some scrap grey card stock before die-cutting everything. (I used my Spellbinders Deckle Rectangle dies for the main sentiment) On the previous card, I glued the whipped cream on top of the mug, but when the light caught it just right, it didn’t look like the cream was inside the cup, so I cut away the ‘inside’ top of the mug on the right and glued the whipped cream behind the cup. Much better!! now that cream really looks like it’s inside the mug. I added another coffee stirrer between the two background pieces and used foam tape to mount the cups and the sentiment. I stamped the ‘steam’ stamp with Barely Beige ink on a scrap of white card stock and die cut that to mount over the left mug. A few SSS Colorful Confetti sequins adds a a little touch of bling and I really enjoy how it feels like the mugs are talking to each other… That’s right…! We ARE sweet and hot!!
The more I perused this stamp set, the more I realized that a lot of the sentiments could be taken as romantic or at the very least extremely friendly, so I thought I’d try and use them all on one card which prompted this 4″ x 9″ card. It fits in a business envelope!

I’ve never done a card this size before and I think I really like the format! At least for this card! LOL! This took a little planning to decide which sentiment would fit on which cup, and then to distribute them evenly across the card. I had to do some stamp surgery on the ‘You’re the cream in my coffee’ sentiment to make it fit on a cup but that’s the only real adaptation I had to make here. I stamped all the images with Onyx Black ink on Bristol smooth card stock and colored everything with my Zigg real brush markers. After coloring, I stamped all the sentiments and die cut all the shapes. My card base is 110# white card stock cut to 8″ x 9″ and folded to make a 4″ x 9″ card. I sponged the heart background with the Simon Says Stamp Falling Hearts stencil using Wilted Violet Distress Oxide ink, Deep Purple Archival ink, Hero Arts Summer Sky ink, and SSS Key Lime, Lemon Zest, Orange Slush and Watermelon Hybrid inks. I tried to use inks that came closest to matching the Zigg watercolor markers. And, YES! The coffee stirrers make another appearance here..! I colored a bunch with a couple of Tan Spectrum Noir alcohol markers and glued them all together to make a nice wooden ‘counter’ for our cups. I found that scor-tape was the best adhesive for the coffee stirrers – this ‘counter’ is a half inch wide strip of scor-tape on some scrap card stock and then I laid the stirrers on the tape staggering the joints and trimming them with my 7″ Tim Holtz snips. Once I had filled the half inch of tape, I glued the ‘counter’ to my card front. I assembled all the pieces of the die-cut stamps (making sure the creams were inside the cups!), added some of the lacquer pen to the exposed coffees and mounted them to the card front with multi medium glue and foam tape. I embossed the final unifying sentiment in white on a scrap of black card stock, cut it into a banner shape and foam taped that to the card front. Three tiny bronze crystals adds some bling and highlights that sentiment very nicely! I really enjoy this card quite a lot… if this ain’t a ‘latte love’ then I don’t know what is!! LOL!!!
I have now used 15 of the 19 sentiments included with this set, so I think I’m allowed to start playing around with some pun-worthy sentiments of my own!

This background uses the Sunshine Turnabout stamp with Walnut Stain, Vintage Photo, Iced Spruce, and Fossilized Amber Distress Oxide inks on black card stock. and VERY lightly misted with water to get a little oxidization going. I cut that background with a stitched rectangle die (naturally!) mounted that on some white card stock and glued those to a black card base. The cup is stamped in Onyx Black ink on Bristol smooth card stock and colored with my Zigg markers (can you tell I like my Ziggs?) and the ‘chocolate swirl’ is stamped in Acorn Archival ink and embossed with some clear embossing powder. I created and printed this fun sentiment using my Silhouette software and the Smoothie Shoppe font, and matted that on white card stock and used foam tape to attach the cup and sentiment to the card front. I did white emboss a couple of the heart stamps on the sentiment strip for a little finishing touch. This sentiment makes me laugh! I like the black/white high contrast of this card, and that coffee looks good enough to drink!
I decided I needed to stamp some pattern paper for a card this month, so I took the cappuccino cup stamp and, using Acorn Archival ink, created an interesting pattern on some of my kraft card stock, and then added some light coloring with my colored pencils.

I cut the stamped background with a stitched rectangle die, and double matted that with my standard Staples Ivory card stock, and some blue core’dinations Brights card stock and glued those to a top-folding kraft card base. I stamped the mug on kraft card stock with Onyx Black ink and colored this one with my colored pencils! Surprise! LOL!! I did stamp the ‘java junkie’ sentiment after I finished coloring the mug. The mug is die-cut and foam taped to more Ivory card stock cut with a stitched circle die and matted on more blue card stock cut with my Orbis circle cutter and then foam taped to the card front.  Now here’s a sentiment for our times..!!! ROTFL!! I actually sketched this sentiment on Ivory card stock using my Silhouette Portrait, the Noteworthy font, and my brown Micron pen. I cut the sentiment with a small stitched rectangle die, matted that on some more blue card stock, and foam taped it to the card front. This sentiment makes me laugh right out loud! I did take the opportunity to add a secondary sentiment on the inside of the card that goes along with the whole over-caffeinated theme of this card! I stamped that in Acorn ink again and added another one of those underline flourishes that really does emphasize these short sentiments! Again I think the blue mug works really well with the kraft / ivory card stocks and I always like the effect of coloring on darker card stocks with colored pencils. You see… I don’t ALWAYS have to use my Zigg Clean Color Real Brush Markers! LOL!!
But, of course, I do return to my Zigg markers for this next card! I just can’t help myself!
 Here I was mostly interested in seeing if I could adapt that to-go cup lid into a dome-topped lid for a couple of frappes! When stamping the lids, I wiped away the ink from the back (top) of the lid before stamping. If there was any ghosting of that line, it was easy to use my sand eraser to clean it up. I then cut out a 1.5″ circle from some scrap card stock and used that as a template to draw the domes. I did make a little mask for the bottom portion of the lid for stamping the whipped cream, and simply filled in the lines below the dome.
 I searched for some frappe images on line for some coloring inspiration, and am thrilled with my mocha and strawberry frappes! I printed this fun sentiment on one of my graduated circles backgrounds (SSS Barely Beige ink on kraft) using my Silhouette software and the Smoothie Shoppe font (naturally!). Then I die-cut that background with a stitched rectangle die and matted that on a thin white mat and a thicker red core’dinations Brights card stock mat before gluing all down to a white card base. I used more coffee stirrers on an angle as an anchor
 for the cups, and foam taped both of the cups to the card front. I did stamp and color a couple of the straws, and, using my craft knife, cut two small slits at the top of the whipped cream and just under the top of the dome to slide the straws through. A tiny highlight of blue colored pencil on the domes adds to the ‘see-through’ lid illusion. I did go ahead an make this an actual Birthday Card with the addition of the sentiment on the inside of the card (Smoothie Shoppe font again) and a little slot to hold a gift card. With the prevalence of ‘blended drinks’ at coffee shops these days, I thought it only fitting to do this frappe card and I had a great time figuring out how to make those iconic dome top lids.
For my last card this month, I wanted to try and make that pedestal cup appear as clear glass… I did some YouTube research on ‘coloring glass’ and found out that one way to achieve the effect is leaving a little bit of white between the stamp line and whatever color liquid is on the inside. I also thought that stamping these mugs in Manganese Blue Archival ink would help add to the ‘glass mug’ effect I was going for.

I did use my Zigg markers to color these coffees, die-cut them out, and added the lacquer over the whole mug. Due to the fact that these images are water-colored and the liquid (water) nature of the lacquer pen, the edges of the coffee softened up a bit, but it still gives the impression of a glass mug. I did a ‘second-generation’ stamp of the whipped creams with the same blue ink to get a bit of a lighter color. I tried the lacquer plus puffy embossing powder technique but wasn’t real pleased with the lack of control I had with that technique, so I tried only doing partial lacquer and puffy powder on the creams, but, once again, the lacquer bubbled up all over the place and I’m just a little too anal-retentive to be happy with that. Finally, I did the partial lacquer and puffy embossing powder but I let that dry completely before heat-setting the powder. That’s the effect I was going for! Nice, fluffy, tightly controlled texture on the whipped creams! And you can still see the stamp lines! I did fussy cut the top rim of the mug so I could attach the creams behind the mugs. I grabbed my white Sunshine Turnabout stamp background (stamped in the same colors as card #4) and paired that up with a background I created with a Carabella Studio “Bulles” (bubbles) stencil and the Hero Arts Unicorn White pigment ink on black card stock. I die-cut both background layers with my stitched rectangle dies, and added a thin mat of brown core’dinations Glitter Silk paper and mounted everything to a top-folding white card base. I die-cut more of that brown glitter paper with a stitched circle die to back the mugs, and foam taped the circle and the mugs to the card front. Of course I dipped into my (seemingly) never ending stash of of song lyric puns for this fun sentiment. I printed and cut this sentiment using my Silhouette Portrait (Impact font) on some photo paper for a shiny, almost ’embossed’ effect. I also cut four ‘shadow’ shapes from plain white card stock and layered them all together for a nice chunky ‘chipboard’ sentiment mounted to the card front with a bit of foam tape. I thought this “good idea” sentiment from the stamp set worked well with this card and added it to the inside with another gift card slot. I really like the ‘glass’ effect achieved here and will definitely have to keep practicing that technique! I think this card is kind of the ‘Cadillac’ of this set. LOL! I LOVE this shiny sentiment, and all the glitter and ‘glass’! And that coffee looks good enough to drink!
So that completes my ten cards with the My Monthly Hero August 2018 Kit. I had a great time coloring all these images and think we have a nice variety of coffee themed cards!
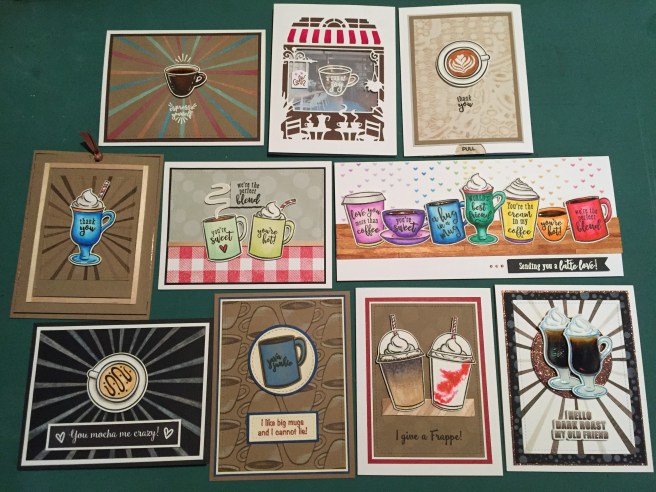
Now I finally have some real coffee stamps and dies in my stash, and I will have to spend some more time with this Fancy Window die. I thought this kit was a bit of a challenge this month seeing that there are really only six images in this stamp set vs. an over-abundance of sentiments. We’ve got a couple of interactive cards, a birthday card, some thank you cards and quite a few puns this month! I actually used 18 of the 19 sentiments on this set of cards – ‘but first, coffee’ didn’t make the cut, and I didn’t use two of the ‘latte art’ stamps and one of the flourishes – that means I used 35 stamps from this set on these 10 cards! LOL! That seems pretty amazing! I think the only thing I really missed in this kit was a nice coffee bean stamp(s)! Nevertheless, any one of these cards could be used for coffee gift cards and there is some room for improvisation with these stamps (to-go dome lid, anyone?!). All in all a great stamp and die set!
I had a fun time with the kit this month and really enjoyed working with some new background stamps and coloring all these images in a variety of palettes and medias. Please be sure to share this post with anyone you think might be interested, don’t forget to like me, list me, pin me, post me, let me know if you have any questions about what I did this month, don’t run with scissors(!), and as always… Happy Crafting!!

Hi Scott. I really enjoyed your designs on the Hero Latte set. You are very creative and clever. Thanks for sharing! Lee
LikeLike