
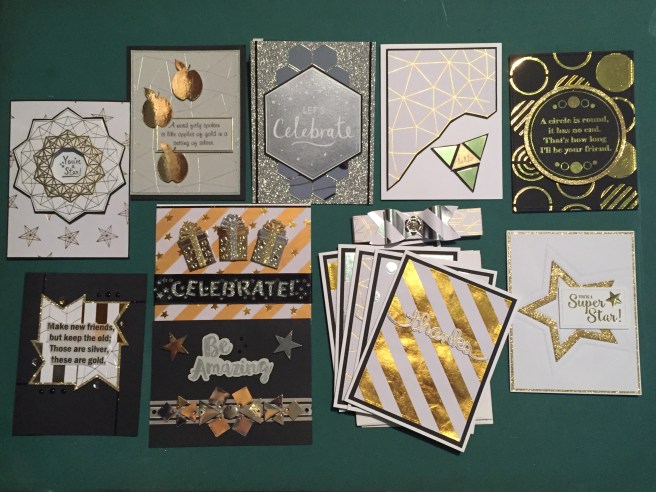
Hello Folks! Scott here with my 10 cards from the Love from Lizi August 2018 Card kit. This month’s kit was a bonanza of foiled pattern papers and die-cuts in gold and silver.

Lizi also offered a “Super Shine Bumper Pack” as an add-on which doubles all your foiled pattern papers and includes a bunch of different die-cut sheets to supplement your goodies.
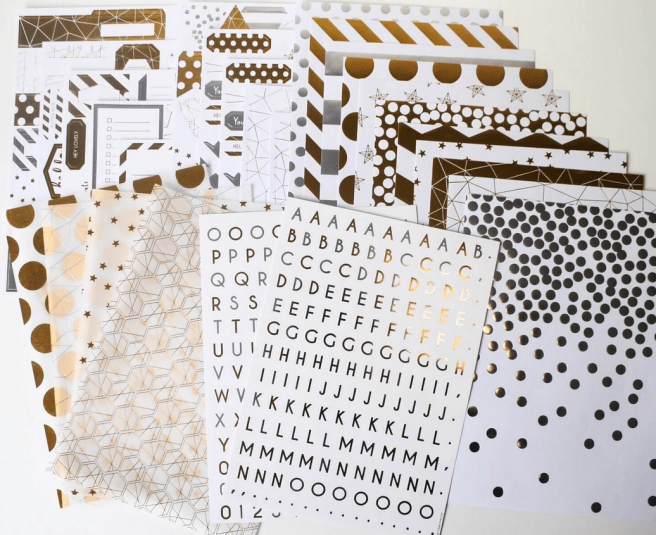
I know that there are some of us that don’t necessarily order the offered add-ons and try to find all our inspiration in the monthly kits on their own. Now, that doesn’t mean I didn’t bring in other materials from my stash – a lot of the extras I used this month came from prior LFL kits! I did try to stick with the Super Shine theme and kept everything in gold, silver, black and white. I love all these pattern papers, but I do think this kit is a little short on images – unless you’re extremely into tags, banners and bows, there aren’t a lot of shapes to work with here. However, I was excited to have a new opportunity to play with my iCraft deco-foil and create some sentiments on my laser printer at work…!!
I did create my card bases from the card stock provided in the kit – that gave me 4 black and 6 white card bases. To begin with, I noticed that one of our stamps matched one of the journal card die cuts – the stamp is just a little smaller.  Since the printed card was in silver, I decided to emboss the stamp right on top of the journal card in gold. I used the LFL Golden Crown embossing powder that we received in the LFL May 2018 Card Kit. Then I fussy cut the outer and inner edges and decided to add the “You’re a Star!” sentiment on the inside panel, so I needed to cut a window through the front of my white card base. I took the pentagram pattern paper, trimmed it down to 4.125″ x 5.375″ and added a thin black mat around that before attaching that to my card front – THEN I die-cut a circle through the card front and embossed the sentiment in the LFL Silver Dollar embossing powder included in the kit.
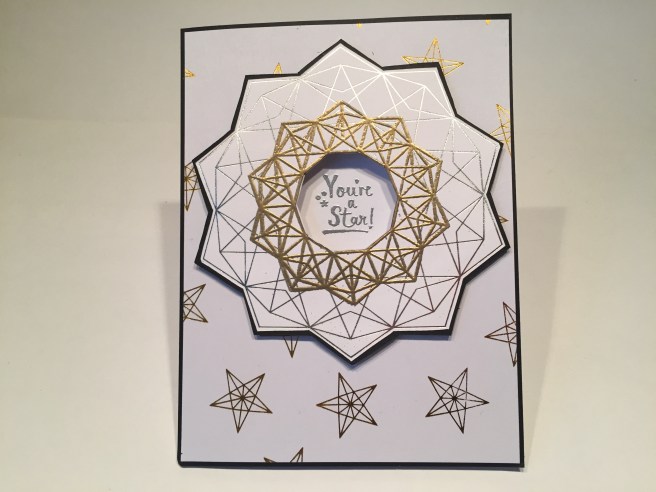
I did get a very poor stamp of that sentiment on my first attempt, so I stamped it again on some scrap white card and die cut that with a circle die to go on the inside and cover my mistake! I matted the large geometric star with a little black card stock and mounted that to the card front with some LFL foam squares that were in last month’s LFL kit. Really interesting dimension on this card. Gold, Silver, Black and White! Perfectly on theme!
I am not one for generic sentiments on my cards; “Love”, “For You”. Made With Love”, etc.. I ran across this lovely bible verse when I was researching ‘silver and gold’, and I thought that it was so interesting that it deserved to have a card of it’s own.
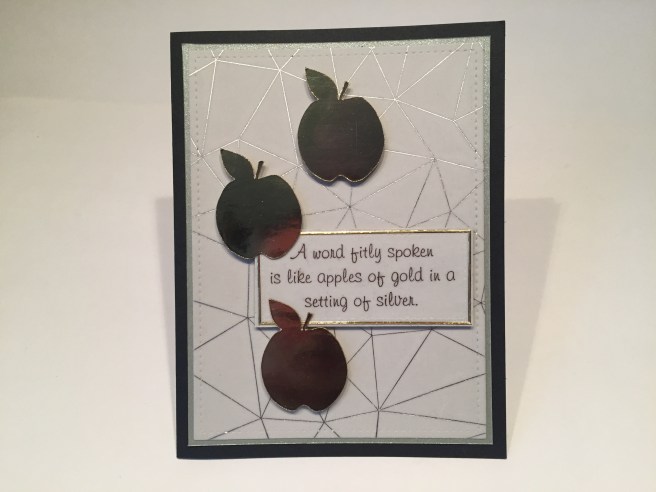
On a black card base, I cut a piece of the silver line-art vellum with a LF Stitched Rectangle die, ran that through my Xyron Sticker maker and matted it to a piece of silver pearl card stock from the LFL January 2018 Card Kit and glued them both to my card base. I cut the three apples from gold mirror card stock from the LFL July 2017 kit using my Silhouette Portrait and a file from my library. I printed the sentiment on a piece of vellum from my stash using the Freehand 591 BT font, die-cut it with a stitched rectangle die, ran that through the sticker maker and glued it to a scrap of gray card stock.  I outlined that piece with the LFL Gold Mirror peel-off stickers from the May 2018 kit, and mounted the sentiment and the apples to the card front with the LFL foam squares. I did want to give proper attribution to this sentiment so, on the bottom of the inside gray writing surface, I noted the reference to “Proverbs 25: 11” using the same font. I really love this sentiment and thought it was kind of perfect to contemplate ‘fitly spoken’ – especially these days..!
Now, let’s tackle the other main stamp in this kit – the large hexagonal “Let’s Celebrate”.

I embossed that stamp with LFL the Silver Dollar embossing powder on some white card stock, fussy cut that out with a little white border and matted that to some black card stock. That’s a BIG stamp with lots of surface area – we should be able to use the back of that for some ‘reverse stamping’..! Now, I’ve been on the Love from Lizi Design Team for a year, and I could not find any silver glitter card stock from the last 13 months in any of my leftovers, so I broke down and grabbed a piece of my core’dinations Silver Glitter card stock to use as the background on this white card base. I attached the hexagon to the card front with LFL foam squares, and attached the mirror tiles from the kit to the top and bottom points of the sentiment. Two strips of the Black Diamond peel-off stickers down the sides and we have a VERY Art Deco card all in silver. Talk about Super Shine!!
Those hexagonal mirror tiles reminded me of the golden triangular mirror tiles from the LFL November 2017 card kit that are about the same size as the triangular ‘hello’ stamp in this kit. This is as generic as I get with these sentiments this month!

I embossed the stamp with the LFL Golden Crown embossing powder on a scrap of white card stock, trimmed that out with a bit of a white border, and mounted that with a foam square to some black card stock. I added those triangle mirror ties and trimmed the whole piece down leaving a little border of black. I cut out a piece of the gold line-art pattern paper (those are mostly triangles!) with a stitched rectangle die, and fussy cut an interesting edge from the bottom left to mid-right before matting that on a scrap of black card stock. The matted pattern paper and the mirror triangle(s) are both mounted with LFL foam squares to a white card base. We’ve gone from Art Deco to Modern Art in no time at all! I really like the unexpected shapes and the triangle motif on this card!
I haven’t done any deco foiling yet, and I want to see if I can foil on black card stock. And I’m dying to try some foiling with that stencil in the kit as well. Let’s do both on one card!
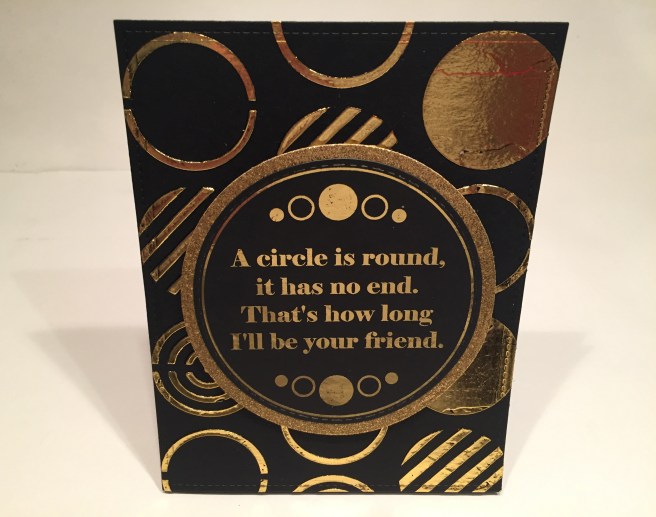
It’s a little hard to get a good picture of this but WOW! All Black and Gold!! I reached for the stencil and used deco foil Transfer Gel through the stencil on some black card stock. Once that was dry, you add the deco foil over the dry transfer gel and run it through a laminator. That’s a big difference from all the foiled white pattern papers in this kit! I picked out a portion of the foiled stencil and die-cut that with my largest stitched rectangle die to cover the whole front of my black card base. I designed this circular sentiment piece using my Silhouette Software, and used the Elephant font for this old scouting sentiment. I printed this design on some black card stock using my laser (toner) printer at work and then foiled it in gold and die-cut it with one of my circle dies. I matted that black circle on some more gold glitter card stock from the LFL February 2018 card kit and used the foam squares to mount that to my card front. STRIKING! I love all the gold and black foiling – Super Shine!
I wanted to see what I could do with that die-cut black ribbon that said CELEBRATE!, so I pressed that ribbon nicely with a hot iron and then applied a layer of Multi Medium Matte to the back of the ribbon to try and stiffen it up a little bit. That did the trick!

On a white card base, I took the gold star vellum and the gold stripe pattern paper and glued those both together with my Zyron sticker maker. That mutes the stripes into an almost new color while letting the stars shine and giving us a ‘new’ pattern paper. I glued those directly to the card base and trimmed the top and bottom edges with the Black Diamond peel-off stickers. I took the gift die from the kit and die-cut two silver mirror (LFL Jan. 2018) packages and two gold mirror (LFL July 2017) packages and inlaid the stars on the packages in alternating colors – gold stars in the silver packages and visa versa. I die-cut the package bows in gold glitter (LFL Feb. 2018) and silver glitter (core’dinations) and added those to the package fronts with my thin foam 3D-dots.  I added some thin foam strips to the top and bottom of the CELEBRATE! ribbon and added that to a strip of my silver glitter card stock for a little recessed dimension behind the letters and glued those together down to the card front. I mounted the presents with the LFL foam squares and finished up this card with an inside sentiment cut from the silver mirror card stock using the Happy Birthday die from the LFL Feb. 2018 card kit. This card is certainly reason to celebrate and I am thrilled that I was able to make that die-cut ribbon work extremely well here!
I was determined to use at least some of the die cut pieces included in this month’s kit, so I started fiddling around with the square banners and figured out a nice kind-of pinwheel pattern by gluing the ‘tabs’ of four banners behind each other.
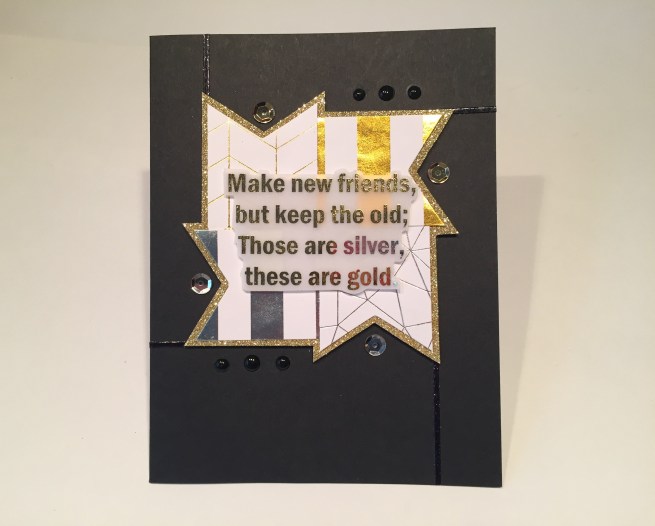
I glued that banner assembly to the gold glitter (LFL Feb. 2018) card stock and cut that into a thin mat for the banners. I used the LFL foam squares to mount that piece to a black card base, added the black peel-offs shooting out from the four corners, a few sequins from the Super Shine sequin mix and some of the Ebony Black Nuvo drops for some subtle shine and dimension. I printed this classic sentiment on some vellum from my stash using the Franklin Gothic Demi Cond font and foiled that in gold with my deco foil – the word ‘silver’ is actually foiled in silver!  I fussy cut that sentiment out and, with some carefully placed foam dots, mounted that to the center of the banners. I thought this sentiment was a perfect companion to the “Best and Loveliest Friend” stamp from the kit, so I stamped that on the inside writing surface with VersaFine Onyx Black ink. Again, this feels very Art Deco to me, and I love being able to use these banner die cuts to create something very unique for this card.
I thought there must be a fun way to use the metal charm pieces included in our kit, so I started playing around with different ways to arrange them, and finally arrived at this.
 Feels like a big spangly bracelet or maybe a fancy metal belt…! On my last black card base, I glued down a line of the gray velvet ribbon and two lines of the thin gray satin ribbon for a ‘base’ and arranged the metal charms on top of that using my thin foam dots. I did add the little bronze gems from the LFL March 2018 kit to all the holes on the edges of the charms – I thought that camouflaged those holes perfectly! This sentiment is from the Richard Garay stamp and die set ‘Be Amazing’ embossed on white card stock with the LFL Silver Dollar embossing powder, die-cut and mounted to the card front with the LFL foam squares. A few dots of the Nuvo Drops (note the drops on the ends of the velvet ribbon) and the two big star charms add the final touch to a card that is all about the BLING, and is pretty amazing all on it’s own! Talk about Super Shine!!
Here we are at card number nine already, and I feel like I have hardly made a dent in all these pattern papers… Is there something I can do to really highlight these papers?

How about a nice set of thank you cards to be used as gifts? A small collection of thank you cards with envelopes makes a GREAT gift for co-workers, friends, postal workers, paper carriers, doctors, lawyers, butchers, bakers, candlestick makers, even a lovely hostess gift! And this set of cards lets the foiled pattern paper take center stage.
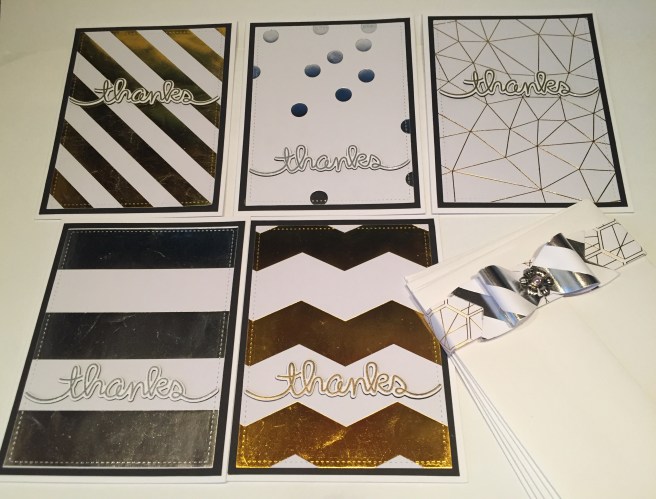
I did look through all my LFL stamp sets from the last year, and was actually surprised to realize that we haven’t received a single “thanks” or “thank you” stamp in our kits. “Thank you” seems like such a standard sentiment – right up there with “Happy Birthday” – so Lizzi, if you’re listening, how about a nice Thank You stamp for our stash!?? LOL!! I turned to my Lawn Fawn Big Scripty Words stamps and dies for the ‘thanks’ sentiment on these cards. I embossed these in the LFL Golden Crown and Silver Dollar embossing powders on white card stock and die-cut them out with the matching die. I did glue two layers of die-cut black card stock behind each sentiment for some contrast and added dimension. I chose five pattern papers from the kit and cut them to size with a stitched rectangle die, matted those on black card stock and glued them directly to my white card bases. I glued the chunky sentiments to the card fronts and contemplated adding some embellishments or a little something extra, but decided that the simplicity of these cards was all that was really needed.
BUT… here’s the perfect opportunity to use one of the paper bows from our kit! Personally, I’m not much of a ‘bows’ person, and would be hard pressed to use one of these on a card, but here, those paper bows work perfectly! I did dig in to the Super Shine Bumper Pack for the belly band that wraps up this set so nicely, but that’s the ONLY piece I used from the extras. I really like this idea and the simple fact there are so many pattern papers in this kit means that you could make a whole bunch of card sets to use as gifts all year round. I think a variety of foiled patterns all included in one set makes an attractive and interesting gift that most anyone would be pleased to receive. And don’t forget to include some envelopes too! LOL!!
Ever since I first heard the words Super Shine, they reminded me of the Saturday Night Live spin off movie with Molly Shannon and Will Ferrell called “Superstar” where Molly Shannon over-emphasizes “superstar” ever time she says it. I couldn’t help but imitate that when saying Super Shine… and, taking a cue from the ‘You’re a Star’ sentiment in the kit, decided that I had to do a Super Star card with this Super Shine card kit!
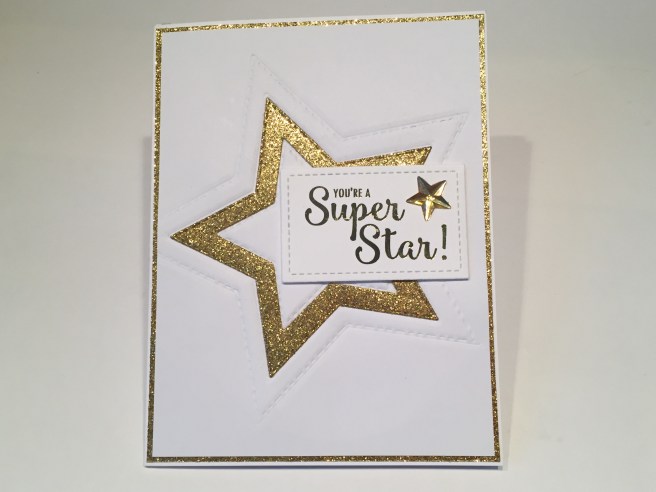
I actually used up all my LFL gold glitter card stock so I had to reach into my stash of core’dinations gold glitter card stock to make this card. On a white card stock panel, I dry embossed 3 of my Stitched Nesting Star dies and, using the two smaller stars, cut a gold glitter star and glued that to the card front. I really like that effect a lot – actually kind of looks like it’s quilted! I matted that panel on glitter card stock and glued it directly to my card base. I printed the sentiment with toner on my work printer using the Smoothie Shoppe font and the Arial Unicode MS font and foiled that in gold. I die-cut the sentiment with a stitched rectangle die, mounted that to the card with my thin foam tape, and added the gold star gem from the LFL November 2017 kit.
I remembered seeing Jennifer McGuire’s ‘Inside Shadow Box Cards‘ video from a couple of months ago and wanted to give that technique a try. However, I was interested in making the shadow box thinner than the 1/2″ deep box that Jennifer made. A little trial and error and I came up with this very sharp, 1/4″ shadow box card that has a very interesting 3D effect when you open it up.

My ‘Inside Shadow Box Card’ is made with two pieces of white card stock both cut to 8.5″ x 5.5″. Score the first piece in half (4.25″) and trim 1/4″ off of the back of that card base. Score your second piece of card stock at 1/4″, 4.25″, and 4.5″. Trim a sliver off the first 1/4″ edge of this piece to help it fit together nicely, and the rest of the card assembles exactly the same as illustrated by Jennifer in her video.
Again, using my stitched star dies, I cut a window in the second piece of card stock and a thin glitter frame for the opening. I printed this sentiment on vellum (Smoothie Shoppe font) with my work printer and foiled that in gold. I put some thin foam tape behind the cut out to attached the vellum, and added a piece of the gold star pattern paper to the back. As you open the card, you can see the gold stars in the background moving across the sentiment. Very interesting effect! Okay… so there’s not a lot from the card kit on this card but I figured I was allowed since I just made five thank you cards..! Whether I was a little ‘patterned out’ after 13 cards, or just happy to have all of my cards done, I really, really love this card. The simple gold and white is very smart and the glitter and foiling add all the Super Shine that this card needs. Super Shine Super Star!!
 That covers my 10 Cards for the Love From Lizi August 2018 Super Shine Card Kit. No real puns this month, but these cards have a certain sophistication to them that kind of belies the use of puns! I did make a pretty good dent in these supplies, but I still have tons of leftovers from the kit. I only have 3 complete sheets of pattern paper left, two full vellum sheets, the mini alphabet stickers and the complete tag die-cut sheet. I did use pieces from the other three die-cut sheets and a little bit of everything from the embellishments bag. And we’re not even talking about the Bumper Pack that I (almost) didn’t even touch.
I liked the challenge of making these cards with only the kit contents, and I am very pleased at the wide variety I was able to achieve with these rather elaborate looking cards. They definitely live up to the Super Shine theme!
I do know that there are still a few kits (and bumper packs!) left at lovefromlizi.com so if you’d like to bulk out your stash with some beautiful Super Shiny pattern papers please use my link when shopping: http://bit.ly/LFLlink Thank you so much for sharing some time with me here. I hope you like my examples this month! Let me know if you have any questions or comments, please share this post with anyone who might be interested, don’t run with scissors, and by all means, Happy Crafting!!
