
Hello Folks! Scott here with my 10 Cards from the Love From Lizi April 2018 Card Kit. This kit is full of colorful card stocks, pattern papers, ephemera, embellishments and an exclusive sentiment builder stamp set. There’s always a plethora of supplies in Lizi’s kits!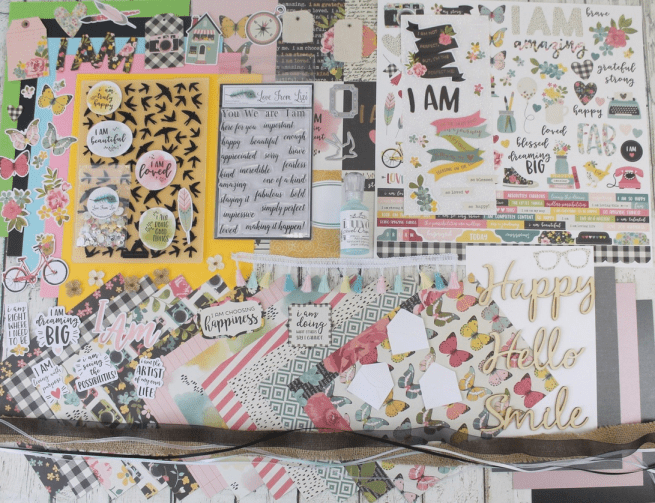 As usual, I did take the 5 sheets of colored card stock and made 10 card bases to begin. I do have a bit of an obsession with trying to use all the stamps in a stamp set for my 10 Card videos, and, sentiments or not, this kit was no exception, so I started experimenting with all the stamps and came upon this interesting ‘word cloud’ concept for my first card.
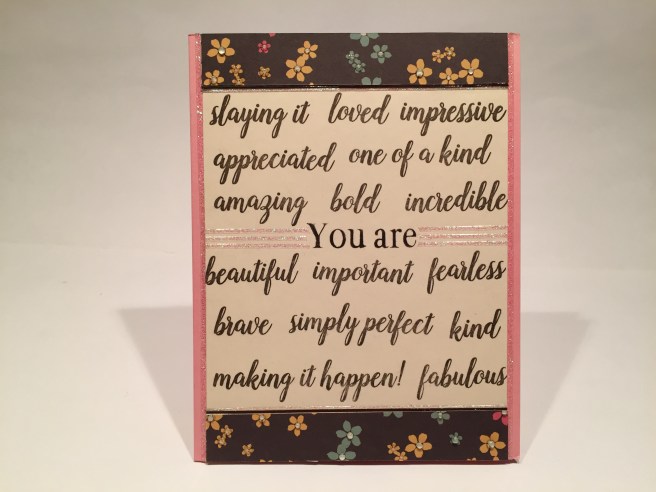 I managed to get 18 stamps on this one card! LOL! I stamped the ‘You are’ in the center with Simon Says Stamp Intense Black Ink, and used my Stampin’ Up Early Espresso ink to stamp all the adjectives in a big ‘cloud’ around the center subject. I did use a scrap of my go-to Staples Ivory card stock to stamp on, and I trimmed that down to leave a little bit of the Rose Pink card base showing on the edges. I cut a couple strips of the small flower pattern paper to extend the top and bottom of my ‘word cloud’ and used a combination of Lizi’s Chocolate Brown peel-offs (from the August 2017 Kit) and the Clear Glitter peel-offs from this kit. I highlighted the edges of the pattern paper and the sides of the card base, and used three strips of the glitter peel-offs on either side of the ‘You are’ to help draw your eye to the subject matter. I did add little drops of this month’s Nuvo Jewel Drops to the centers of all the flowers for a little extra touch of shine. If you know somebody who embodies all of these descriptive terms, or just can’t decide between them, then go ahead and use all of them!! LOL!! I like this card a lot, and felt like this was a nice way of easing into a sentiment heavy kit like this.
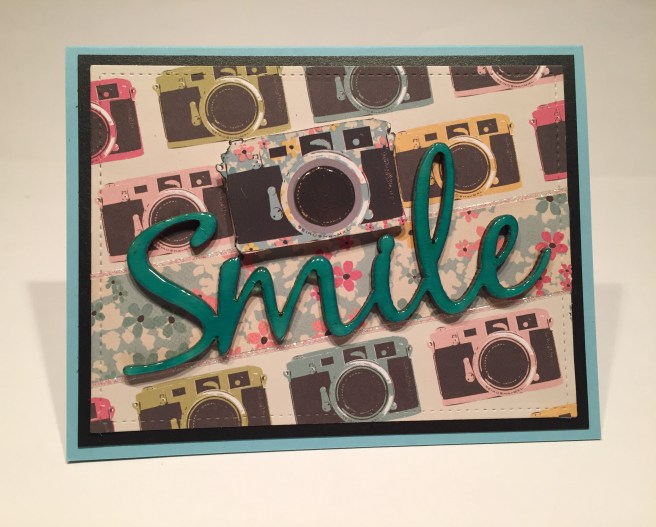 There were three large wood veneer die-cut sentiments included with this kit, and I couldn’t resist pairing up the ‘Smile’ sentiment with some of the camera images. I colored the sentiment with Broken China Distress Oxide ink, and covered that with the Sea Breeze Nuvo Jewel Drops from the kit, and was thrilled with the intense color and shine that gave me! On the Sky Blue card base, I cut a mat from the Black Pearl specialty card stock and cut out the camera pattern paper with a Lawn Fawn Stitched Rectangle die and attached those both directly to the card base. I took the camera from the sticker sheet, and fussy cut the white border away and removed the sticky on the back with my EK Success Powder Tool – the glue on these stickers is extremely sticky, and took a lot of powder to neutralize! I cut a strip of the flower pattern paper that matched the pattern on the camera and covered one row of the cameras with that strip, and trimmed those edges with the glitter peel-offs. I glued the ‘Smile’ directly to the card base and mounted the camera up with two layers of foam tape. Since the camera sticker was a little larger than the pattern paper cameras, the extra height helps justify the size increase. I did cover the lens of the camera with Glossy Accents for some matching shine. I love the color that the ink and jewel drops gave to the wood-veneer piece – it feels very ’50’s retro.
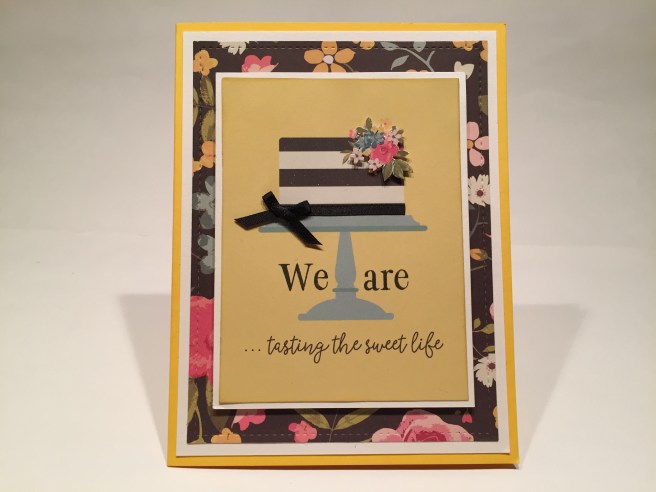 I was drawn to the cut-apart sheet that had the 3″ x 4″ images and wanted to pair this yellow cake cut apart with the ‘We are’ from the stamp set to make this lovely Anniversary card. On the Sunshine Yellow card base, I cut a mat from the Oyster White Pearl specialty card stock and die cut that beautiful flower pattern paper on the dark background with the same LFL Stitched Rectangle die, and glued those both directly to the card base. I stamped the ‘We are’ from the stamp set (SSS Intense Black ink) on either side of the cake stand to add to the printed sentiment, attached that cut-apart to a white mat cut from my stash, and foam taped that up on the card base.
 I covered the bottom black stripe on the cake with some of the black satin ribbon from the kit and added a small bow to the left side. The added dimension of that bow, made me want to add more dimension to the top of the cake, but none of the stickers or ephemera flowers matched the size of the flowers that were printed on the cake. I ultimately fussy cut the flowers from the middle of the notebook paper sticker (now that’s some REAL fussy cutting!) and foam taped those over the flowers on the top of the cake. That sticker piece is not the exact same flower grouping that was printed on the cut apart piece, but was close enough in size to work perfectly here. Any flowers poking out around it just add another layer to the bouquet! I did use my Spectrum Noir Sparkle Brush Pen to add some glitter to the flowers and the two other black layers of the cake, and finished out this card with ‘happy anniversary’ (Shoreline Script Bold font) printed on the writing surface inside. I liked being able to pair up some of the stamps in this kit with an already printed sentiment!
I am NOT a big fan of butterflies – I think they are hugely overused on handmade cards – but we did have a lot of very nice butterfly images in this kit – pattern paper butterflies, sticker butterflies, cut-apart butterflies and ephemera butterflies. One of the 4″ x 6″ cut apart images featured 3 butterflies in a line and that prompted me to make this fun card.
Jennifer McGuire inspired me as well with her ‘Fun Fold Card Design’ video featuring butterflies from the last Monday in March. She shows just how to make this Fun Fold Card Design (hint: it takes two card bases!). SO… using the black card bases, I made the double gate fold base, and attached two strips of that small flower pattern paper – the scallop edge is cut with my American Crafts Knock Outs Border Punch – on the sides of the front flaps. I used three of the ephemera butterflies on the front and foam taped opposite halves of them to the fold on the front. I did add a tiny magnet to the left wing of the center butterfly (and it’s mate attached behind the left side of the black card stock) to help hold this card closed. I realized that once you opened this card there were big black empty spaces on either side so I grabbed three of the butterflies from the sticker sheet and added them to the inner panels – three butterflies become six – and, in keeping with the stamped sentiment (SSS Intense Black ink) on the writing surface, all the butterflies are unique! I really like this card (especially the panorama of the unfolded card!) and thought it was an excellent use of all the butterfly images that came in the kit!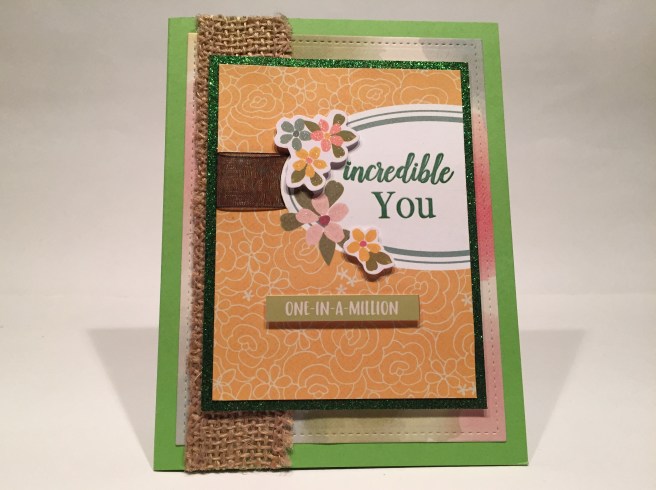 Suddenly, I realized that some of the sentiment stamps in the kit could be reversed – effectively ignoring the ‘are’ and the ‘am’ stamps for a short declarative sentiment – this would work with many of the adjective stamps in this set. This yellow piece with the oval and flowers was another of the 3″ x 4″ cut apart images. I used my craft knife to cut the left side of the oval and threaded a piece of the black organza ribbon behind the oval and around the side of the cut apart. I stamped the sentiment in the oval with my Stampin’ Up Mint Macaron ink pad (discontinued) and then stamped the sentiment in VersaMark ink and used some Ranger clear embossing powder to shine it up a bit. On the Apple Green card base, I added a mat of that cool watercolor pattern paper (cut out with my LF Stitched Rectangle die) making sure that some of the green watercolor was visible. I added a length of the burlap ribbon from the kit to the left side of the pattern paper and dug out some green Glitter Silk card stock from my stash to add some sparkle (and a little more green!) to this card – I glued the yellow cut apart to the glitter mat and foam taped them both to my card front. For a little more dimension, I foam taped two of the ephemera flower pieces along the oval and glittered all the flowers with my Spectrum Noir Sparkle Brush Pen. The ‘one-in-a-million’ piece came from the sticker sheet and went perfectly on this card. I think this demonstrates that there are more sentiments I can build from this stamp set than I originally thought. I do like this sentiment!
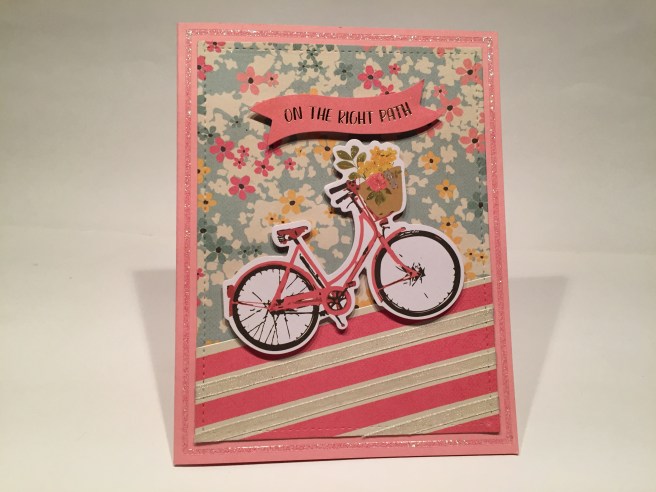 Once again, there was plenty of pink in this card kit, so I throw caution to the wind and had to go all out with the pink for this card! On the Rose Pink card base, I paired up the flower pattern paper with the pink candy stripe pattern paper (on an angle), cut them both with my stitched rectangle die, and glued them directly to the card base. I did take the thin white organza ribbon from the kit and highlighted the off-white stripes on the ‘road’ – that gave us some nice sparkle and a little texture! The bicycle and sentiment are ephemera pieces foam taped up on the card front. I did add a frame of the glitter peel-offs around the card base and added a touch of Spectrum Noir sparkle to the flowers. I thought the ‘on the right path’ sentiment was complete and didn’t need any modifiers! Considering the fact that this is VERY pink, I do like it quite a bit! Simple and sweet!
I had a hard time finding any real worthy puns or humor in this card kit… it is SO heavily oriented towards ‘personal affirmation’ (how many times does “I AM” appear??) that I was especially pleased when I came up with this next card featuring a tiny bit of a pun…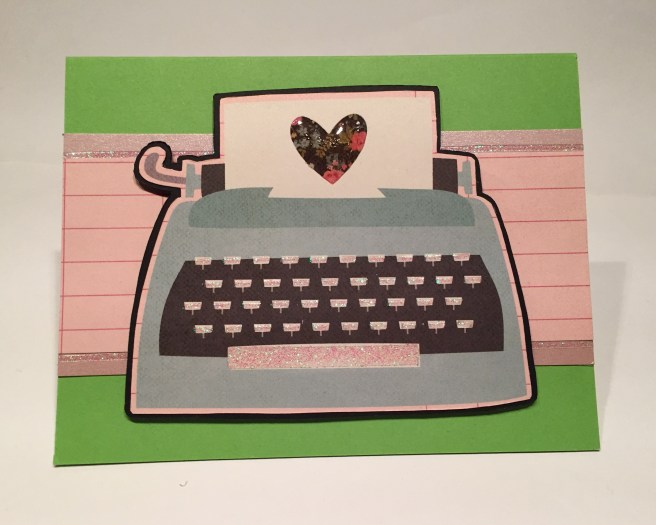 This is the large typewriter from one of the pattern papers – I fussy cut that out and glued it to a black fussy cut mat from my stash. On the Apple Green card base, I added a strip of the pink ledger pattern paper and added thin strips of the Dusty Rose Pearl specialty paper to the top and bottom. I added the glitter peel offs to the edges of the ledger paper and also used them to highlight the typewriter keys and space bar!
 This is the first time I’ve actually used one of the edges of the peel off sheet but it fit perfectly on the space bar! I mounted the typewriter to the card front with foam tape, and I added Glossy Accents to the heart on the typing paper. That’s all the shine we need! I printed this sentiment in the Typewriter Hand font on the writing surface, and yes, there are no words..!! Okay, this is a slight pun at best, but I do think it is a great lead-in to an assortment of card occasions… be it sympathetic, encouraging, loving, congratulatory, or what have you! I do like that retro typewriter!
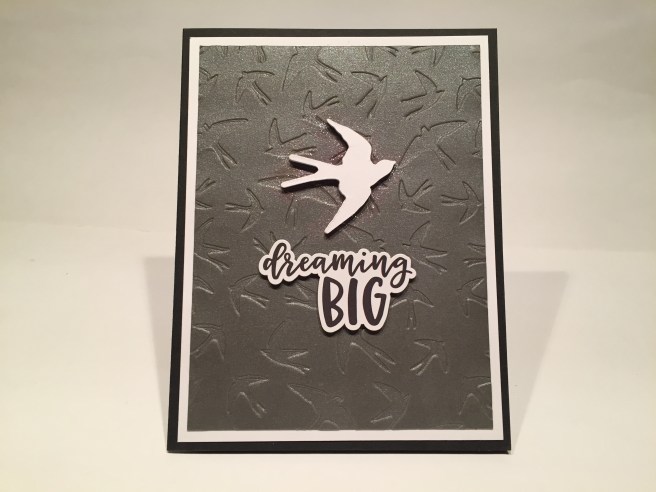 Though I am always jazzed to get new and useful products in my kits, this sparrow embossing folder and die didn’t really seem to go with anything else in this kit, so I decided to pair them up for a simple monochromatic card. On a black card base from my stash (I used both of the black card bases from the kit on the butterfly card) I added a white mat from my stash and embossed the Gunmetal Grey Pearl specialty paper with the embossing folder, and die-cut six sparrows from some scrap white card stock and one from the Oyster White Pearl specialty paper. I glued the embossed paper directly to the mat and glued all the sparrow die cuts together before adding them to the card front as well. The ‘dreaming big’ sticker from the sticker sheet went well with this simple design and I used some foam tape to attach it to the card front. I did use my Spectrum Noir Sparkle pen to add a bit of glitter on the card base around the bird. This card makes me think of Richard Bach’s Johnathon Livingston Seagull! Yes, I know, this isn’t a seagull, but it still evokes the spirit of that story! Am I dating myself here?? LOL!
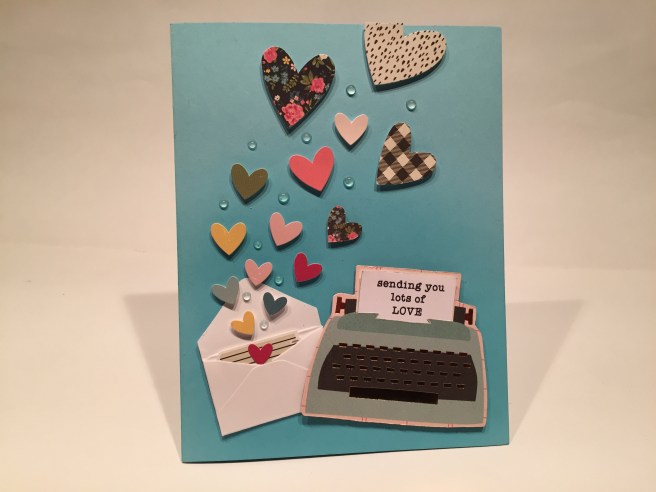 As I kept perusing all the images in this kit, I began to notice that there were a large number of hearts in assorted sizes on both the sticker sheet and with the ephemera. We also have those cute mini-envelopes in the kit, and there’s a smaller typewriter on one of the 3″ x 4″ cut apart images as well. Here’s the result! On the Sky Blue card base, I took some Broken China Distress Oxide ink and used my Ink Duster Blending Brush to add a bit of an ombre to the card base… darker at the bottom and lighter at the top – that seems to mitigate having to use any pattern paper! I fussy cut the typewriter out and used my craft knife to open a slit in front of the rollers so I could insert my own paper and message. I printed ‘sending you lots of LOVE’ (Typewriter Hand font again) on plain typing paper and slipped that into the typewriter carriage with a spot of foam tape to add some dimension. I trimmed the bottom bit of notebook paper from the sticker I had cut the flowers out of, and tucked that into the mini-envelope with a spot of foam tape inside to keep the envelope ‘open’. I glued the envelope to the card front and foam taped the typewriter on top of that. All that was left was attaching the hearts with foam tape in a pleasing swoop (the heart on the notebook paper has no foam tape)
 (also, the smaller flower pattern heart was fussy cut from the paper in the typewriter image – I knew I was going to cover that up anyway!). I actually used all of the hearts on this card except for the largest ephemera heart! Some dots of the Sea Breeze Jewel Drops adds some beautiful shine, and for the final finishing touch, I added the smallest typewriter (from the sticker sheet) to the writing surface inside the card. I thought the typewriter and envelope were a natural match, and I LOVE this card!
When I was playing with using all the stamps on my first card, I came up with an idea that offered a little bit more of a refined solution to try using multiple stamps on one card. I like this idea a lot and thought it was a unique way to get more from these stamps.
Yes! We have a little spinning wheel behind the card front that offers up six different adjectives for a special someone! We are on to the last Sunshine Yellow card base now, and I chose the yellow and white pattern paper for my card front. I cut a 1.5″ x 5/8″ opening in the right side of the card front, and, with much trimming and layering, I was able to frame the opening with 2 of the frame die-cuts from the kit. Somehow I was lucky enough that piecing this frame together gave me three dots on the top and bottom of the frame, and you can hardly tell that it has been pieced together! I had created the rotating wheel for my “GROOVY” Birthday Card back in May of 2017, so I was able to re-size it for this card. I discovered that the Staples 9″ x 12″ clasp envelopes (they say they are ‘sturdy brown kraft’) matched this pattern paper perfectly, so I laminated a piece of that envelope to some scrap card stock and cut the wheel with my Silhouette Portrait. Then it was simply a matter of rotating the wheel and marking where the stamps should go. In addition to ‘amazing’, ‘loved’ and ‘beautiful’, you can also dial up ‘fearless’, ‘kind’ and ‘brave’. Much more elegant (and FUN!) than my first ‘word cloud’ card! I added a strip of the Graphite Black specialty paper punched with my American Crafts border punch to the left side of the pattern paper (with a strip of the glitter peel offs of course) and stamped and embossed all of the sentiments for some classy shine. I also added the banner sticker from the sticker sheet which, if you notice, had some tassels hanging from it. I trimmed the paper tassels away and added some real tassels from the trim (matching the colors of the printed tassels) to the banner sticker and foam taped the whole banner to the card front. Of course the extra sticker sentiment ‘the possibilities are endless’ is perfect for a card like this, so I foam taped that to the bottom part of the card front. I ADORE this interactive card, and I think this is about as encouraging as any card can get!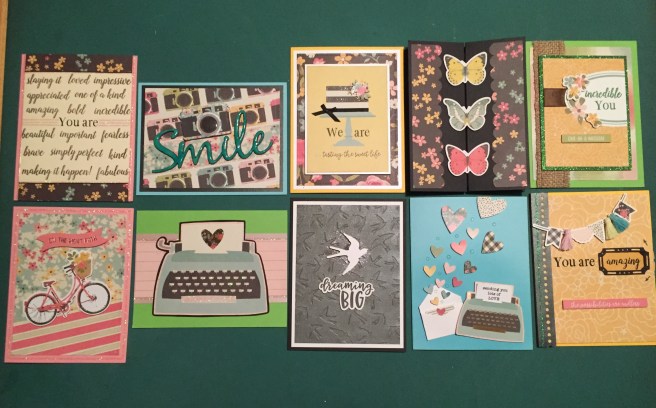 That’s my 10 Cards from the Love From Lizi April 2018 card kit. This kit did sell out rather quickly, so if you want to become a subscriber and join in with the fun, please use my link to shop at lovefromlizi.com. Of course, I have tons of supplies left over – I didn’t get to the canvas tags and burlap flowers, and I didn’t use any sequins either – I think the glitter peel offs and the Nuvo Drops satisfied all my sparkle desires! I didn’t use any of the 1/8″ white and pale blue satin ribbon, nor any of the images from the 12″ x 12″ cut apart page that had the 4″ x 6″ images, but it felt like I used a little bit of everything! Though there were tons of supplies and terrific images in this kit, I did find it a little bit of a challenge to come up with a variety of cards that didn’t all feel the same. This is certainly a colorful batch of cards and a couple of unique mechanical surprises that I hope you like. Thank you so much for sharing your time with me here – your support and encouragement mean the world to me! Please share this post with anyone who might enjoy it, Spread the Cheer, don’t run with scissors, and HAPPY CRAFTING!

As always I love all your cards but I think my favorite is “There are no words”. You are so clever! Thanks for sharing.
LikeLike
Thank YOU, Jennifer! Always greatly appreciated! Scott
LikeLike
Fabulous as usual! Can’t wait to get this kit. It looks like it will be one of my favorites. Thank you for doing this, Scott.
LikeLike
Thank YOU, Lezlee! Much appreciated!! Spread the Cheer!! Scott
LikeLike