
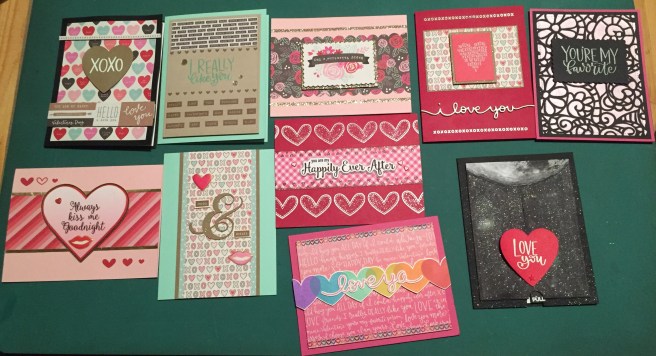
Hello Folks, Scott here with my 10 cards from the Simon Says Stamp January 2018 Card kit. This kit was obviously geared toward Valentine’s day with all the reds and pinks, and is still available at Simon Says Stamp.com! This kit comes with the ‘Really Like You’ clear stamp set; 12 single-sided sheets of 6″ x 6″ Pebbles, Inc. ‘Forever My Always’ pattern paper; a Crate Paper ‘Main Squeeze’ puffy sticker sheet; a Tsukineko Delicata ink cube in Pink Shimmer; a full jar of Tim Holtz’ Distress Glitter Dust in Vintage Platinum; Six SSS metallic envelopes in Doll Pink, Schoolhouse Red, Cotton Candy, Ivory, and Cream; five sheets of SSS 100# card stock in Schoolhouse Red, Mint, Black, Cotton Candy, Doll Pink, and one sheet of Neenah Desert Storm 100# card stock. 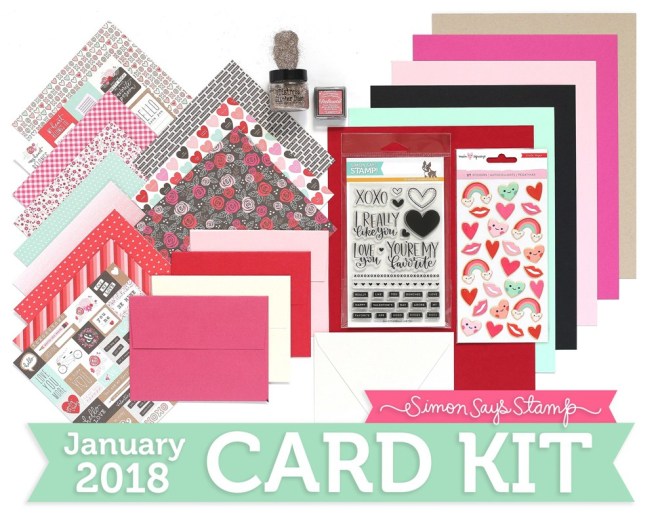 I would usually begin my 10 cards by coloring the images in a stamp set but, as you might be able to tell, besides a couple of heart stamps, there are no images to color. This is my 11th month as a subscriber with the Simon Says Stamp Card Kits and out of the last 11 months, only two stamp sets actually had NO hearts on them at all… LOL! I get it!! I get it! They really like hearts at SSS!! I did go ahead and make 10 card bases from the 5 sheets of SSS card stock. My goal with this kit, was to try my best to make some lovely Valentine’s Day cards that a guy wouldn’t be embarrassed to give to their sweetheart.
For my first card, I wanted to see what kind of Valentine card I could make using the black card base, so reached for a couple of pattern papers – one with the ‘candy hearts’ (almost black on some of those hearts) and a wide stripe from one of the two pages of cut-apart pattern pages. I did manage to trim the ‘xoxo’ strip from one of the top strips of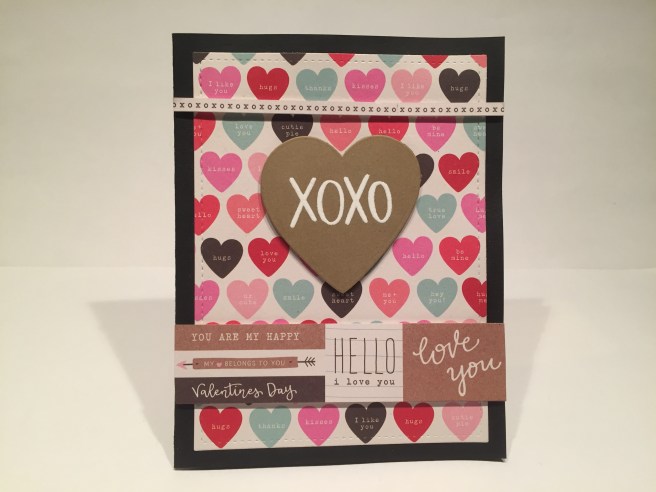 the pattern papers and pieced the strip together where the display hole was. I was going to use the Desert Storm card stock to die cut the heart, (with a Darice “Nesting Hearts’ die) but I thought that my Recollections Kraft card stock was a closer match to the kraft colors on the pattern papers, so I stamped the ‘XOXO’ stamp with VersaMark ink and embossed that with my Ranger Ultra Fine White embossing powder on top of the kraft die cut. I did cut the main background with a Lawn Fawn Stitched Rectangle Die and attached that directly to the black card base. I used foam tape to attach all the pieces to the background, and, lo and behold, we have a pretty masculine Valentine’s Day card. I thought the die cut matched the ‘candy hearts’ on the pattern paper really well, and the pinks and reds don’t really dominate the color pallet. NICE!
So, would I be able to create a card with NO pinks and reds with this kit? Here we go!: I cut out a quarter of the sheet of Desert Storm card stock with the same stitched rectangle die, and stamped the ‘I Really like you’ sentiment in Cracked Pistachio Distress oxide ink (matched that mint card base really well!) and embossed that with some Ranger clear embossing powder. I usually strive to use ALL the stamps in a stamp set on my 10 cards, and was worried that I wouldn’t be able to use all of the ‘block text’ stamps in the set, but after running across the ‘block text’ pattern paper, I decided to use them all on one card! I literally mounted the stamp set to my Tim Holtz stamp platform, and stamped ALL the text blocks in the exact same place where they were mounted on the acetate. I used Distress Oxide ink in Walnut Stain, and added a couple of rows of the heart border stamp as well. I added a strip of the pattern paper directly to the top of the Desert Storm piece and then mounted the whole piece to the Mint card base on a piece of fun foam for a touch of dimension. A few SSS Moonshine Confetti sequins adds a touch of sparkle, and the result is a Valentine’s Day card without a single spot of red or pink! YAY!
Well, I knew that I had 6 red and pink card bases to use, so I embraced the pink and went 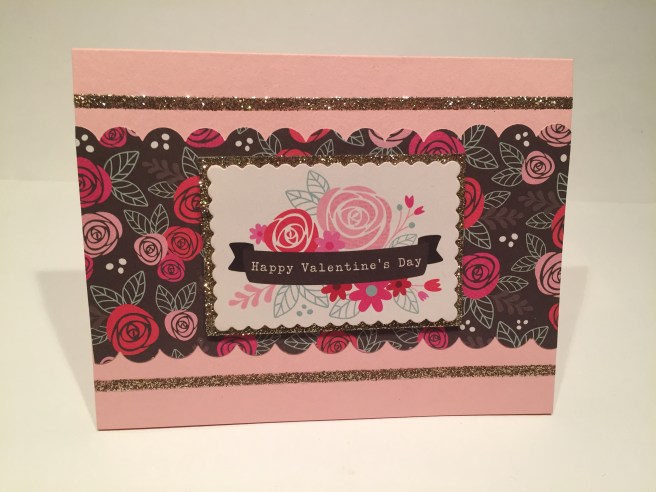 with the color flow! This Happy Valentine’s Day banner arrangement was one of the bigger images in the pattern papers, and when I discovered that I had a scalloped die that fit it perfectly, I decided to go ahead and use it. That scalloped die is one of the very first dies I ever owned, and I have no idea where it came from anymore… sorry! I paired that piece with the matching pattern paper (I like that the sentiment flowers are on white and the background flowers are on black – nice contrast while still matching!) and punched a scallop on the edges of that pattern paper with my American Crafts border punch. The Vintage Platinum Distress Glitter Dust looked enticing in the bottle, so I wanted try it out! Using scor-tape, I glittered the edges of a scrap piece of card stock to make a mat behind the sentiment, and added two stripes to the Cotton Candy card base with 1/8″ scor-tape. I attached the pattern paper directly to the card base, and used foam tape to mount the mat and the sentiment for some nice dimension. I LOVE the look of that glitter, but when they say glitter DUST they mean DUST! This stuff is SO FINE that it went everywhere -even with me being super careful to try to contain it! I will have to try mixing it into some texture paste or something to see if I can achieve the same effect while cutting down on some of the mess! TBD! Yes, this is PINK but not overly fussy and feminine…!
Okay, that’s one of the Cotton Candy card bases, let’s try using the Schoolhouse Red base. I did really like the heart shape created with xoxo’s from the cut-apart sheets and paired  that with the xoxo pattern paper. Again, the kraft color on the pattern papers matched my Recollections Kraft card stock better than the Desert Storm card stock, so I used that for a mat behind both pieces of the pattern paper, attaching the XOXO paper and mat directly to the card base, and the heart shape paper and mat with some foam tape. In my continuing efforts to use ALL of the stamps, I used the xoxo border stamp (I found both border stamps in this set a little short – neither would go clear across (horizontally OR vertically) an A2 card base – odd) stamped with VersaMark ink and embossed with my Ranger Silver embossing powder on the top and bottom of the card. Now, I was looking for a long sentiment for this card, but all the sentiments from the stamp set were pretty short, so I reached for my Lawn Fawn ‘I Love You’ border die and cut that out of some silver metallic card stock and a piece of craft foam. I glued those together for a really nice and chunky, yet delicate sentiment. I really like all the different xoxo’s on this card, and I have to admit that I truly LOVE that Schoolhouse Red card stock!
SSS has included the Doll Pink card stock in some of their other kits, and, if I have to use pink, I do like this Doll Pink. In our March 2017 card kit from Simon Says Stamp, we got a sample of the Nuvo Embellishment Mousse in Peony Pink, and I thought that was a pretty close match to the Doll Pink card base, so I grabbed a Julie Balzer “Swirly Garden” stencil and a piece of black card stock from my stash and created a background for my fifth card. I did have to add some water to my old pot of mousse and let it re-hydrate in  order to get it to spread enough to go through the stencil (that mousse dries out fairly quickly no matter how tight you screw the lid on..!) but I got some good coverage with the leftover mousse, and, after it was sufficiently dry, cut it out with my Stitched Rectangle die. I liked the color, the texture, and the pattern so much that I thought a simple sentiment was all this card needed. I did attach the stenciled piece to a black mat and attached those directly to the card base, then took that old scalloped rectangle die to cut another piece of black card stock from my stash for the sentiment. The ‘You’re My favorite” stamp is from the stamp set, and I stamped that (multiple times!) with the Delicatta Pink Shimmer ink cube using my stamping platform and attached that to the card with foam tape. I like the brightness of that ink on the black, but I don’t think the ‘pink’ particularly reads very well. However, the shimmer from the ink and the shine of the embellishment mousse are really very eye-catching and I think the pink and black work really well together without being too girly-girly… Do you think so?
Now back to the 2nd Cotton Candy Card base. I’ve used three of the four sentiment stamps by now, so I started doing my own sentiments on my Silhouette. I really love the ‘Always kiss me goodnight’ and created that using the Ballerina Script font. I used my Silhouette to print and cut that sentiment and also cut two mats for the heart (one in plain red and one in gold metallic) on the Silhouette as well. I decided to use the gold because all the stickers were outlined with gold – a touch odd to have gold stickers but silver glitter in the kit… I kept reaching for the puffy stickers only to realize that I needed some gold to match! So that’s where the gold metallic accents come from…! I used that  great striped pattern paper from the kit, and outlined that with some thin strips of gold directly on top of the card base. There are 4 layers of the pink printed card stock glued together, 3 layers of the red mat glued together, and a single gold mat on the bottom – that whole assembly is foam taped to the card base. I stamped all of the tiny heart stamps in Distress Oxide Fired Brick and used clear embossing powder on them all for a little shine. One of the puffy stickers from the kit and an old red heart brad complete the embellishments here, and I think the clean unadorned lines feel very masculine! LOL!
I was starting to feel a little guilty about using all those ‘word block’ stamps on one card, so I though it would be fun to pair a couple of those up with an oversize ampersand.  On the Mint card base, I created three mats – the bottom is Recollections Kraft card stock (3″ wide), then the teal polka-dot pattern paper (2.75″ wide) and the xoxo pattern paper (2.375″ wide) on top. I cut the ampersand on my Sillhouette out of 3 layers of my kraft cardstock in the Chopin Script font, glued them all together, covered that with my Spectrum Noir Sparkle pen and glued it down to the card front. I stamped the ‘HUGS’ and ‘KISSES’ block word stamps in Distress Oxide Walnut Stain on my standard Staples ivory card stock and fussy cut simple boxes around them before attaching them to the card with foam tape. The heart and lips puffy stickers added a nice touch of whimsy and shine to a fairly simple, but very handsome card – and not necessarily a ‘Valentine’s Day’ card.
I ran across this great sentiment on-line, and thought it would work very well with the stitched heart stamp from the kit – and here’s that terrific Schoolhouse Red card stock! I used my stamp platform to stamp two rows of that stitched heart stamp along the top and bottom sides of the card base with VersaMark ink and embossed them with Ranger White super fine embossing powder. I cut a piece of red glitter card stock from my stash (1.5″ wide) and created heart scallop border on a piece of the red gingham pattern paper with my American Crafts Border punch, glued that and glitter card stock directly to the card base. Back to my Silhouette (have I mentioned how much I love my Silhouette Portrait in this post yet? LOL!) for this great sentiment. ‘you are my’ is in the DIN Condensed font and the ‘Happily Ever After’ is in the Smoothie Shoppe font. I cut three of those and glued them together and then glued those to a mat cut from vellum, and used foam tape to attach the whole sentiment to the card base. I love how the vellum kind of blurs the edges of the pattern paper around the sentiment. I used my Spectrum Noir sparkle pen to fill in the centers of all the stamped hearts, and a few tiny Fimo Fun hearts from Queen & Co. add just the perfect finishing touch to this non-frilly valentine.
I still have the large solid heart stamp to use, so, for a little adventure with color, I stamped a row of six hearts on some white card stock with my stamp platform in a rainbow of Distress Oxide inks: Wilted Violet, Broken China, Cracked Pistachio, Fossilized  Amber, Spiced Marmalade, and Fired Brick. I really like the way the Distress Oxide inks are translucent and layer on top of each other so nicely. I was determined to use that fantastic ombre pattern paper and thought that this Lawn Fawn ‘Big Scripty Words’ stamp and die matched with the script on the paper extremely well. I cut the pattern paper with my Stitched Rectangle die, mounted that to the card base with some fun foam, fussy cut the row of stamped hearts and attached them with foam tape to the card front. I stamped the ‘love ya’ sentiment in Worn Lipstick Distress oxide ink on some plain white card stock, and embossed it with clear embossing powder to add some shine and a little depth. I used the matching die to cut four layers of the white card stock (including the stamped sentiment) and glued them all together for a real chip-board effect with the sentiment. I added that great skinny washi tape (I just got that for Christmas!) to the top and bottom of the pattern paper and I am amazed at how perfectly that new tape goes with this card! I did think this was the only sheet of patter paper that actually matched the Doll Pink card stock, and I am pleased at how the colors stand up and demand to be seen on top of all that pink..!! Not necessarily masculine, but clean and modern at least!
Now we get to my last card of this kit. The only stamp I haven’t used is the ‘Love You’ stamp, and I have the last black card base to use, so, in lieu of a shaker card or a slider card this month, I created this fun pull tab interactive card.
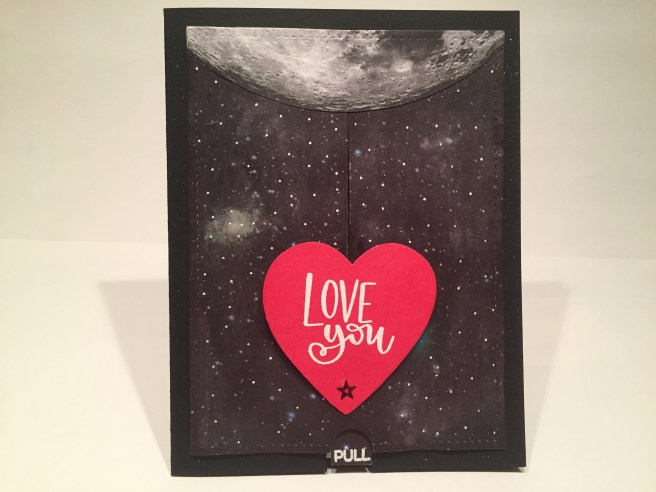
 This action is based on a double slider card, but instead of pulling the tab and having something come out of the other side of the card, you pull this tab and the heart goes up to the moon revealing the rest of the sentiment: ‘to the moon and back’. And yes, if you push the tab the heart returns to it’s starting point. I simply added a small slit to the front of the card that allows the heart to be attached to the plastic bag ‘conveyor belt’ with a simple paper hinge. The galaxy paper, moon and continuation of the sentiment were printed and cut with my Silhouette (that’s the Arabella font) and I stamped the sentiment with VersaMark ink on my red card stock, embossed it in white and die cut it with my Darice Nesting Heart die. Lots of Sheer Shimmer Spritz makes the galaxy really sparkle, and now the ‘Love you to the moon and back’ sentiments becomes almost literal as you move the heart to the moon and back..! LOVE this so much! Now here’s a very macho Valentine’s Day card with a little engineering magic to convey your deep manly feelings for your loved one! LOL!!! This was so much fun to figure out and create! I LOVE IT!!
 Here we have a very handsome set of Valentines that avoid the frill and frippery so often associated with the holiday, yet still feels artistic, sincere, clean and modern. I did have a fun time with this card kit, and am proud to say that I did use every single stamp in the stamp set, and I used a little bit of everything that came in this kit. Now THAT was the fun part! I do have plenty of ink and glitter left over and a few sheets of pattern paper and, of course, the ‘Really Like You’ stamp set will find a loving home in my stash! That about wraps up the SSS January 2018 card kit on this end! The last I looked, this kit was still available at SimonSaysStamp.com if you want to partake in some of the loving..! Thank you so much for sharing your time with me, I hope you enjoyed my cards and somewhat wacky ideas – It’s always a pleasure to be able to share with you here. If you have any question or comments please use the comment button and if you’d like to contact me directly, go to the contact page and send me an e-mail! Spread the Cheer, (and the LOVE) and Happy Crafting!!
