
Hello Folks! Scott here with my 10 cards from the Simon Says Stamp December 2017 ‘Milk and Cookies’ card kit – FINALLY !! The holidays really kept me busy this year and it was difficult for me to find time to sit down at my desk and work on this kit. Add to that the fact that we made and sent 120 Christmas Cards this year (video and post to follow soon..!) and you might see why I am a little bit behind!. The Milk and Cookies Card Kit  came with the “Christmas Squad” stamp set featuring Santa and Mrs. Clause, a gingerbread man, a cookie, glass of milk and a dog and a cat as well as a few holiday sentiments. We received a dozen double-sided “Milk and Cookies” pattern papers from Doodlebug with an exclusive set of matching ‘sprinkles’ (enameled stickers) and a Tsukineko Delicata stamp cube in Rose Gold. Also included in the kit were three sheets of glitter card stock (A4) from Tonic in Silver Screen, Tropical Tide and Candy Floss, and one sheet of Simon Says Stamp Ivory card stock and one sheet of Neenah 100# Desert Storm card stock, and a teaspoon of Colorful Confetti sequins. This whole kit is very cute and very Christmas-y.
  • As usual, I stamped a couple groups of images with SSS Intense Black ink on some Bristol Smooth card stock and colored one set with my Zigg Clean Color Real Brush Markers. These are very nice images, but, other than the heads, they have very small areas for coloring – that’s why I like the Zigg brush markers for coloring images like this – the brush tip will get into those tiny areas with no problem. I did like the pattern paper that featured Santa sitting in his chair in front of the fire and Christmas Tree, but I thought the image of Santa was comically tiny – kind of looked like Edith Ann (Lily Tomlin) in her giant rocking chair (and that’s the truth! THBPBPTHPT!). The stamped images were much larger than the printed images, so I decided to fussy cut the colored images and group them together in such a way that they covered up the Santa and the cat on the original image. Now, I may be old and behind the times, but I had to look up to see what #squadgoals meant. Not something I have ever used or have ever even seen used, but obviously a modern reference to ‘family’. I ignored the ‘squad’ sentiments and created a simple “From our family to yours” sentiment (Arial font) to use with this
  first card. I used a white card base from my stash, and covered the front of that with the tiny polka-dot pattern paper and trimmed down the ‘living room’ paper to fit. I did add a couple of strips of the tiny red polka dot pattern paper to the sides of the image for a bit of extra framing, and added a touch of the larger red polka dot paper as a mat behind my sentiment. I used foam tape to mount the characters and sentiment to the front of the card, and now the characters are the focus of this scene instead of the living room. I used a black glaze pen on the characters eyes, and a few confetti sequins from the kit on the wreath and tree, and some Spectrum Noir Sparkle Pen on the fire, star and white ‘fur’ parts of the costumes. I did stamp the ‘Merry Christmas’ stamp on the inside of the card, and voila! my first card for this kit came together very nicely. • There were a couple of sheets of cut-apart images and sentiments included in the pattern paper set, and I went with the ‘we belong together’ sentiment for my second card.
  Since that cut-apart sentiment was in the blue with candy-cane stripes, I decided to use the Tropical Tide glitter card stock for my background and the striped pattern paper for my focal image. I used my Lawn Fawn Stitched Rectangle dies to cut the glitter card stock and some plain red card stock from my stash (excellent match!) and used my We R Memory Keepers Next Level embossing folder to add some hearts to the red pattern paper. Those are glued flat to the Ivory card base (from the kit) and then I used my stitched oval dies to cut more blue glitter card stock and the red and white striped pattern paper and a scrap of white card stock for the base of my Milk and Cookie (and heart) stickers from the kit. I used foam tape for the top two layers and for the milk and cookie stickers as well. I also cut a small blue glitter card stock mat for the sentiment and mounted that with foam tape as well. Nothing Christmas-y about this card! I only wish the milk and cookie stamps were larger so I could make more cards of this kind rather than more Christmas cards. • Though I am not really one to use a lot of cut-apart images on my cards, I did like the “December 25” image, and when I discovered that the gingerbread man sticker was the same size as the printed gingerbread man, I decided to use this image and paired it up with the Christmas tree cut-apart and the holly pattern
 papers. I did use Glossy Accents for the gumdrops to the left of the gingerbread man (the gumdrop stickers were not the same size) to match the g-bread man, and chose two of the cut-apart sentiments – “Santa Clause is comin’ to town” and “have a holly jolly Christmas”. I cut the holly pattern paper to 2.5″ x 5.5″ and glued that straight down to a white card base from my stash, and (because of the pink berries on the pattern paper) added two thin strips of the Candy Floss glitter paper to the top and bottom edges. I added the holly stripe from the pattern papers below the center piece to punch up the ‘holly’ theme and sentiment, and used foam tape to mount all the sentiments and images to the card. I did cut out the tree circle and added a thin mat of the pink glitter to that piece for a little extra pop. Some of the Colorful Confetti sequins on the tree and by the sentiments adds a nice touch of bling and pulls your eye to the sentiments. It wasn’t until I finished this card that I realized that both of these sentiments are actually holiday song titles! And, even though I did use some pink accents, this card doesn’t scream pink at all! • Now, I think this is the first time I’ve actually held the Neenah Desert Storm card stock in my hands and it was good to see and feel what appears to be the ‘go-to Kraft card stock’ these days. I wanted to experiment with coloring on the card stock directly, so
  I stamped the Santa stamp on the Kraft card base (using SSS Intense Black ink), and colored him up with my colored pencils. I did put down a light layer of white pencil over the entire stamp before I colored it, and also cut some stamping mask paper to cover Santa, so I could create a soft blue (Broken China Distress oxide ink) halo around the image. I did use my new Ink Dusting Brushes and I love the soft effect that those brushes create. That highlights the stamped image very nicely. I did re-stamp Santa after coloring to reinforce the outline of the stamp which tends to get a little ‘fuzzy’ when colored with colored pencils. I simply left the stamp in the same place on my stamp platform to facilitate a second stamping. That really added a lot of detail and a crisp black outline to the colored image. Of course I also dotted his eyes with my black glaze pen! I cut an oval window in a 3″ wide strip of the small red polka dot pattern paper and mounted that to the card base with foam tape for some dimension. I used the ‘HAPPY HOLIDAYS’ cut-apart sentiment and since the text was blue, added two 1/4″ strips of the Tropical Tide glitter card stock to either side. Foam tape for attaching the sentiment adds a little more dimension, and some snowflake sequins from my stash along the edges of the window really highlights the opening. I did add a touch of Ranger Enamel Accents in Caribbean Coast to the center of the sequins, and this is my Holiday card starring SANTA! I really liked coloring this on the Kraft card base and hope to experiment with that technique more! • I do really like the “Christmas is Clause for Celebration” sentiment in the stamp set and decided I had to feature Santa on one more card! I went ahead and colored the
  second set of characters with my Crayola Fine Line markers that we received with the SSS May ’17 Card Kit, and I was pleased at how nicely those markers move on the Bristol Smooth card stock. Using the second Desert Storm card base, I used the mini polka dot pattern paper (1.75″ x 5.5″) and the red and white striped pattern paper (2.125″ x 5.5″) and glued those directly to the card base for my background. I fussy cut the Santa (leaving a white border this time), and mounted him with foam tape to the Santa head pattern paper cut with the stitched oval die, foam mounted that to an oval cut from the Silver Screen glitter card stock and foam taped the whole assemblage to the background. I stamped the sentiment on a scrap of white card stock with Ranger Archival ink in
  Vermillion, and cut that out with a small Lawn Fawn Stitched Rectangle Die. I did add two silver glitter peel-off stickers (from the Love From Lizi September ’17 Card Kit) to the sides of the background to pull the focal image and the background together, and I used a few Colorful Confetti sequins, black glaze pen for the eyes and a little bitty tree gem from my stash (can’t find those anymore!) for a final touch of bling. I really love the full Santa on top of all those Santa heads on the pattern paper! • I did go back to the ‘sprinkles’ sheet and used the milk carton sticker and the other cookie sticker to do a shaker card. I used the milk and cookie cut-apart square as the background for the shaker because the cookie sticker was the same size as the printed cookie, and the carton of milk would cover up the printed glass of milk while still being able to use the ‘straw’ (and hearts!) as part of the image. I did use a little bit of white-out correction tape to
 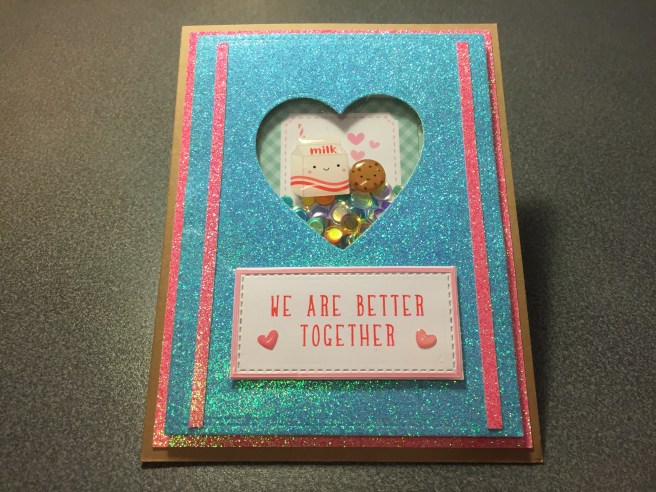 cover up the second cookie on the cut apart print. I liked the way the Tropical Tide and Candy Floss glitter card stock worked together, so I cut a mat of the pink glitter at 4″ x 5.25″, and the blue glitter at 3.75″ x 5″ and used a simple Darice Nesting Heart die to cut the shaker shape. I glued the pink glitter mat directly to a Kraft card base from my stash. I doubled up my foam tape for extra shaker dimension behind the blue glitter card stock, and used the confetti sequins for the shaker bits and the stickers for the focal image. I couldn’t find another appropriate sentiment for this card among the cut apart pattern papers, so I created one of my own using the sketch function on my Silhouette to write “We are better together” in Paprika font (that’s a Silhouette font) with a Pilot G-2 red ink pen on a scrap of white card stock. I LOVE that sentiment and being able to ‘draw’ it in red made me a very happy camper! I cut out the sentiment with a small LF Stitched Rectangle Die and outlined it with some pink peel-off stickers (from the Love From Lizi July ’17 card kit) for a little extra pop and then felt the need to add a couple of pink ‘racing stripes’ down the sides of the blue glitter card stock. I also really like how the straw and the hearts on the printed cut-apart work with the stickers attached to the top of the shaker acetate. The last two heart stickers from the sprinkles sheet highlight the sentiment, and we have another card that is more oriented towards Valentine’s Day than Christmas. • Okay! Back to the stamp set! I stamped this scene of the cat and dog and tree with SSS Intense Black Ink using stamping masks on some Bristol smooth card stock, and colored everything with my Zigg Clean Color Real Brush Markers.
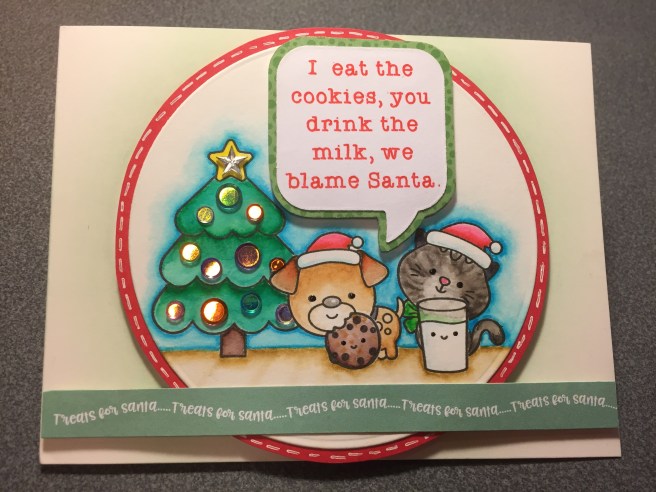 I wish the animals had more interesting expressions on their faces, but I figured they would do here. I ‘drew” the sentiment (love my Silhouette!) in the Typewriter Hand font with my red Pilot pen (again) on a scrap of white card stock and cut it out using a Darice Word Bubbles die. I cut out my little scene vignette with a Darice Nesting Circle die and hand cut mats for both the die cuts from pattern paper and my own red card stock. I used my new ink blending brushes (again) to add a little Cracked Pistachio (Distress Oxide ink) halo on the Ivory card base. I used my Signo Broad white gel pen to add some stitching around the circular red mat, and added the ‘treats for santa’ pattern paper strip (matched the cracked pistachio ink!) along the bottom. Colorful Confetti Sequins provide ornaments on the tree (I even cut a couple to fit around the dog) and some black glaze pen for their eyes and I have a pretty funny Christmas Card! • I wanted to feature the Mrs. Claus stamp on a card so I grabbed another Kraft card base from my stash, and fussy cut the Mrs. Claus stamp colored with the Crayola markers and kind of combined a couple ideas from earlier cards to come up with this card that uses the “All I want for
 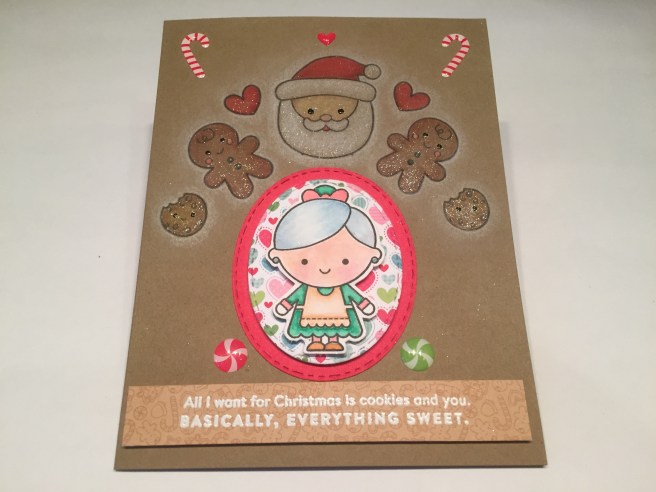 Christmas…” sentiment stamp from the kit. I masked and hand-stamped Santa’s head, the gingerbread cookies, the round cookies and the hearts directly on the card base and colored all the images with my colored pencils. This took a little bit of practice to get the stamping placed just right and I wasted a little bit of my Kraft card stock in the process, but I finally got the images where I wanted them. I also did a light white ‘halo’ around the images to help make it look like they were ‘in her thoughts’. Two stitched ovals from the pattern paper and my red card stock provide a mat for Mrs. Claus, and I stamped the sentiment in VersaMark ink on a strip of pattern paper and embossed that in Ranger white embossing powder. A few stickers of sweets from the Doodlebug Sprinkles, black glaze pen on the eyes, some Spectrum Noir sparkle pen on the cookies and Santa, and that’s plenty of bling for a card starring Mrs. Claus! I was shooting to make this card look like Mrs. Claus was day-dreaming about Santa and cookies, and I think I achieved that! • Now I have a number of extra Gingerbread men stamped on Kraft card stock left over from my practice runs on the Mrs. Claus card, so let’s use those to make a card that features the gingerbread man stamp! My red card stock from my stash (Recollections) was such a good match I decided to do the last couple of card bases on red. I fussy cut
  four of the gingerbread men and lightly colored them with my colored pencils and used both my glaze pens (on the outside two) and Nuvo drops (on the inside two) for their decorations. I foam mounted them with a couple of the gumdrop sprinkles to a double mat of pattern papers (hearts cut at 1.625″ x 5.5″ – brown pattern paper cut at 1.25″ x 5.5″) down the center of the card. I did add .125″ strips of the Silver Screen glitter paper to the edges of the pattern paper and and matted two of the cut-apart stripes to the glitter card stock as well for the top and bottom of the card front. The “have a sweet Christmas” sentiment is cut from the pattern papers and foam taped up on the bottom strip, and here we have an adorable Christmas card starring the Gingerbread Man Stamp! • Now it seems the only stamp I haven’t featured in a starring role is the Christmas Tree, and I am sorely in need of a little bit of a pun, so let’s remedy that right now! Let’s do some paper-piecing! I stamped the tree (in SSS Intense Black Ink) three times on the green polka dot pattern paper and fussy cut the three different layers and then stacked them up with a little foam tape at their bottom edges. I did fussy cut a trunk from the brown pattern paper and of course outlined all the cut edges with a black brush marker.
  I actually had this brick piece already cut because I was thinking of using that with the ‘Santa colored with pencils on Kraft’ card but the white on the pattern paper was too white when compared with the white on the kraft colored Santa, so I had this piece already ready already! I used a square of the merry Christmas pattern paper for the background behind the tree, and mounted the brick pattern paper to the red card base with foam tape. Back to my Silhouette and my Red Pilot pen for this pun-y sentiment that is perfect for this card! Again, I ‘sketched’ this sentiment with my Silhouette (Paprika font) on a scrap of white card stock and die cut it out with a Darice Banner die. I did add a couple of .125″ strips of the candy floss glitter card stock down the sides of the card front (some of those bricks are rather pink!) and used the Colorful Confetti sequins for all the ornaments on the tree. I really appreciated that these sequins fit on the tree stamp perfectly. A gold star gem from my stash and couple more of those adorable tree gems (I know I got those at Oriental Trading Company an number of years ago, but I can’t seem to locate them now!) highlight the sides of the sentiment and now there’s a pun-y card starring the Christmas Tree Stamp.!
  • SO… that’s 8 Christmas Cards and 2 ‘love’ cards from this card kit. I know this took me a long time to get out, but I hope you enjoyed what I came up with this month. I did think this card kit was a little high on the ultra-cute scale but, as usual, once I got started working on my cards, ideas started flowing a little easier. Though I didn’t use the Delicata Rose Gold stamp pad, I did use some of the pink in the kit for highlights, and I think I was able to avoid any real pink overload!! And now I have a real honest-to-goodness Christmas stamp set with images in my stamp collection. All in all a very nice, almost retro, vintage-y feel with these holiday cards. I have plenty of extras left over from this kit and I am looking forward to making some valentines with the Simon Says Stamp January Card Kit. Now even I can deal with some pink in my Valentine’s Day cards! Thanks for joining me here today and sharing your time with me! Please like me, List me, Pin me, Post me, Follow me and by all means… Happy Crafting!!
