
Hello folks!, Scott here with another Love From Lizi Card Kit for August of 2017. Check out my previous blog for the un-boxing of this ‘foodie’ card kit. Lizi always includes a bunch of supplies in her kits and this month was no exception! My goal is to use as many pieces and parts from the kit in my 10 cards as possible… often that proves to be a challenge as there are so many goodies. 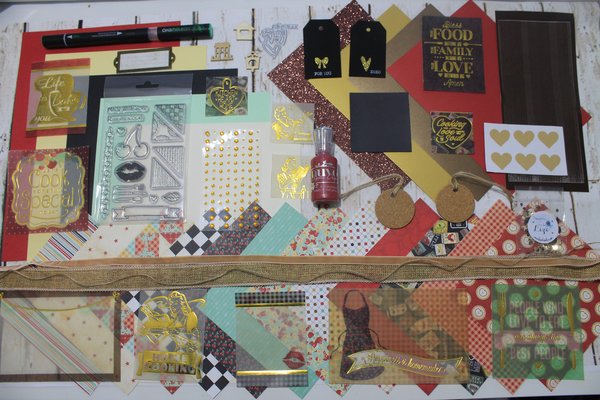
Lizi always includes 5 pieces of A4 cardstock in her kits, so I trim a half an inch from the long ends and split the cardstocks in half to make 5 1/2″ X 4 1/8″ card bases – just shy of a regular A2 card. From my stash, I added some assorted pieces of white cardstock, black cardstock, dark red cardstock, and I discovered that my Staples 110# Ivory cardstock was almost a perfect match to the off-white cardstock from the kit, so all of the vellum pieces from the kit got mounted on that ivory cardstock. I keep that ivory cardstock in my stash mostly for mock-ups, experiments, and as my inexpensive trial and error cardstock… This stuff is so cost-effective that I don’t mind making mistakes with it!
I admit I had some qualms about the sentiments in this kit… they didn’t particularly seem like card sentiments, more like scrapbook sentiments and cooking craft sentiments, but I have no problem bringing in my own sayings and sentiments to make cards that are more useful to me…!

My first card features the “Home Cooking” vellum from the kit. Mounted on the Staples Ivory cardstock with Stick It adhesive sheets covering the entire back of the image – that way, you can’t see your adhesive through the vellum. I outlined the mounted vellum with the chocolate peel-offs from the kit, mounted that on the gold glimmer specialty paper from the kit, and mounted those on a black cardstock mat and foam taped the entire assemblage to the apple pie pattern paper included in the kit. I did add small touches of the burlap and velvet ribbon from the kit (they match perfectly) to the top and bottom and mounted it all on the dark red card base. Fairly clean and simple, but “Home Cooking” doesn’t mean much to me as a sentiment, so I added a little more inside –

Now there’s a reason to send this card to somebody!! LOL! This sentiment I printed with my Silhouette Software in the Marketing Script font on that Ivory cardstock, stamped a couple of hearts from the stamp set in Fired Brick Oxide Ink and die-cut the cardstock with my Lawn Fawn Stitched Rectangle dies. Just a simple addition inside the card and what might be considered an unwieldy sentiment on the front, takes on new meaning…!
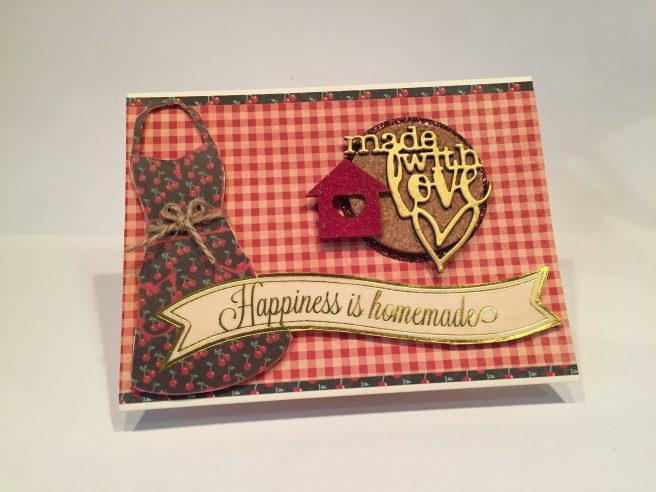
For card number two, I took the large 6″ wide vellum piece with the apron and banner and cut the images off the gingham background. I thought the color of the gingham on the vellum was not nearly as bright and lively as the gingham pattern paper, so I mounted the vellum apron and banner to some ivory cardstock and popped that up with some foam tape on the gingham pattern paper. I added some twine from the kit to stand in for the apron strings, and cut thin strips of the cherry pattern paper to trim the top and bottom. The “made with love” die cut is from the kit – I die-cut 4 black pieces and one from the gold glimmer specialty paper and glued them all together to make a nice chunky die-cut. I thought that would be enough, but when I went to add the die-cut to the card, it seemed a little naked to me, so I glued the die-cut to one of the cork tags from the kit (twine removed) but that still wasn’t enough. I die cut a circle from the glitter specialty paper in the kit and mounted the cork tag to that, but I still wasn’t satisfied, so I broke out one of the wood veneer die-cuts from the kit, colored it red with an alcohol marker, added a little Wink of Stella to it, and attached that to the whole assemblage. Finally, a big, chunky sentiment that fills the space very nicely. I can see using this card with a gift of pound cake or banana bread, but other than that, I don’t see much traction to be had with these sentiments.
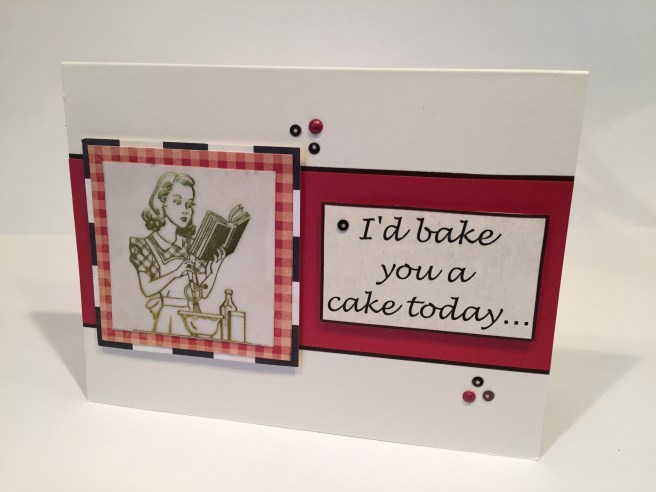
Now I’m going full tilt with my own sentiments…! There were plenty of vellum pieces without sentiments, so I focused my attention on them. I really like this retro image of a young lady at the counter with a cook book and egg beater, so I mounted that vellum piece to some ivory cardstock, mounted that to some gingham pattern paper and added that to a square of the black and white tile pattern paper. That whole piece is foam taped up on a rectangle of the red glimmer specialty paper, which is outlined with the chocolate peel-offs. The sentiment is printed with my Silhouette software on the ivory cardstock in Lucida Calligraphy font and I used the peel-offs around that piece before foam taping it to the red glimmer paper. I complete the sentiment inside…
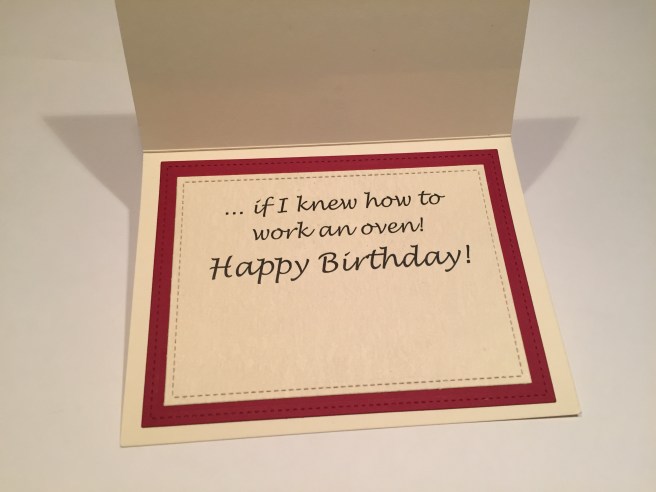
“I’d bake you a cake today … if I knew how to work an oven! Happy Birthday!” The inside sentiment is printed on the ivory cardstock, cut with a stitched rectangle die and mounted to some of my own dark red cardstock, which was also die cut with the stitched rectangle dies. An excellent and totally appropriate birthday card! I did add some small sequins from the ‘cookies and cream’ sequin mix in the kit to the front of the card and added a couple small dots of the Nuvo Crystal Drops in Autumn Red which, of course, were included with this kit. I really like this card and can always use another birthday card in my stash..!!

Here’s another one of the vellum pieces that I liked, but found very difficult to read… the “WHAT” is very hard to make out, and I found the order of the text slightly confusing… Not one to be deterred, I went online and searched out a similar stand mixer image and added my own text to it:

Printed on the ivory cardstock with my laser printer (at work), the “Live a Little” is in the Script MT Bold font, and the “Lick the bowl” is Goudy Heavyface BT font. Of course I was able to foil the image with gold deco-foil and a laminator – I have to admit I really enjoy the results I get with the deco-foil! I outlined the image with the chocolate peel-offs, mounted that with foam tape to the mint utensil pattern paper (outlined with the peel-offs too!), wrapped some more of that burlap and velvet ribbon around the mint paper and glued it all down to that great food advertisement pattern paper. Everything is attached to one of the mint card bases and a few sequins from the kit finishes this card off nicely. No sentiment inside, but this would make a great birthday card for any age and would be appropriate for a variety of occasions. AND it’s easy to read!

There was a magnet included with this kit, and, what with the ‘foodie’ theme, I’m sure Lizi was thinking of a refrigerator magnet. Here’s my fridge magnet card – I figured the “Kiss the Cook” stamp went well with the lips stamp in the kit and that made sense to me for something to go on your fridge… so I stamped the lips in the Fired Brick Oxide ink and embossed it with my Ranger Clear embossing powder, stamped the Kiss the Cook sentiment with my Simon Says Stamp Intense Black ink and embossed that as well. All on the ivory cardstock. I added the red and gold vellum strips I cut off of the stand mixer piece and added a couple strips of the peel-offs on the sides.

I used a black card base, with a frame cut from the bronze glimmer specialty paper (cut with Lawn Fawn stitched rectangle dies) to frame a piece of the polka-dot pattern paper with a strip of the striped pattern paper down the middle. I stamped the banner from the stamp set in Walnut Stain Oxide Ink on the ivory cardstock and stamped the “Made with Love” sentiment stamp with the Fired Brick Oxide ink and added a little clear embossing to that too. If you look close, you can see a bit of the outline of a ‘holding’ magnet under the striped pattern paper which holds the magnet to the card while allowing for easy removal. This did use both of the sentiment stamps included with the stamp set on this card. I suppose, this would be an appropriate card to accompany a gift of food or something homemade. Nothing inside the card but some of my ivory cardstock to provide writing space.

“Sorry… sometimes I bake mistakes” is a great little pun to use for an apology card. I went with the older lady vellum piece from the kit, and mounted that to some ivory cardstock and printed the sentiment on the same piece. I created the sentiment on my Silhouette software in Marker Felt font and outlined both pieces with the chocolate peel-offs. I mounted the ivory piece to a mat of the gold glimmer specialty paper and added some peel-offs to the top and bottom of that. I stamped the mint card base with the silverware stamp in Cracked Pistachio Oxide Ink making a little pattern on the top and bottom. I colored the silverware handles with a TN1 Spectrum Noir alcohol marker just to add a little definition to the silverware. I glued one of the craft heart stickers to a piece of the glitter specialty paper and fussy cut that around the heart shape. A bunch of Wink of Stella on top of the heart, and a few sequins paired with the small golden rhinestones finishes up this card with a touch of sparkle. A pun-y apology card!
I’m starting to run low on usable vellum pieces in the kit so I jumped to the cherries and leaf stamp for my next card. There are so many ‘cherry’ puns you can use (since cherry rhymes with so many words!) that I had to reign my baser impulses in…!

“I love you cherry much” is printed on white cardstock in the Noteworthy font. I LOVE using the Silhouette software to design my sentiments. The basic software is free and very intuitive, so I suggest some vast experimenting out there! I stamped the cherries and leaves using a couple of small leaf masks in SSS Intense Black ink on white cardstock and colored the cherries and stems with my Spectrum Noir alcohol markers. I did use the Chameleon marker included in the kit to color the leaves. I fussy cut the image out, and mounted it to the white cardstock with foam tape and then mounted that whole piece to a black cardstock mat. I stamped the border stamp from the kit in SSS Intense Black Ink on another piece of white cardstock and colored the balls with my alcohol markers and added a touch of highlight to them with a white gel pen. A couple of small pieces of the striped pattern paper adorn the top and bottom, the focal piece is foam taped to the white and striped layer, and the whole thing goes on one of the dark red card bases. As a last embellishment, I added Glossy Accents to the cherries for an added touch of dimension and some great shine. I think the border stamp and the cherry stamp goes very well together, and I really like the simple pun on this card.
I have this classic saying in postcard form on my desk:
“Keep Calm and Carry On” was a motivational poster produced by the British government in 1939 in preparation for World War II. The poster was intended to raise the morale of the British public, threatened with widely predicted mass air attacks on major cities. Of course this has been adapted to many uses over the years… I actually found one that said “Stay Alive and Avoid Zombies”! So I felt justified in adapting this to my own uses, and, inspired by the lips stamp in the kit, came up with my own Keep Calm card.

I printed the sentiment on white cardstock in the Din Alternate font using my Silhouette software (I know, I know!) and stamped the lips in Fired Brick Oxide Ink and embossed them with some Ranger clear embossing powder (mmmmmm! – makes the lips look nice and juicy!). I mounted that on a piece of my own dark red cardstock with the edges glittered up with my Wink of Stella pen. I mounted that piece on one of the light yellow card bases and added golden rhinestones from the kit at the four corners. I thought I was being totally original with this, but, naturally, a quick search on the internet and “Keep Calm and Kiss Me” has obviously been around for a while. After completing this card, I also found a Keep Calm font at dafont.com! Oh, well, I guess I’m not as forward-thinking as I might have wished..!! LOL!! But I still like this card very much!
I wanted to try and use all the stamps in the stamp set this month, so I was looking forward to using the triangle pattern stamps to make my own ‘quilt’ using various pattern papers from the kit.

I concede that the stamping on pattern paper may seem like overkill, but I like how it looks on the red and the star pattern paper, and I even like the striped triangle stamp on the striped pattern paper. I stamped all with the Walnut Stain Oxide Ink and fussy cut all 32 triangles out. I actually assembled the quilt on a simple piece of typing paper before mounting it to the light yellow card base. I was thinking of this as a “Welcome to your new home” card and liked the abbreviation of “Welcome Home” as my sentiment. I printed that in Signpainter font on the ivory cardstock and cut it out with my Silhouette Portrait machine. I added one of the wood veneer die-cuts from the kit colored with my Delicata Gold ink pad and a little knot of twine from the kit to finish it off. I was worried that this wouldn’t work out – that the pattern paper would be way too busy – but am ultimately very pleased with the result. I can see my using these triangle stamps to create assorted ‘quilts’ for my card backgrounds!
And now, for card number ten, I realize it’s not the season but I couldn’t resist:

I loved the cherry pattern paper so much – it felt very Christmas-y to me, so I stamped the cherries and a couple of leaves with SSS Intense Black Ink on white cardstock, colored them with my Zigg Clean Color Real Brush Markers and fussy cut them out with a little white border. I had the Santa hat in my image file from a previous Christmas Card as well as the curvy Merry Christmas sentiment. A little fiddling around in Photoshop changed Merry to Cherry and the Santa Hat fit the cherries perfectly without even having to re-size them! The Cherries and the sentiment are foam taped up on the pattern paper for a little dimension, with a couple of thin strips of the gold glimmer specialty paper down the sides and everything mounted to the black card base. I added a little sparkle to the fur on the hats and the sentiment with my Wink of Stella pen and Voila! a very Cherry Christmas card! This makes me giggle a lot!
There was one vellum piece in the kit that I absolutely adored, but couldn’t figure out how to use on a card, so I decided to do a little bonus project this month. All the cooking, baking, food, and related sentiments in this kit kept making me think of a recipe book…

“Let’s Cook Something Special Today” was my favorite vellum piece from this kit – I just couldn’t set it aside and not do anything with it, so I created a nice “Favorite Recipes” gift book! This was the only vellum piece to feature the strawberries and yellow flowers which matched one of the patter papers perfectly, so I mounted the vellum on my ivory cardstock, did a border punch with hearts and scallops on the strawberry pattern paper and added that to the top and bottom of the vellum with some chocolate peel-offs between the two. I used the ‘book plate’ embellishment from the kit but couldn’t print my sentiment on the included tag because it was super glossy, so I printed “Favorite Recipes” on the star pattern paper in the Lucida Handwriting font.
I based the size of this recipe book around a half-sheet of cardstock – 8.5″ X 5.5″ – and I felt like 12 sheets (recipes) should cover most anyone’s favorites – so I only used 6 sheets of black cardstock for all the pages.

I cut slits in the 12 black cardstock pieces to fit a 4″ x 6″ index card for the recipes, and created a cover out of black chipboard that was a little larger all the way around. (8 3/4″ x 5 3/4″) I cut 7/8″ off one end of the chipboard to serve as the ‘spine’ (scoring the cardstock pages at 3/4″ for their fold)  and then created a ‘hinge’ out of the red stripes on a USPS tyvek priority mail envelope. I simply cut the strips off the envelope and, using scor-tape, attached the chipboard pieces back together with a small gap to facilitate the fold.
 I punched small holes on the ‘spine’ and pages, added gold grommets to the holes on the covers and bound the book together with some twine from my stash (the twine in the kit was a little too thin for binding purposes). I added a little washi tape to the front cover for a little decorative touch and my “Favorite Recipes Gift Book” is complete. Now, I could fill this up with my favorite recipes – in which case I would add my name to the upper right hand corner of the cover. OR, I could give this to friends to fill with their favorite recipes in which case I would add their names to the cover.
I believe that this kit lent itself to projects like this or even to scrapbook pages more so than to cards, but I still had a great time creating with this kit. I actually used ALMOST every stamp from the stamp set (the small heart stamp did not get used) and I also used a little bit of everything in the kit (except the chalkboard tags!). I have lots of supplies left over to augment my stash and I am looking forward to the September Kit! Let me know if you have any questions or comments and, as always, Happy Crafting!

You did it again Scott! I especially like the sentiment “Live a little Lick the bowl”. When my kids were little, they used to fight over who got to lick the bowl. I got my kit yesterday and I am now ready to dig in with a few smiles on my face. Happy crafti
LikeLike