
Hello Folks! Scott here today with my ten cards inspired by the My Monthly Hero September 2023 Classic and Premium Kits! This fall-themed kit includes one of Hero Arts most popular product combinations – a window die with coordinating layering stencils! Mushrooms, autumn leaves and capering critters adorn this release.

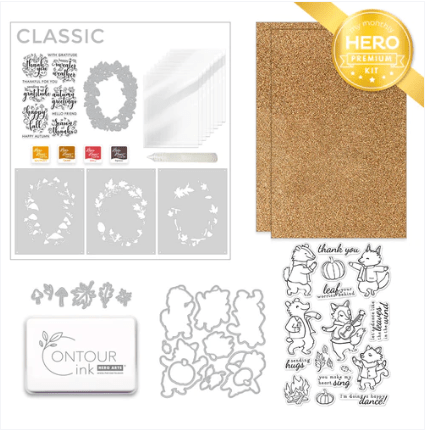
CLASSIC KIT INCLUDES:
• Fall Messages Clear Stamp Set, 4″ x 6″
• 3 Color Layering Stencils, 5.25″ x 6.5″
• Coordinating Fall Window Die
• 4 Core Ink Cubes (Spicy Mustard, Caramel, Cherry, Espresso)
• 8 Clear Card Panels, 4.25″ x 5.5″
• Unicorn Lacquer Pen
PREMIUM KIT INCLUDES:
• Everything in the Classic Kit AND…
• Autumn Critters Clear Stamp, 4″ x 6″
• 10 Coordinating Frame Cuts
• 6 Leaf Fancy Dies
• Contour Ink Pad
• 2 Sheets Bronze Glitter Paper, 5.5″ x 8.5″
So much stuff in our kits this month! As usual, I will make my first five cards using only the Classic Kit… lots of sentiments there but really only one image revealed by the Layering Stencils / Window Die. Let’s dive right in!
I took those Layering Stencils and the included Ink cubes and ink blended the stencils on a 4.25″ x 5.5″ piece of Hero Hues Ivory Card Stock. (Especially with a Fall-themed kit, I find it less jarring to ink-blend on a lightly colored card stock).

I am happy to say that lining up the layering stencils was quite easy – even without using the Window Die (there are registration squares in the four corners of the stencils). I used all four colors of the Ink cubes and did some selective stenciling with small blending brushes to get a little bit of color variety on the leaves and mushrooms. (Spicy Mustard for stems, Cherry and Caramel for leaves on stencil ‘a’; Spicy Mustard for ‘shroom details, Caramel for leaves on stencil ‘b’; Cherry for the ‘shroom tops and Espresso for the leaf details with stencil ‘c’) Looks like I have to be careful with that Espresso Ink – it is rich and quite dark!
I stamped the sentiment using Espresso Ink and embossed it with some Clear Embossing Powder, and ink blended Caramel ink around the edges. I kind of went to town on the mushrooms with the Unicorn White Lacquer Pen… and here I have to be careful of bubbles at the tip of the lacquer pen… nothing worse that getting a beautiful round embellishment on your mushroom and then it pops and leaves just a little flat dot. And finally, some Autumnal sequins from my stash adds a little extra bling to this card. The finished panel is glued to an A2 White card base. Okay… I may have overdid it with the enamel dots a little, but I think the layering stencils work beautifully.
So let’s pair up those Layering Stencils with the Fall Window Die…! I die-cut the Window Die from another 4.25″ x 5.5″ panel of Hero Hues Ivory card stock.


It is SO EASY to line up the stencils with the Window Die! This time, I thought I would just use a single color for each stencil – I used Spicy Mustard ink for Stencil ‘a’, Caramel ink for Stencil ‘b’, and Cherry ink for Stencil ‘c’. I did do a little bit of shading (darker on the bottom, lighter on the top) with these inks, and am kind of amazed at how well the stencils work with just these three colors! I believe this color combo is the one illustrated here and on HeroArts.com.
I remember hearing someone say that the Hero Arts Clear Card Panels will take heat embossing with no problem. I stamped the sentiment on one of the clear panels using Root Beer Reactive ink, and embossed that with Clear Embossing powder. (move quickly when embossing on acetate!) and then glued that to the back of the Stenciled Fall Window die. I glued a panel of plain Ivory card stock from my stash to the front of an A2 Card base, and glued a few sequins to that panel. (so when the shaker bits are at the bottom, you still see a few sequins in the window. I added a double layer of foam tape around the back of the acetate/window die and selected more Autumnal sequins to use as the shaker bits, and attached the window to the card base.
You may notice I restrained myself with the lacquer dots this time! and they seem much cleaner… I often will make a whole bunch of enamel or lacquer dots on a non-stick craft sheet in a variety of sizes, let them dry, and then glue the individual dots in place.

I know I often feel like shaker cards aren’t that big a deal… but card recipients are always fascinated by them – a fairly simple little bit of interactive movement that people love to receive! And you don’t have to go fancy-fancy with your ink blending to get terrific coloring on this window die. I really appreciate the restraint on display here!! Looks Great!
So that’s the stencils alone… the stencils with the window die… How about the Window Die and NO stencils?

Remember you can dry emboss a die without cutting it out for a classy textured “letter-press” effect for your cards. I embossed the Window Die on a panel of Canson Mix Media card stock (138#) and that gave us this lovely detailed wreath of leaves and mushrooms on a lightly textured card stock that not only looks amazing, but FEELS terrific too… Love that texture! I stamped the sentiment in the center with Intense Black ink and colored the bits with my Zig Clean Color Real Brush markers. I glued the panel to the front of an A2 card base and added a Gold Leaf sequin from my stash to add a touch of sparkle. Clean and Classy! (you know I like my white space!)
I wanted to hand-color one of these Fall Window Dies… stencils are handy and quick but will never achieve as much detail as something that’s been colored by hand.

That’s what I’m talking about! I decided to color this die with my Prismacolor colored pencils, so I cut the Window Die from a piece of Stonehenge White card stock (my favorite for colored pencil work) and started coloring – lots of tiny images here so I did keep the points of my pencils very sharp. So much detail and color variations are possible with colored pencils…I also used some Gamsol mineral spirits and paper stomps to blend the coloring… The final result here is worth every minute it took to color!
I played around with what to put in the window… at one point I was going to have a black background with a White sentiment, but, while that certainly made the coloring pop, it also seemed just a little too dark. I came up with this black shadowing by die-cutting the window die on a panel of HA Pitch Black card stock, then I cut away about a quarter of an inch from the center of the die-cut (top and bottom), slid the two sides together and that gave me a nice “reflecting” shadow on either side of the die cuts. Just what the Doctor ordered!
I stamped the sentiment on the front of an A2 card base with Intense Black ink, embossed it with Clear embossing powder, and colored the bits with my Zig markers (the brush tips on Zig markers are fine enough to handle tiny images like these). I glued the colored window and shadow to the card front, and didn’t think it needed any lacquer dots or additional bling of any kind… don’t want to distract from that coloring! Like I said… totally worth the extra time.
I feel like I have given the stencils and window die their fair due, and was looking for something different for this card.

A leaf-shaped card fits the bill! I turned to my Silhouette Portrait to cut-out and create this card. I took a simple leaf shape and enlarged it to card base size, and cut 3 copies of that from Kraft card stock – two copies were glued together for the card front, and the third copy was scored across the top, folded, and the flap glued to the card front.
I knew I was going to add a writing surface on the inside, so I didn’t double-up on the back piece. I stamped the sentiment using Intense Black ink and embossed it with Clear embossing powder. I added a suggestion of veins (and outlined the leaf) with an alcohol marker and colored the stamped bits with (very sharp) colored pencils. Instead of adding sequins or jewels for bling, I grabbed some Gold Hero Wax and applied it lightly to the card front with a finger. That proved to be just the finishing touch this card needed! And this card stands up on its own as well! I do love my Silhouette Portrait!

If you’d like my pattern for this Leaf Card just send me a request at cardcutups@gmail.com. Specify if you’d like the pattern as a Silhouette file or as a simple PDF, and I will pass that along to you as soon as I can!
Now we get to crack into the Premium Kit supplies and those incredibly cute critter stamps!

This Critter (I decided he was a Grey Wolf) with his arms spread wide seemed to be begging for a hug! We got that Contour Ink pad in the Premium Kit which is specially formulated for “no-line watercoloring” on your stamps. I figured I’d give that a whirl and stamped this critter on some Bristol Smooth card stock using the Contour ink. I watercolored him using my Zig watercolor markers and a small paintbrush. I’m not a big practitioner of this method, but I think he came out quite nicely… I do like the furry texture I was able to achieve, but I think these fairly small image stamps make no-line watercoloring a bit of a challenge, and it’s easy to lose some details if you’re not paying close attention! After all the watercolor was dry, I die-cut him out with the matching Fancy die.
I cut a panel of Kraft card stock to 3″ x 4.25″, added some finger swipes of the Gold Hero Wax around the edges, and glued a thin Pitch Black mat behind. I die-cut some of the Bronze Glitter Paper with a HA Nesting Infinity Circle die, and cut a Pitch Black mat (using the next larger die) to glue to the back. I stamped the sentiment using Intense Black ink, glued the background (and mat) to a White A2 card base, glued the circle dies on top of the background, and added our critter with foam tape. The Bronze Glitter paper and Gold Hero Wax give us plenty of shine on this card so no embellishments needed! I think these critters are cute enough to stand on their own… no fancy “scene” required!
I often hesitate to use my Spectrum Noir alcohol markers to color small images just because I don’t think the tips on those markers are fine enough to get into all those tiny spaces… but if I’m really careful…!

It’s the sentiments in this stamp set that dictated which critters I would use. The guitar playing Fox goes with this sentiment perfectly! I stamped him on some Bristol Smooth card stock with Intense Black ink and colored him with my Spectrum Noir alcohol markers. Reminds me of Robin Hood with that green tunic!

Here’s a shot of the alcohol marker colors I used on this musical Fox. I die-cut him with the matching Fancy die and set about creating a background. I remembered I had this OLD Darice Music die in my stash and thought that might provide an interesting background. I die-cut that from some Kraft card stock and realized that the die is completely backwards… now I could just flip the die (showing the unattractive ‘back cut”) or just excise the treble clef and leave it at that.
I die-cut a piece of Ivory card stock with a (3.75″x5″) Lawn Fawn Stitched Rectangle Die, and splattered some Espresso ink on that before adding a thin Champagne Metallic mat to the back. I glued those both to an A2 card base and glued my music staff in the center. I die-cut a bunch of small hearts (HA Nesting Infinity Heart Dies) from the Champagne Metallic card stock and glued those on top of the “notes” on the staff. I added the Fox with foam tape and scattered a few more hearts around for good measure. Hearts, Music notes, Guitar… all work perfectly well with this sentiment! Love this (even though the notes are technically backward – stems going up should be on the right side of the note) But I imagine (hope) most folks won’t notice…!
Other than hugging and playing music, it seems that dancing is a favorite activity for these critters…!
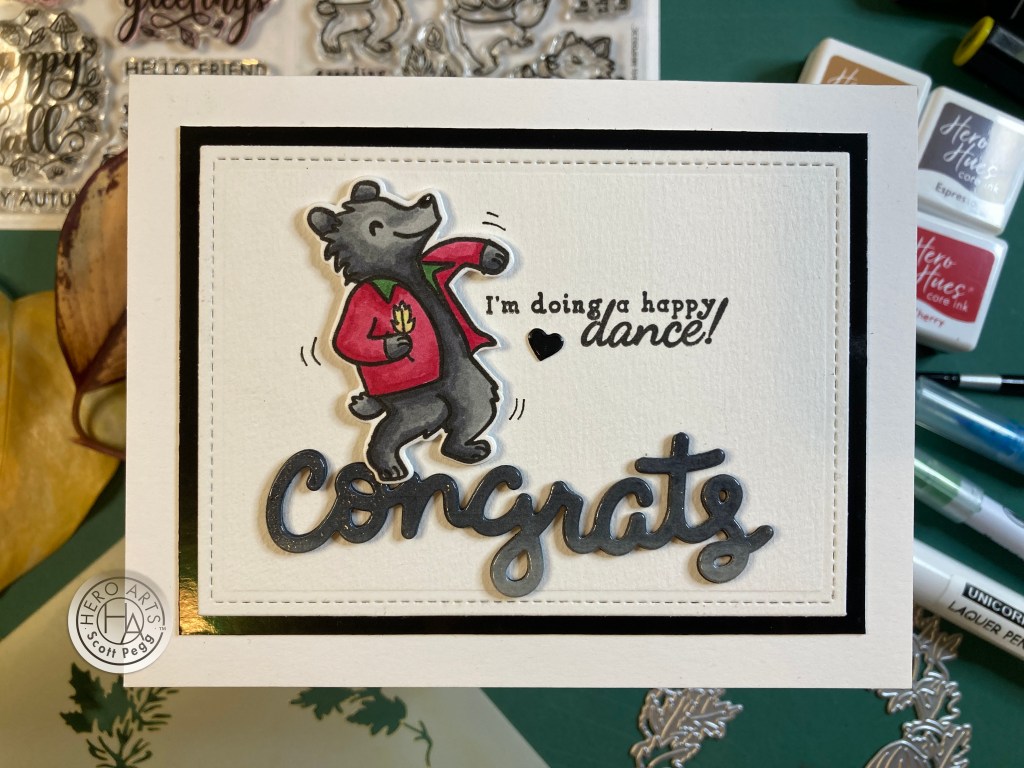
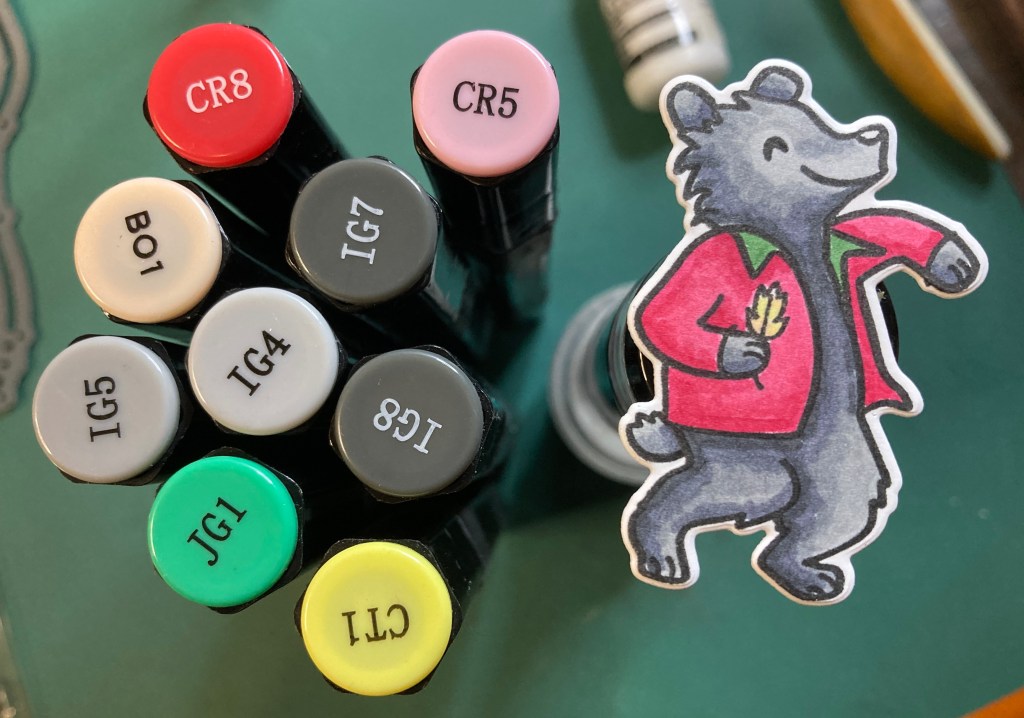
Now we know that this critter is a bear! I was eager to see if I could make this a Black Bear!
Here’s a shot of the colors I used for this Black Bear. Quite dapper in his red and green jacket! Again, I used the matching Fancy Die to cut him out. The sentiment didn’t seem to mean much without a qualifier, so I dug out this Lawn Fawn Scripty Congrats Die from my stash and die-cut it from a piece of card stock that I had colored with the matching black alcohol markers. I die-cut three more from Pitch Black card stock, glued all the layers together and, using Embossing and Watermark ink, embossed the whole sentiment with Clear embossing powder.
I do find Embossing powder is a much easier way to add shine to a die-cut sentiment than with Glossy Accents! I die-cut another piece of Canson Mix Media card stock with a 3.25″x4.5″ LFSRdie, and added a Glossy Black card stock mat behind that and glued them both to an A2 card base. I stamped the sentiment with Intense Black ink, glued the die cut sentiment in place, and added the bear with foam tape. Another Glossy Black Heart die glued next to the sentiment and some “motion” lines around his knee, elbow and hand finishes out our dancing bear (thank you, Captain Kangaroo!).
Two more critters to go… I decided that a couple should be dancing together.. and there is another dancing sentiment!
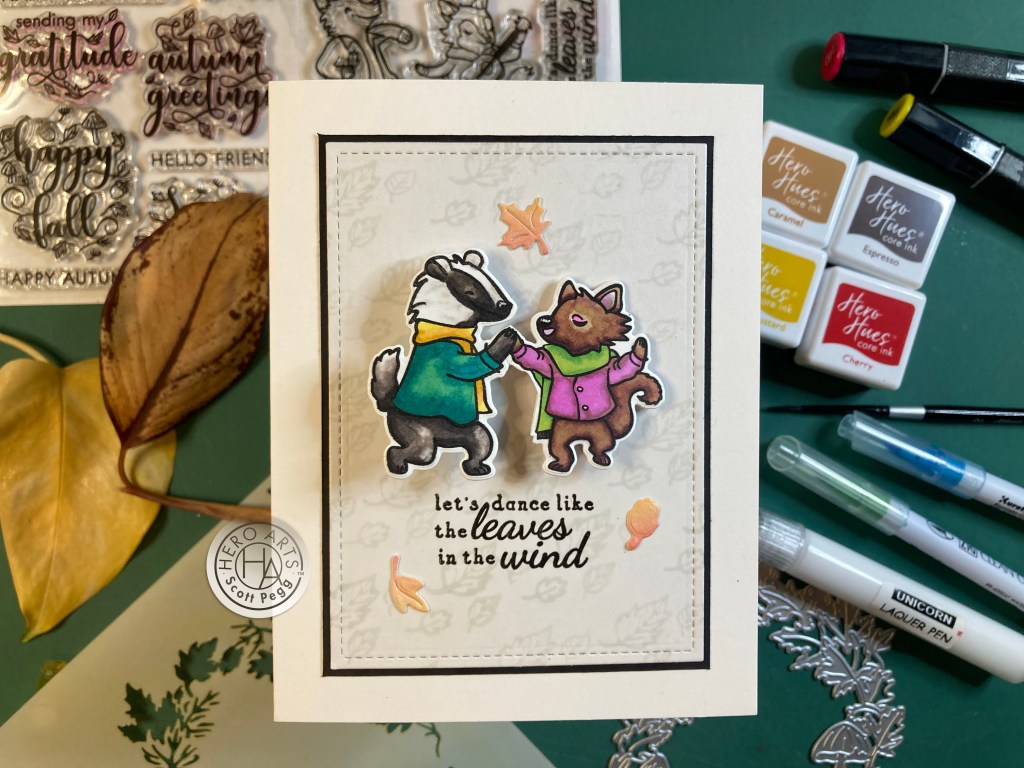
Here’s another use for the Contour Ink pad… just use it as a light Grey ink! I stamped all the leaf stamps on a panel of White card stock to give us a nice Autumnal background. I stamped the sentiment on the background with Intense Black ink and embossed it with Clear embossing Powder, added a thin black mat and glued those to an A2 card base.

I stamped the badger on some Bristol Smooth card stock, masked off his hand and stamped the squirrel(? seems like a squirrel tail!) so it looks like they are holding hands. Here’s a pic of the markers I used to color this pair, and when I was done, I used partial die-cutting to cut them both out together. Looks like this pair was all one stamp!
I lightly blended a little Cherry and Spicy Mustard on a scrap of card stock and die cut the three leaves using the Fancy dies. I attached our dancing couple using a Mini Action Wobbler so they actually move…! The wobbler is behind the badger so the squirrel bounces up and down quite a bit! I glued the die cut leaves around the dancers and here we have a fun interactive card. These critter stamps are truly adorable!
There are a few Leaf Fancy Dies left, so I thought I’d pair them up with the one nice pun in this set!
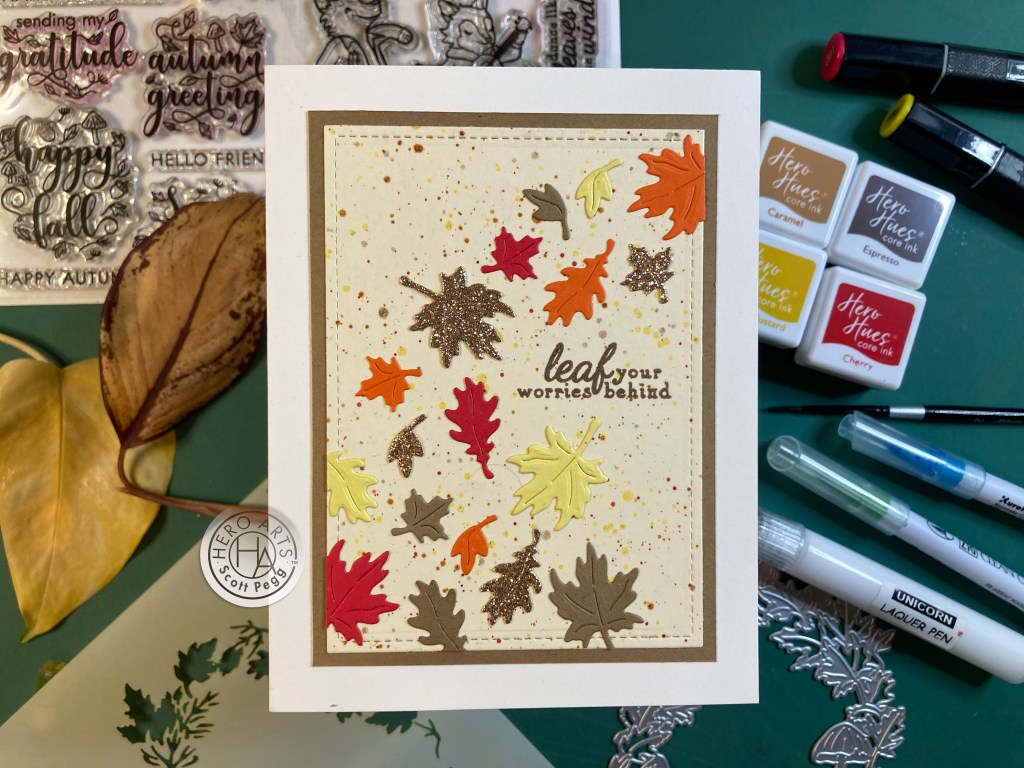
I die cut the Leaf Fancy Dies from Kraft, Red, Yellow, Orange and the Bronze Glitter card stocks. I die-cut another 3.25″x4.5″ panel of Ivory card stock with a LFSRdie and splattered that all over with all four of our ink colors. I glued that to a Kraft mat and then to a White A2 card base. I decided where I wanted the sentiment and stamped that with the Espresso ink. Then it was a simple matter of gluing the leaves and place and enjoying the swirl of leaves as we head into a blustery Fall. I did think about doing some ink blending on the leaves but thought the detail of the dies provided plenty of interest. A nice graphic card to wrap up this colorful Fall kit.
And that wraps up my ten cards using the My Monthly Hero September 2023 Classic and Premium Kits. Though I didn’t use every single stamp and die, I did use a little bit of everything! The Fall Window Die is pretty spectacular, and is made all the simpler with the layering stencils, and my affection for these critters grew more each time I colored one!

Very colorful collection of cards… It seems I was certainly in the mood to do some coloring this month and I like the Autumn feel here without everything having to be just about the season!
These kits are still available at Hero Arts! If you see something you like here or if I’ve managed to spark some ideas of your own then you should grab a kit for yourself. Remember, HA has started offering the Premium Elements if you’re especially drawn to the critters and don’t particularly care for the Fall Window Die. Lots of options! If you do go shopping at Hero Arts please use my links provided below. It helps support this page and is always truly appreciated!
My Monthly Hero September 2023 Classic Kit: http://shrsl.com/48myj
My Monthly Hero September 2023 Premium Kit: http://shrsl.com/48mym
My Monthly Hero September 2023 Premium Elements: http://shrsl.com/48myp
Thank you so much for sharing some time with me here today! Your attention never goes unnoticed! Please remember to to Like me, List me, Pin me, Post me, share me with all your crafty friends – oh hell, ALL of your friends! I am getting ready to go on (a MUCH needed) vacation, so my October 10 Cards 1 Kit posting may be a little delayed, but I will get that to you as soon as possible! Don’t run with scissors…! And I send you and yours Love and Light and Happy Crafting!
DISCLOSURE: This site contains some affiliate links to products. I may receive a commission for purchases made through these links (at no cost to you). As an Amazon Associate I earn from qualifying purchases. Thank you!

Dear Scotty, at the risk of being totally redundant, after months and months of singing your praises after seeing your beautiful, creative designs and colors, I opened this month’s email and was blown away by your fall wreaths of many layers and lovely sentiments. If I saw your cards at my local card store or drugstore, I would be guilty of buying them in bunches but being too selfish to send them to anyone. I’m sure you have many hundreds of followers and fans, so I am just one little fan among many, but I want you to know how thrilled I am each time I open your emails. Hope all is well with you and yours. Love, Faith 😘❤️
Sent from my iPhone
>
LikeLiked by 1 person
Thank you so very, very much dear Faith! Always good to hear from you and a bonus to know you’re paying attention! Sending all my love out west to you! Here’s to health and happiness! XO! Scott
LikeLike
I like the swirling fall leaves best. The dimension you achieved by varying the size of the leaves is great!
LikeLiked by 1 person
Hi Scott, Remember me? Probably not because it’s been WAYYYYY TOOOOOO LONG!! All my fault. I honestly don’t know where the time has gone. The only thing I can say is we’ve been super busy with kids and grandkids. Things have settled down somewhat now so I am back. ( in case you’ve really forgotten me it’s Judy Nafus from Rio Rancho NM☺️) Please send me the PDF of your leaf card when you can. No hurry at all. ENJOY YOUR VACATION WITH JOEL. XOXOXO JUDY
LikeLike
JJJJJJJJJUUUUUUUUDDDDDDDDYYYYYYYY!!!!!!! Good to hear from you!
LikeLike