
Hello Folks! Scott here with my 10 cards prompted by the first-ever Premium Kit from My Monthly Hero. Hero Arts is expanding their MMH kits this month with a Premium option! And to introduce this option, every subscriber gets a premium kit this month at no extra charge! From now on… you can choose to purchase (or subscribe!) to the Classic MMH Kit or the Premium MMH Kit (Premium costs more (naturally)).

MY MONTHLY HERO CLASSIC KIT INCLUDES:
• Clear Stamp Set, 3″ x 4″
• Butterfly Window Fancy Die
• 4 Color Layering Stencils, 5.25″ x 6.5″
• Butterfly Garden Palette Reactive Ink Pad (Thistle, Taffy, Creamsicle, Lemon Drop, and Key Lime Fizz)
• Small Ink Blending Brush
• 1 Sheet each of Stardream Coral, Azalea, Lagoon, and Amethyst, 5.5″ x 8.5″ (pearlescent!)
• 2 Sheets each of Iris and Mustard Cardstock, 5.5″ x 8.5″
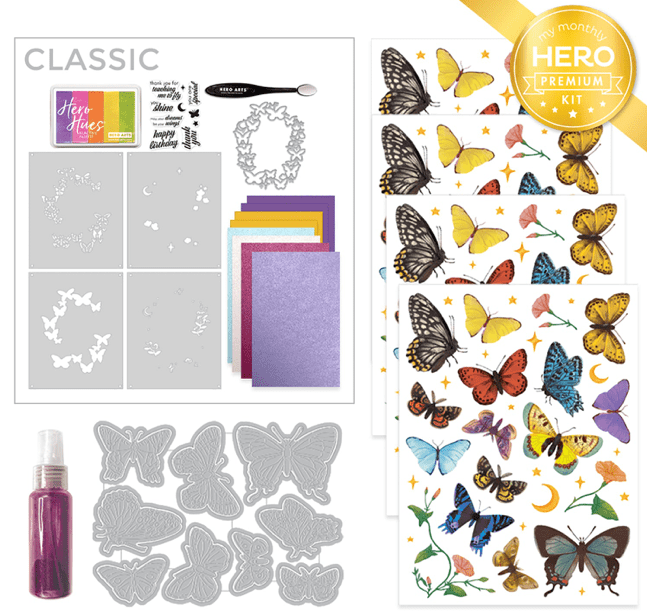
MY MONTHLY HERO PREMIUM KIT INCLUDES:
• Everything in the Classic Kit AND
• 9 Butterfly Fancy Dies with 9 Frame Cuts
• 4 Sheets of Butterfly Hero Transfers, 6″ x 8″
• Fuchsia & Gold Luster Duo Spray
This new offering of the Classic or Premium Kit will be interesting to watch as the next few months roll out…
If you’ve followed me for any length of time, you know that butterflies aren’t really my thing… I’ve always thought they were a little over-used in the craft world… But I’ve been getting the MMH kits for a number of years now, and I do believe this is the first truly butterfly-centric kit I’ve received from HA! That in itself garners some attention!!
I figured I’d explore this new Classic/Premium thing, and start with cards made from the items in the Classic Kit first!

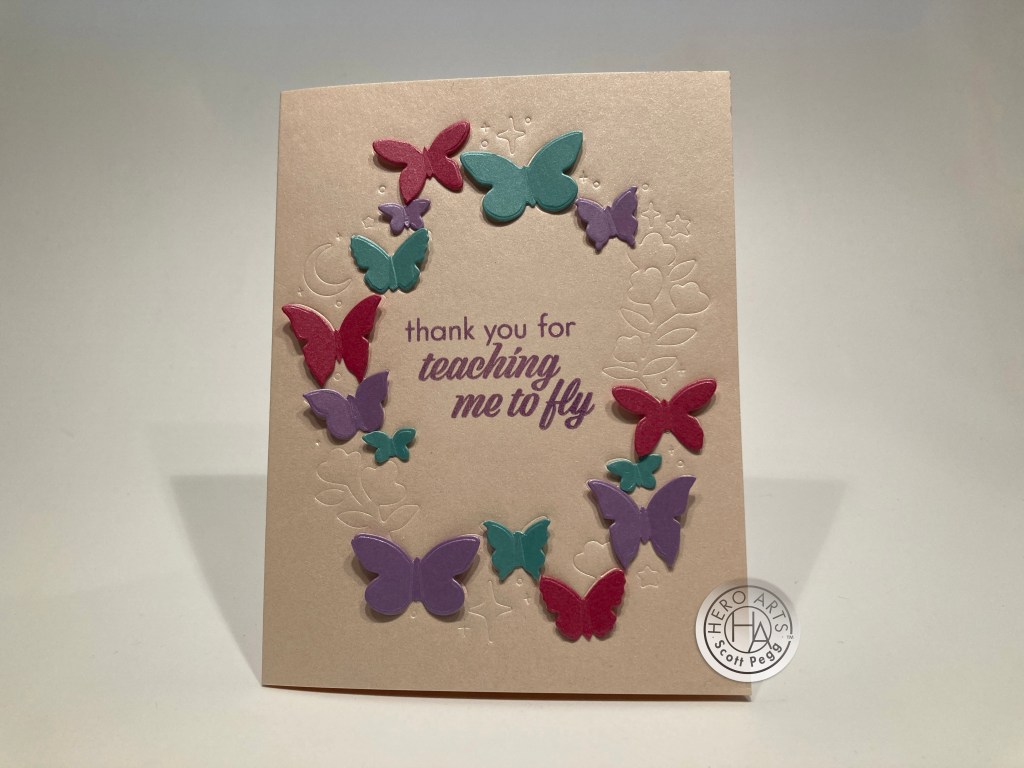
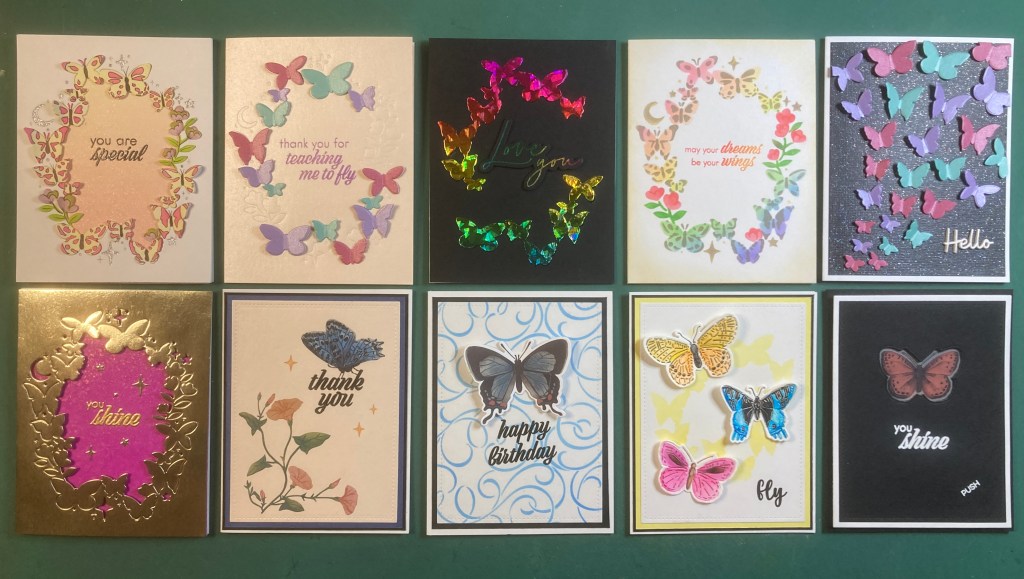
I die-cut the Fancy Die on some White card stock, and used the four layering stencils to color the die cut using inks from the Palette Ink Pad. Lemon drop for the bodies, Taffy for the butterfly details, Thistle for the flowers and Key Lime Fizz for the greenery. I added touches of Silver glitter card stock behind the moon, stars and dot cut-outs, but the whole card was feeling a little pale to me, so I took a Pigma Micron pen and outlined all the details… That gives lots of pop!
The background is a piece of pattern paper I had that matched almost perfectly, and I stamped the sentiment in the center using Intense Black ink and embossed that with Clear Embossing powder and then sprayed the whole background with some Sheer Shimmer spritz for a little sparkle. I curled up the edges of the die cuts, and glued everything to a White card base. I did add two layers of card stock frames behind the die cut to add a little depth and dimension. Nice! The stencils work brilliantly and the Butterfly Window Fancy die is rather spectacular!
We can treat that window die like an embossing folder, and complete the actual die-cuts to make lots of butterflies!
Using the embossing plates on my die-cutting machine, I embossed the die on the front of the Stardream Coral pearlescent card stock folded in half to make the card base. While I was at it, I die-cut the window die from the Azalea, Lagoon and Amethyst card stocks and fussy-cut out all the butterflies. I stamped the sentiment in the center with Thistle Reactive ink and embossed that with Clear embossing powder. Then I gave a light fold to the wings of the assorted butterflies (with help from the HA Reverse Grip tweezers) and glued their bodies down to their respective places. Very colorful! This really highlights the butterflies (sentiment!), and there’s a nice shine to all the pearlescent card stocks!
How about some foiling on those butterflies? Since we have a stencil, we can use some Deco Foil Transfer Gel!
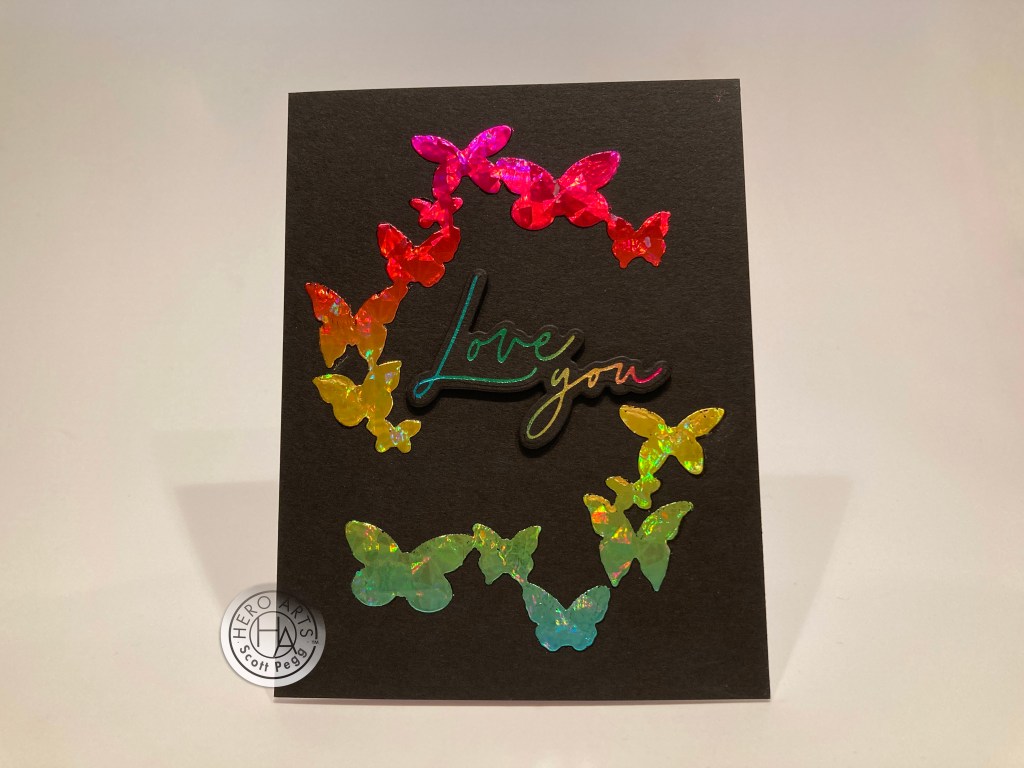
Well… THAT makes me happy!! On Pitch Black card stock I used the Deco Foil Transfer Gel through stencil A (bodies), let that dry, added Rainbow Shattered Glass Deco Foil on top and ran it through my laminator. GORGEOUS! I fiddled around with the “you shine” sentiment and a bunch of different glittery embossing powders but couldn’t come up with a sentiment that held its own with the foiled butterflies.
And here is the main reason I invested in a Spellbinders Glimmer Foiling machine… Foiled Sentiments!! This “Love you” sentiment (which fits perfectly!) is the Foil Script: Wishes – Hot Foil Plate & Die Cuts from Honey Bee Stamps. I foiled the sentiment on more Pitch Black card stock with Rainbow Glimmer foil and die-cut the sentiment. I die-cut three more blanks and glued them all together to make a chunky dimensional sentiment. I glued the card front to a White card base and glued the sentiment into place. I’m thrilled at how well the Glimmer Foil and Deco Foil products work together! Loving this!
Lets try the layering stencils WITHOUT the die! Maybe I can get a little brighter colors using just the stencils this time!

A batch of rainbow butterflies certainly brings a bright splash of color to this card! On a White card panel, I ink blended the rainbow with Purple Galaxy, Blue Hawaii, Green Apple, Lemon Drop, Creamsicle, and Fruit Punch reactive inks. The flowers and leaves are Green Apple and Fruit Punch Reactive inks, and I used Soft Granite for the butterfly details and the moon and stars. Then I used some Tsukineko Golden Glitz metallic ink for the moon, stars and dots details as well as a little soft ink blending around the edges of the card front.
The sentiment is stamped with Fruit Punch and Creamsicle Reactive inks and embossed with Clear Embossing powder. Very colorful one-layer card- a little shine and lots of colors… I really like those layering stencils!
Now a shaker card seems a natural choice for a fancy window die, but I still have all those butterflies I fussy-cut…

A flight of butterflies sweeps this card upward and uses all but two of my previously fussy cut butterflies! I cut a piece of Black Tie Glitter card stock to 4″ x 5.5″ and glued that to a White card base. I folded up the wings of all the butterflies with the help of a HA Reverse Grip tweezer and glued their bodies down to the card front. The sentiment is die cut from 3 layers of White card stock and a top layer of Iridescent White card stock.
I think this die came from a (Spellbinders?) die-cut Advent calendar from a couple of years ago… nice and small and perfectly sized for this card. I glued all the layers together and then down to the card front. There’s a great sense of movement on this card, and even distance as well…! Almost feels like they’re coming right at ya! Love it!
That’s five cards using the supplies from the Classic Kit. Now let’s expand our reach by including the Premium elements as well…When I first saw the Fuchsia & Gold Luster Duo Spray, I thought it was empty and the contents had either dried up or leaked out… but NO…! Just add water to the bottle and you get this intense Fuchsia color with golden highlights!

It’s a little hard to see the gold sparkles in this intense Fuchsia background, but it is very apparent in person! I thought this would make a perfect background to highlight the intricacy of the Butterfly Window Fancy Die. I used the Duo Tone spray on some plain White card stock and let it dry – that’s only 3 or 4 sprays! Amazing color! Once dry, I cut the panel to 4.25″ x 5.5″ and embossed the sentiment using Embossing and Watermark ink and HA Gold embossing powder and glued it down to a White card base.
I die-cut the window from a piece of Tim Holtz Metallic Champange card stock cut to 4.25″ x 5.5″, outlined the piece with foam tape, and mounted that on the Fuchsia background. I added the die-cut Champagne stars around the sentiment and let the die and the color speak for themselves. That Fuchsia & Gold Luster Duo Spray is spectacular all on it’s own!
Time to play with the Butterfly transfer sheets – Rub-On Time!! I wanted to do a card that featured JUST the rub-ons…

My favorite thing about rub-on transfers is how easy you can combine multiple images into one. This card uses all three of the flower pieces from one sheet of transfers – and where all three join together is indecipherable! (I did lose the two buds on the right side of the largest flower transfer.) These are rubbed onto a panel of the Stardream Coral card stock die-cut to 3.75″ x 5″ with LF Stitched Rectangle die.
I stamped the sentiment using Intense Black ink and embossed it with Clear embossing powder. I set the beautiful blue butterfly transfer as if it had just landed on the sentiment, rubbed it down and added some of the transfer stars as well. The card front is double matted on some Pearlescent Blue card stock (closest to the color of the butterfly that I could find in my stash) and a thin black mat before gluing down to a white card front. LOTS of bang for your buck here – basically a very simple card to put together, but with completely lovely results! Even I like those butterfly transfers!
That’s the Luster Spray and the Transfer Sheets… the Premium Frame cuts actually die-cut the butterfly transfers too!
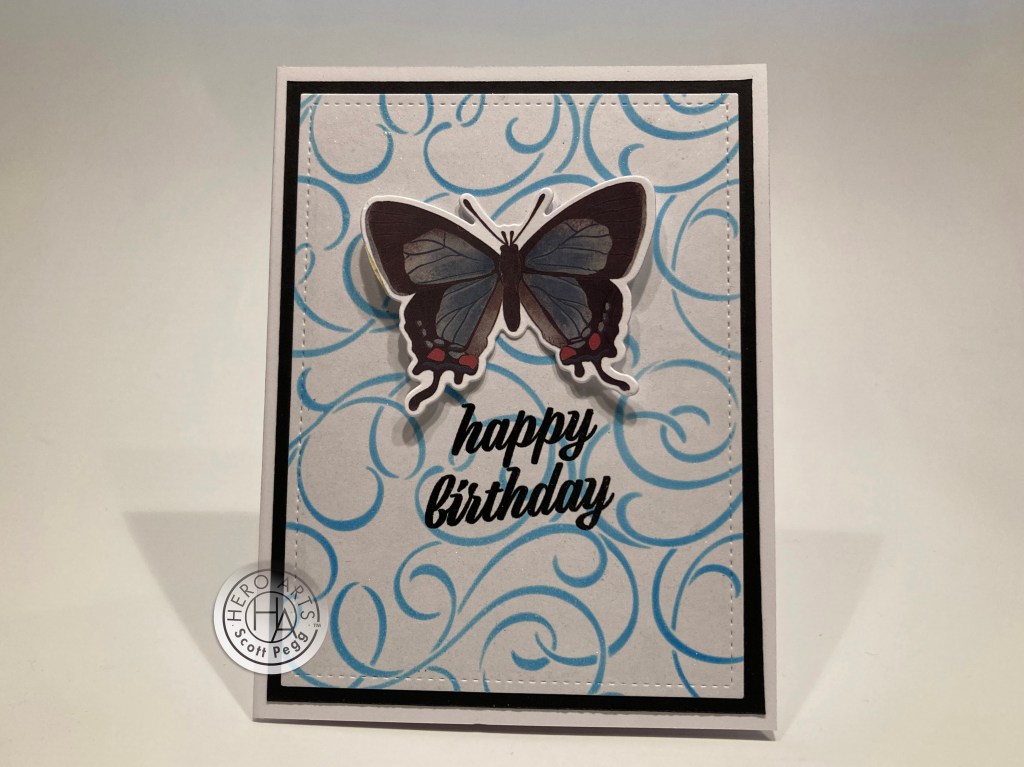
There is that ubiquitous Happy Birthday stamp in our stamp set this month… time to use it! On a White card panel die-cut to 3.75″ x 5″ I used Blue Hawaii Reactive ink to color this Stampendous Flourishes stencil – one of my favorite “party” stencils in my stash! I stamped the sentiment with Intense Black ink and embossed that with Clear Embossing powder. Some Sheer Shimmer Spritz adds a little sparkle to the background, and when that was dry, I glued the panel to a Pitch Black mat and then down to a White card base.
I transferred this butterfly to a piece of white card stock and die-cut it with the matching Frame cut. I folded up the wings a little and glued the body to the card front. You have to admit those rub-on transfers add a high level of polish and finesse to a card, and are so simple to use! Easy peasy yet beautiful!
Of course there are Fancy butterfly dies with lots of fine detail to go along with the Frame cuts… something to color!

I die-cut these butterflies from some Canson XL Watercolor card stock and colored them with my TomBow markers. It was nice to be able to do a little coloring this month! I also took a Pigma Micron pen and traced all the die-cut details on the yellow and pink butterflies – but didn’t need that definition on the black and blue butterfly (except for the antennae)!
On another 3.75″ x 5″ stitched rectangle panel I ink blended Lemon Drop Reactive ink through the butterfly stencil and brought the two sides of the stencil closer together to make a smaller, more circular group of lepidoptera for our background. I created the sentiment using the My Favorite Things Mini Well-Connected Alphabet stamps with Intense Black ink and embossed that with Clear embossing powder.
I glued the inked panel to a mat of HA Canary card stock (a great match to the Lemon Drop ink) and to a thin black mat and down to a White card base. A little fold on the wings of the butterflies gives them a little shape and I glued their bodies to the card front. With the NINE fancy dies in the Premium Kit, you could color butterflies till the cows come home… definitely useful for when you run out of your transfer sheets! And I do love this simple sentiment!
We got a sheet of rub-on transfers with our MMH September ’22 kit and I noted then that transfers are naturally translucent… light will pass through the transfers until they are rubbed down on card stock – but on acetate???
It’s been a long time since I made a light-up card! These butterfly transfers work beautifully for a light up card… and we couldn’t ask for a more perfect sentiment! The first thing I needed to do was make sure that the transfers would work on clear acetate. Turns out they stick beautifully to acetate! I rubbed-on the butterfly transfer to the center of a 3″ x 2″ piece of acetate.
I die-cut a panel of Pitch Black card stock with a LF Stitched Rectangle die (3.75″ x 5″) and stamped the sentiments with Embossing and Watermark ink and embossed them with White Embossing powder. The “push” sentiment is from the My Favorite Things Interactive labels stamp set. I die-cut the window for the butterfly, added a White mat behind the black and marked where the die-cut should be. I cut out the butterfly on the white mat, colored the edges of the opening with a black marker, and glued the two layers together.

When I put the butterfly behind the window, I realized you could see right through the edges – between the transfer and the die-cut edge… A piece of vellum would alleviate that, and also provide a little diffusion for the light. So I taped the acetate butterfly in place behind the window, and taped the vellum behind that.

I used a white Chibitronics bulb and copper tape to lay out my wiring on a Pitch Black card base. The folded white card stock in the lower corner is the “switch” for activating the light. I marked the center of the butterfly opening on the card base and located my LED there. Copper tape runs from one side of the light to the inside (bottom) of the “switch” and another piece of copper tape runs from the other side of the light to the back of the switch flap, over the edge and to the top of the flap on the inside. Just make sure all your wiring (copper tape) is burnished down firmly.
A double thickness of foam tape provides enough height to give the “switch” some room to operate. Note that the triangles of foam tape (double thick!) secure the button cell battery in place on the switch and keep the top flap from making a connection until it is pushed down. When attaching the card front to this base, I did use some liquid glue on top of the foam tape (liner paper removed!) to give me a little wiggle room to get the card front positioned correctly.

I think this is a terrific use for those butterfly transfer rub-ons…! Especially because we have Frame dies for them as well. I know of nobody who doesn’t delight at the receipt of a light-up card… if only batteries lasted forever…!
There we have five cards using the Classic Kit and five cards using the Premium Kit. I know some people will probably hesitate to level up to the Premium Kit – though, of course, still a great value, the Premium option is more expensive… I’m not quite sure how I feel about the whole Classic / Premium thing… I’ll have to see more months with that option.
I confess… I really do like all these cards this month! Even though there are five cards using that window die, I think they all read quite differently! The transfers are simply beautiful and make creating stunning cards quite simple! I did manage to use a little bit of everything in this Premium Kit… I used all the sentiment stamps (one, twice!) the inks, stencils, card stocks, dies and transfers… I didn’t use the small icons in the stamp set… (moon, star, and butterfly) but what’s the point when you have all these rub-ons and/or die-cuts that are basically the same shapes!
Yes… butterflies are certainly popular… Both versions of this kit have sold out already – the Premium Kit sold out very fast! And even all the monthly add-ons have sold out!! Remember, as a subscriber, you are guaranteed to receive a kit each month… whether the Classic or the Premium! Here’s the link if you’d like to take a look at the new subscription pricing for subscriptions to My Monthly Hero: https://heroarts.com/pages/subscribe I know I can’t wait to see what the coming months have in store for us!
Thank you so much for sharing some time with me here today. I hope you enjoyed my take on this kit! Let me know if you have any favorites! Remember to Like me, List me, Pin me, Post me, Share me with all your crafty friends… don’t run with scissors, and, as always, I wish you and yours Love and Light and Happy Crafting!!

Nice cards – but I’m really “over” butterflys after so many recently. You did a great job as usual!
LikeLiked by 1 person
Well done, Scott! I especially like the “you are special” and “fly” cards. Great use of the supplies you were given.
LikeLiked by 1 person