
Hello Folks! Scott here with the new My Monthly Hero September 2022 kit! Just in time for fall and a bounteous harvest season, this kit features a large autumnal bouquet and something totally new to the MMH kits… Rub-Ons!

Kit Includes • Clear Stamp Set, 4” x 6”
• 6 Coordinating Frame Cuts
• Rub-On Transfer Sheet
• Cling Background Stamp, 6“ x 6”
• 2 Sheets Each of Cardstock in Sand & Antique Ivory, 5.5” x 8.5”
• Rose Gold Metallic Floss, 5 yds
I was a little intimidated by the bouquet stamp – it is intricately detailed which makes some of the flowers and foliage quite small… and just to intimidate me more… the rub-on bouquet (which is exactly the same as the stamp – even the die works for both) is amazing and brilliantly colored! My snub-nosed Spectrum Noir Alcohol markers would make a mess on such a finely detailed image… so there’s another huge advantage to fancy Copic markers…!
Usually, Gold embossing on White card stock works quite well for an elegant card that requires no coloring…

On a piece of the Watercolor paper from last month’s kit, I stamped and embossed the bouquet, sentiment and leaves using Embossing and Watermark ink and HA Gold Embossing powder. That worked okay, but there is SO MUCH detail in this stamp that you really couldn’t tell what was going on towards the center of the bouquet. The detail needed a little detailing…!
Thinking I’d stick with the gold theme, I reached for the Hero Arts Gold Glimmer Metallic ink and painted in all the details… the Glimmer ink mixes well with water, and I was able to get some subtle shading here and there. That worked quite nicely and gave us enough definition to make out the flowers, stems and leaves in the center of this bouquet. I die cut the panel with a HA Rectangle Infinity die (next to the largest) and glued it to a gold metallic mat cut to 4.25″ x 5.5″, and then glued those both to a White card base. This would probably look amazing on Black card stock as well!
I decided to try my hand at water-coloring our bouquet for this next card.

I stamped the bouquet on more of the Watercolor card stock from last month’s kit using HA Intense Black ink. I broke out my giant Daniel Smith Dot card (thanks Pat!) and went to town…!

I did use the rub-on for a slight color reference as I painted this bouquet, and while I did try to keep an autumnal feeling, I also tried to lighten everything up a little bit while keeping some darkness and depth towards the center of the arrangement.
Once painted, I partially die-cut the bouquet with the included die, leaving the base attached to the watercolor paper where I stamped the sentiment using Intense Black ink. For a little definition, I added a thin strip of Bone card stock and a line of the Rose Gold Metallic Floss to the edge of the watercolor base.
I stamped the Background Cling stamp on a 4.25″ x 5.5″ piece of the Antique Ivory card stock in the kit using HA Sand ink. I die-cut four more bouquets from plain White card stock and glued them all together behind the painted panel to add some dimension (without fussing with a million pieces of foam tape) and glued all to the stamped background. Okay, yes, this did take me quite a while to paint, but I really enjoyed the process and am quite pleased with the final result! The Cling stamp is gorgeous and stamps like a dream, and, while I doubt that I’ll be painting a lot of these bouquets, it is satisfying to know that I can if I chose to! Take THAT you rub-ons!!
(Blick art supplies was having a sale on DS Watercolors, and I did enjoy painting this, so I splurged and got me a real Daniel Smith Watercolor Palette – hand poured half-pans in 24 colors…! Can’t wait to swatch them out!)
While I was laboring over the watercolor bouquet, I was thinking that there had to be an easier way to color this image, when it occurred to me that we could color and stamp this bouquet using TomBow markers!

On a piece of Canson XL watercolor paper, I stamped the bouquet using my TomBow markers – coloring individual sections and lightly misting before stamping. It was a little challenging to differentiate all the plants on the clear stamp but I used the cover sheet to help. Of course my MISTI was indispensable..! Once the whole stamp was complete, it was a breeze taking a damp brush to the foliage and spreading the TomBow colors around! This gives us a much softer, almost pastel bouquet while still keeping us in the realm of autumn! Once I was pleased with the insta-watercoloring, I did stamp the bouquet again (HA Caramel ink) to bring back some of the detail lost with the water.
I die-cut the floral display and trimmed off the left side so the sentiment would fit on the right. I die-cut two more bouquets of white card stock, glued those behind, and then glued the base to a 1/2″ strip of the Sand card stock from the kit with a touch of Auburn Pearl card stock peeking out the top. I stamped the sentiment on a White card base, using HA Sand ink, and splattered some watered-down (matching) TomBow colors all over the background. Glue everything together and here’s another variation of that bouquet stamp – much quicker (and almost as impressive) than the DS watercolor version… I need to remember that TomBow Markers can work as “ink” for stamps… This was fun!
I must give some love to the Cling Background stamp in the kit… a truly lovely stamp that should prove very useful!

I cut a piece of the Sand card stock to 4″ x 5.25″, and embossed the background stamp using Embossing and Watermark ink and HA Gold Embossing powder. Absolutely beautiful! We all know that Hero Arts’ Cling stamps are exceptionally high quality and this stamp lives up to the hype! I glued the background to a White A2 card base and just admired it for a while!!
I stamped the sentiment on more of the Sand card stock using my MISTI… I stamped the Intense Black shadow first – I just scooted the card stock a fraction to the right and a fraction up for the shadow, then I put the card stock back in the corner of the MISTI and stamped and embossed the second layer in Gold. Shadow stamping works so well with an embossed sentiment! I trimmed the sentiment down to 1″ x 2.25″, added a thin White mat behind, and attached it to my card front at a slightly jaunty angle using foam tape. I’m lovin’ that Cling Background stamp!
And just to keep my love for the cling stamp going, I decided to do do a Joseph’s Coat technique.

I ink blended Fruit Punch, Lemon Drop and Blue Hawaii Reactive inks on a 4.25″ x 5.5″ White card stock panel… Love how you get a definite orange and green blend from just these three inks! After that panel dried, I stamped the cling stamp with Embossing and Watermark ink, and embossed it with Clear embossing powder. Then I ink blended Intense Black ink over the whole panel wiping off the excess ink from the top of the embossing. I used three different black inks – Intense Black from HA, VersaFine Onyx Black ink, and Gina K. Jet Black Amalgam ink to try to get the background as black as possible, but something about the reactive inks prevented me from getting a real black black. Interesting! I die-cut that panel (3.5″ x 4.75″) with a HA Rectangle Infinity die, and added a thin Pitch Black mat behind.

Since we have this nice rainbow background, I decided to echo that with the sentiment. This is the Lawn Fawn Scripty Thanks die. I die cut 2 pieces of Blue, Green, Yellow, Orange and Red card stock and glued those all together to make a chunky sentiment. I waffled about what to put on top of the rainbow stackers… Black glitter card stock…? Red Glitter card stock…? I finally settled on this metallic Red card stock.
On a Pitch Black A2 card base, I added a 4″ x 5.25″ mat of the metallic Red card stock and glued the rainbow panel to the top. Nothing autumnal about this card, but you know this rainbow makes me happy, and the “thanks” is perfectly on theme for this kit. I do love that background stamp!
You might think that I’m avoiding the rub-ons… but I was simply exploring the other aspects of this kit to start with!
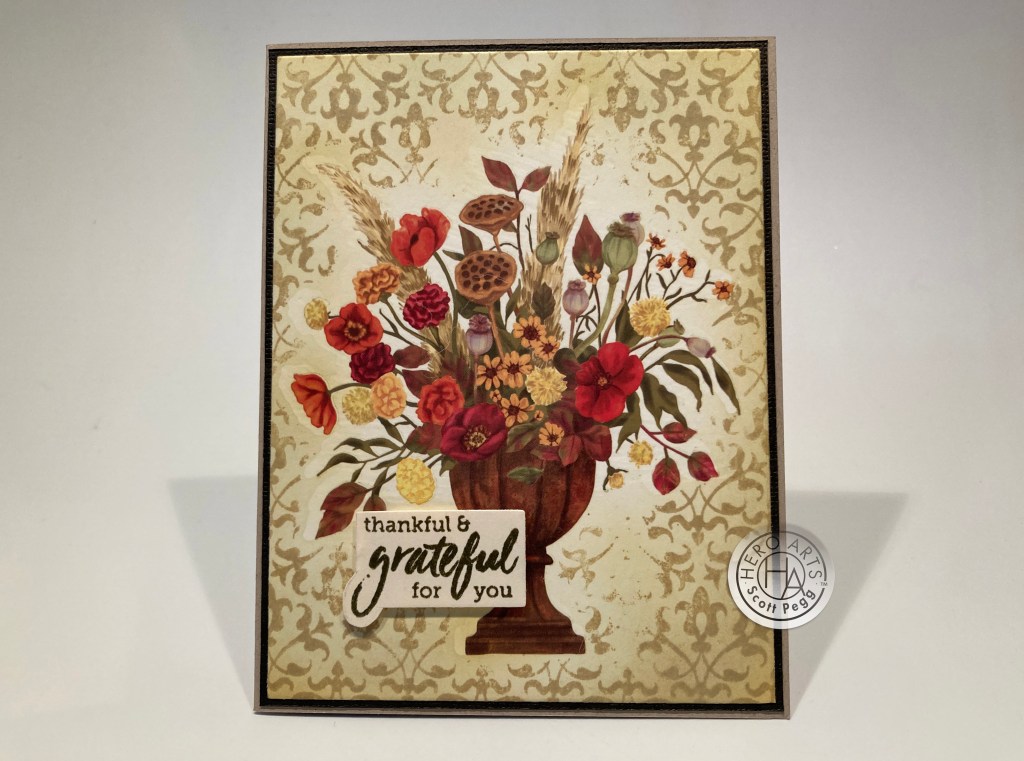
You have to admit, that large rub-on bouquet is pretty stunning! First I die-cut a mask for the bouquet from Gina K Masking Magic and laid that on an A2 Panel of the Antique Ivory card stock where I wanted the rub-on to go. I ink blended Sand ink around the edges for a touch of distress, and then stamped the background stamp on the masked panel with the same ink – I wasn’t trying for a perfect stamping… and the mask helps soften the line around the arrangement.
I cut the rub-on bouquet away from the sheet and went to add it to my inked panel… be careful… the sticky on the back of the rub-ons will grab onto your card stock and not let go… I was ultimately a little off on my placement for that exact reason..! I did find that a metal ball stylus worked better for applying the rub-ons than the popsicle stick included in the kit. I was also able to do a little more ink blending around the image to try to camouflage the misplacement…! Ink doesn’t stick to the top of the rub-ons so that helped a lot! It also helped that I die-cut the panel down to 4″ x 5.25″, and then added a thin Dark Brown mat and mounted all to a Sand card base.
The sentiment is from the MMH September 2020 (HeroScapes Pumpkin Patch) kit. I stamped that on a scrap of Bone card stock with Root Beer Reactive ink and embossed that with Clear embossing powder. I die-cut (and fussy cut) the sentiment and added it to the card front with foam tape. Really striking card! I like the antique, distress feeling, and yes… that rub-on is in a class all by itself!
Our rub-on sheet has TWO of the bouquets, two pomegranates, a pear and LOTS of assorted foliage… including leaves… and I couldn’t resist trying the offset shadow stamping with the cling background stamp!

On a panel of the Sand card stock I stamped the cling stamp in HA Unicorn White ink, shifted the card stock a little down and to the right, and then stamped again with Caramel ink. That gives us three colors of ink and a truly 3-D look to this background! Almost looks like an embossing folder! I trimmed the background to 4″ x 5.25″ and cut a diagonal across the middle. I added a mat behind the two pieces of Auburn Pearl card stock only showing the mat on the diagonal line. I glued both panels to an Antique Ivory card base.
I cut out a bunch of rub-on leaves and added them to the center opening leaving some room for the sentiment. I originally stamped the sentiment in the opening using Caramel ink, but didn’t like how that looked, so I stamped the sentiment again on a scrap of Bone card stock with Root Beer Reactive ink, clear embossed it, trimmed it down and mounted it to the card front with foam tape. A few tiny Bronze gems adds a little touch of sparkle amongst the leaves. This is not my favorite sentiment in the kit, but I think it works well with this faux 3-D background and the light tumble of autumn leaves. I am certainly looking forward to Fall this year!!
And what to do with all those flowers and individual rub-ons? There’s quite a batch of individual foliage rub-ons…

A wreath is a perfectly seasonal image! I did cut out all the (remaining) individual rub-on pieces and fiddled around with them for a pleasant arrangement. I rubbed them all onto a piece of Antique Ivory card stock to complete this wreath. There are a few things I learned here… 1) The rub-ons ARE translucent so you CAN see through them… notice the poppy (and the carnation) at the 8:30/9:00 position and you can see the stem behind the blooms. 2) You can cut apart the individual rub-ons… the leaves on the poppy seed head at 12:00 are from much further down the stem. 3) Once applied, you can remove portions of the rub-ons with an eraser – a Xyron Adhesive eraser works especially well.
I started on the bottom going counter-clockwise, and the placement and layering gets better as I moved around the wreath. Im especially pleased with the dried Lotus pod (1:00) with a stem that looks like it goes behind the yellow carnation and behind the poppy! The leaves at the base of the pomegranate started as a cluster of 3 leaves but the missing third leaf is on the wreath at 10:00. Creating this wreath gave me a great deal of pleasure!
I stamped the sentiment (my favorite this month) below the wreath with Intense Black ink and embossed it with some Clear embossing powder. I die-cut that panel to 3.75″ x 5″, added a thin red mat and a thin mustard mat and glued all down to an Antique Ivory card base. I really like this card and it was massive fun using up all the rub-ons!
Yes… there are a few more rub-ons… and I’ve covered all the sentiments in the stamp set, so now it’s time for some puns!

Trust me… there are not a lot of pomegranate puns floating around out there! But this one does make me smile! This is on a modified A1 card base (3.5″ x 5″) on which I printed this sentiment using my Silhouette Software and the Raustila font. I rubbed the pomegranate onto a scrap of White card stock and die-cut it out with the included die. I used two Lawn Fawn Stitched Rectangle dies to make the dark red frame (3.25″ x 4.5″) – since the LFSRDies are sized to A2 cards I ultimately trimmed down my card base to 4.75″ tall. I added the die cut pomegranate with foam tape and we have a juicy congratulations card for any pomegranate lover…! That takes care of the second pomegranate rub-on….!
I simply could not help myself with this last card… I tell you, I could send this card to a lot of people I know!!!

This card gives me the giggles!! I hope I don’t offend anyone, but this tickles me to no end! Again we’re on a 3.5″ x 5″ plain White card base. I printed the sentiment on a scrap of White card stock using the Rockwell font, ink blended a little Sand ink under where I thought the pear rub-on would go – added the pear along with the cute little leaf, and then die-cut the image with a HA Square Infinity die (1.75″). I added a dark brown mat and mounted both to the card front with foam tape. This might seem a little brash, but it really is an encouragement card… STRONGLY encouraging!
And before you know it, that’s my 10 cards created with the My Monthly Hero September 2022 Kit! I truly enjoyed myself with this kit – MUCH more than I thought I would – the wide variety of contents kept feeding my imagination…

However… I didn’t actually use all the stamps in the stamp set this month (oops!) – I missed the pomegranate, pear, and poppy stamps… but why bother with stamping and coloring when you have such beautiful rub-on renditions? I did use all of the sentiment stamps, most of the card stock and even a little piece of the metallic floss! I am also pleased to say that I only have the one bouquet and the pampas grass rub-ons left – THAT was my big accomplishment this month!!
This is a nicely varied set of cards – most do have have a bountiful autumnal feel to them – and a couple puns never hurt!! I love that cling stamp, the rub-ons were fun to play with, and even that detailed bouquet provided me with a few hours of pleasure! Let me know which card(s) are your favorite!
This kit is still available at Hero Arts (guess I wasn’t the only one intimidated by that stamp!) If I’ve managed to capture your imagination or sparked an idea or two of your own, or even if you just want to play with some new rub-ons, I suggest grabbing a kit for yourself before they are all gone. When you do go shopping at Hero Arts, please use my links… it is always supremely appreciated and it truly helps support this page! Thank YOU!!
My Monthly Hero September 2022 Kit: http://shrsl.com/3pbd6
Hero Arts Complete September ’22 release: http://shrsl.com/3pbd7
Thank you so very much for sharing some time with me today… I am always encouraged, humbled and thankful for your attention! I had great fun this month and I hope you did too! Remember to Like me, List me, Pin me, Post me, Friend me, Follow me, Share me with all your crafting friends… remember… Don’t run with scissors! I wish you all a beautiful and bounteous autumn, and I’m sending you and yours Love and Light and Happy Crafting!
DISCLOSURE: This site contains some affiliate links to products. I may receive a commission for purchases made through these links (at no cost to you). As an Amazon Associate I earn from qualifying purchases. Thank you!

Scott, You are a genius. Never thought you would get 10 different cards out of this set, but should have remembered you think outside the box. This is definitely not the kit for me. I don’t like rub one and flower stamps. Perhaps because I already have a zillion flower stamps. My favor card is your last one. Fit for a President to help him solve the border invasion. Take care, stay safe and keep creating.
Sent from my iPhone
>
LikeLike
Thanks Sheryl!! Always appreciated! (I have so many flower stamps in my stash too…!!)
LikeLike
Great cards! So impressed with all the different techniques you used to produce cards that are so different from each other. Love the offset stamping! I’m inspired to pull out my background stamps and try something new with them.
LikeLike
Gosh Scott … You are amazingly talented!! Grow a Pear & You da Pom my favs though all the others are fabulous as well. I so look forward to your videos, you always lift my spirits .. God Bless … Barbara
LikeLike
Thanks you so much Barbara! That means a lot to me! You know I love me some good puns!!
All my best,
Scott
LikeLike