
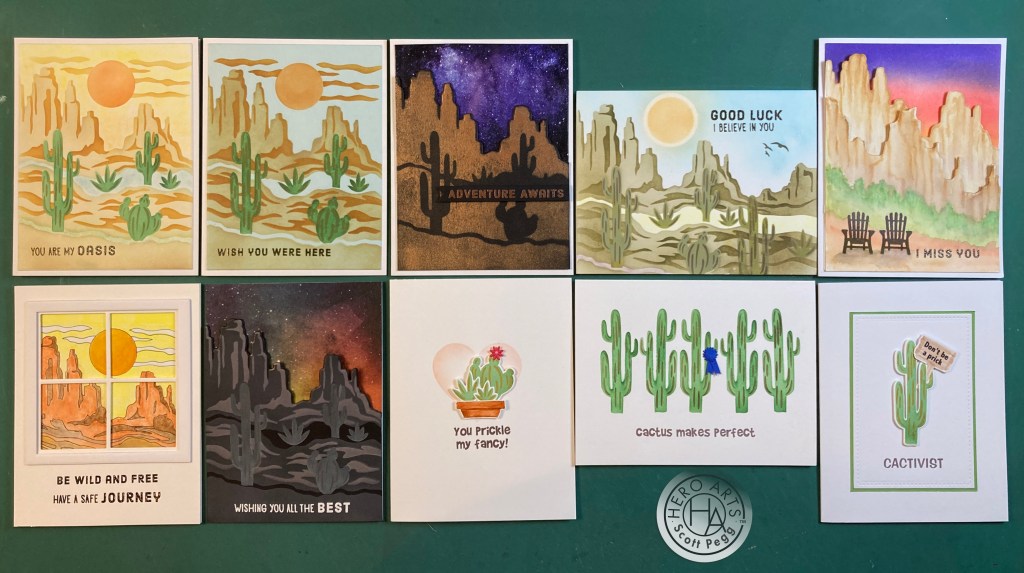
Hello Folks! Scott here with my 10 cards created using the My Monthly Hero August 2022 Kit! “Adventure lies ahead” with this desert southwest themed kit that creates beautiful vistas and detailed landscapes with the kit’s layering stencils. A plethora of possibilities await.

Kit Includes • 3″ x 4″ Clear Stamp Set
• 4 Color Layering Stencils (5.25″ x 6.5″)
• 6 Coordinating Frame Cuts
• 4 Ink Cubes (Caramel, Sand, Tangerine, Pine)
• 5 Sheets Luxe White Watercolor Paper (5.5″ x 8.5″)
• Bronze PearlEx (0.11 oz.)
Once again… we have what feels like a pretty limited kit…! Thankfully there are frame cuts for the five cacti, so that does extend the usefulness of the layering stencil… but the stamp set is only sentiments… a great deal of sentiments…

I figured I’d start by putting these stencils and inks to the test. On a piece of the Watercolor Paper from the kit, I stenciled layer “a” with the Sand ink cube, layer “b” with the Caramel ink cube, layer “c” with the Pine (cacti) and Tangerine (sun) ink cubes, and layer “d” with the Caramel ink. Really nice Southwestern scene… the stencils line up easily and the vista is actually quite eye-catching.
Of course, the layering stencils leave the sky and the base of the two cactus swatches blank – in this case, white. I reached for my Pebbles Chalk palette to add some color to these un-inked areas – a little light green for the bottom cacti, light blue for the second row (water? oasis?) and light yellow for the sky. These chalks are nicely suited for providing a little background color behind stenciled (or stamped) images.
I stamped the sentiment using Hero Hues Root Beer Reactive ink and embossed that with some clear embossing powder. I die-cut the panel with the next-to-the-largest HA Rectangle Infinity die and glued that down to a White card base. Basically, a one-layer card! I think the wash of blue provides a good justification for this sentiment. Now, saguaro cactus (the ones with “arms”) only grow in the Sonoran desert, which is in southern Arizona, but this scene reminds me more of Monument Valley (Utah) than of Arizona.
Did I mention that I lived in Phoenix, Arizona for seven years after college (before I moved to NYC)?
In an effort to avoid patches of white sky and landscape, I thought we might get away with stenciling this scene on some very light blue card stock – in this instance I used Hero Hues Arctic card stock.

I used the same (included ) inks for this card, in the same order, and I like how the blue card stock darkens all the inks making for a little bit more of a dramatic presentation. Sentiment stamped and embossed the same as the first card, the panel is die-cut to size and glued to a White card base. That’s an easy way to avoid the white spaces..! I bet Kraft card stock would be an interesting background color..!
Of course this kit includes a die that cuts the sky away from the buttes, and you can stencil the sun and clouds on a different background, but I was interested in something a little more radical.. and ultimately very simple!
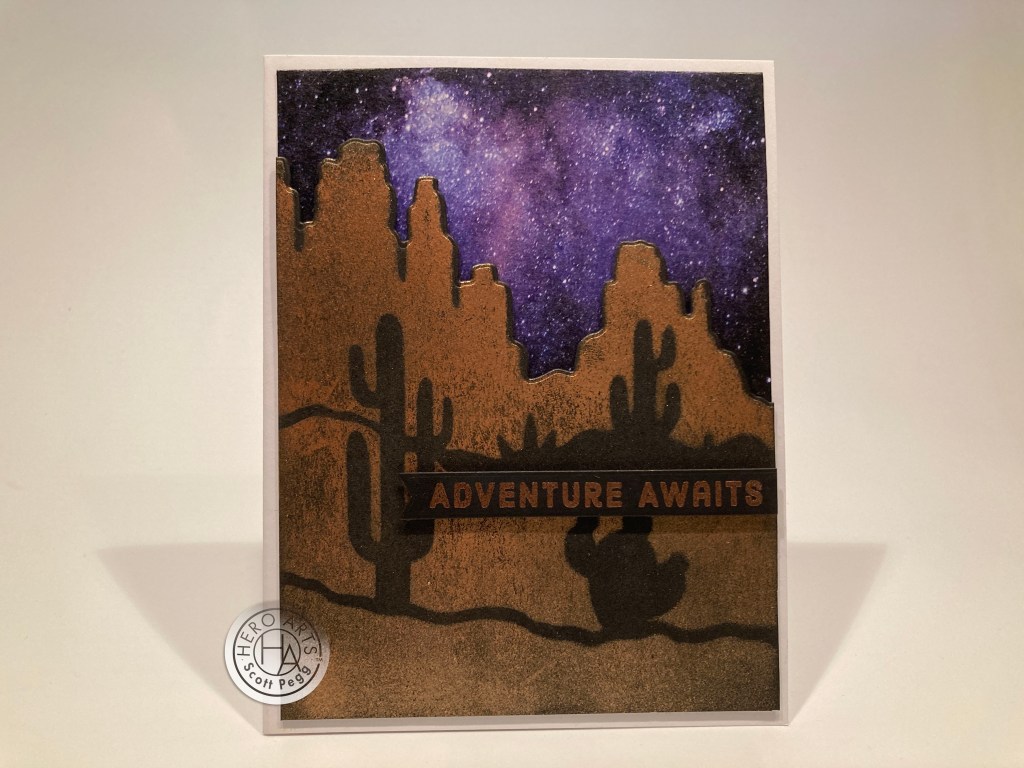
I used Embossing and Watermark ink through stencil layer “a” on some HA Pitch Black card stock, and covered all of that sticky ink with the Bronze PealEx powder. Remember, there is no binder in this powder so you do need to seal it with some hair spray or fixative to make it permanent. I die-cut the buttes before I sealed the powder, so I lost a little bronze-ing to my die-cutting plates (it washes off easily!) but I kind of like the texture that was left! (THEN I sealed it!)
I die-cut a background panel (4″ x 5.25″) and covered the top of that with some Altenew Galaxy Wide washi tape and glued that to a White card base. I trimmed the sides of the die-cut buttes (the die cuts it at 4 1/8″) to 4″ and attached it to the card front with thin foam tape around the edges of the buttes and liquid glue on the bottom. I embossed the sentiment on a scrap of Pitch Black card stock using Copper Rose (Love From Lizi) embossing powder and die-cut that with a Lawn Fawn Everyday Sentiment Banners die and attached that to the card front with more foam tape. Very striking and Very easy! I love the cactus silhouettes!
When we get a stencil (or die, or stamp) in a particular orientation (here, portrait) I always try to see if I can use it in the other (landscape) orientation. Some creative mask cutting was involved…!

I reached for my TH Distress Oxide inks for this card – Antique Linen (a); Frayed Burlap (b); Peeled Paint (c); and back to the Frayed Burlap for “d”. The stencil ends on the right under the “in” of the sentiment, so I laid a piece of masking on the right side of the card base, sketched in more buttes and washes (following the contours of the layering stencils) cut out the mask where I wanted to ink and continued our vista to the right. Then I placed another piece of masking over the newly inked portions, and sketched and cut the contours – again, imitating the contours of the stencil, and inked those details as well. When I removed the mask, we suddenly have a landscape view! But the seam where the plastic stencil meets the masking stencil is very apparent.
I can hide that seam with more cacti! I stenciled the two right cacti so the saguaro cactus covers the seam… had to lay on the ink pretty heavily, but I think it’s a terrific job of camouflage! I stenciled the sun with the Tangerine ink, added a larger circle mask over the top of that, and ink blended Splash Reactive ink on the top for some friendly blue skies. I removed the mask and lightly blended the Tangerine out for a bit of a corona! Pebbles Chalk palette returns to add some color to the leftover white washes (yellow and a brown), and I stamped and embossed the sentiment(s) with Root Beer Reactive ink and clear embossing powder. I added the birds (from the MMH April 2019 Venice kit) to camouflage a little heavy inking (Root Beer Reactive ink) – that actually adds a nice touch of LIFE to this landscape!
I really like that this orientation gets rid of most of the lowest (unadorned) portion of the stencil, and this landscape view certainly feels a lot more expansive…! Now THERE’s a vista!
Since we got LUXE watercolor paper in our kit I thought it was only appropriate that I try to make a watercolor card!

Since I’m not relying on the stencils, I can do just about anything! I die-cut a piece of the watercolor paper with the buttes die and realized that the top and bottom could work together for a multi-layer vista! And I didn’t have to include any cacti! I painted both of the die-cut layers with my Zig Clean Color Real Brush Markers – shooting for a loose watercolor-y feel – that Luxe White Watercolor paper holds up well to a good deal of water! I cut a background panel to 4″ x 5.25″ and ink blended the sky with HA Creamsicle, Fruit Punch and Purple Galaxy Reactive inks and glued that down to a White card base.
I dug out the Adirondack chair stamp from the MMH June 2018 kit and stamped two of them with the Root Beer Reactive ink and added a touch of shadow under them with my markers. The sentiment is stamped and embossed exactly the same (Root Beer and Clear embossing powder). I attached both layers to the card front with thin foam tape along the edges and liquid glue along the bottoms. This is so completely different from the stenciling… and I like it a great deal… I think this actually feels like a watercolor painting and it certainly drives home the sentiment! This is a great way to expand on the design possibilities of this kit!
No cacti on that last card got me to thinking… what if I just outlined the stencils to make a “color by numbers” type image? Would I be able to excise the cacti by just not outlining that part of the stencils?
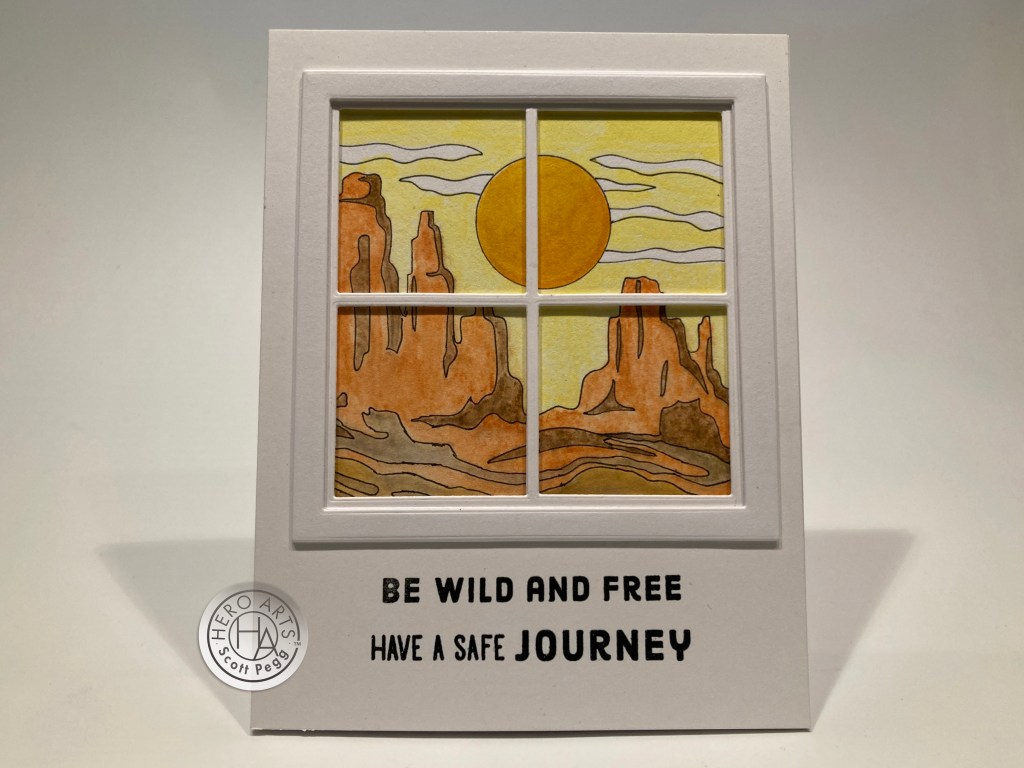
Sure…! Yet another way to use these stencils. I outlined the stencils using an .05 Pigma Micron pen and avoided all the (essentially) vertical lines of the cacti, connecting the contour lines where the cactus one stood. I like the look… it does look like a page from a coloring book! I grabbed my TomBow markers to color this image, but I have to admit that the bottom half of our vista got a little boring with no plant life…! So I decided to get rid of the lower half by limiting our view through a window!
I don’t have a specific window die, so I created this window opening using three HA Square Infinity dies. The window is 3.75″ square and the panes are 1.5″ square. I trimmed the colored background to fit behind the window and glued those to a White card base. I stamped the sentiment(s) using Intense Black ink and embossed them with clear embossing powder. At first glance you hardly notice the outlines, but I do think they give this card a fun coloring book or paint-by-numbers quality! And no cacti!


Having the fancy die for the buttes lends itself to a classic easel card! On Pitch Black card stock, I used Distress Oxide inks again in Antique Linen (layer a); HA Unicorn White (layer b); Bundled Sage (layer c) and Walnut Stain (layer d). I thought those colors worked great for a desaturated night time feel. I die-cut the buttes and trimmed a top folding card base to 4 1/8″ wide – matching the width of the die-cut. I stamped the sentiment using Unicorn White ink and embossed that with White detail embossing powder.
I added some Altenew Watercolor Nebula Wide Washi tape to the top two-thirds of the card base, and scored and folded the bottom of the front at 2 3/8″ to make the easel. I glued the buttes to the bottom of the card front. I stamped the inside sentiment using Intense Black ink and embossed that with clear embossing powder, trimmed it to size, added a second layer of card stock behind the sentiment, and glued that to the inside of the card in position to hold the easel up. I do my best to use all the stamps in a kit and this card brings my stamp total to 10 out of 13…! I think that’s pretty darn good!
All right… enough with the sentiments provided for us in this kit… I think it’s time for some PUNS!
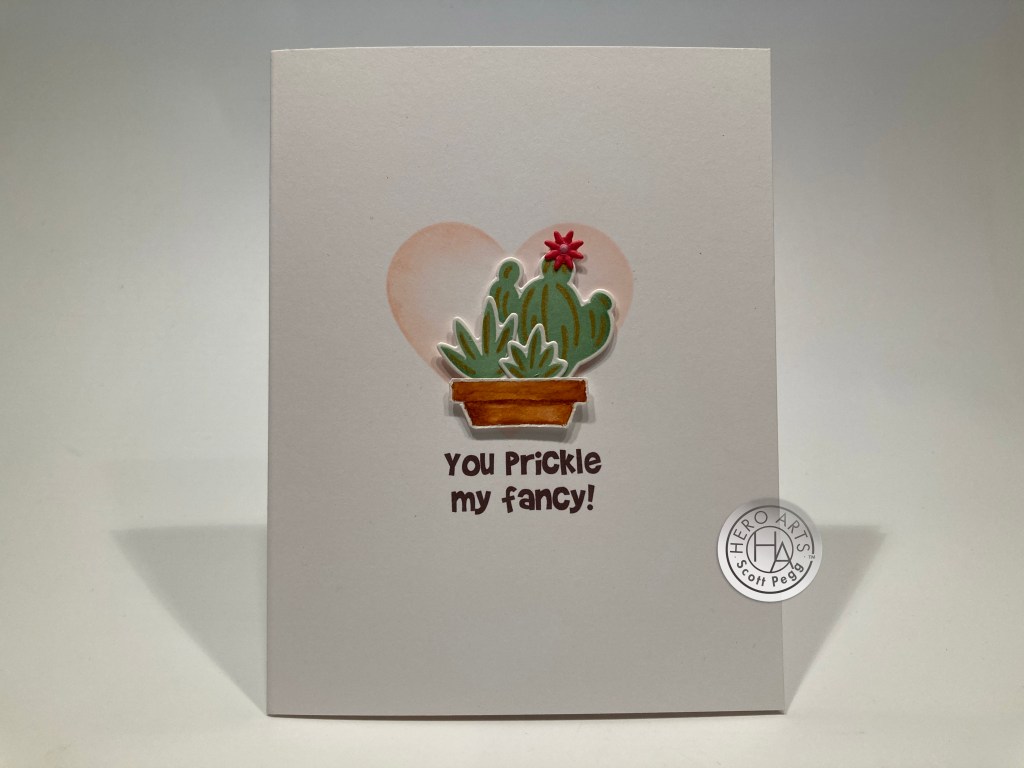
This card makes me giggle! I stenciled a set of cacti using the Pine and Caramel inks included in the kit, and die cut them all with the included frame cuts. I also added a little sparkle with a gold gel pen tracing the contours. I started looking or an appropriate flower pot stamp in my stash when I realized that the planter shouldn’t have a black outline because the cacti don’t have a black outline. I ‘drew” this pot using my Zig markers and fussy-cut it out leaving a (matching the die cuts) white border. I arranged the three cacti in the pot and glued them all together.
I printed the sentiment on the card base using my Silhouette Software and the Brady Bunch Remastered font. I thought we needed a little more of a background to help reinforce the ‘valentine’ aspect, so I lightly stenciled a heart on the card front using Tattered Rose Distress Oxide ink. I don’t own a heart stencil, so I made my own using a HA Nesting Heart Infinity die and a scrap of white card stock. That adds some nice color to the background, and supports the theme as well! For a final touch, I die-cut a tiny bloom from Red card stock using the Dress My Craft Mini Daisy die set #2 and added that to the Hedgehog cactus (I think that’s right… though it could be a prickly pear…). A tiny drop of HA Pink lacquer pen for the center of the flower finishes this card with a nice touch of detail. These just might be the first set of cacti images (stamp or stencil) in my stash! Excellent!
There are lots of cactus puns out there… I was trying to come up with something you might not have heard before…
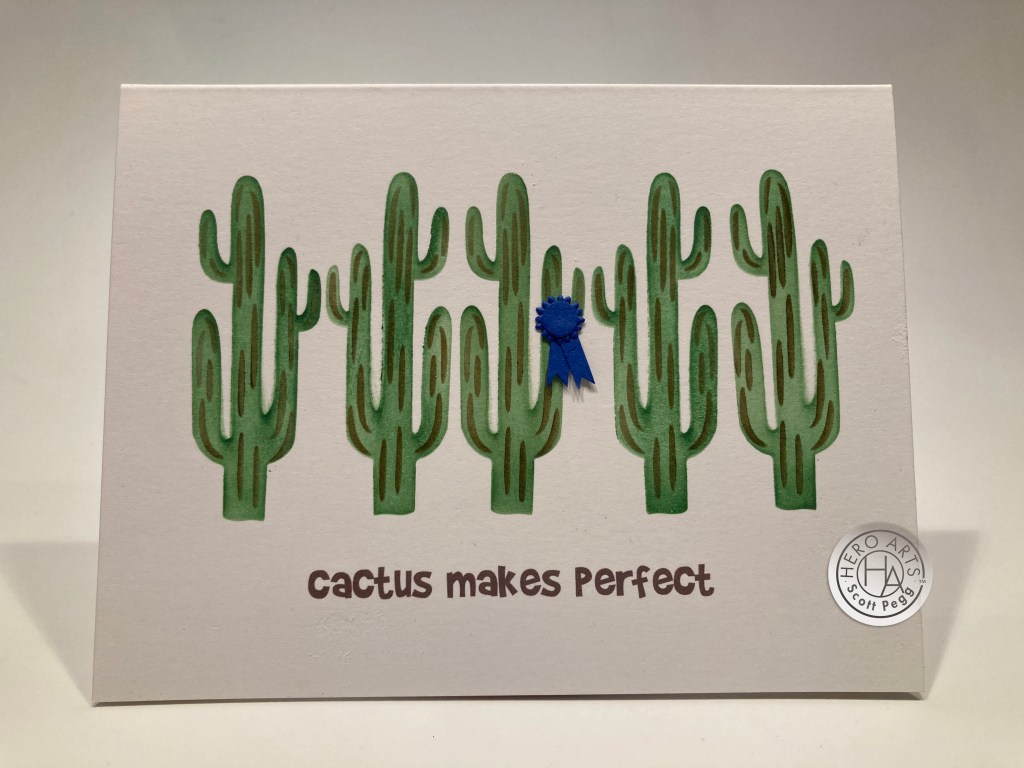
What a fun encouragement card! I stenciled the saguaro on the front of a White card base with the Pine and Caramel inks from the kit. Cacti 2 and 4 are reversed just by flipping the stencil over and bending through the back. I did have to make sure I cleaned the stencil every time I flipped it over, but I got a pretty clean image! I printed the sentiment with the Brady Bunch Remastered font, and created a little blue ribbon with two of the mini daisy die cuts, one circle punch and a couple of fussy cut tails. I’m not sure exactly what that center saguaro did to get that ribbon, but it must be something pretty special! Cactus makes perfect!
I do still have a die-cut saguaro cactus… and saguaros do have “arms”… I can’t resist this one!

This makes me laugh out loud! And it works on so many levels…! This is done exactly the same as the “prickle” card with the exception that the (terrific!) pun sentiment is printed using the Impress BT font. The protest sign is printed with the Abadi MT Condensed Ex Bold font (that”s a mouthful!). I colored the sign with my Zig markers and fussy-cut it out. I did extend the die-cuts on the cactus all the way down the arms just to even everything up. I die-cut the main panel with a Lawn Fawn Stitched Rectangle die (2.75″ x 4″) and added a thin green mat behind that and glued them together down to a White card base.
I did throw in another little pun on the inside of the card… perfectly appropriate for this militant expression of solidarity! I glued the sign in the saguaro’s left “arm” and attached both to the card front with foam tape. I do love this pun (both of them) (all three of them!) and for some reason, this feels fairly topical to me these days…!
And before you know it, we’ve covered all my cards made with the My Monthly Hero August 2022 Kit. Lots of deserts this month, but I think we’ve got a nice variety of looks here! And I am happy to have some real cacti in my stash now!
I did manage to use almost all of the sentiments in the stamp set. I really like the Luxe Watercolor paper, and the new core ink cubes, and I even used that PearlEx powder almost all by itself! I’m thrilled I was able to use the stencils in a landscape mode, and I really like doubling up the buttes on the watercolor card. Much fun to be had this month!
This kit is still available at Hero Arts! If you’re hankering for a little western hospitality, looking for a drier climate, or just like a good cactus, grab a kit for yourself before they all sell out. If I’ve managed to inspire you, please use my links when you go shopping at Hero Arts. It is always gratefully appreciated and helps support this page! Thank You!!
My Monthly Hero August 2022 Kit: http://shrsl.com/3nweb
Hero Arts August Release: http://shrsl.com/3nwee
It is an honor and a pleasure to have you spend some time with me here today! Please remember to Like me, List me, Pin me, Post me, Friend me, Follow me, Share me with all your crafty friends (and enemies!) remember… Don’t run with scissors! I send Love and Light to you and yours, and, as always, Happy Crafting!
DISCLOSURE: This site contains some affiliate links to products. I may receive a commission for purchases made through these links (at no cost to you). As an Amazon Associate I earn from qualifying purchases. Thank you!

Another amazingly creative use of your kit.
I enjoyed your inking and loved the last card; as you said very appropriate!
Thanks for “sticking” with it!!
LikeLike
Beautiful and fun!
LikeLiked by 1 person
Thank you Laurie,
Enjoy your trip; you will be missed!
LikeLike