
Hello Folks! Scott here with my new 10 Cards 1 Kit post using the latest My Monthly Hero June 2022 Kit! It seems we’re heading under the sea this month with a large mermaid stamp (with even bigger hair!), assorted underwater accessories and even a bad pun!. I do have a mermaid silhouette stamp in my stash, but I believe this is my first detailed mermaid stamp. Looks like I’m in for some serious coloring with this kit!

KIT INCLUDES:
• 6″ x 8″ Clear Stamp Set
• 8 Coordinating Frame Cuts
• Mermaid Reactive Palette Ink Pad
• Self-Adhesive Pearl Gems
• Water Flow Brush
That Palette ink pad is made up of Reactive inks in Berry Smoothie, Grape Slush, Blue Hawaii, Splash, and Blue Raspberry – so they work especially well as watercolors… thus the water flow brush…! When I see a stamp set like this I automatically start thinking about creating a scene, so, first things first, I stamped the mermaid on some masking paper and made a full mask to cover the whole mermaid.

I stamped the mermaid on some Bristol Smooth card stock with Intense Black ink, masked her off, and stamped the seagrass, coral and one of the starfish “behind” her. I stamped the clams and an extra starfish without needing the mask. I colored everything (but her tail) using Zig Clean Color Real Brush markers, and I used the Mermaid Palette inks to color her tail. The sentiment is stamped with Intense Black ink and embossed with Clear embossing Powder. I used a Lawn Fawn Stitched Rectangle die to die-cut the painting to 4.25″ x 5.5″, glued that to a White card base, and added a Pearl gem – the only touch of dimension on this single layer card. I did use a little White gel pen for some highlights in the sand, and I’m terrifically pleased with this scene… It did take me a couple hours or so to paint, but I think it’s worth it!
The jellyfish stamp in this kit must be the largest jellyfish stamp in my stash… I do have others but much smaller…!

I stamped the jellyfish on some Pitch Black card stock using Embossing and Watermark ink and embossed them all with Underwater embossing powder (MMH May ’21) – nice sparkle in that! I ink blended some water lines in the background using Broken China Distress Oxide ink and a small blending brush, and colored the jelly fish using Hero Arts Red, Purple, and Blue Glimmer Metallic inks (more shine!). I added some glimmer ink dots in the water along with some White gel pen highlights, and stamped and embossed the sentiment with Ultra fine White embossing powder. I die-cut the panel with another LFSRDie, added a dark blue pearlescent mat behind that, and glued those down to a White card base. You can get a nice underwater background with Pitch Black card stock and some simple “waves”!
We don’t always get a pun in our sentiments, but this month we are treated to not only a pun… but a groaner at that!

If they’re “having fun” then maybe they’re dancing! All featured in some fantastic underwater chorus line! HA! On Canson Mixed Media card stock, I stamped all the clams in three rows using my MISTI and Intense Black ink. I colored them all with my Zig markers, stamped and clear embossed the sentiment, die-cut the panel with a LFSRDie, added a glitter holographic mat behind that and glued them to a White card base. I embellished the front with some Love From Lizi Circle peel-offs in pink and added the pearl gems inside all the clams. I was actually able to CUT the pearl gems (two ends of the center row) using my 7″ Tim Holtz snips! The only way I think you could improve on this bad pun is to make it worse: “pearls just want to have pun”!!??!! Yup… that’s even more of a groaner!!
Is ALL THAT HAIR really necessary for our mermaid? You can actually give her a substantial haircut very simply!!

I stamped our mermaid using Intense Black ink on Bristol Smooth card stock and embossed her with clear embossing powder. I colored her with my ZIG markers (I used the Palette ink for her tail) and fussy-cut her out following the fourth line of hair at her scalp. That still give us quite a healthy head of hair, but pulls it back into a bit more of a realistic realm… I know… what’s realistic about a mermaid…!!? Embossing this stamp is HIGHLY RECOMMENDED – she sparkles ALL OVER! And giving her a haircut might help make coloring her seem less daunting…!
The background is an old Jelly Plate print using Broken China Distress Oxide ink and a wave stamp… we have gotten a lot of underwater themed stamp sets from Hero Arts (is that because they’re located in the San Francisco area?) so I do have a number of underwater backgrounds patiently waiting to be used! I stamped the seagrass and coral on the background using HA Contour ink and softly colored them with the Palette inks. I stamped the bubbles with Hickory Smoke Distress Oxide ink and clear embossed them for even more shine! For the sea bed, I used some of that terrific HA Sand embossing powder on the bottom of the panel. I cut the front panel to 4″ x 5.25″, added a thin Black Glitter mat and glued those down to a White card base.

I stamped and embossed the sentiment on a scrap of Kraft card stock, fussy-cut that out and added the mermaid and sentiment to the card front using foam tape. I had a few puns floating around my head so I continued the sentiment on the inside with “you mermaid my day” printed with the raustila font). A perfectly punny accompaniment for a Thank You card!
Okay.. here come the puns! The “Happy Birthday” and “Hello” sentiments weren’t quite doing it for me this month!
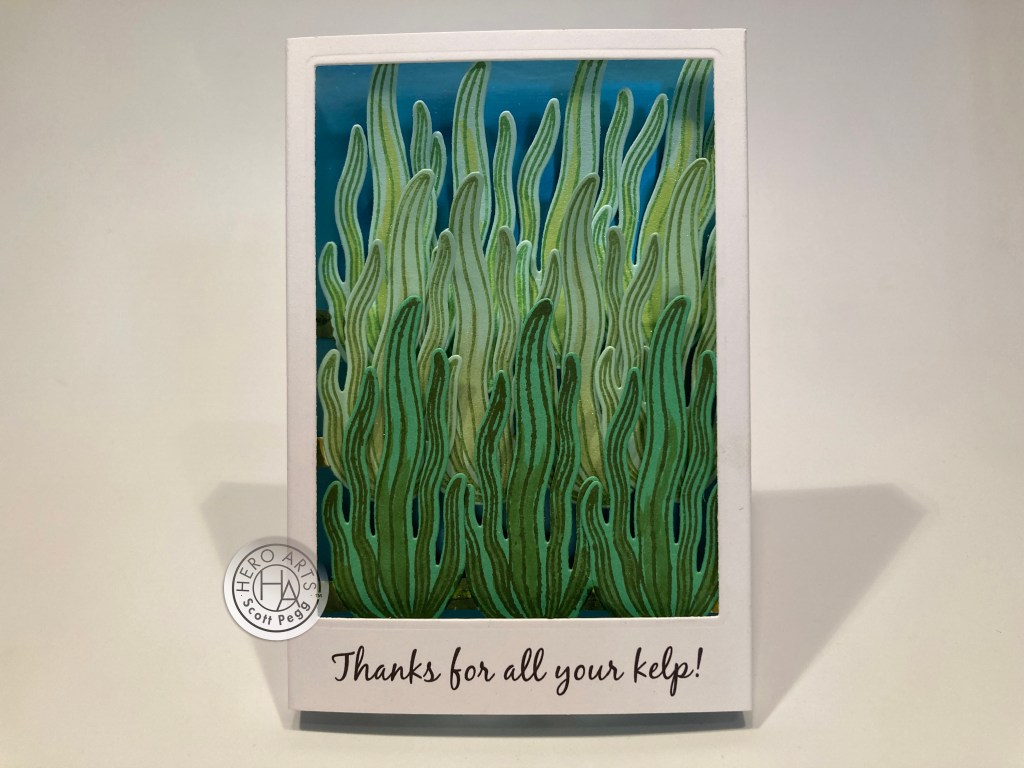
This makes me giggle! A little 3-D box card with three layers of kelp and the whole thing folds flat at 4.25″ x 5.5″ so it fits in an envelope with no problem! I cut a piece of white card stock to 5.25″ x 5.5″, and printed the sentiment using my Silhouette software and the Black Jack font. On the 5.25″ side I scored at 1/4″, 3/4″, 4.5″, and 5″. Fold on all the score lines and you have a 3.75″ x 5.5″ center panel with 1/5″ sides and 1/4″ tabs for attaching to the back. I used a 3.25″ x 4.5″ Nesting rectangle die to cut out the window.
I cut a piece of Silky Sky Mirror card stock to 3.75″ x 5.5″ for the back, and stamped and die-cut 11 clumps of kelp using some Altenew Gradient card stock and HA Fresh Lawn, Forest, and Forever Green dye inks. I also gave all the kelp some Alcohol marker shading a nice layer of glitter with a Spectrum Noir Sparkle pen. I cut three strips of white card stock to 4.75″ and scored both end at 1/2″ to use for the three layers of kelp. I glued the die-cut seagrass pieces to the strips and staggered their end tabs to give them depth – the front row has just under 1/2″ tabs, the middle row has 1/4″ tabs and the back row has 1/8″ tabs.
I glued the blue mirror back to the left side tab and staggered the kelp strips on the left side using the tabs. Then it was easy to fold the whole card flat and attach the back and the tabs to the right side of the card. Only thing left to do was add another 3.75″ x 5.5″ piece of White card stock to the back to cover up the glue tabs – that also gives us a perfect place to write a personal message of thanks to any pun-loving friend!
That was fun, but I have more puns just waiting!
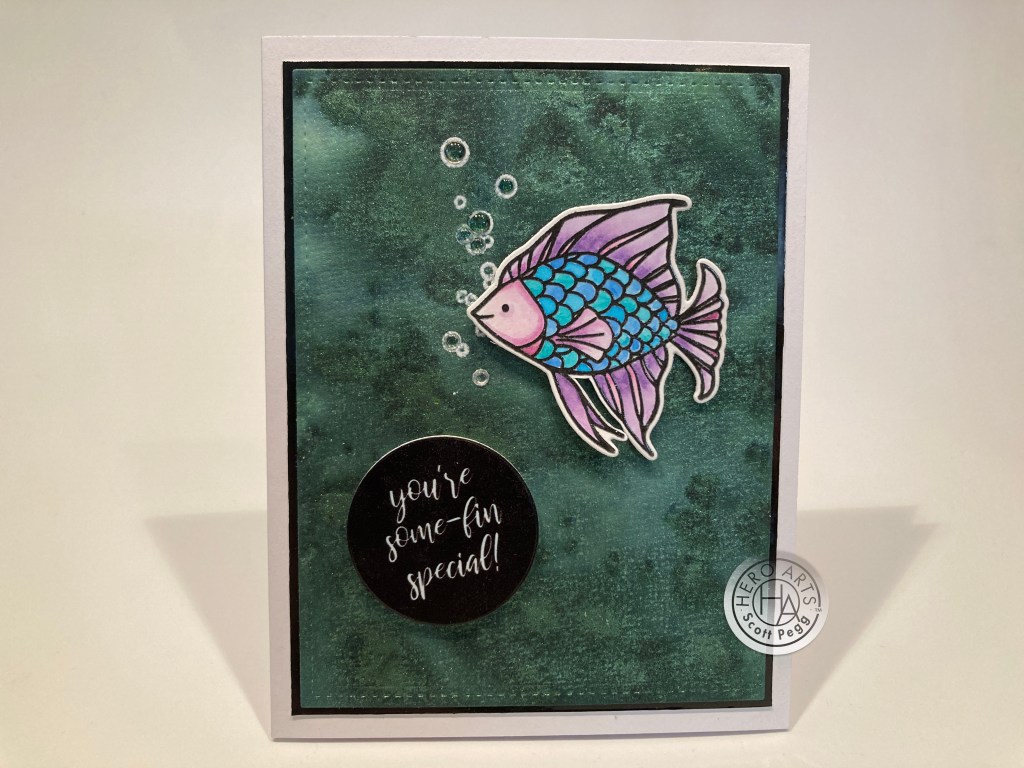
This one tickles me too! There is a very nice fish stamp in our kit… large enough to be a focal point and detailed enough to encourage some fun coloring. This fish is stamped with Intense Black ink on Bristol Smooth card stock and clear embossed for that terrific underwater shine! I did use the palette ink pad to color this fish, and die-cut it out with the included die.
This background is a saved background I made using Nuvo Shimmer Powder in Green Parade. I stamped and White embossed some bubbles on that background (they didn’t take to that shimmer powder too well) and die cut the background with a LFSRDie, added a TRUE Black Mirror card stock mat and glued this to a white card base. I printed this sentiment on a piece of matte photo paper (still nice and reflective) using the Raustila font and die-cut that with a Circle Nesting die. I didn’t care for a white mat cut with the next size larger circle die, so I just die-cut 5 matching circles from white card stock and glued them all together for a subtle frame around the sentiment. A few HA Clear enamel dots help some of the bubbles, and the fish is mounted with thin foam tape. I think YOU are some-fin special!
I’m not finished yet…! I’m actually surprised this pun wasn’t included in our stamp set… it does seem perfectly obvious…

If you’re going to do “pearls just want to have fun” then why not go all in with “you go, pearl!” I couldn’t resist!! I stamped this vignette on Bristol Smooth card stock using a 4″ Gina K. designs Wreath Builder stencil. Those stencils and your trusty MISTY make short work out of precision stamping like this! After stamping, I printed the sentiment using my favorite Brady Bunch Remastered font. I colored all with my ZIG watercolor markers and die-cut the panel with a LFSRDie. I added a thin Black Glitter mat behind that and a thicker Yellow Metallic card stock mat (cut with another LFSRDie!) behind those and glued them all down to a white card base. All that’s left is a Pearl gem in the center!
I was thinking about different ways to use that mermaid stamp without having to color the whole thing, when I came upon the idea that no one has ever really seen a mermaid, so they must be adept at blending into their background…

I think this is SO INTERESTING!!! And I used something I have never used before – Pebeo drawing gum / liquid frisket – basically a paint-on mask! On a piece of Canson Multi Media card stock, I stamped the mermaid using the Mermaid Palette ink pad and embossed her with Clear embossing Powder. Then I painted the frisket over her fleshy parts and let that dry.
I ink smooshed the whole panel using the Palette ink pad and let that dry. Then I blended some Splash Reactive ink over the whole background through my water ripple stencil. When that was dry, I splattered some water droplets on the reactive inks and sopped them up with a paper towel. I stamped and clear embossed some bubbles, and stamped the sentiment with Grape Slush Reactive ink and clear embossed that too.
Then I wiped the frisket off her skin and colored her with my Zig markers. – That liquid mask came off so easily and kept all the ink off so well… I am definitely going to have to play with this Pebeo Drawing Gum some more! I die-cut the colored panel with a Rounded Rectangle Infinity die, and glued that to a Dark Blue Shimmer mat cut with the next size larger die and glued those to a white card base that had its corners rounded with my corner chompers. A few Clear Enamel dots highlight the sentiment. I love the whole idea behind this card and the mermaid came out magically ethereal with minimal coloring! One of a kind, indeed!!!
Okay… I do have one more pun for you this month… this seems like another obvious pun to me…!

I stamped one fish and reverse stamped the other on some Bristol Smooth card stock using a silicon mat and VersaFine Onyx Black ink. Here’s a quick look at my reverse stamping method:
I colored both fish with my TomBow markers and die-cut them with the matching die. I watercolored the background on a panel of Canson Multi Media card stock using TomBow markers, and when that was dry, I printed the sentiment using my Silhouette Software and the Black Jack font. I stamped the bubbles on the background and glittered everything up with some Sheer Shimmer Spritz.
I created the Card base using the largest HA Oval Infinity die and two pieces of White card stock – the top of the back piece is folded at a quarter of an inch and that flap is glued to the front piece. I used the next smaller Oval die to die-cut the colored panel and glued that to my card base. I attached the fish with foam tape and am totally thrilled with this oval shaped card – unique and colorful with a really good pun!
Using all these Hero Arts Infinity dies led me to my final card this month… MORE hair but LESS mermaid!!
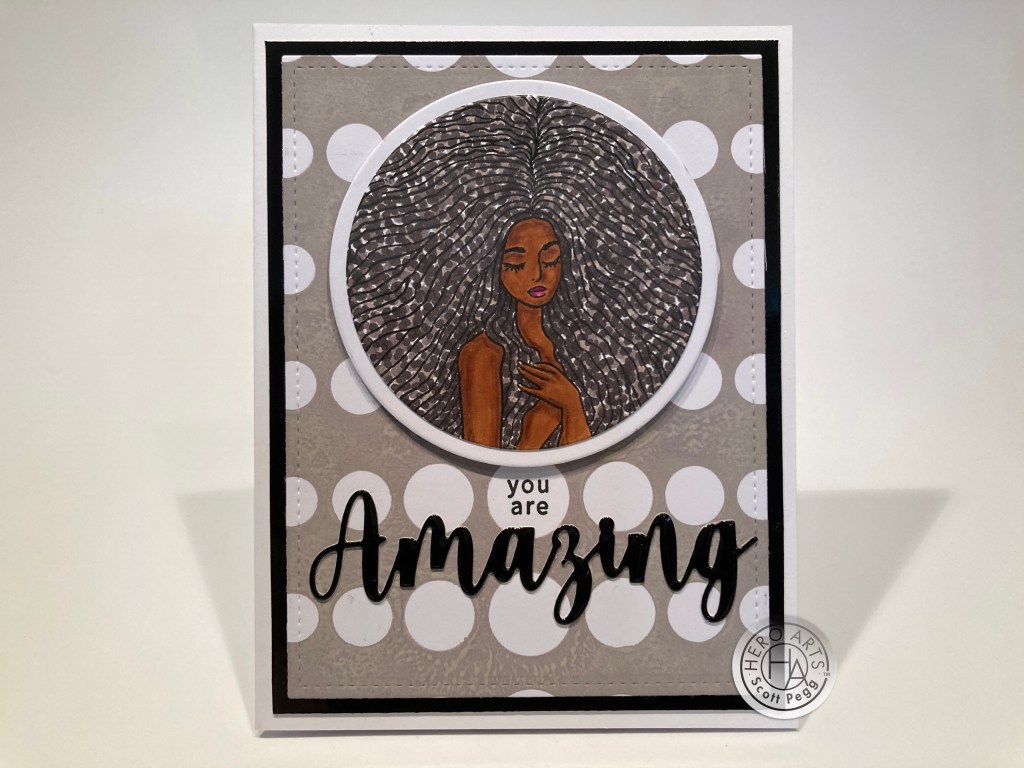
I stamped the top half of our mermaid stamp on some Neenah Solar White card stock using Intense Black ink. I did have to wipe away the top of her tail to keep it from appearing on this stamping. Then it was easy to connect the hair lines where the missing tail was and I kept adding hair lines to the top of her head to fill in the whole circle. I colored her with my Spectrum Noir alcohol markers (TN4, TN6, TN7, BG5, BG7, BG9, PV1, PV4) using simple dots of color for her hair, and even added some sparkle to her hair with a GellyRoll Stardust glitter pen. I die-cut her out with a 2.75″ Circle Infinity die and added a 3″ die-cut white mat behind.
The background is an old background stamp from my stash stamped with Hickory Smoke Distress Oxide ink, die cut with a LFSRDie, matted to more TRUE Black mirror card stock and glued to a white card base. I trimmed the “you are” away from the “you are a pearl…” sentiment and stamped that with Intense Black ink and added the “Amazing” (from the MMH April ’22 Kit) die-cut from that Black Mirror card stock. Finally, I added the matted circles with some foam tape. I knew what I wanted to do with this card when I started, but I was actually taken a bit by surprise after die-cutting the stamp into a circle and realizing how much it looks like a perfectly retro Afro! There certainly aren’t any mermaids here…! This is truly some fun “out of the sea” stamping on this card… I hope you love it as much as I do!
That wraps up my 10 cards using the My Monthly Hero June 2022 Kit. I was certainly wary about coming up with 10 cards with what (at first glance) seems like a fairly limited batch of supplies, but I think I managed to get a nice variety!
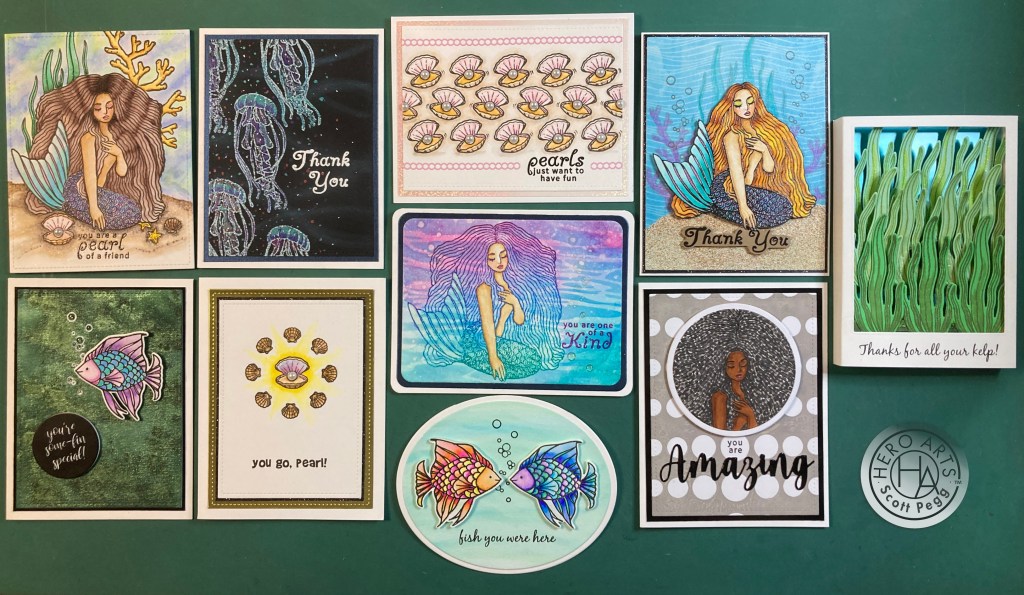
I did use every stamp in this stamp set – except the “Hello ” and “Happy Birthday” sentiments (snore) and I used the Palette ink pad a great deal as well as a few of the dies and plenty of the Pearl gems. And LOTS of puns this month! Once I started working with this kit, the ideas started to flow and I am thrilled with some of the unique looks I achieved.
This kit is still available at Hero Arts! If I’ve caught your imagination or inspired some ideas of your own, and you’d like to grab a kit for yourself, please use my links when you go shopping at Hero Arts. It is supremely appreciated and it truly does help support this page! Thank you!!!
My Monthly Hero June 2022 Kit: https://shrsl.com/3kxmt
June 2022 MMH Kit additions: https://shrsl.com/3kxn4
Thank you so very much for sharing your time with me here… I am always appreciative of your attention! Please remember to Like me, List me, Pin me, Post me, Follow me, Friend me, Share me with all your crafty friends… don’t run with scissors… and I send you and yours Love and Light and Happy Crafting!
DISCLOSURE: This site contains some affiliate links to products. I may receive a commission for purchases made through these links (at no cost to you). As an Amazon Associate I earn from qualifying purchases. Thank you!

Again you have amazed me with your versatility!
LikeLike
Always appreciated, Victoria!!
Scott
LikeLike
As usual, your cards are amazing!
LikeLike
Thank you, Laurie! Always appreciated!
LikeLike
I look forward to seeing your work each month.
LikeLike
Thank you, Beth! Always appreciated!
LikeLike