
DISCLOSURE: This site contains some affiliate links to products. I may receive a commission for purchases made through these links (at no cost to you). As an Amazon Associate I earn from qualifying purchases. Thank you!
Hello Folks! Scott here with my 10 Cards 1 Kit post with the Love From Lizi February 2020 Card Kit! This kit features a GIGANTIC 8.5″ x 11″ stamp set and lots of pink goodies!
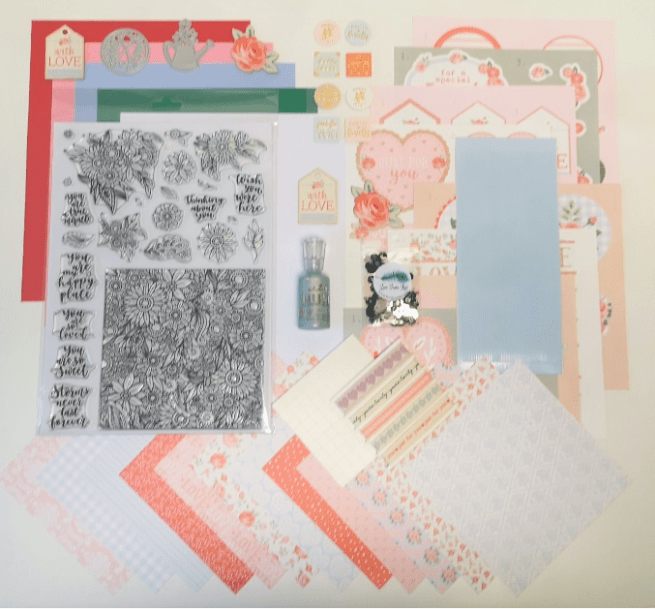
As usual, I do take the the 5 sheets of card stock in the kit and make A2 (4.25″ x 5.5″) card bases with them. That gives me 2 red, 2 pink, 2 blue, 2 green, and 2 white card bases.
When I posted the unboxing video for this kit on YouTube, Judy Brown commented, “Scott! Your challenge? Make a completely pink card for me. 🌈🌈😍😆😆😆”. Shouldn’t be too hard with these supplies!! And Lizi’s decoupage sheets are always a fun way to get started on a new kit!

Judy, I don’t think you can get much more pink than this!! I took a 4″ x 5.5″ piece of the pink pattern paper and punched a heart scallop border on the long sides with my American Crafts Knock Out paper punch, and glued that down to one of the pink card bases. I assembled the “Just for you” heart using all five layers of the decoupage sheet, and the included foam squares. I stamped the valentine sentiment with VersaMark ink using a stamp from the MMH Jan.’19 kit, and embossed that with the LFL Copper Glitz embossing powder. I thought that had a good sense of ‘pink’ while still being dark enough to read… and the ‘glitz’ matches all the glitter on the heart.
I guess I wasn’t satisfied with five layers on the heart itself, so I mounted the whole decoupage assembly to the card front with more foam squares! This card is probably too thick to  send in a standard envelope, but I love the 3-dimensional aspect of the decoupage heart. I did think one of the sentiments from our stamp set would compliment this card nicely, so I stamped “you are so loved” on the inside of the card using Worn Lipstick Distress Oxide ink – gotta keep everything pink! As a sweet valentine card, I actually like this quite a bit! This one’s for YOU, Judy!
I was dying to play with the large 6″ x 6″ background stamp that was part of our stamp set. I stamped it on some Bristol Smooth card stock using VersaFine Onyx Black ink, and embossed it with clear embossing powder. I colored the whole sh-bang using my KingArt Dual Tip Brush Pens. These are nice inexpensive watercolor pens that I got for Christmas ’18 from my sister-in-law.  Thank you, Alice! Very much like Tombow markers but much less expensive. Now, I know some folks look at a stamp like this and feel a little overwhelmed at the prospect of coloring something this large and detailed. But if you take it step by step, It’s really not an insurmountable challenge! I started by coloring all the greenery – everywhere I saw a “leaf” I colored it green. One of the great things about a stamp like this is you can color something “wrong” and no one will ever notice! Once the foliage was colored, it was easy to see the flowers as individual entities… I just colored each style of flower exactly the same, however often it was repeated in this pattern. Granted, this did take a couple hours to color, but I find it very therapeutic to put on some music and zen out with my colors! And look at the lovely results! I definitely think it was worth the time… Now let’s make a card with this!

I die-cut my preferred section with a Lawn Fawn Stitched Rectangle die, and glued that on a thin white mat before attaching both to the front of the green card base. I love the shine that the embossing powder gives this panel… almost makes the whole thing look shiny! I turned to my Silhouette software and printed “if friends were flowers, I’d pick you” on scrap of white card stock using the Lucida Grande font. I did try printing one with white letters on a black background, but I thought the black on white looked better. I die-cut that with the smallest Lawn Fawn Everyday Sentiment Banners die, and mounted it to the card front with foam tape. LOVE IT! Certainly not what you were thinking would come out of this card kit…! But, I love all the bright colors, the shine, and the friendly sentiment. I can’t wait to send this card to someone special!
Okay… My coloring mojo is still in gear… lets try coloring another one of the stamps!

I stamped and embossed this stamp exactly the same as the background stamp, but I colored this one using my Zig Clean Color Real Brush Markers. I did take the time to fussy-cut this out using my craft knife. I know, I know, incredibly fussy… but I think it’s worth the effort! I die cut a piece of the blue gingham pattern paper with a LFSRD, glued that to a thin Black Tie glitter card stock mat and added a frame on the edge of the gingham using the Sky Blue peel offs from the kit. Finally, I glued the whole background assembly to one of the blue card bases.
I cut a 3/4″ x 3.3/4″ strip of my Black Tie glitter paper (I love the multicolored glitter on this card stock), and wrapped a piece of the blue flower ribbon from our kit across the center. I glued that down to the card front and ran more peel offs across the top and bottom edges. I attached the flower arrangement to the card front with my standard foam tape, and added one of the foiled sentiment stickers from the kit to the center. A generous sprinkling of our Blue Babe Nuvo Crystal drops adds the final touch to this blue themed card. That soft blue gingham is probably my favorite pattern paper in this kit!
I’m on a roll coloring these stamps, and there is another smaller arrangement in our set.
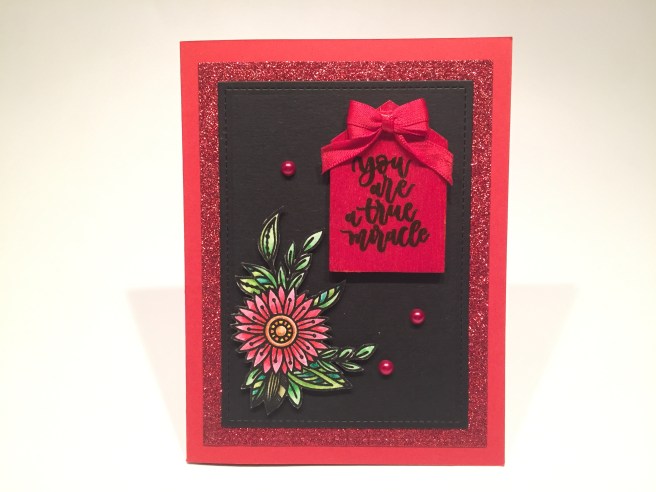
I stamped, embossed and colored this stamp the same as the blue flower arrangement and went ahead and fussy cut it out. I die-cut a piece of plain black card stock from my stash with a Lawn Fawn Stitched Rectangle Die, and matted that to some red glitter card stock, and glued it to one of the red card bases.
I took one of the wood-veneer tags from our kit and, on the back, gave the bare wood a coat of Multi Medium Matte glue to seal the wood so ink wouldn’t bleed. Once dried, I colored the tag with Vermillion Archival ink (permanant) and then (once dry) stamped the “miracle” sentiment on the tag using VersaFine Onyx Black ink and I clear embossed that to assure it was permanent.
I attached the tag and flower to the card front using foam tape, and finished this up with a double red satin bow on top of the tag, and a few red pearls from my stash. Quite red here, but I think it’s actually very eye-catching, and I love the fact that there are a few sentiment stamps in our stamp set that will fit on these small wooden tags!
I think those three cards finally satisfied my need to color… let’s do another decoupage!
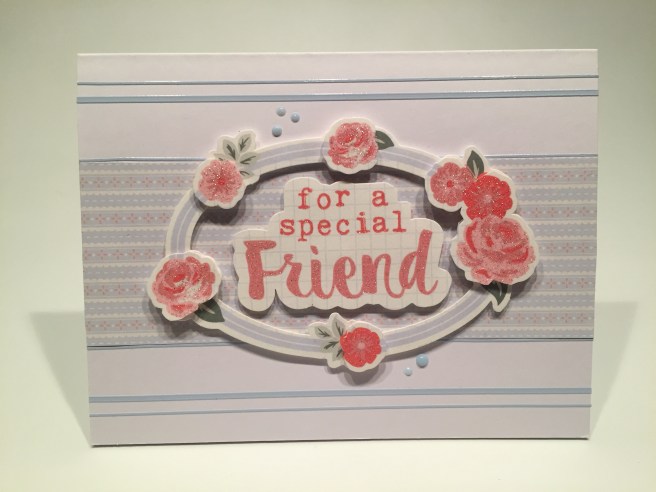
I cut a strip of the blue stripe pattern paper to 2″ x 5.5″ and glued that to the center of a white card base. I outlined the edges of that with the medium width peel offs and then added the wide and narrow peel offs to the top and bottom spaces of this card front.
I assembled this decoupage piece using the extra sentiment piece and layers 2 and 4 from the decoupage sheet. I did use some of my thin foam tape to try and keep the dimension under control. I trimmed away the partial leaves on the flower die cuts so you could see the whole leaf on the layer below. I think these decoupage sheets work best when the die-cutting doesn’t leave a white border. I liked seeing the stripe background in the center of the oval instead of the plain grid behind the sentiment. A few Blue Babe Nuvo drops on the front adds another touch of blue and a little more shine. I thought this decoupage card was perfect for using another stamped sentiment on the inside, so I stamped “you are so sweet” on the inside of the card using Hickory Smoke Distress Oxide ink. I think the blue and white on this card kind of minimizes the pink (as if!), and here we have a lovely, 3-dimensional friendship card! For a SPECIAL friend!
Back to our second pink card base… It’s hard to ignore the pink when it’s your card base!

This kind of feels like a card you’d give to your grandmother… or at least to someone who is into roses! I die cut the rose pattern paper and the red mat with my Hero Arts Nesting Oval dies. I do find it easier to use two dies to cut a “frame” for the mat instead of just using one die for each layer and having to center one oval on top of the other. I glued those flat to the card base and stamped the sentiment using Onyx Black ink and clear embossing powder. I added the two wood-veneer rose die cuts with some foam tape and went to town with our sequin mix! I did try different quantities and arrangements of the sequins, but I decided this old-fashioned card could support a lot of sequins.  Again, this sentiment paired up with the “wish you were here” sentiment, so I stamped that on the inside with Onyx black ink. For a final touch, I rounded all four corners of this card with my We R Memory Keepers 1/4″ & 1/2″ Crop-A-Dile Corner Chomper. I thought rounding the corners felt more “retro” and finished off this (another very pink!) card quite well!
I do challenge myself to use all the stamps in a kit on my 10 cards, and there were LOTS of stamps in this over-sized stamp set… including 14 individual flower and leaf stamps.

This “one layer wonder” card uses all fourteen of those single image stamps. After a little practice stamping on some scrap paper, I stamped this arrangement on the left side of the green card base using Archival Emerald ink. I wasn’t quite sure what I was going to do with this arrangement, so I erred on the side of caution and used a permanent ink. I took some light grey Spectrum Noir alcohol markers (BGR2 and BGR1) and colored the background shadow around the flowers. That didn’t quite give me the contrast I was hoping for, so I grabbed a white colored pencil, and softly colored all the images – being careful to avoid the stamped lines and leaving some of the regular green card stock showing through. That’s just what was I was looking for!
I stamped the sentiment using Hero Arts Unicorn pigment ink (no embossing powder) being careful not to over-ink the stamp. I did stamp that sentiment a few times using my mini-MISTI stamp platform and am kind of thrilled at being able to achieve a nice white sentiment without embossing powder! This is a pigment ink so you do have to make sure it dries completely! For a final touch, I added some Love From Lizi Mint Glitter peel offs to create a bounding edge on the top, bottom and right sides of this card. Very tranquil… very peaceful… very green! One Layer Wonder!
We also have that “storms never last forever” stamp that gave me a little pause… we don’t have any particular “storm” stamps – so how can I possibly convey this sentiment?

With Sunbeams! I masked off 1/2″ all the way around the edges of this card base, and masked off these two ‘beams’ and, using a Tim Holtz Distress Blending Brush and my HA Unicorn ink, added the two sunbeams to the card front. Before removing the 1/2″ masking from around the edges, I used the LFL Silver peel off stickers to create my ‘partial frame’ on the top right and bottom left, using the masking to line everything up.
I realize lots of folks are going to use these flower stamps to simply emboss on card stock instead of trying to color them, so I wanted to try embossing the smallest flower arrangement stamp – I figured if embossing powder would preserve the detail on this small stamp, then it would work great on the bigger stamps too. Using VersaMark ink and LFL Silver Dollar embossing powder, I embossed this stamp on a scrap of white card stock. And, yes… I did fussy-cut this out! That stamp embossed beautifully!
I stamped the sentiment using Faded Jeans Distress Oxide ink (no embossing!) and attached the flowers with some foam tape. More Blue Babe Nuvo drops for some soft shine and a little more dimension finishes this card. I think this does a decent job of conveying the end of a storm… it almost feels kind of religious… must be the sunbeams!
Wow! I have actually used every stamp in this stamp set on these first 8 cards! Of course, I did some doubling up with sentiments, but nothing untoward! I was really looking forward to seeing what I could do with the watering can die…

It is very rare for me to make a card without a sentiment on the front, but I fell in love with this little vignette and couldn’t bear to add anything else..! I die cut the watering can two times from some medium grey card stock in my stash. I trimmed the flowers off of one and glued that on top of the other, and added some shadows with a grey alcohol marker. I die-cut the flowers from some alcohol friendly card stock and colored them with my Spectrum Noir markers before paper piecing them on the can. I used an extra-fine point silver Sharpie to add some silver highlights to the can, folded the spout and handle forward on the sides and used my bone folder to give the can a little curve.
I fussy cut a diamond from the blue rose tile pattern paper and mounted that to a thin grey mat that matched the can. I die cut the blue stripe pattern paper with a 3.5″ x 2.25″ LFSRD snd matted that to a darker grey mat and then to a wider mat of the red-ish rain drop pattern paper. Those are glued directly to the card front, the diamond is mounted with foam tape and the watering can is attached with a strip of foam tape down the center,  liquid glue on the edges, and the handle, spout, and center flower are raised up with tiny spots of foam tape. I used my Silhouette software and printed “you help me grow” on the inside of this card using Arial and Mona Lisa Solid fonts. A lovely little sentiment for a watering can that can be used for many different occasions. I don’t know what it is about this card, but I’m really attached to it!! It feels homey and a little old-fashioned and showcases this watering can die perfectly!
I still have a decent sized piece of that background stamp I colored at the start of this kit, and I was certainly not going to let that piece go to waste!

This is a 2″ x 5.5″ piece of my original colored background, matted with more of the Black Tie glitter card stock and glued down to our last red card base. I cut a 1/4″ strip of purple card stock from my stash to glue behind the sentiment, and two very thin strips to go above and below the stamped panel. I die-cut the Lawn Fawn Scripty Congrats die from the same purple card stock five times, glued them all together, and topped them with one last die-cut “congrats” using the Black Tie glitter card stock, and then glued that whole chinky sentiment down to the card front.  It wasn’t easy coming up with any puns for this kit, but I did manage a nice one with this card. I printed “you bloom me away” on the inside writing surface using my Silhouette software and the Freehand 521 BT font. I die-cut the writing surface with a LFSRD and mounted that to the inside of this card. Love the play of red and purple on this card! Very colorful!
That’s my 10 Cards using the Love From Lizi February 2020 Card Kit. That giant stamp set is nothing short of amazing, and I think this is a very interesting assortment of cards.
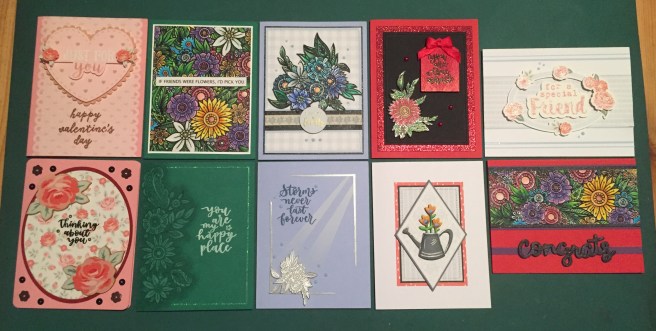
I did use every stamp in our stamp set, I used 6 of the 12 pattern papers, and two of the eight decoupage sheets. I used a little bit of everything in our embellishment bag (only one of the ribbons), plenty of our peel offs, and I do have 2 sheet of super smooth alcohol marker-friendly White card stock that will go into my stash along with all the other leftovers from this eclectic kit. I did have a great time creating these cards, and I actually quite enjoyed coloring these fun flower stamps. That stamp set is certainly a keeper!
Unfortunately, this kit has already sold out – as most of Lizi’s kits are prone to do! If you don’t want to miss out on any of this crafty fun, I would suggest subscribing at lovefromlizi.com. Lizi’s kits are very unique and usually over-loaded with all kinds of crafty goodness. If you do go shopping with Lizi, please use my links whenever you can! It is always supremely appreciated!
Thank you so very much for sharing your time with me here – YOU are the ones who truly keep me inspired! My CardCutups channel on YouTube is rapidly approaching 5000 subscribers, so stay tuned for a little bit of a celebration when that milestone is reached, and I believe we’ll have some nice giveaways to impart a big Thank You for your continued support. Remember to Like me, List me, Pin me, Post me, Share me with all your friends… Don’t run with scissors, and Happy Crafting!
